
Customize Out-of-the-Box Templates
Learn how to customize Basic and AMP email templates available out-of-the-box on the CleverTap dashboard.
Overview
While the entire template is customizable, CleverTap highlights a set of key components you can easily tailor to match your brand and campaign needs. These include logos, banners, CTAs, and theme colors. This section outlines how to modify these core elements, along with reusable code snippets and step-by-step guidance to ensure consistency and ease across your email campaigns.
Customization Options
The following are the key customization options:
- Replace Logo
- Replace Background
- Update Banner/Product Images
- Update Call-To-Actions (CTAs)
- Update Links in Header/Footer
- Change Theme or Background Color
- Update Privacy Policy
- Update Social Media and Download Links
- Countdown Timer (Flash Sale Only)
- Add or Modify Filters
Replace Logo
Displays the brand logo at the top of the email, ensuring immediate brand recognition and consistent visual identity.
Option 1: Using Source Mode
-
Locate the logo block in your HTML template. The following is a common example:
<td style="text-align: left; vertical-align: middle; padding: 20px"> <img alt="Logo" class="logo" src="https://yourdomain.com/logo.png" style="display: inline-block; width: 127px; height: 58px; object-fit: cover;" /> </td> -
Replace the
srcvalue with the URL of your updated brand logo as follows:src="https://yourdomain.com/path-to-your-logo.png" -
Optionally customize:
alt: Add accessible text such as"Your Brand Logo"widthandheight: Adjust only if required (default is typically127px × 58px)
Option 2: Using Visual Mode
-
Select the required template in the CleverTap Email Editor (for example, under Create Email > Single Message).
-
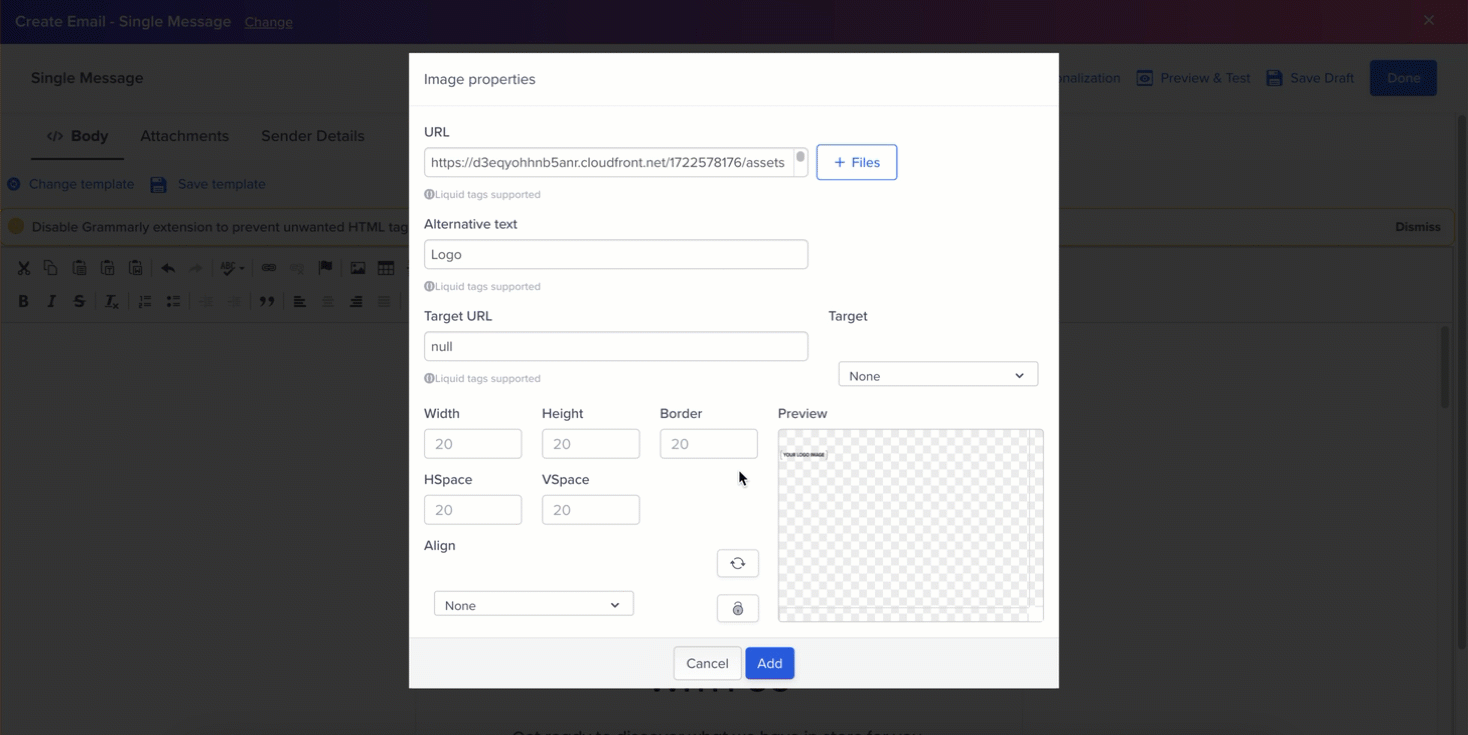
Locate and click the existing logo image in the top section of the email.
-
Choose one of the following image replacement methods:
- Upload a new image file (recommended: PNG or SVG).
- Paste the URL where image is hosted in the Image URL field (if available).
Replace Logo
-
Click Insert to add the image.
-
Adjust the image size and alignment using the styling and formatting options—such as margins, width, and spacing.
-
Click Add and click Done in the top-right corner of the editor and preview the email to ensure proper rendering.
NoteEnsure to verify logo alignment, spacing, and sizing on both mobile and desktop previews after replacement.
Replace Background
Sets or replaces the existing background with a custom image of your choice.
Using Source Mode
- Locate the
.header-containerproperty in the HTML code..header-container { background: transparent url(https://d1qzvqecfo5h8o.cloudfront.net/images/67Z-875-RR7Z/spinn/header-design.png); background-size: contain; background-repeat: repeat-x; background-position: bottom; padding-bottom: 18px; } - Replace the
backgroundURL with the link to the new image, in this case,header-design.png.
Update Banner/Product Images
Visually highlights products, offers, or campaigns at the top of the email using a full-width banner image or a product tile grid, depending on the template layout.
Option 1: Using Source Mode
-
Locate the banner
<img>tag in your HTML template. For example:<tr> <td align="center"> <img src="https://yourdomain.com/banner.jpg" alt="Promotional Banner" style="width: 100%; height: auto;" /> </td> </tr> -
Replace the
srcURL with the path to your new banner image. -
Update the
altattribute to provide descriptive alternative text for accessibility and fallback scenarios. -
Ensure the image meets the following specifications:
- Recommended size: 600px (width) × 400px (height)
- Aspect ratio: 3:2
- File formats:
.jpg,.png,.gif - Maximum file size: Under 1MB
Option 2: Using Visual Mode
-
Select the required template in the CleverTap Email Editor.
-
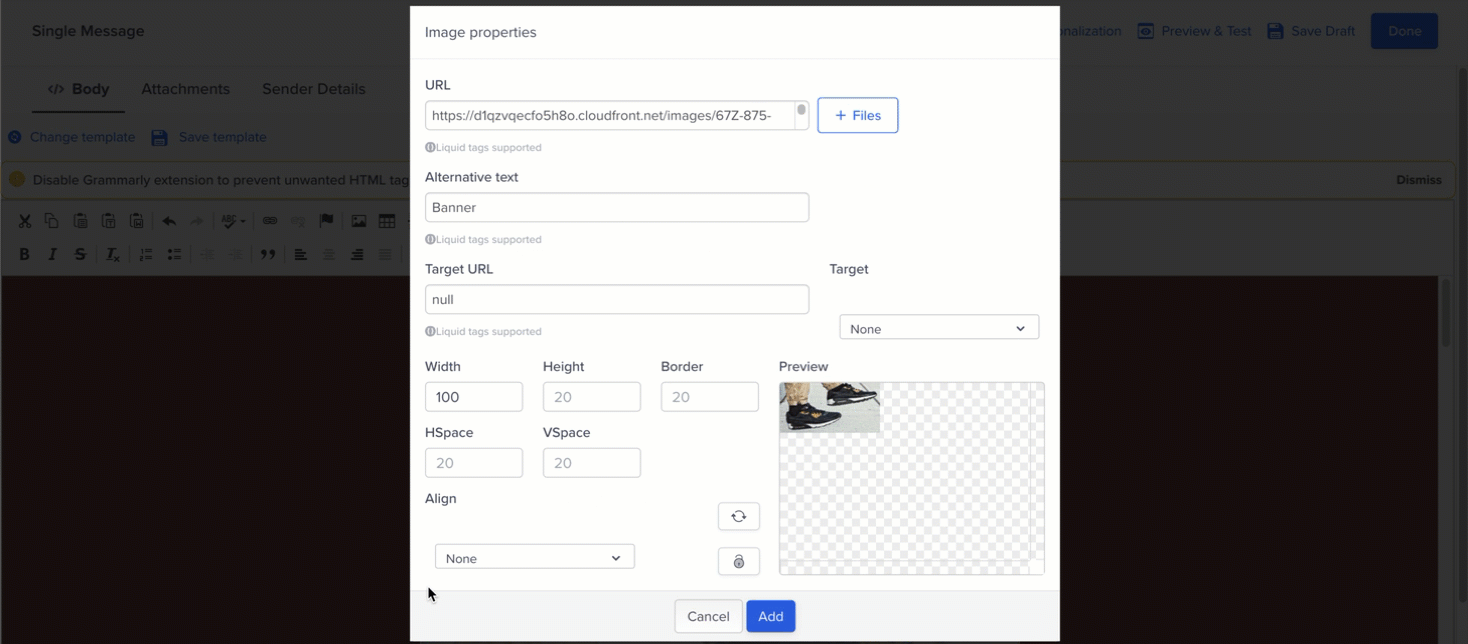
Click on the existing banner image.
-
Choose one of the following image replacement methods:
- Upload a new image file (recommended: PNG or SVG).
- Paste the URL where image is hosted in the Image URL field (if available).
Update Banner/Product Images.png
-
Click Insert to add the image.
-
Adjust the image size and alignment using the styling and formatting options—such as margins, width, and spacing.
-
Click Add and click Done in the top-right corner of the editor and preview the email to ensure proper rendering.
NoteFor templates using grid-based layouts or product tiles, ensure to match the original image dimensions and maintain consistent spacing to ensure the layout remains visually balanced and responsive.
Update Call-To-Actions (CTAs)
Guides the user to take specific actions within the email, such as clicking a button to redirect the user to a web page, completing a purchase, or viewing more details. You can customize the following elements:
- Text: Modify the text within the anchor tag (e.g., "Discover More" → "Shop Now").
- URL: Update the
hrefattribute with the desired link (e.g.,href="https://your-domain.com") - Styling: Adjust the CSS properties to fit your design specifications (for example, background color, padding, text size).
Option 1: Using Source Mode
-
Locate the CTA section in your HTML template as shown below:
<tr> <td style="text-align: center; padding: 20px;"> <a href="https://your-link.com" style="background: #FF5733; padding: 10px 20px; color: #fff; text-decoration: none; font-size: 16px; border-radius: 5px;"> Shop Now </a> </td> </tr> -
Replace the
hrefURL with the link where you want to direct the user:href="https://yourdomain.com/your-action" -
Optionally, modify the text of the CTA, such as changing "Shop Now" to "Get Started" or "Claim Your Offer."
-
Adjust the button styling by modifying the CSS within the
<a>tag (for example, background color, padding, font size, etc.):style="background: #FF5733; padding: 10px 20px; color: #fff; text-decoration: none; font-size: 16px; border-radius: 5px;"
Option 2: Using Visual Mode
-
Open the template in the CleverTap Email Editor.
-
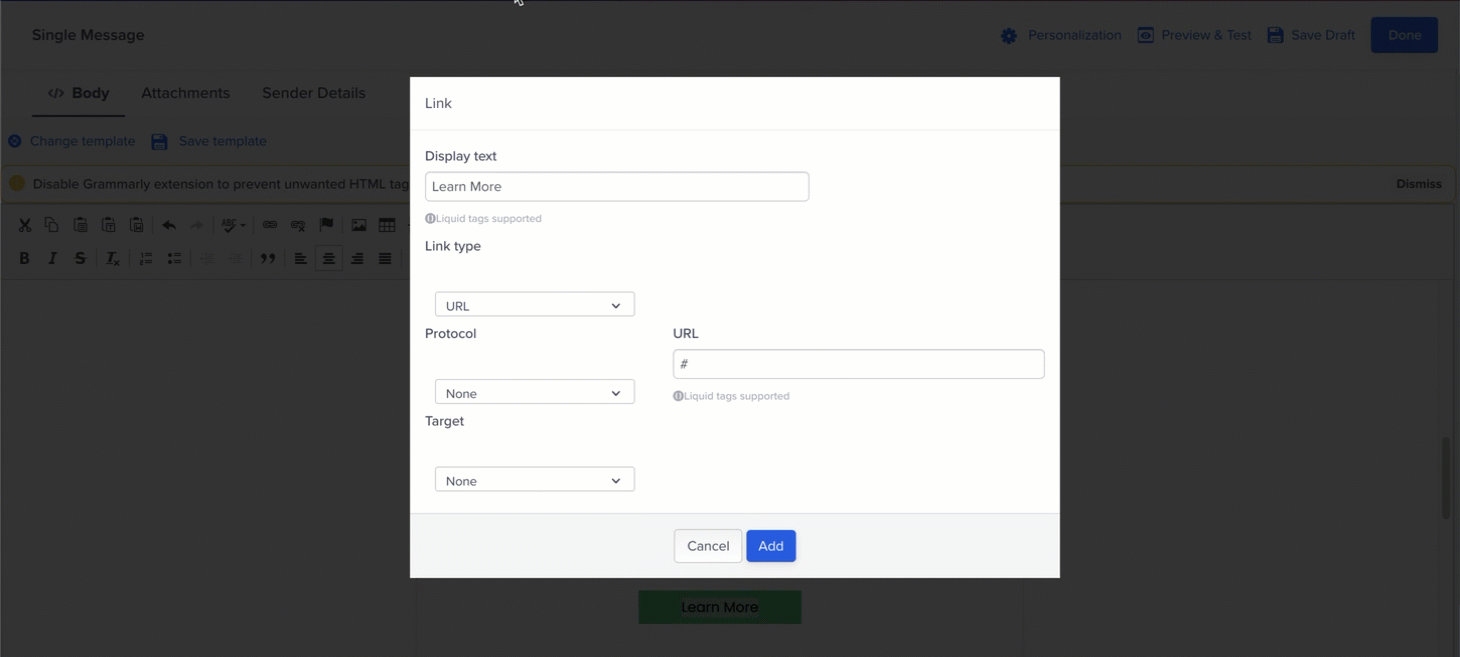
Click on the existing CTA button in the email layout.
-
Update the Display Text to match your new call to action (for example, Learn More, Shop Now, and so on).
Update CTAs
-
Enter or update the Link URL to point to your desired destination.
-
Click Add, then click Done in the top-right corner.
-
Preview the email to confirm that the CTA appears and functions correctly across devices.
Best PracticesAlways make sure the CTAs are clear and actionable, and consider using verbs such as "Buy," "Get Started," "Learn More," or "Shop Now."
Update Links in Header/Footer
Updates the links in the header or footer sections of the email, such as Privacy Policy, Terms of Service, or any social media or download links, to ensure they direct to the correct URLs.
Option 1: Using Source Mode
-
Locate the Header/Footer Section: Search for the relevant section in your HTML code. The following is a sample code:
<td class="footer" style="text-align: center; padding: 10px; font-size: 12px;"> <a href="https://your-domain.com/privacy-policy" style="color: #939393; text-decoration: none;">Privacy Policy</a> </td> -
Update Link: Replace the
hrefURL with the new destination:href="https://your-domain.com/new-link" -
Update the Text: If required, update the link's visible text. For example:
<a href="https://your-domain.com/privacy-policy" style="color: #939393; text-decoration: none;">Terms & Conditions</a> -
Styling Adjustments: You can adjust the text styles by modifying the
styleattribute (for example, font color, size, and so on). -
Save and Preview: After making changes, ensure to save the file and preview the email to confirm that the links are functional and styled properly.
Option 2: Using Visual Mode
-
Select the template from the CleverTap dashboard that fits your business requirement.
-
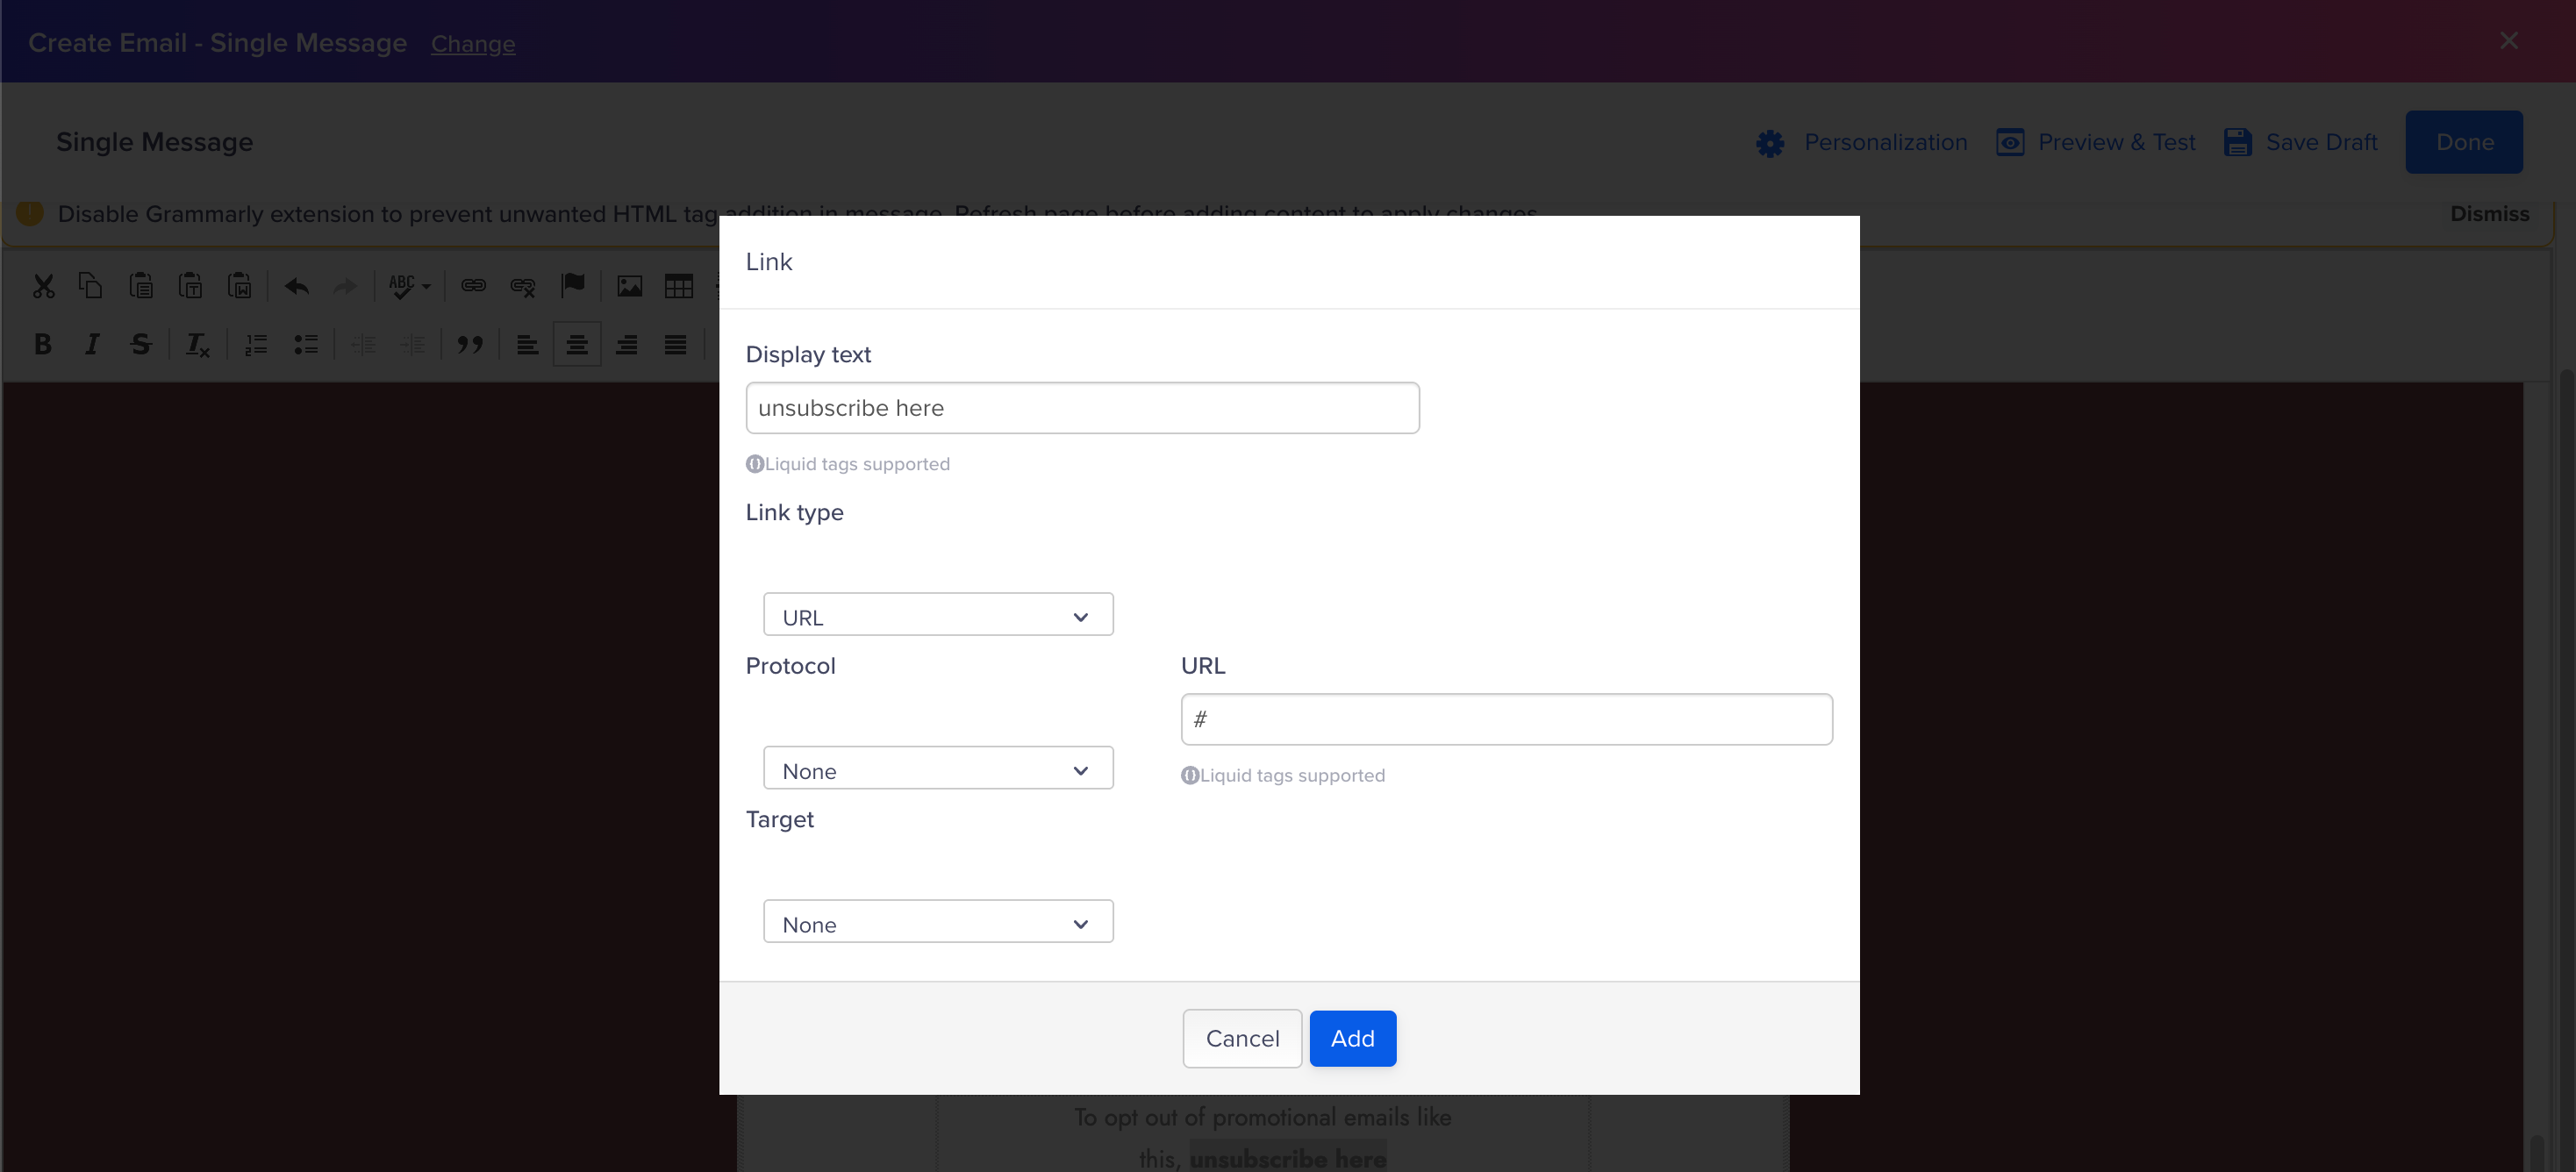
Click the link you want to update in the header or footer section (for example, Unsubscribe link).
-
Update the Display Text to reflect your desired action or label.
-
Enter or update the Link URL to point to the correct destination.
Update Links in Header/Footer
-
Click Apply, then click Done in the top-right corner.
-
Preview the email to confirm that the link appears and functions correctly across devices.
Header/Footer Links
- Unsubscribe Link: For compliance with regulations such as GDPR and CAN-SPAM, all templates that include an Unsubscribe link in the footer must ensure it directs to the correct unsubscribe mechanism.
- Social Media Links: Ensure all social media links, like those for Facebook, Instagram, etc., are up-to-date and lead to your current active profiles.
- Dynamic Links: Some templates, like Referral or Cart Abandonment, require dynamic links that change based on user activity. Make sure these URLs are generated dynamically by your platform or manually updated.
- Call-to-Actions (CTAs): Some templates, especially those with sales, product promotions, or loyalty rewards, might have CTAs that need to be consistently checked and updated based on current offers or time-sensitive promotions.
Change Theme or Background Color
Modifies the background color or overall theme of the email to match your branding or campaign requirements. This ensures a consistent visual experience aligned with your marketing or seasonal themes.
Using Source Mode
-
Locate the
<table>tag defining the background color in your HTML code. A typical structure might look like this:<table style="border-collapse: collapse; width: 100%; max-width: 600px; margin: 0 auto; background: #ffffff;" width="100%" cellspacing="0" cellpadding="0" border="0"> -
Update the Background Color:
Replace the existingbackgroundattribute value with your desired color. For example:background: #f0f0f0; -
Save and Preview: After making the changes, save the file and preview the email to ensure the new background color appears correctly across different devices.
Update Privacy Policy
Ensures that the Privacy Policy link in the email template directs users to the most current and correct Privacy Policy page.
Option 1: Using Source Mode
-
Locate the Privacy Policy Link:
Search for the<a>tag associated with the Privacy Policy in the footer or header section of your template. The following is a sample code:<a href="#" class="f-nav-link" style="font-family: 'Poppins', Arial, sans-serif; font-size: 14px; font-weight: 400; line-height: 24px; color: #939393 !important; text-decoration: none;">Privacy Policy</a> -
Update the
hrefURL:
Replace the currenthref="#"with the correct URL for your Privacy Policy page. For example:href="https://yourdomain.com/privacy-policy" -
Modify Text (Optional): You can optionally change the visible text of the link, such as replacing "Privacy Policy" with "Terms & Conditions" if required.
-
Save and Preview: After making the changes, save your template and preview it to ensure the Privacy Policy link is working correctly and properly displayed.
Option 2: Using Visual Mode
-
Open the template in the CleverTap Email Editor.
-
Locate the Privacy Policy link in the footer (or header) section of the email.
-
Click the link to open the editing toolbar.
-
Update the Link URL to point to the correct Privacy Policy page.
-
Optionally, update the Display Text if needed (for example, change "Privacy Policy" to "Terms & Conditions").
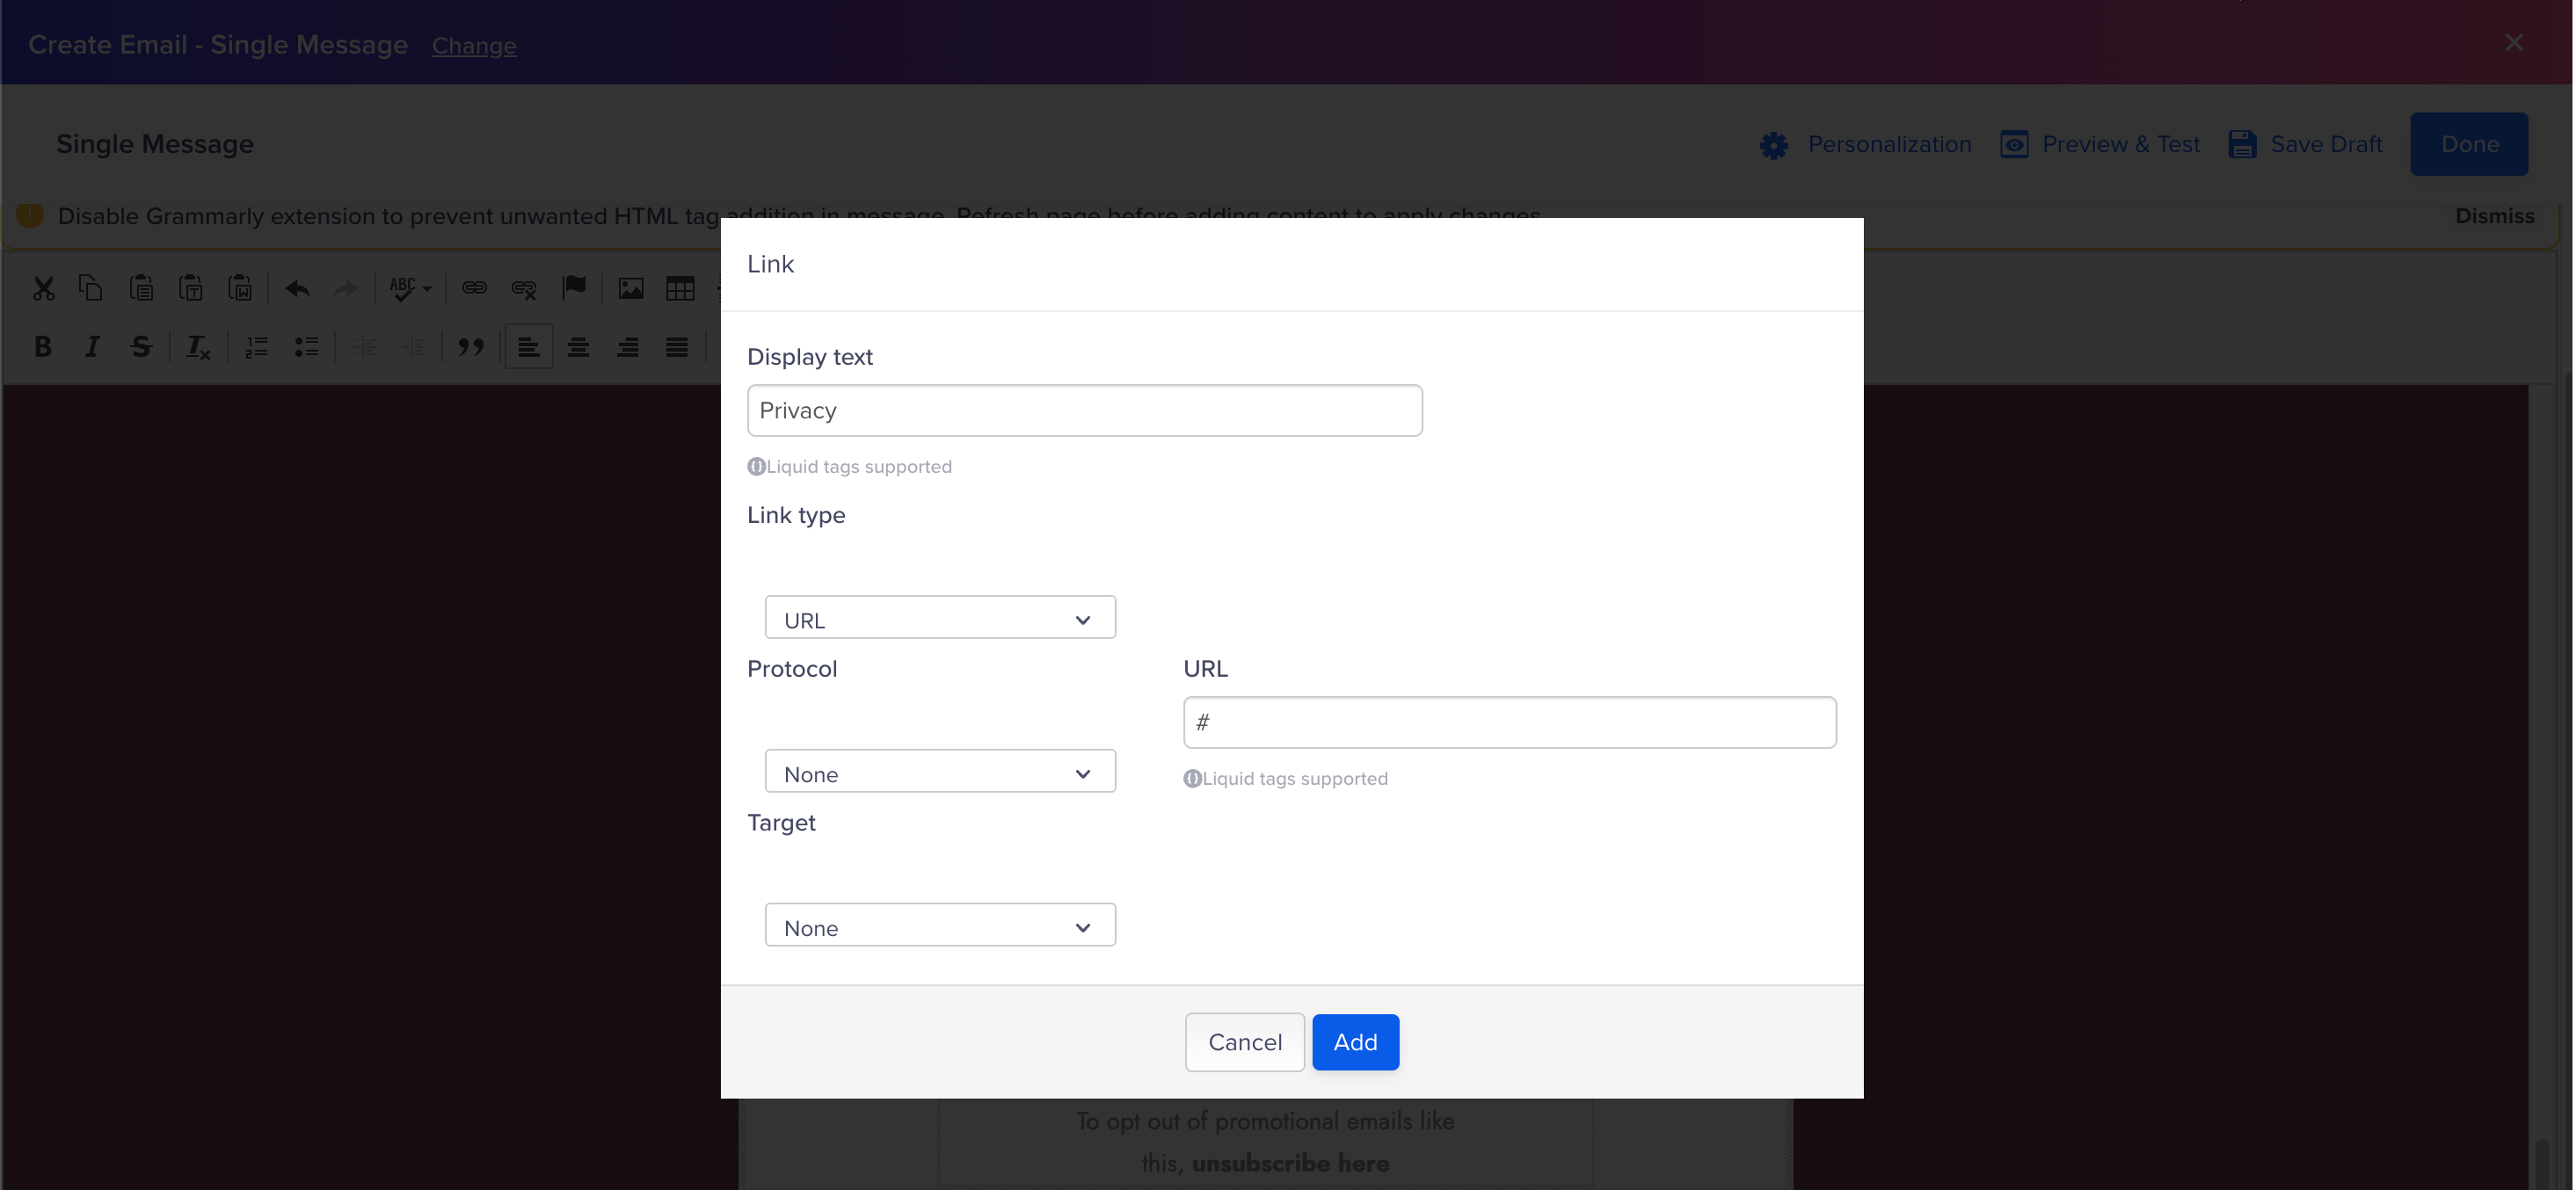
Update Privacy Policy
-
Click Add, then click Done in the top-right corner of the editor.
-
Preview the email to confirm the link is functional and renders correctly across devices.
Update Social Media and Download Links
Updates and ensures all social media and download links in your email template direct users to the correct platforms, apps, or resources.
Option 1: Using Source Mode
-
Locate the Social Media and Download Sections:
Search for sections in the HTML code related to social media platforms (such as Facebook, Twitter, Instagram, etc.) and download buttons (such as Android or Apple store download links). You may see something like:<a href="https://your-facebook-link" target="_blank"> <img src="https://path-to-facebook-icon.png" alt="Facebook" class="social-icon" /> </a> -
Update the Links:
For social media platforms, replace the
hrefwith the correct URL. For example:<a href="https://facebook.com/your-page" target="_blank"> <img src="https://path-to-facebook-icon.png" alt="Facebook" class="social-icon" /> </a>Similarly, for download links, locate the button or link related to the app download:
<a href="#" class="btn-link" style="margin: 0 10px;">
  <img src="apple-btn.png" alt="Download on Apple" class="btn-img" style="background: #F7F7F7; position: relative; z-index: 1;">
</a>
Update the
hrefattribute with the correct download link:<a href="https://www.apple.com/app-store" class="btn-link" style="margin: 0 10px;"> <img src="apple-btn.png" alt="Download on Apple" class="btn-img" style="background: #F7F7F7; position: relative; z-index: 1;"> </a> -
Save and Preview:
After updating the URLs for social media and download links, save the file and preview the email to ensure all links work properly.
Option 2: Using Visual Mode
-
Select the template from the CleverTap dashboard that fits your business requirement.
-
In the footer section, click on a social media icon (such as Facebook, Instagram, or Twitter).
-
Click the link you want to update and update the Link URL to point to your brand’s corresponding social media page.
-
Repeat the process for each social media icon you want to update.
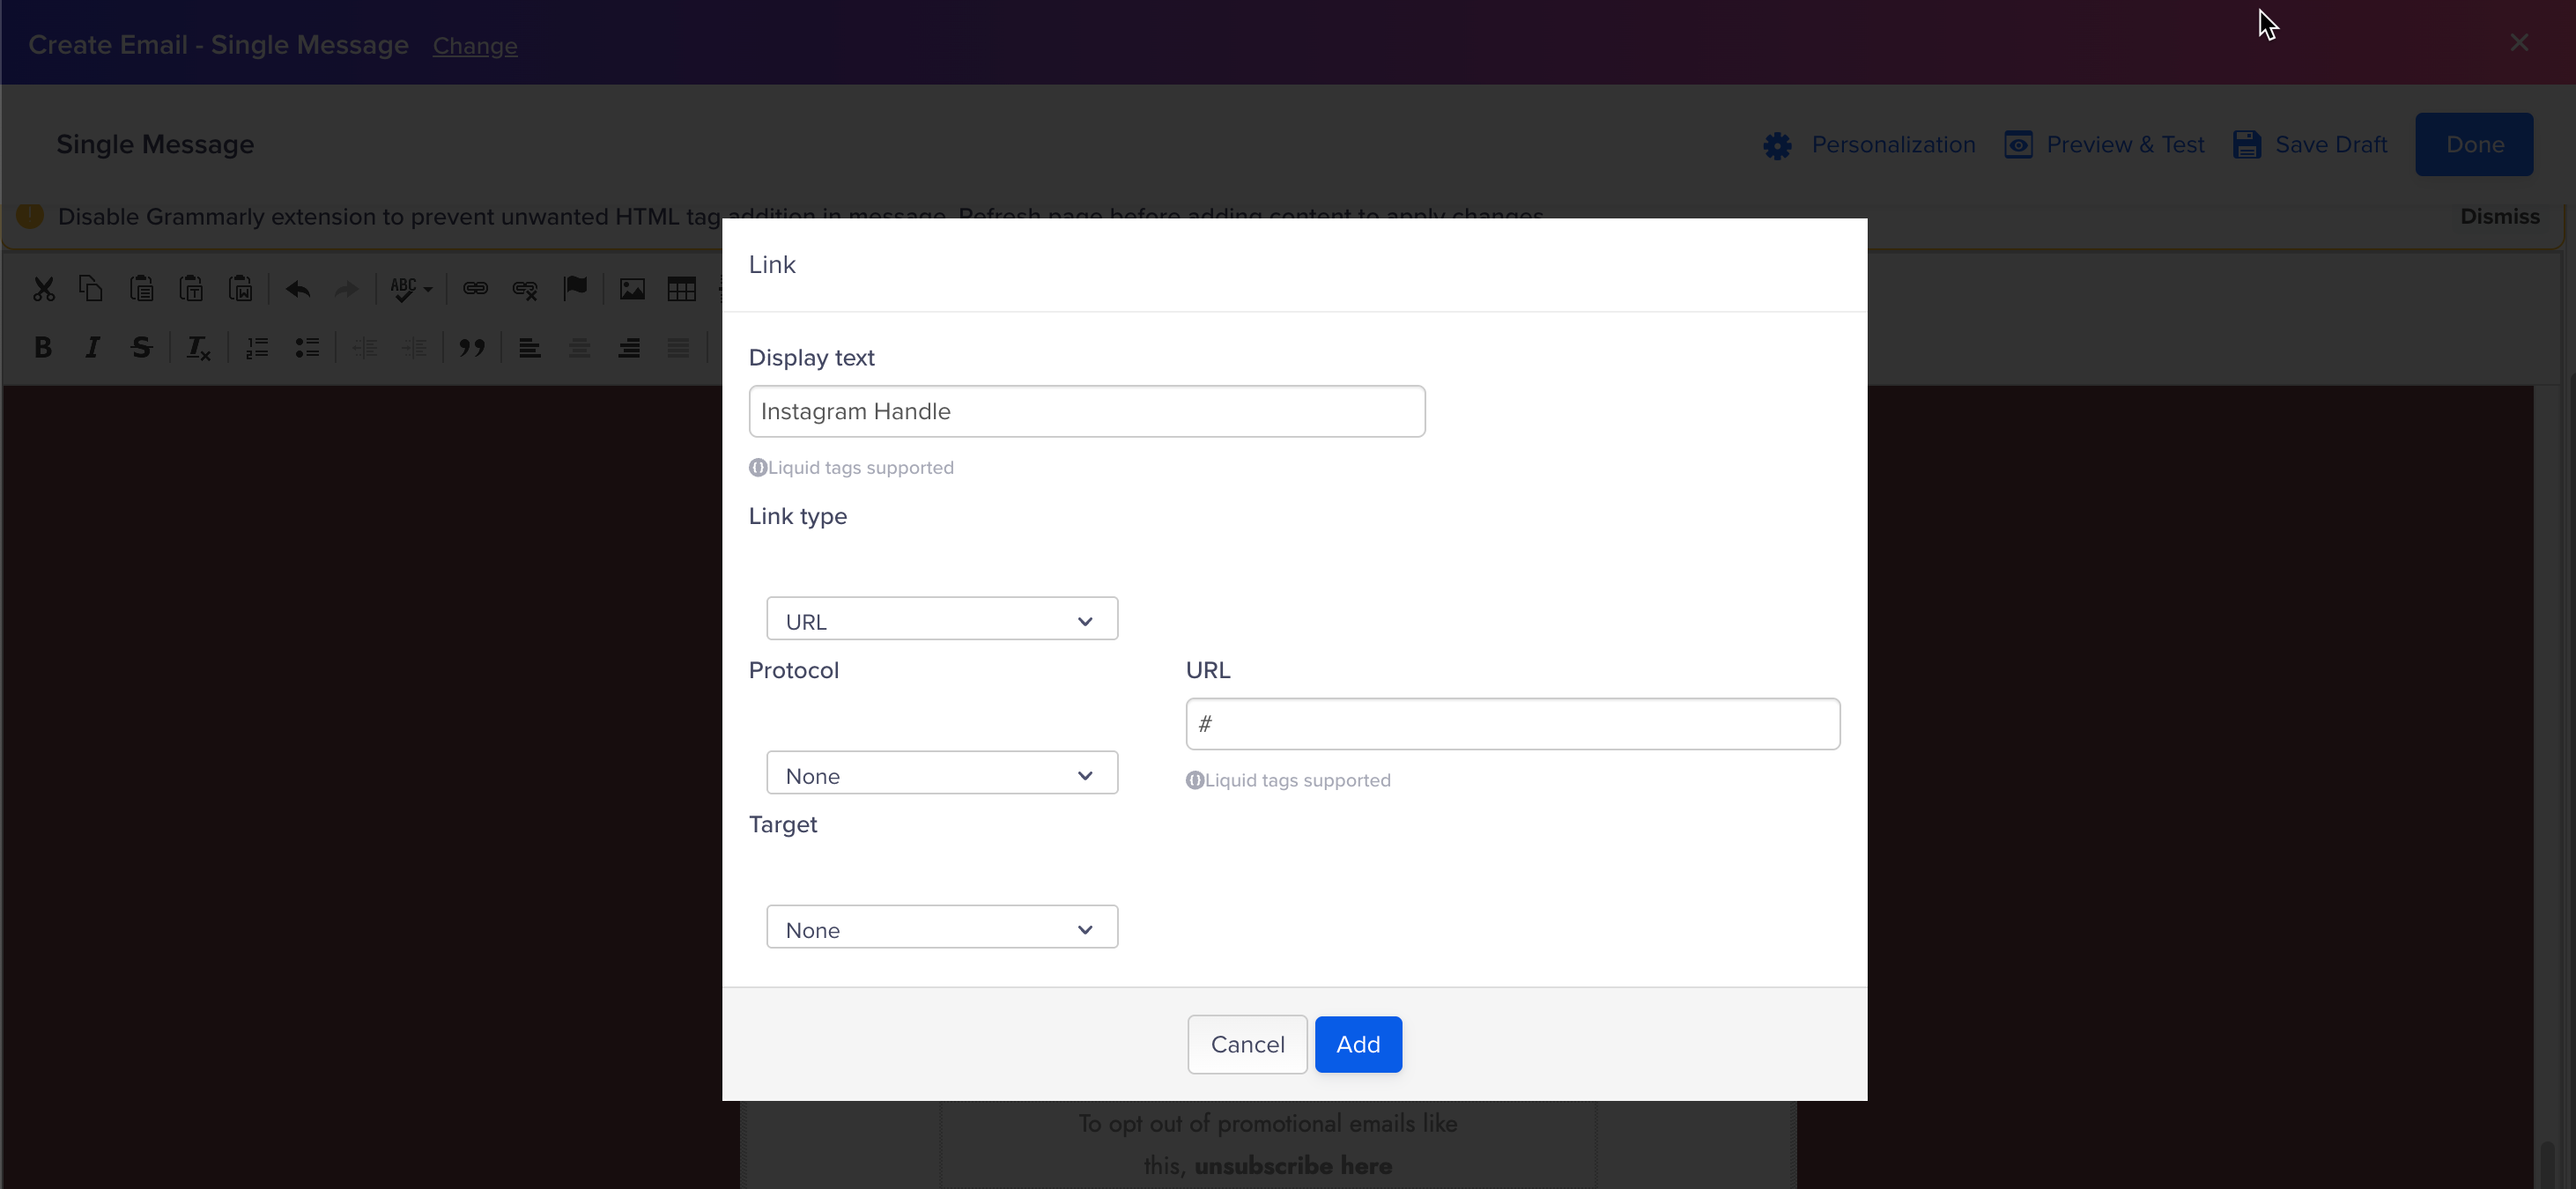
Update Social Media and Download Links
-
Locate and click on the download link (for example, Android or iOS button) in the footer.
-
Update the Link URL to the correct app store page (for example, Google Play Store or Apple App Store).
-
Click Add and click Done in the top-right corner of the dashboard.
-
Preview the email to ensure all links are functional and direct users to the right destinations.
Countdown Timer (Flash Sale Only)
Adds urgency with a live or static countdown. Use a hosted GIF or PNG and replace the image attribute src with the required graphics.
<img src="timer.gif" alt="Countdown Timer" style="width: 100%;" />Add or Modify Filters
-
Add CTA for the Filter, for example, Kids
<button class="btn typ-secondary" [class]="'btn ' + (selectedCategory.value == 'kids' ? '' : 'typ-secondary')" value="kids" on="tap:AMP.setState({selectedCategory: {value: 'kids'}})"> Kids </button> 2. Add Their Products <div class="category category-women" hidden [hidden]="selectedCategory.value != 'women'"> -
Add a list of the products for Kids.
<div class="category category-women" hidden [hidden]="selectedCategory.value != 'women'"> <ul class="product-list"> <li class="product-item"> <div class="product-card"> <div class="img-wrap"> <!-- Change image src as per your requirements --> <amp-img layout="responsive" src="https://d1qzvqecfo5h8o.cloudfront.net/images/67Z-875-RR7Z/relevant/women-product- 1.png" alt="Product Image" width="258" height="174"></amp-img> </div> <div class="content-wrap"> <div class="lhs"> <h3 class="p-title">Product name</h3> </div> <div class="rhs"> <p class="p-amt"><span class="rupee">₹</span>1500</p> </div> </div> <p class="p-desc">is simply dummy text of the new age fashion industry.</p> <a href="https://www.google.co.in/" class="p-link"> Shop now </a> </div> </li> <li class="product-item"> <div class="product-card"> <div class="img-wrap"> <!-- Change image src as per your requirements --> <amp-img layout="responsive" src="https://d1qzvqecfo5h8o.cloudfront.net/images/67Z-875-RR7Z/relevant/women-product- 2.png" alt="Product Image" width="258" height="174"></amp-img> </div> <div class="content-wrap"> <div class="lhs"> <h3 class="p-title">Product name</h3> </div> <div class="rhs"> <p class="p-amt"><span class="rupee">₹</span>1500</p> </div> </div> <p class="p-desc">is simply dummy text of the new age fashion industry.</p> <a href="https://www.google.co.in/" class="p-link"> Shop now </a> </div> </li> <li class="product-item"> <div class="product-card"> <div class="img-wrap"> <!-- Change image src as per your requirements --> <amp-img layout="responsive" src="https://d1qzvqecfo5h8o.cloudfront.net/images/67Z-875-RR7Z/relevant/women-product- 3.png" alt="Product Image" width="258" height="174"></amp-img> </div> <div class="content-wrap"> <div class="lhs"> <h3 class="p-title">Product name</h3> </div> <div class="rhs"> <p class="p-amt"><span class="rupee">₹</span>1500</p> </div> </div> <p class="p-desc">is simply dummy text of the new age fashion industry.</p> <a href="https://www.google.co.in/" class="p-link"> Shop now </a> </div> </li> <li class="product-item"> <div class="product-card"> <div class="img-wrap"> <!-- Change image src as per your requirements --> <amp-img layout="responsive" src="https://d1qzvqecfo5h8o.cloudfront.net/images/67Z-875-RR7Z/relevant/women-product- 4.png" alt="Product Image" width="258" height="174"></amp-img> </div> <div class="content-wrap"> <div class="lhs"> <h3 class="p-title">Product name</h3> </div> <div class="rhs"> <p class="p-amt"><span class="rupee">₹</span>1500</p> </div> </div> <p class="p-desc">is simply dummy text of the new age fashion industry.</p> <a href="https://www.google.co.in/" class="p-link"> Shop now </a> </div> </li> </ul> </div>Output:
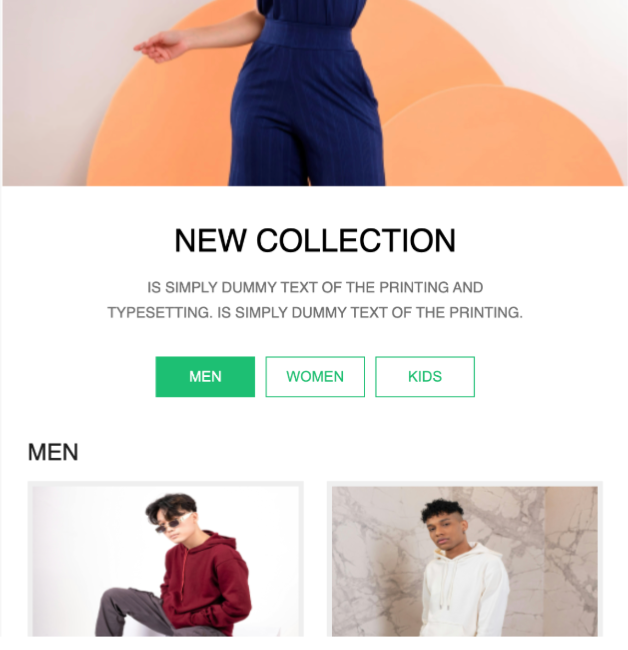
Output for Adding Filter
Updated about 6 hours ago