BigQuery
Overview
Configuring Google BigQuery with CleverTap enables seamless data import, ensuring synchronization and access to relevant information for analysis, personalized engagement, and data-driven growth.
NoteThis document covers importing data from BigQuery into CleverTap. For exporting data from CleverTap to BigQuery, refer to BigQuery Export.
Quick Start Guide for Existing Users
Expand for quick setup if you have previously configured a BigQuery workspace and are familiar with the CleverTap dashboard. If you are setting up BigQuery for the first time, skip to Prerequisites for Integration below.
Prerequisites
Before you begin, ensure you already have the following details:
- Project ID
- Dataset ID
- Google Service Account JSON Key (file or JSON text)
Configure BigQuery Credentials in CleverTap
To set up the Snowflake credentials in CleverTap, perform the following steps:
- Go to CleverTap Dashboard > Settings > Partners > BigQuery.
- Enter the following details: Project ID and Dataset ID
- Upload a Google Service Account JSON Key file or paste the JSON under the Custom key.
- Click Test Connection and Save
After setting up the configuration, you can import data from BigQuery into CleverTap.
Prerequisites for Integration
Before configuring BigQuery in CleverTap, ensure that the required Google Cloud resources and access permissions are available.
- CleverTap Access to configure BigQuery
- A Google Cloud Project with BigQuery enabled
- A BigQuery Project ID and dataset
- A Service Account JSON key with required permissions
Set Up BigQuery for Integration
You can set up BigQuery using one of the following options:
-
For new users who need to provision BigQuery resources from scratch: Create a Service Account, Assign BigQuery Permission, Create or Select a Dataset, and Create a Service Account JSON Key.
-
For users who already have configured resources in BigQuery: Use Existing BigQuery Credentials
Create New BigQuery Setup
If you do not already have a Service Account, Project ID, Dataset, and Service Account JSON key configured in Google Cloud, you must create them before proceeding. These components are required to ensure CleverTap can securely access, store, and process your data.
To create each resource, perform the following steps:
- Create a Service Account
- Assign BigQuery Permissions
- Create or Select a Dataset
- Create a Service Account JSON Key
Create Service Account
To allow CleverTap to access your BigQuery environment, first create a dedicated service account:
-
In the Google Cloud Console, click on
 to navigate to IAM & Admin > Service Accounts.
 -
Click Create Service Account.
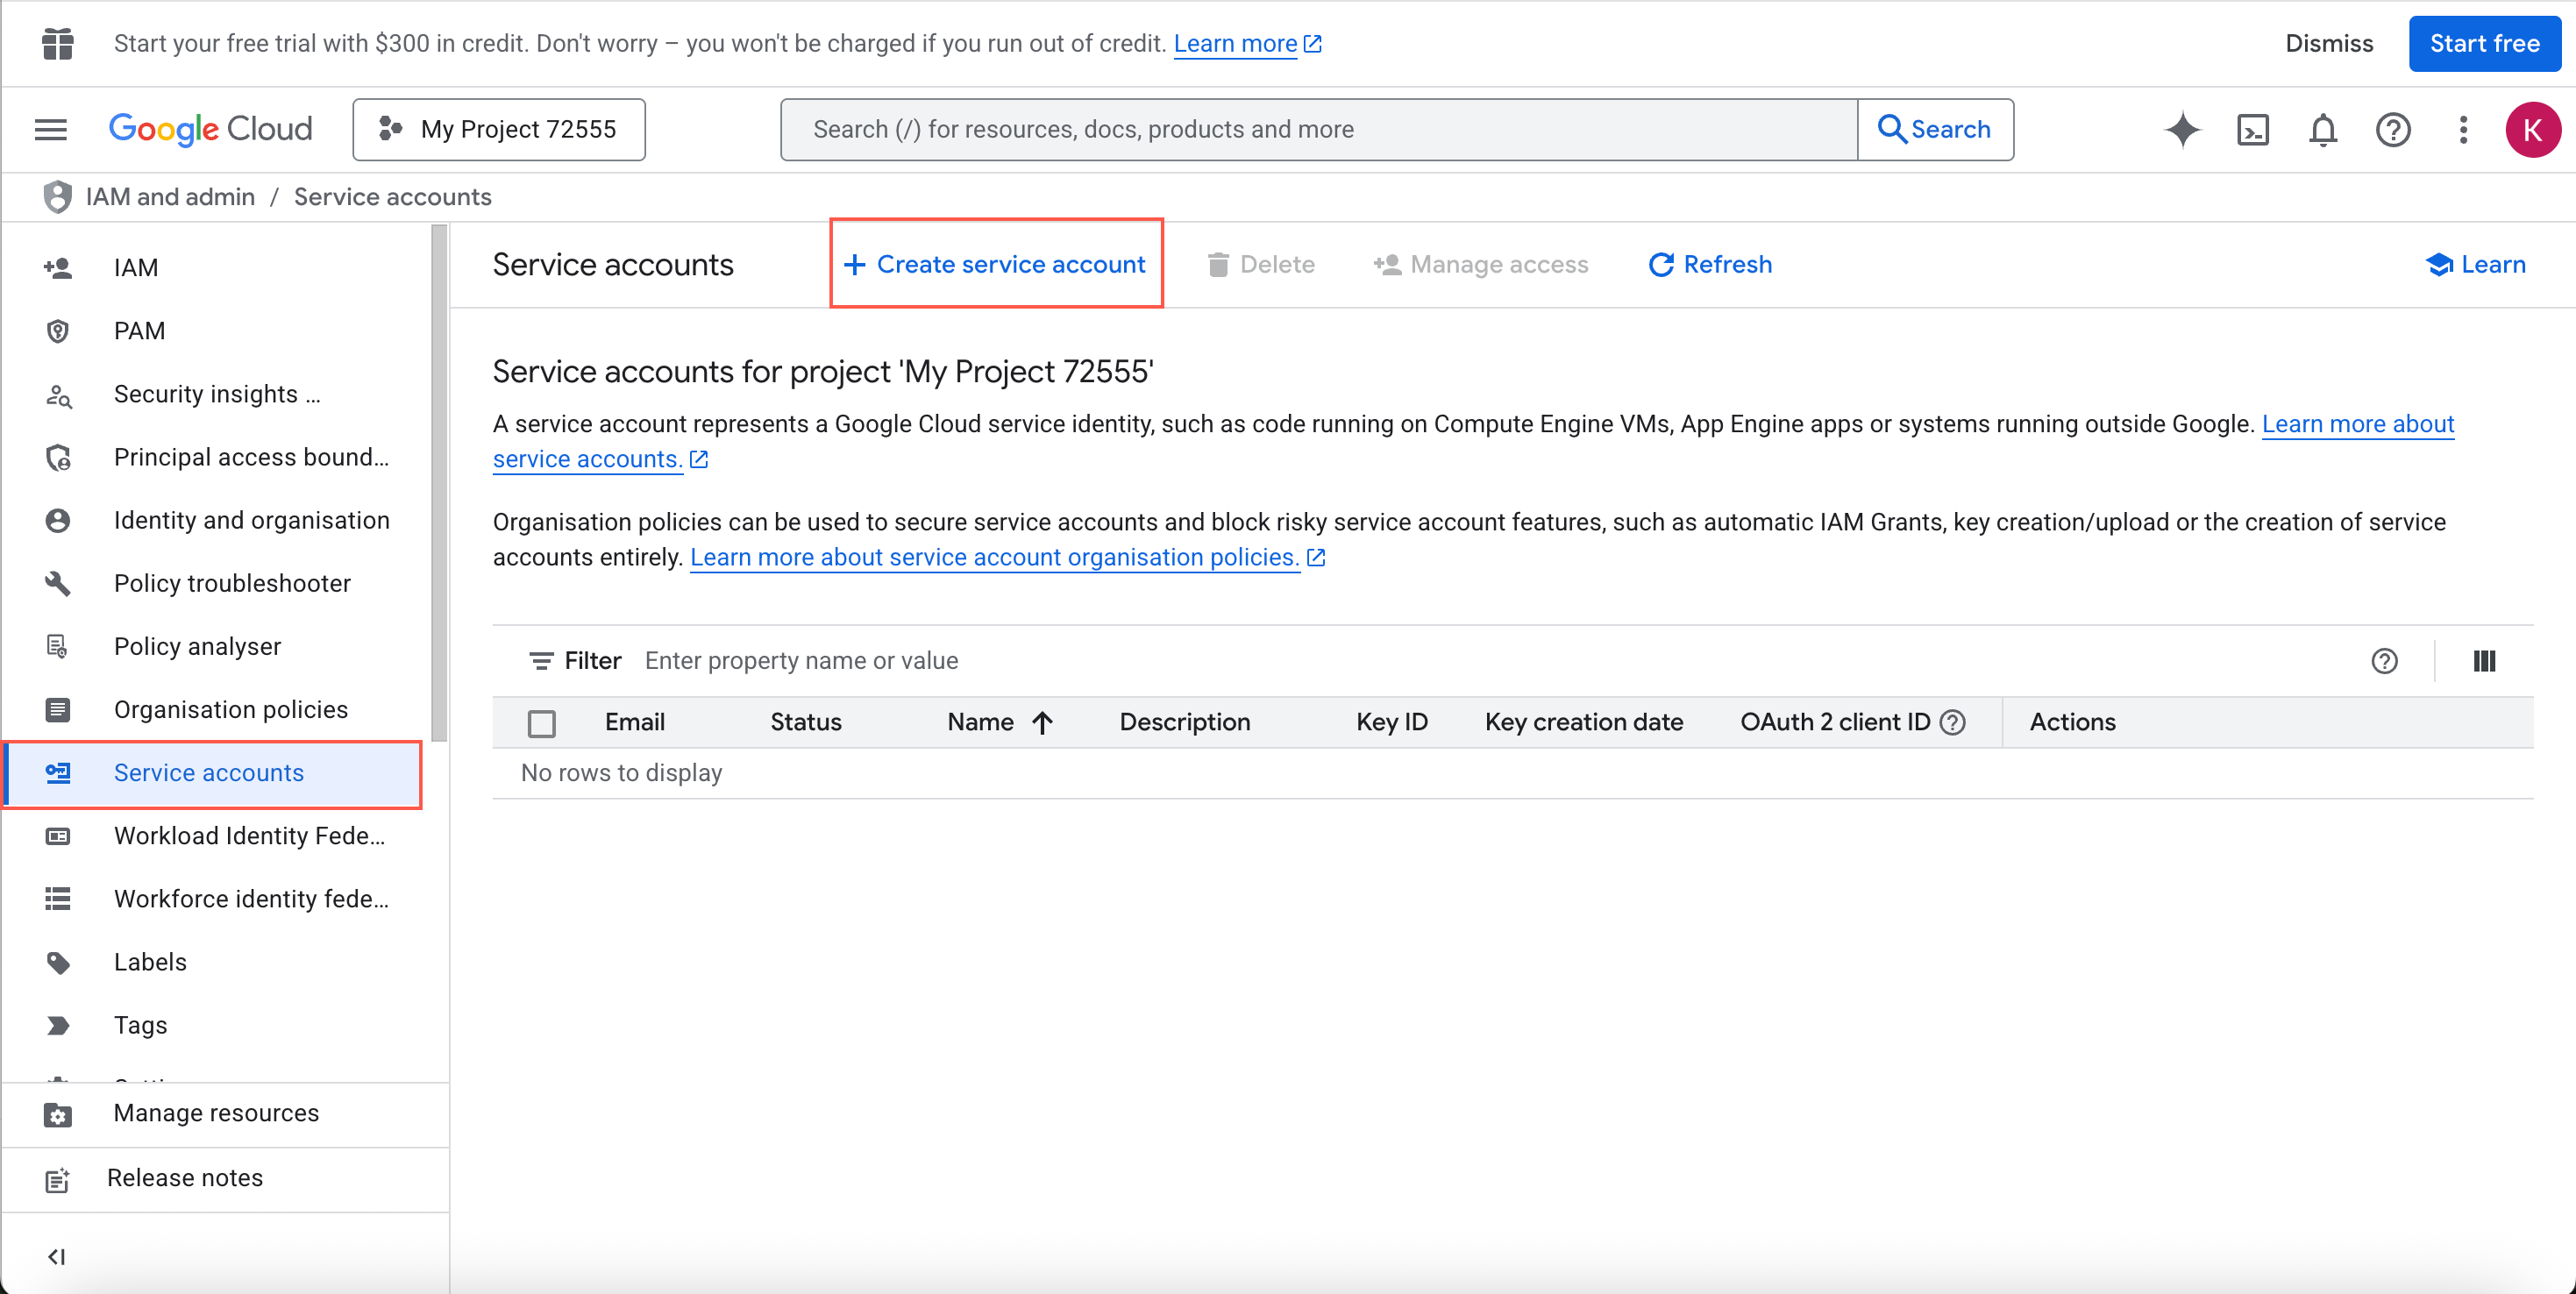
Create Service Account
-
Enter a Service account name (for example,
clevertap-bq-sa). -
Click Create and continue, then Done.
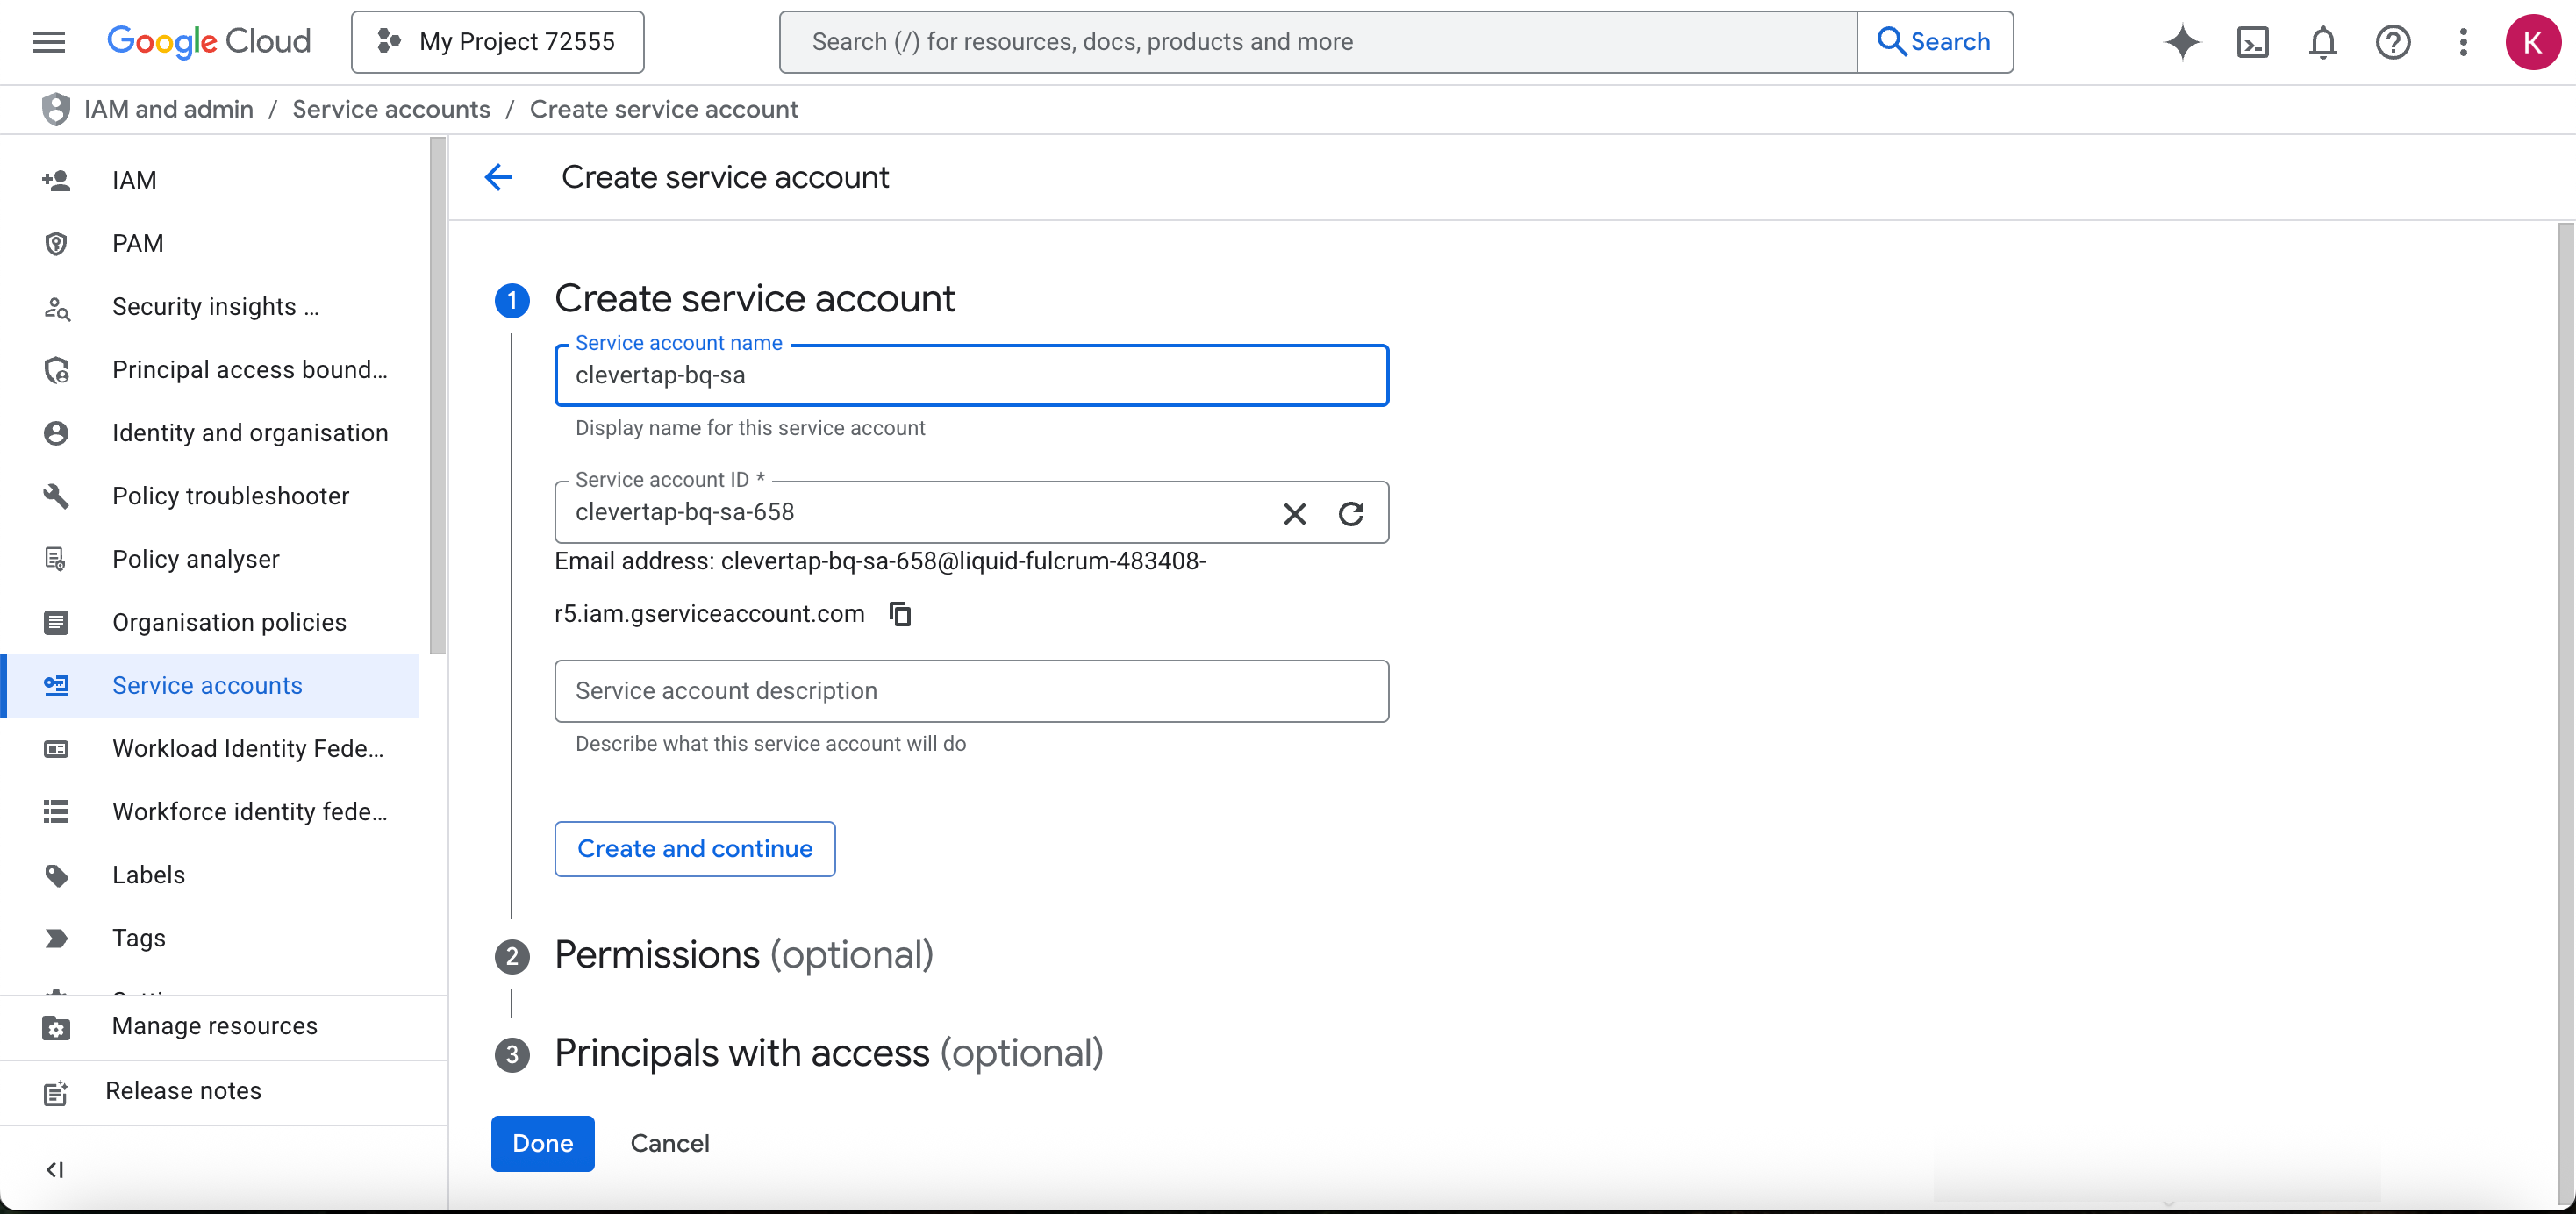
Service Account Name
Best Practices
Use a dedicated service account for each CleverTap workspace to maintain clear access boundaries.
Assign BigQuery Permissions
Assign the required roles to the service account:
-
In the Google Cloud Console, click on
navigate to IAM & Admin > Service Accounts. -
Locate the service account and click Manage Permissions.

Manage Permissions
-
Click on Manage Access.
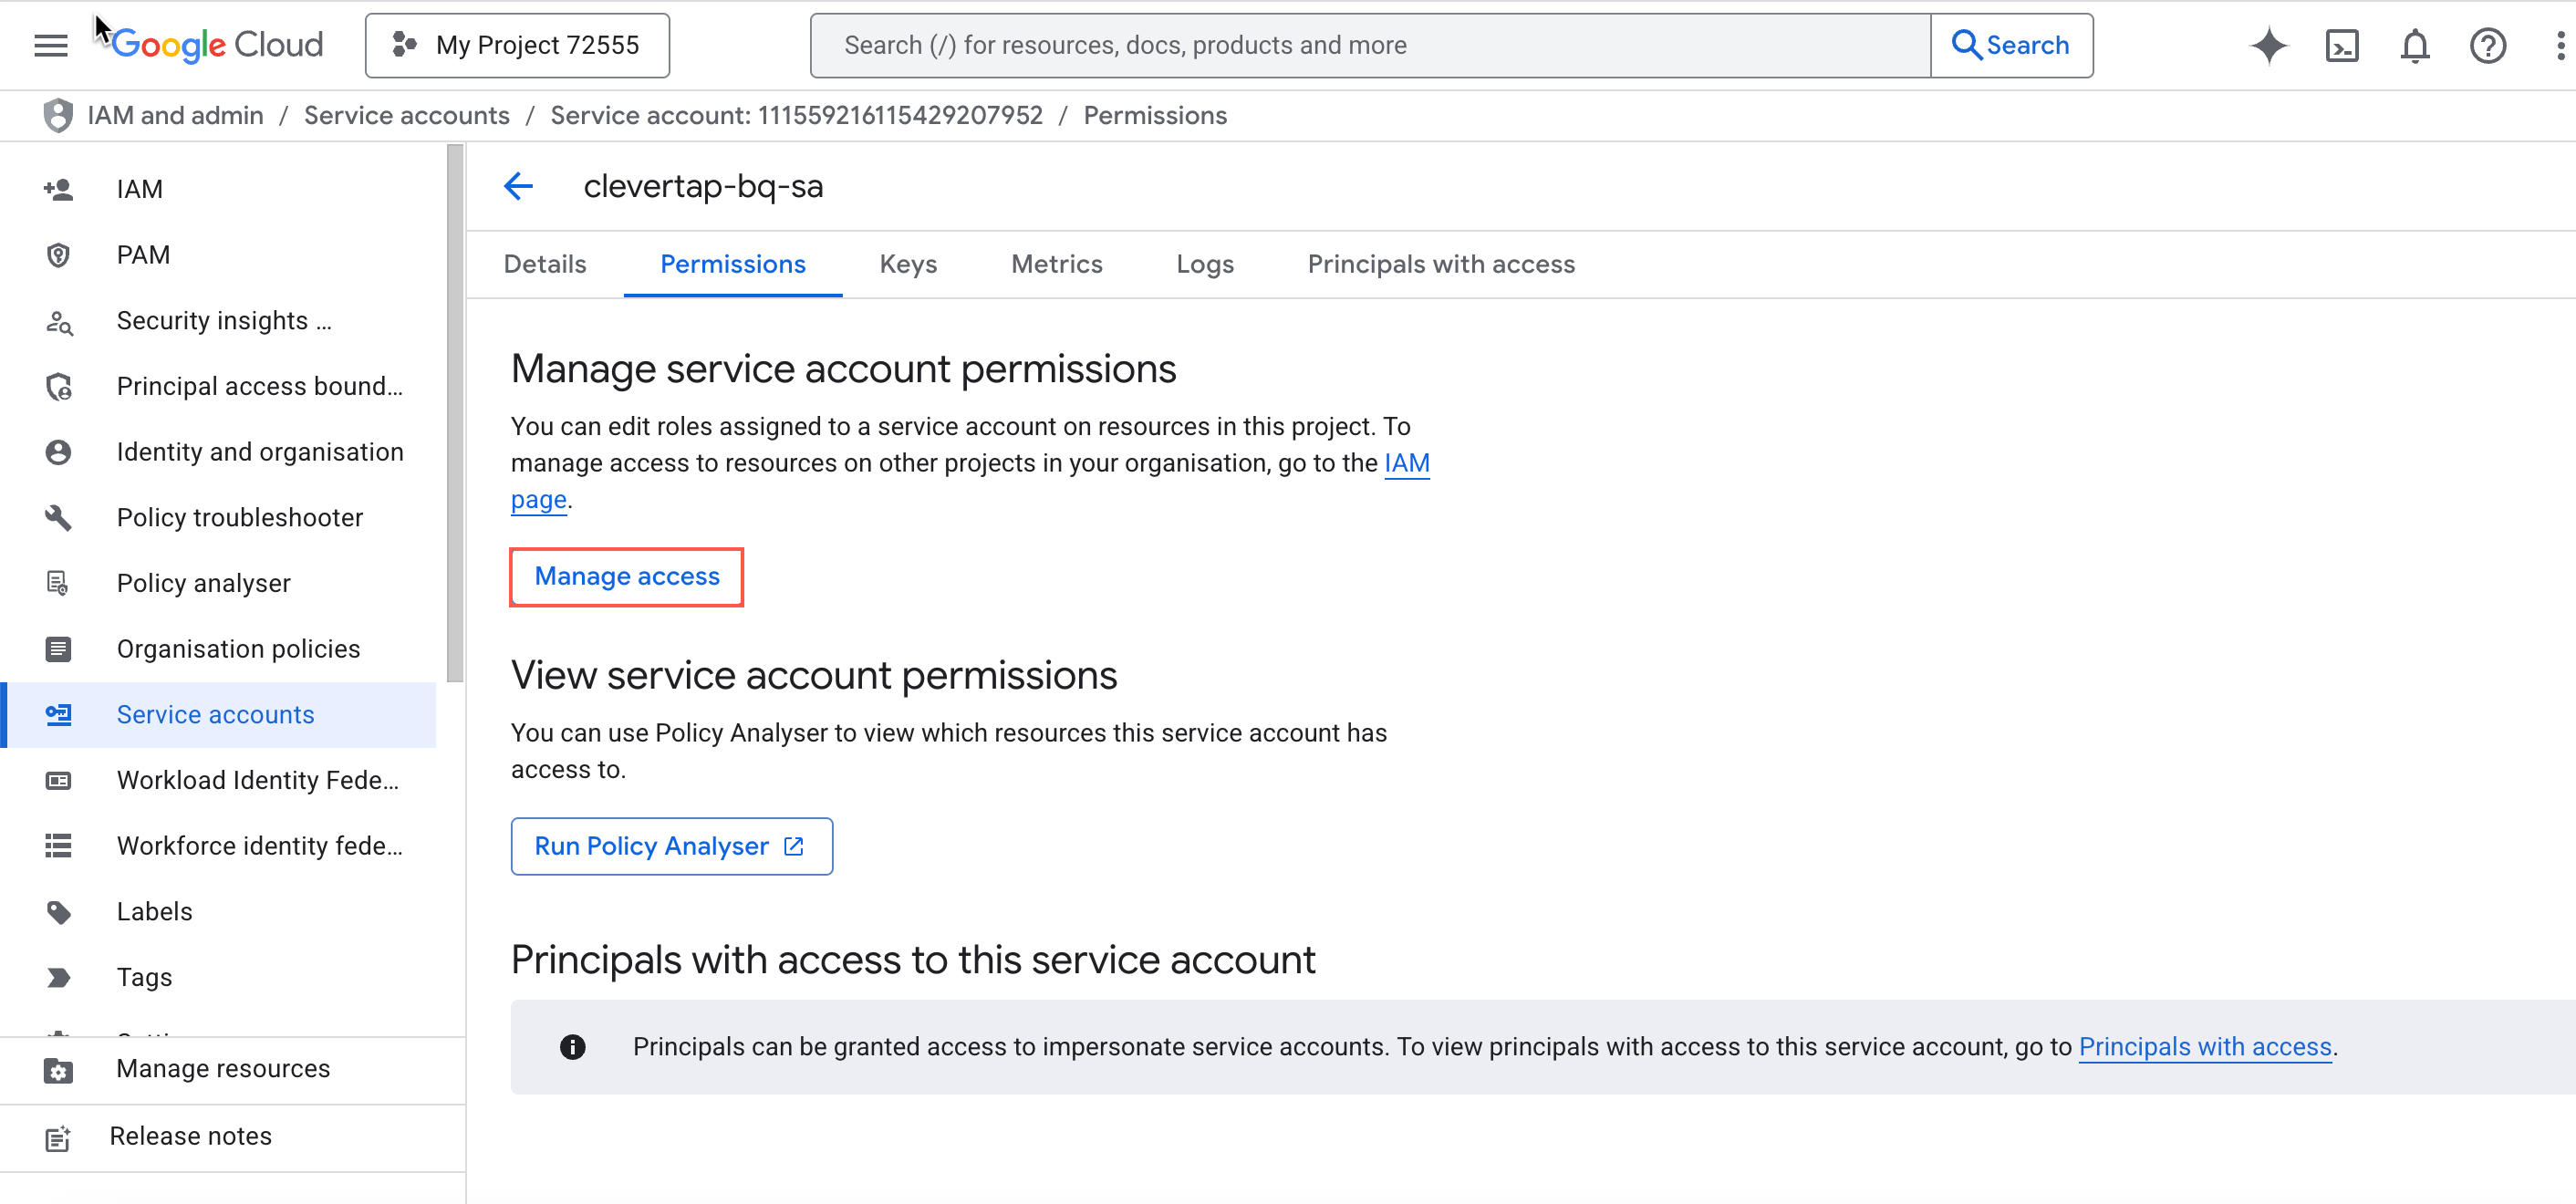
Manage Access
-
Assign the following required roles to the service account.
Role Purpose BigQuery Job User Allows CleverTap to run BigQuery jobs BigQuery Data Editor Allows read/write access to datasets
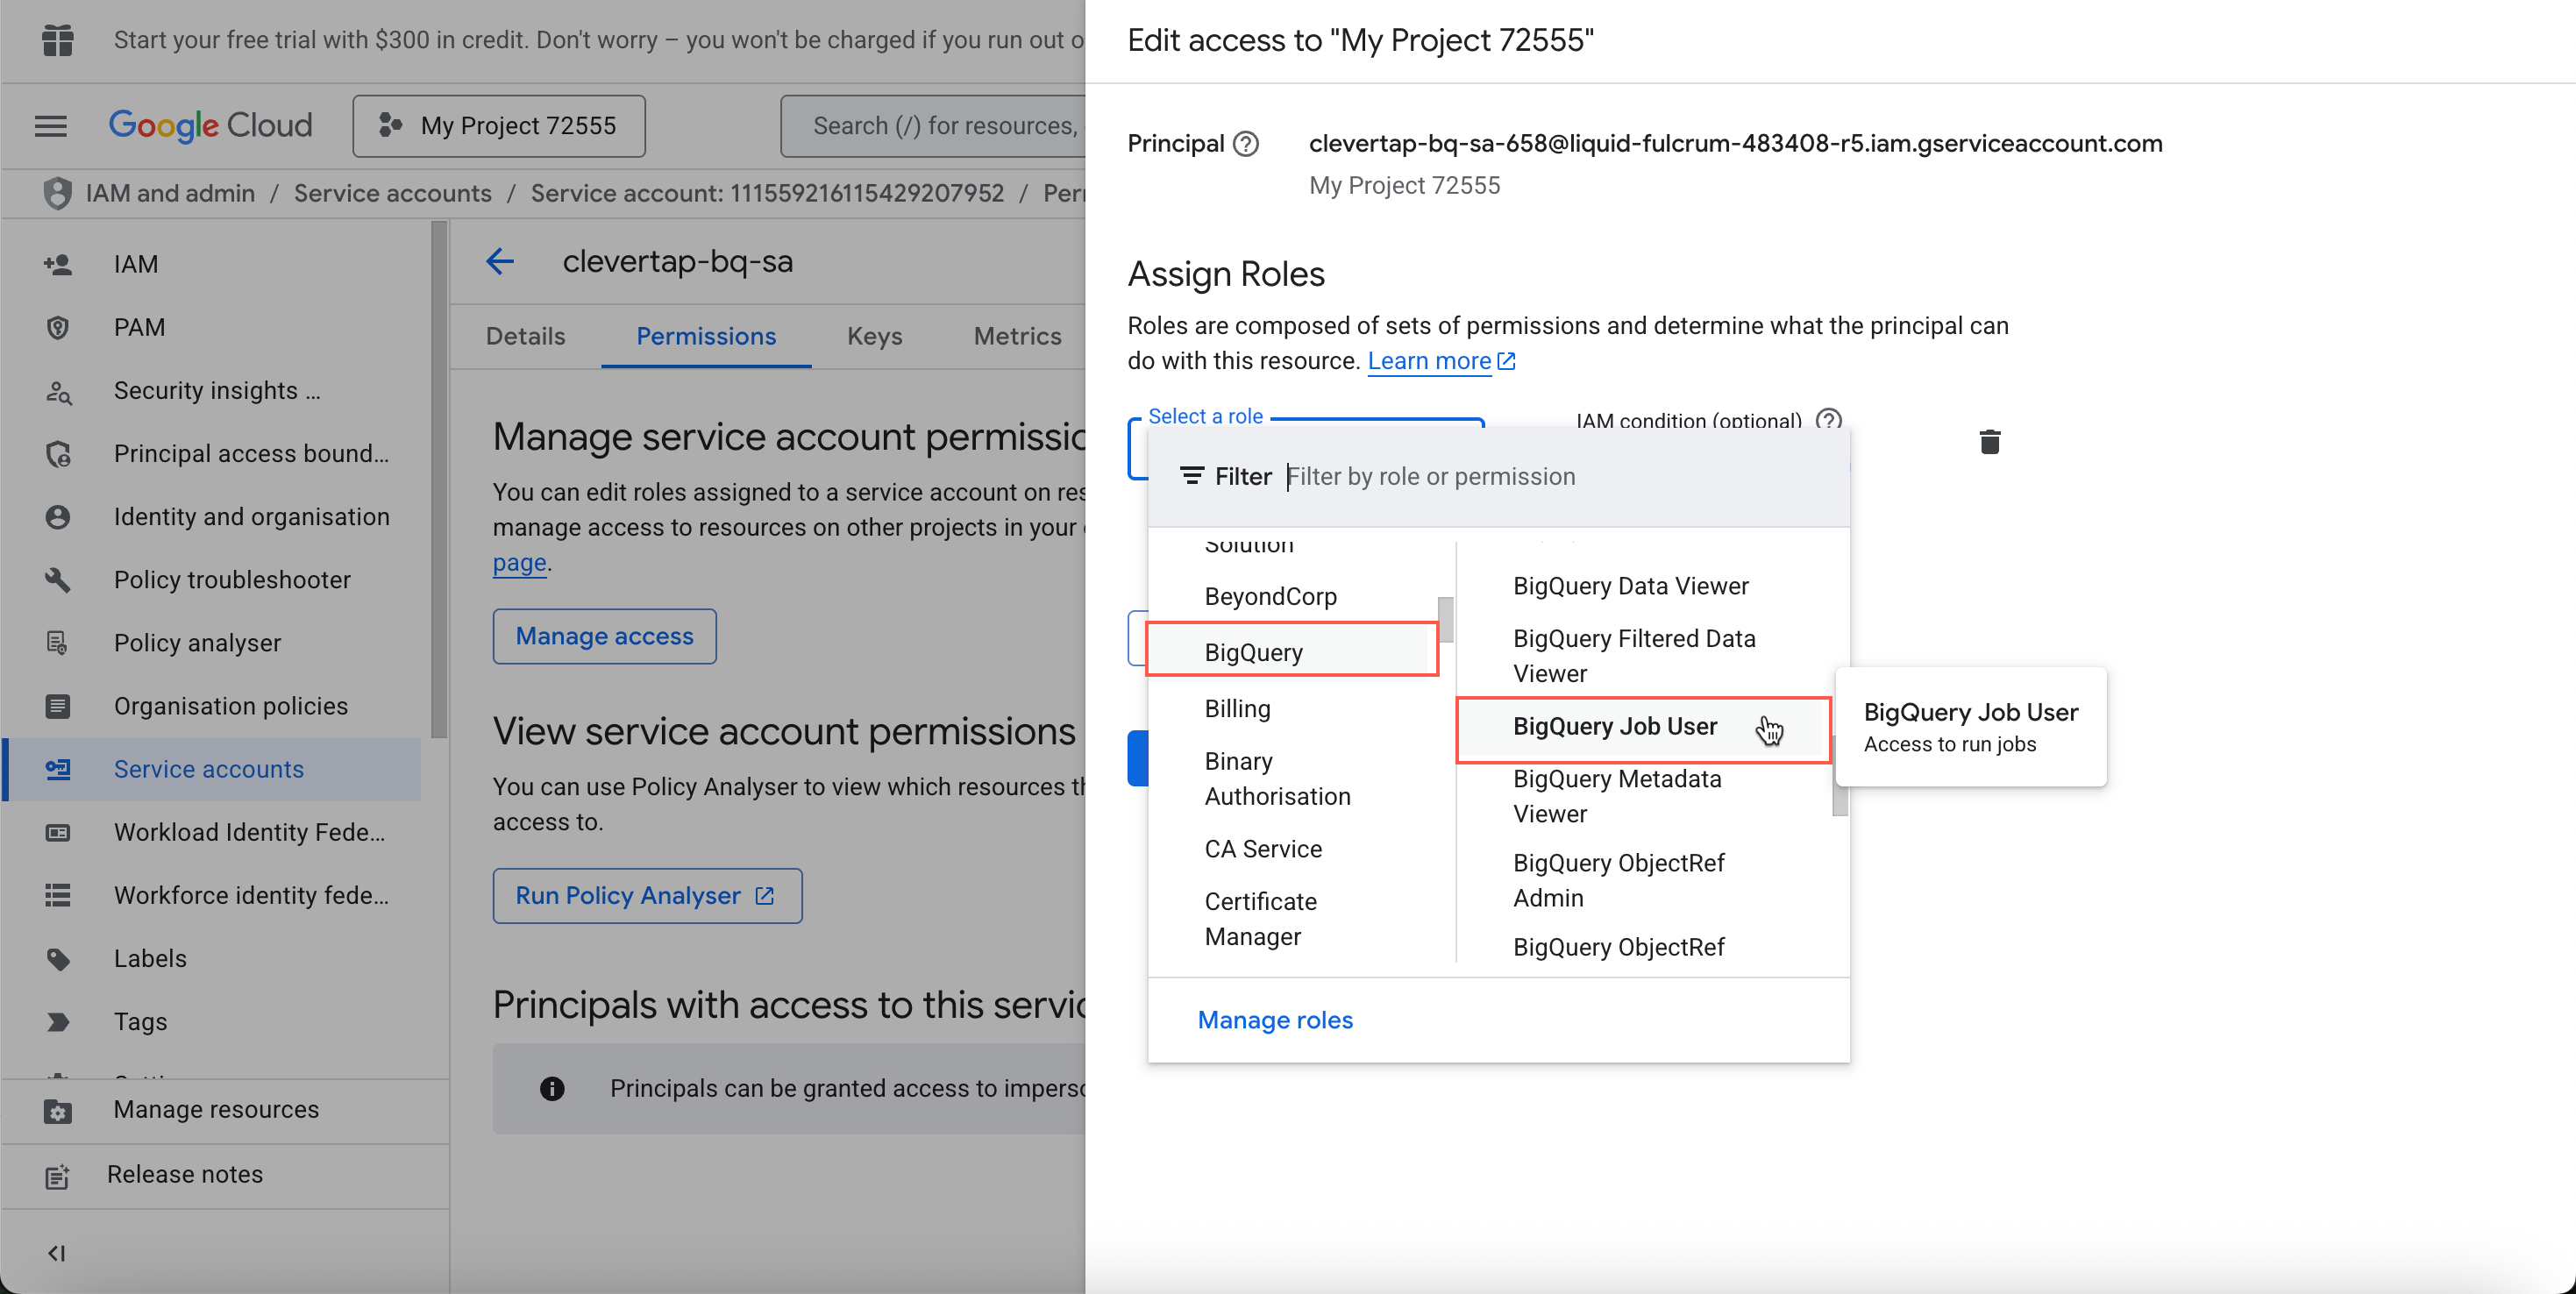
Add Roles
- Click Save. To learn more, refer to BigQuery IAM roles.
Create or Select BigQuery Dataset
Create a dataset for CleverTap to store and query data:
-
Go to BigQuery in the Google Cloud Console.
-
Select your project and click Create dataset.
-
Enter:
- Dataset ID (for example,
clevertap_dataset) - Location (must remain unchanged)
- Dataset ID (for example,
-
Click Create dataset.
Or use SQL:
CREATE SCHEMA IF NOT EXISTS `[ProjectID].[DatasetID]`;Create Service Account JSON Key
Generate a JSON key that CleverTap will use for authentication:
-
In the Google Cloud Console, click on
navigate to IAM & Admin > Service Accounts. -
Open the Keys tab.
-
Click Add key > Create new key.
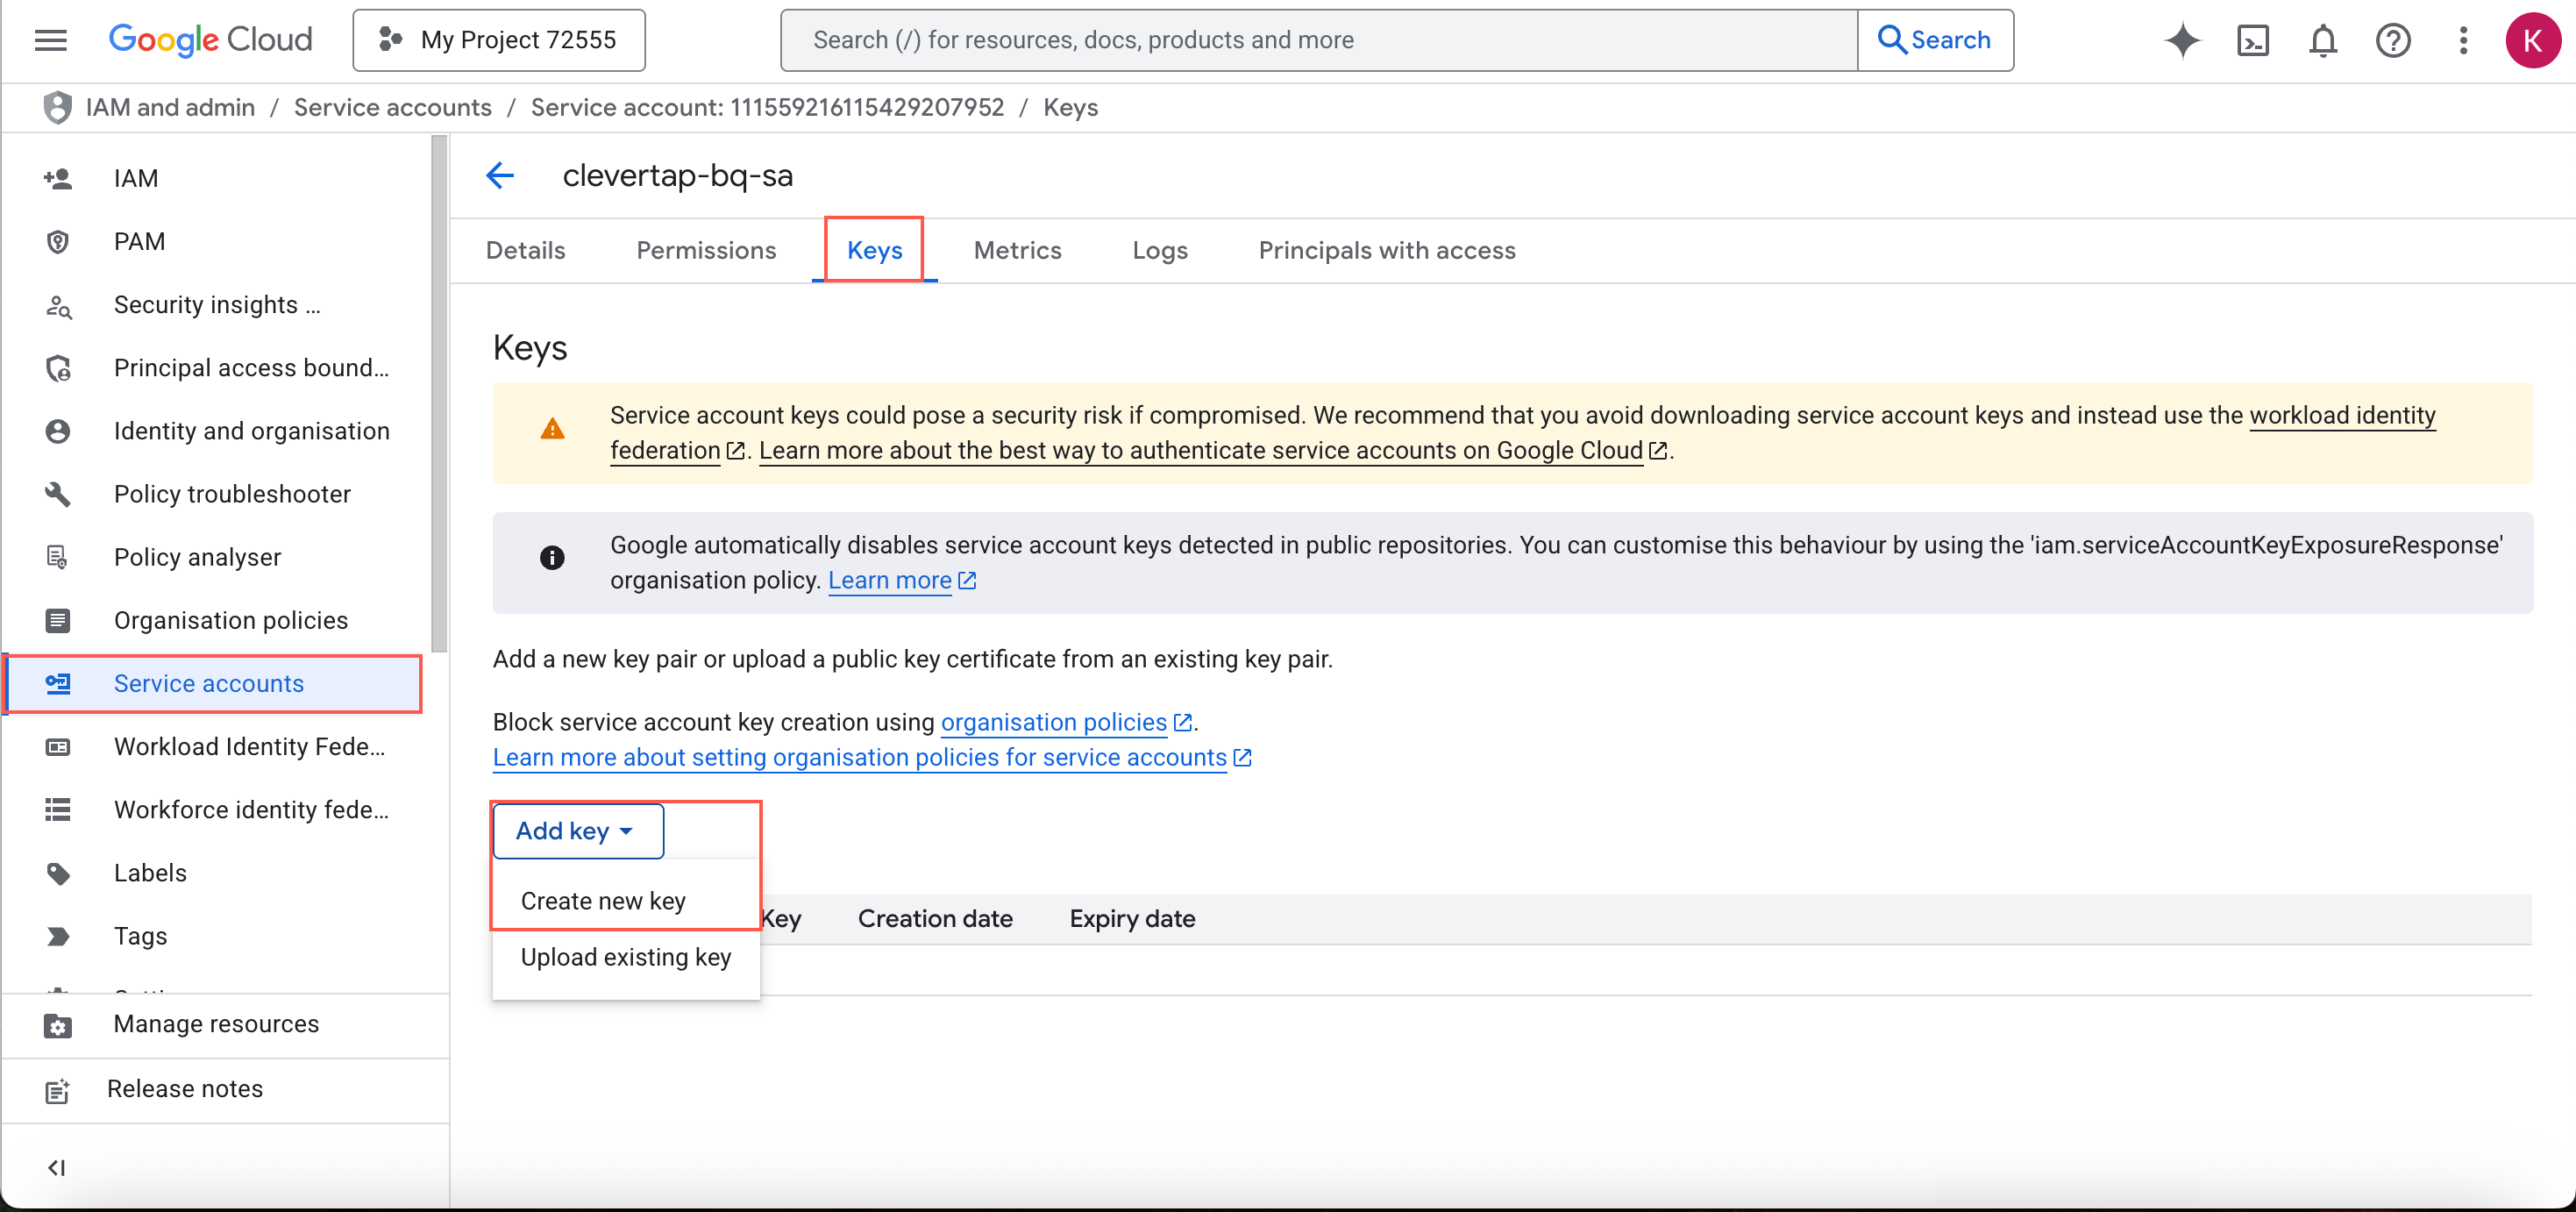
Create New key
-
Select JSON and click Create.
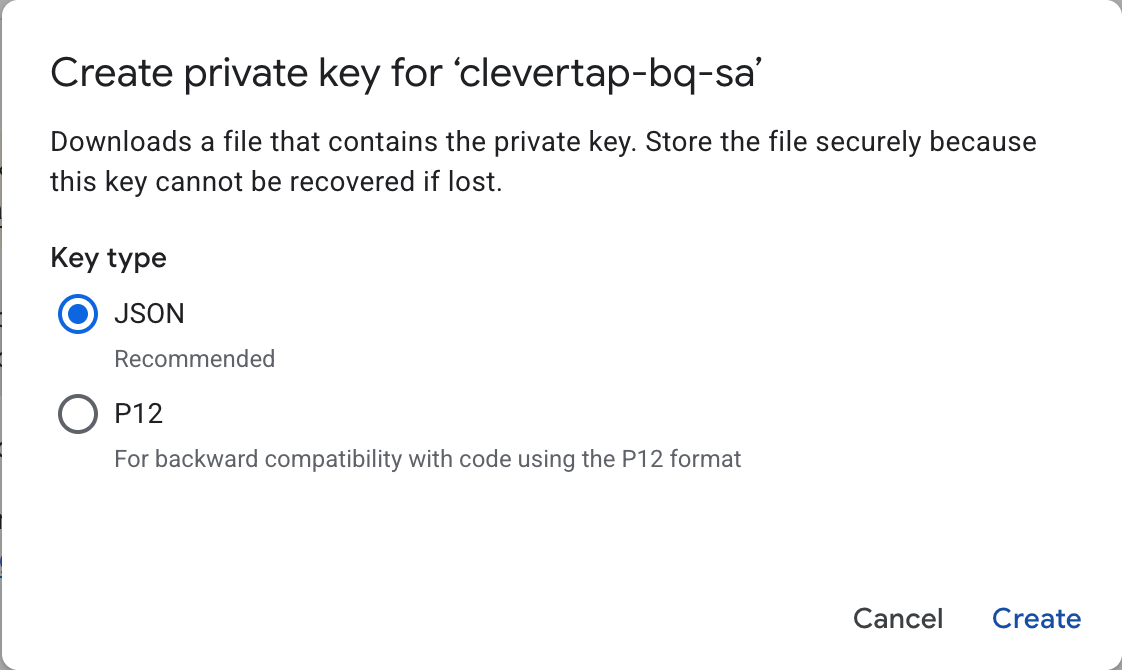
Create JSON Key
-
Download and securely store the JSON file.
NoteGoogle Cloud discourages long-lived keys. Rotate or revoke this key anytime to remove CleverTap’s access. Refer to Key Management Best Practices for more information.
Use Existing BigQuery Credentials
If you already have BigQuery set up, perform the following steps to find each detail on the BigQuery dashboard.
Find Your Project ID
To configure the integration, you need your BigQuery project identifier. Follow these steps to find it:
-
Open Project Picker next to the Google Cloud logo.
-
Copy the Project ID of the target project.
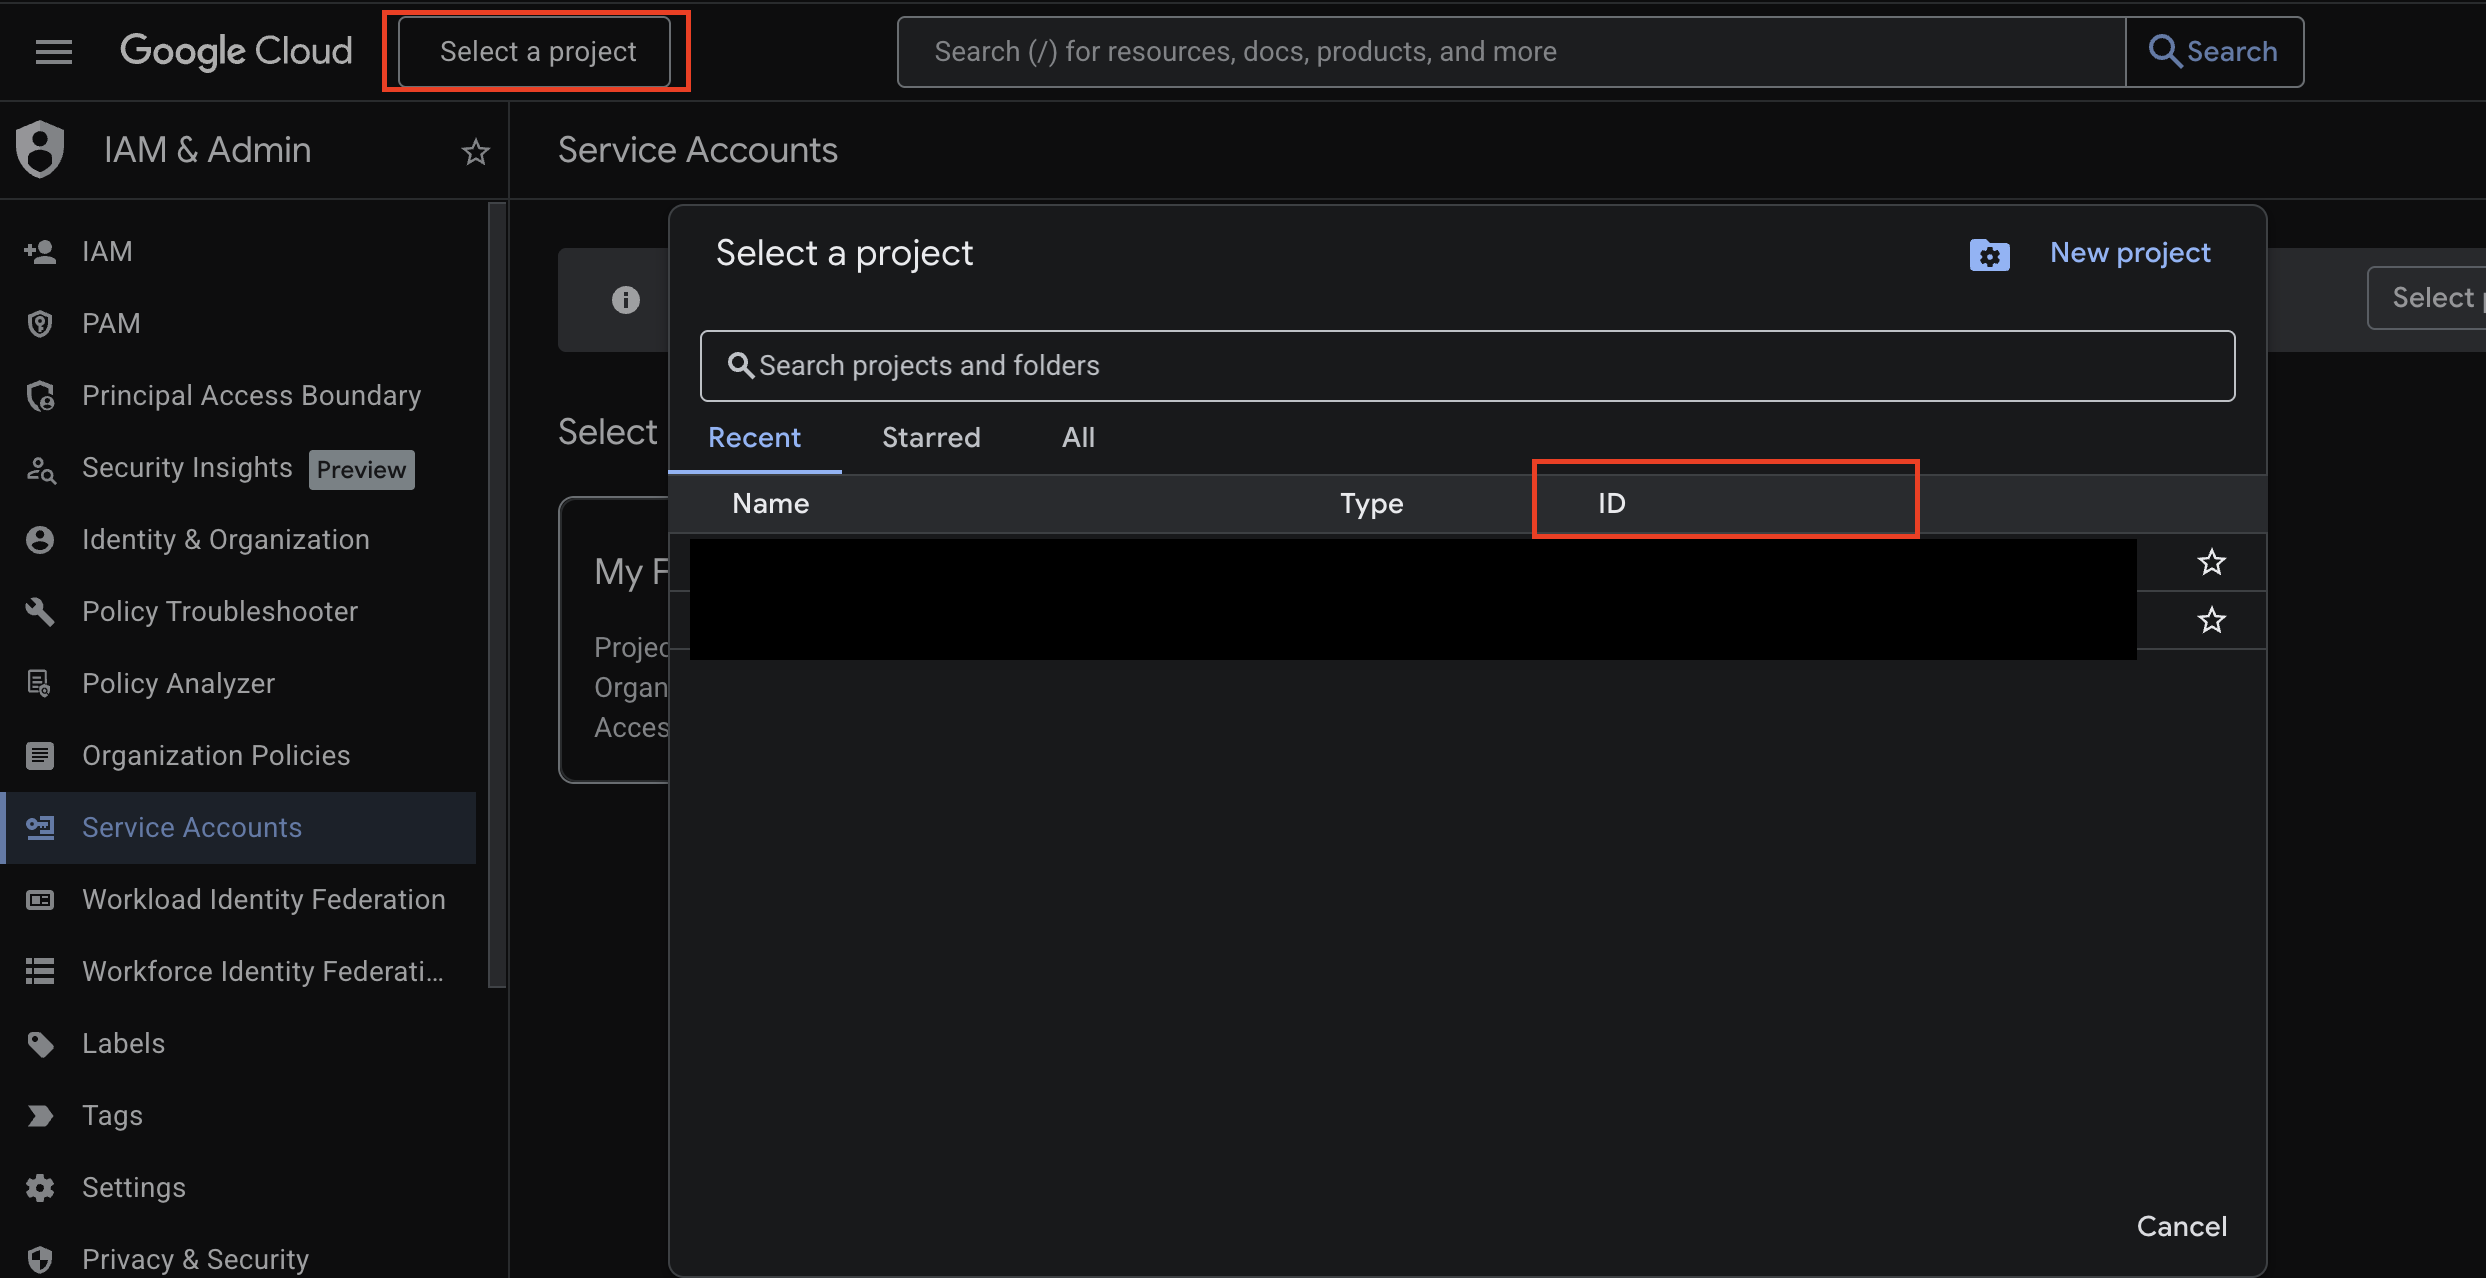
Find Project ID - BigQuery
Find Existing Dataset ID
To configure the integration, identify the dataset that CleverTap will use to read or write data in BigQuery.
- Go to BigQuery.
- Expand your project to view datasets.
- Select the dataset you intend to use with CleverTap.
Or use SQL:
SELECT schema_name FROM 'projectID'.INFORMATION_SCHEMA.SCHEMA;Find a Service Account
Locate an existing service account with the required permissions, or create one if needed.
-
Navigate to IAM & Admin > Service Accounts.
-
Select an existing service account with sufficient permissions, or create a new one with the following permissions.
Role Purpose BigQuery Job User Allows CleverTap to run BigQuery jobs BigQuery Data Editor Allows read/write access to datasets
Download or Create a Service Account JSON Key
To authenticate the integration, download an existing service account JSON key or create a new one from the Google Cloud Console.
- Select the service account.
- Go to the Keys tab.
- Create a new JSON key if needed.
Set Up CleverTap Dashboard for Integration
After preparing your BigQuery project, dataset, and service account, connect BigQuery to CleverTap using the collected values.
Integrate BigQuery with CleverTap
To set up CleverTap dashboard for intergration, perform the following steps:
- Go to Settings > Partners > BigQuery and select Add Database.
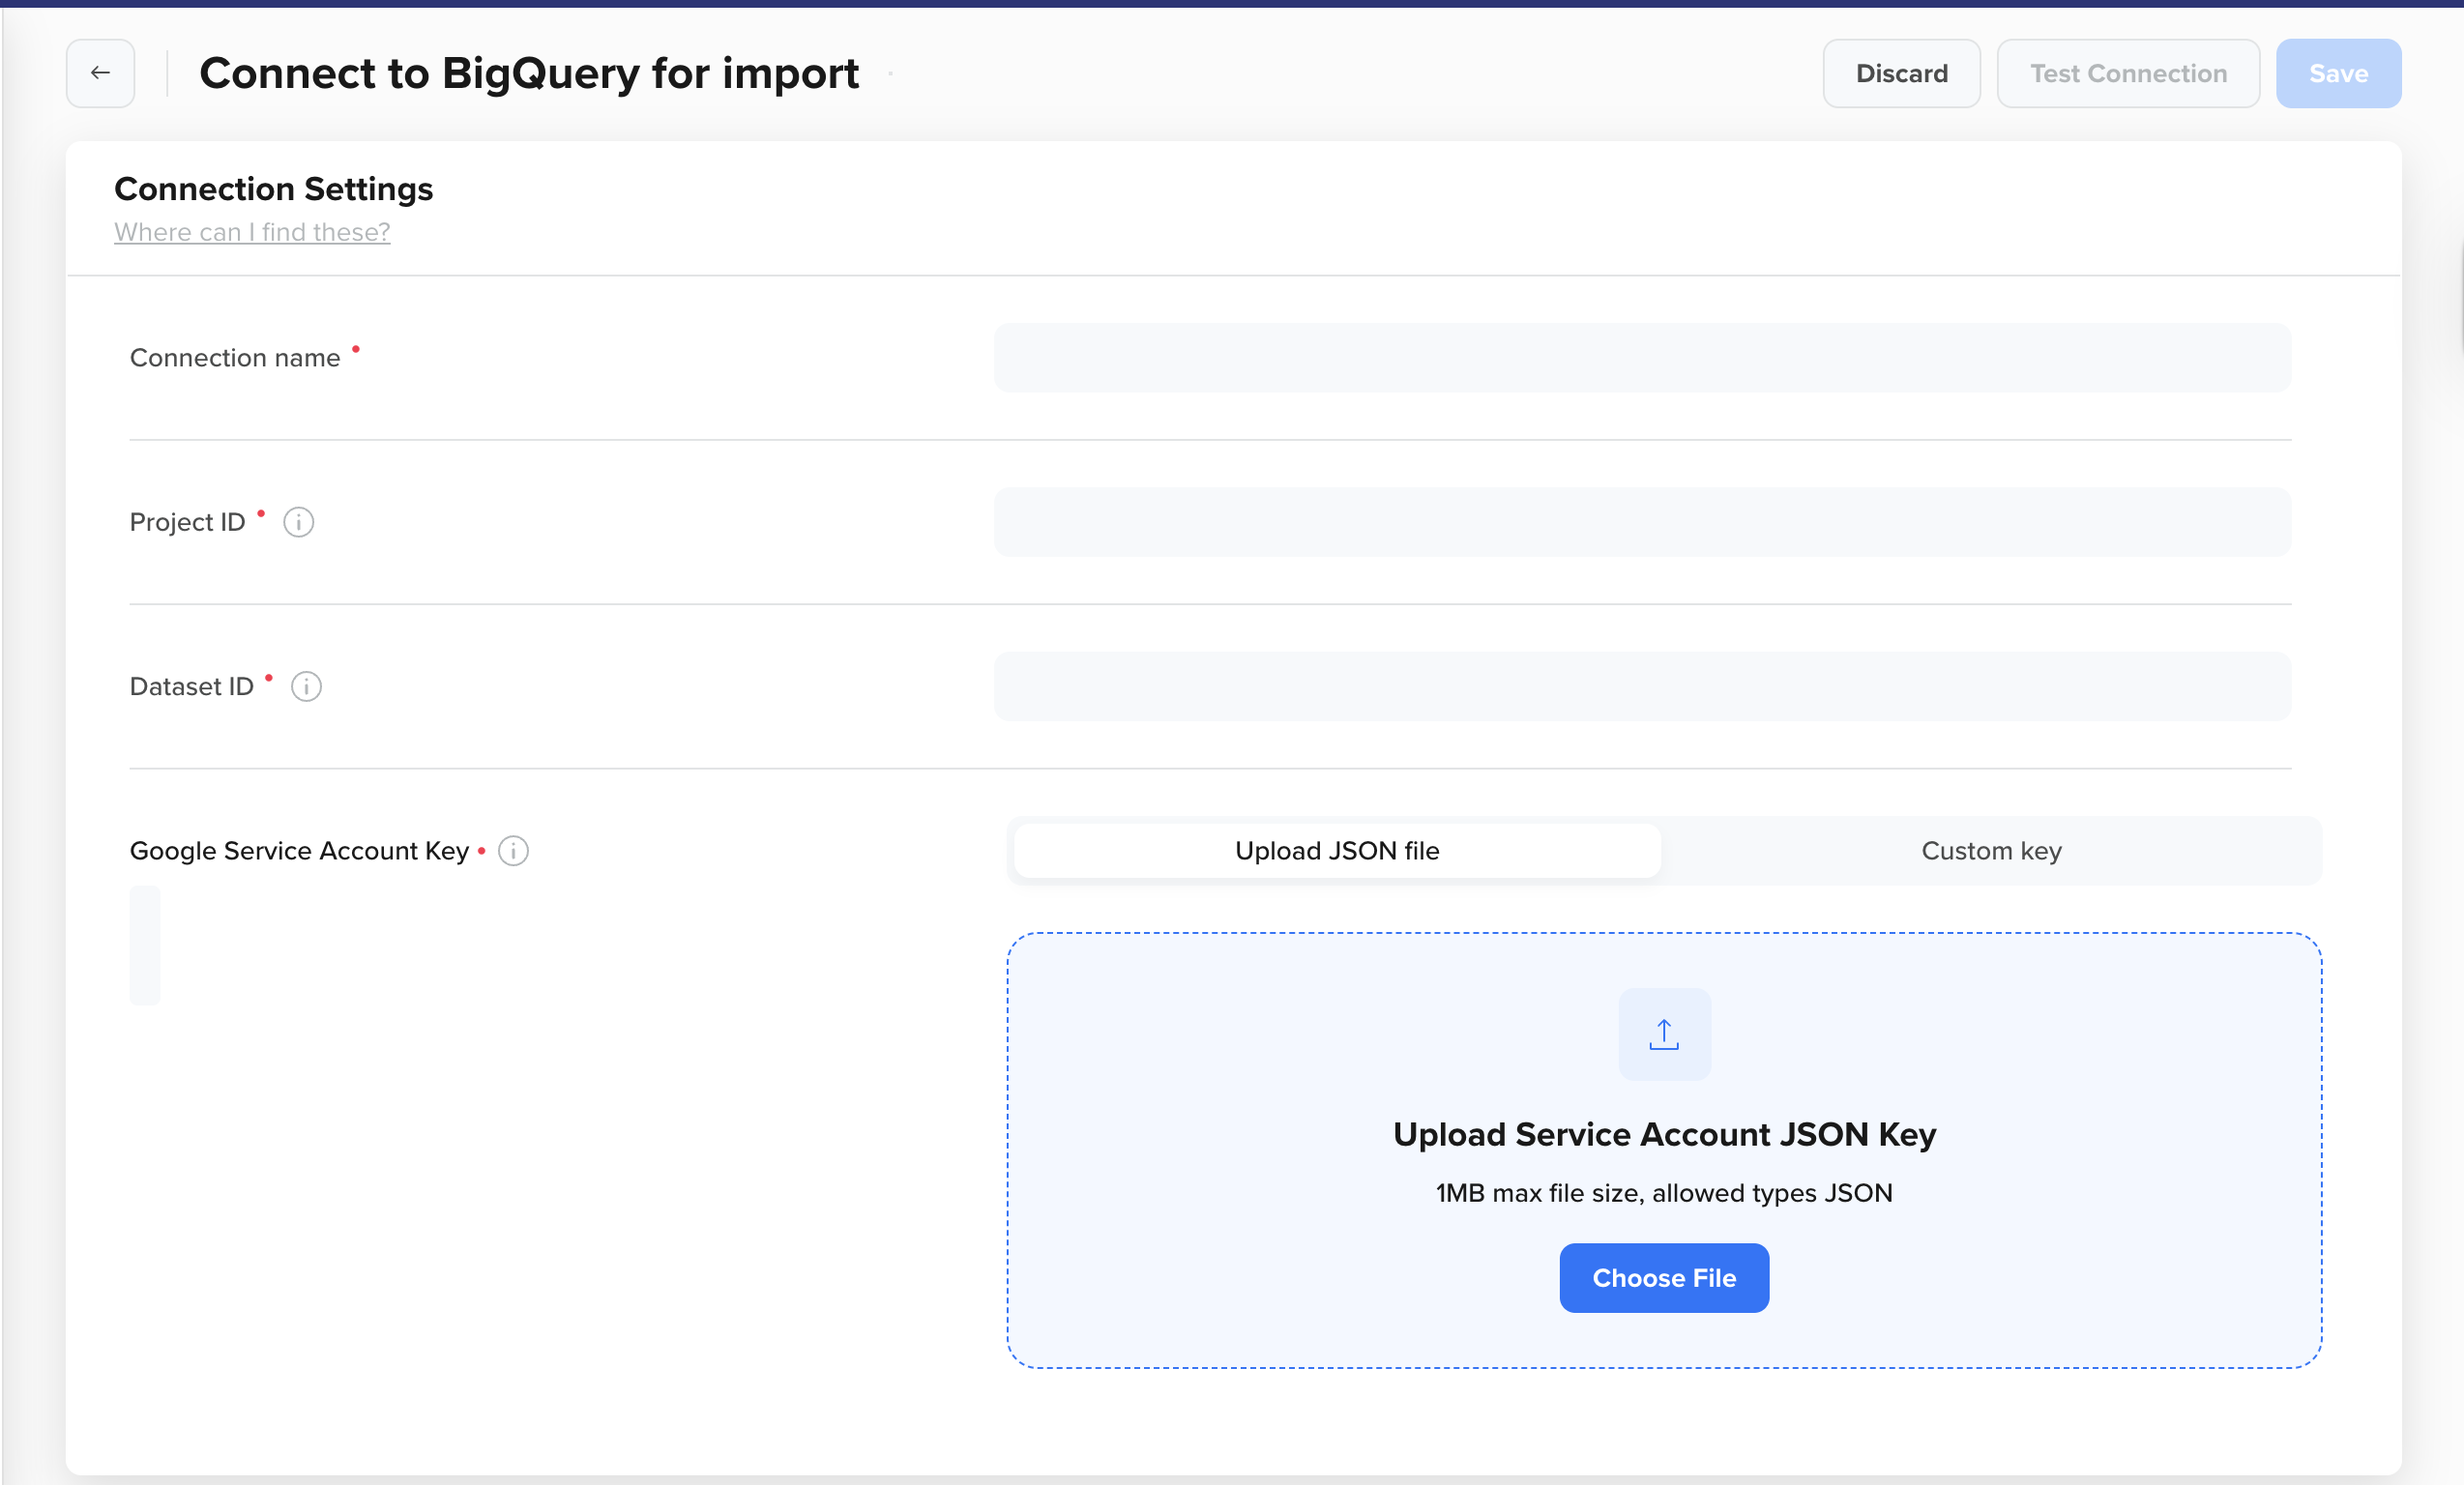
- Enter the following details:
| Field | Description |
|---|---|
| Connection name | A unique name for this BigQuery connection. |
| Project ID | The Google Cloud project ID. |
| Dataset ID | The dataset where CleverTap will read and write data. |
| Google Service Account Key | In the Upload JSON file tab, upload the JSON key generated during Create Service Account JSON Key. Alternatively, use the Custom key tab to paste the JSON content directly. |
-
Click Test Connection or Save:
- Test Connection: Verifies project access, dataset validity, and service account permissions.
- Save: Stores the connection for use with imports.
-
After saving the connection, navigate to Create Import in the Import Connections dashboard.
FAQs
This section addresses common questions about managing BigQuery connections and imports in CleverTap.
How can I delete a connection that has running imports?
Go to Import Connections and select the connection. Click on Delete and review any active imports. If there are any imports in Ready, Schedule, paused, or running states, stop all active imports associated with that connection. Ensuring all imports are stopped, click Delete again and confirm your action.
How can I filter import connections?
Use the filters on Import Connections to refine the list:
- Connected On: Filter by creation date.
- Connected By: Filter by the user who created the connection.
How can I whitelist IPs for CleverTap integration?
To ensure seamless communication between CleverTap and your systems, whitelist the required IP ranges. To access the list of IPs to whitelist for import integrations, refer to CleverTap IP Ranges for Import.