Sendbird Business Messaging
Messenger Partner
Overview
Sendbird Business Messaging empowers Product, Operations, Support, and Engineering teams with software and API to message customers through their apps. This document is a comprehensive guide for integrating Sendbird and CleverTap. This integration helps you to send In-App notifications via CleverTap using Sendbird Business Messaging Builder, a Chrome extension.
Prerequisites for Integration
Ensure that you have the following:
- Sendbird account
- CleverTap account
Integrate CleverTap with Sendbird
To set up the CleverTap integration with your Sendbird account:
Set Up Sendbird Dashboard
- Log in to your Sendbird account and navigate to Settings > Integrations.
- Select CleverTap from the available integrations.
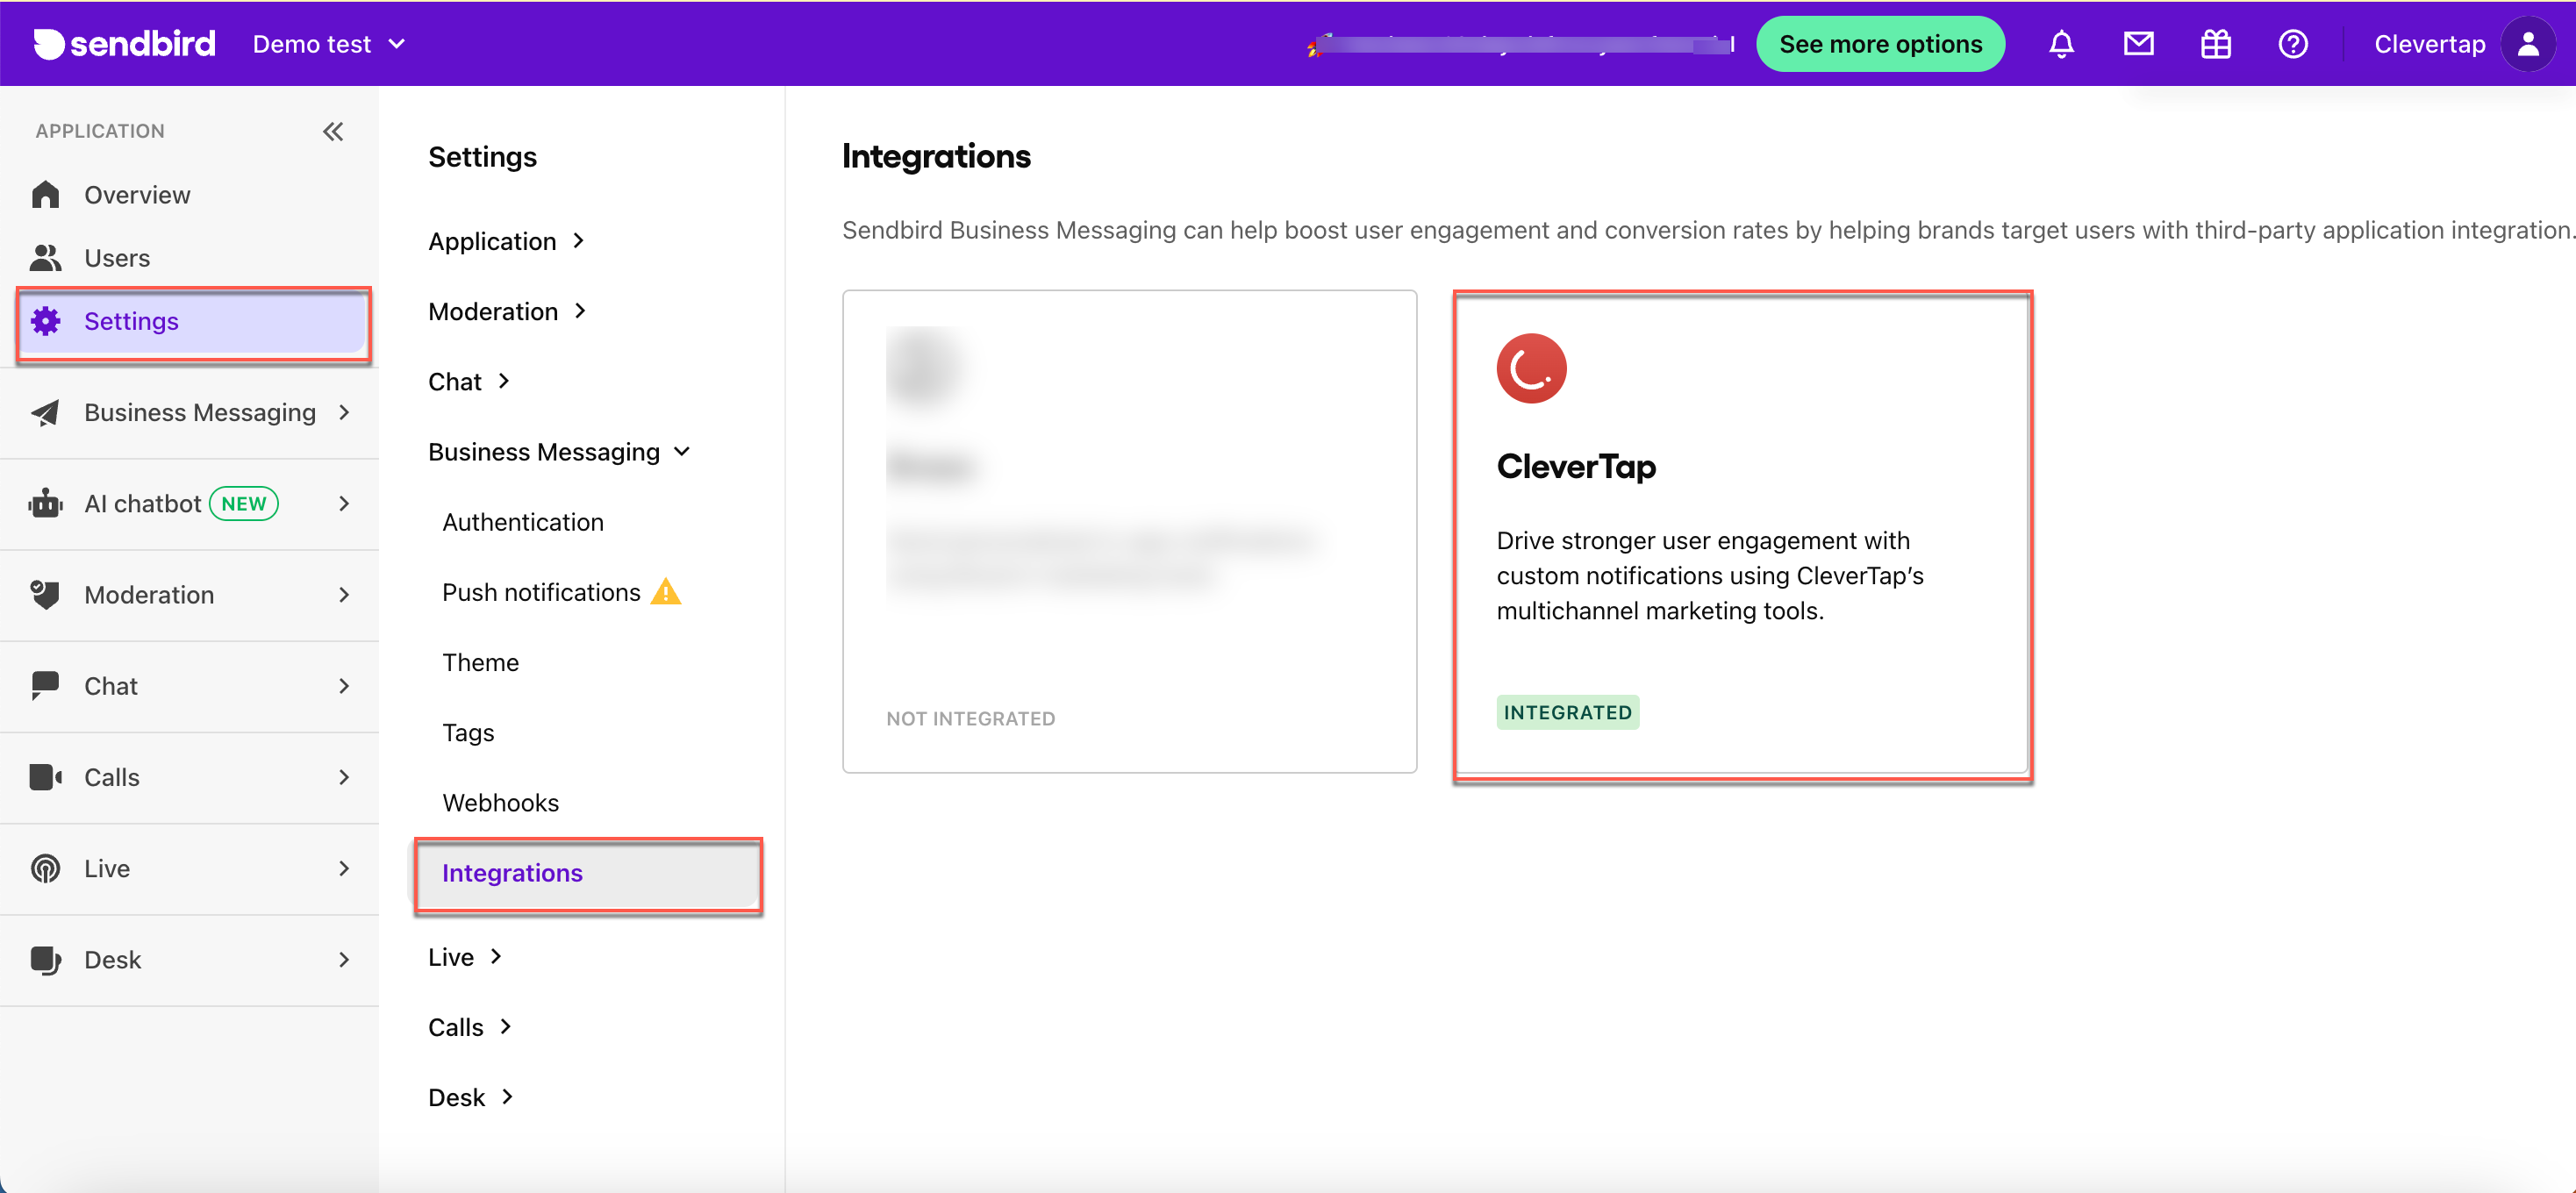
CleverTap Integration on Sendbird Dashboard
- Toggle ON the Event callback option to set up and track campaign metrics. This step is optional.
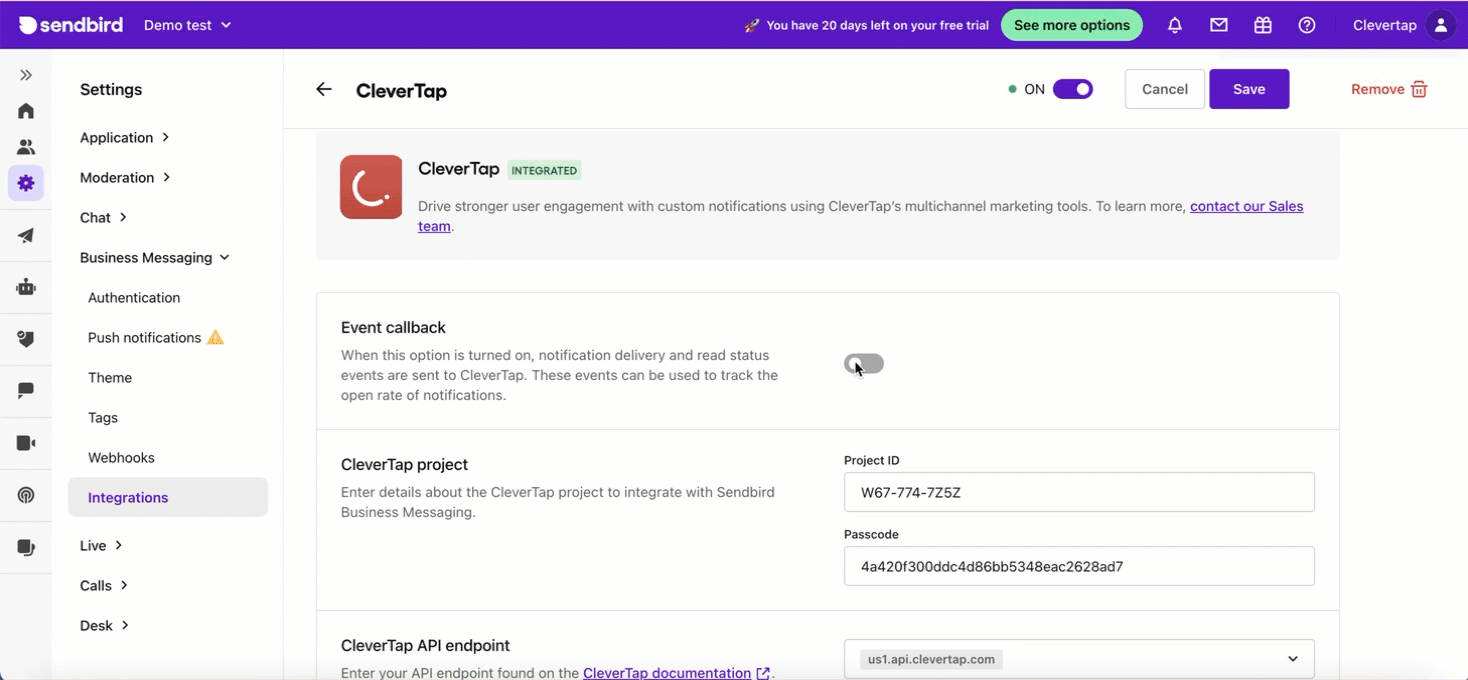
Sendbird Event Callback
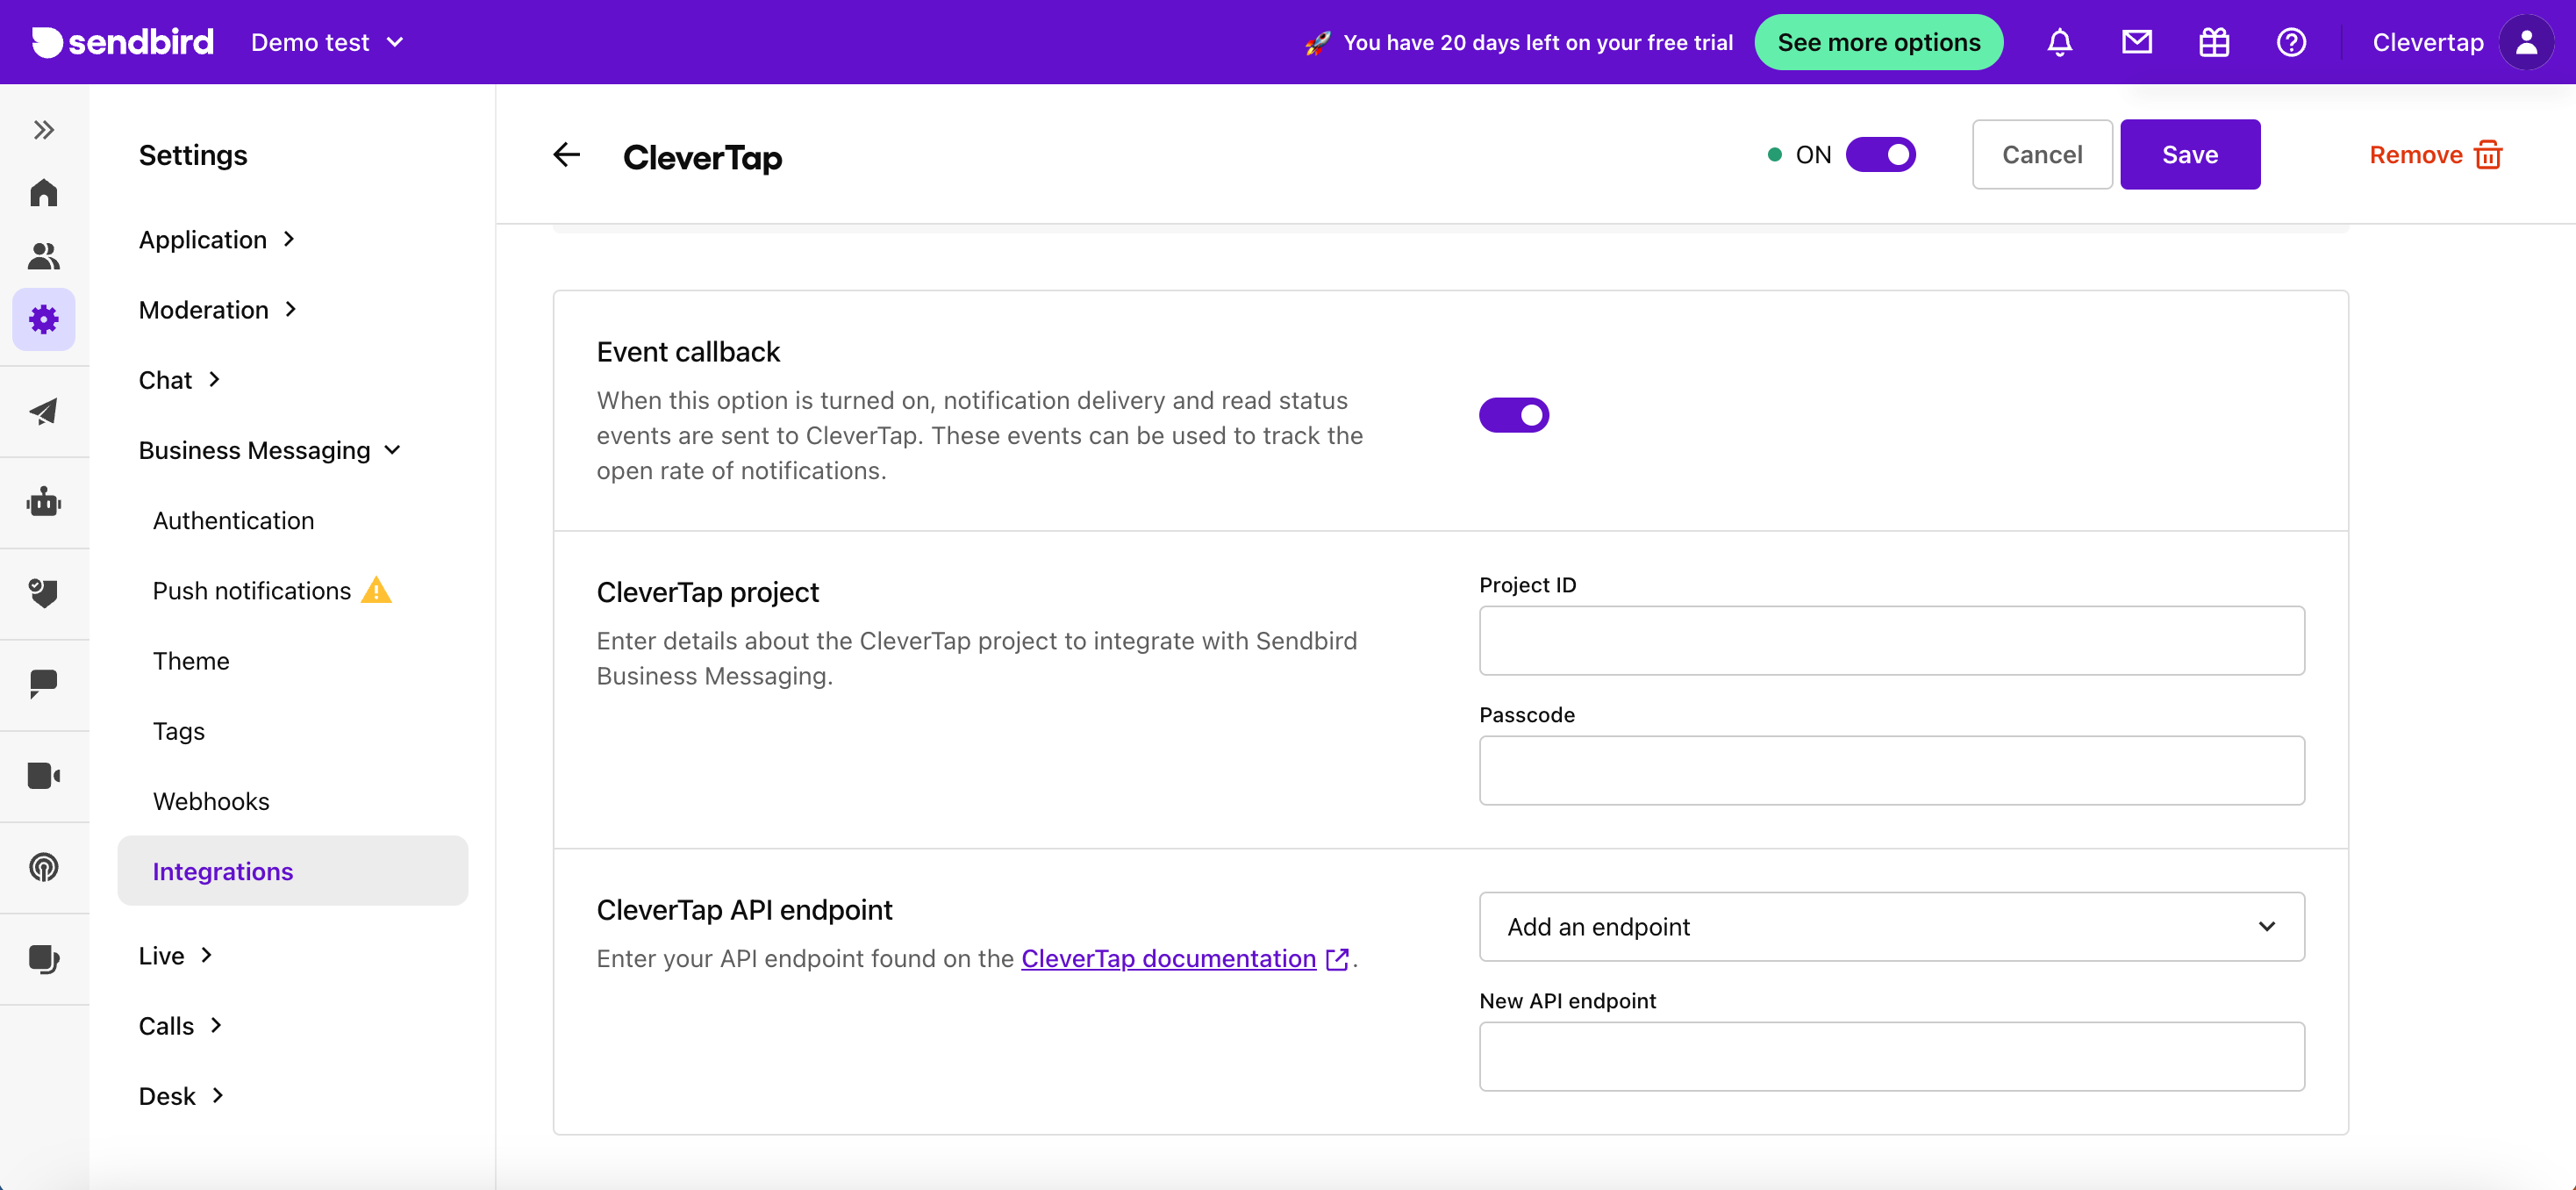
- Enter the following details:
- Project ID: You can obtain the Project ID by navigating to the Settings > Project page of the CleverTap dashboard.
- Passcode: To find the passcode for your project, refer to Account Passcode.
- API endpoint: To find the API endpoint for your region, refer to API endpoints based on your data center region.
Sendbird Project ID, Passcode and API endpoint
You can find these details on the CleverTap dashboard by navigating to the Settings > Project page.
-
Select from the following configurations and click Save
| Endpoint | Description |
| :--------------------- | :----------------------------------------------------------------------------------------------------------------------------------------------------------------------------------------------------------- |
| Event callback | Determines whether to send the delivery and read status of a notification to CleverTap. For more information, refer to CleverTap custom events. |
| Project details | Specify the project ID and passcode under Settings > Project on the CleverTap dashboard. |
| CleverTap API endpoint | Specifies the CleverTap API endpoint. Copy and paste the API endpoint under API in the CleverTap documentation based on your data center region | -
Install Sendbird Business Messaging Builder.
Install the Sendbird Business Messaging Builder Chrome extension. The extension link is present under Business Messaging > Integrations > CleverTap on the Sendbird Dashboard. Copy the App ID and API Token for further configuration.
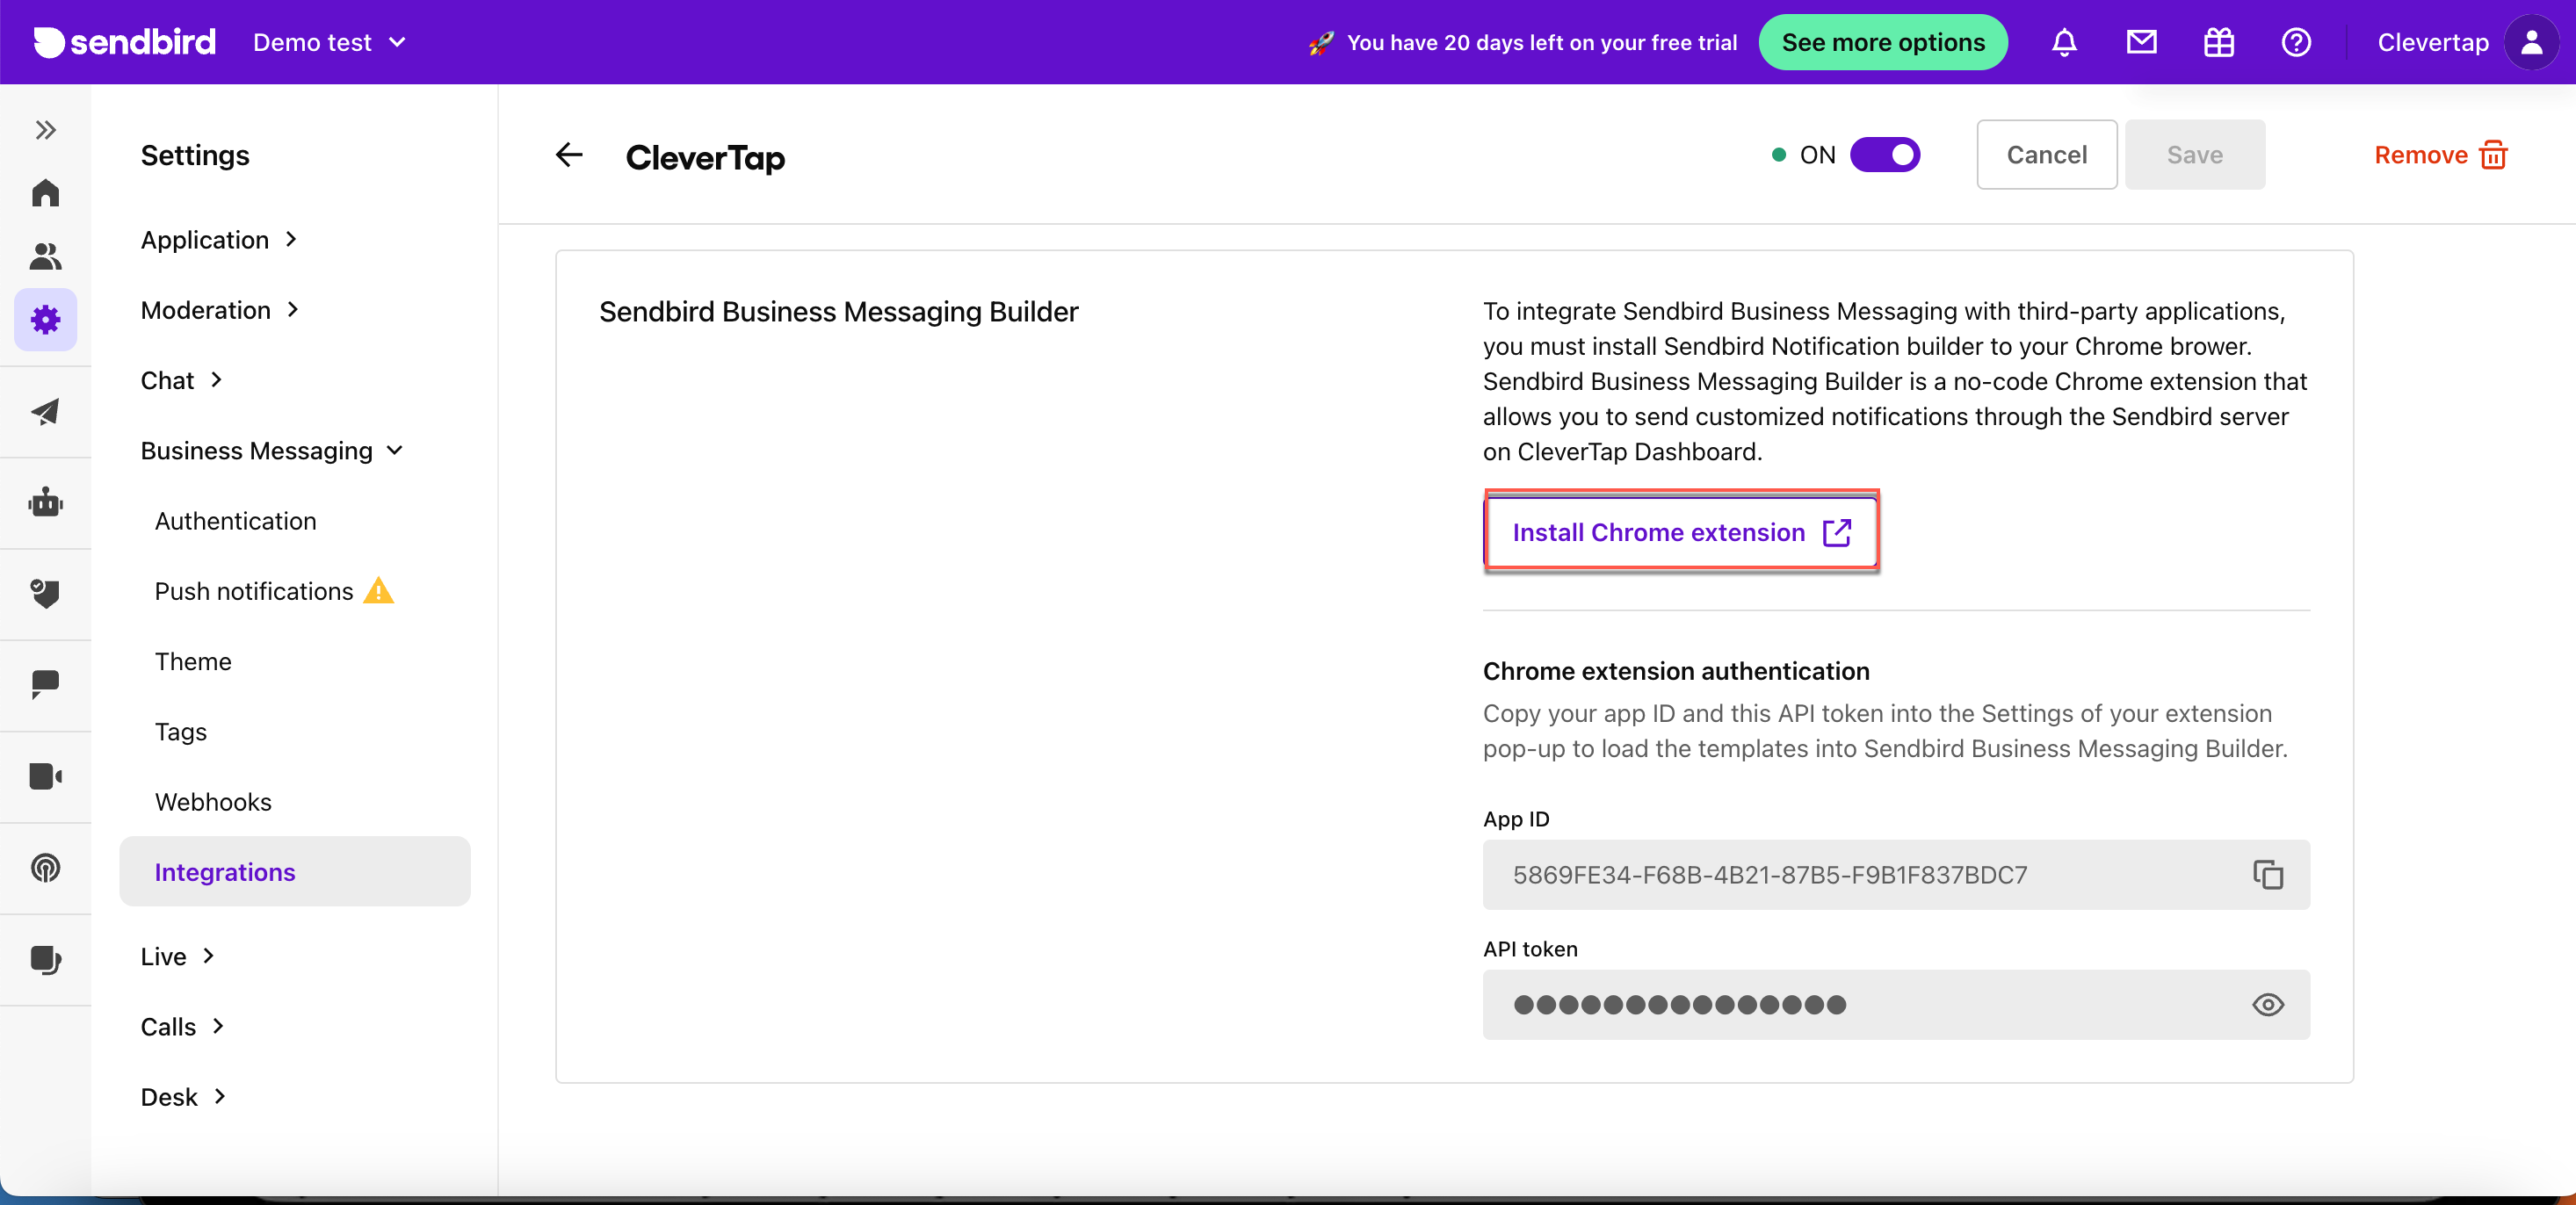
Sendbird Chrome Extension
- Access the extension by clicking the Sendbird Business Messaging Builder icon in your Chrome browser and then click Go to Settings.

Sendbird Settings
- Enter your App ID and API token to load the created templates into the Sendbird Business Messaging Builder.

Sendbird Authentication
Create a Template on Sendbird Dashboard
Create a Webhook template on the Sendbird Dashboard under Business Messaging > Template > Create Template +. Once the template is built on Sendbird, individuals or brands can utilize it to send personalized notifications through multiple channels when launching campaigns from the CleverTap dashboard. For instructions on building a template on Sendbird, refer to this link.
Set Up CleverTap Dashboard
To set up CleverTap Dashboard:
- Navigate to Settings > Channels > Webhooks on the CleverTap dashboard.
- Click + Add Webhook to begin adding a new webhook.
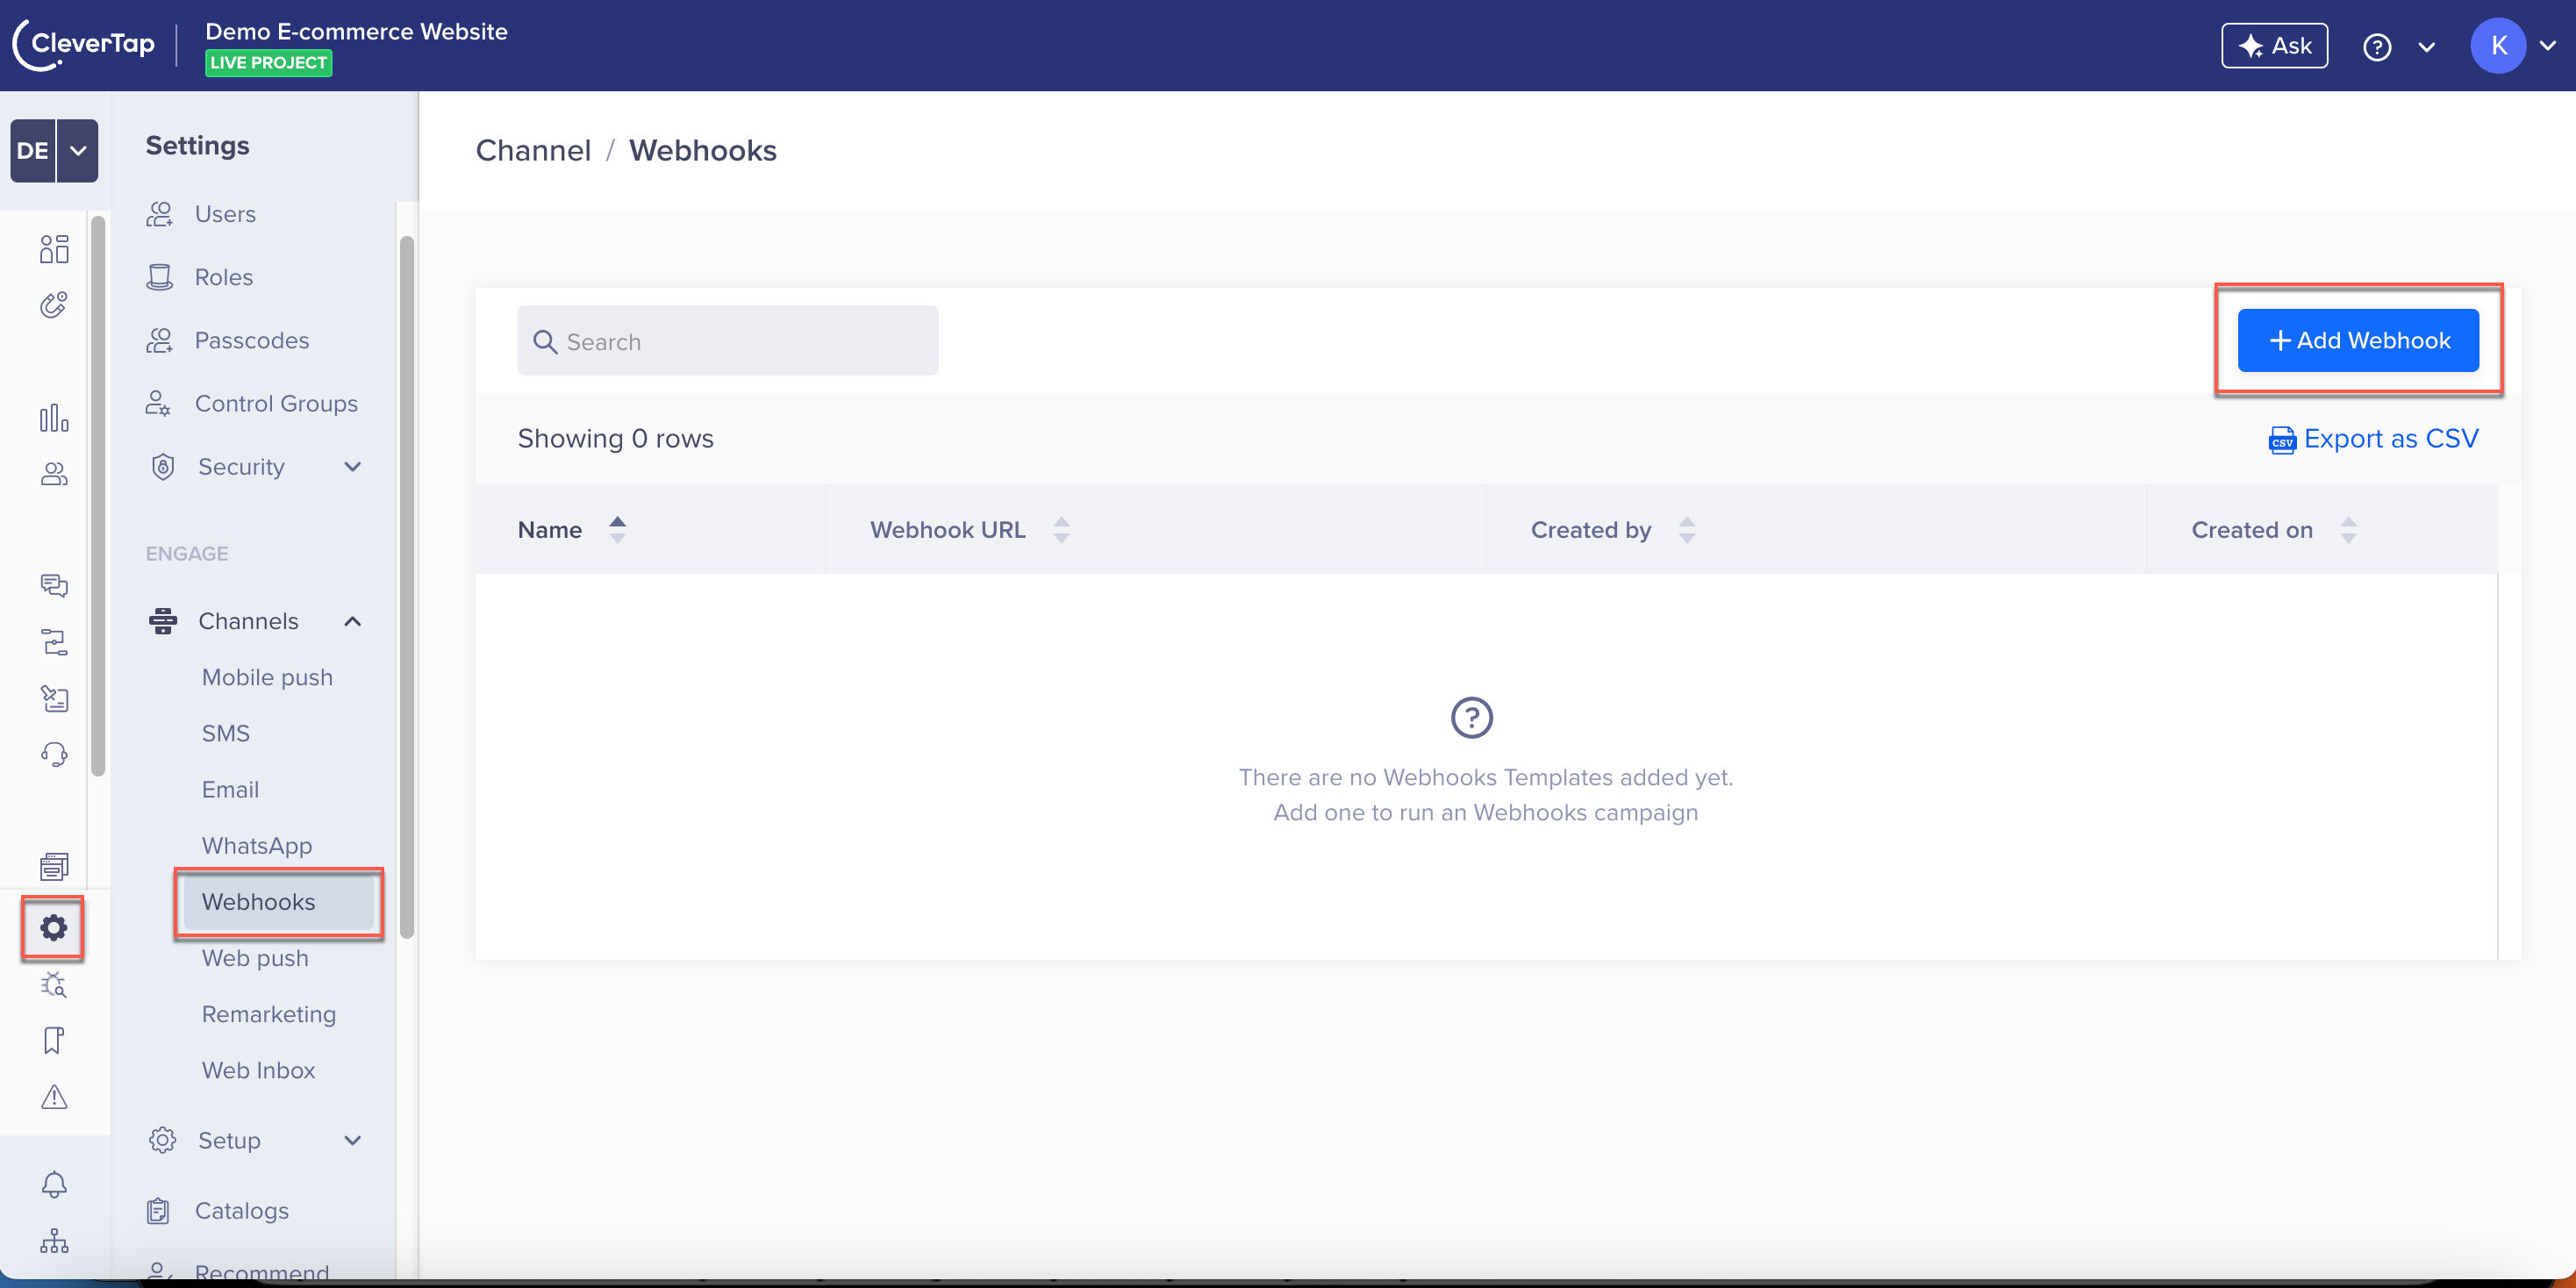
Clevertap Add Webhook
- Enter the following details and click Save:
  <th>
    Description
  </th>
</tr> <td>
Enter the webhook name. CleverTap recommends naming the webhook **Sendbird single** or **Sendbird multi** for each endpoint.
</td>
</tr>
<tr>
<td>
HTTP method
</td>
<td>
Select the desired action. In this case, you must set it to *POST*.
</td>
</tr>
<tr>
<td>
Destination URL
</td>
<td>
Navigate to **Business Messaging > Integrations > CleverTap** on the Sendbird dashboard to select one of the following CleverTap integration endpoints:
- **single**: Select this endpoint to send real-time notifications to users as soon as a specific event occurs. Sending a large batch of notifications at once through this endpoint could result in [rate limiting](https://sendbird.com/docs/chat/platform-api/v3/application/understanding-rate-limits/rate-limits#1-rate-limits). The endpoint is in the following format: `https://api-{'{app_id}'}.notifications.sendbird.com/clevertap/notifications/single`
- **multi**: Select this endpoint to send notifications to a large group of users. Notifications are not sent in real-time but can be delivered to a significant number of target users simultaneously without encountering rate limit problems. The endpoint is in the following format: `https://api-{'{app_id}'}.notifications.sendbird.com/clevertap/notifications/multi`
</td>
</tr>
<tr>
<td>
Key
</td>
<td>
Enter the API token to authenticate. Add a key-value pair with `Api-token` as a key, and copy and paste the CleverTap Integration API token from the Sendbird dashboard under **Business Messaging > Integrations > CleverTap** as a value
</td>
</tr>Create a Campaign on CleverTap Dashboard
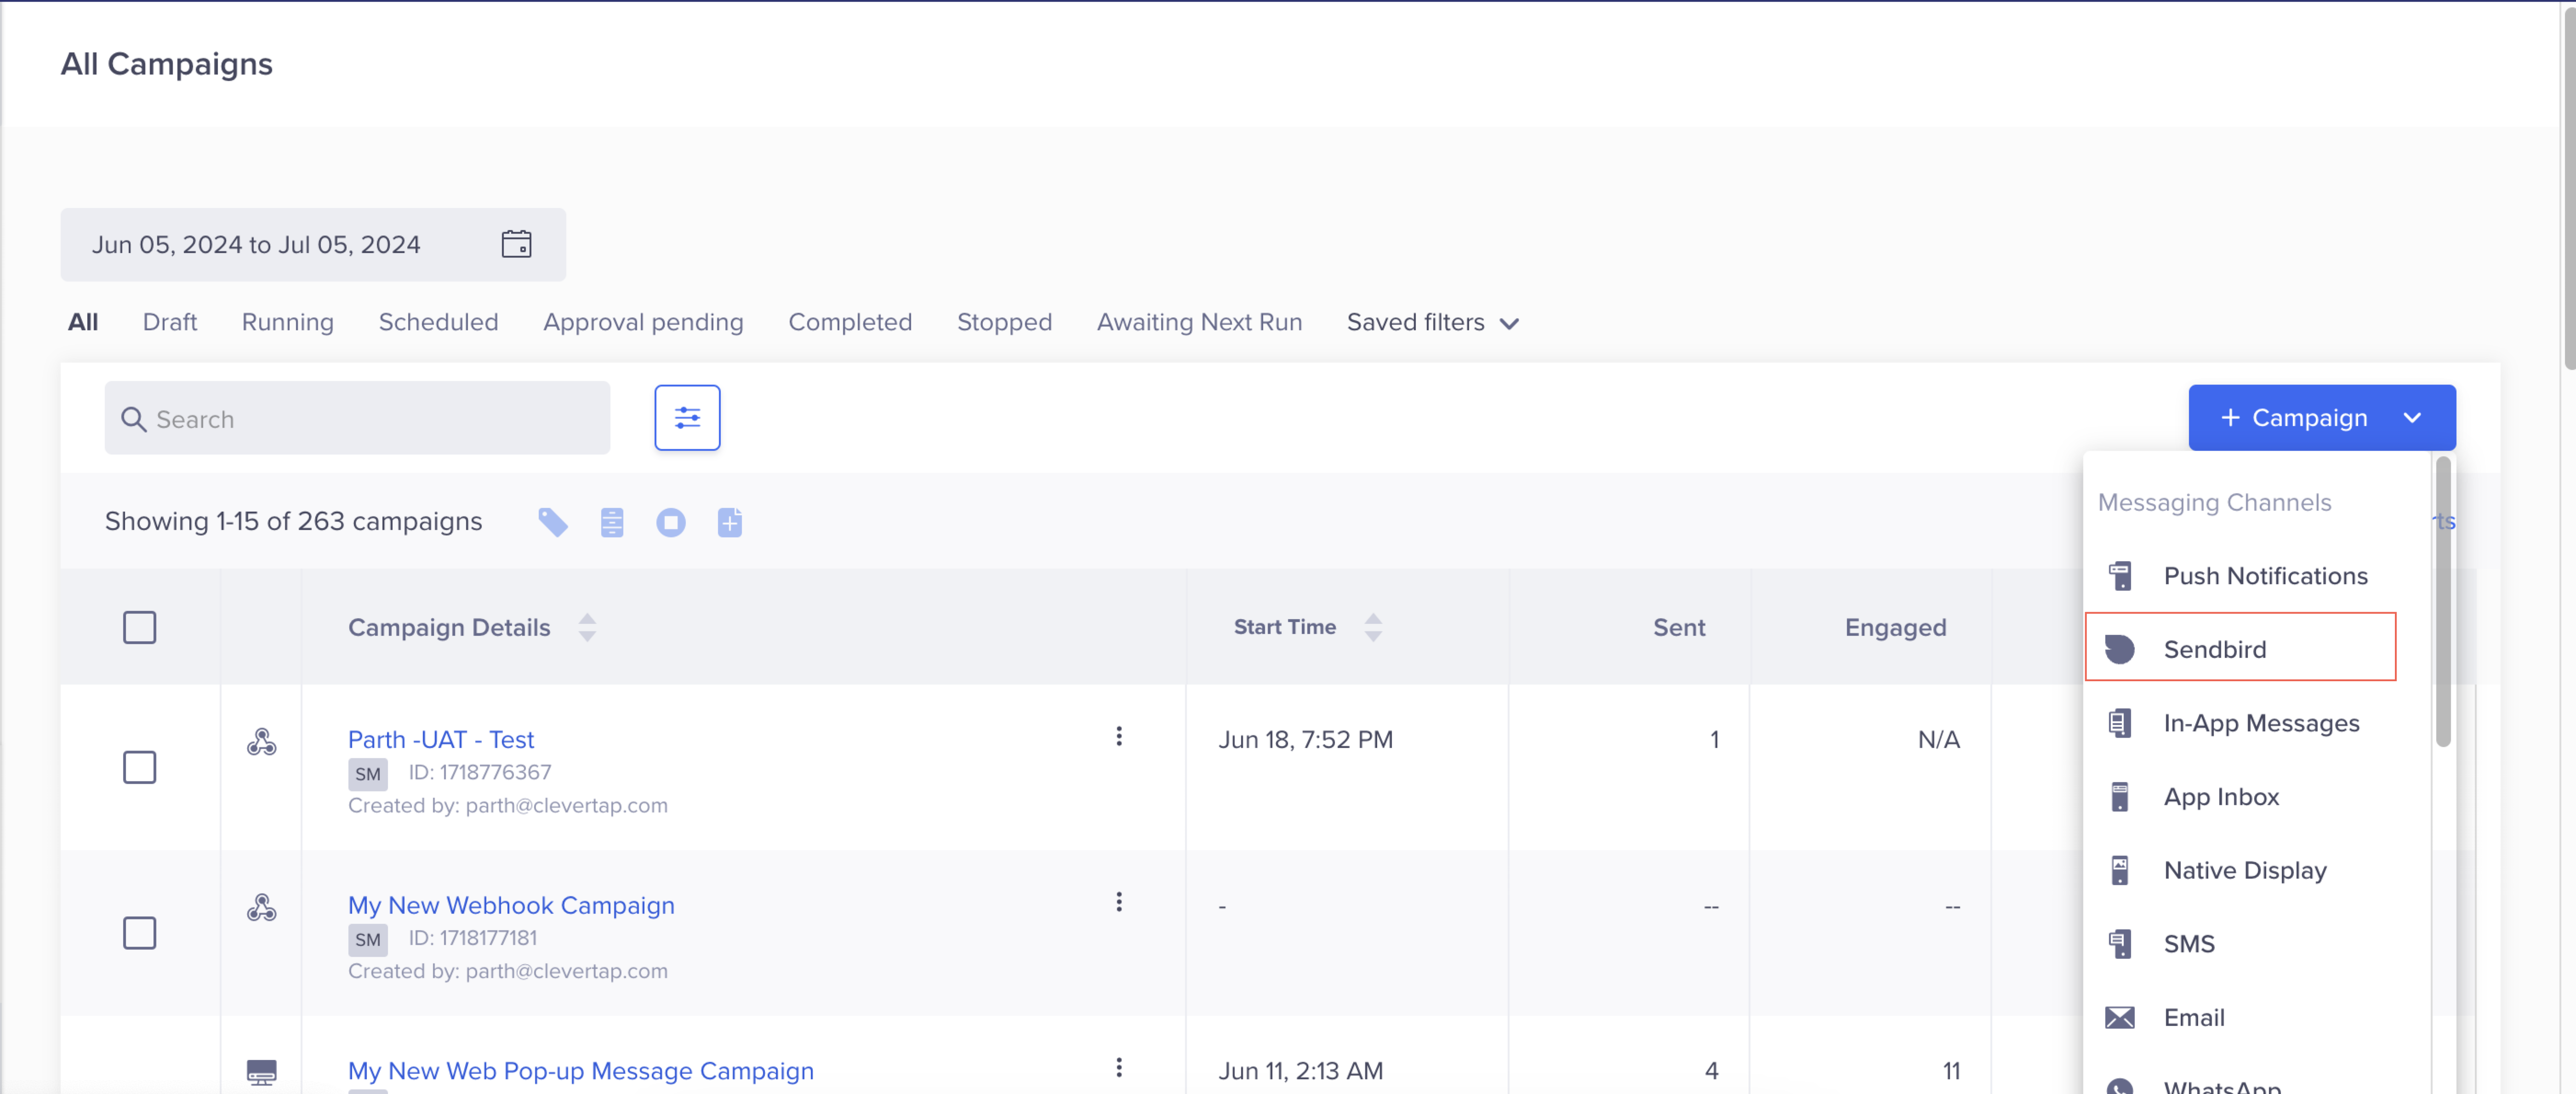
To send a notification using the CleverTap dashboard, go to the Campaigns page and select Sendbird from the list of messaging channels.
Sendbird Integration Successful
Download the Chrome ExtensionTo integrate SendBird directly into the messaging channels on CleverTap, it's essential to download the Chrome extension. This lets you view integrated fields from SendBird in the campaign editor on CleverTap.
Go to the Campaigns page from the CleverTap dashboard and click + Campaign. The integration is successful if Sendbird appears in the list of Messaging Channels.
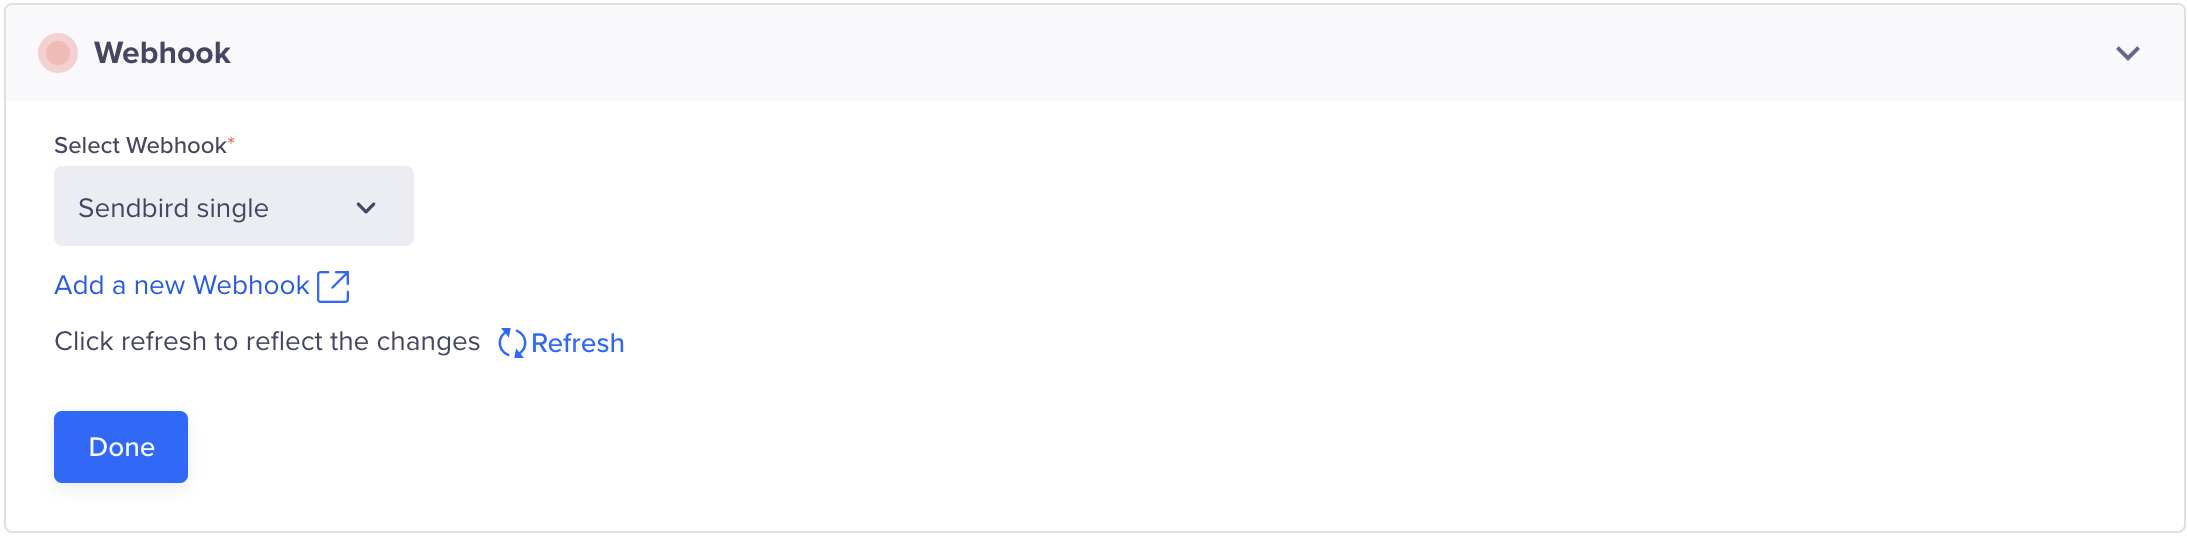
Select the webhook that you created while setting up the CleverTap dashboard under the Start here section.
Select Webhook
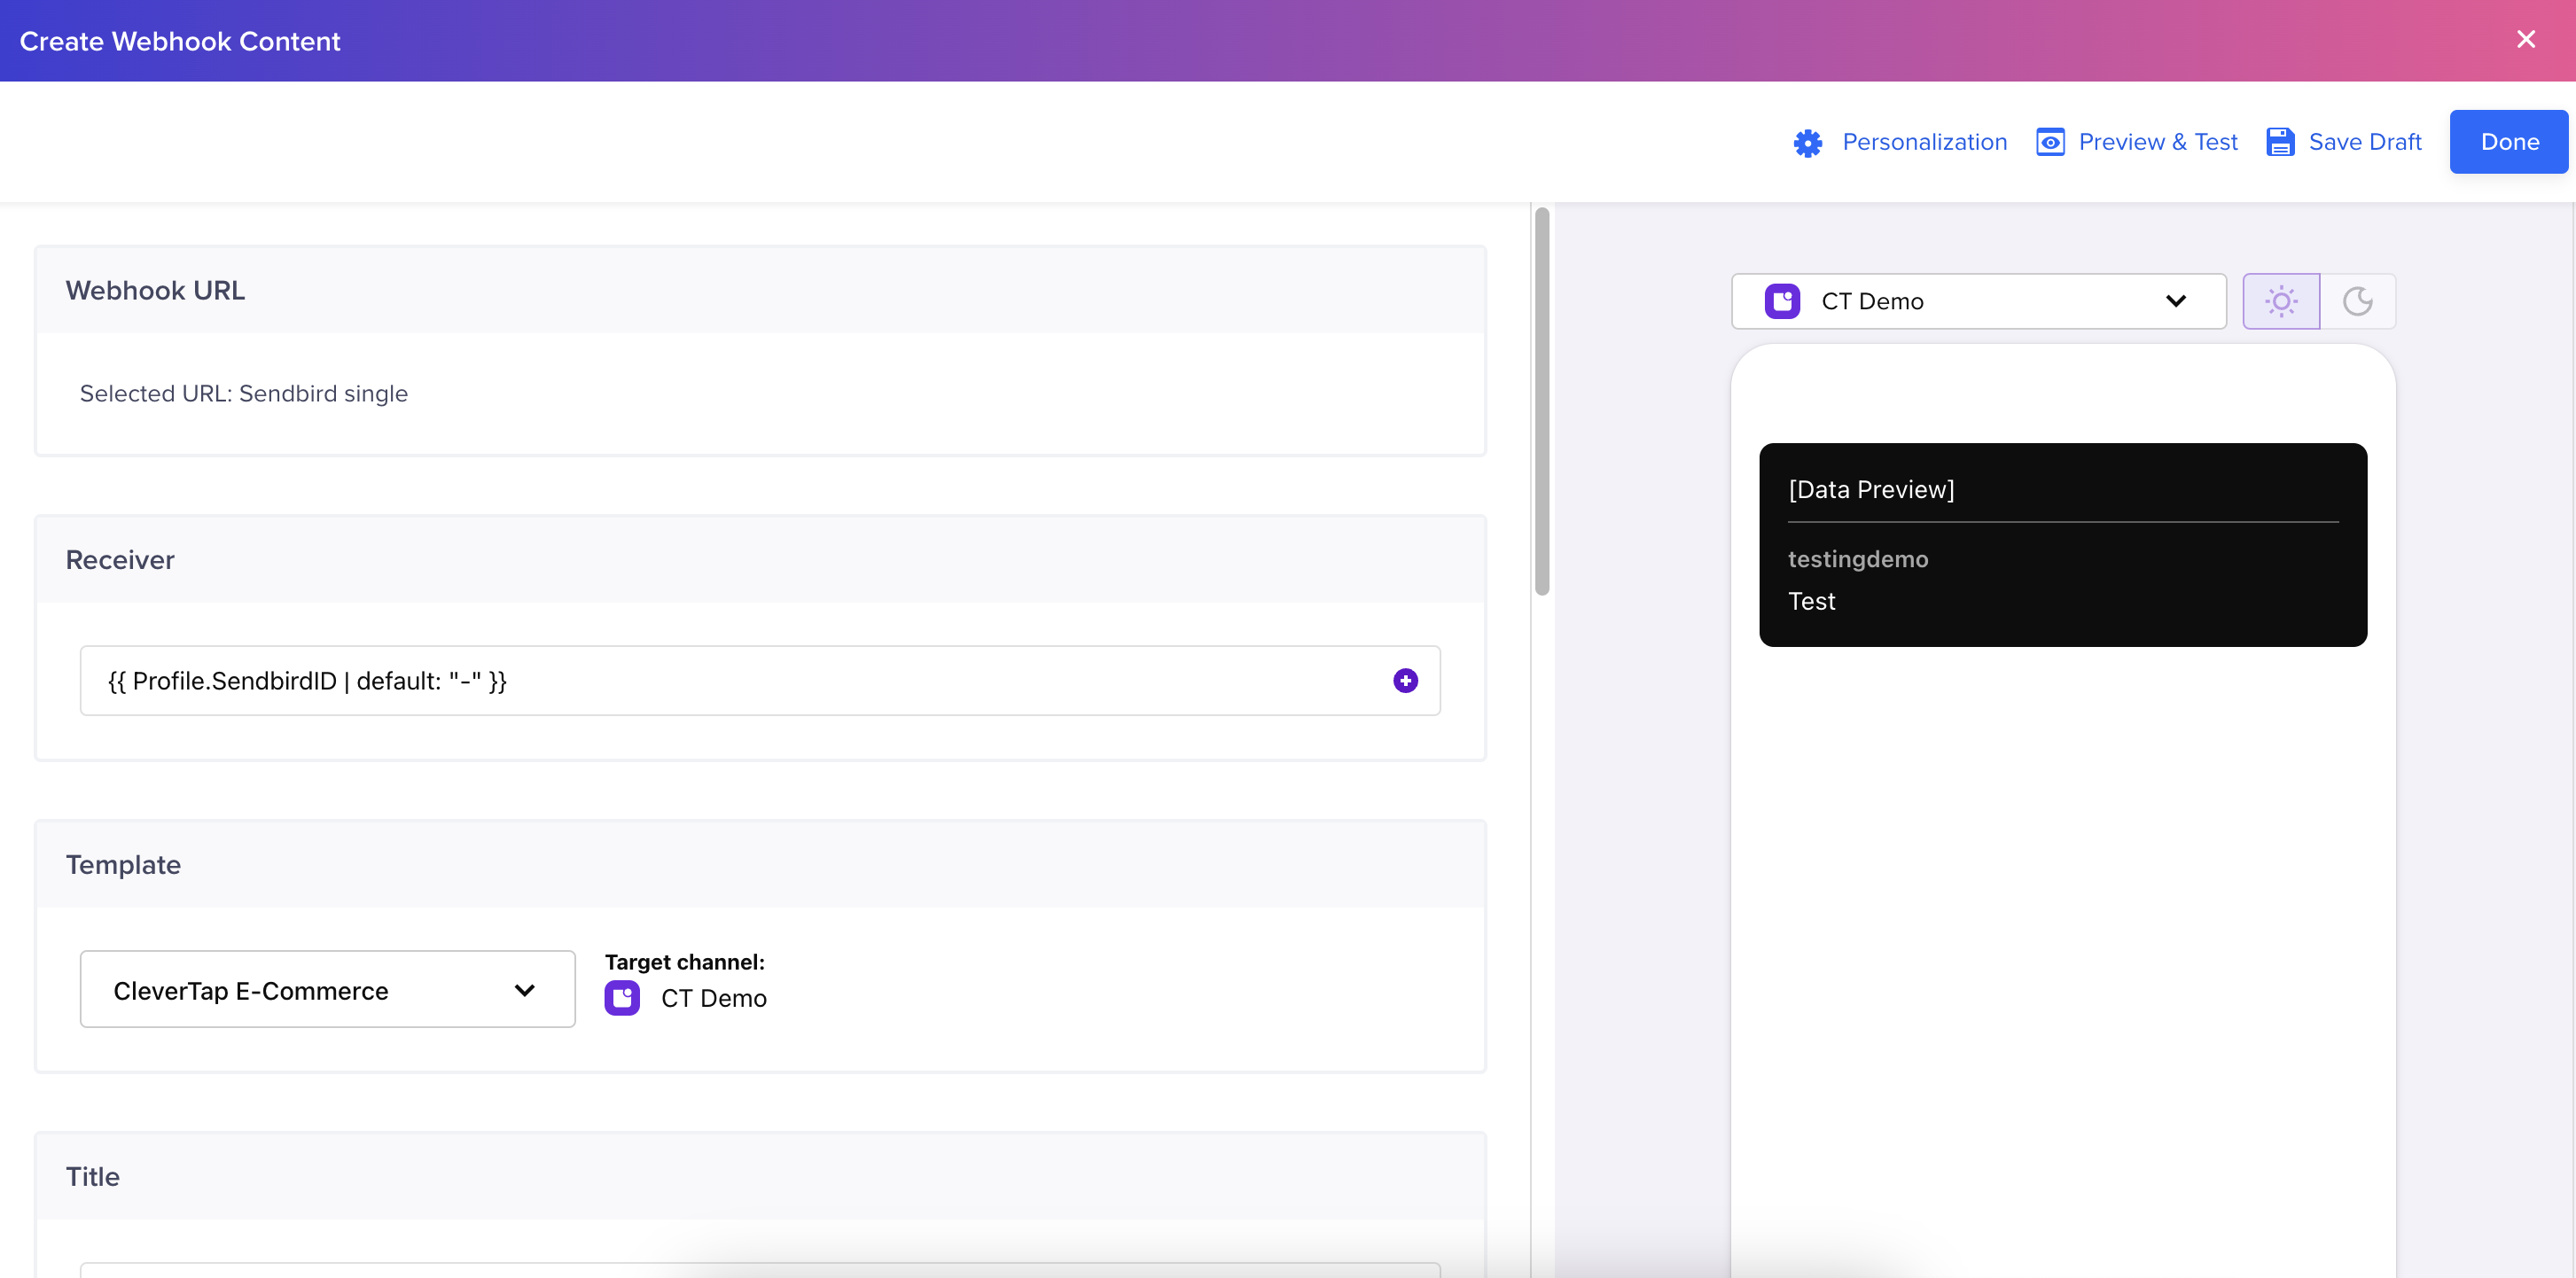
Click Go To Editor from the What section to define the campaign message. The Create Webhook Content window opens. To send the notification, select the template you created on the Sendbord dashboard.
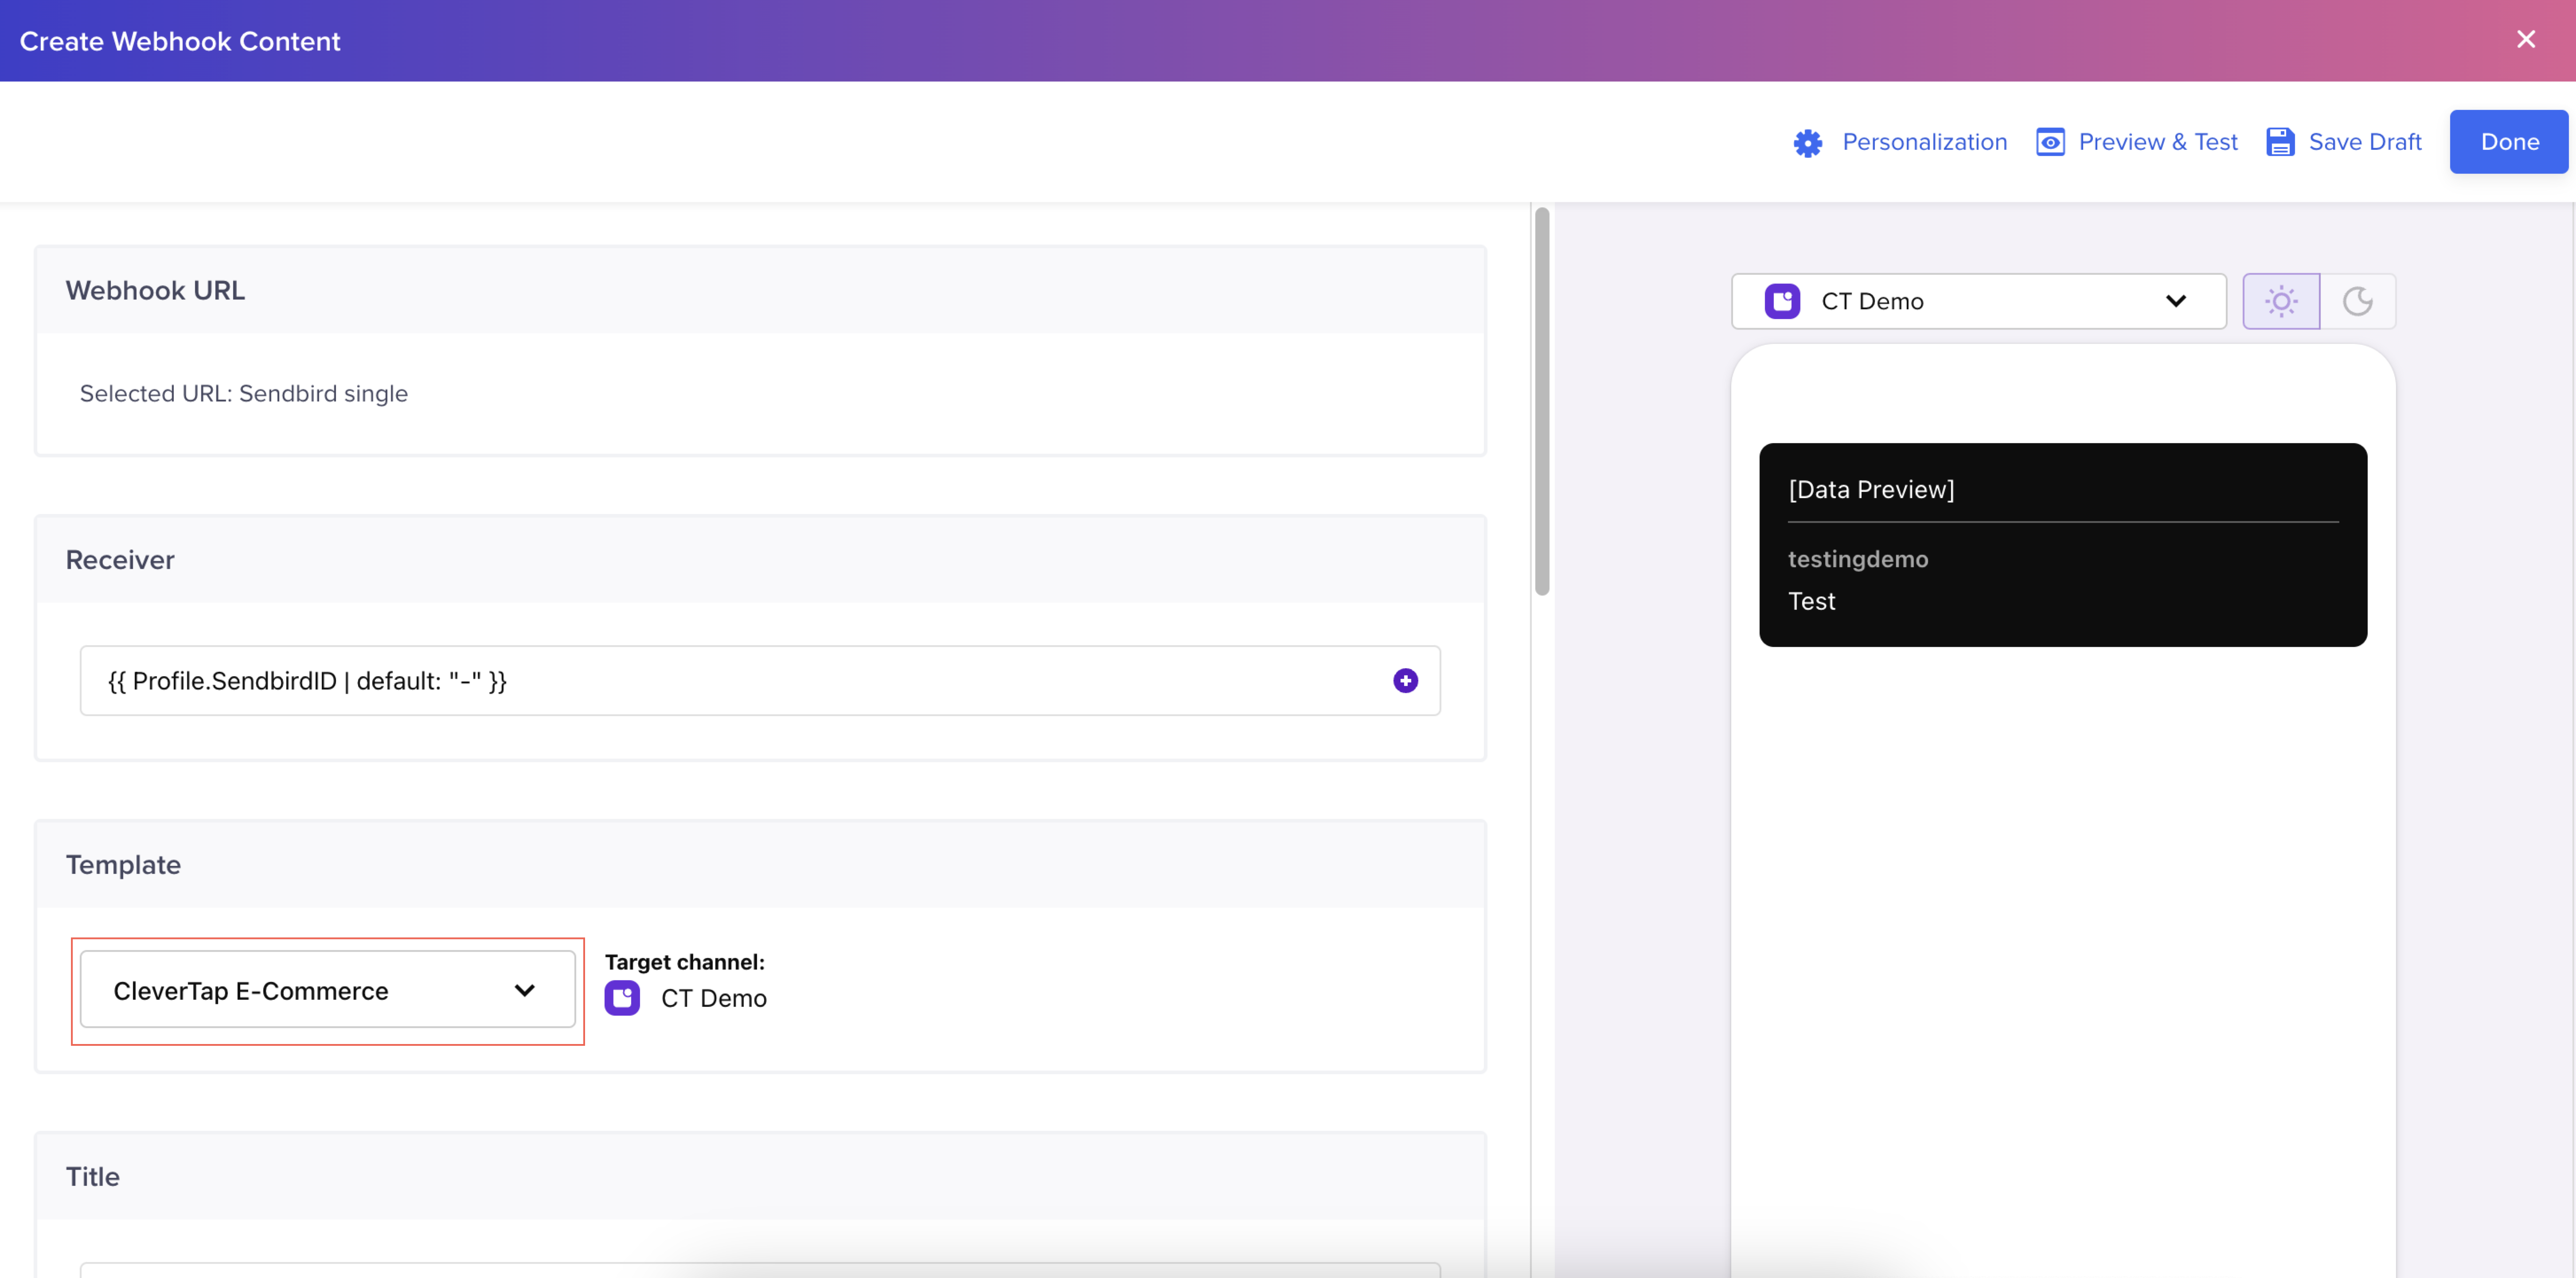
Select Sendbird Template
The fields displayed on the Clevertap dashboard correspond to the fields defined in the SendBird dashboard when creating a template.
Send Notification from CleverTap
You can publish the campaign after defining all the campaign sections.
FAQs
How can I set up the campaign metrics?
You can do so by following the steps listed below:
-
Map Sendbird user ID to CleverTap user ID.
CleverTap creates a user profile for each person who uses your app. User profiles have a set of default fields, such as email, phone number, and language. But you can also add more identifiers to the user's custom attributes. To map a Sendbird user ID to a CleverTap user ID, you must add a Sendbird user ID as a custom identifier.
You can refer to the following example code for CleverTap's Android SDK:HashMap<String, Object> profileUpdate = new HashMap<String, Object>(); profileUpdate.put("SendbirdID", "<Sendbird User ID>"); cleverTap.pushProfile(profileUpdate);Once set, this shows in the Receiver field of the Editor page while sending the Campaign from the CleverTap dashboard.
-
Toggle on the Event callback option on the Sendbird Dashboard.
This helps integrate the delivery receipt and read receipt events of the notification with CleverTap's custom events. When an event takes place, the Sendbird server uses CleverTap's upload events API to raise an event on the CleverTap.
The following is a sample JSON payload of the callback:\{ "evtName": "My First Campaign", // The Event name value you've set in Editor // during the notification creation. "evtData": { "status": "READ", // The status of a notification. Either SENT // or READ. "target_id": 123123 // The campaign or journey ID. } }
Updated 8 months ago