Create Message
Create a New Campaign
Create a campaign to deliver your message. To create a new campaign:
- From the dashboard, select Campaigns.
- Click + Campaign.
- From the Messaging Channels list, select Web Native Display.

Create a New Web Native Display Campaign
The Campaign page displays.

Web Native Display Campaign Setup
Define all the sections and publish the campaign.
Start Campaign
The Start here section displays the setup information.
This section has the following parts:
- Set a goal: Tracks your campaign conversions by setting a goal. This step is optional, but it helps you measure how effectively your campaign meets its goal.
You can define your conversion goal by selecting the Event and specifying the Conversion Time. The Conversion Time field accepts any numeric value along with a time unit such as Minutes, Hours, Days, Weeks, or Months. This allows you to define conversion windows such as 10 days, 72 hours, or 2 months. The value can range from a minimum of 1 minute to a maximum of 5 months.
For example, if you set the conversion time to 5 Minutes, the system counts conversions within 5 minutes of the goal event.
Your campaign goal can be as broad or as specific as you want. For example, you can answer questions such as: How many users were influenced to purchase an X amount? or How many first-time visitors purchased red shoes worth at least X and blue jackets worth at least Y?
Set Conversion Time
Define the Audience
You must indicate the target audience for your campaign. You can specify your target audience from the Target segment section. Here, you can create a new segment or use a previously saved user segment from the segment list.

Define the Target Audience
Segment
If you want to create an ad-hoc segment, you can select a type of segment on which to base your campaign. You can create the target based on user properties or live (ongoing) user behavior. The latter is helpful to send out real-time, triggered campaigns.
Deliver Action-Based Web Native Display Campaign
You can trigger a web native display campaign based on an action. Users receive this campaign when they perform an action on the website. For example, creating a campaign that displays a personalized contextual banner with images of fitness equipment for users who have shown interest in the fitness category.
It makes the web experience more contextual and increases conversion.
Filter Users Based on Past Behavior
You can also target users basis their past behavior. For example, you might want to create a personalized campaign for a set of customers who have purchased a specific product in the past.
Filter by User Properties
Using the With user properties filter in the Who section, you can segment your campaign to only reach users who meet specific criteria.
For example, you can create a web native display campaign specifically for female users who live in the United States. The image below represents a sample target segment that is filtered using specific user properties to target the required audience.

Filter by User Properties
The following table explains the various property types:
| Property Type | Description | Example |
|---|---|---|
| User Properties | Custom user profile properties that you define and send to CleverTap. | Customer Type = Platinum |
| Demographics | Demographics filters include Age and Gender. | Age = 25 to 40 years Gender = Female |
| Geography | User's coarse location. Filters include Country, Region, and City. CleverTap's SDK can automatically detect this from the user's IP address. | Country = United States State = California City = San Francisco |
| Reachability | Reachability filters include Has email address, Has phone number, Unsubscribed email, and Unsubscribed SMS. | Unsubscribed email = No |
| App Fields | App fields filters include App Version, Device Make, Device Model, OS Version, and CleverTap SDK Version. This information is sent by CleverTap's SDK for each device that has your app which means a single user can have multiple devices associated with their user profile. | OS Version = 10 |
To know more about what segments can be used, see Segments.
Calculate Estimated Reach
The Estimated Reach option allows you to preview how many users meet your targeting criteria in an online trigger campaign before publishing it. This helps you validate audience size and adjust filters to ensure the campaign reaches the intended users.
Estimated Reach is particularly useful when you select the Filter on past behavior and user properties option. You can view both the estimated user count and device count.
To calculate the estimated reach, perform the steps below:
-
Select Filter on past behavior and user properties.
-
Click Calculate in the right panel. The result shows the estimated number of users or devices for that segment. You can view the following:
- Total Users: The number of users that match the filters.
- Breakdown by Platform and Devices: The users count on Android, iOS, or both, and on different devices.
- Visual Indicator: A chart summarizing the share by operating system.
The estimate, based on the latest available event data, updates each time you apply or modify filters. It reflects stored event data and is not a real-time count. This helps you plan and refine your audience before sending the campaign.
Calculate Estimate Reach
Control Group
You can define the control group to compare and measure the results of your campaign. For more information, refer to Control Groups.

Set Control Group
Message Types
You can create the following types of messages:
- Single Message
- AB Test
- Split Delivery
- By User Property
Single Message
Here, a standard web campaign is rolled out for all the users who qualify as your target audience. This type of campaign is best suited for use cases where the campaign communication does not vary based on the differences between properties such as language, geography, or any other user properties.
A/B Testing
A/B testing helps you understand what type of message copy works best to get clicks from users.
You can test up to three message variants on a test group and the variant that gets the most clicks is declared the winning variant and is automatically sent to the rest of your target audience.
When you create multiple variants for a campaign, you can also auto-copy what is already present in a current variant.
Split Delivery
With split delivery, you can decide what percentage of your audience receives each message variant for the duration of the campaign. You can test up to three message variants.

Split Delivery for Web Native Display Campaigns
Split Delivery to Live User Segments
With campaigns sent to live user segments (triggered campaigns), messages are delivered immediately when a user’s activity matches the criteria you have selected. For example, you can send a message when the user has completed a booking or purchase. Since it is not possible to determine the reach of triggered campaigns upfront, you need to decide how many total messages to send for A/B testing before a winner is declared.
Triggered Campaign ExampleIf you select 500 users as your test audience, we will alternate delivery of Variant A and Variant B as users qualify for the campaign. After a total of messages are sent (Variant A – 250 and Variant B – 250), we then decide the winner based on the number of clicks and continue only with this winning message for the duration of the campaign.
Deciding on a test audience for A/B testing triggered campaigns requires some estimation. We recommend you check the total messages that were sent for similar triggered campaigns in the past to get a sense of how many users may qualify. If you select a test audience that is too small such as 25 users, you will get a statistically insignificant sample. If your test group size exceeds the total number of users who ultimately qualify for that campaign, then no winner will be declared and each message variant will be alternatively delivered for the duration of the campaign.
By User Property
If you would like to send different message variants to your target audience based on the user properties they possess, this campaign type is your best bet. You can send up to 50 message variants to different users based on a user property. A good example would be when you want to send a localized update to people based on their preferred language.
Web Native Display Editor
The Web Native Display Editor offers instant access to ready-to-use templates for creating personalized campaigns. For more information, refer to the Web Native Display Editor document.
Define the Campaign Schedule
The delivery preferences for Live campaigns can be set as follows:
- Start Date and Time
- End Date and Time
- Set Delay

Define Campaign Schedule
Delivery preferences
Web Native Display Priority
The Web Native Display Priority dropdown allows you to set priority levels from 1 (lowest) to 100 (highest), with 1 being the default priority. Configuring campaign priority helps prevent conflicts, especially when multiple campaigns are configured with the same triggers
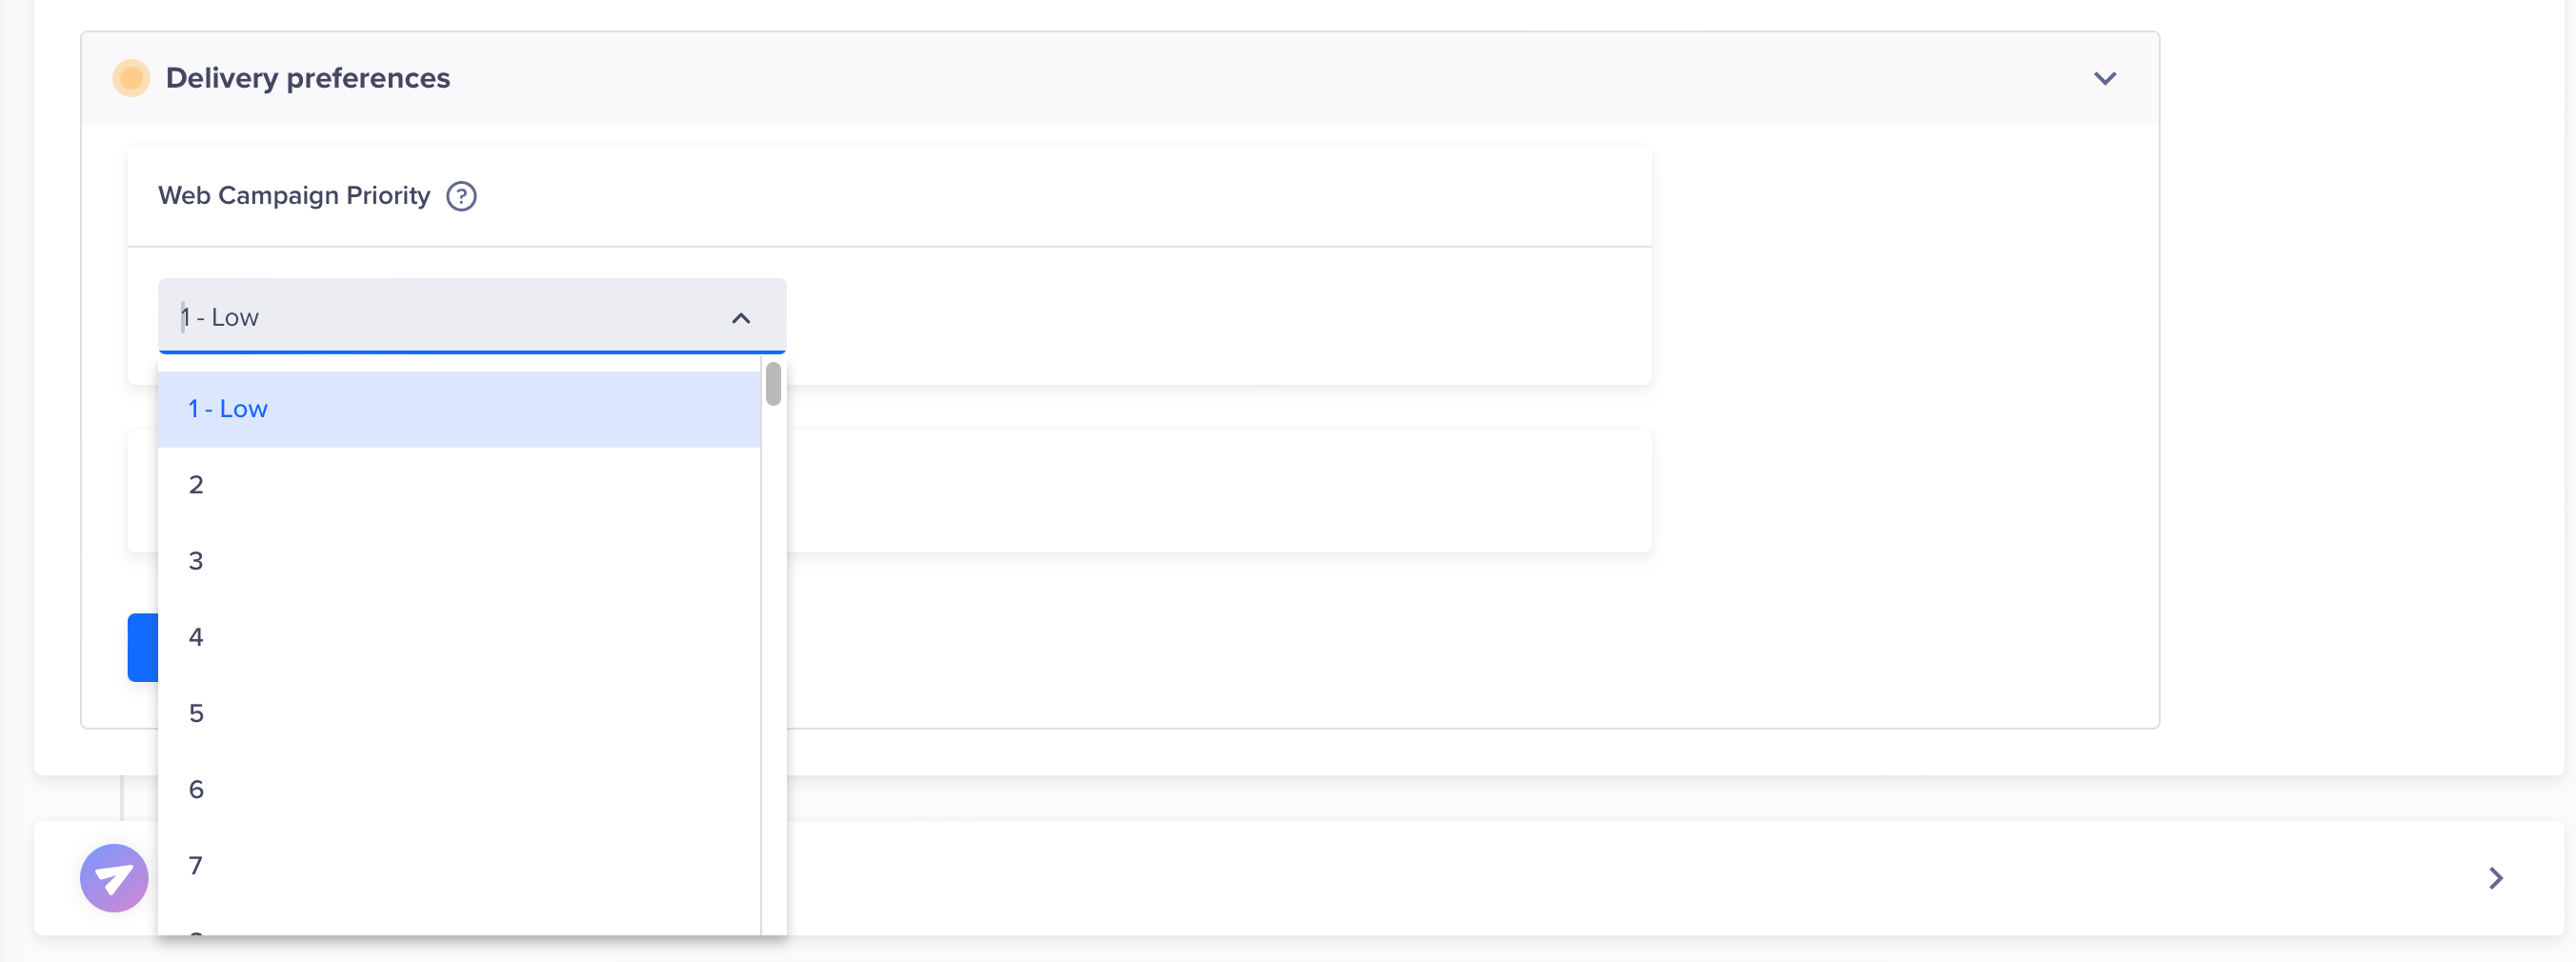
Web Campaign Priority
Campaign Priority Handling
Web Native Display campaigns allow users to create multiple campaigns targeting the same webpage elements or events. When multiple campaigns target the same elements, conflicts may arise. To resolve these conflicts, CleverTap uses Priority to determine how different campaigns are rendered.
Web Native Display campaigns are classified based on how rendering is handled:
- Rendering Handled by CleverTap
- Rendering Handled by Customer
Rendering handled by CleverTap
These campaigns involve templates where CleverTap handles end-to-end rendering of elements on the customer's website using predefined payloads.
The following templates fall under this category:
- Carousels
- Banners
- Custom HTML
- Visual Editor
- Element Based Changes
Visual Editor Campaign BehaviorVisual Editor campaigns can result in two types of changes based on the campaign configuration:
- HTML-Based Changes: If the campaign simply updates static content such as text or images, CleverTap renders these changes directly via HTML.
- JSON-Based Changes: If the campaign includes personalization, dynamic logic, or conditional targeting, CleverTap pushes
CustomEventand the rendering is handled by the client.
Priority kicks in when an element selector (a CSS-based identifier such as a div ID or class) is matched on the page. If multiple campaigns target the same selector, only the campaign with the highest priority executes. Lower-priority campaigns that target the same selector will not be executed.
Visual Editor Examples
Visual Editor campaigns introduce complexity as they can affect multiple selectors at once. Refer to the below examples of how priorities are resolved:
Example 1: Overlapping Visual Editor Campaigns
* Setup:
* VE Campaign 1 (Priority: 1): Updates the homepage headline text “Welcome to Our Store".
* VE Campaign 2 (Priority: 2): Updates both the headline text and the description.
- Outcome:
- VE Campaign 2 executes entirely due to its higher priority. The headline text "Welcome to Our Store" and description are updated.
- Conclusion:
- A campaign is executed entirely or not at all.
Example 2: Mixed Campaign Priorities
* Setup:
* VE Campaign 1 (Priority: 1): Updates the headline text "Welcome to Our Store".
* VE Campaign 2 (Priority: 3): Updates both the headline text and the description.
* Banner Campaign 3 (Priority: 2): Replaces the headline text with a promotional banner.
- Outcome:
- VE Campaign 2, having the highest priority, is executed entirely. The headline text "Welcome to Our Store" and description are updated.
- Conclusion:
- If campaigns target common nodes, they are grouped and selected based on priority.
Rendering Handled by Customer
These campaigns do not perform DOM updates directly. Instead, CleverTap pushes CustomEvents to the webpage, which customers can listen for and act upon as needed. Thus, CleverTap only provides data for rendering.
The following campaign types use customEvent to trigger client-side actions:
- Key-Value Pair (KV Pair)
- Visual Editor
- JSON-Based Campaigns
- JSON
Campaign execution is determined based on the event name associated with each campaign.
We use custom events named CT_web_native_display_builder, CT_web_native_display, and CT_web_native_display_json to listen for campaign activity. Events with the same name are grouped and prioritized accordingly.
When multiple campaigns trigger events with the same name, only the event from the highest-priority campaign is executed. This prevents conflicts and ensures consistent, predictable behavior.
Note
- Visual Editor and JSON-based campaigns do not support topics.
- If multiple campaigns of these types exist, only one event is created (the one with the highest priority).
Examples
Refer to the below examples of how priorities are resolved for such campaigns:
Example 1: Conflicting KV Pair Topics
* Setup:
* Two KV Pair campaigns share the same topic.
- Outcome:
- Only the campaign with the highest priority is executed. The other campaign is ignored.
- Conclusion
- Only one campaign can propagate an event per topic.
Example 2: Unique KV Pair Topics
* Setup:
* Multiple KV Pair campaigns use different topics.
- Outcome:
- All campaigns are executed simultaneously without conflict.
- Conclusion
- Topics act as unique identifiers and each topic is treated independently.
Example 3: Conflicting Visual Editor and JSON-Based Campaigns
* Setup:
* One Visual Editor campaign and one JSON-based campaign trigger similar CustomEvents.
- Outcome:
- Both campaigns are executed, as they are under different events (
CT_web_native_displayandCT_web_native_display_json).
- Both campaigns are executed, as they are under different events (
- Conclusion:
- JSON and Visual Editor campaigns do not compete with each other.
- If a JSON and Visual Editor campaign run simultaneously, both will be executed since they are under different events. Only when multiple JSON-based or Visual Editor-based campaigns run does priority determine which one is executed.
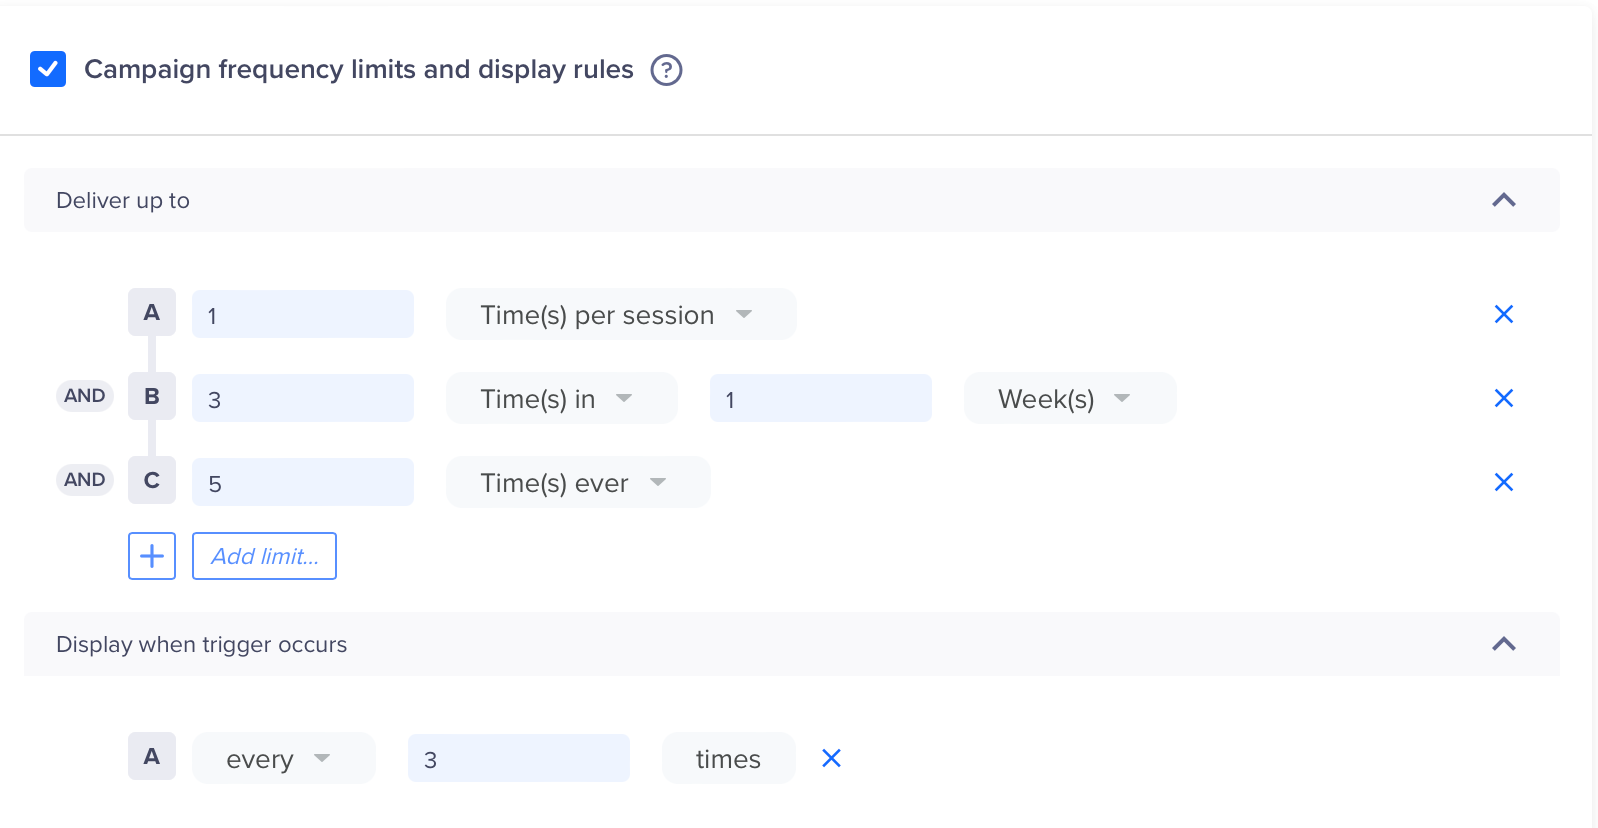
Campaign Frequency Limits and Display Rules
This feature provides additional flexibility by allowing you to control how often a Web Native Display campaign is delivered based on a defined trigger count.
SDK PrerequisitesThe Campaign Frequency Limits and Display Rules for Web Native Display is supported on CleverTap Web SDK version 1.13.3 and newer.
Example:
Consider a scenario where you want to configure a Web Native Display campaign to:
- Display once per session
- Display thrice per week
- Show a maximum of five times throughout its duration
- Trigger when a user performs a specific action multiple times (such as adding to cart three times in a session)
In this case, the message will be delivered once per session and thrice per week but will stop showing once the user has received it five times. Additionally, for event-based triggers, the message can be configured to appear exactly when the user performs the action a specified number of times. In this case, the message will be delivered exactly when the user completes adding to cart thrice in one session. Alternatively, you can select every or exactly display conditions based on your business requirements.
Campaign frequency limits and display rules
Display Rules for Time-Based Frequency
- If the Times in Frequency is set in days or weeks, the message is displayed according to the calendar day or week.
- However, if the frequency is set in days or weeks, the message delivery is not considered as per the calendar week. For example, if a campaign is set to display 5 times in a week, it will be shown up to 5 times over the last 7 days.
- For this functionality to work, SDK version on your website must be
2.0.0or above.- If SDK version on your website is lower than
2.0.0, then:
- For display when trigger occurs, users will not qualify if value entered is above 1.
- exactly operator will work the same as every operator.
- The Deliver up to setting will not be enforced and the campaign will be delivered every time the user qualifies.
Set frequency
From the Delivery preferences section, select the days and the time frame to deliver the message.
Click Apply to all to copy the choices from the selected day to all other days.

Set Campaign Delivery Preferences
Publish Campaign
After testing and once you are satisfied with the appearance of your campaign, finalize your campaign with the following steps:
- Click Continue to view your campaign summary. The overview page displays.
- View your campaign summary, then click Publish Campaign.

Publish Campaign