Event Exports
Overview
Event Exports allow you to securely export event data from CleverTap to analytics partners, customer data platforms, external cloud storage, and data warehouses. You can configure exports to centralize behavioral data, integrate with existing analytics workflows, and ensure your destination platform always has the latest event information.
CleverTap supports event exports to the following destinations:
- Cloud Storage: Amazon S3, Google Cloud Storage, and Microsoft Azure
- Analytics: mParticle, Mixpanel, Amplitude, and Segment
- Data Warehouses: Snowflake and BigQuery
NoteThis document covers event exports to Amazon S3, Google Cloud Storage, and Microsoft Azure only. For exports to analytics partners or data warehouses, refer to their respective documentation linked above.
With Event Exports, you can:
- Export to Multiple Cloud Storage Platforms: Send event data to Amazon S3, Google Cloud Storage, or Microsoft Azure blob storage.
- Customize Folder and File Structure: Organize exports using flexible sub-folder patterns and custom file naming conventions.
- Choose File Format: Export data as CSV, JSON, XML, or Parquet to match the requirements for your pipeline.
- Select Which Events to Export: Export all events, system events, engagement events, or a specific subset from your schema.
- Configure Identity Output: Export either a single identifier per event record, using fallback logic, all selected identifiers, or include the CleverTap ID and account-defined identities (Identity, Email, and Phone).
- Configure Data Fields: Choose specific event properties, user properties, device attributes, communication preferences, and timestamps to export. Rename and reorder columns to suit your data pipeline.
- Manage Schema: Lock the schema or auto-include new properties as your event schema evolves.
- Schedule Exports: Run one-time exports for a defined date range, or set up recurring exports at 4, 8, 12, or 24-hour intervals.
Use Cases
Event Exports support a variety of use cases across analytics, data science, and compliance functions:
- Behavioral Analytics and Business Intelligence: Export raw event streams to your cloud storage to power funnel analysis, cohort studies, and attribution modeling. Recurring exports ensure your warehouse always reflects the latest user behavior without reprocessing the full dataset.
- Product Analytics: Isolate high-signal events to track feature adoption, measure activation rates, and build usage dashboards. Use event-name-based folder partitioning to simplify ingestion by event type.
- Custom Identity Reconciliation: Export all identity fields alongside the CleverTap ID to map CleverTap event records to user profiles in your CRM, data warehouse, or internal systems.
- Machine Learning & Data Science: Use exported event data to train recommendation engines, churn prediction models, or propensity models on up-to-date behavioral signals.
- Privacy & Compliance: Export only the event properties required for your use case. Exclude Personally Identifiable Information (PII) by deselecting sensitive properties, and lock the schema to prevent new sensitive attributes from being included in future runs.
- Archival and Regulatory Compliance: Schedule periodic exports to back up event data for regulatory compliance and long-term archival.
Quick Start Guide
The following steps provide a high-level flow for setting up an event export from CleverTap to your cloud storage destination. Each step links to detailed documentation.
- Configure Storage & File Details
- Select User Identifiers
- Select Data Fields & Event
- Edit Properties & Order
- Define Schedule
Before creating an event export, ensure your cloud storage environment is ready, and your CleverTap account has the necessary permissions. Depending on the cloud platform you are using:
- Configure Amazon S3 Integration
- Configure Google Cloud Storage Integration
- Configure Microsoft Azure Integration
You must have write access permissions on the cloud storage platform you use to create and manage exports.
Create Export
An export in CleverTap is a configured job that sends your data to an external destination on a schedule you define. A destination is a cloud storage platform (such as Amazon S3, Google Cloud Storage, or Microsoft Azure) that CleverTap connects to and delivers files to on your behalf.
To create an export, perform the following steps:
-
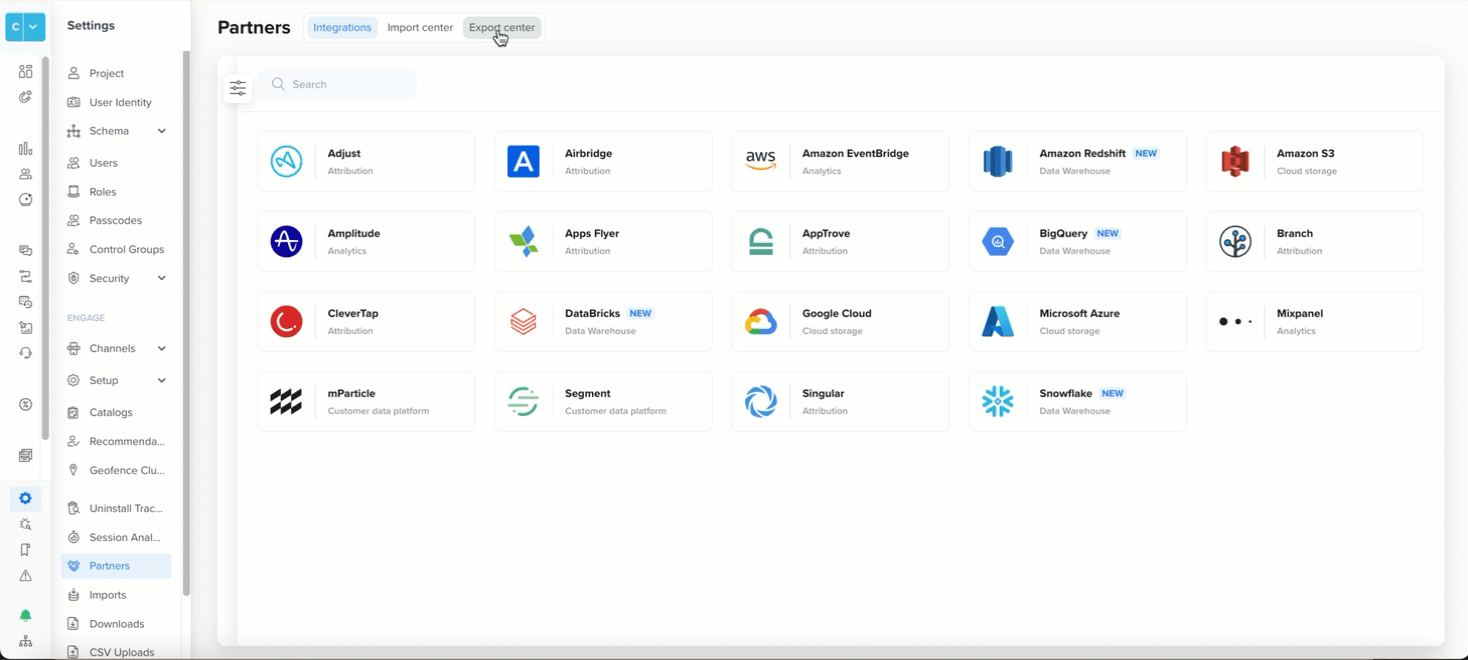
Go to Settings > Partners and select Export center.
-
Click Create Export, select Events, and click Next.
-
Select the Partner to which you want to send the export and click Start. The export setup includes the following five main steps:
Create Export
- Configure Storage & File Details: Configure the destination, folder structure, file format, and naming conventions.
- Select User Identifiers: Define which user identifiers to include alongside each event record and their order.
- Select Data Fields & Events: Choose the timestamp format, user properties, device attributes, and communication preferences to include alongside each event record.
- Edit Properties & Order: Select, rename, and reorder event properties for each selected event individually.
- Define Schedule: Set up one-time or recurring export schedules.
Legacy Exports Migration
- Legacy exports continue to run without interruption. You can view and edit legacy exports using the Switch to legacy option.
- You cannot migrate legacy exports to the new flow directly. You must do the following:
- Stop the legacy export and create a new export using the enhanced flow with the same or improved settings. For more information about what has changed, refer to this FAQ.
- Verify the new export runs successfully and produces the expected output.
- Update your downstream pipelines to process files from the new export location.
Configure Storage & File Details
In this section, you will define the destination, folder organization, file format, and file naming for your export. Use the live Preview on the screen to validate paths and filenames as you configure them.
-
Select Storage Bucket: Choose the cloud storage bucket or blob container where you want to export event data. The dropdown displays all integrated storage destinations configured in your account.
-
Set Up Sub-folder Structure: Choose how CleverTap should organize folders within your bucket or container using the following options. The folder structure preview updates in real-time as you configure each option.
-
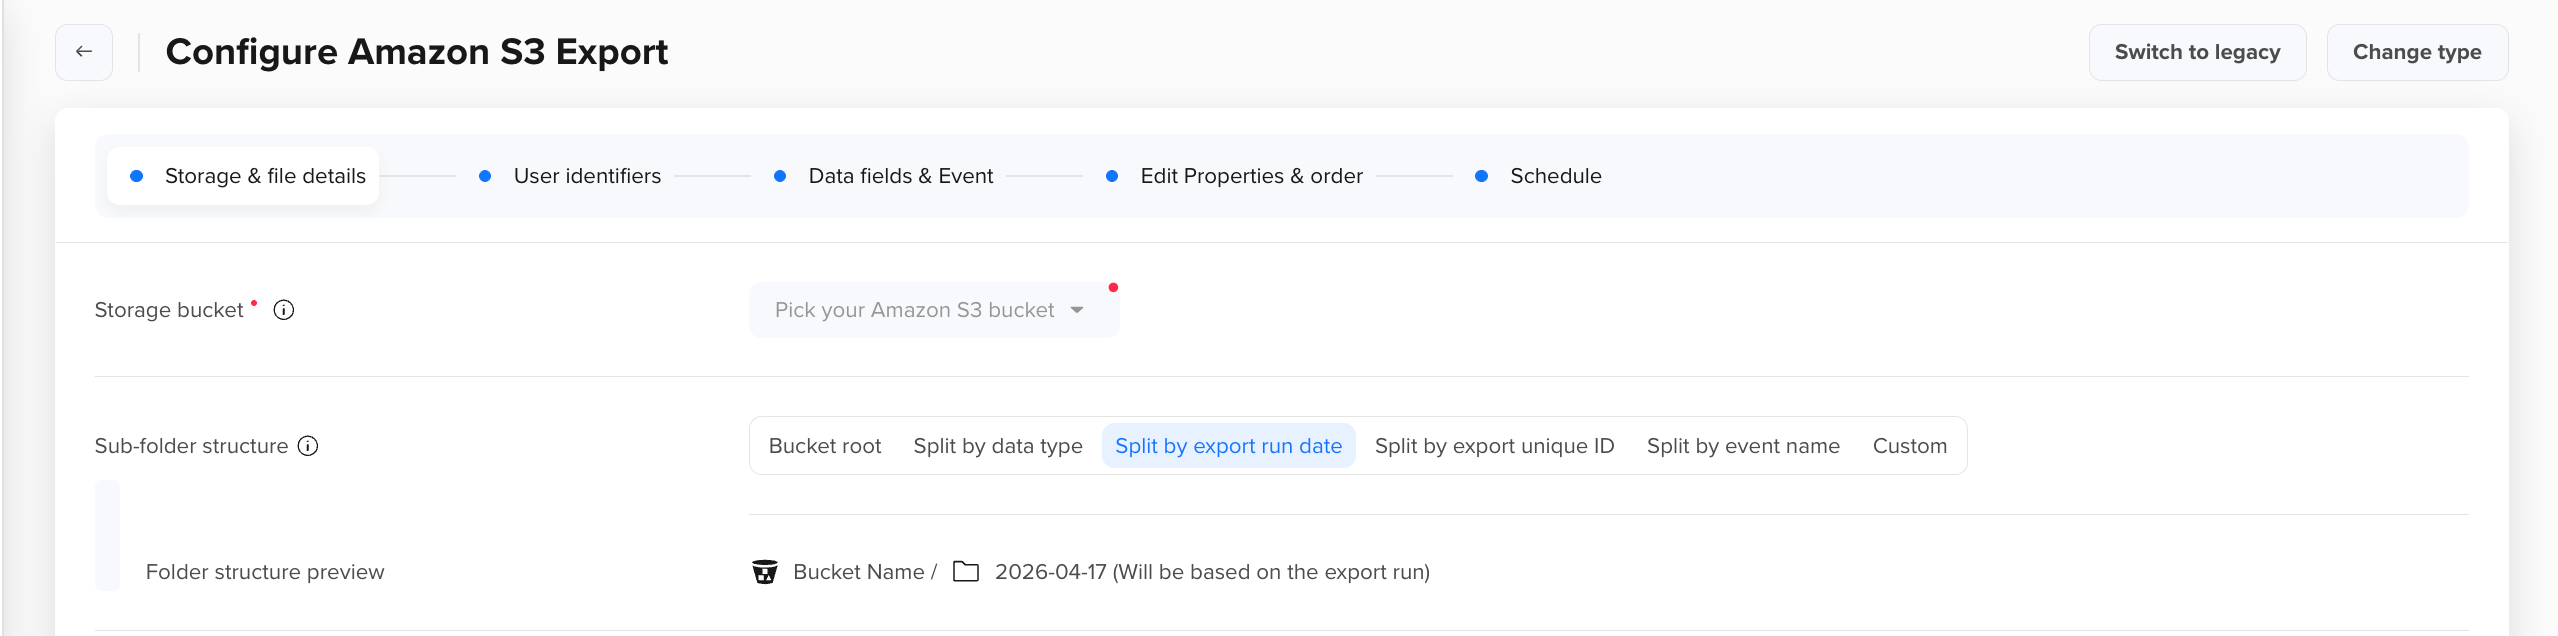
Bucket root: Files are stored directly in the root of your bucket with no sub-folders. Preview:
/{bucket-name}/file.csv.gz -
Split by data type: Creates top-level folders such as
events/andprofile/. Event exports are stored underevents/. Preview:/{bucket-name}/events/file.csv.gz -
Split by export run date: Partitions files by the export run date so each run's data lands in its own folder. This is ideal for date-based ingestion pipelines. Preview:
/{bucket-name}/2025-10-03/file.csv.gz -
Split by export unique ID: Creates a sub-folder using the unique export ID assigned to each export configuration. Preview:
/{bucket-name}/1761650178/ -
Split by event name: Creates a sub-folder for each event name, making it easy to isolate and process individual event types in downstream pipelines. Preview:
/{bucket-name}/App-Launched/file.csv.gz -
Custom: Build your own folder structure using dynamic variables. Click
{{ }}to insert variables and use/to create sub-folders. The following are the supported variables:{{Account-id}}: Your unique CleverTap account identifier.{{Export-id}}: Unique export ID assigned to each export run.{{Timestamp}}: EPOCH timestamp when the export runs.{{Instance-id}}: Database identifier for your account (typically 0–23).{{Date}}: Export run date inyyyy-mm-dd.{{Event-name}}: Name of the exported event.
Example:
{{date}}/{{event-name}}/run-{{export-id}}Preview:/{bucket-name}/2025-10-03/App-Launched/run-1761650178/file.csv.gzNoteUse forward slashes (/) to create sub-folders. You can include letters (a-z, A-Z), numbers (0-9), slashes (/), hyphens (-), and underscore(_).
Set Up Sub-Folder Structure
-
-
Select File Format Select the file format for your exported data. To minimize post-processing, select the format that your downstream platforms can process most efficiently. You can choose from the following formats:
-
CSV: Flat tabular file with a header row. All selected fields are exported, even if the values are null.
-
JSON: Structured JSON format, ideal for flexible data parsing.
-
Parquet: A compressed, column-based format designed for analytics and large-scale data storage.
-
XML: A structured format suited for systems that need nested data.
Note- Parquet files are saved as .parquet by default (without additional compression). If compression is enabled, they are saved as .parquet.gz.
- CSV, JSON, and XML files are automatically compressed using Gzip and saved as .gz files.
-
-
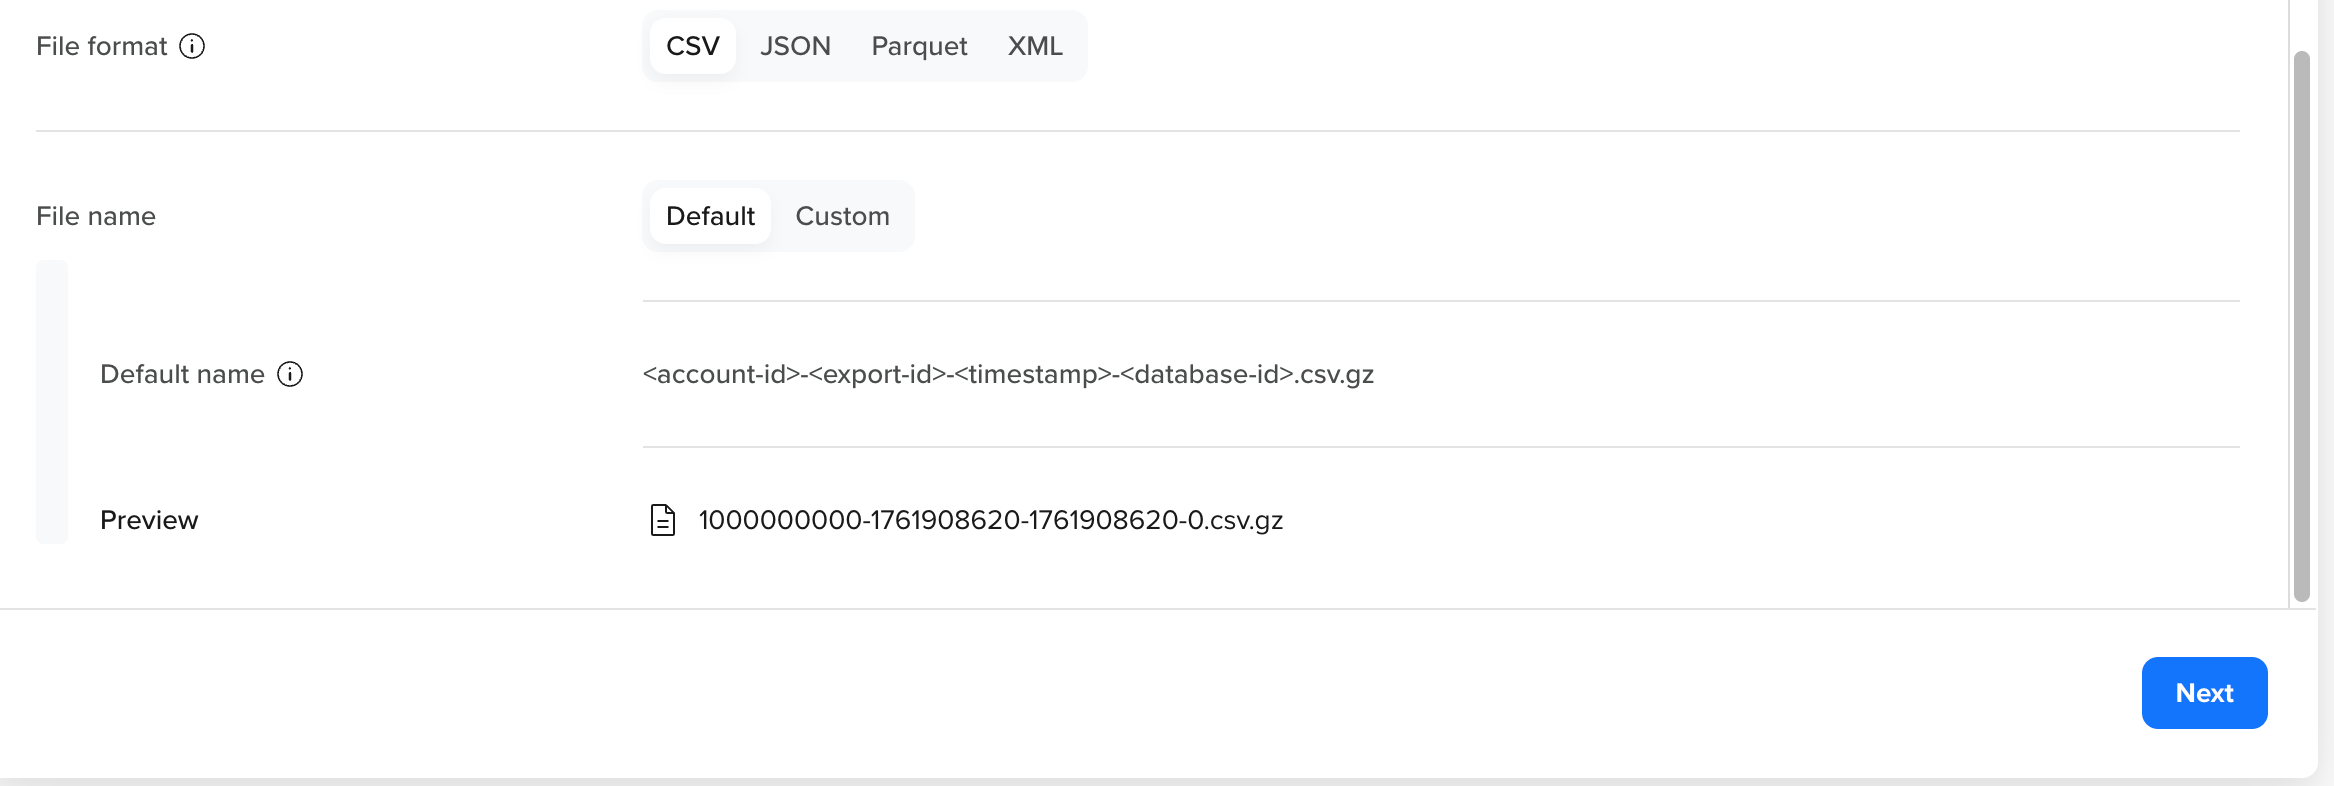
Define File Name Convention Define how each file is named inside the innermost folder created by Sub-folder structure. If you select Default, CleverTap applies a standard naming structure. If you select Custom, the input field and dynamic variable picker are enabled. Ensure that required variables are included and correctly separated. The Preview shows the exact filename based on your input.
-
Default file name: The default format is
<event-name>-<date>-<account-id>-<export-request-id>-<timestamp>-<database-id>-<file-index>.<format>.gz. For example,App-Launched-2026-04-14-1517477760-1776150812-1776150812-0-0.csv.gz. -
Custom: Create a custom filename using supported dynamic variables. Click
{{ }}to insert variables and combine them with fixed text. For example,events-{{date}}-{{export-id}}.csv.gzresolves toevents-2025-10-03-1761651721.csv.gz. By default, the timestamp, instance ID and file Index are always appended to the end of the filename to ensure that file content is not overridden. EventName will also be appended in case you have not set EventName under Subfolder.The following are the supported variables:
-
{{Account-id}}: Your unique CleverTap account identifier. -
{{Export-id}}: Unique export ID assigned to each export run. -
{{Timestamp}}: Epoch timestamp when the export runs. -
{{Instance-id}}: Database identifier for your CleverTap account (typically 0–23). -
{{Date}}: Export run date inyyyy-mm-dd. -
{{Event-name}}: Name of the exported event.
-
NoteUse forward slashes (/) to create sub-folders. You can include letters (a-z, A-Z), numbers (0-9), slashes (/), hyphens (-), and underscores (_).
-
Select File Format and Define File Name
- Click Next to choose user identifiers.
Select User Identifiers
Choose which user identifiers to include in each exported event record and how they appear in the output file. These settings enable downstream platforms to accurately link event records back to user profiles across multiple identifiers.
-
Select Identity & Define Order Use the dropdown to select which identifiers to export and click Apply. You must select at least one identifier. Options include:
-
Identity: Your account-defined user identifier.
-
Email: The email address stored in the user profile.
-
Phone: The phone number stored in the user profile.
-
Custom: A business-specific identifier (for example,
crm_id).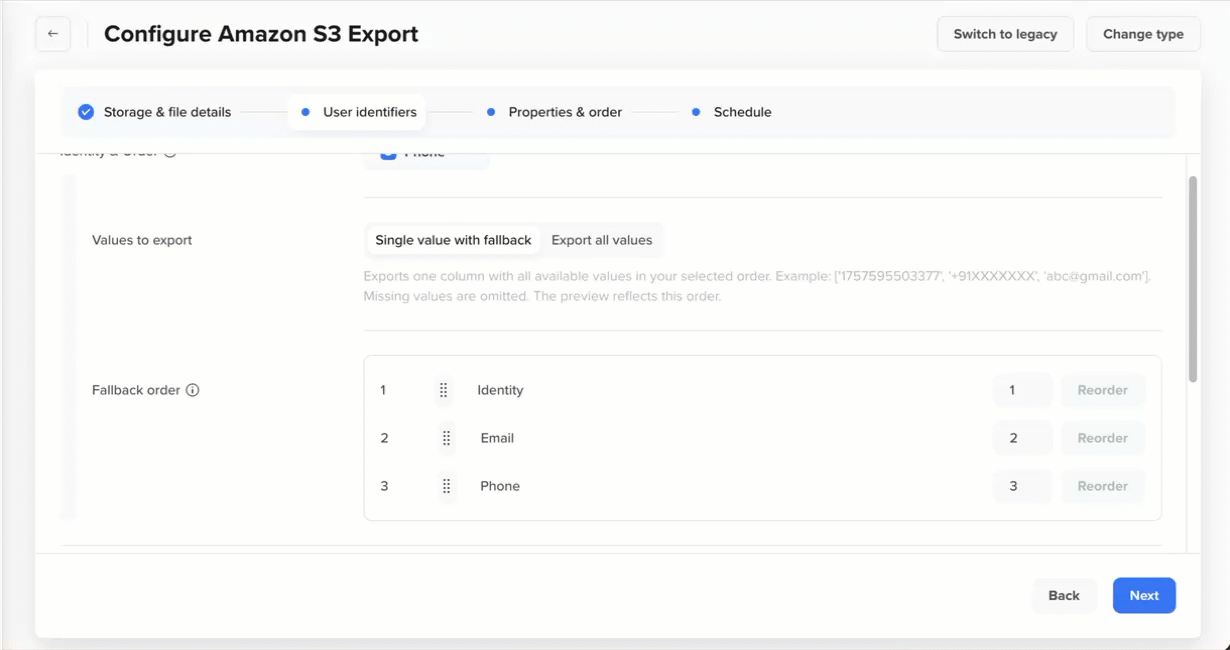
Select Identity
NoteThe order in which you select identifiers sets the initial priority. You can fine-tune priority under Values to export and Fallback order. Ensure Phone values use E.164 format (for example,
+15551234567) to avoid downstream validation issues. -
-
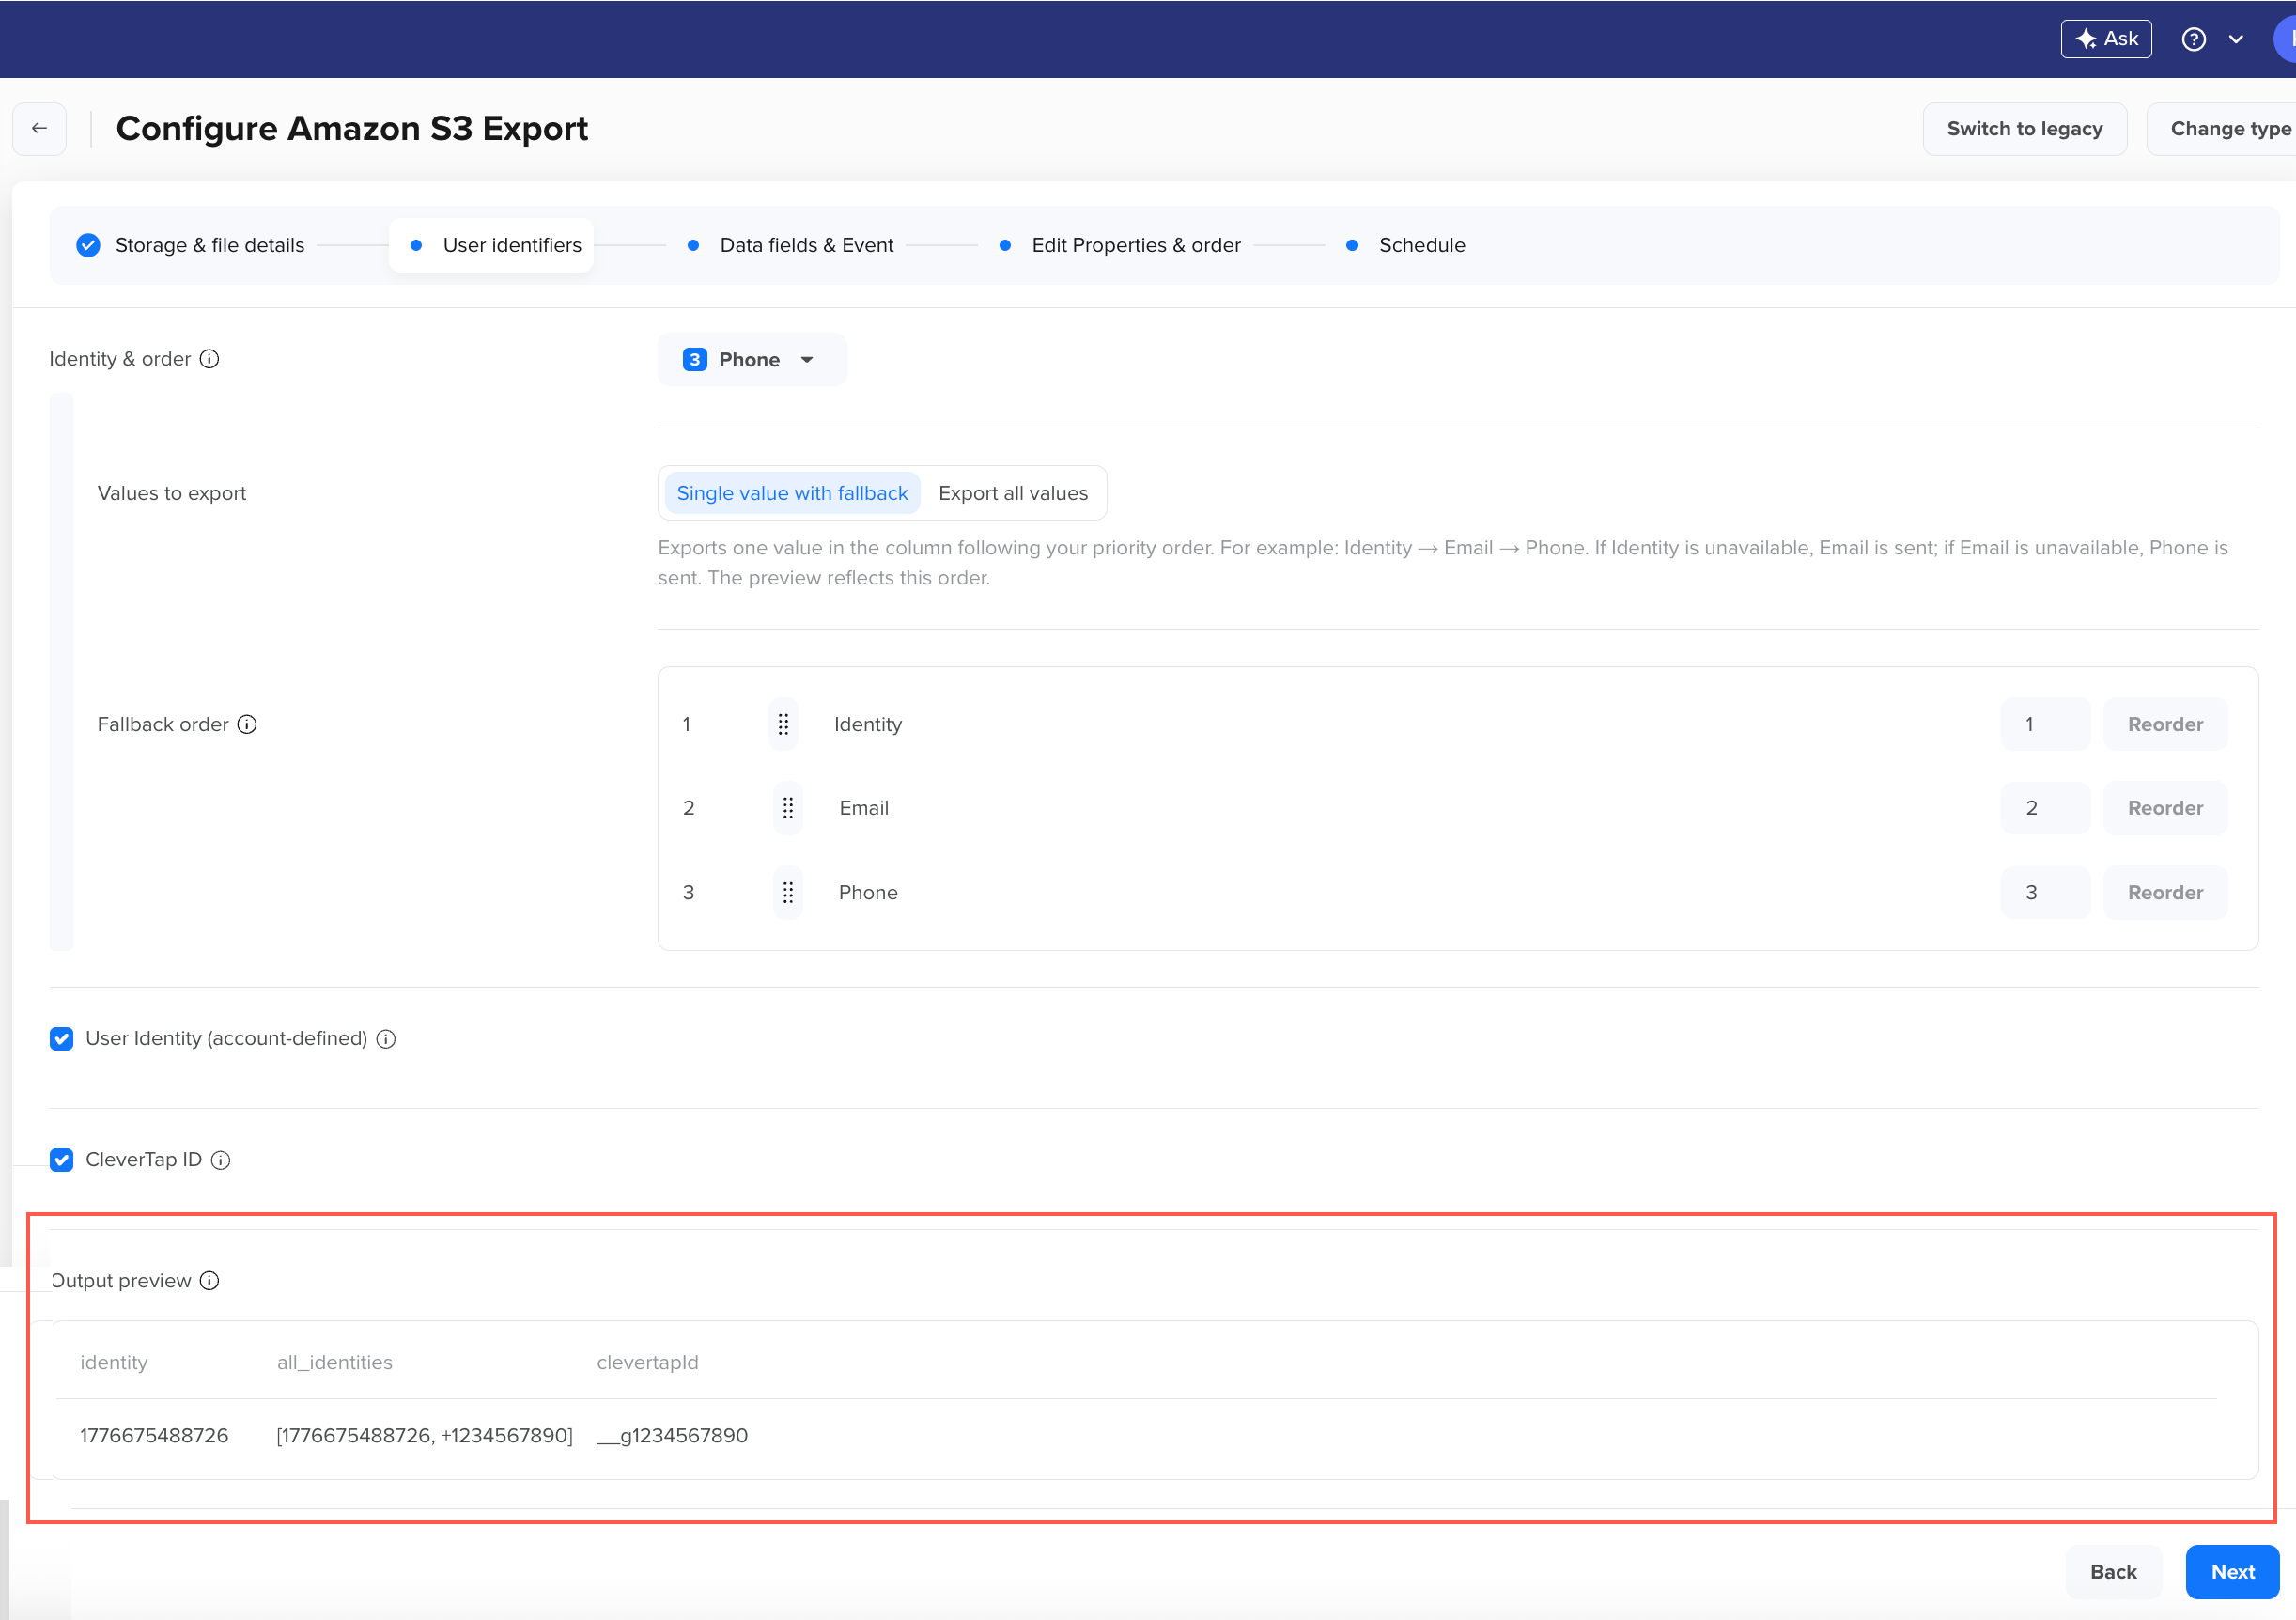
Define Export Preference: Choose how identifier values are written and define priority, as follows:
-
Single value with fallback: Exports a single identifier value per event record, following your priority order. If the first identifier is unavailable, CleverTap uses the next available identifier as per your defined sequence. Use the Reorder option to set priority by dragging rows or entering position numbers. For example, if the priority order is
Identity → Email → Phone → CRM ID [Custom properties], CleverTap exports the first available identifier in that order for each event record.
Define Export Preference when Exporting Single Value for Identity
- Export all values: Exports all selected identifiers in the identity column, listed in order of priority. Missing values are omitted. Select this option when reconciliation, deduplication, or identity joins are required downstream.
-
-
(Optional) Select Account-Defined User Identity: Turn ON the toggle to add all_identities, which exports all account-defined identifiers such as Identity, Email, Phone, for each event record. If a user does not have a value for one or more of these identifiers, those values are omitted from the list. Example: If a profile has identities user_123, user_456, and email [email protected], the output will be:
[user_123, user_456, [[email protected]]([email protected])]. -
Select CleverTap ID: Select this option to include clevertapId in your export. It is a unique, system-generated identifier assigned to each user profile. For more information, refer to User Profile Data Model.
-
Preview Output: Review how the selected identifiers will appear in the export. The live preview updates based on your selection and priority order, allowing you to verify the fallback behavior, data structure, and sample output format.
Preview Output
-
Click Next to proceed to the Data Fields & Event step.
Select Data Fields & Event
Configure which data fields and events to include in the export. Use the live Preview to verify selected fields, headers, and column order before proceeding.
-
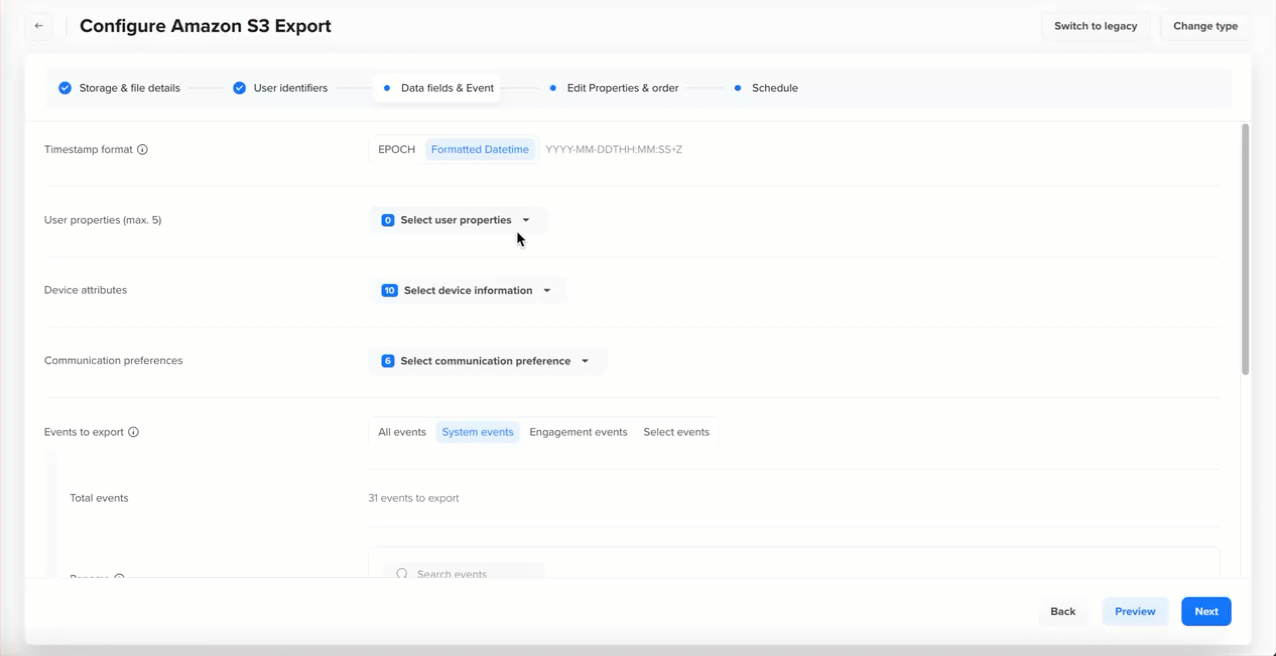
Select Timestamp Format Choose how the event timestamp is represented in the exported file:
- EPOCH: Exports the timestamp as a Unix epoch integer (for example,
1728000000). Use this when your system accepts timestamps in Unix format, or you want to simplify data processing in your system's timezone. - Formatted Datetime: Exports the timestamp as a human-readable datetime string with the timezone appended based on your CleverTap account timezone. Use this when the exported file will be reviewed directly or consumed by systems that require formatted dates.
- EPOCH: Exports the timestamp as a Unix epoch integer (for example,
-
Select User Properties (max. 5): Optionally include up to 5 user profile properties alongside each event record. These are profile-level attributes (for example,
Email,Phone,Name,Gender,DOB) that provide user context for each exported event. Use the dropdown to search and select from available user properties, then click Apply.Once selected, use the Rename and reorder panel to customize column headers and reorder the selected user properties using the drag handles or the Reorder button.
Select, Rename and Reorder User Properties
NoteUser properties exported here reflect the profile state at the time of export, not at the time the event occurred.
-
Select Device Attributes Choose which device-level attributes captured at event time to include.
-
Click the Select device information dropdown and select from the following available attributes:
platform,token,make,model,appVersion,sdkVersion,osVersion,browser,dpi, anddimensions. -
Click Apply to confirm your selection.
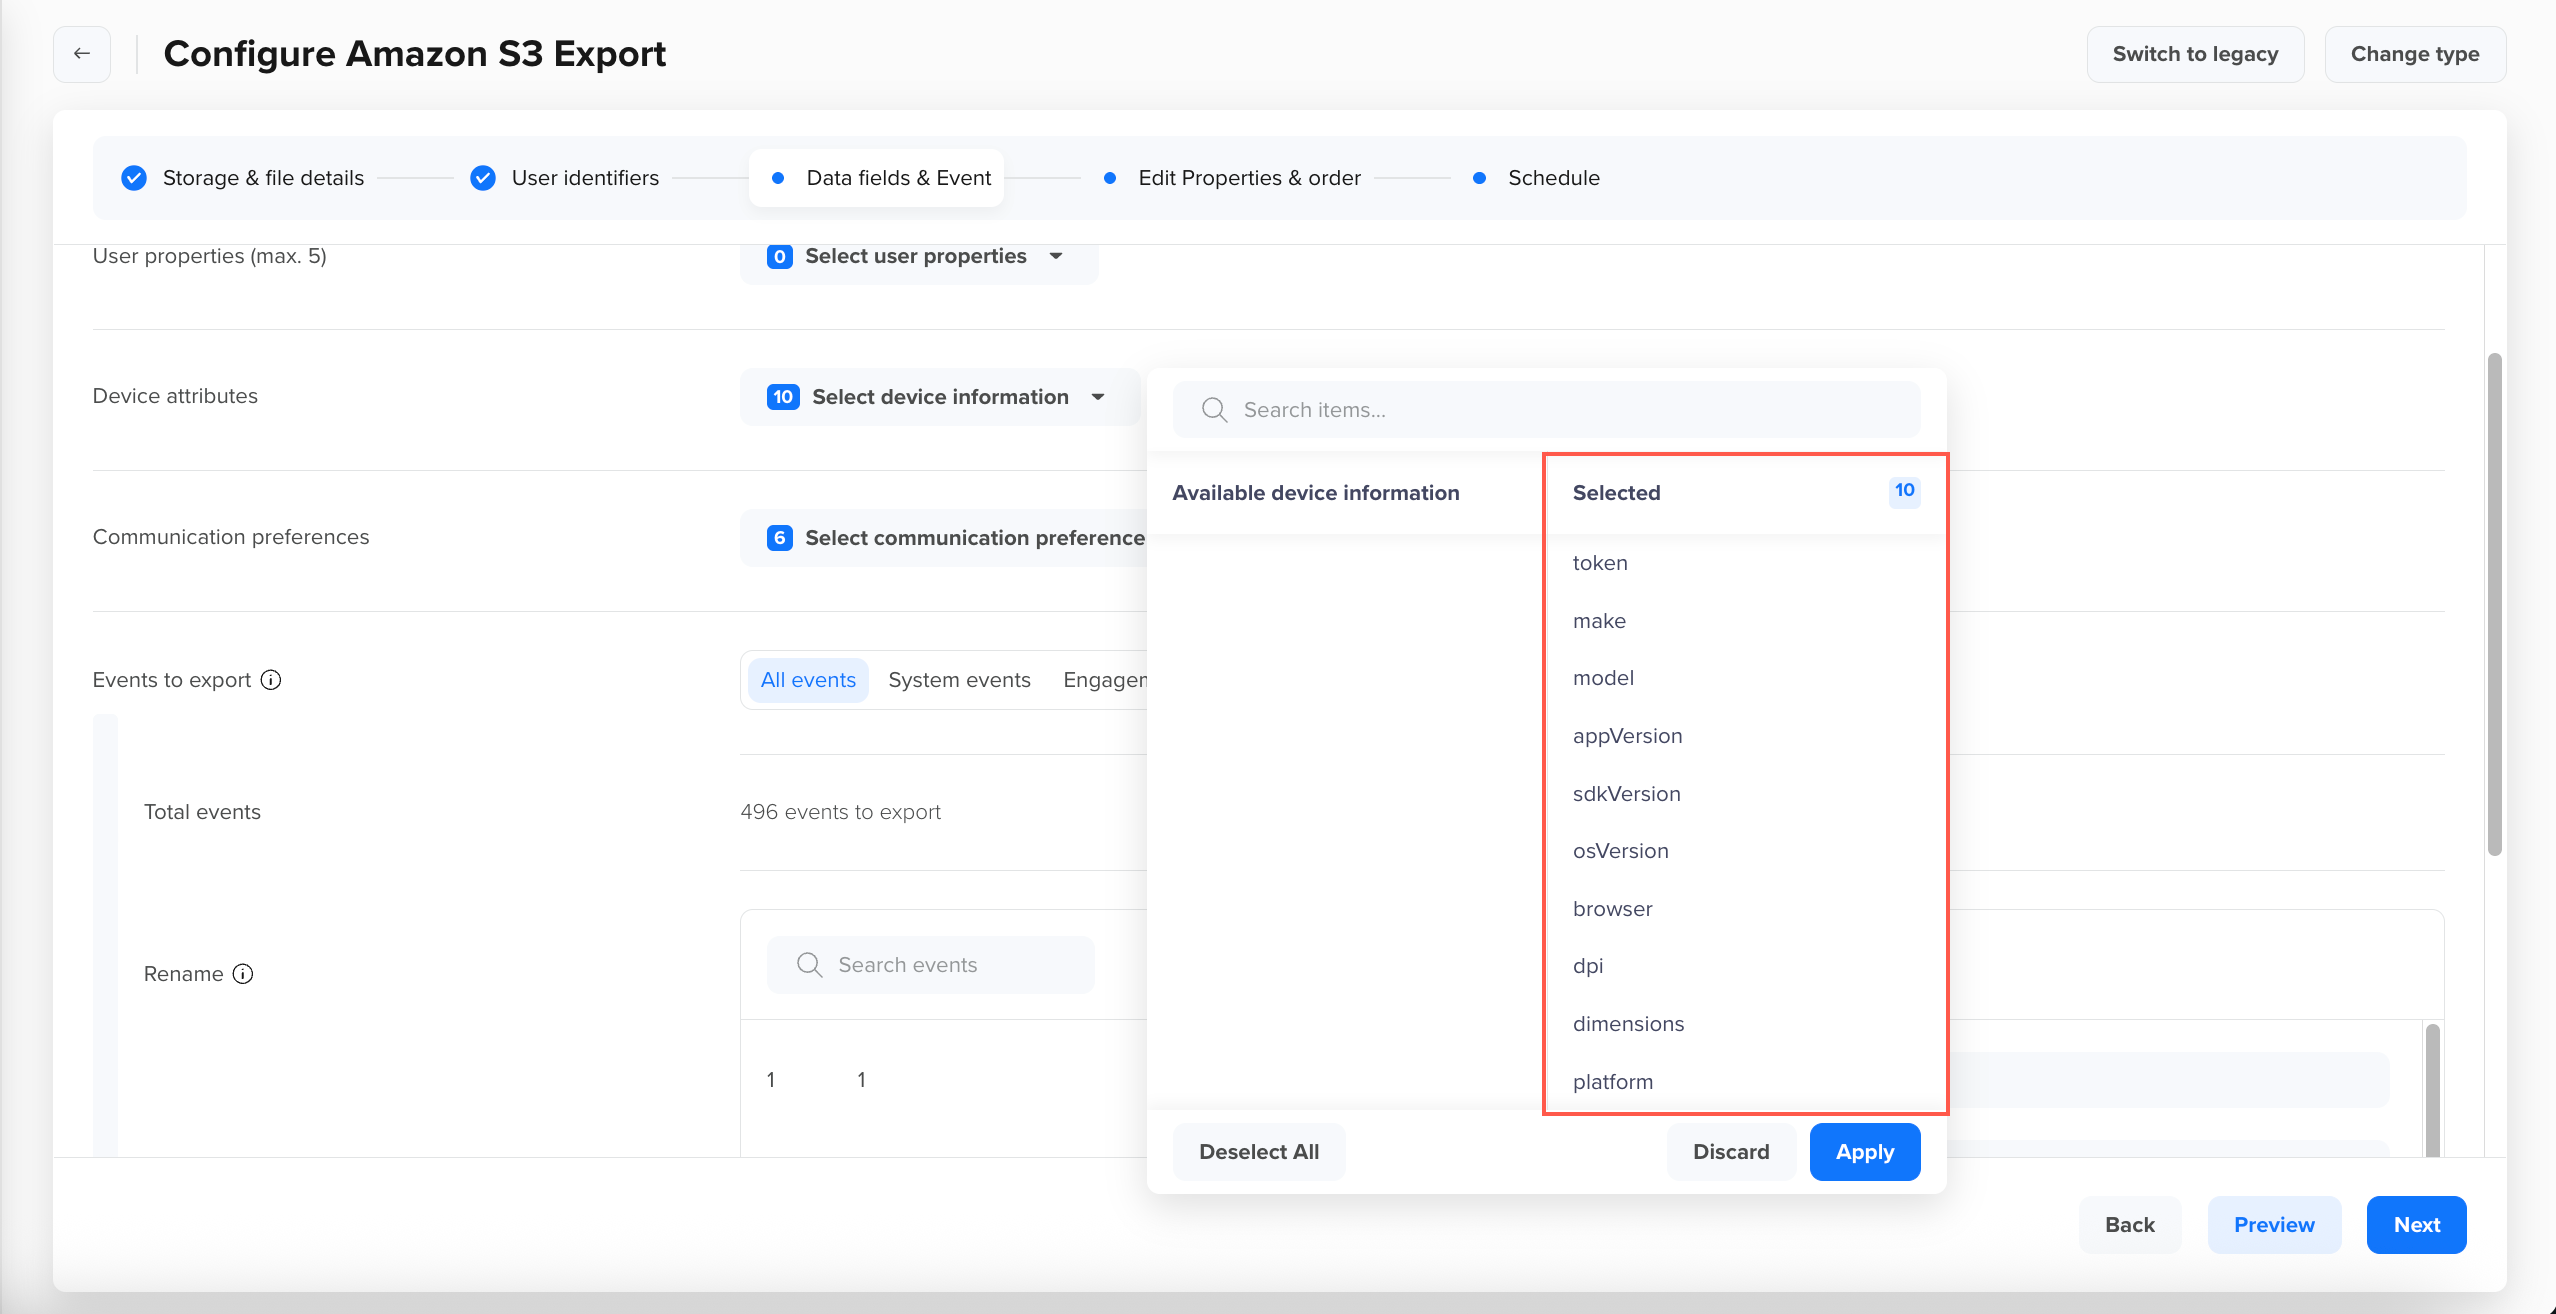
Include Device Attributes
NoteIf a device attribute is unavailable for a given event record, the corresponding column appears blank in the exported file.
-
-
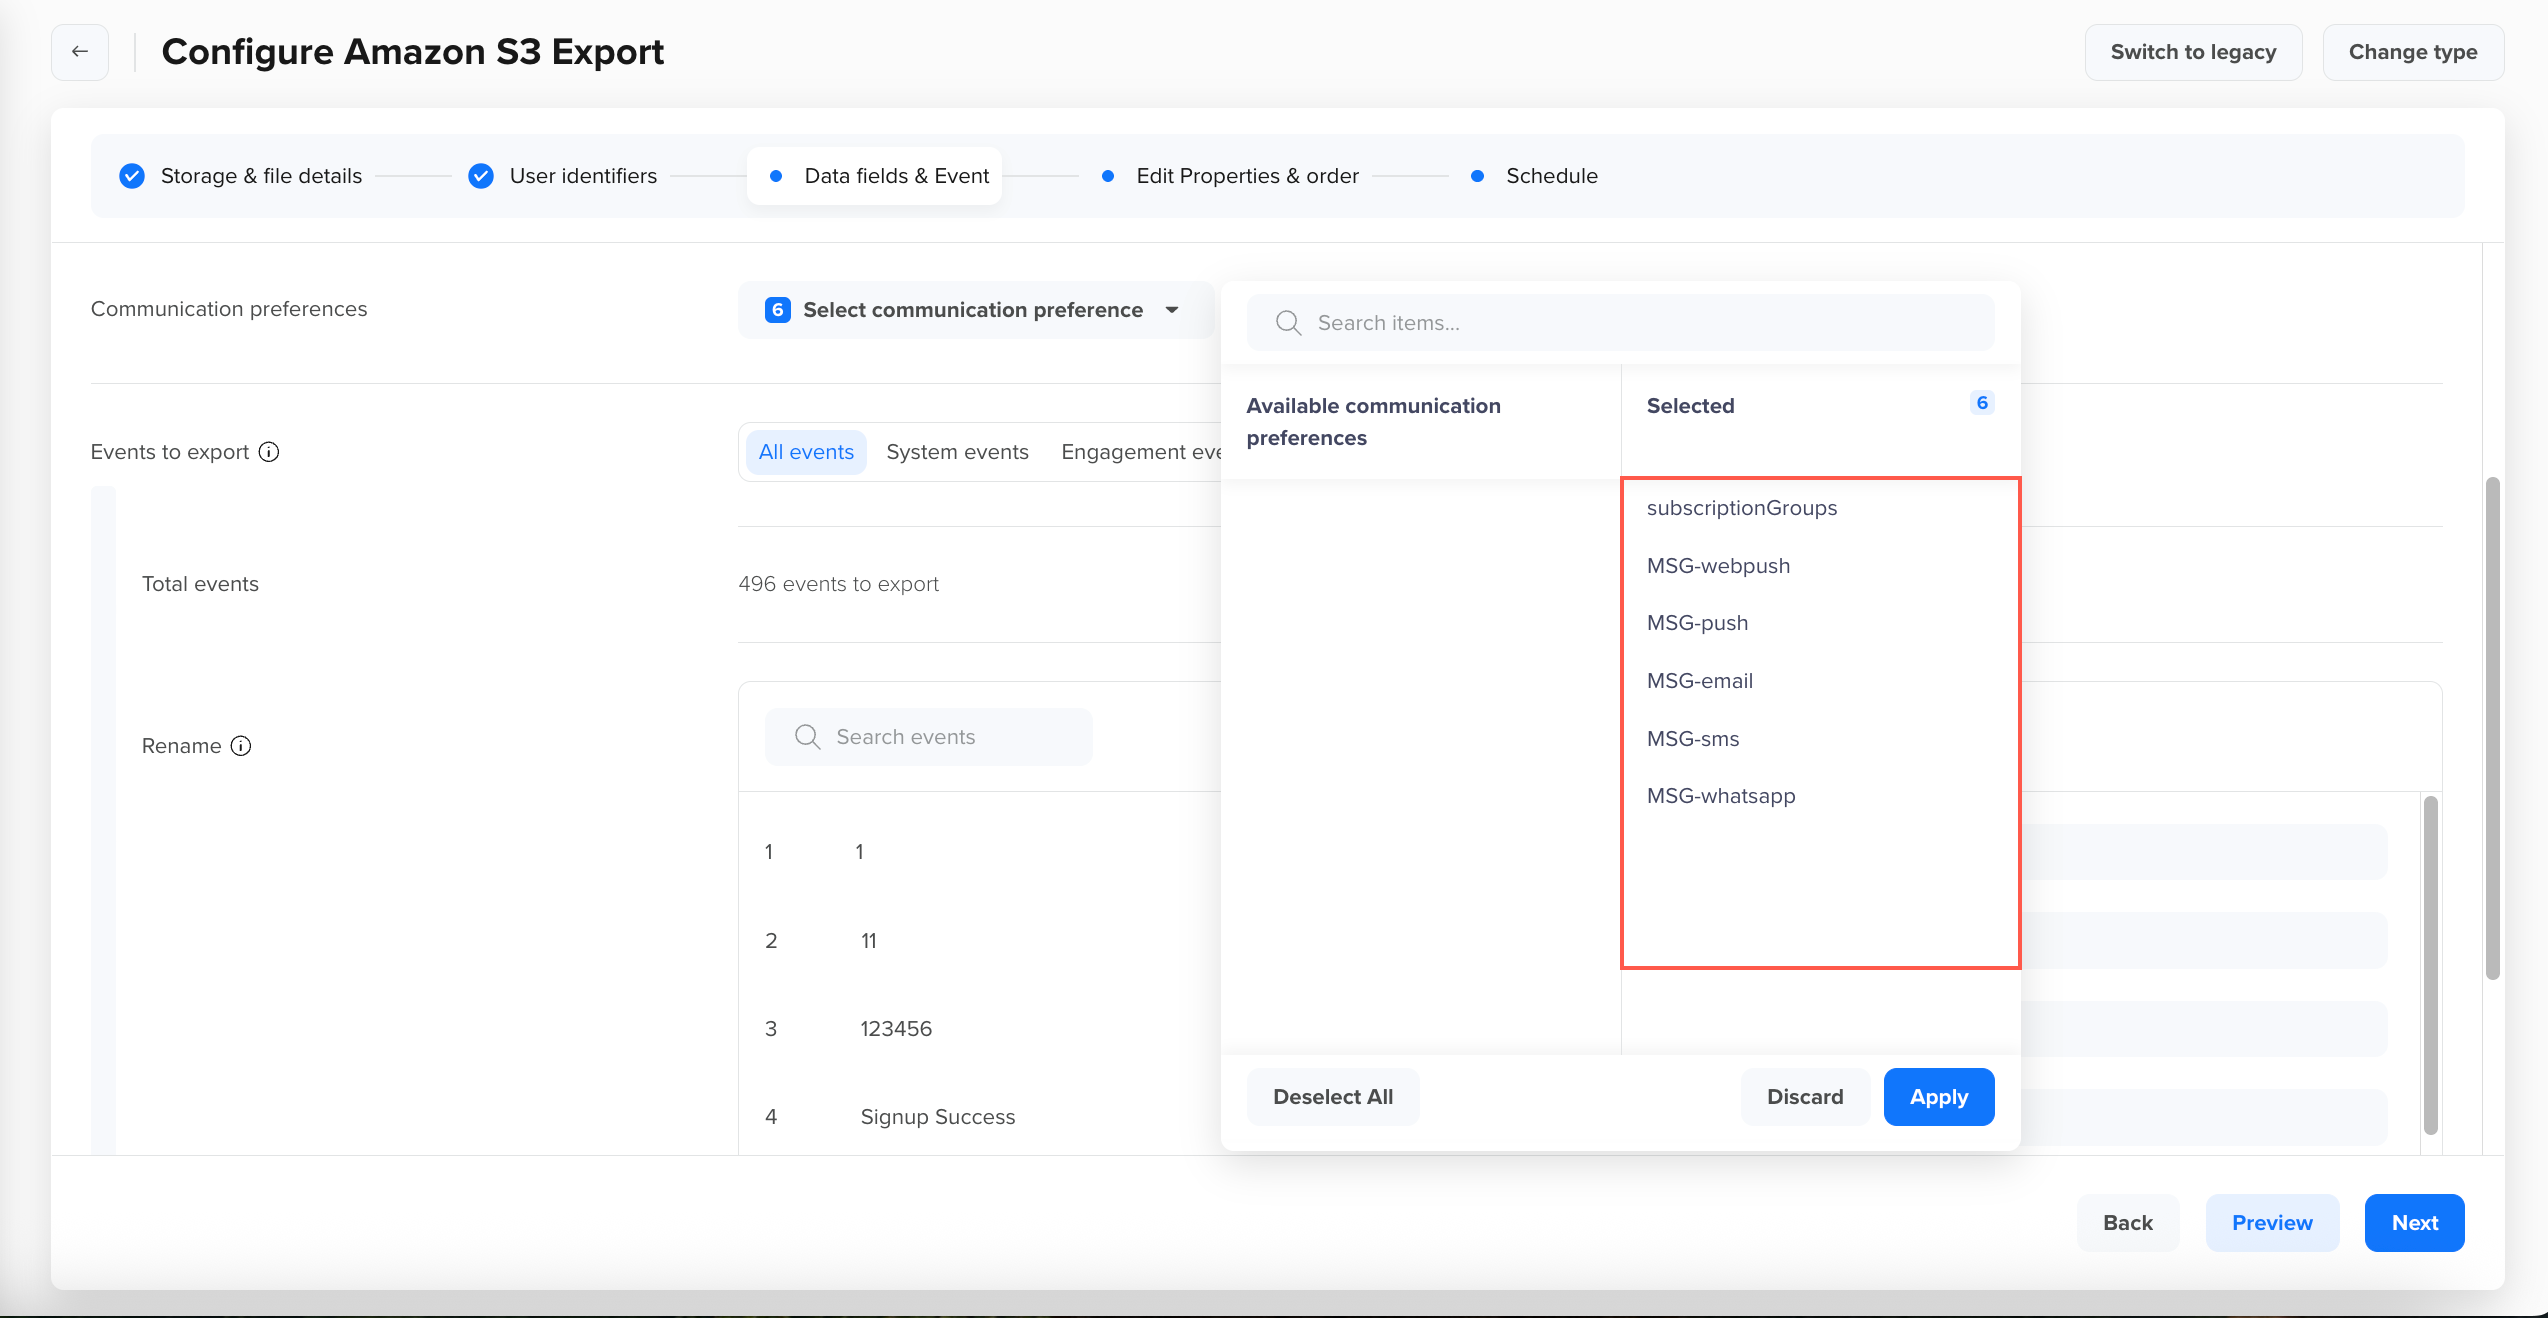
Add Communication Preferences Include the user's opt-in/opt-out status across messaging channels alongside each event record.
-
Click the Select communication preference dropdown and select one or more options:
subscriptionGroups,MSG-webpush,MSG-push,MSG-email,MSG-sms, andMSG-whatsapp. -
Click Apply to confirm your selection. If a profile has no value for a selected preference, the corresponding column appears blank.
Export Communication Preferences
-
-
Select Events to Export Choose which events to include in the export using one of the following tabs:
- All events: Exports data for every event tracked in your CleverTap account. The total count of events to be exported is shown under Total events.
- System events: Exports only CleverTap system-generated events. For the full list of system events, refer to System Events. Any new system events released by CleverTap in the future are automatically included in this export.
- Engagement events: Exports a fixed set of events related to campaign and messaging engagement. Use this for delivery and interaction analysis across your messaging channels. The list of engagement events is fixed and no new events are added automatically. For the full list of engagement events, refer to Engagement Events.
- Select events: Exports only the specific events you choose from your account's event schema. Click the Select events dropdown, search for and select the events you want to export, and click Apply. The Total events counter updates to reflect your selection.
-
The total count of events to be exported is shown under Total events.
-
Rename Events (optional): After selecting events, each event in the list displays an editable Rename field on the right. You can enter a custom display name for any event to use in the export output instead of the original event name. For example, rename
Notification SenttoPush Notification Sentor any name that suits your data pipeline conventions.NoteRenaming Events only affects the event name in the export; it does not change the original property name in CleverTap. Also, the file name will have the original filename instead of the renamed one.
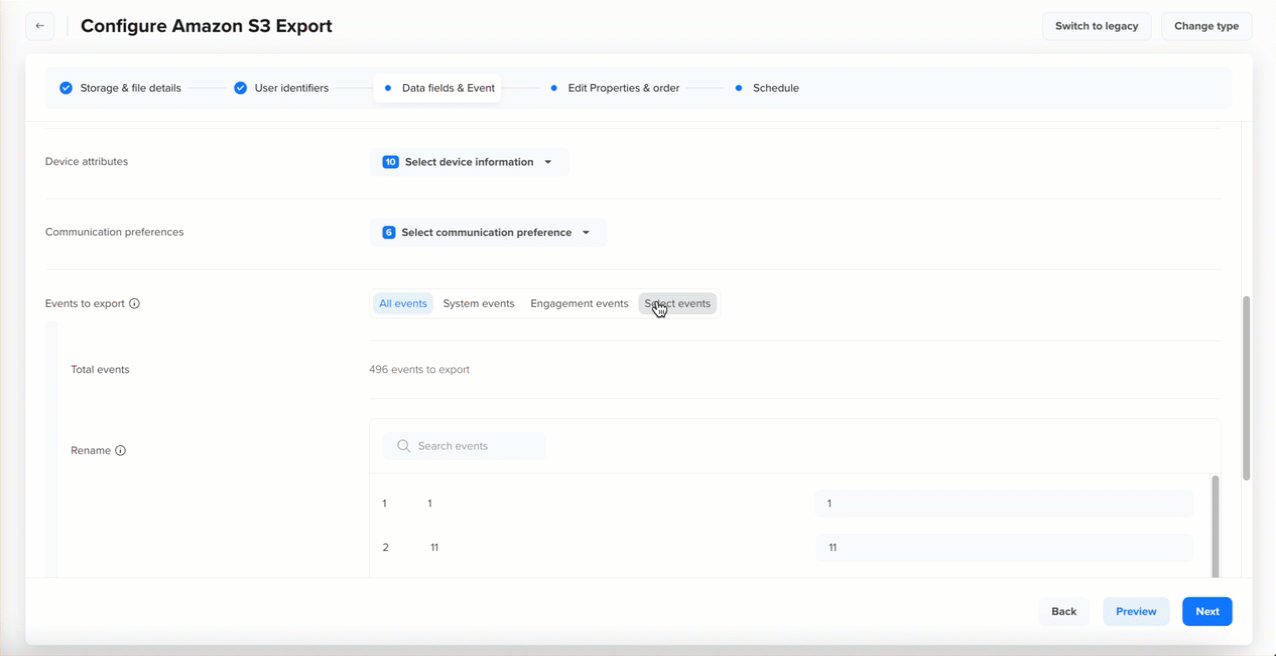
Select Events to Export
- Click Preview to validate the configuration or click Next to proceed to Edit Properties & Order.
Edit Properties & Order
Configure event properties for each selected event - choose which properties to include, rename column headers, set column order, and control schema behavior. This step uses a two-panel layout: the left panel lists all Selected Events, and the right panel shows Properties to export from: [Event Name] for the event currently in focus. Click any event in the left panel to configure its properties.
-
Select Event Properties For each selected event, use the properties dropdown in the right panel to choose which event properties to include. Click the dropdown, search or browse Available event properties, select the properties you want, and click Apply. The selected properties appear in the reorder list below.
For example, for
Notification Sent, available properties include:Campaign type,Campaign id,Campaign name,Variant,Campaign labels,Journey id,Journey node ID,Journey Version ID,Journey name, andControl Group Name.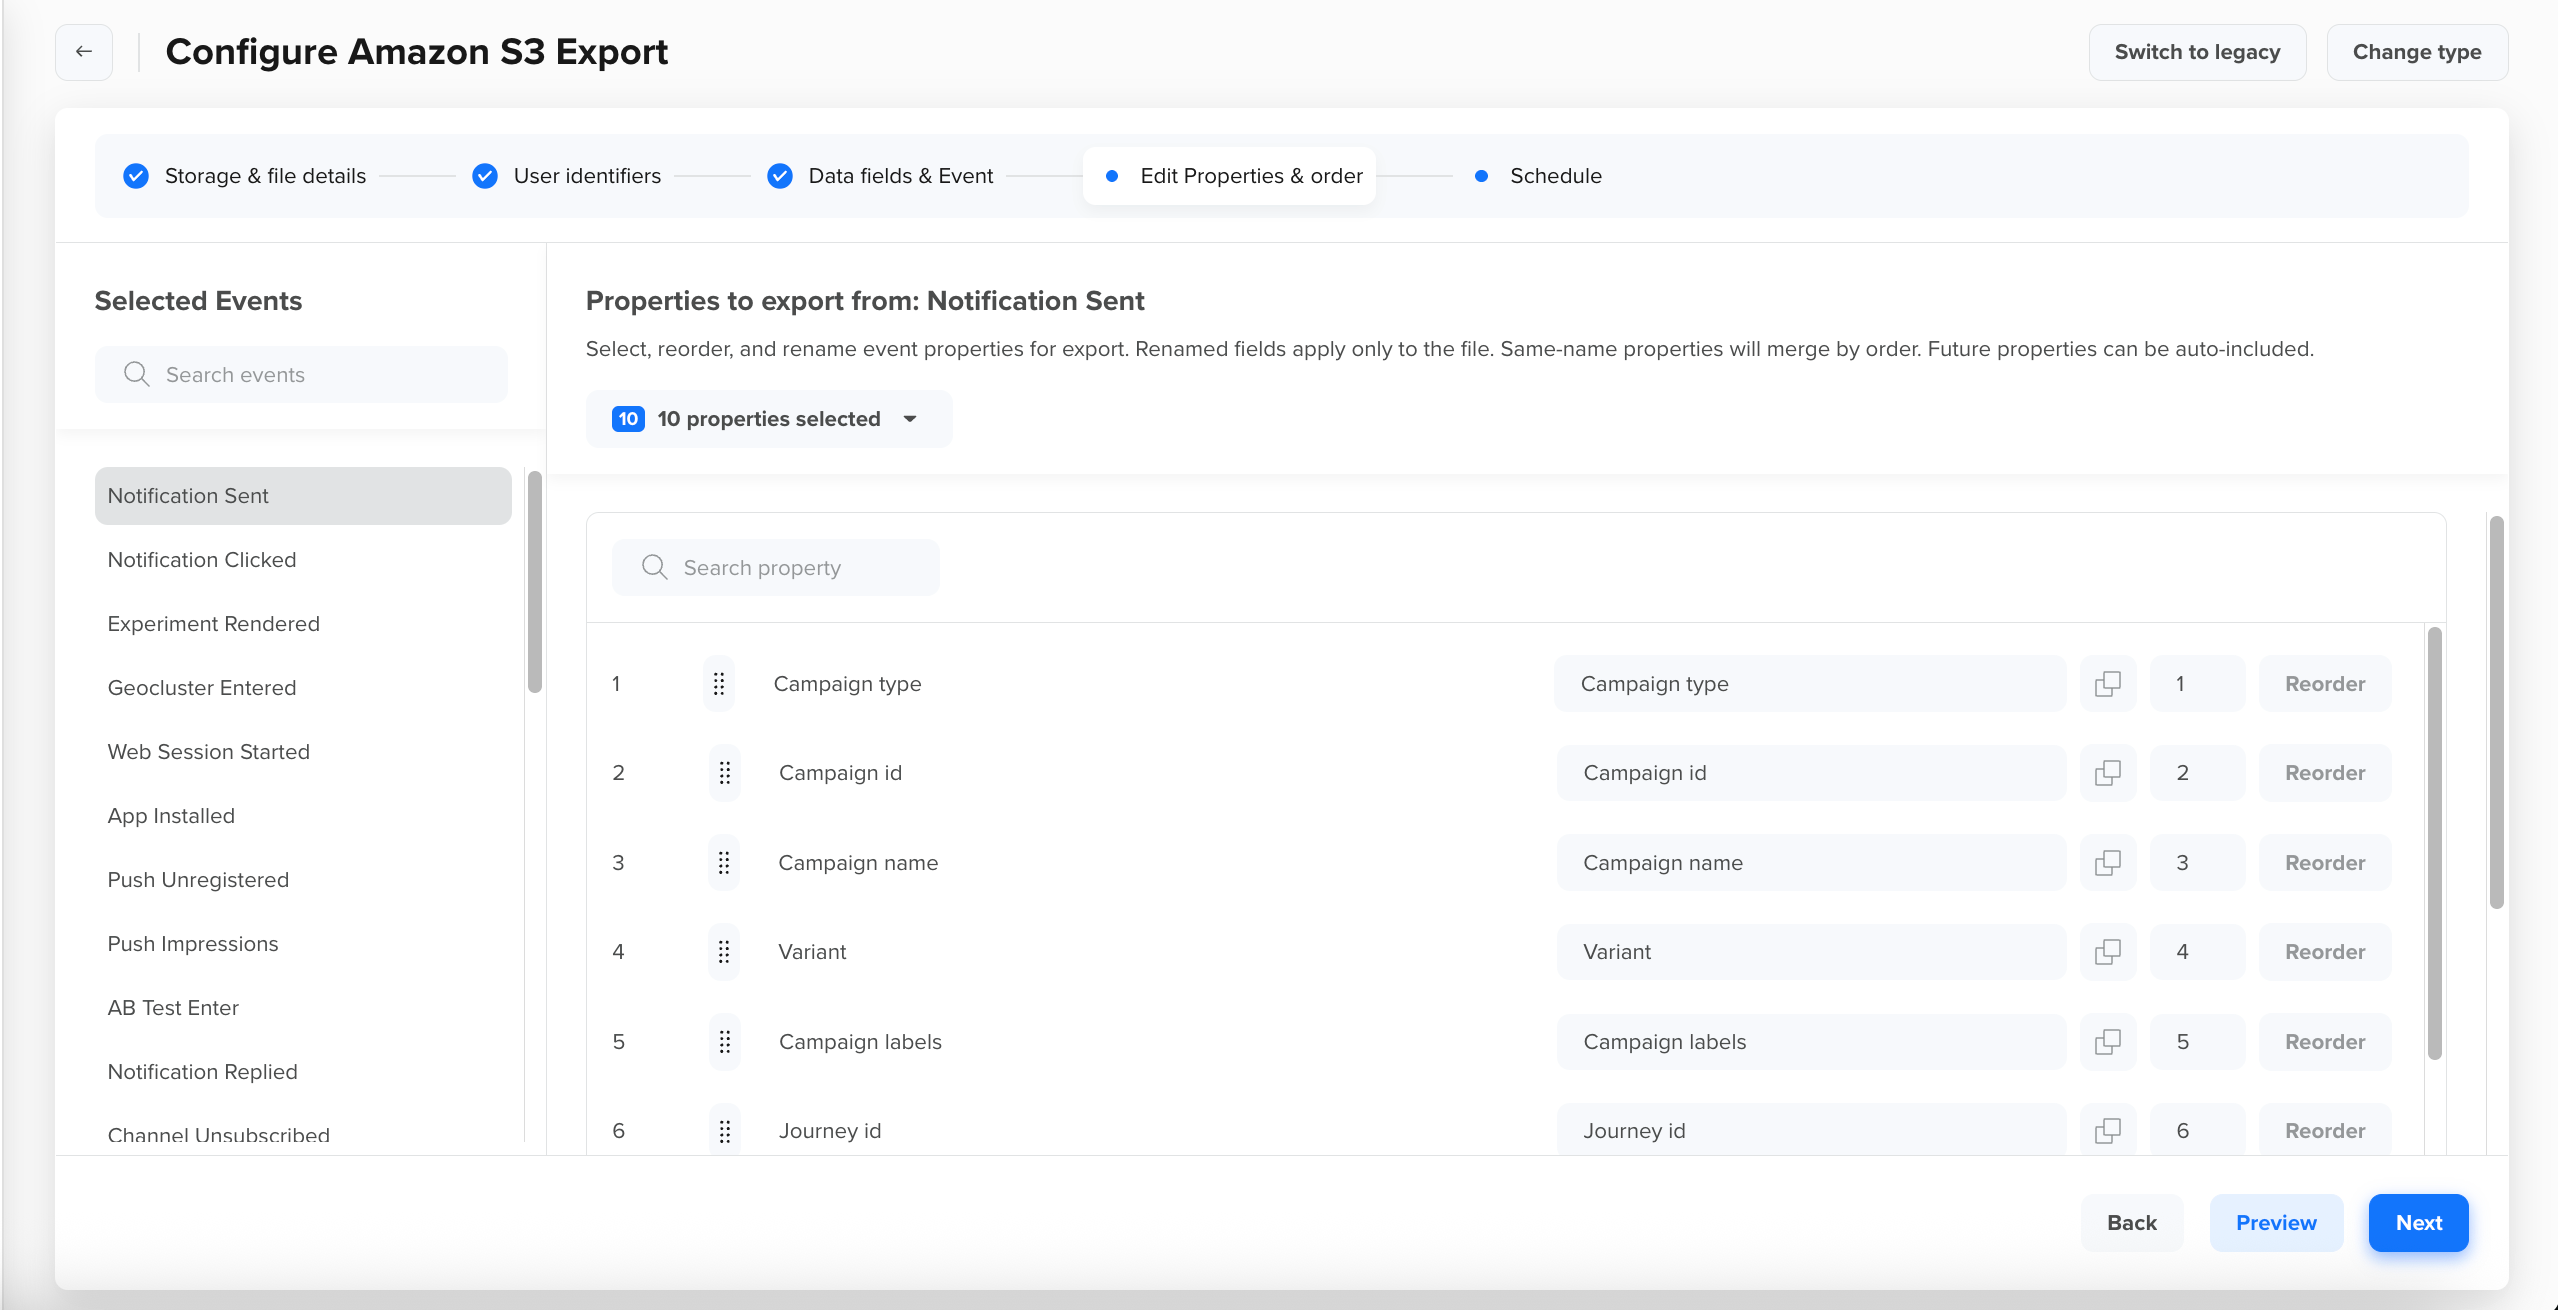
Select Event Properties for the Selected Event
-
Rename & Reorder Properties For each event, use the property list in the right panel to rename or reorder the selected properties. The left column shows the original property name, and the right column shows an editable field for the export column header. Use the drag handles or the Reorder button to reorder the columns. Once you rename a property, click the Copy icon next to it to apply that rename to the same property across all other selected events in the left panel. For example:
-
To match your data warehouse naming convention, rename
Campaign idtocampaignIdby editing the field in the right column. -
To prioritize push notification properties, drag
Campaign type,Campaign id, andCampaign nameto the top of the list andJourney idandJourney nameto the bottom.
Points to Consider- Renaming only affects the column header in the export; it does not change the original property name in CleverTap.
- Use the search bar above the property list to find specific fields.
- Drag rows to rearrange columns, or use the Reorder button to set the export sequence.
- Use the Copy icon to apply a property rename to all other selected events that share the same property name.
- If a property is missing for a given event record, the column still appears but remains blank. The key is removed from the JSON file.
- Reordering does not impact data collection or internal storage - it only affects the file structure.
- If two or more properties share the same name, their values are merged in data order, the first non-null value is exported. If all values are null,
nullis exported. If you rename multiple properties to the same name, the duplicate is skipped and the next property in the order is exported in its place.
-
-
Manage Schema Updates At the bottom of the right panel for each event, choose how new event properties are handled in future export runs:
-
Add new properties at the end: Any new event properties added after the export is created are automatically appended as new columns at the end of the file. Existing columns and names remain unchanged, preventing script breaks for scripts that rely on the current column order.
-
Lock current schema: The file structure is fixed once the export is created. New event properties are excluded until you manually stop this export and create a new one with the updated schema. For example, if your downstream pipeline breaks when new columns appear unexpectedly, choose this option to keep the schema stable.
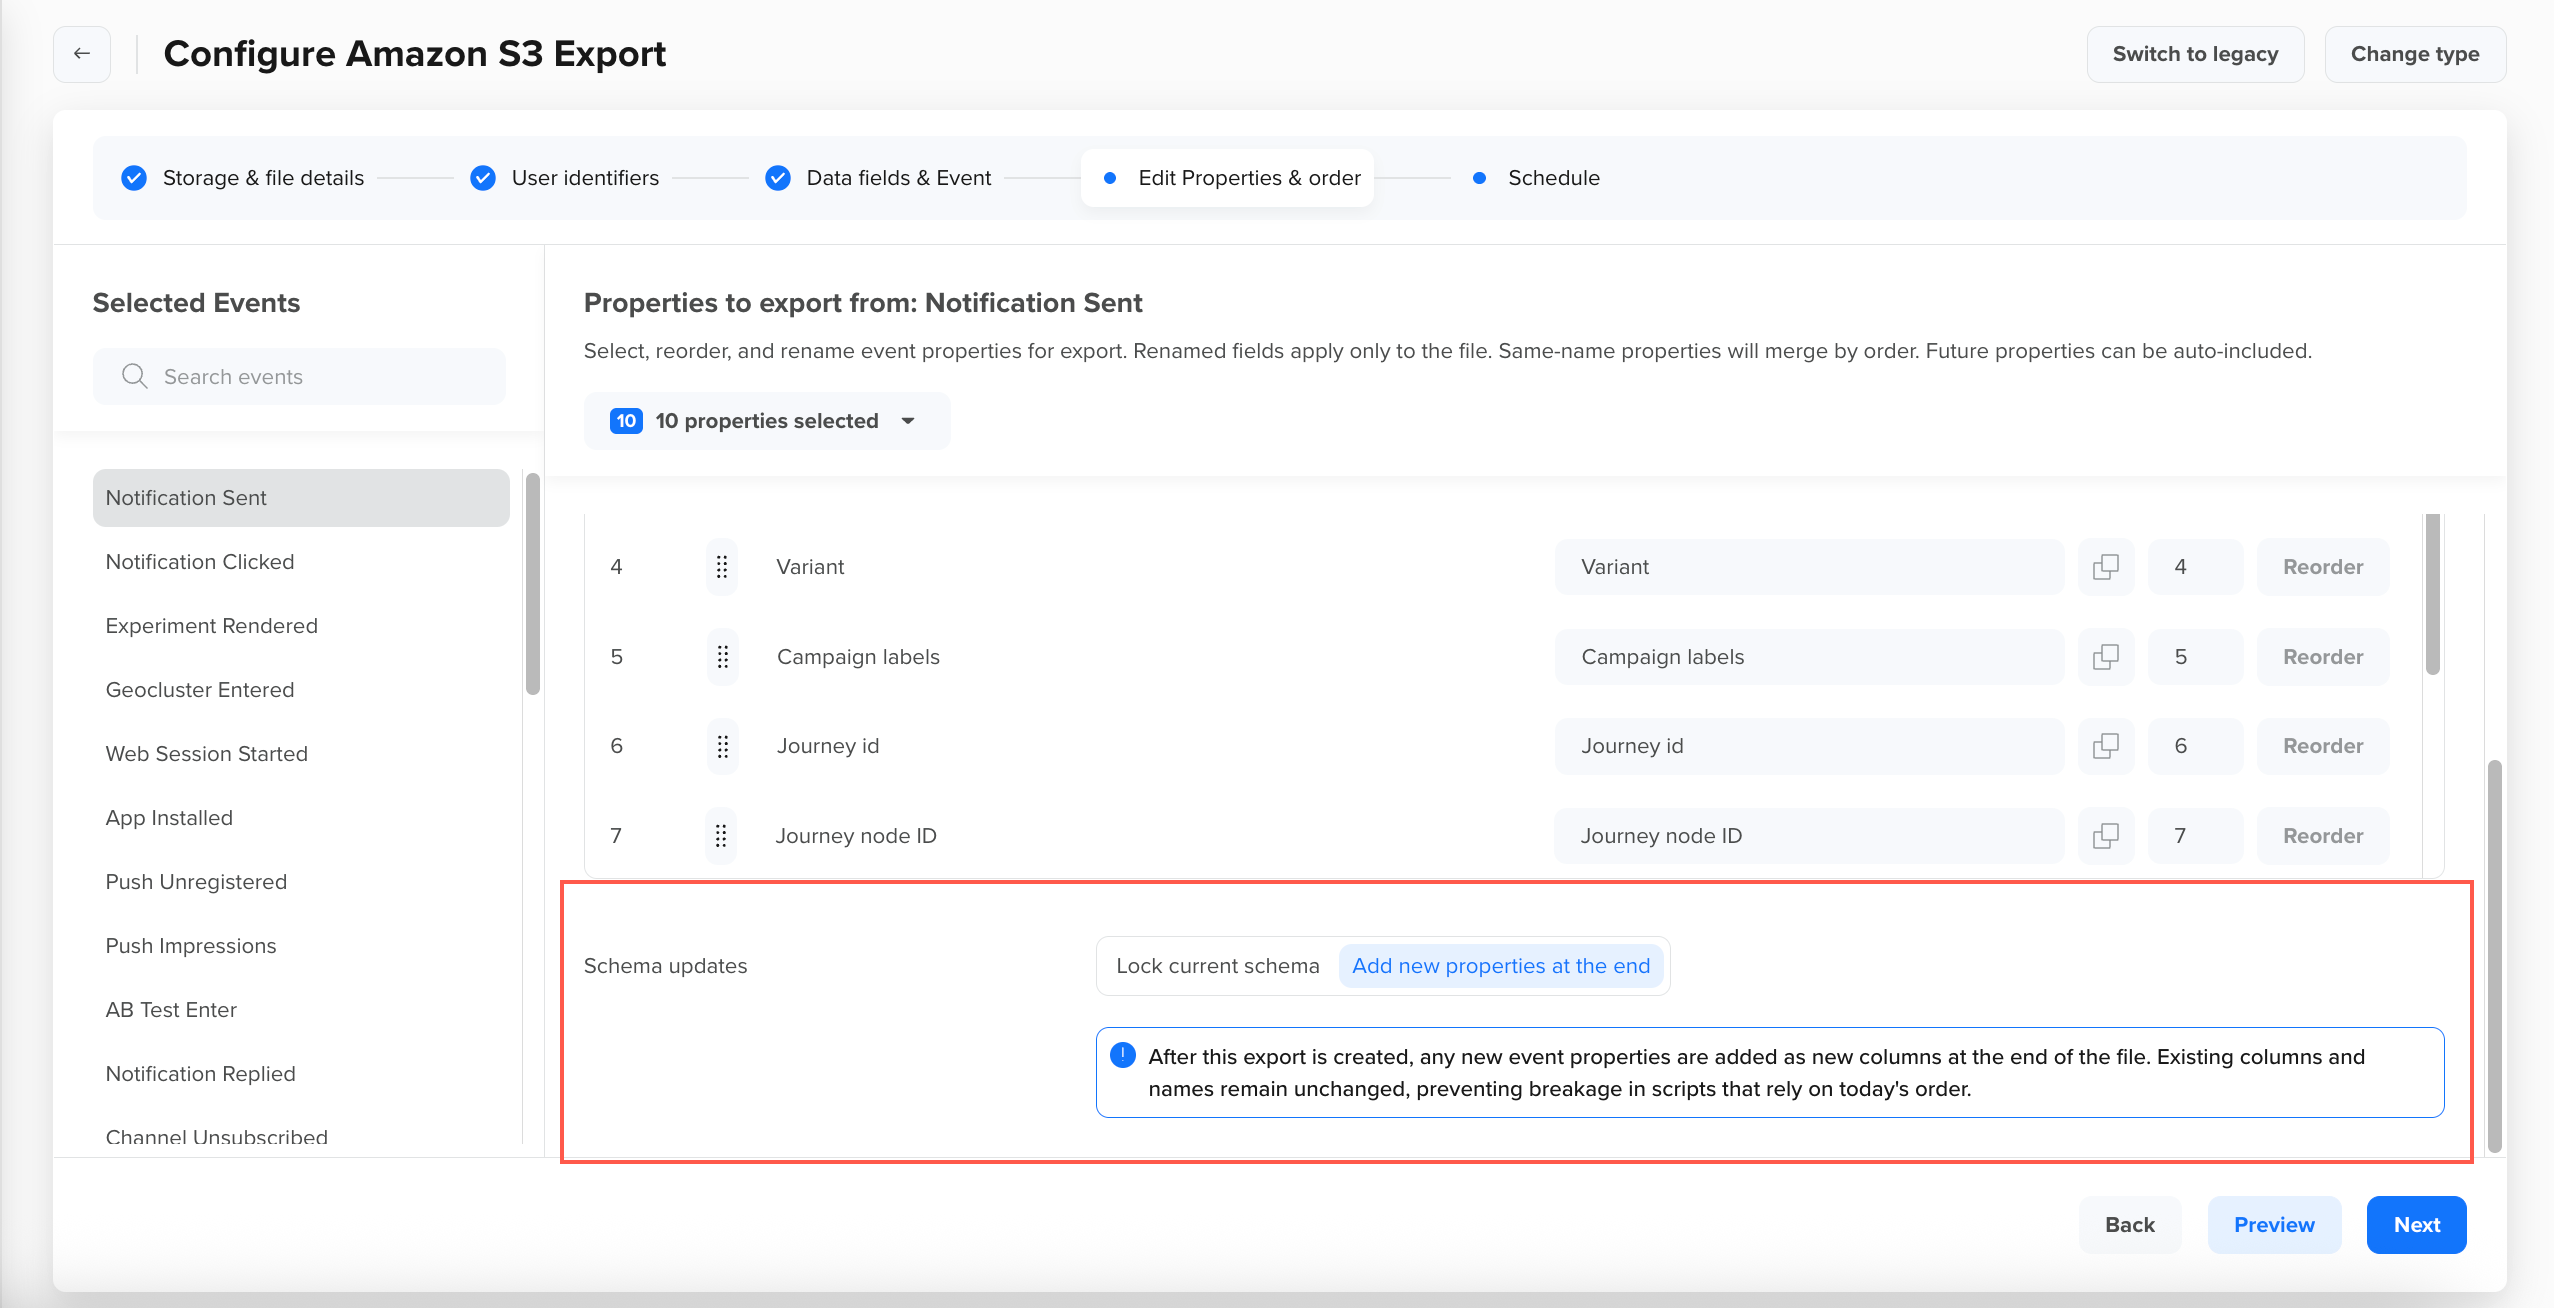
Schema Updates
TipChoose Add new properties at the end if you want to capture all event data automatically. Choose Lock current schema if your downstream pipelines require a fixed schema structure and cannot tolerate new columns being appended.
-
-
Repeat steps 1 through 3 for each event in the Selected Events panel. Click Preview to review the complete data structure and click Next to configure the export schedule.
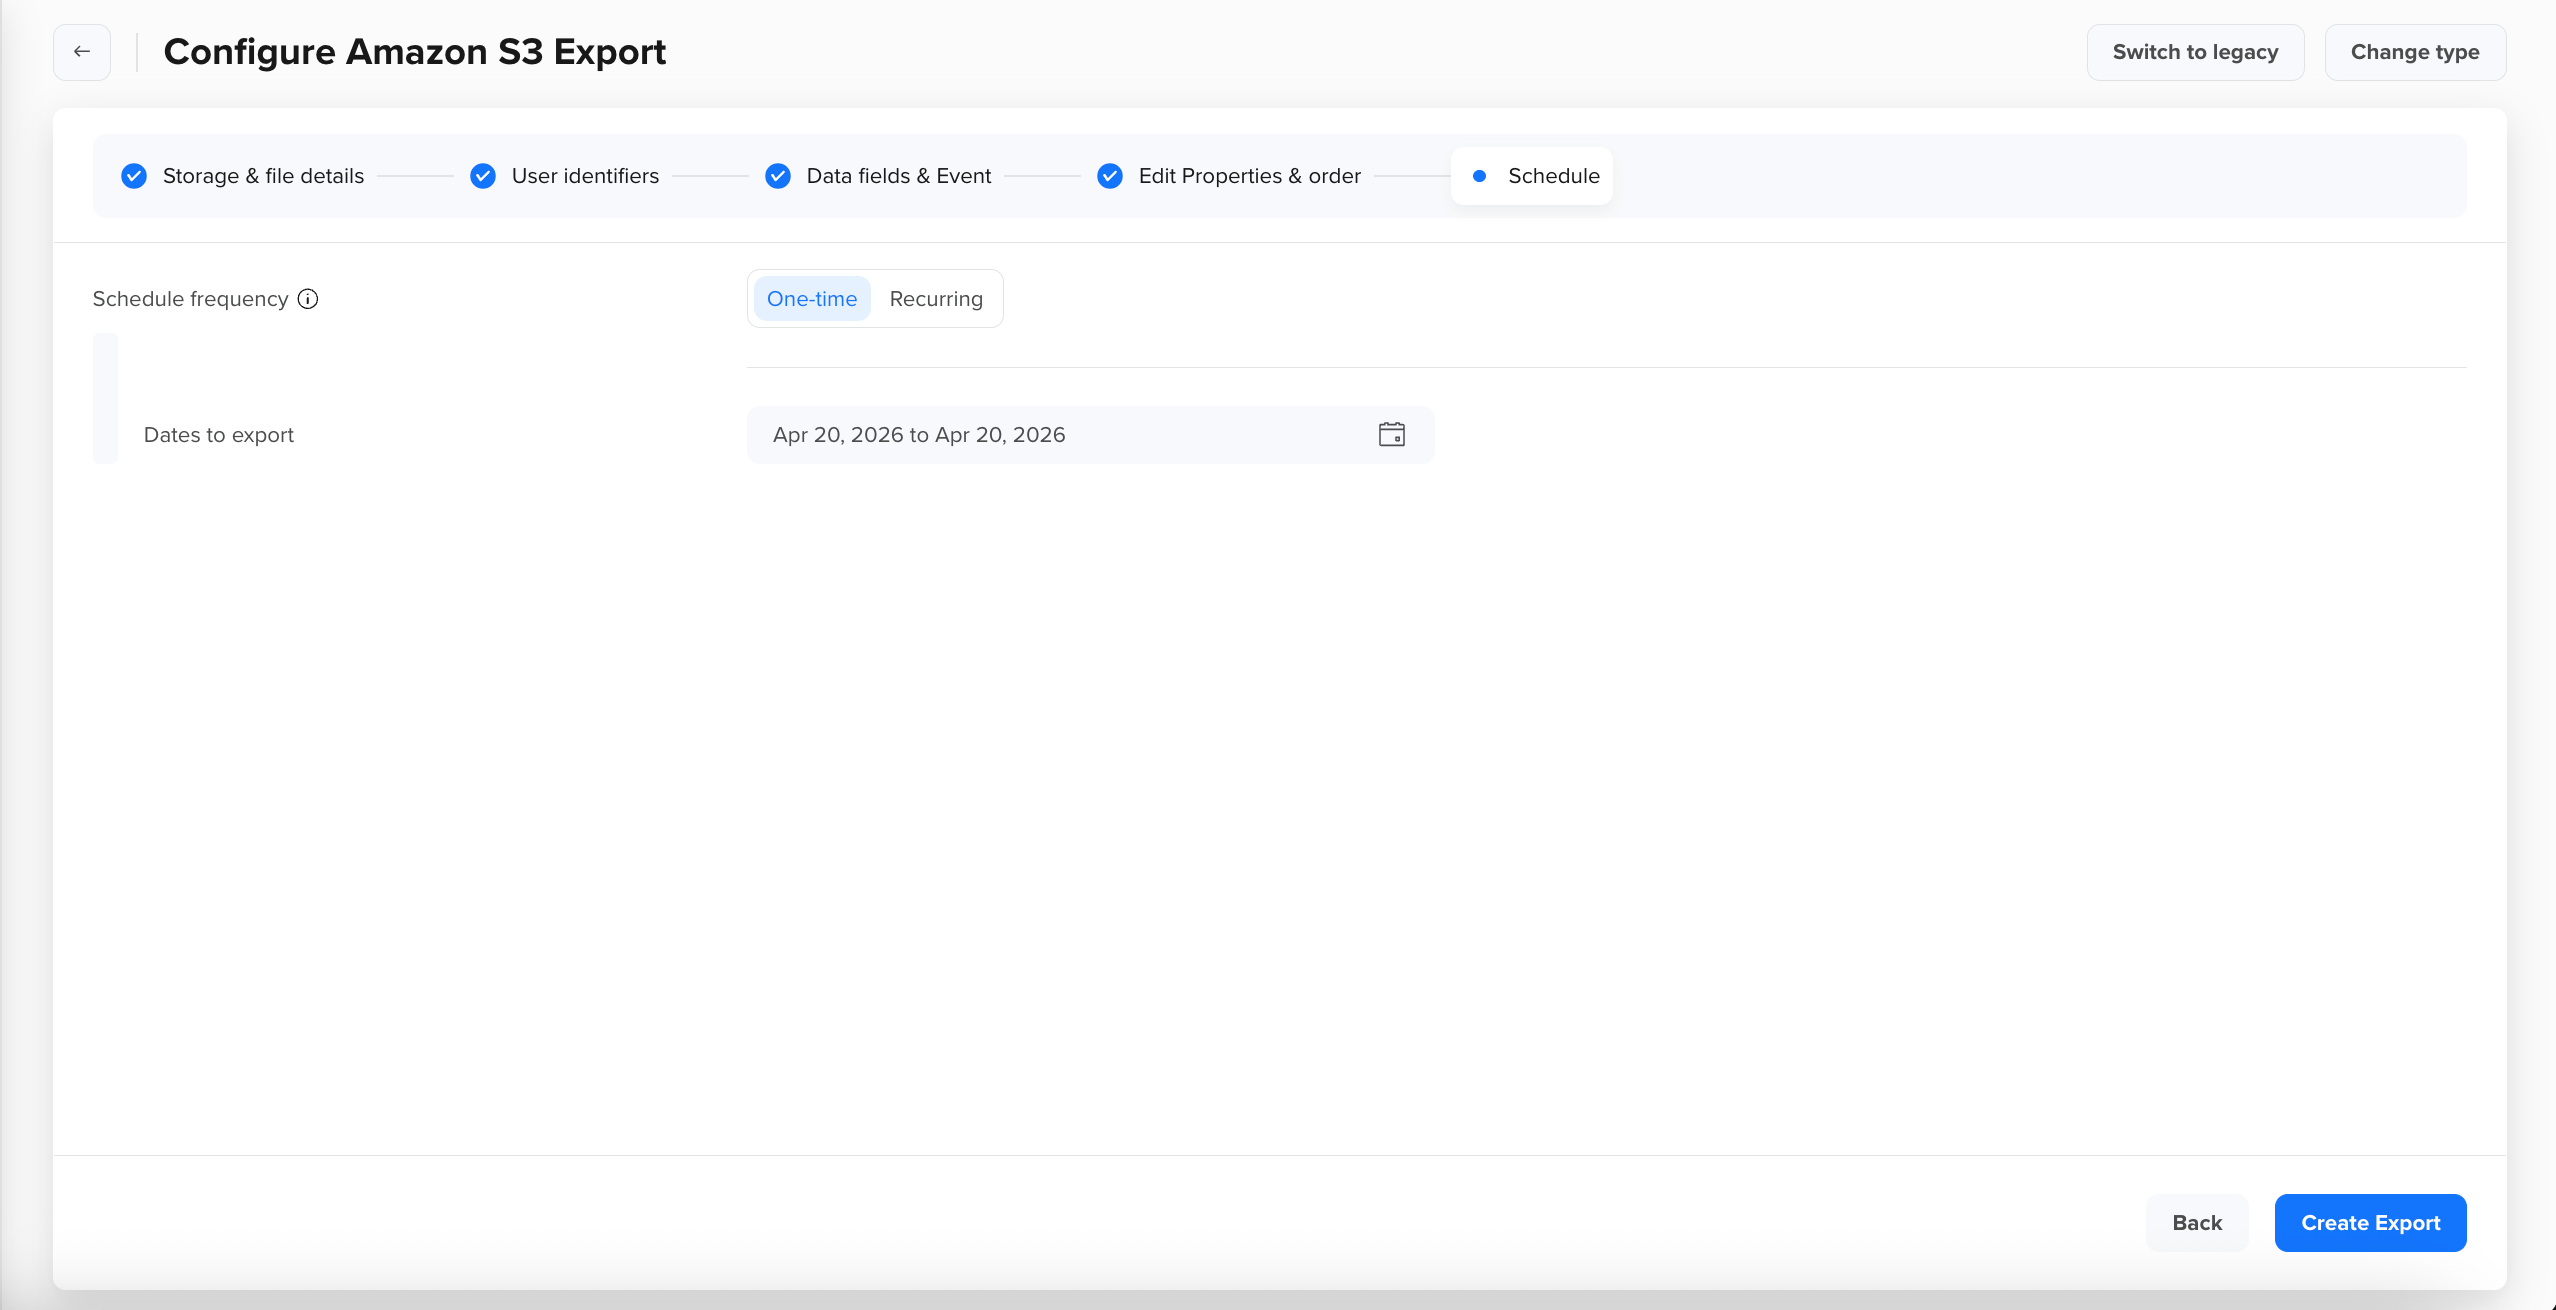
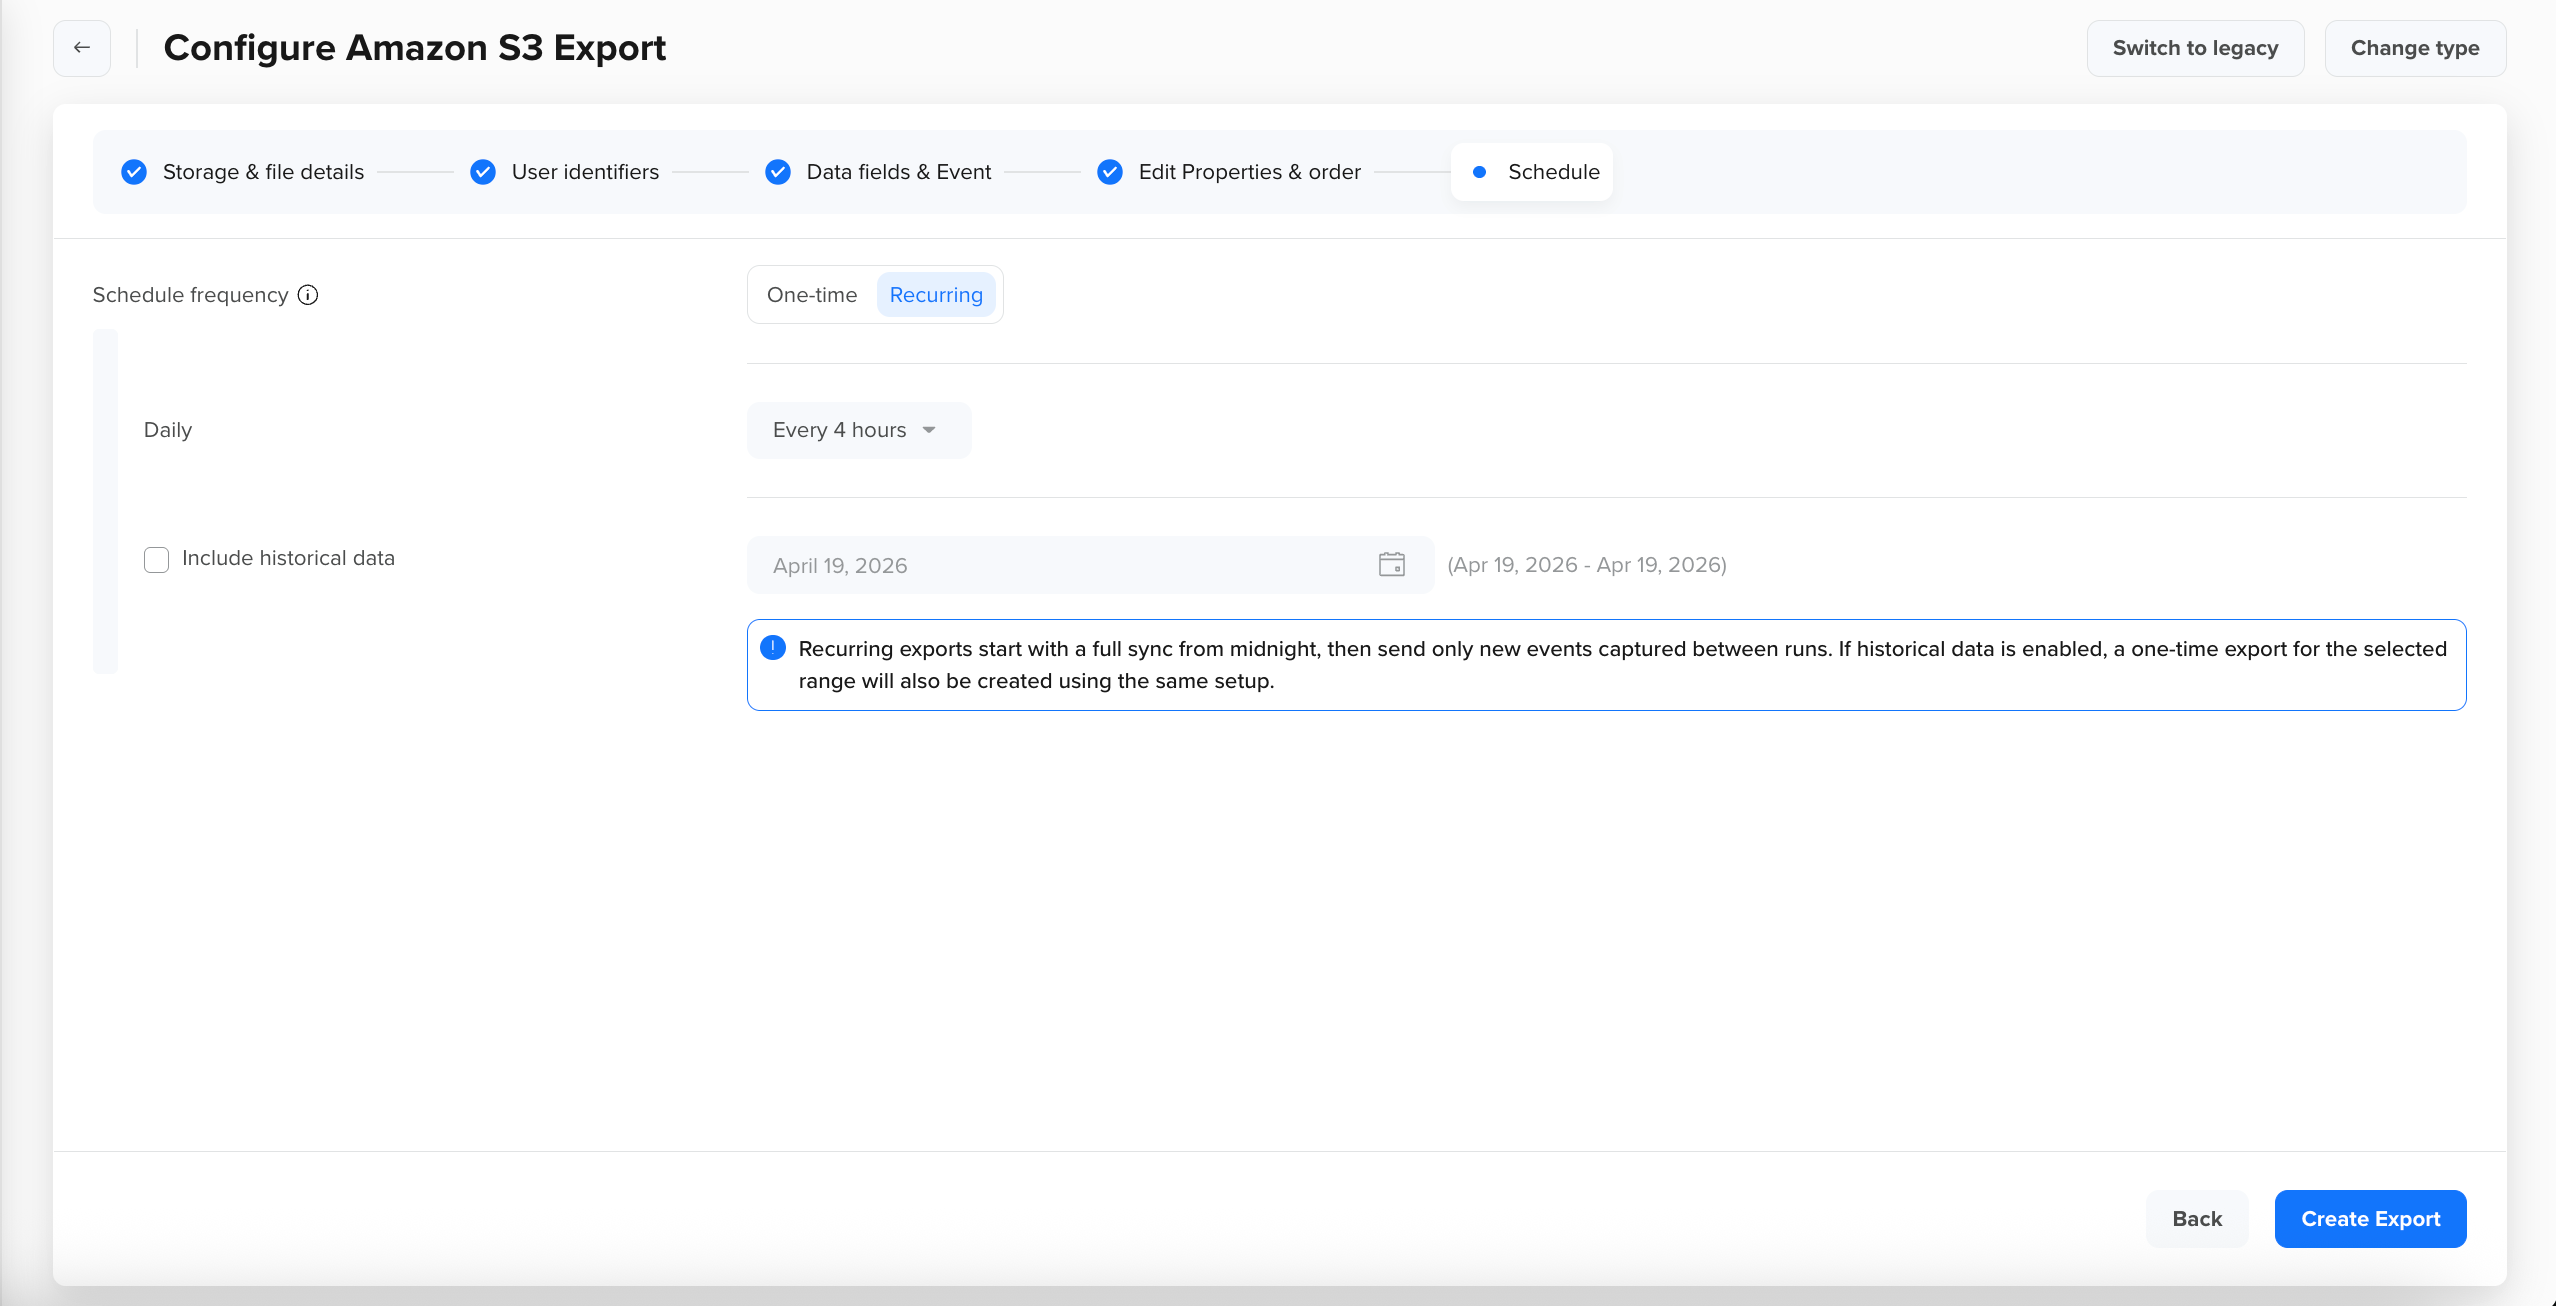
Define Schedule for Export
Define how often event data should be exported to your destination.
-
Choose Schedule Frequency Select how often the export should run:
- One-time: Runs a single export for a specific date range you define. Use this for ad-hoc analysis, backfills, or initial data migration.
- Recurring: Automatically exports data on a repeating schedule. Use when downstream systems expect a regular file at a fixed cadence.
-
Configure One-time Export (One-time only) Select the Dates to export using the date range picker. You can export data for up to the last 365 days. For historical data beyond 365 days, contact your CSM or TAM. Click Apply to confirm the date range selection.
One-time export
-
Configure Recurring Export (Recurring only)
-
Daily: Use the Daily dropdown to select how often the recurring export runs. The available options are:
- Every 4 hours
- Every 8 hours
- Every 12 hours
- Every 24 hours
Regardless of the frequency you choose, all recurring exports are aligned to midnight of the scheduled day, not to the time you created the export. For example, a 4-hour export runs at 00:00, 04:00, 08:00, 12:00, 16:00, and 20:00 each day, not 4 hours after you clicked Create Export. Each recurring run works as follows:
- First run: Exports all events from midnight of the scheduled day.
- Consecutive runs: Exports only events that occurred after the previous run's scheduled time through the current run's scheduled time. For example, for a 4-hour export, if the previous run started at 08:00, the next run picks up events from 08:00 through 12:00.
- After a failed run: The failed run is automatically retried every 5 minutes with no retry limit. The next scheduled run only starts after the current run has finished. If the next run was due while the current run was still in progress, it begins as soon as the current run completes.
Recurring Export
-
Include historical data (optional): Select this checkbox to trigger a one-time export of historical event data alongside your recurring export. When you click Create Export, two exports are created simultaneously:
- A recurring export that runs on your chosen schedule going forward.
- A one-time historical export that starts immediately for the date range you select. Both exports write files to the same destination folder using the same configuration, so your storage path receives both historical and ongoing data in a consistent format.
For example, if you set up a recurring export starting today and select a historical range of the last 90 days, the historical export immediately backfills the last 90 days of event data while the recurring export begins capturing new events going forward. This ensures there are no gaps in your data when you first set up the pipeline.
NoteThe historical date range is limited to the last 365 days. For data beyond 365 days, contact your CSM or TAM.
-
-
Click Create Export to complete the creation of your export.
File Output Structure
Exported event files follow this consistent column order:
- User Identifiers: Identity, All Identities, CleverTap ID based on the configuration in Step 2.
- Event Timestamp: The timestamp of when the event occurred, in the format selected (EPOCH or Formatted Datetime).
- User Properties: Up to 5 user profile properties in the order you define in Step 3.
- Device Attributes: Device-level attributes captured at event time, in the order you define in Step 3.
- Communication Preferences:
subscriptionGroups,MSG-webpush,MSG-push,MSG-email,MSG-sms,MSG-whatsapp(if selected). - Event Properties: Event properties in the order you define in Step 4.
The following sample shows the exported file structure with all fields included:
{
  "eventName": "App Launched",
  "eventTime": "2026-06-14T23:36:08-10:00",
  "identity": {
    "clevertapId": "...",
    "all_identities": [
      "..."
    ],
    "identity": "..."
  },
  "profile": {
    "Email": "...",
    "Gender": "Unknown",
    "Phone": "...",
    "Name": "..."
  },
  "deviceInfo": {
    "appVersion": "...",
    "osVersion": "...",
    "browser": "MobileApp",
    "model": "...",
    "sdkVersion": "...",
    "dpi": "...",
    "make": "...",
    "platform": "Android",
    "token": "",
    "dimensions": {
      "unit": "mm",
      "width": "...",
      "height": "..."
    }
  },
  "commPrefs": {
    "MSG-push": false,
    "MSG-whatsapp": false,
    "MSG-webpush": false,
    "subscriptionGroups": {
      "product updates": "Subscribed",
      "promotional": "Subscribed",
      "transactions comms": "Subscribed"
    },
    "MSG-email": false,
    "MSG-sms": false
  },
  "eventProps": {
    "CT Network Carrier": "...",
    "CT Source": "Mobile",
    "ct_app_version": "",
    "CT Bluetooth Version": "",
    "Keyword": "",
    "CT SDK Version": "...",
    "CT Bluetooth Enabled": "",
    "CT OS Version": "...",
    "CT Network Type": "",
    "Model": "",
    "CT Longitude": "...",
    "CT Latitude": "...",
    "CT Connected To WiFi": "",
    "CT Session Id": "...",
    "CT App Version": "..."
  }
}
[
{
"column_name": "eventName",
"column_type": "VARCHAR",
"null": "YES",
"key": null,
"default": null,
"extra": null
},
{
"column_name": "timestamp",
"column_type": "MAP(VARCHAR, VARCHAR)",
"null": "YES",
"key": null,
"default": null,
"extra": null
},
{
"column_name": "identity",
"column_type": "MAP(VARCHAR, STRUCT(member0 VARCHAR, member1 STRUCT(member0 VARCHAR, member1 INTEGER, member2 BIGINT, member3 FLOAT, member4 DOUBLE)[], member2 INTEGER, member3 BIGINT, member4 FLOAT, member5 DOUBLE))",
"null": "YES",
"key": null,
"default": null,
"extra": null
},
{
"column_name": "deviceInfo",
"column_type": "MAP(VARCHAR, STRUCT(member0 BOOLEAN, member1 INTEGER, member2 BIGINT, member3 FLOAT, member4 DOUBLE, member5 VARCHAR))",
"null": "YES",
"key": null,
"default": null,
"extra": null
},
{
"column_name": "commPrefs",
"column_type": "MAP(VARCHAR, STRUCT(member0 BOOLEAN, member1 INTEGER, member2 BIGINT, member3 FLOAT, member4 DOUBLE, member5 VARCHAR, member6 MAP(VARCHAR, STRUCT(member0 BOOLEAN, member1 INTEGER, member2 BIGINT, member3 FLOAT, member4 DOUBLE, member5 VARCHAR))))",
"null": "YES",
"key": null,
"default": null,
"extra": null
},
{
"column_name": "profile",
"column_type": "MAP(VARCHAR, STRUCT(member0 BOOLEAN, member1 INTEGER, member2 BIGINT, member3 FLOAT, member4 DOUBLE, member5 VARCHAR))",
"null": "YES",
"key": null,
"default": null,
"extra": null
},
{
"column_name": "eventProps",
"column_type": "MAP(VARCHAR, STRUCT(member0 BOOLEAN, member1 INTEGER, member2 BIGINT, member3 FLOAT, member4 DOUBLE, member5 VARCHAR))",
"null": "YES",
"key": null,
"default": null,
"extra": null
}
]<?xml version='1.0' encoding='UTF-8'?>
<root>
<Event>
<eventName>Notification Viewed</eventName>
<eventTime>2026-06-14T23:36:10-10:00</eventTime>
<identity>
<entry>
<key>clevertapId</key>
<value>...</value>
</entry>
<entry>
<key>all_identities</key>
<value>[...,...]</value>
</entry>
<entry>
<key>identity</key>
<value>...</value>
</entry>
</identity>
<profile>
<entry>
<key>Email</key>
<value>...</value>
</entry>
<entry>
<key>Gender</key>
<value>Unknown</value>
</entry>
<entry>
<key>Phone</key>
<value>...</value>
</entry>
<entry>
<key>DOB</key>
<value>...</value>
</entry>
<entry>
<key>Name</key>
<value>...</value>
</entry>
</profile>
<deviceInfo>
<entry>
<key>appVersion</key>
<value>...</value>
</entry>
<entry>
<key>osVersion</key>
<value>...</value>
</entry>
<entry>
<key>browser</key>
<value>MobileApp</value>
</entry>
<entry>
<key>model</key>
<value>...</value>
</entry>
<entry>
<key>sdkVersion</key>
<value>...</value>
</entry>
<entry>
<key>dpi</key>
<value>...</value>
</entry>
<entry>
<key>make</key>
<value>...</value>
</entry>
<entry>
<key>platform</key>
<value>Android</value>
</entry>
<entry>
<key>token</key>
<value></value>
</entry>
<entry>
<key>dimensions</key>
<value>{...}</value>
</entry>
</deviceInfo>
<commPrefs>
<entry>
<key>MSG-push</key>
<value>false</value>
</entry>
<entry>
<key>MSG-whatsapp</key>
<value>false</value>
</entry>
<entry>
<key>MSG-webpush</key>
<value>false</value>
</entry>
<entry>
<key>subscriptionGroups</key>
<value>{..,..}</value>
</entry>
<entry>
<key>MSG-email</key>
<value>false</value>
</entry>
<entry>
<key>MSG-sms</key>
<value>false</value>
</entry>
</commPrefs>
<eventProps>
<entry>
<key>wzrk_acts</key>
<value>...</value>
</entry>
<entry>
<key>CT Source</key>
<value>Mobile</value>
</entry>
<entry>
<key>wzrk_cts</key>
<value>...</value>
</entry>
<entry>
<key>Client Name</key>
<value>...</value>
</entry>
<entry>
<key>Campaign name</key>
<value>...</value>
</entry>
<entry>
<key>CT Session Id</key>
<value>...</value>
</entry>
</eventProps>
</Event>
</root>The following is a sample of the exported CSV file with all fields included:
| eventName | eventTime | identity | all_identities | clevertapId | Phone | Name | Gender | DOB | platform | token | make | model | appVersion | sdkVersion | osVersion | browser | dpi | dimensions | subscriptionGroups | MSG-webpush | MSG-push | MSG-email | MSG-sms | MSG-whatsapp | wzrk_id | Campaign type | Campaign id | wzrk_pivot | User Agent | Client Name | Campaign name | Campaign labels | Journey id | Journey labels | Journey Version ID | Journey name | |
|---|---|---|---|---|---|---|---|---|---|---|---|---|---|---|---|---|---|---|---|---|---|---|---|---|---|---|---|---|---|---|---|---|---|---|---|---|---|
| Notification Viewed | 1780914785 | [...] | [...] | ... | ... | ... | Unknown | Android | ... | ... | ... | ... | ... | ... | MobileApp | ... | {...} | {...} | false | true | true | false | false | ... | ... | wzrk_default | ... | ... | ... | [...] |
Manage Export
This section outlines how to track the status of your data exports and stop them when needed.
Stop Export
Stop a running export by hovering over the export and clicking Stop. The export status on the Export center page is displayed as Stopped.
Export Status
Each export has a status that reflects its current state in the export lifecycle as follows:
- Pending: Indicates that the export has been created and is awaiting the scheduled run to begin. For recurring exports, after each successful run, the status returns to Pending, indicating that the next scheduled run is waiting to begin. The status changes to Running once the next execution starts.
- Running: Indicates that the export is in progress, processing, and transferring event data.
- Stopped: Indicates that the export was manually stopped and will not run again.
- Done: Indicates that the one-time export finished successfully.
Best Practices
Follow these best practices to ensure your event exports are reliable, organized, and compatible with downstream systems:
-
Use Clear File Naming Conventions
Create descriptive file names using dynamic date and event-name variables to help identify and process exports chronologically and by event type. -
Structure Folders by Event Name and Date
Use the Split by event name sub-folder option combined with date-based variables (for example,{{Event-name}}/{{Date}}) to partition your data warehouse ingestion by event type and run date. -
Use Recurring Exports for Large Datasets
Set up recurring exports for high-volume event streams to minimize processing time, enhance performance, and reduce storage costs. Choose a higher frequency (every 4 hours) to receive data more frequently throughout the day. -
Choose the Right Frequency
Match your export frequency to your downstream pipeline's ingestion cadence. Use 4-hour exports for dashboards that require frequent data refreshes and 24-hour exports for daily batch processing workflows. -
Manage Schema Carefully
- Lock the schema if downstream systems require a fixed column structure.
- Use Add new properties at the end to automatically capture newly added event properties without affecting existing columns.
-
Monitor Export Delivery
CleverTap sends automatic alerts to help you monitor your exports. There are two types of alerts:-
Webhook notifications: CleverTap sends a webhook notification when an export job starts and when it completes successfully. Webhook notifications are supported for Amazon S3, Google Cloud Storage, and Microsoft Azure destinations only.
-
Email notifications: CleverTap sends system-generated email alerts for the following export states:
-
Started: When the export job begins running.
-
Completed: When the export job finishes successfully.
-
Stopped: When the export is manually stopped.
-
Failed: When the export fails due to invalid or expired storage credentials. CleverTap sends up to 3 email alerts over 3 consecutive days:
-
Day 1: Notifies you that your storage credentials are invalid and must be updated to resume the export.
-
Day 2: A follow-up reminder if the issue is not resolved.
-
Day 3: A final notice that your credentials are still invalid and the export has been automatically stopped.
The following credential errors trigger email alerts:
Error Description Wrong Access Key The username for storage access is incorrect Wrong Secret Key The password for storage access is incorrect Access Disabled The storage account has been locked or disabled Bucket Not Found The destination bucket or container no longer exists
-
-
-
-
Validate Exported Data
Run data quality checks to confirm exported files match your expectations before loading them into downstream systems. -
Monitoring & Error Handling: If your export fails:
- Check that your storage credentials (IAM policy, service account key, or SAS token) are valid.
- Ensure the bucket or container exists and is accessible.
- For GCP exports, a 403 error often indicates that the service account key is invalid.
FAQs
Can I run a one-time Event Export if a recurring Event Export is already active?
Yes. You can create multiple event exports, but they run sequentially. A new export will start only after the currently running export has completed.
How long are exported event files retained in my cloud storage?
CleverTap does not delete exported files. Your cloud storage bucket lifecycle policies control file retention.
Can I export events for a specific user segment?
Event Exports export all events (or your selected events) across the entire account. To analyze events for a specific segment, post-process the exported files in your data warehouse, or use the CleverTap API with segment filters.
What is the maximum file size for event exports?
CleverTap automatically splits large exports into multiple files when the record count exceeds 10 million for a given database. The file index indicates the file number in the series.
What recurring frequency options are available?
Recurring Event Exports support four frequency options: every 4 hours, every 8 hours, every 12 hours, and every 24 hours.
What date ranges can I select for a one-time export?
You can export data for up to the last 365 days using the date range picker. For historical data beyond 365 days, contact your CSM or TAM.
How does the Include historical data option work on recurring exports?
When enabled, this option triggers a one-time export of historical event data for a selected date range, using the same export configuration. This backfill runs alongside the recurring export, allowing you to populate your data warehouse with historical data before the regular runs resume.
Can I export events more frequently than every 4 hours?
The minimum frequency for recurring Event Exports is every 4 hours. For more frequent access to event data, consider using the CleverTap Events API.
How do I handle schema changes in my data warehouse?
Use the Add new properties at the end option to append new event property columns automatically. Update your warehouse schema to accommodate new columns, or use the Lock current schema option to prevent unintended changes.
Can I export events to multiple buckets simultaneously?
You can create multiple recurring event exports pointing to different destination buckets, provided each export uses a distinct configuration.
Can I change the folder structure or file name after creating an export?
Currently, you cannot edit a new-flow event export after it is created. Stop the existing export and create a new one with the updated configuration.
What happens if an export does not due to a system issue?
If a run gets stuck due to a system error, it is automatically retried and resumes from where it stopped once the system is back online.
Why do I see an error when creating the export?
Check that the bucket or container name matches exactly and that the IAM policy, service account key, or SAS token is valid. Regenerate keys if necessary.
What should I do if my export fails?
If your export fails, follow these steps to troubleshoot the issue:
Verify your storage credentials - Make sure your IAM policy (AWS), service account key (GCP), or SAS token (Azure) is valid and has the required write permissions. Check bucket or container access - Ensure the target bucket or container exists and is reachable from CleverTap.
Check for the following error codes: A 403 error in GCP usually indicates an invalid or expired service account key.
* For other platforms, refer to your cloud provider's error documentation for further guidance.
What other ways can I export event data from CleverTap?
* Export via API: Use the CleverTap Events API to programmatically query and download event data.
* Find People: Download user-level data directly from the CleverTap dashboard through Segments > Find People.
What are the Campaign Type values in the new export?
The Campaign type field value has changed between the legacy export and the new export. The old format returned human-readable strings; the new format returns internal enum values.
| Channel | Old value | New value |
|---|---|---|
| Android push | Mobile Push - Android | Push |
| iOS push | Mobile Push - iOS | Push |
| Windows push | Mobile Push - Windows | Push |
Email | ||
| SMS | SMS | Sms |
WhatsApp | ||
| Web push (Chrome) | Web Push - Chrome | Browser |
| Facebook Audiences | Facebook Audiences | Fb |
| Webhook | Webhook | Webhook |
| App Inbox | App Inbox | NotificationInbox |
| In-App (Mobile) | Others | InApp |
| Native Display | Others | NativeDisplay |
| Web Popup | Others | Web |
| Web Native Display | Others | WebNativeDisplay |
| Web Exit Intent | Others | WEB_EXIT_INTENT |
| Web Inbox | Others | WebInbox |
| Google Adwords | Others | GoogleAdWords |
| TikTok | Others | TIKTOK |
| Segment | Others | Partner |
| mParticle | Others | Partner |
| Amazon EventBridge | Others | Partner |
| Unified Inbox | INBOX | INBOX |
| Promotions | Others | PROMO |
Review the table above and update any downstream filters or logic that reference old Campaign type values before migrating to the new export.
What has changed between the legacy export and the new export?
The new export uses a fundamentally different schema compared to the legacy export. The key differences are summarized below. For full details on the legacy export format, refer to the Legacy Event Export documentation.
Identity and profile fields
The old profile{} block is now split into two separate groups: identity{} (who the user is) and profile{} (attributes of the user). Update any parsers that read from a flat profile{} object.
Timestamp
ts (Long in yyyyMMddHHmmss format) is now eventTime (String). The value format depends on the Timestamp Format you configured when setting up the export (EPOCH or Formatted Datetime).
Device info
Both old and new formats include a deviceInfo block with the same fields (make, model, appVersion, sdkVersion, osVersion, browser, dpi, dimensions). In the new format, only the device attributes you selected during export configuration are present.
Communication preferences
The old format had no commPrefs section. The new format adds a commPrefs map containing subscription groups and opt-in/opt-out state. This is entirely new with no equivalent in the legacy export.
CSV event property headers
The old format prefixed event property columns with their type, for example eventproperties.product_id or sessionproperties.utm_source. The new format uses a flat structure where property names appear directly as column headers, for example product_id. Update any downstream logic that references the old prefixed column names.
Summary
| Aspect | Old export | New export |
|---|---|---|
| Schema | Fixed, always-present fields | Configurable, only selected fields present |
| Timestamp | ts (Long, root level) | timestamp (Map, root level) |
| Identity fields | Inside profile{} object | Separate identity{} map |
| Profile attributes | Inside profile{} object | Separate profile{} map |
| Device info | Fixed typed fields | Flexible map, same keys |
| Communication preferences | Not present | New commPrefs{} map |
| Campaign type field | Human-readable string (for example, Mobile Push - Android) | Enum name (for example, Push) |
| CSV event property headers | Prefixed (for example, eventproperties.product_id) | Flat (for example, product_id) |
Can I edit an event export after creation?
No. Once a configurable event export is created, it is completely locked. No changes can be made to the schedule, destination, file format, event selection, or any other setting. The only actions available after creation are to view or stop the export. To make changes, stop the existing export and create a new one with the updated configuration.
Note that the legacy export type does support editing after creation. This limitation applies only to the new configurable export flow and editing will be available in a future release.
Do I need special permissions to create or manage exports?
All export operations, such as viewing, creating, and stopping, require the Creator role or higher. Read-Only members have no access. For more information, refer to Role-Based Access Control.
Will renaming an event affect the file name and folder structure?
Renaming an event during export configuration affects the eventName field inside the exported file but not the file name or folder structure. For example, if you rename App Launched to CT App Launch during export setup, the exported file will contain "eventName": "CT App Launch", but the {{Event-name}} variable in your folder path and file name will still resolve to App Launched, which is the original event name in CleverTap.
If you rename an event in CleverTap's schema after the export is created, the {{Event-name}} variable in the folder and file name will reflect the new schema name from that point onwards. Files generated before the rename retain the old name in their path.