
Analytics Alerts
Learn how to set up continuous metric monitoring and receive instant notifications when anomalies or threshold breaches occur in your analytics data.
Overview
Alerts in Analytics is a continuous monitoring feature in CleverTap that notifies you when a metric on a trendline behaves unexpectedly. Instead of checking dashboards manually, you set up an alert once, and CleverTap evaluates the metric on the specified conditions on an hourly, daily, weekly, or monthly basis and notifies you when a condition is met.
This feature is available on Trends charts and supports the following metrics:
- Total Events
- Unique Users
Alert Types
You can choose between two alert types:
- Anomaly alerts: Triggered when the metric deviates from its expected range, as determined by CleverTap's seasonality-aware detection model.
- Threshold alerts: Triggered when the metric crosses a fixed value or changes by a defined percentage relative to the same period last week.
When an alert is triggered, CleverTap delivers notifications based on the selected delivery options, such as a Dashboard Notification, Email, or a Slack channel.
Public BetaThis feature is released in Public Beta. For more information or any queries, contact your Customer Success Manager or CleverTap Support.
Alerts Evaluation Process
When you create an alert, CleverTap saves the event, filters, and metric you are monitoring as the alert's query. CleverTap then runs this query automatically at the schedule you set.
Each time CleverTap evaluates the alert, it does the following:
- Fetches the latest metric data for the monitored event and segment.
- Runs the detection logic (anomaly or threshold) against the latest data.
- Triggers a notification if the condition is met and delivers it to your chosen notification channels.
TipChoose the alert type that suits your metric. Use anomaly alerts for metrics that change frequently and unpredictably. Use threshold alerts when you have a specific value or percentage change in mind that you always want to know about.
Prerequisites
Before you create an alert, make sure you meet the following requirements:
- You have access to the CleverTap Analytics module.
- You have a Trends chart configured with at least one supported metric (Event count or Unique users).
- To send alerts to Slack, a user with admin access must first connect your project to Slack. For more information, refer to Connect Slack.
Create an Alert
You can create an alert directly from a Trends chart.
To create an alert:
- Go to Analytics > Trends Beta and view a Trends analysis.
- Hover over a data point on the trendline you want to monitor, then click the + icon to view the selection options.
- Click Create alert.
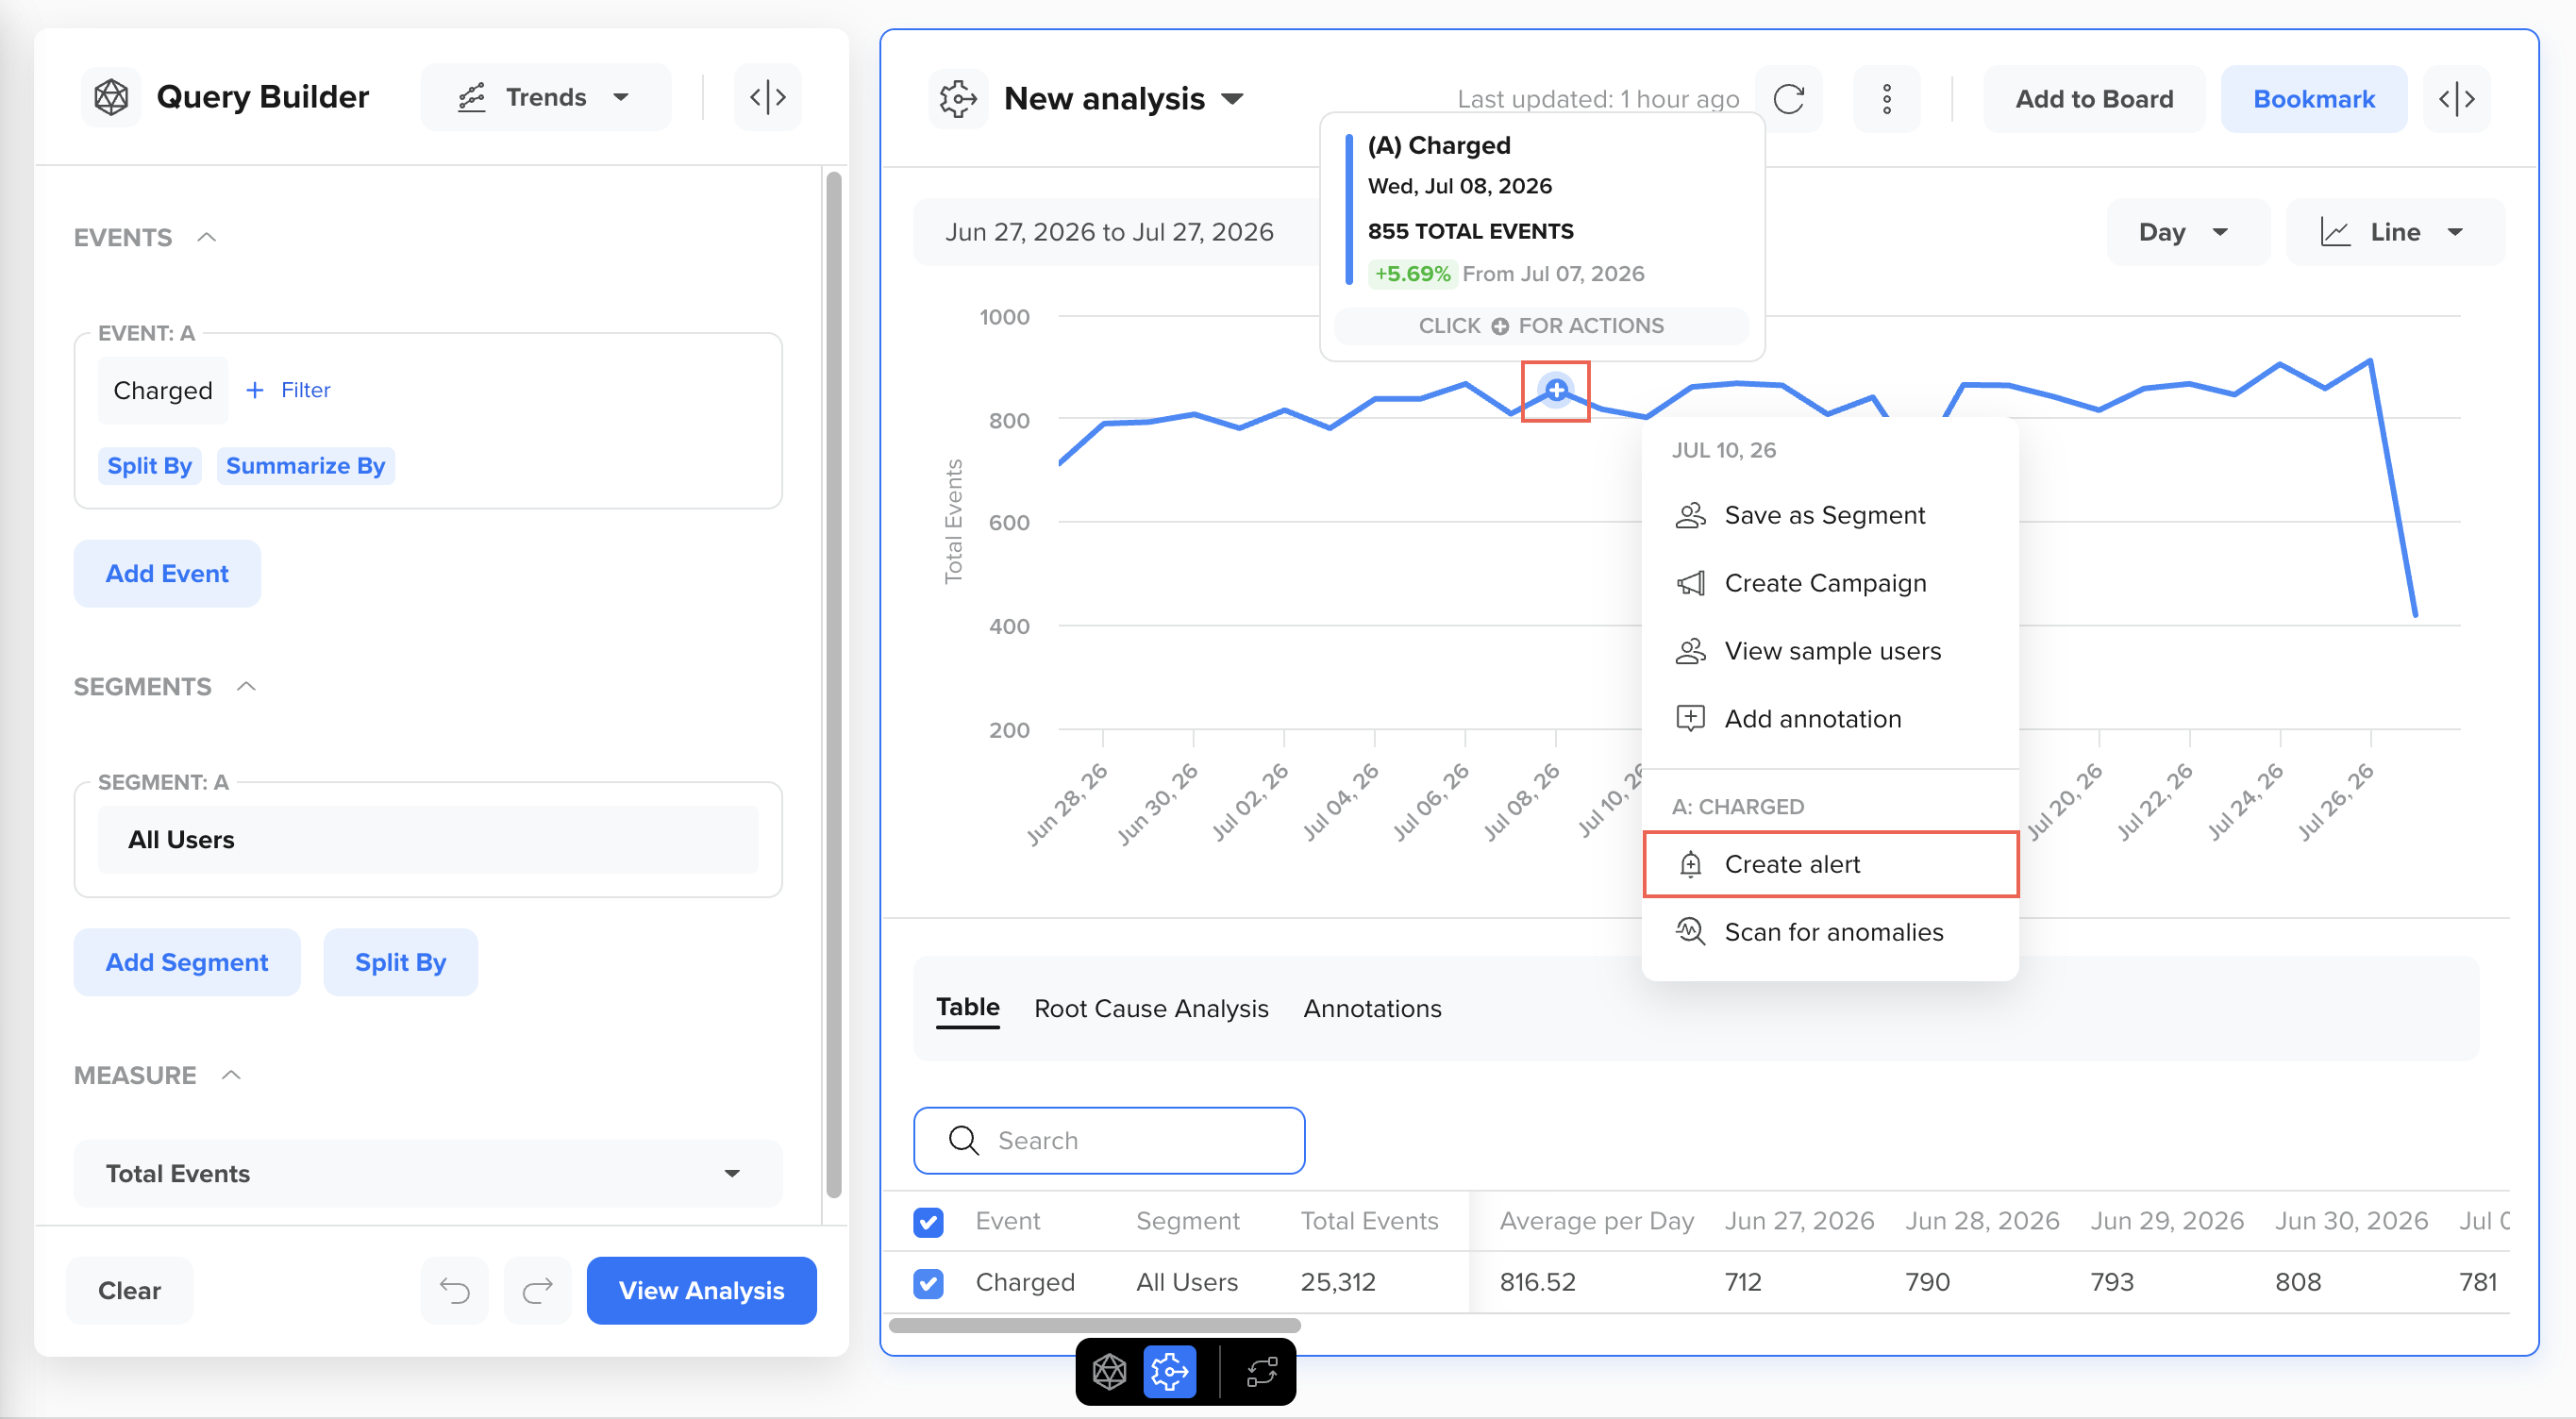
Create Alert from a Trendline Data Point
The Create Alert window opens, which follows the following two-step process:
Criteria
The Criteria step lets you name the alert and define the condition that triggers it. This step lets you define what to monitor and how to detect a condition.
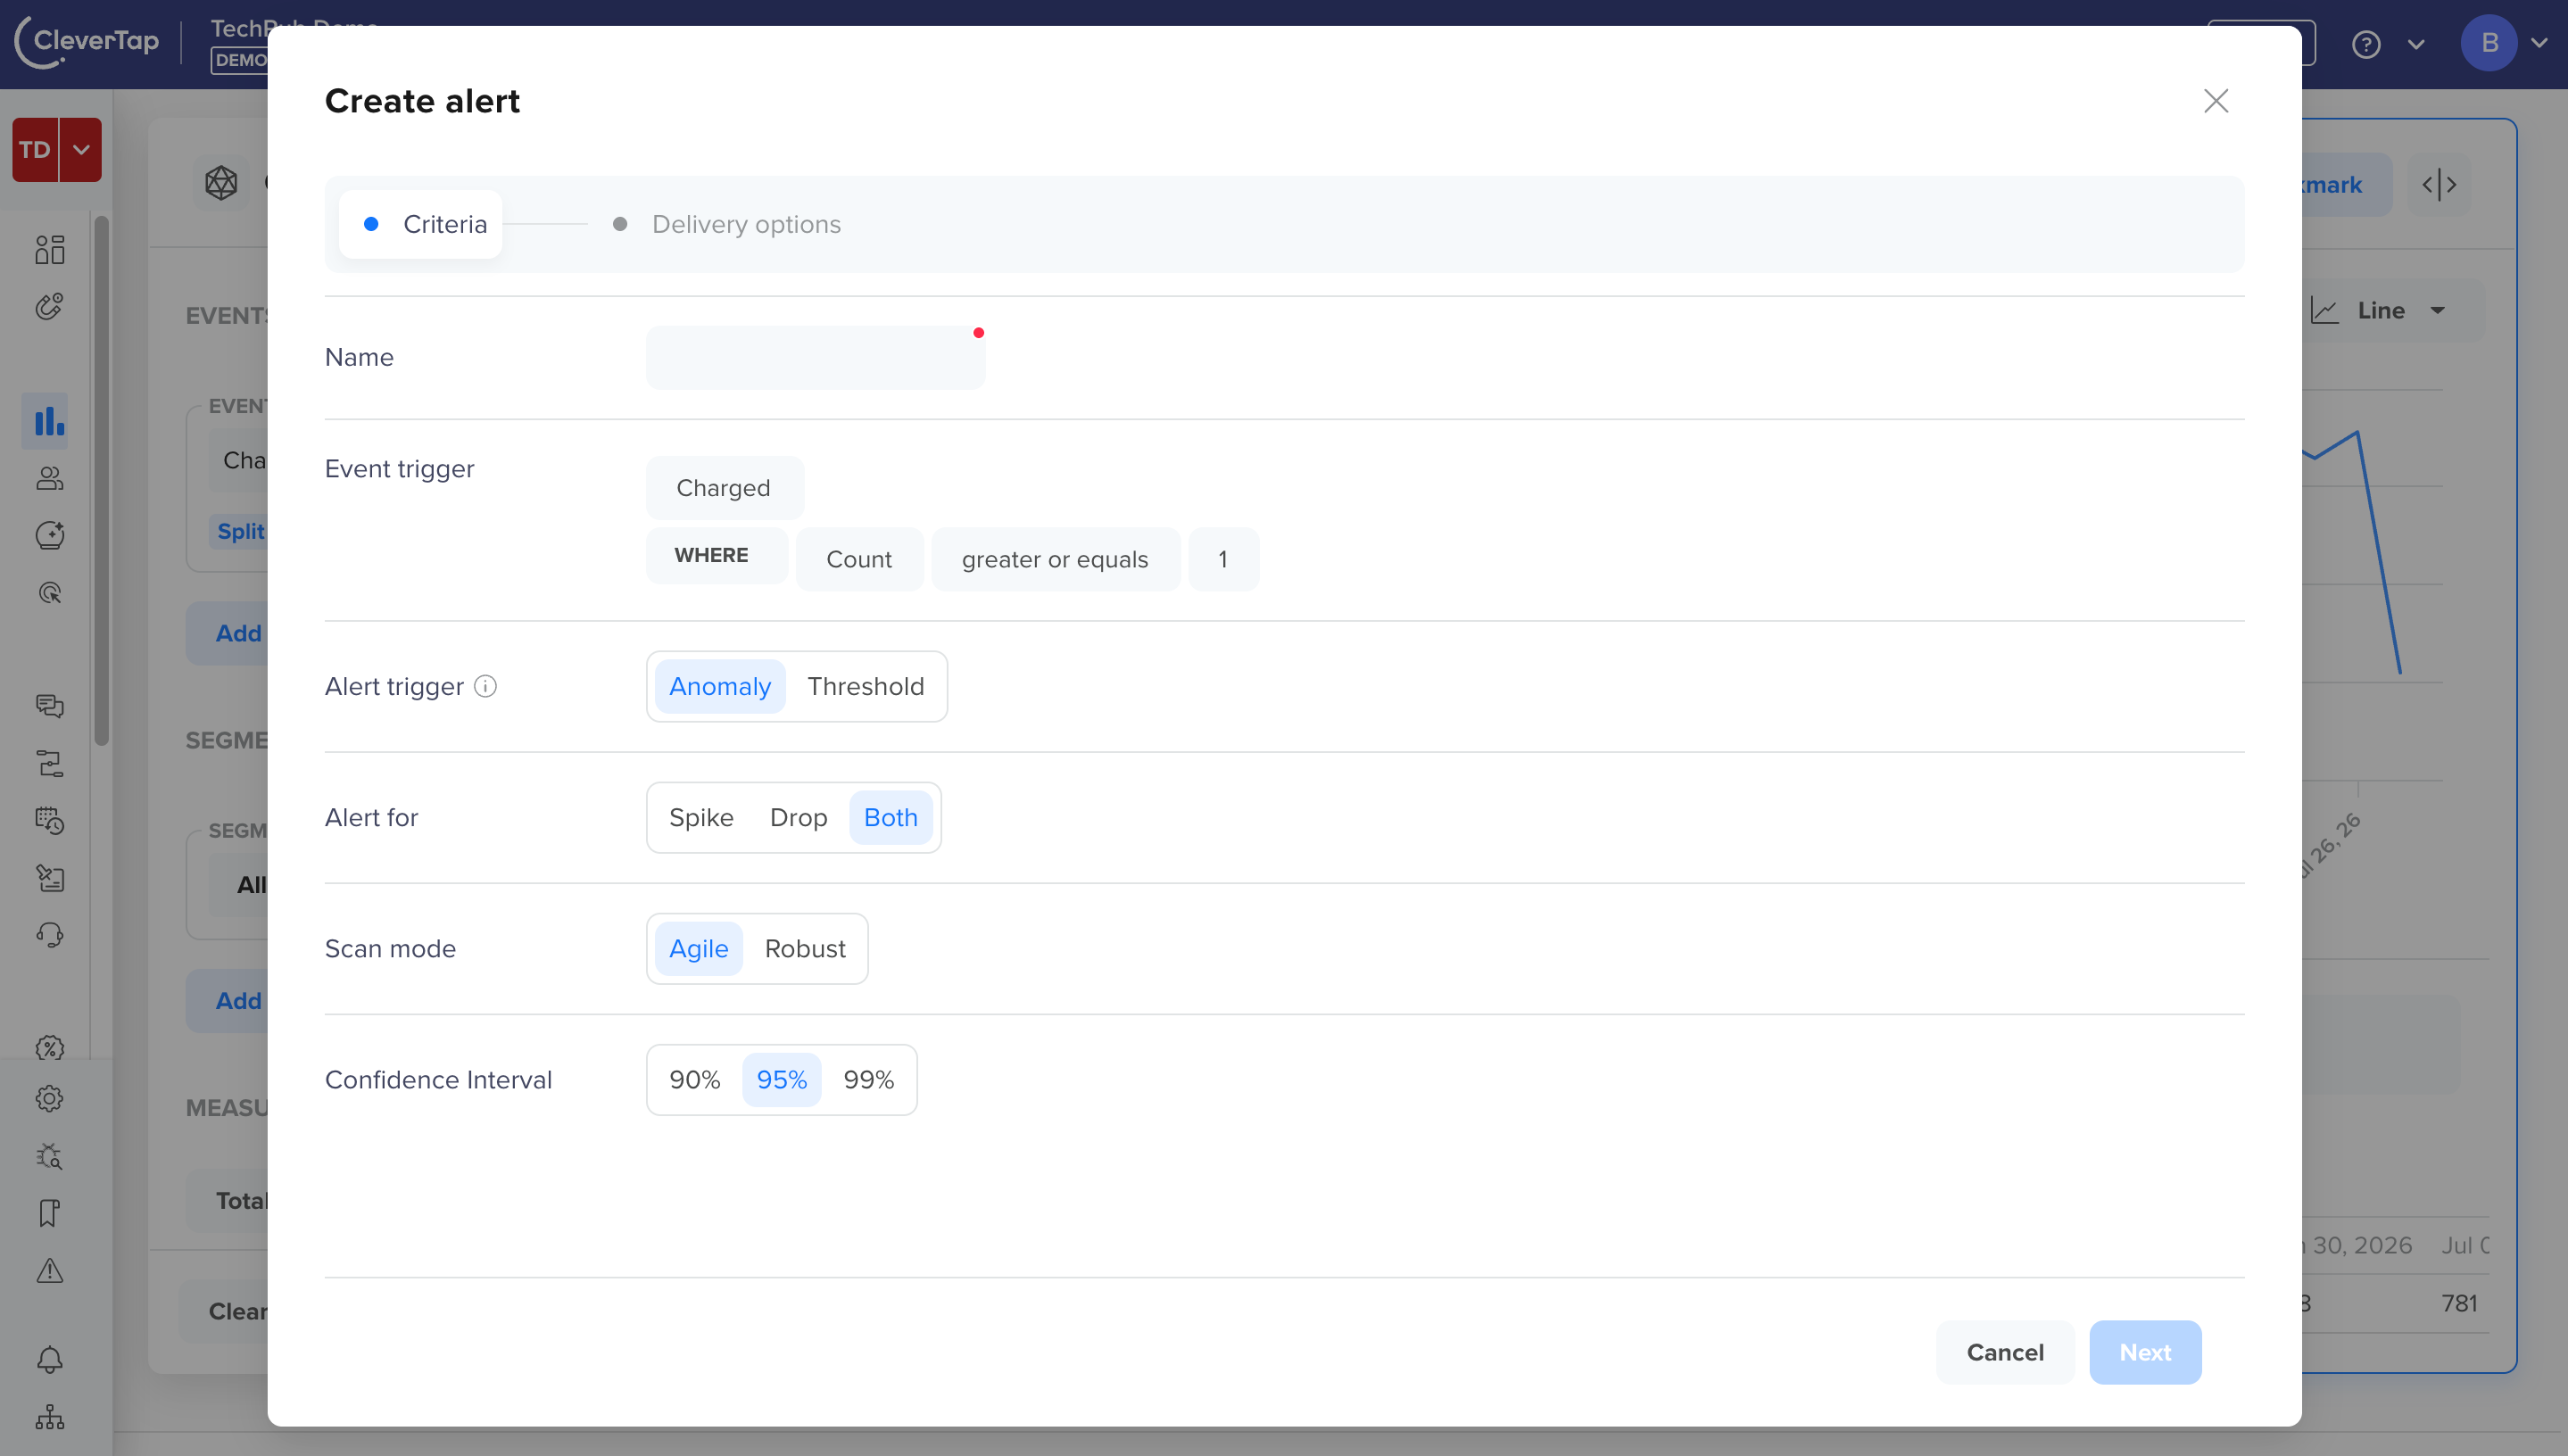
Define Alert Criteria
The following fields appear in this step:
| Field | Description |
|---|---|
| Name | A label for the alert. Choose a name that clearly describes what is being monitored. For example, the charged event drop for weekdays. |
| Event trigger | The event and filter conditions that are being monitored. This field is pre-populated from the trendline you selected on the Trends chart and cannot be edited in the window. For example, if you selected a data point on a Charged event trendline filtered by Count greater than or equal to 1, those details appear here automatically. |
| Alert trigger | The type of detection to apply. You can select the following two Alert trigger types:
|
| Scan mode (Anomaly only) | The detection mode that CleverTap applies. It determines how much historical data CleverTap uses to build the expected value baseline. Choose the mode based on how stable or seasonal your metric is. For more information, refer to Scan Mode. |
| Confidence interval (Anomaly only) | The certainty level CleverTap uses to define the expected range, such as 99%, 95%, or 90%. A higher percentage widens the expected range, so fewer deviations trigger the alert. For more information, refer to Confidence Interval. |
| Alert for (Anomaly only) | Controls which direction of deviation triggers the alert. The following options are available:
|
| Trigger condition (Threshold only) | The condition that must be met to trigger the alert. The following options are available:
|
| Threshold value (Threshold only) | The numeric value used in the trigger condition. Enter an absolute number for Above or Below, or a percentage for Increases by (%) or Decreases by (%). |
After configuring the criteria, click Next to proceed to Delivery Options.
Delivery Options
The Delivery Options step lets you configure how often CleverTap evaluates the alert and where to send the notifications.
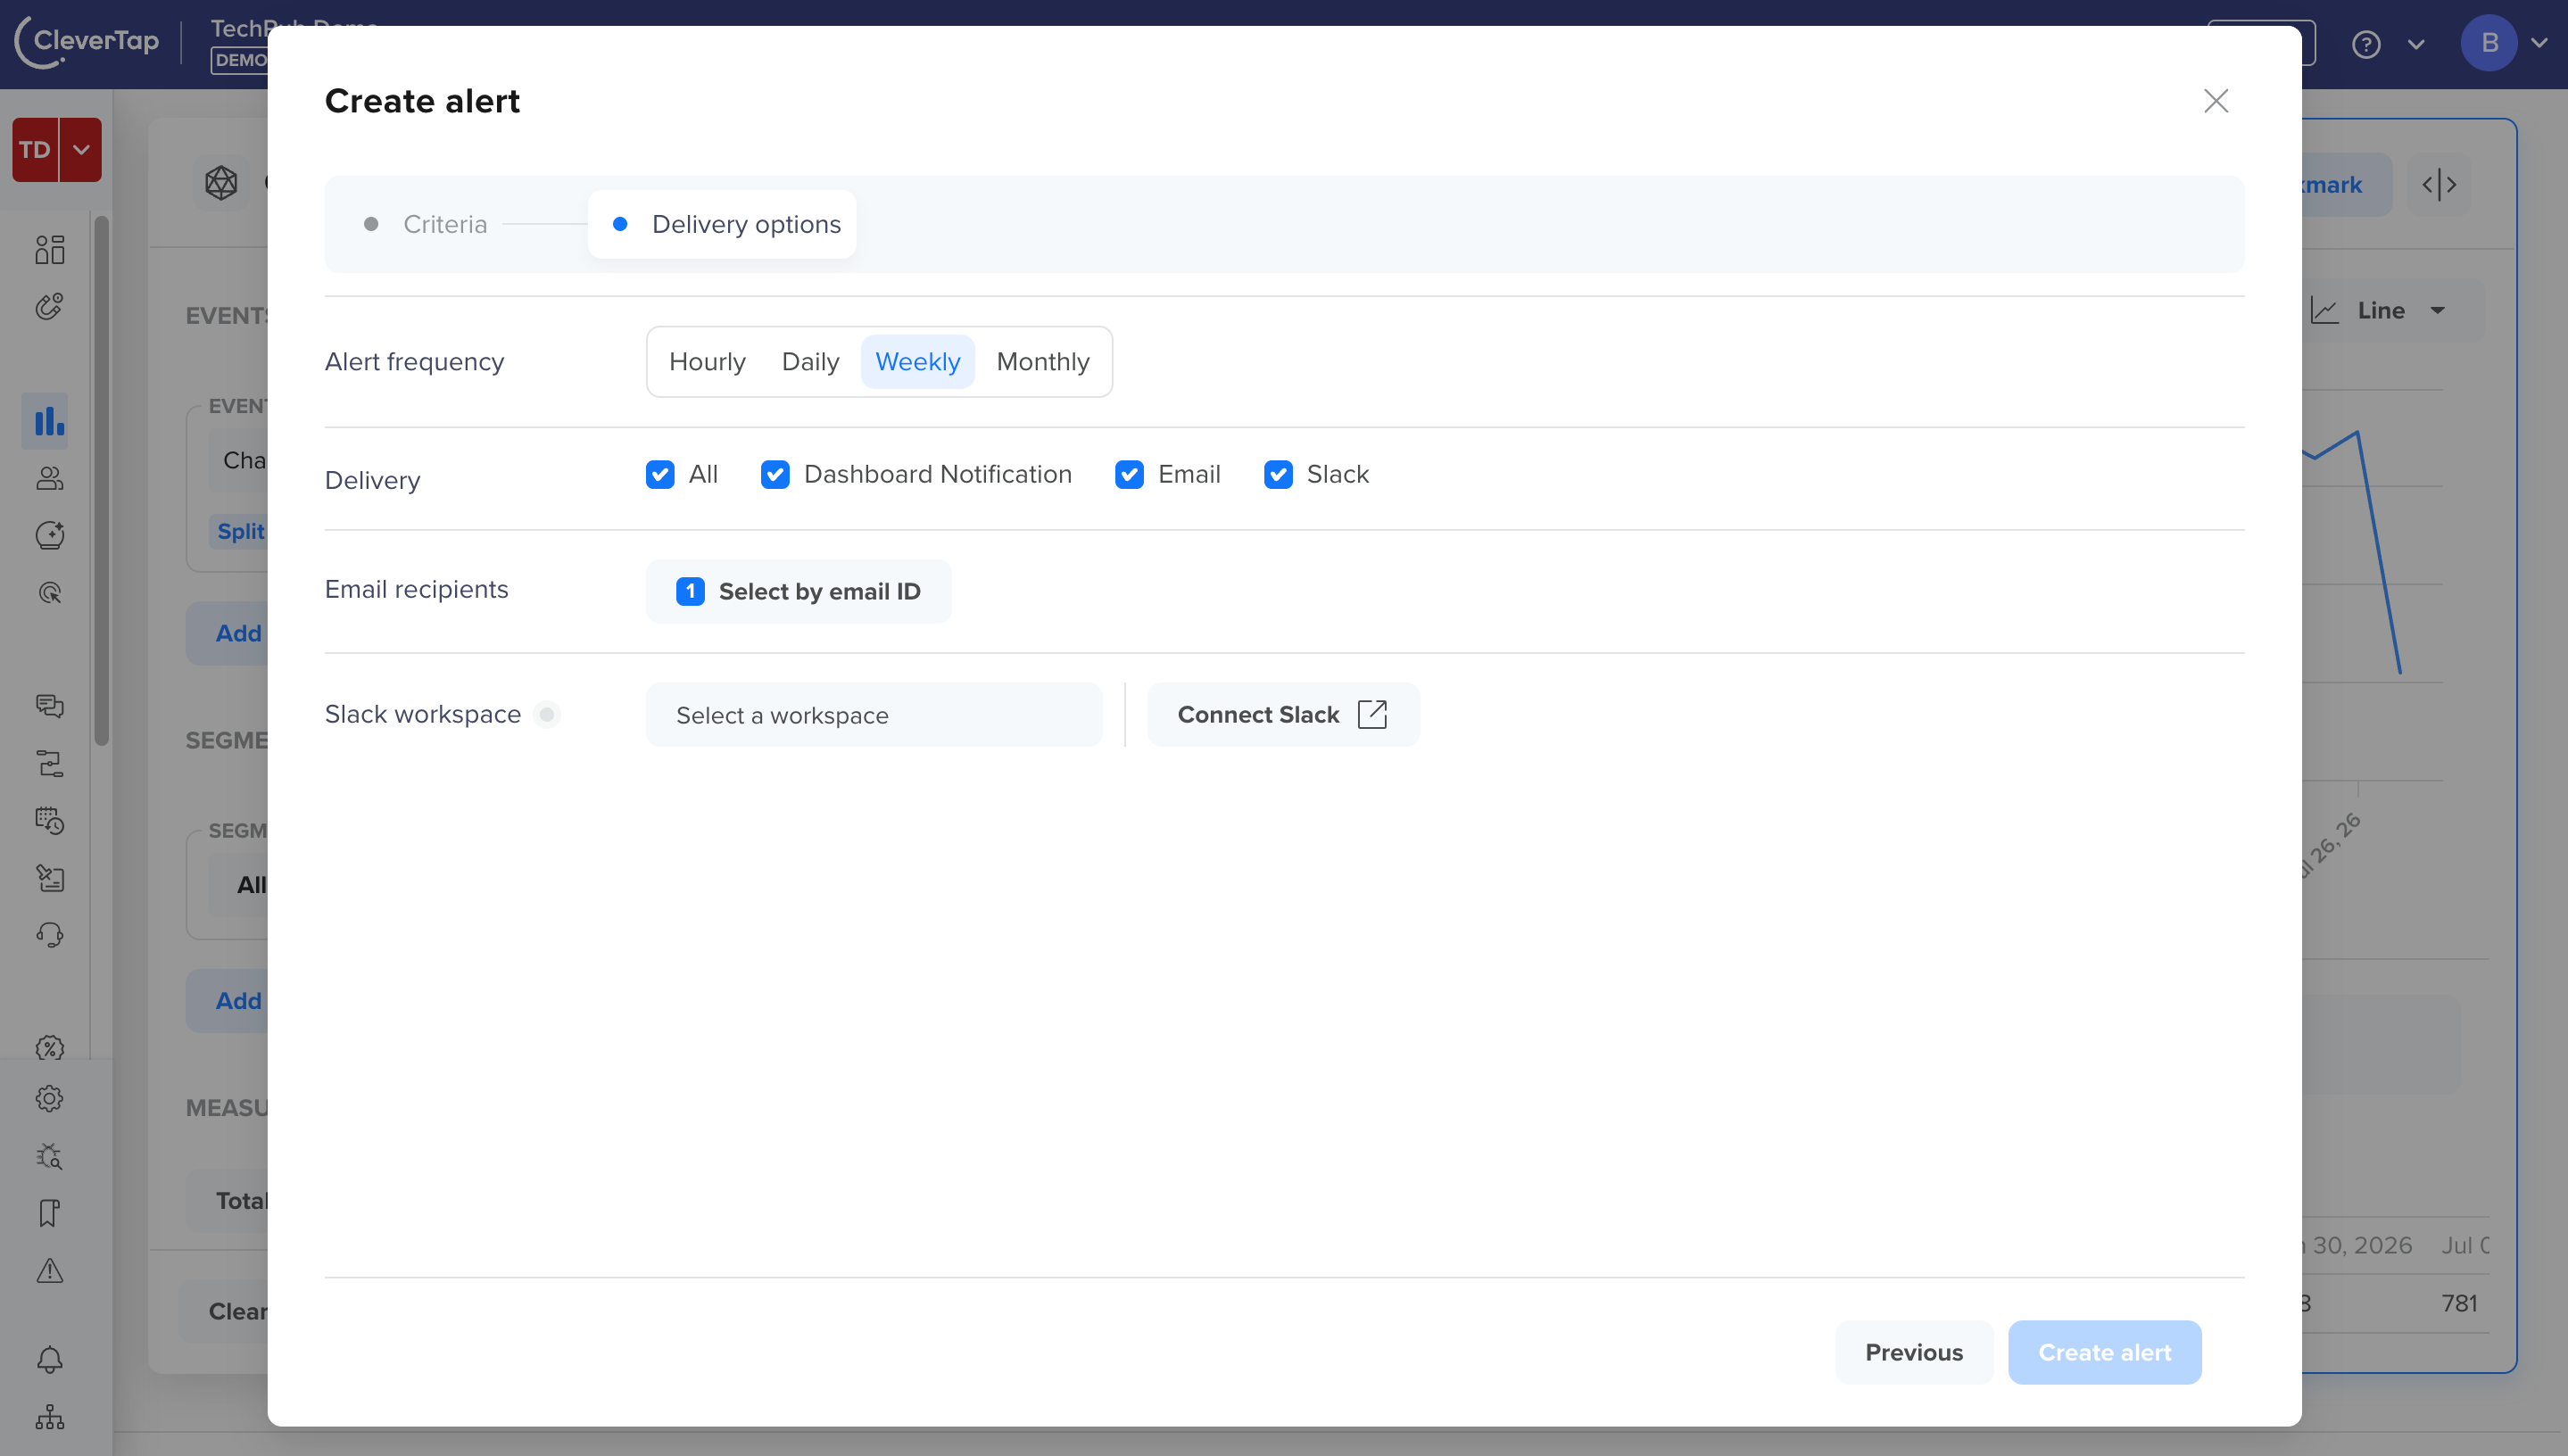
Set Up Delivery Options for Alerts
The following fields appear in this step:
| Field | Description |
|---|---|
| Alert frequency | Determines how often CleverTap checks whether the alert condition is met. The following options are available:
|
| Delivery destination | Defines where to send notifications. For example, Dashboard, Email, or Slack (You can also multi-select Slack channels). |
| Email recipients | The email addresses to notify. You are added automatically as a recipient. |
| Slack channels (if Slack is connected) | The Slack channel that receives the alert. Select from the available channels that the CleverTap bot has been invited to join. Slack delivery requires a one-time project-level Slack connection by an admin. If Slack is not connected, a Connect Slack button appears instead of the channel picker. |
After configuring delivery options, click Create to save the alert.
NoteThe 20-minute delay applies to hourly alerts only. It allows event data to fully settle before evaluation runs. For example, if you set an hourly alert with an evaluation window of 3:00 to 4:00 PM, CleverTap evaluates the metric at approximately 4:20 PM once that hour is fully closed.
For all alert frequencies (hourly, daily, weekly, and monthly), CleverTap only evaluates complete, closed periods. It never evaluates a partial period. This is important when interpreting a metric value of 0. A value of 0 in a completed, evaluated period means no events occurred. It does not mean data has not arrived yet, because CleverTap waits for the period to close before running any evaluation.
Manage Alerts
You can view, edit, pause, resume, and delete all alerts in your project from the Manage Alerts page.
To access Manage Alerts, go to Settings > Alerts.
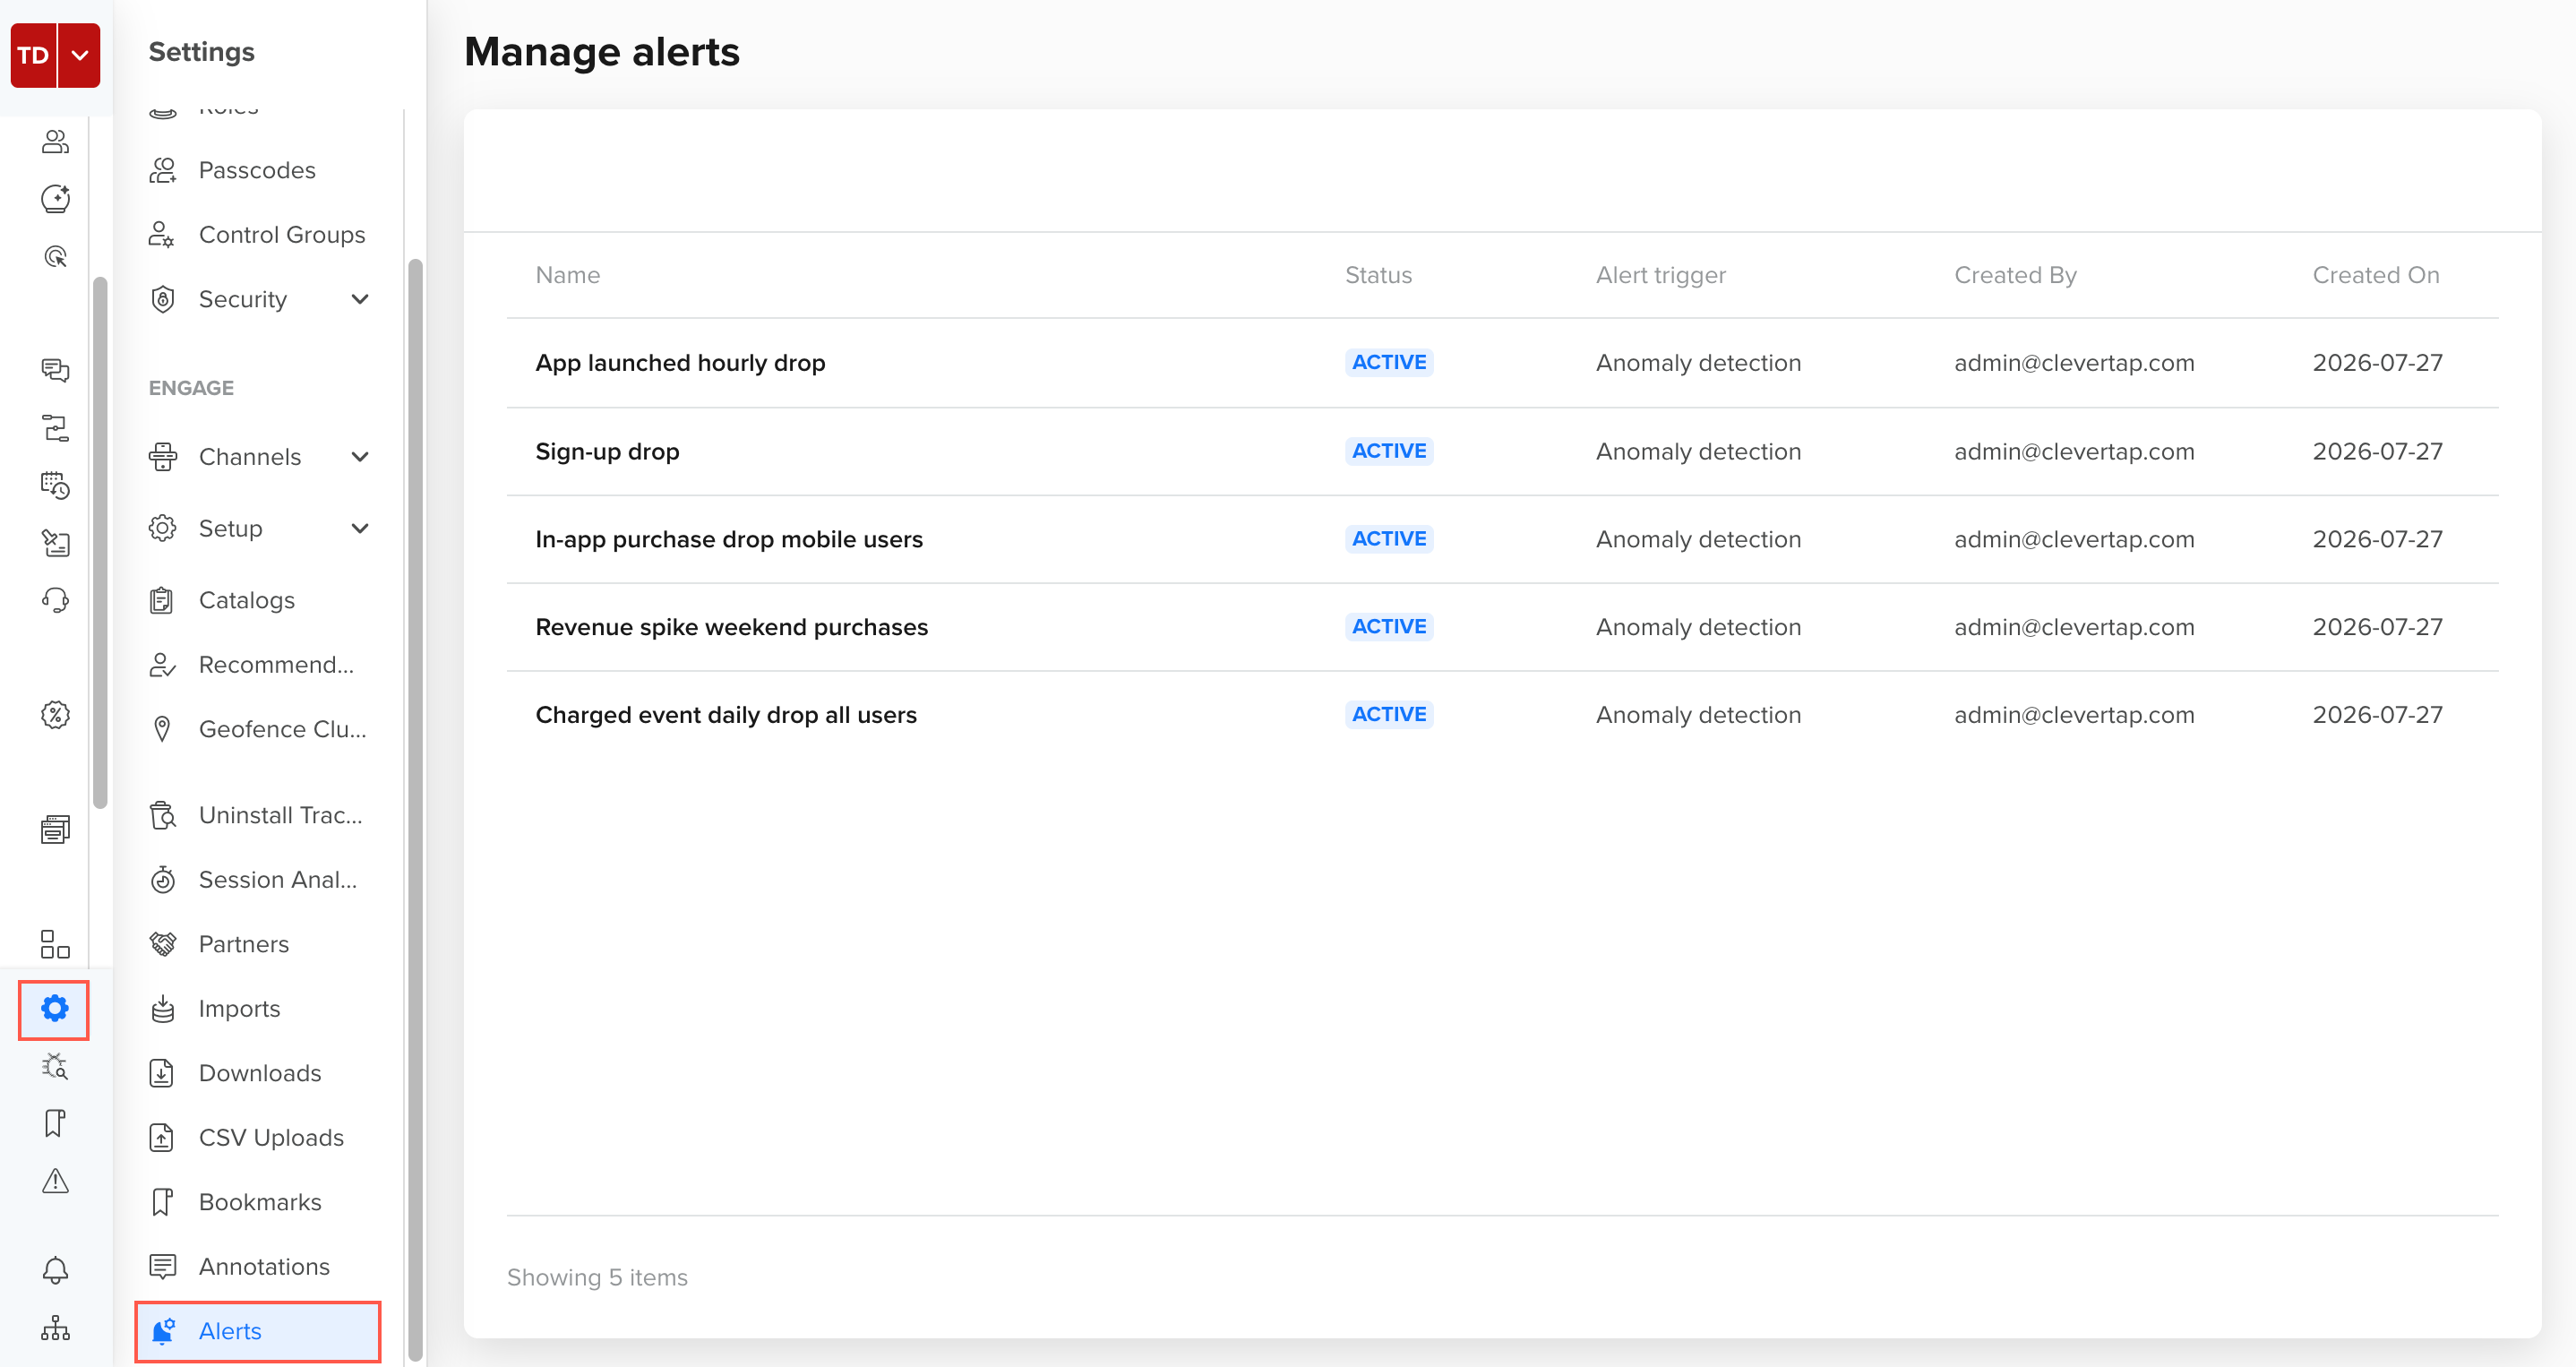
View Alerts on Manage Alerts
The Manage Alerts page shows a table with the following columns:
| Column | Description |
|---|---|
| Name | The name you specified for the alert. |
| Status | The current status of the alert. The following alert statuses are available:
|
| Alert trigger | Whether the alert uses Anomaly or Threshold detection. |
| Created By | The email address of the person who created the alert. |
| Created On | The date the alert was created. |
Edit
To edit an alert's criteria or delivery options:
- On the Manage Alerts page, hover over the alert you want to edit.
- Click the edit icon.
- The Edit alert window opens with your existing settings pre-filled.
- Update the fields you want to edit.
- Click Save changes to confirm.
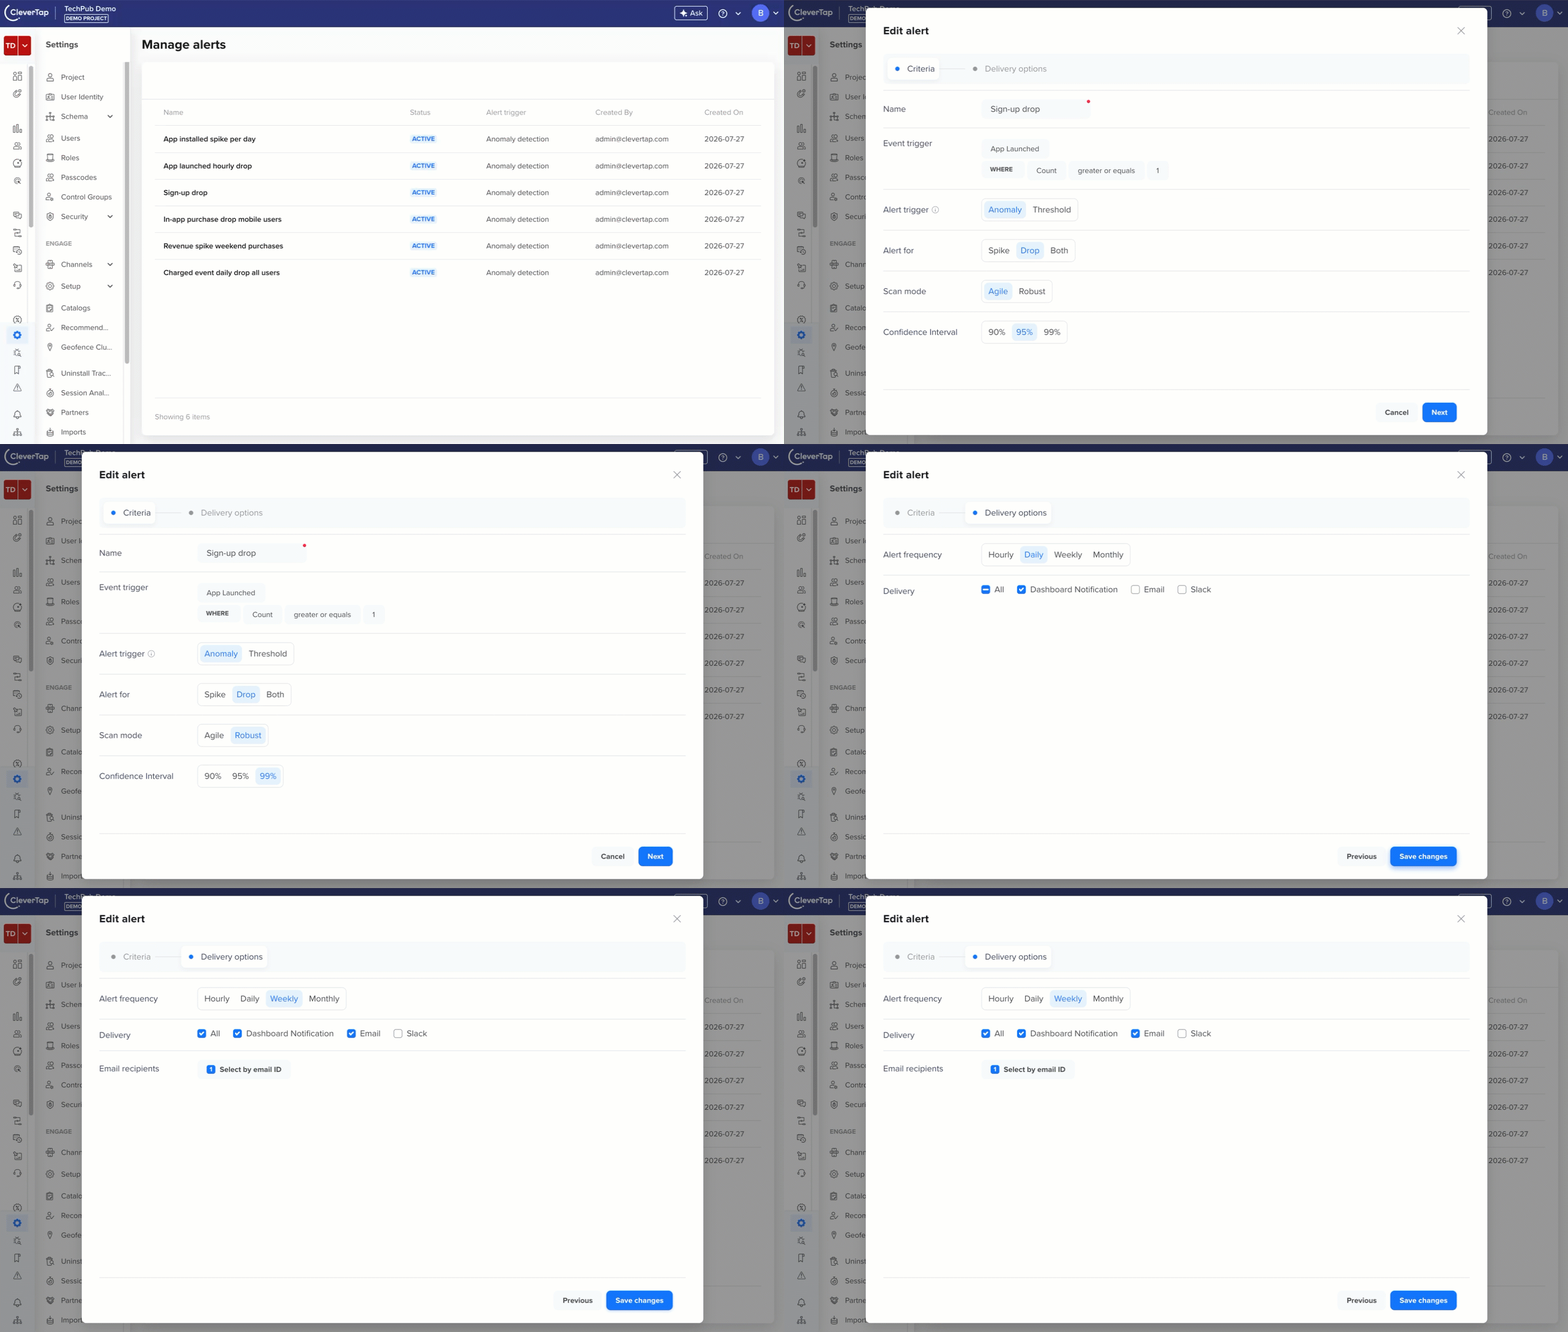
Editing an Active Alert
Pause
Pausing an alert temporarily stops it from evaluating. The alert configuration is preserved, and you can resume it later. Use this when you want to stop receiving alerts during a known period of unusual activity, such as a major product launch or a marketing campaign, without losing the alert configuration.
To pause an alert:
- On the Manage Alerts page, hover over the alert you want to pause.
- Click the ellipsis icon.
- Click Pause from the list.
- Click Pause to confirm.
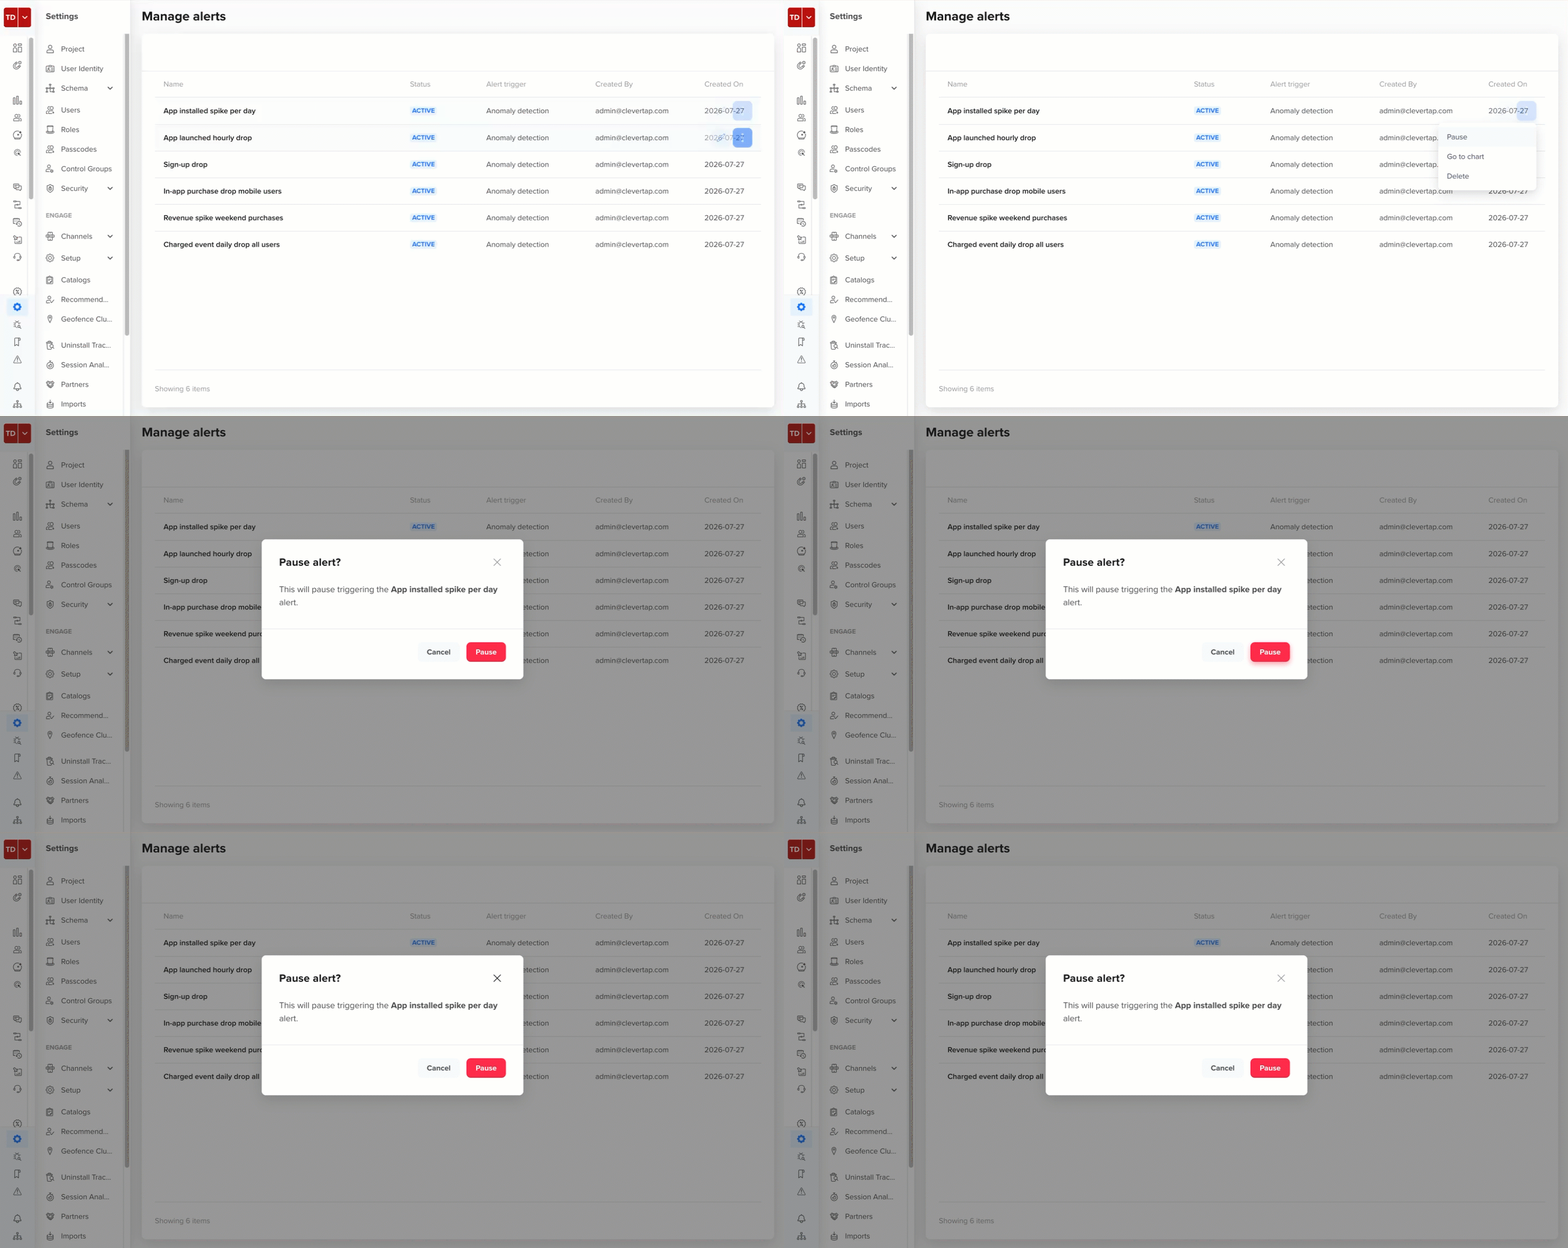
Pausing an Active Alert
To resume a paused alert, follow the same steps and click Resume in the ellipsis menu.
Delete
Deleting an alert permanently removes it and its notification settings. This action cannot be undone.
To delete an alert:
- On the Manage Alerts page, hover over the alert you want to delete.
- Click the ellipsis icon.
- Click Delete from the list.
- Click Delete to confirm.
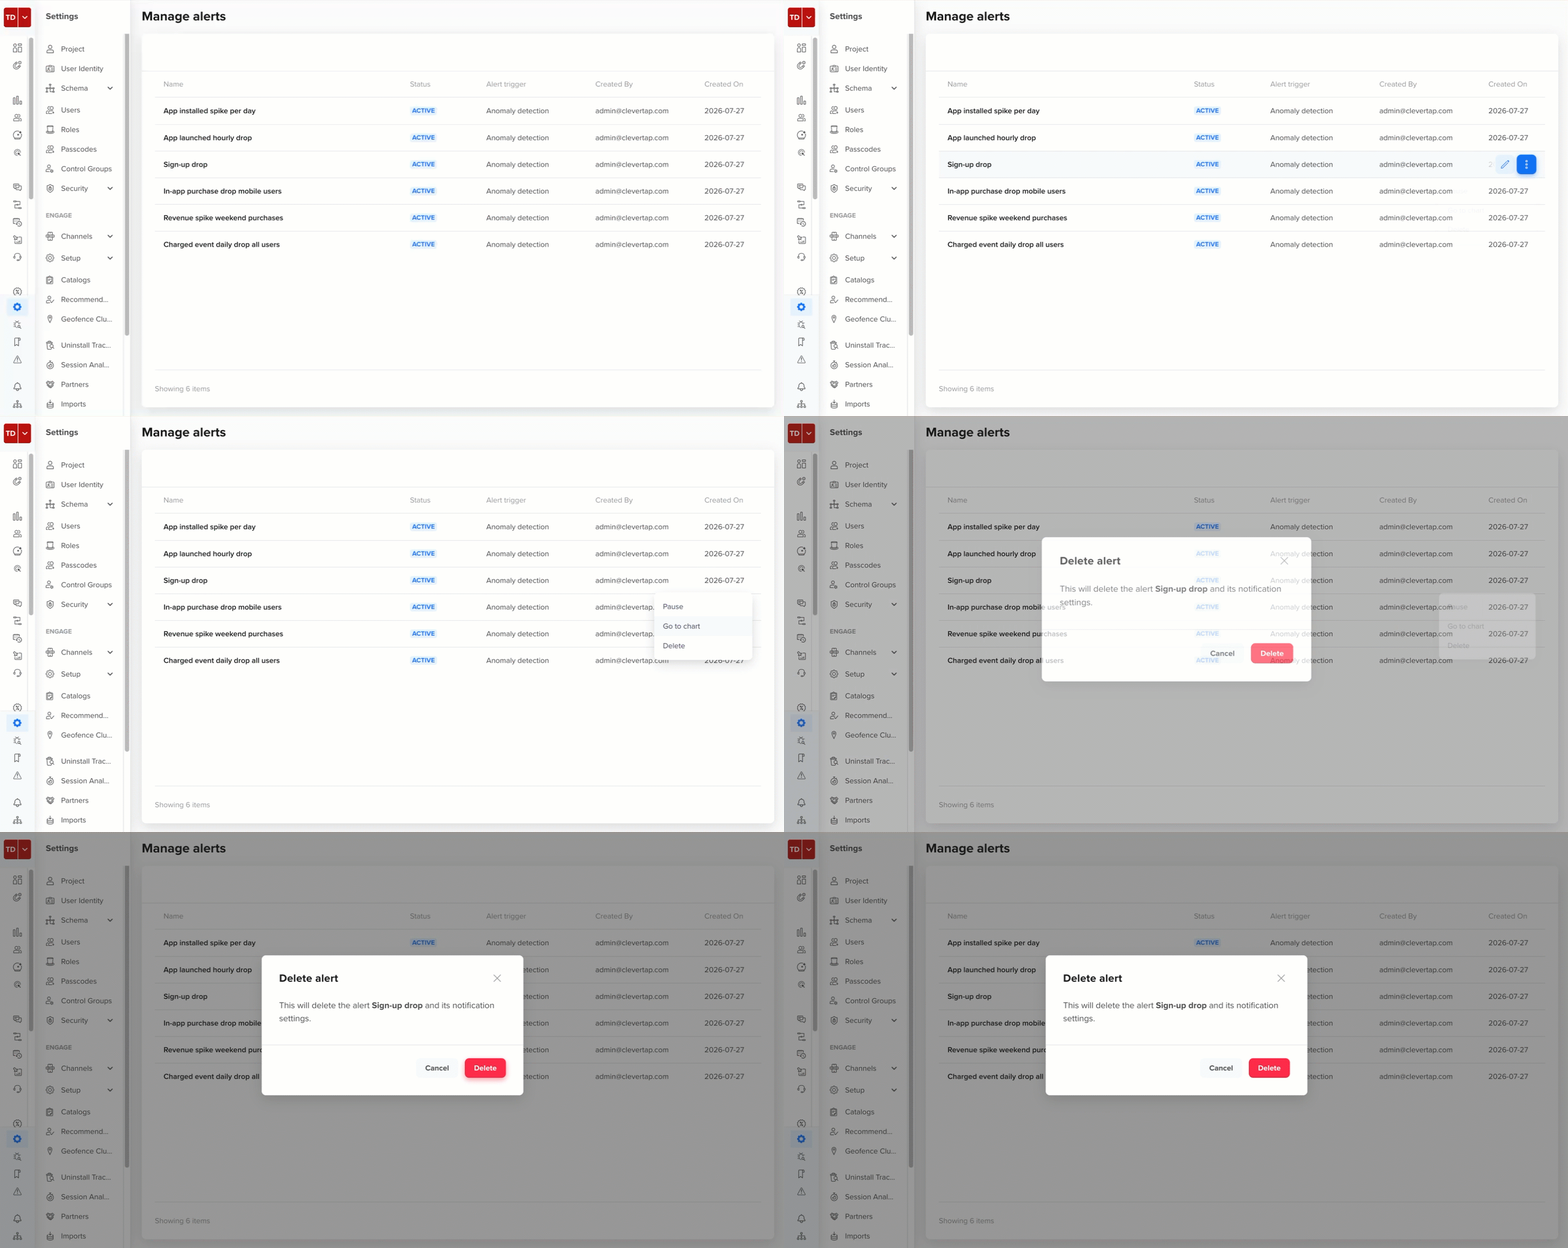
Deleting an Active Alert
Connect Slack
Connecting Slack allows any alert in your project to deliver notifications to a Slack channel. This is a one-time, project-level setup that requires admin access.
Prerequisites for Slack Connection
- You must have admin access to your CleverTap project.
- You must have permission to install apps in your Slack workspace.
Connect Your Slack Workspace
To connect Slack:
- Open the Delivery Options step from the Create Alert window.
- Click Connect Slack. You are redirected to Slack's authorization page to grant CleverTap the requested permissions.
- Select or enter the name of your Slack workspace.
- Click Submit Request.
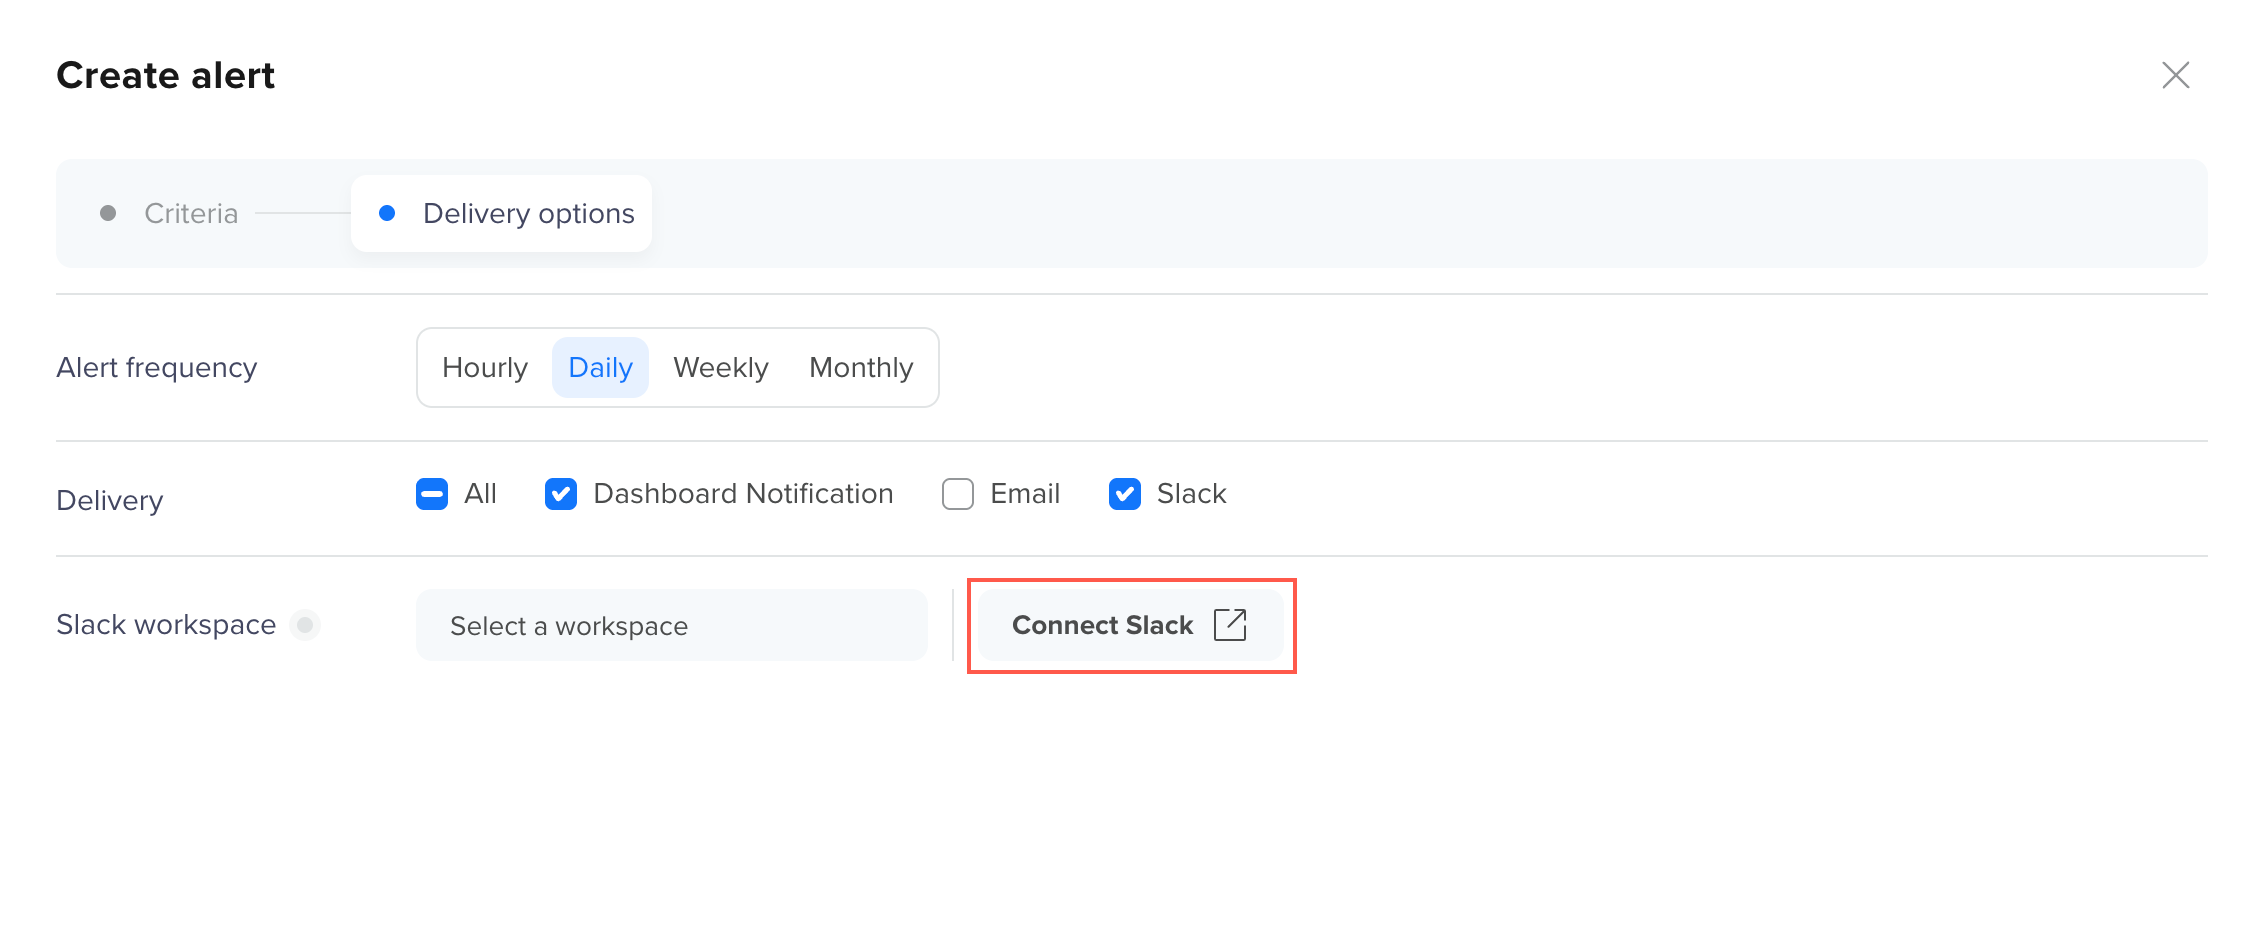
Once connected, any alert in your project can route notifications to any Slack channel to which the CleverTap bot has been invited.
Project Limits
The following limits apply to Alerts:
| Limit | Value |
|---|---|
| Active alerts per project | 10 |
| Supported metrics | Total Events and Unique users only |
| Alert types | Anomaly and Threshold |
| Threshold percent-change baseline | Same period last week only |
NoteWhen you reach the 10-alert limit, the Create alert option is disabled. To create a new alert, go to Manage Alerts and delete or pause any active alerts first. Paused alerts do not count toward the 10-alert limit. Only alerts with ACTIVE status count against the project limit.
FAQs
Find answers to the following common questions about Alerts in Analytics.
What does the alert frequency control?
The alert frequency determines how often CleverTap evaluates the alert. Hourly evaluations check the metric every hour, daily evaluations check once per day, and so on. Choose a frequency that matches how quickly you need to respond to a change in the metric.
What is the baseline for percentage-change threshold alerts?
The baseline is always the same period from the previous week. For example, if your alert evaluates on a Wednesday, CleverTap compares Wednesday's value to the previous Wednesday's value. This applies regardless of whether your alert frequency is set to Hourly, Daily, Weekly, or Monthly. The comparison always looks back to the equivalent period one week prior. Comparison with any other period, such as the previous day or month, is not supported. This keeps comparisons consistent with the weekly seasonality patterns common in most product metrics.
Can I receive alerts on multiple channels at once?
Yes. You can select any combination of Dashboard, Email, and Slack as delivery destinations for each alert.
What happens to Slack alerts if I disconnect Slack?
Slack delivery is paused on all existing alerts. Dashboard and email notifications for those alerts continue to trigger.
Why is my alert showing as FAILING?
An alert enters FAILING status when CleverTap is unable to evaluate the alert's condition successfully three or more consecutive times. This can happen due to a temporary system error. You receive an email notification when this happens. If the alert continues to fail, contact CleverTap Support.
I set an anomaly alert, but it is not triggering even though I can see a clear drop on my chart. Why?
The anomaly algorithm may not have flagged the drop if it falls within the expected range. Try editing the alert and lowering the Confidence Interval to 90%. This narrows the expected range and makes the alert more sensitive. For more information, refer to Confidence Interval.
Can I edit a monitored event or metric after creating an alert?
No. The event, filters, and metric are saved when the alert is created and cannot be changed afterward. To monitor a different event or metric, delete the existing alert and create a new one.
Updated about 11 hours ago