Create Message
Learn how to create a Web Exit Intent campaign using the CleverTap dashboard
Create a New Web Exit Intent Campaign
To create a new Web Exit Intent Popup campaign:
- From the dashboard, select Campaigns.
- Click + Campaign.
- From the Messaging Channels list, select Web Exit Intent.
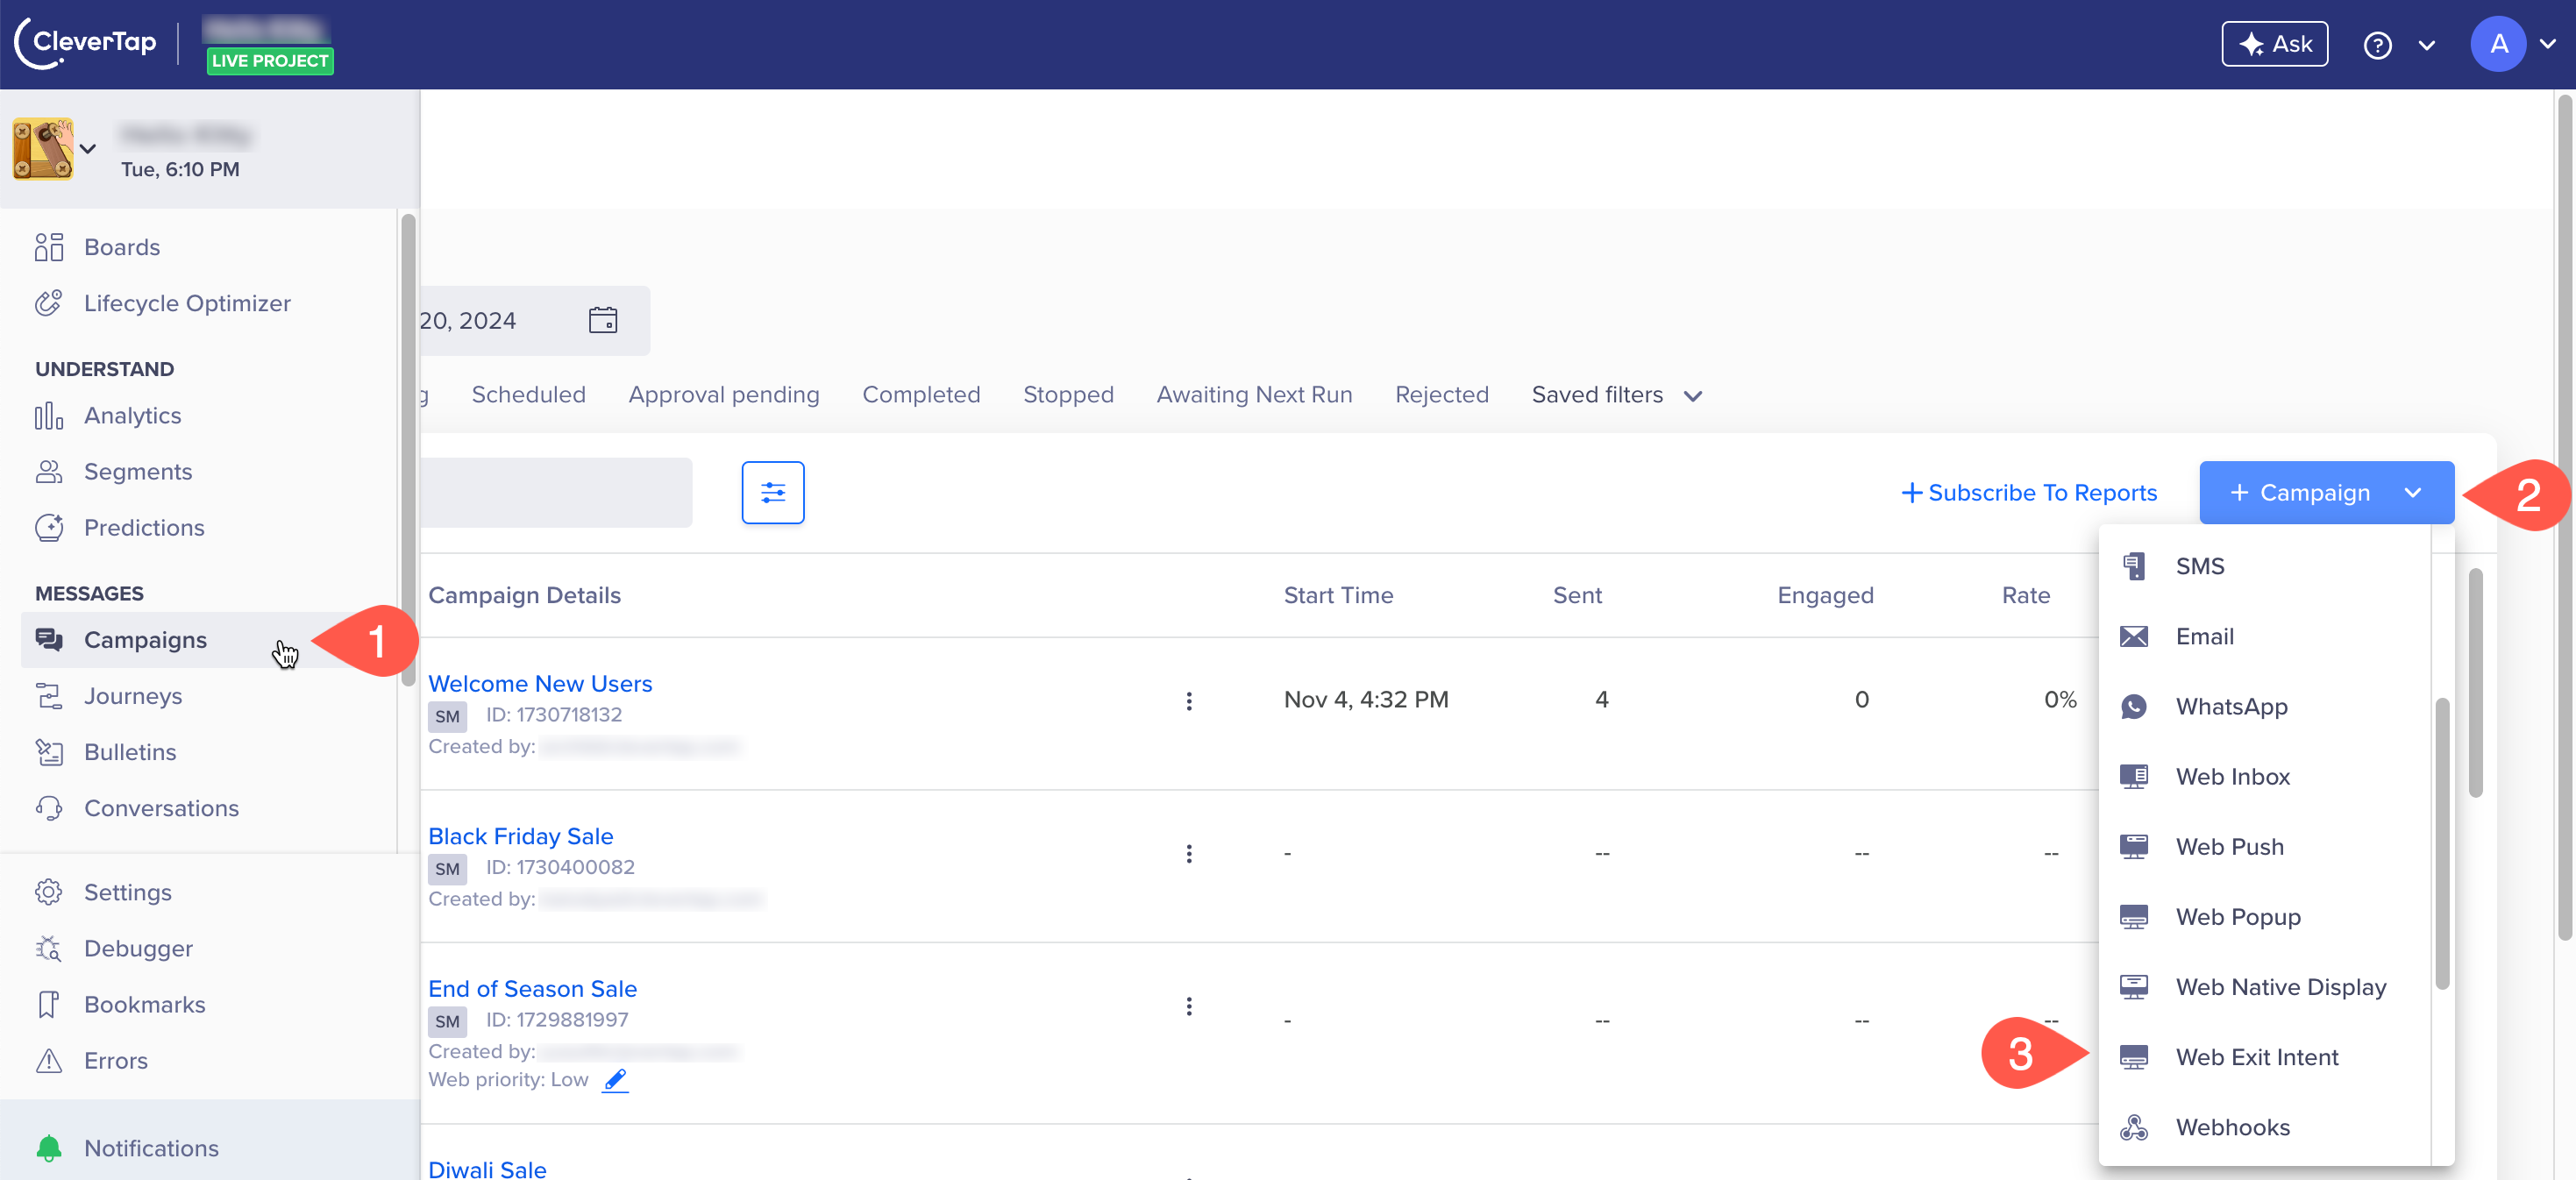
Select Messaging Channel
The campaign page displays.
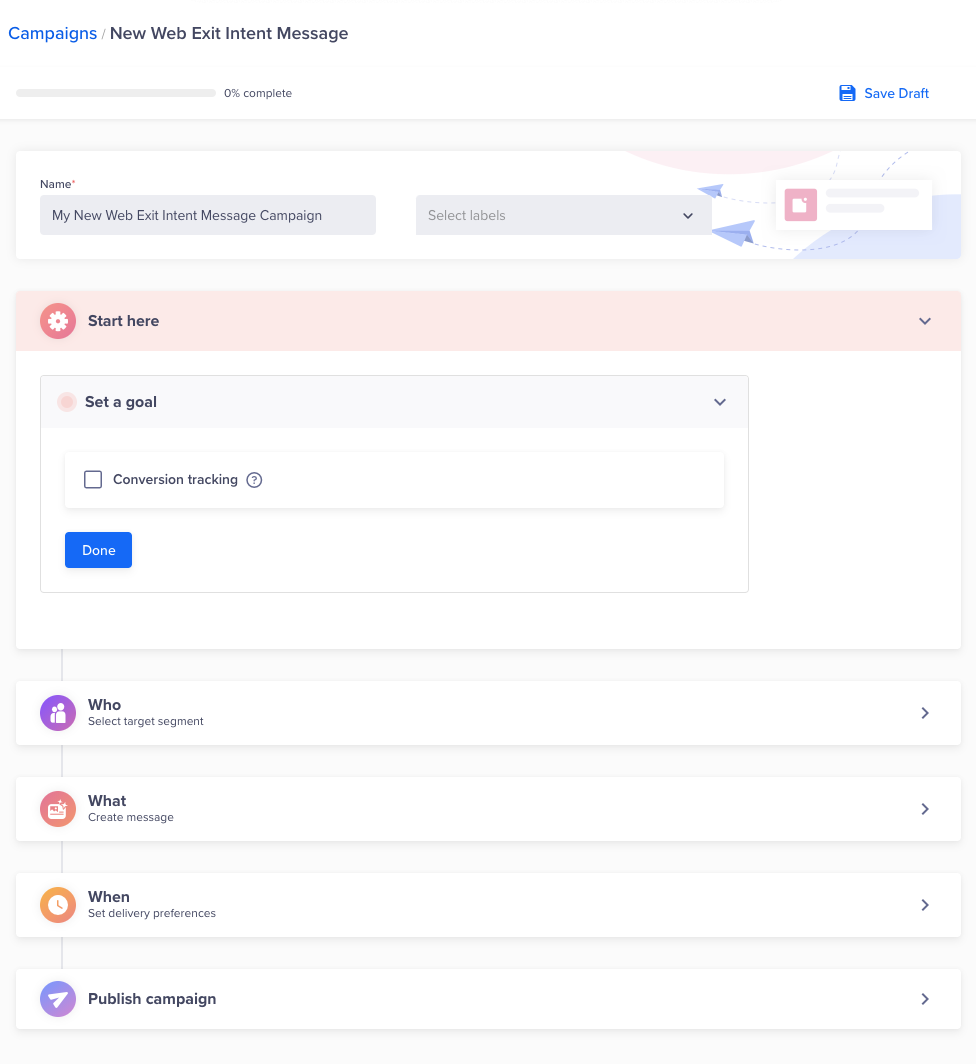
Create Campaign
Define all the sections and publish the campaign.
Start Campaign Setup
The Start here section displays the setup information.
- Set a goal: Tracks your campaign conversions by setting a goal. This step is optional, but it helps you measure how effectively your campaign meets its goal.
You can define your conversion goal by selecting the Event and specifying the Conversion Time. The Conversion Time field accepts any numeric value along with a time unit such as Minutes, Hours, Days, Weeks, or Months. This allows you to define conversion windows such as 10 days, 72 hours, or 2 months. The value can range from a minimum of 1 minute to a maximum of 5 months.
For example, if you set the conversion time to 5 Minutes, the system counts conversions within 5 minutes of the goal event.
Your campaign goal can be as broad or as specific as you want. For example, you can answer questions such as: How many users were influenced to purchase an X amount? or How many first-time visitors purchased red shoes worth at least X and blue jackets worth at least Y?
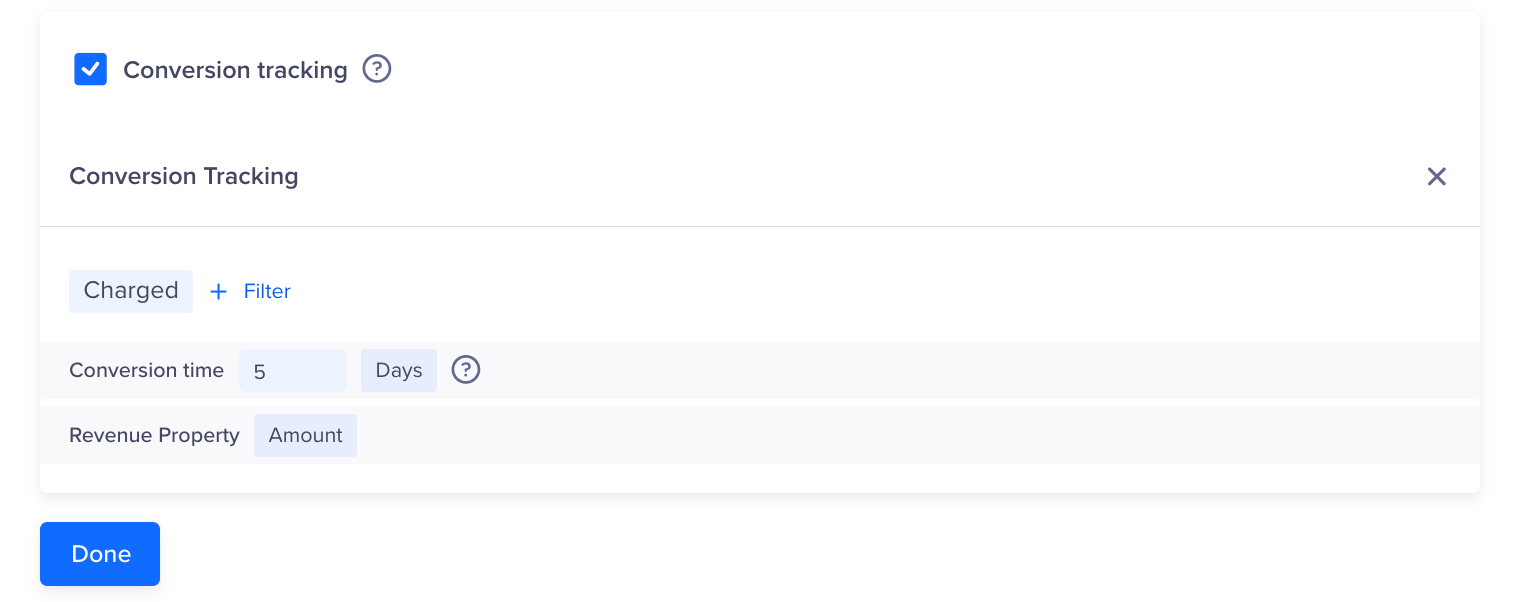
Set Conversion Time
Define the Audience
You must indicate the target audience for your campaign. You can specify your target audience from the Target segment section. Here, you can create a new segment or use a previously saved user segment from the segment list.
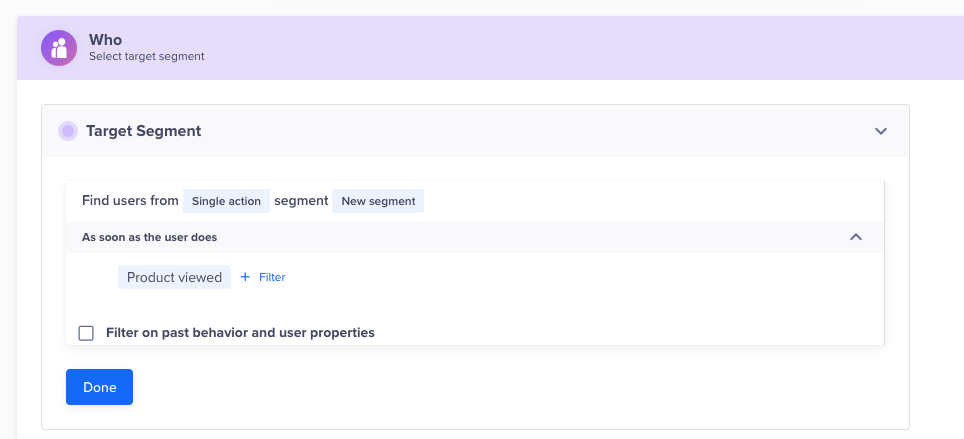
Define Target Segment - Who
Campaigns can be set up as follows:
- Single action: User does an action on one of your web pages.
- Page visit: User visits one of your specific webpage URLs.
- Page referral: User visits your website via any specific referral URL.
- Page count: Number of your web pages a user has visited so far in their session.
Deliver Action Based Web Exit Intent Notifications
You can trigger a web exit intent popup based on an action. For example, a web exit intent popup with an irresistible discount voucher can be shown to a set of customers who have just viewed a specific product page. This will help in incentivizing an existing customer. Moreover, such exit intent popups make notifications more contextual and result in increased conversion.
Deliver Messages based on Past Behavior (PBS)
You can also target users basis their past behavior. For example, you can show a web exit intent popup to customers who had recently added products to the cart but didn't complete the purchase.
Filter by User Properties
Using the With user properties filter in the Who section, you can segment your campaign to only reach users who meet specific criteria.
For example, you can send a web exit Intent popup to customers from Mumbai who have added items to the cart but didn't complete the transaction in the past 10 days.
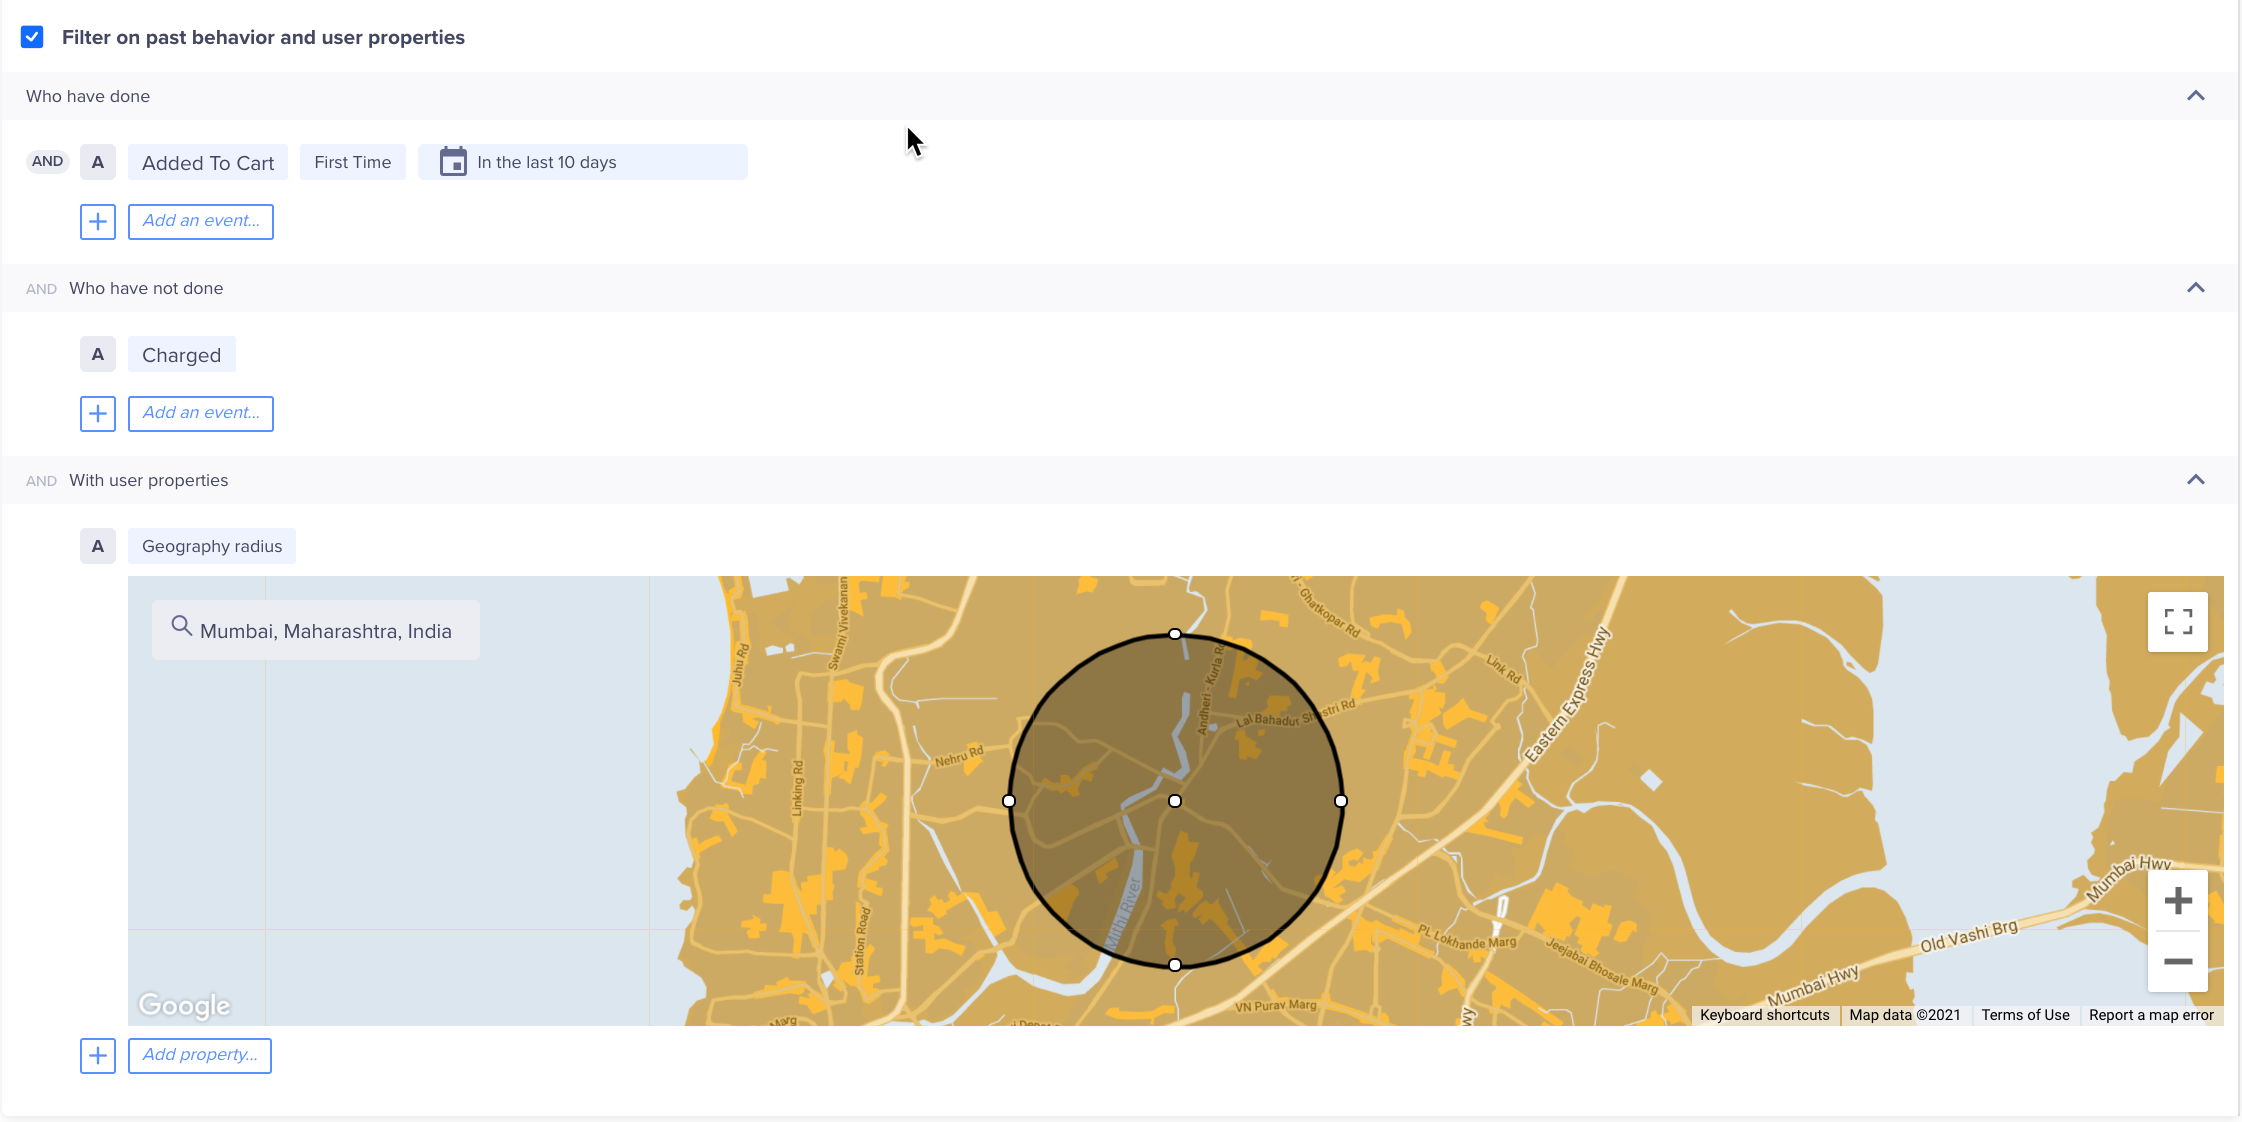
Filter by User Properties
The following table explains the various property types:
Property Type | Description | Example |
|---|---|---|
User Properties | Custom user profile properties that you define and send to CleverTap. | Customer Type = Platinum |
Demographics | Demographics filters include Age and Gender. | Age = 25 to 40 years |
Geography | User's coarse location. Filters include Country, Region, and City. CleverTap's SDK can automatically detect this from the user's IP address. | Country = United States |
Geography Radius | User's exact location. You can select a city, and then define the target radius. You can also select multiple cities. You can send this information using CleverTap's SDK. For more information, refer to the iOS and Android developer guides. | Locations = San Francisco, USA; Paris, France |
Reachability | Reachability filters include Has email address, Has phone number, Unsubscribed email, and Unsubscribed SMS. | Unsubscribed email = No |
App Fields | App fields filters include App Version, Device Make, Device Model, OS Version, and CleverTap SDK Version. This information is sent by CleverTap's SDK for each device that has your app which means a single user can have multiple devices associated with their user profile. | OS Version = 10 |
To know more about what segments can be used, see Segments.
Calculate Estimated Reach
The Estimated Reach option allows you to preview how many users meet your targeting criteria in an online trigger campaign before publishing it. This helps you validate audience size and adjust filters to ensure the campaign reaches the intended users.
Estimated Reach is particularly useful when you select the Filter on past behavior and user properties option. You can view both the estimated user count and device count.
To calculate the estimated reach, perform the steps below:
- Select Filter on past behavior and user properties.
- Click Calculate in the right panel. The result shows the estimated number of users or devices for that segment. You can view the following:
- Total Users: The number of users that match the filters.
- Breakdown by Platform and Devices: The users count on Android, iOS, or both, and on different devices.
- Visual Indicator: A chart summarizing the share by operating system.
The estimate, based on the latest available event data, updates each time you apply or modify filters. It reflects stored event data and is not a real-time count. This helps you plan and refine your audience before sending the campaign.
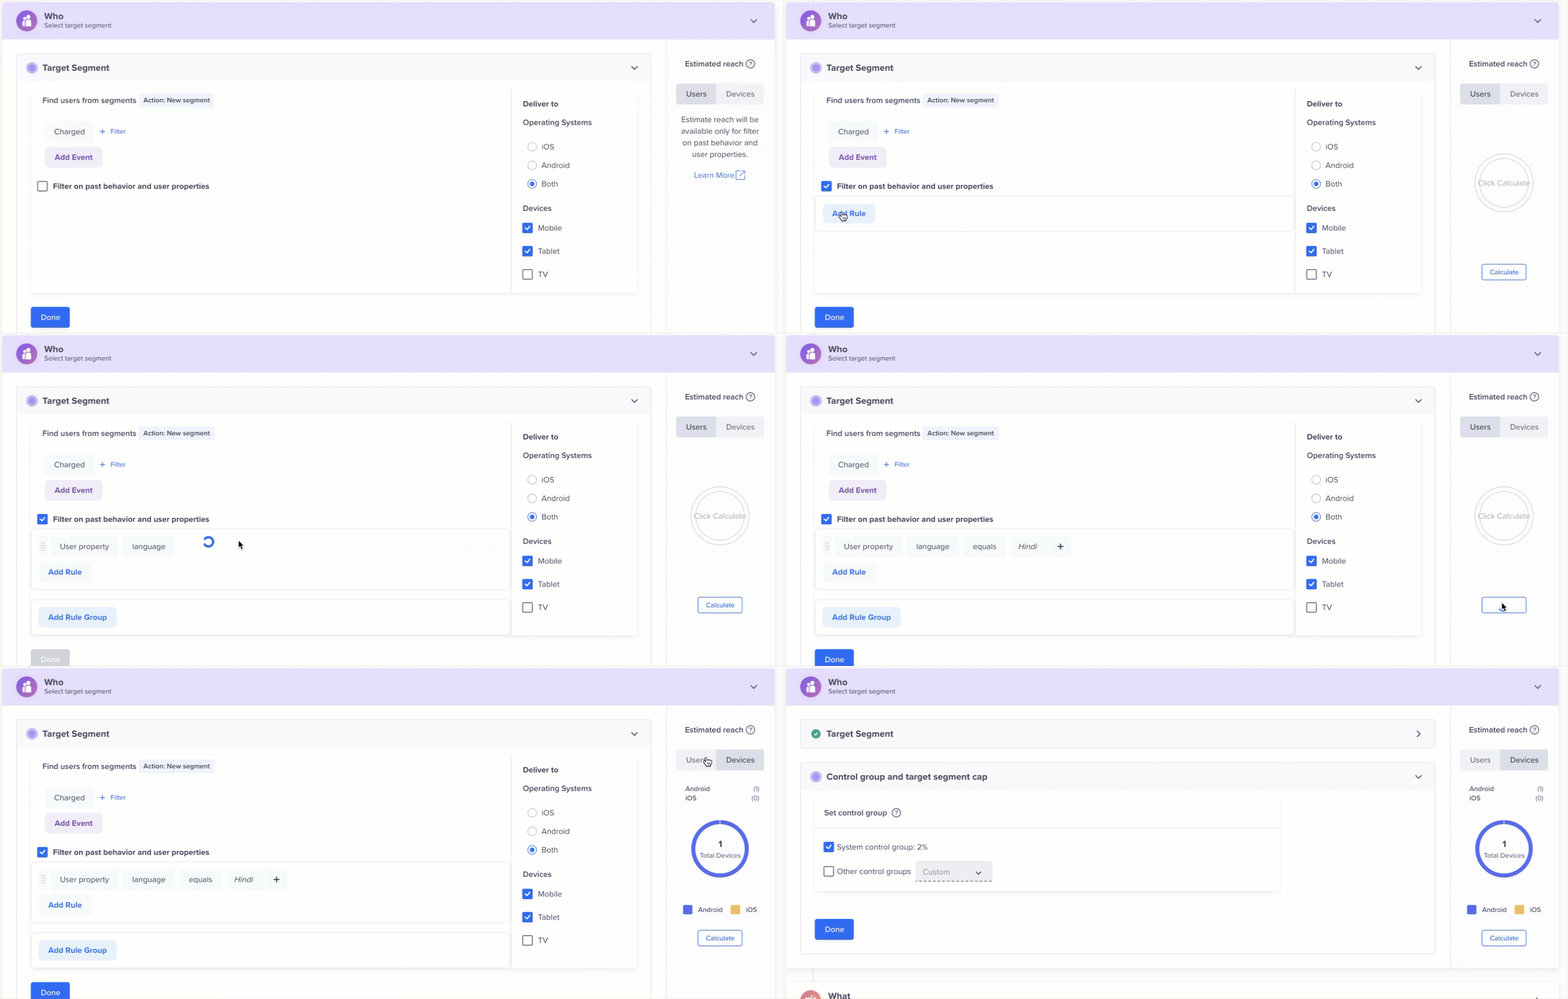
Calculate Estimate Reach
Control Group
You can define the control group to compare and measure the results of your campaign. For more information on control groups, see Control Groups.
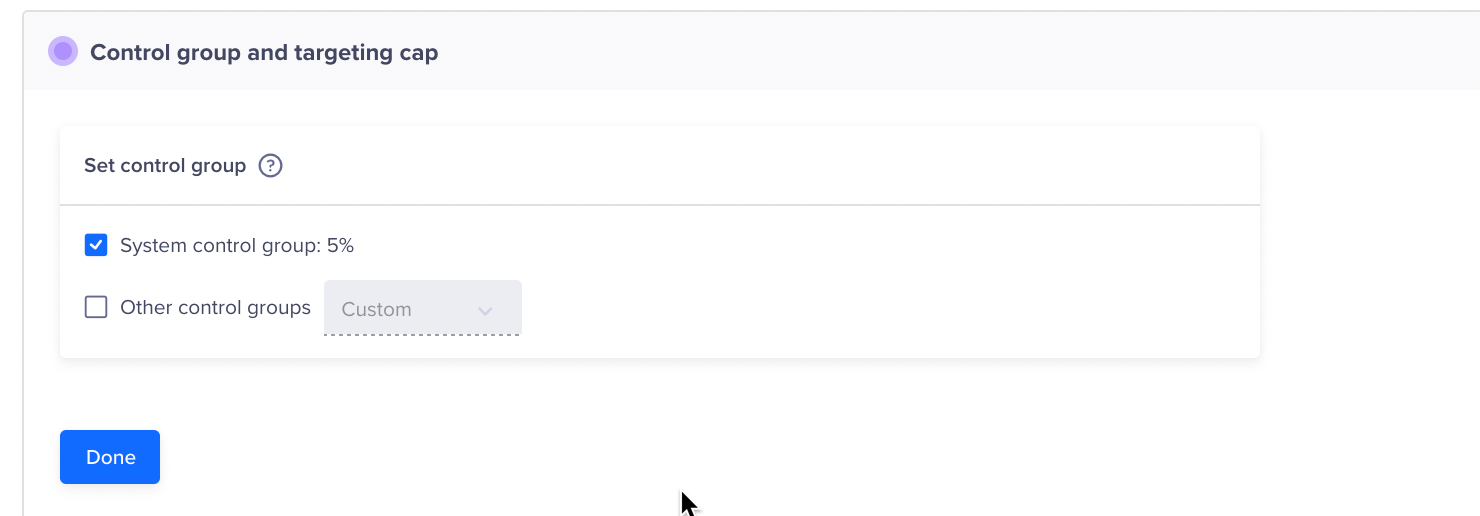
Control Group
Web Exit Intent Pop-up Message Types
You can create the following types of messages for your web exit intent pop-ups:
- Single Message
- AB Test
- Split Delivery
- By User Property
Single Message
In this campaign, a standard message is sent to all users who qualify as your target audience. This message type is best for broadcast messages and for applications that do not vary campaign communication based on differences between properties such as language, geography, or any other user properties.
A/B Testing
A/B testing helps you understand what type of message copy works best in the pop-up to get users' clicks.
You can test up to three pop-up message variants on a test group. The variant that gets the most clicks is declared the winning variant and is automatically sent to the rest of your target audience.
When you create multiple variants for a campaign, you can also auto-copy what is already present in a current variant.

A/B Test Variants
Split Delivery
With split delivery, you can decide what percentage of your audience receives each pop-up variant for the campaign's duration.
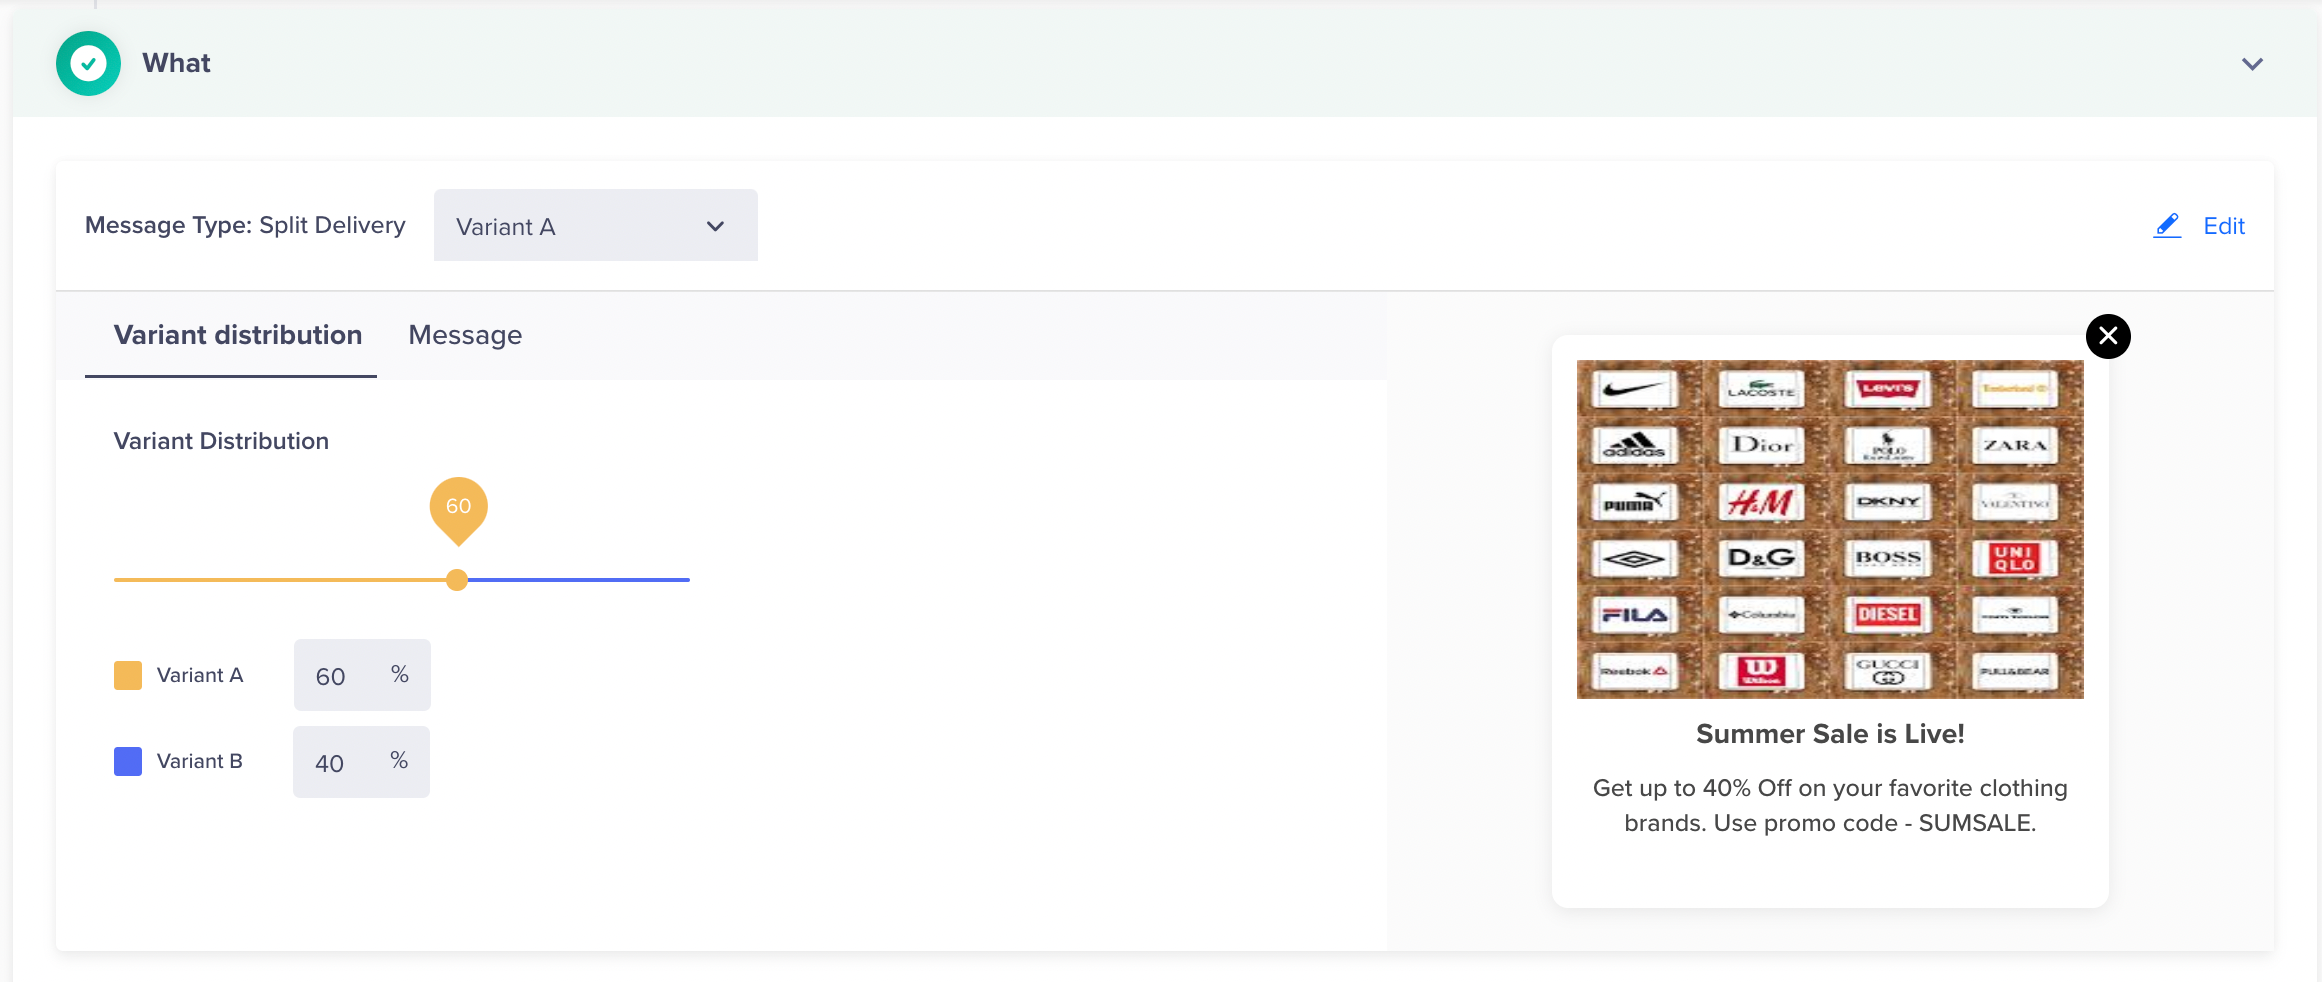
Split Delivery Variant Distribution
By User Property
If you would like to send different message variants to your target audience based on the user properties they possess, this campaign type is your best bet. A good example would be when you want to send a localized update to people based on their preferred language.
Similar to creating A/B test variants, click + Variant to add multiple variants based on a user property value. You can send up to 50 message variants to different users based on a user property. In the example below, we have used the Language user property so users with different language preferences will receive corresponding copies of the campaign in their preferred language (English, Hindi, etc.)
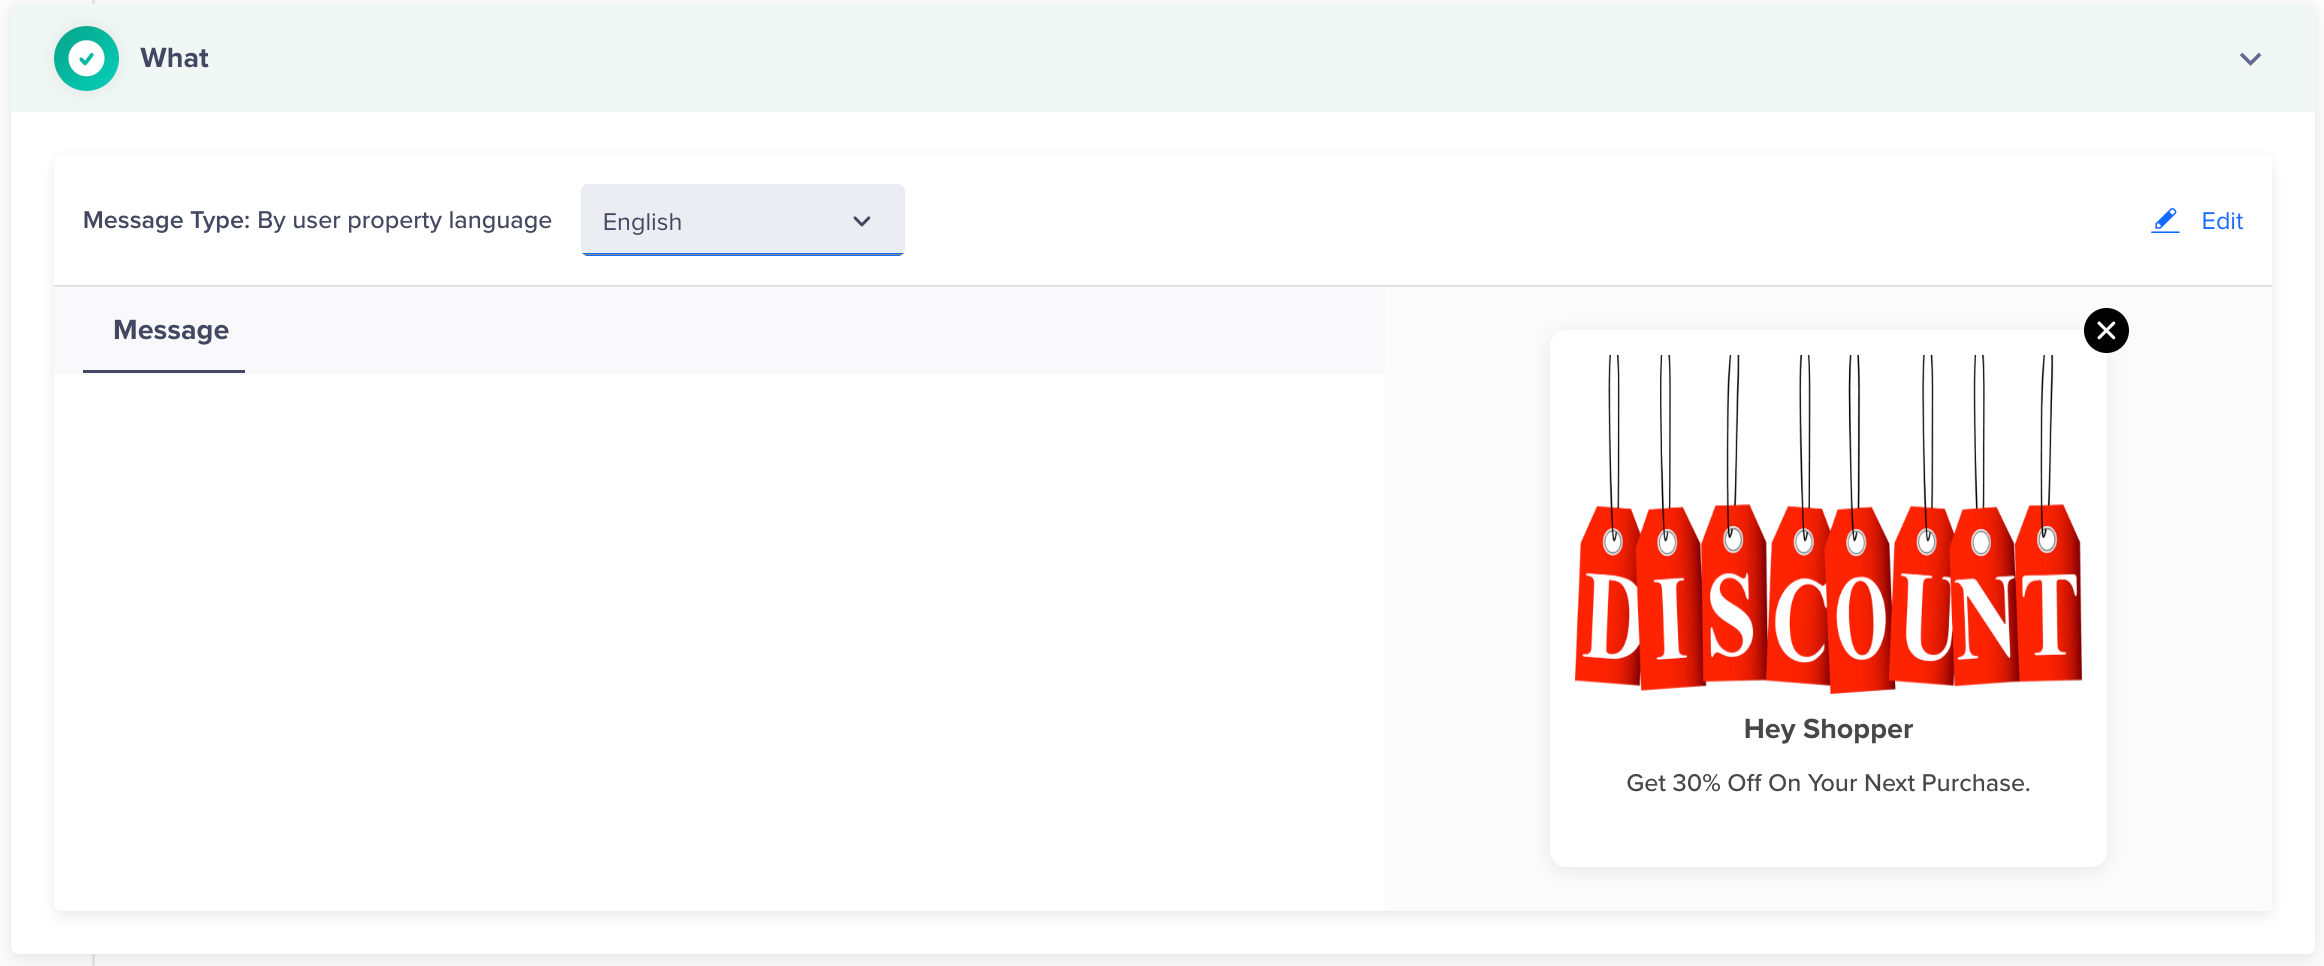
Message Variant by User Property
Define the Message Content
After you select a particular message type, you need to choose a template. CleverTap supports two types of templates for web exit intent pop-up creation:
- Interstitial - It's a center-aligned pop-up mainly used for driving better engagements. The image below represents the editor for a sample Interstitial template.
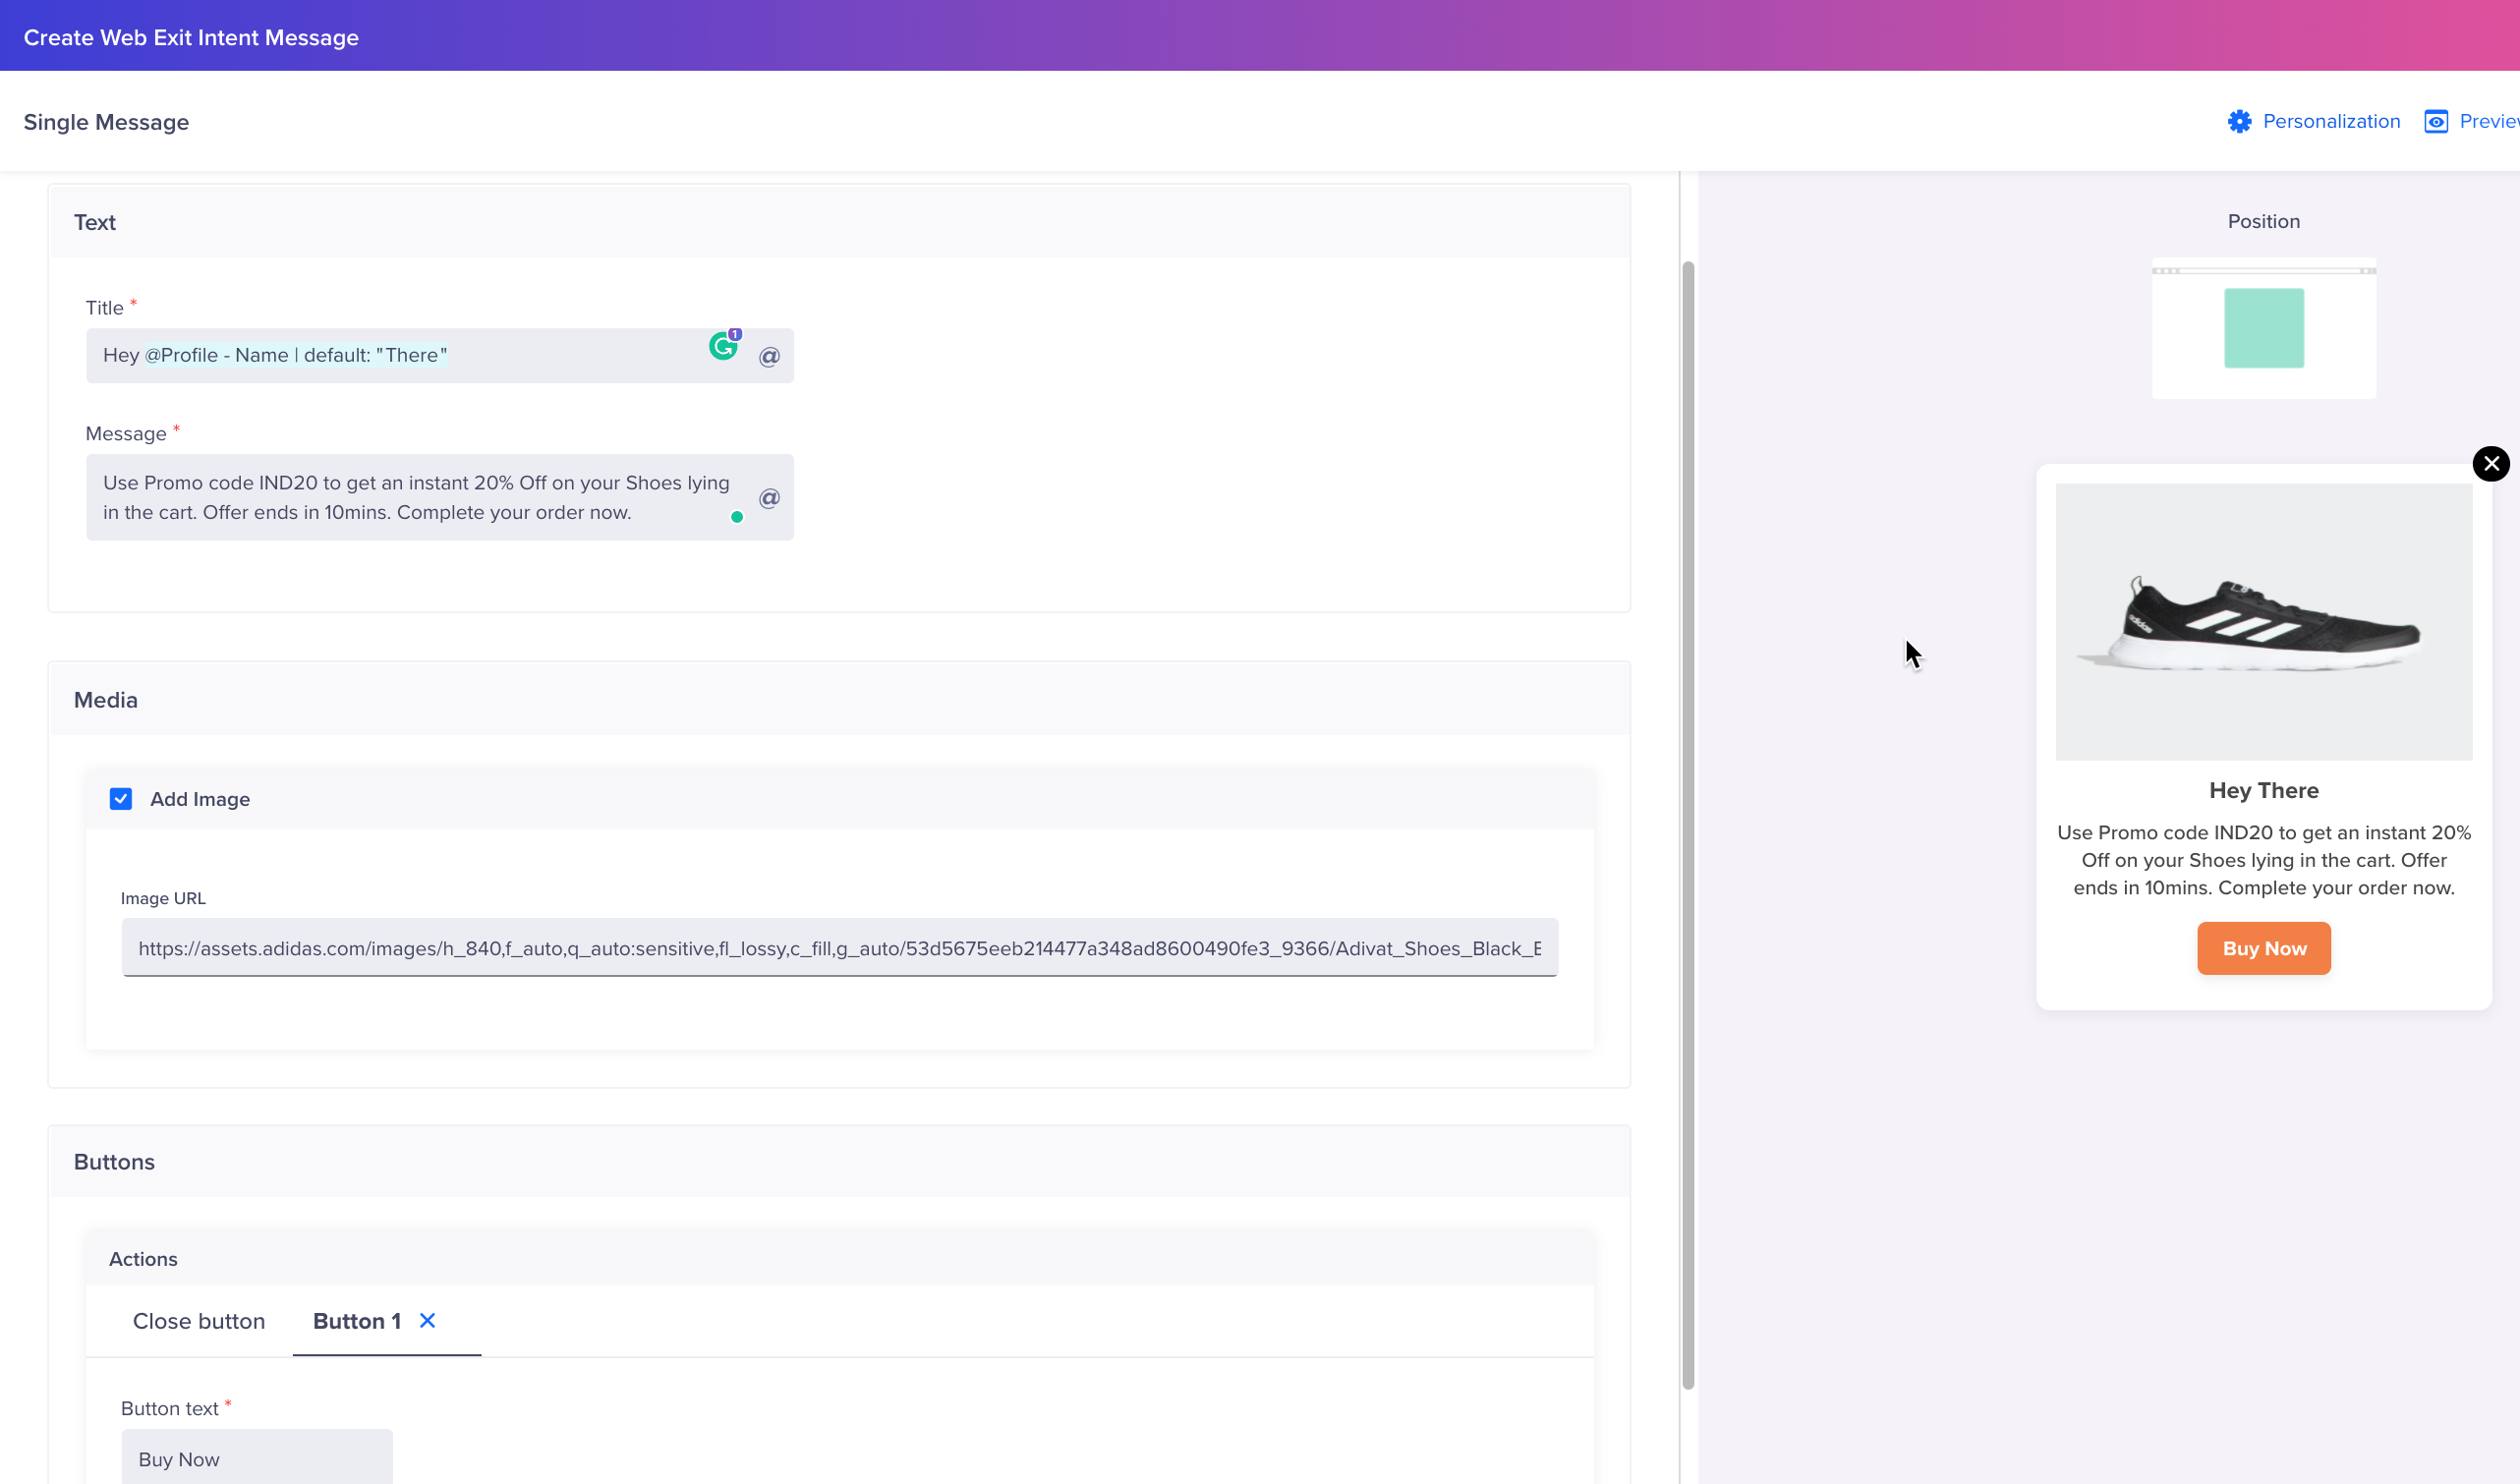
Interstitial Message
For web exit intent pop-ups, you can specify a button with text. Upon a web pop-up click, you can either do nothing, open a link, or invoke a JavaScript function.
- Custom HTML - Here the marketers have a choice to customize their exit intent pop-up's appearance for the Interstitial template. One simply needs to insert the custom HTML scripts for the respective template layout in the HTML editor.
Manually Configured Click Tracking?If you are already raising the Notification Clicked event manually in your template, then ensure to disable the Enable click tracking for Custom HTML checkbox to avoid overcounting.
To track the campaign stats such as the number of total clicks and CTRs, marketers need to ensure that they check mark the Enable click tracking for Custom HTML checkbox.
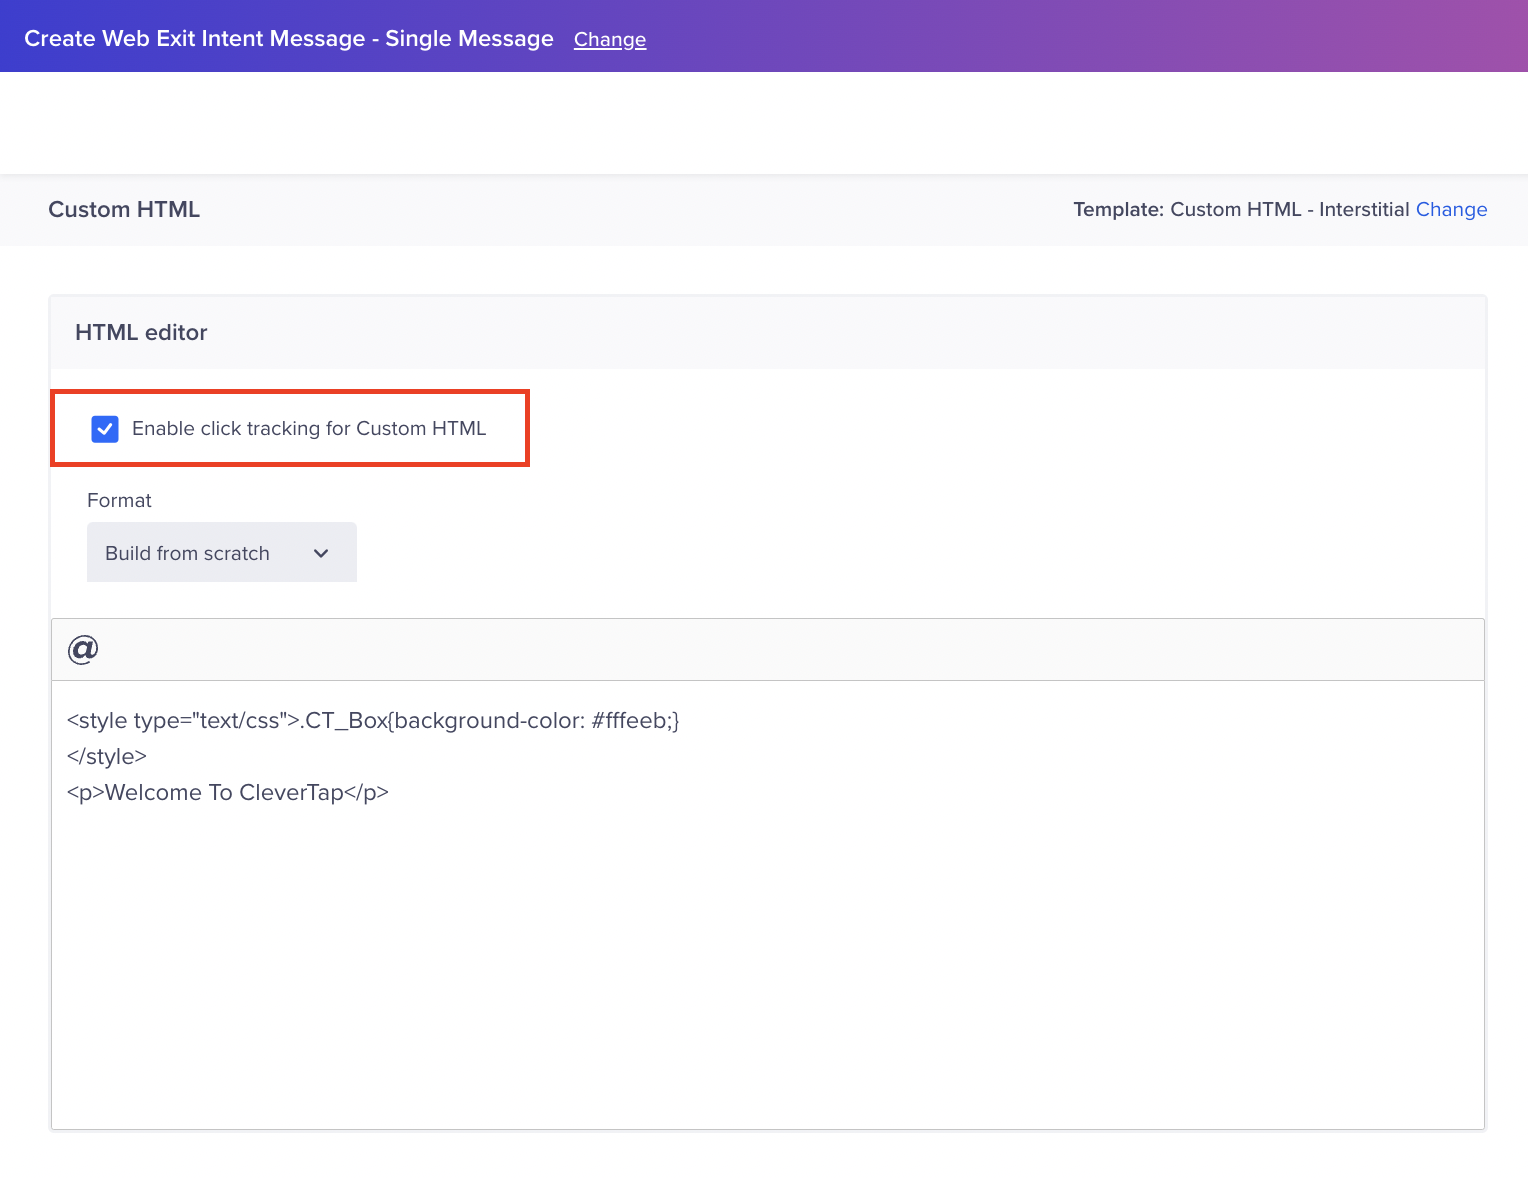
Track Campaign Stats
Define the Campaign Schedule
Each web exit intent campaign needs to be scheduled to run actively for a specific timeline. To define the schedule for your popup campaign, you need to specify the Start date and time and End date and time. You can also define a delay (by seconds, minutes, hours, or days) once a user qualifies for the target segment. Once you define the schedule and click on Done, the campaign will be triggered and terminated as per the defined timings.
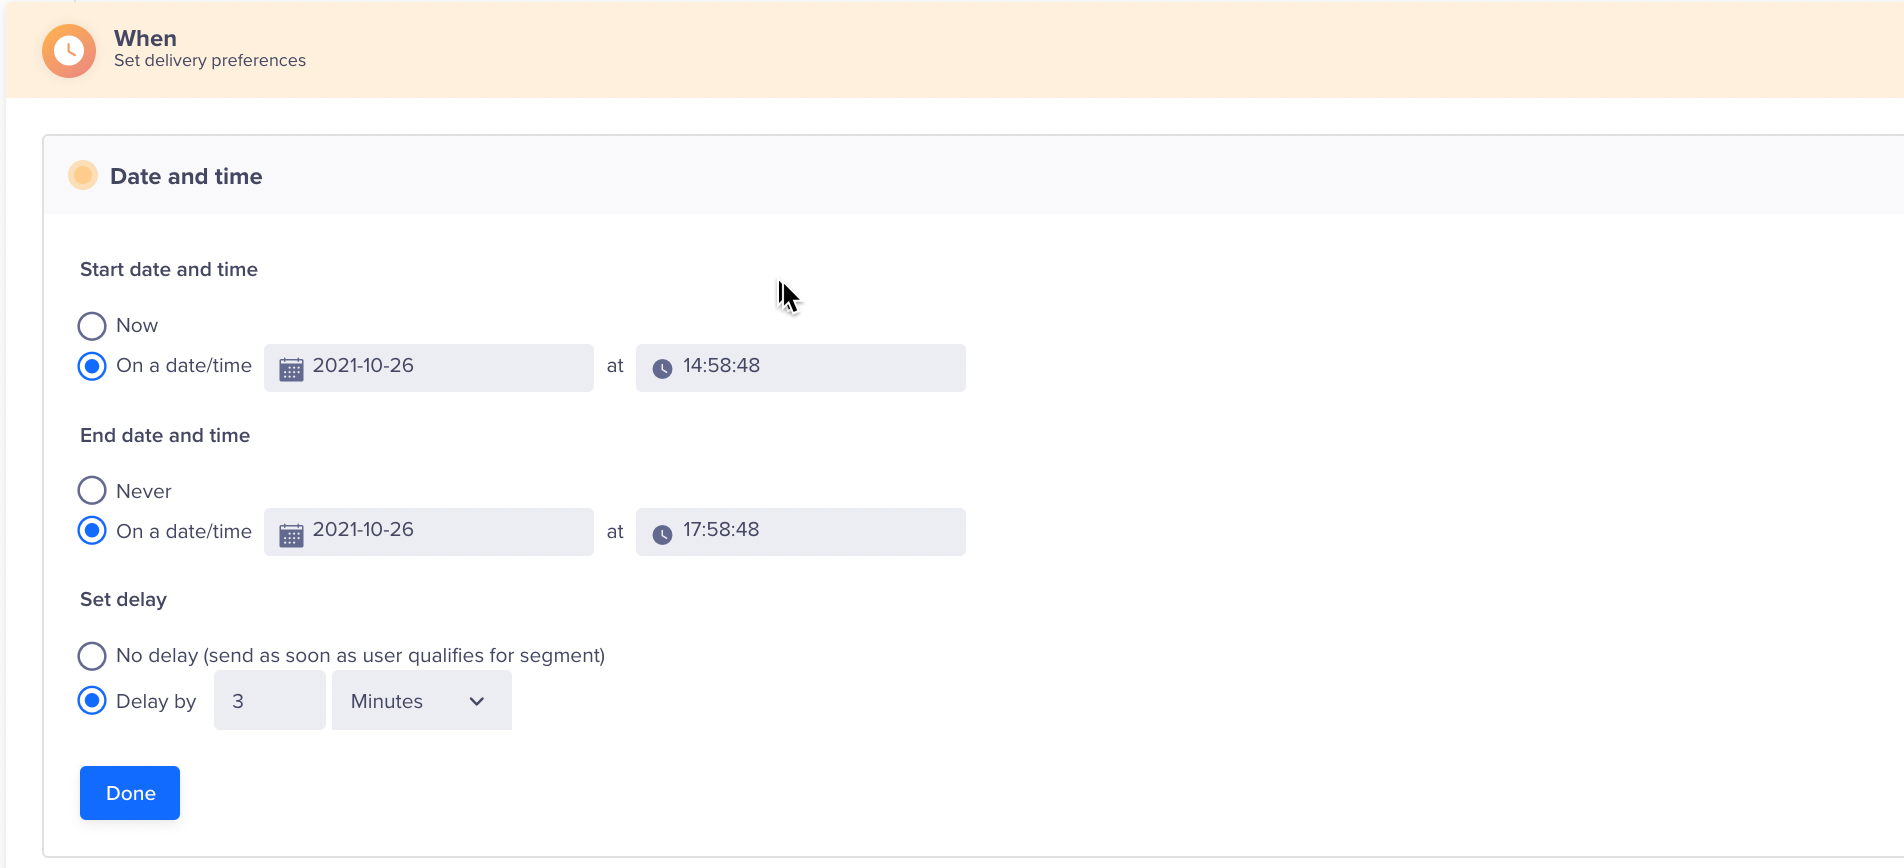
Campaign Schedule
Delivery preferences
In certain scenarios, you might not want a campaign to run actively on a particular day and time. In such cases, you can set the frequency for that particular campaign.
Finally, you can specify how often users receive the campaign: Bypass global campaign limits by selecting the Exclude from campaign limits option from the dropdown or choose the appropriate cadence on how often to send your campaign.
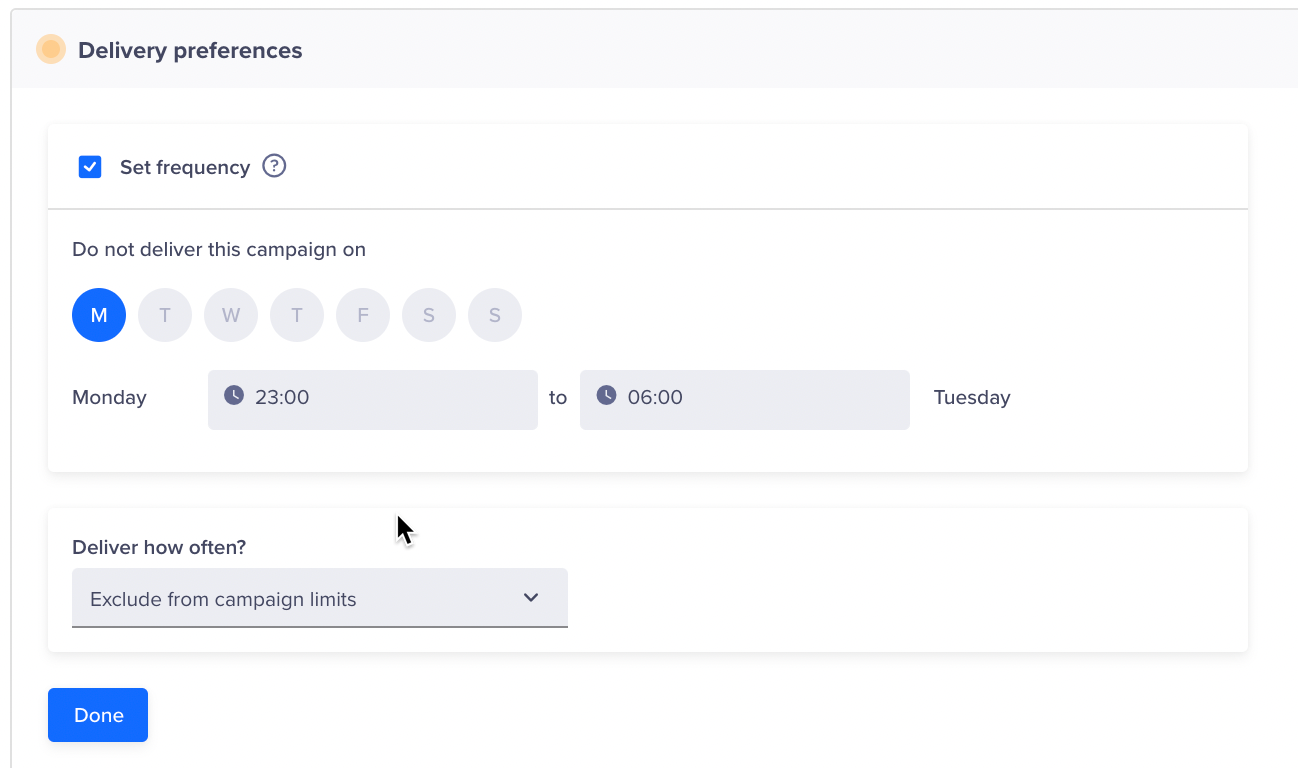
Delivery Preferences
Publish Campaign
- After previewing the appearance of your campaign, finalize your campaign by clicking Publish Campaign.

Publish Campaign
Assigning Priorities for Web Exit Intent Campaigns
After publishing the campaign, marketers can assign the priorities to specific campaigns to avoid random delivery of popups. This means, If multiple web popups are scheduled to go live for the same web page at the same time, the priority order defines the order in which the popups are to be shown.
To assign the priority:
- Navigate to the Campaigns dashboard and select the specific campaign from the campaign list.
- Click the Web priority marker icon below each campaign to open the priority list.

Assign Priority to Web Popups
Set the priority as per your choice and click Save
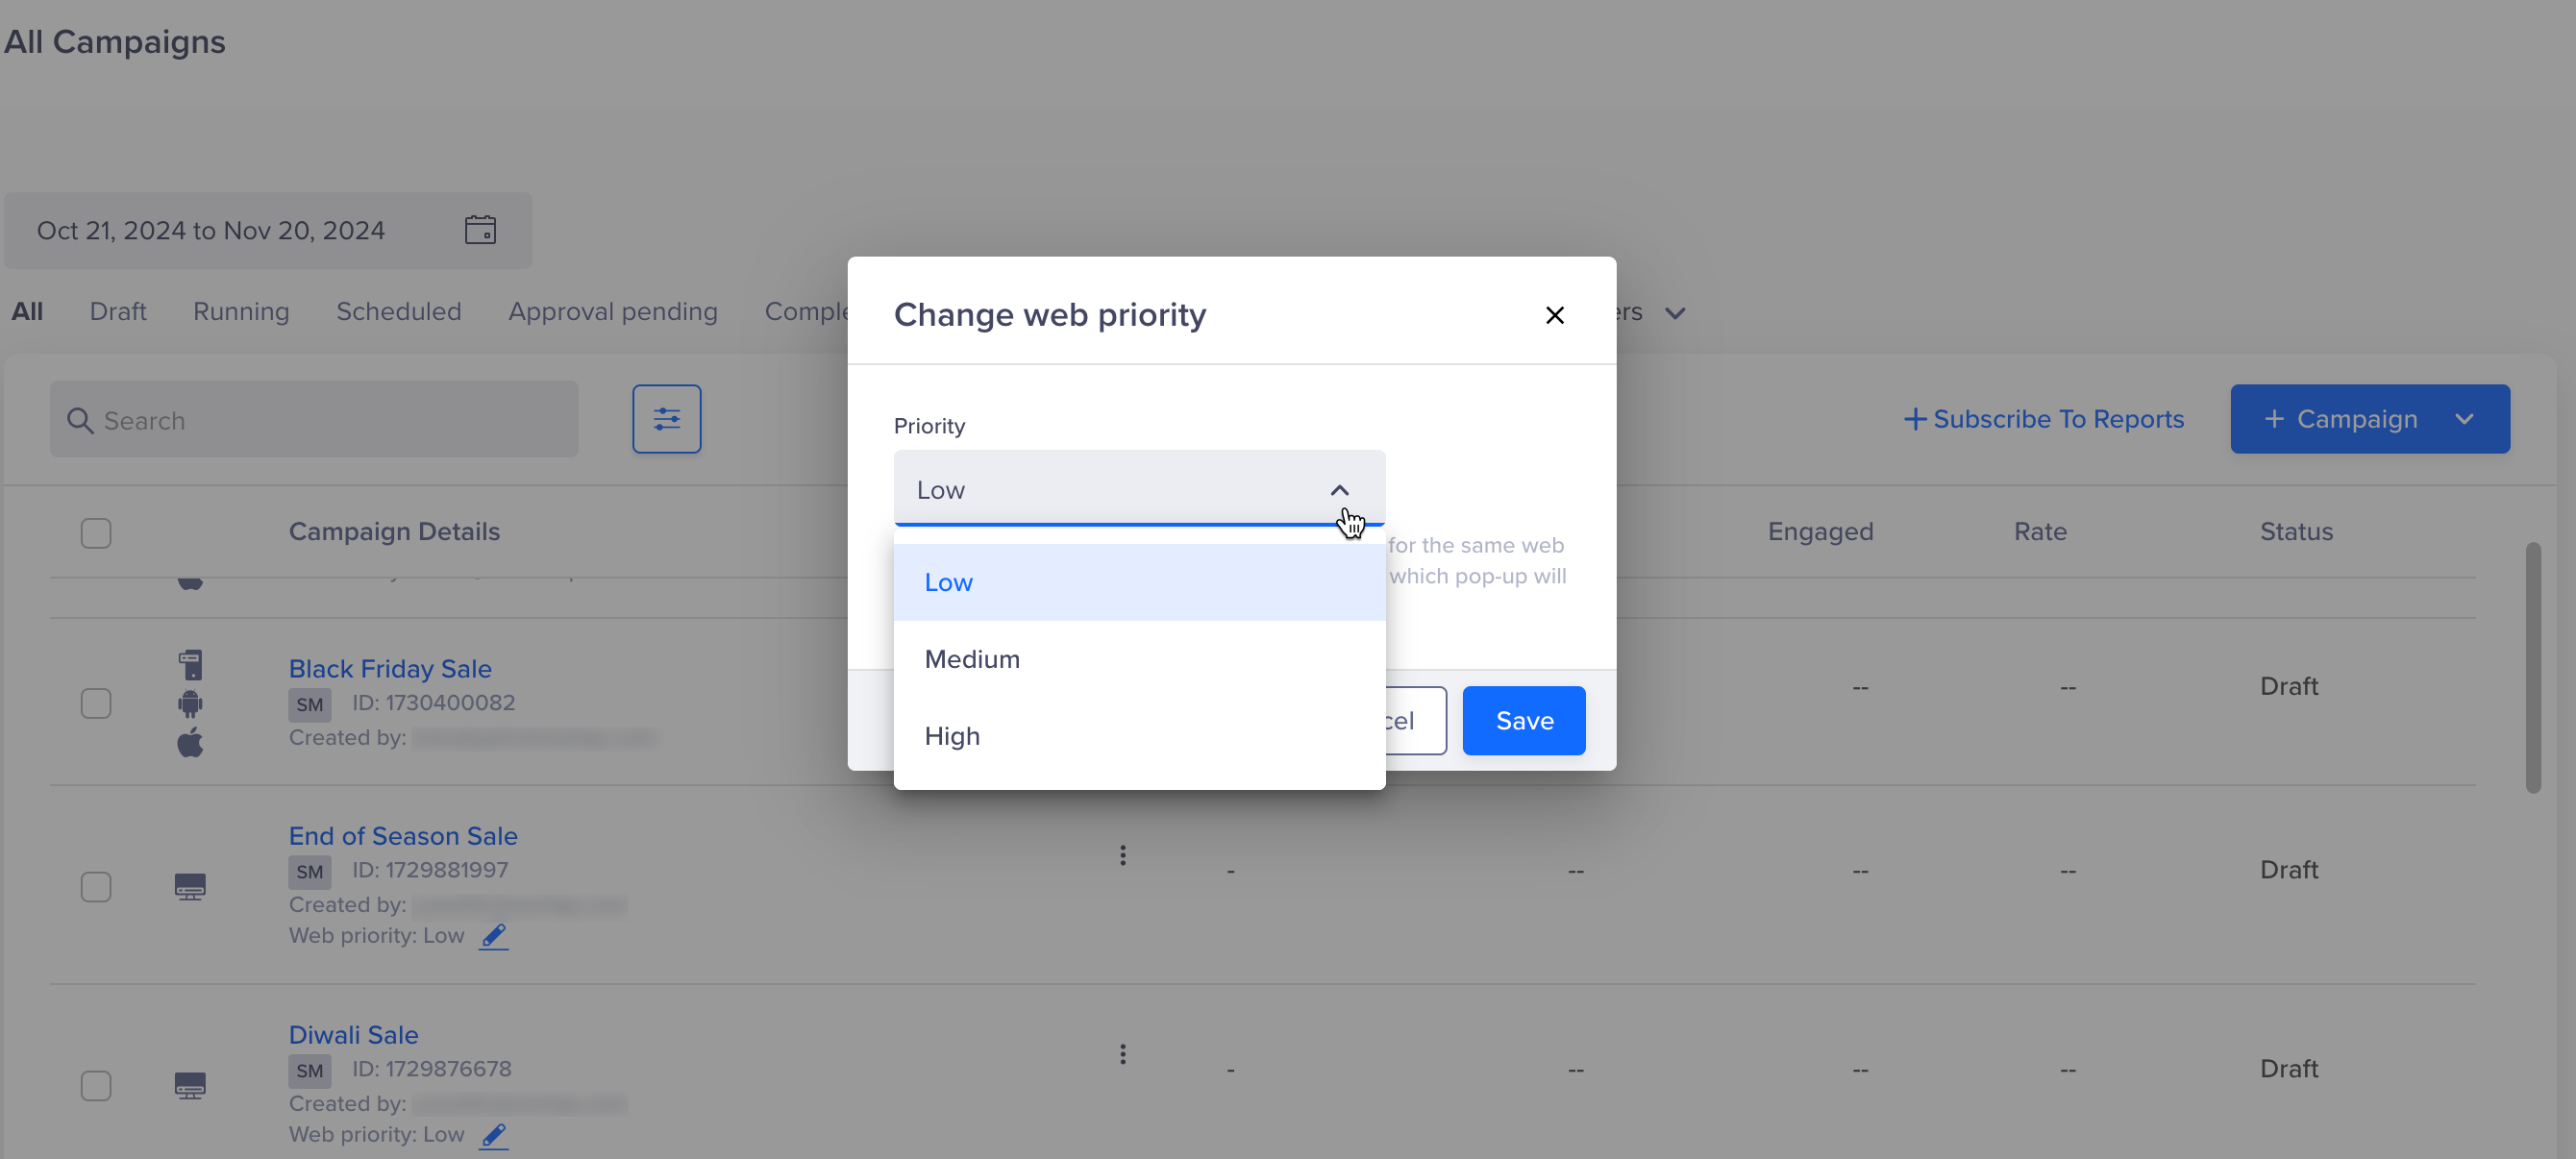
Priority List
Updated about 6 hours ago
