Schema
Overview
A Schema is a framework for maintaining, organizing, and structuring your data. It enforces rules to maintain data integrity, allowing you to avoid data quality issues later. Schema standardizes your data before you even begin using it. Since bad data incdurs high costs in terms of effort and money, you can save a significant amount of manual effort in tracking your data over time.
To preserve data sanity, the schema table stores event and user properties in a pre-defined order. It ensures better output because it enforces standardization of the incoming data and avoids duplication or corruption of data. Better input leads to a better outcome in your campaigns and journeys. It also provides more accurate insights into your data analytics.
Events
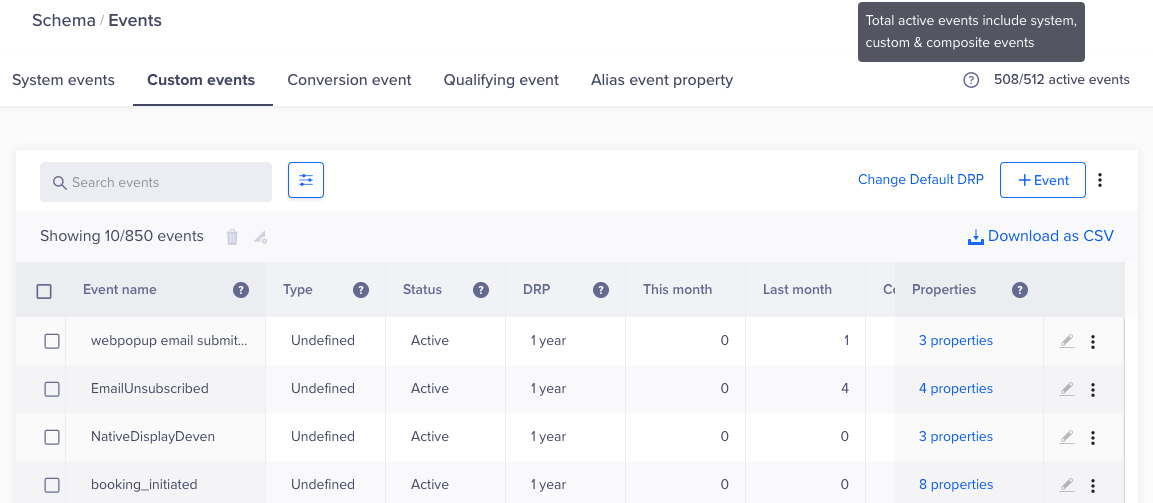
You can see your events under Settings > Schema Events. On this page, you can view all the events you are working with, along with editing or discarding to searching and filtering them.
The Events schema has four parts:
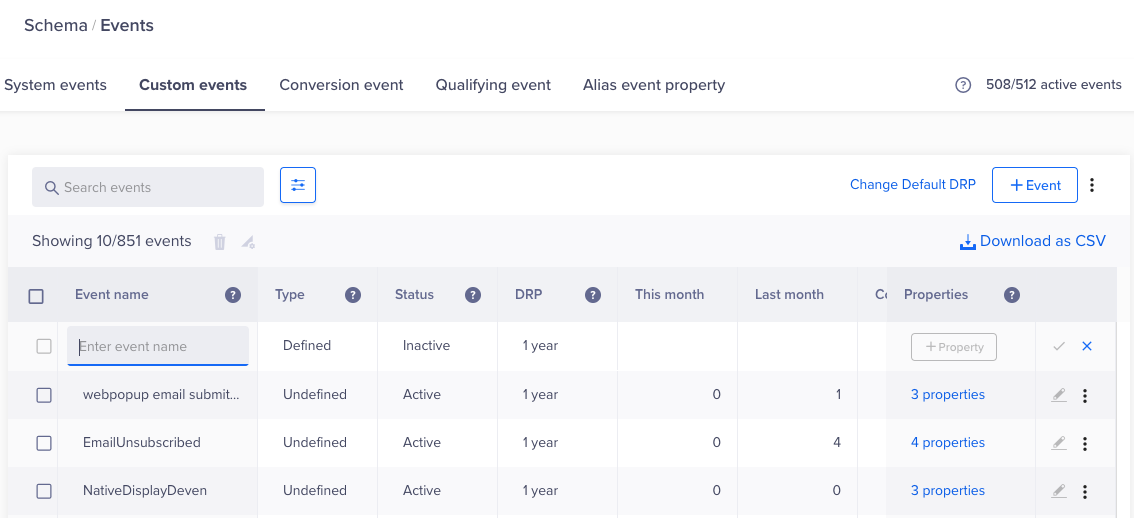
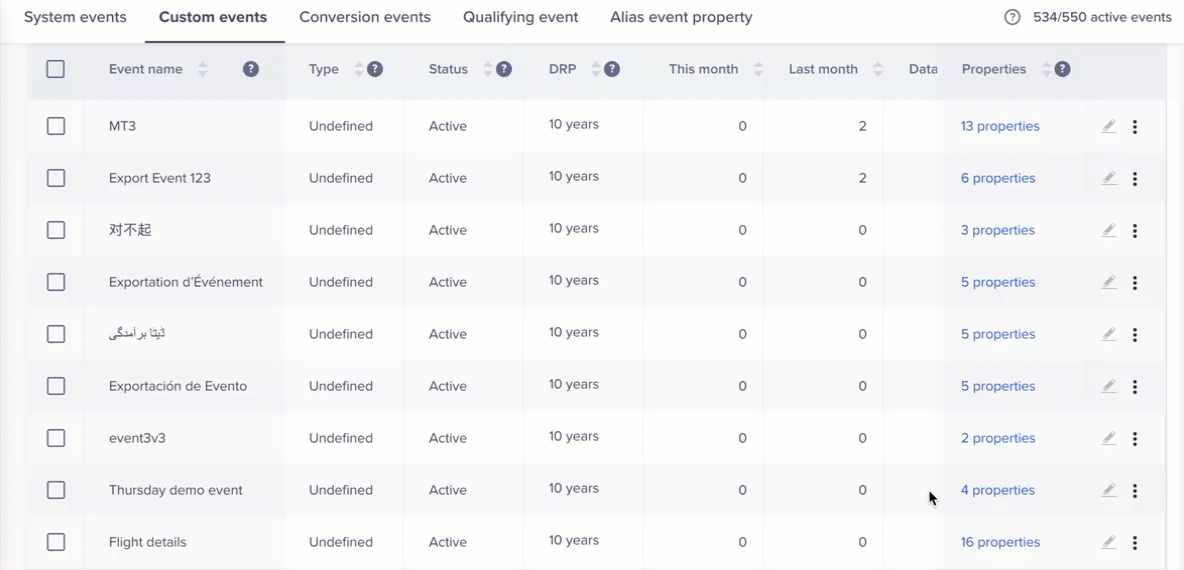
Custom Events
Custom events are events that you can define, edit, remove, and so on. These are your app events that you can fully control.
- Navigate to Settings > Schema > Events.
- Click the Custom events tab.
If you have already defined your events, they are all present on this tab.

View Custom Events
| Event Detail | Description |
|---|---|
| Event name | The name of the event as it is displayed on the dashboard. |
| Type | There are two types:
|
| Status | An event can have any of the following statuses:
|
| DRP | Data retention policy defines the length of time that the data is retained. |
| This month | The number of occurrences of the event in the current month. |
| Last month | The number of occurrences of the event in the previous month. |
| Count | A count can be an event, event property, or a user property update. |
| Properties | Attributes that provide additional context around the event. For more information, refer to Event Property. |
Add Event
You can add an event from the Custom events tab.
- Navigate to Settings > Schema Events > Custom events.
- Click the +Event button to add an event.
- Add the event name. This name must be unique in the schema.
Add Custom Event
For more information, refer to Event Property.
AI-Generated Descriptions for Custom Events
The system now automatically generates clear and consistent descriptions using AI, whenever a description field is clicked while creating or updating a custom event. You can choose to Accept or Dismiss the generated description. After accepting it, you can edit the description if needed.
This AI-generated description is further leveraged in the advanced AI features such as Prompt-to-Segmentation, Prompt-to-Analytics, and Prompt-to-Journeys.
AI-Generated Descriptions for Custom Events
Edit Event
The name cannot be changed after the event is published.
- Click the edit icon on the event row.
- Edit the event name.
- Click the checkmark.
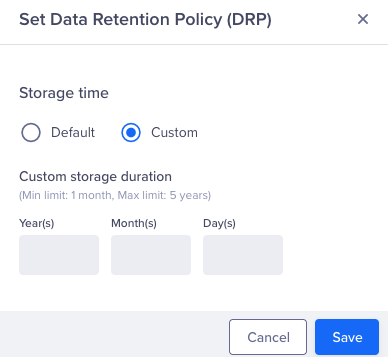
Set Data Retention Policy
The data retention policy (DRP) retains an event for the specified time before discarding it automatically. Your subscription plan will decide the default DRP limit.
- Navigate to Settings > Schema > Events.
- From the System Events tab, click the ellipsis on the event row and click Set DRP.
- Select Custom, then enter your specific time limit.
CleverTap Essentials Plan Limit
The default DRP for CleverTap Essentials Plan users is one year, which cannot be changed.
- Click Save.
Set Data Retention Policy
Remove Event
You must be careful before removing an event. If you ever need to remove an event from the schema, remove it from the event row on the Events page. You can only remove an inactive event from your schema; however, the effects are minimal because the event is not active. This action does not drop another event coming in with the same name.
- Click the ellipsis menu on the event row.
- Click Remove.
Remove an Event
After an event is removed:
- The entire event row is removed from the schema.
- If an event comes in with the same name, it is considered an undefined event.
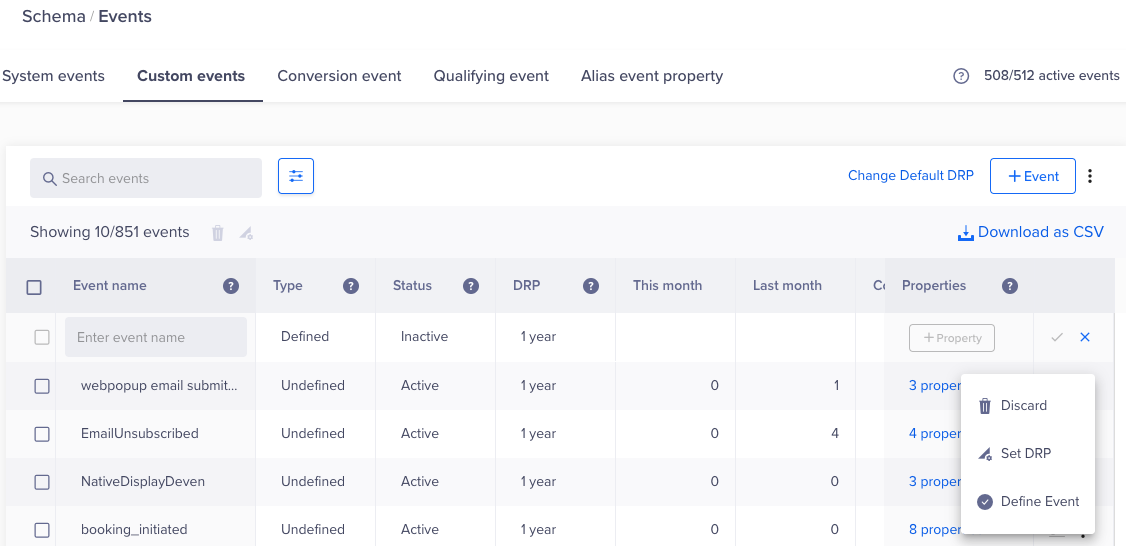
Discard Event
You can discard an active event from the schema. You can still see the event row in the schema; however, it will be marked as discarded.
When Discarding an Event
You can only discard an active event. Exercise extreme caution when discarding an event because this action cannot be undone. This action has an impact on your schema because it purges all data for the discarded event. It also drops any future incoming event with the same name.
- Click the ellipsis menu on the event row.
- Click Discard.
Discard an Event
Define Event
The events that are passed to CleverTap but not defined are marked as undefined events. You can define these events from the event row. Defining an event marks it as a recognized event in the schema, and therefore, when the event is received, this will not cause any error.
- Click the ellipsis menu on the event row.
- Select Define Event, and a new window displays.
- Click Define & Save.
Publish Schema/Events
To publish the events, perform the following:
- Check that you have all the required events.
- Click the Publish Events button.
| Event Name | Description |
|---|---|
| Property name | The name of the property. |
| Type | The type of property:
|
| Status | An event property can have any of the following statuses:
|
| Required | Defines whether a property is mandatory for the event:
|
| Data type | Defines the data type of the event property:
|
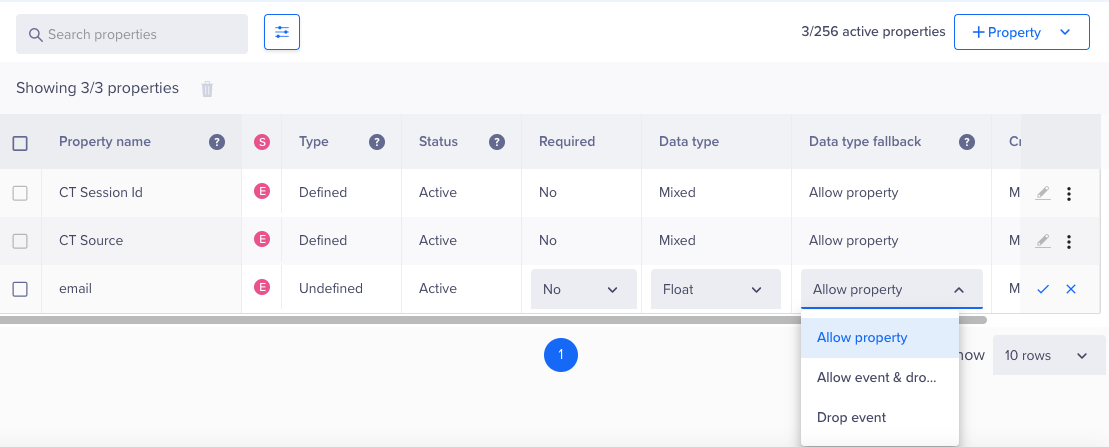
| Data type fallback | The fallback action if the event property is not in the defined format:
|
| Created on | The date when the user property was created. |
| Description | The description of the event property. You can set this from the ellipsis menu on the event property row. The property is optional, and the event is allowed even if it is received without the event property. |
Effect of Changing the Data Type of an Event or User Property
- If you change the user or event property's data type, then all the incoming data will be validated as per the schema definition once you publish the changes.
- The values already present in the old data type will not change in the new data type.
- For the users who already have the value of the user/event property in the old data type, you will have to again pass the user/event property with the value that will have a new data type.
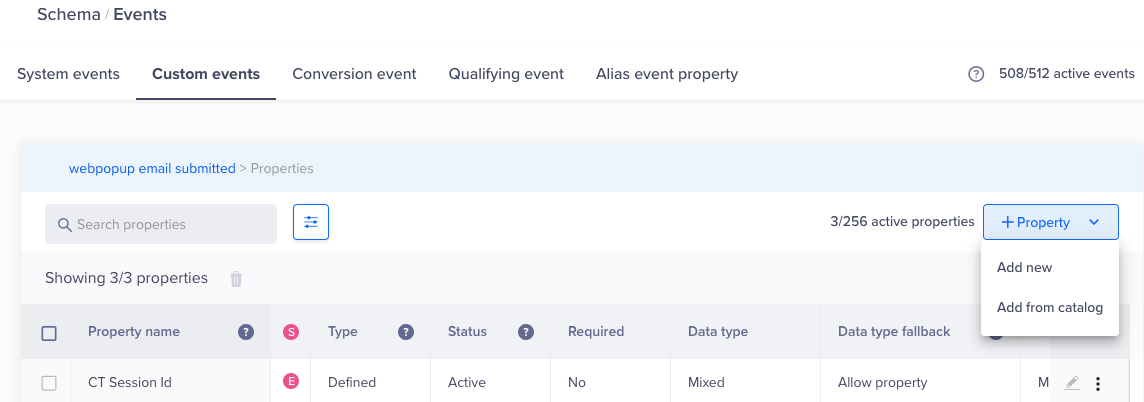
Add Event Property
To add an event property:
- Click the number of properties shown in the Custom events tab
- Click +Property, then click Add new.
You can also add an event property from the catalog by clicking Add from catalog. For more information, refer to Add Columns from a Catalog. - Enter a property name and choose the relevant property details.
- Select the checkmark.
Add Event Property
AI-Generated Descriptions for Event Properties
The system now automatically generates clear and consistent descriptions using AI, whenever a description field is clicked while creating or updating a event property. You can choose to Accept or Dismiss the generated description. After accepting it, you can edit the description if needed.
This AI-generated description is further leveraged in the advanced AI features such as Prompt-to-Segmentation, Prompt-to-Analytics, and Prompt-to-Journeys.
AI-Generated Descriptions for Event Properties
Edit Event Property
You can edit any column; however, you can only edit names for unpublished event properties.
- Click the edit icon on the property row from the Custom events tab.
- Edit the property name and any other appropriate property details.
- Click the checkmark.
Edit Event Property
Remove Event Property
You can remove an unpublished event property.
- Click the ellipsis icon on the property row from the Custom events tab.
- Click Remove.
After an event property is removed:
- The entire event property row is removed from the schema.
- If an event property comes in with the same name, it is considered undefined.
Discard Event
You can discard an active event from the schema. You can still see the event row in the schema; however, the event is marked as discarded. Post discarding, CleverTap removes the data after 16 days. However, you can choose to restore the discarded event after 24 hours. For more information, refer to Restore Events.
Caution When Discarding an EventYou can discard only an active event. Discarding an event purges all data for that event and drops any future incoming events with the same name. This action impacts your schema. A discarded event can be restored, but only after 24 hours.
- Click the ellipsis menu on the event row.
- Click Discard.
Discard an Event
Discard Access
Only admin users can discard events.
Restore Event
You can restore a previously discarded event, event property, or user property from the schema. Once restored, it becomes available again across Campaigns, Journeys, Analytics, and other features that use the schema.
Cooldown Period for Restore and Re-discard
- After you discard an item, you cannot restore it for the next 24 hours.
- After you restore an item, you cannot discard it again for the next 24 hours.
These measures prevent accidental or repeated changes to your schema.
Restore a Single Item
- Go to the Custom events page.
- Locate the discarded event you want to restore.
- Click the
 icon.
icon. - In the confirmation window, click Restore.
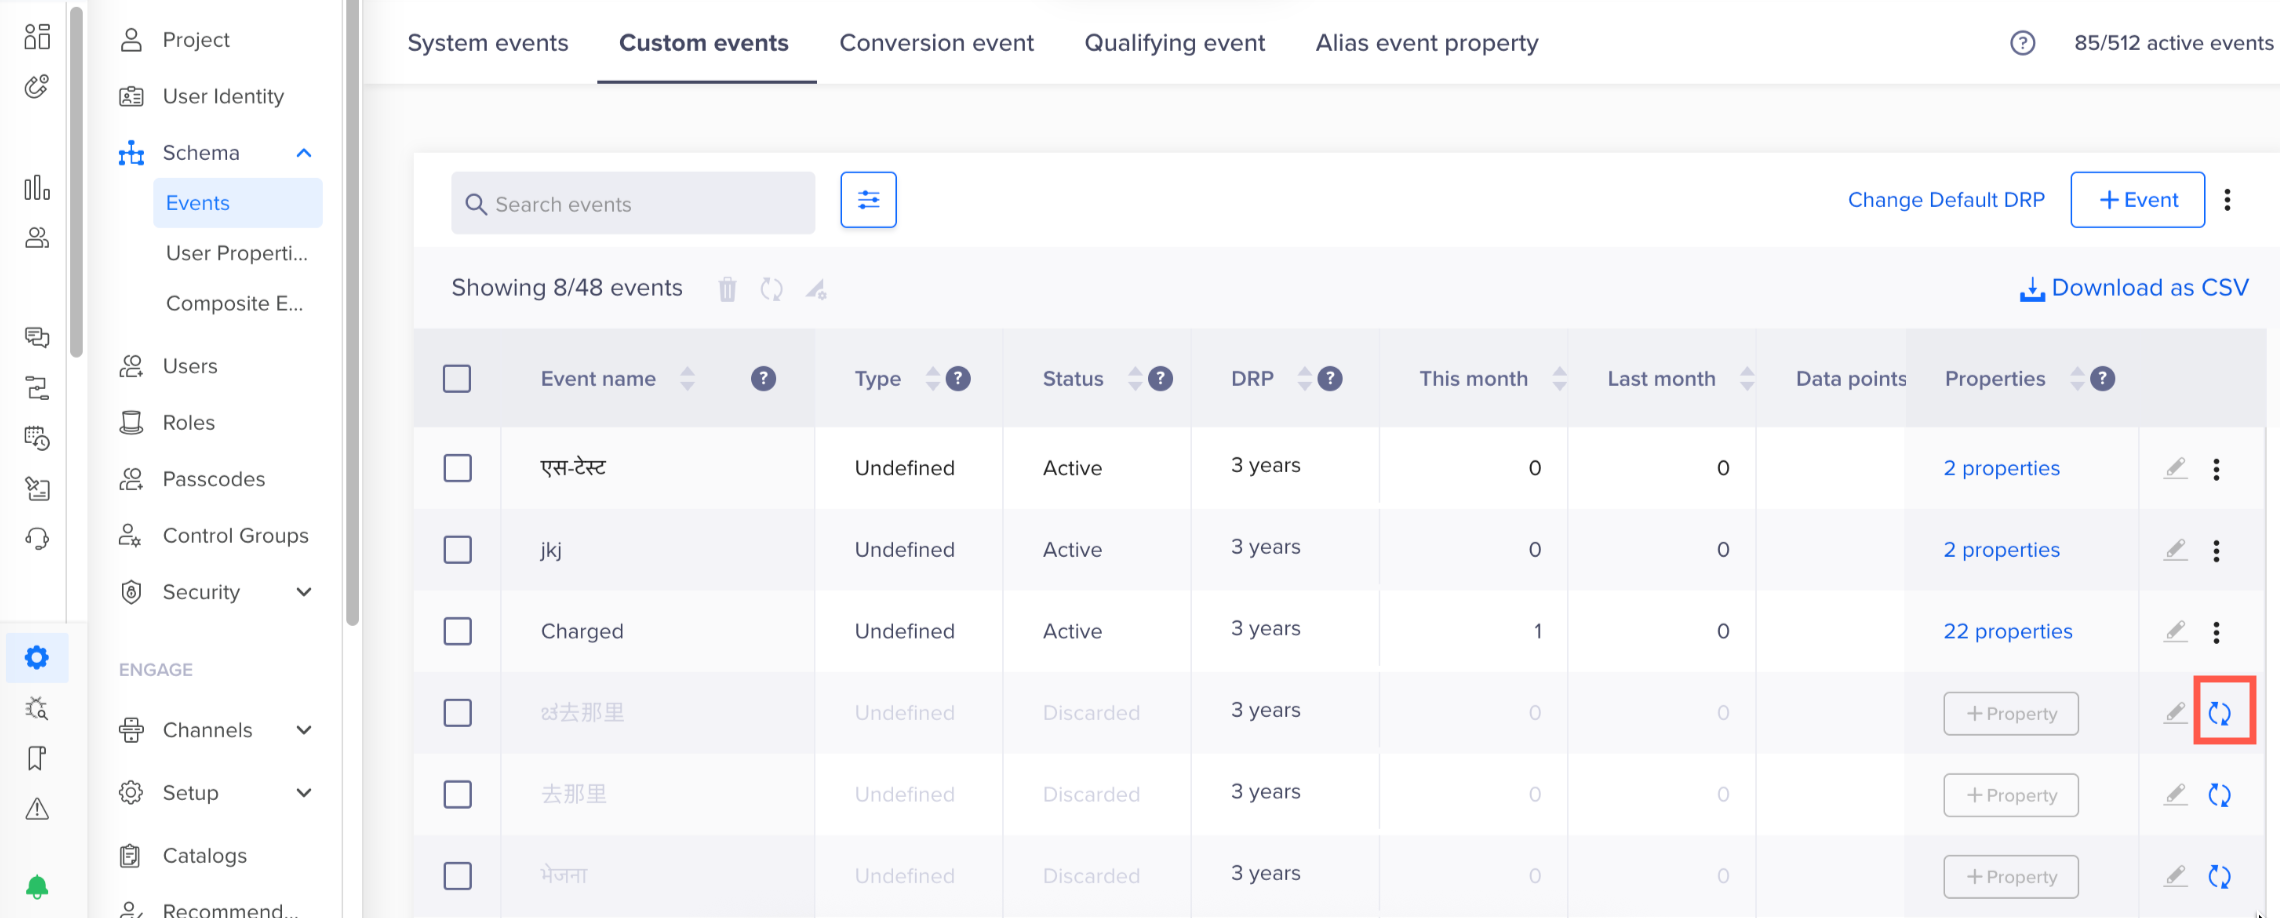
Restore Custom Event
Restore Multiple Items
- Go to the Events, or Event Properties, or User Properties table on the Custom events page.
- Select the discarded items you want to restore.
- Click the
 icon from the toolbar.
 - In the confirmation window, click Restore.
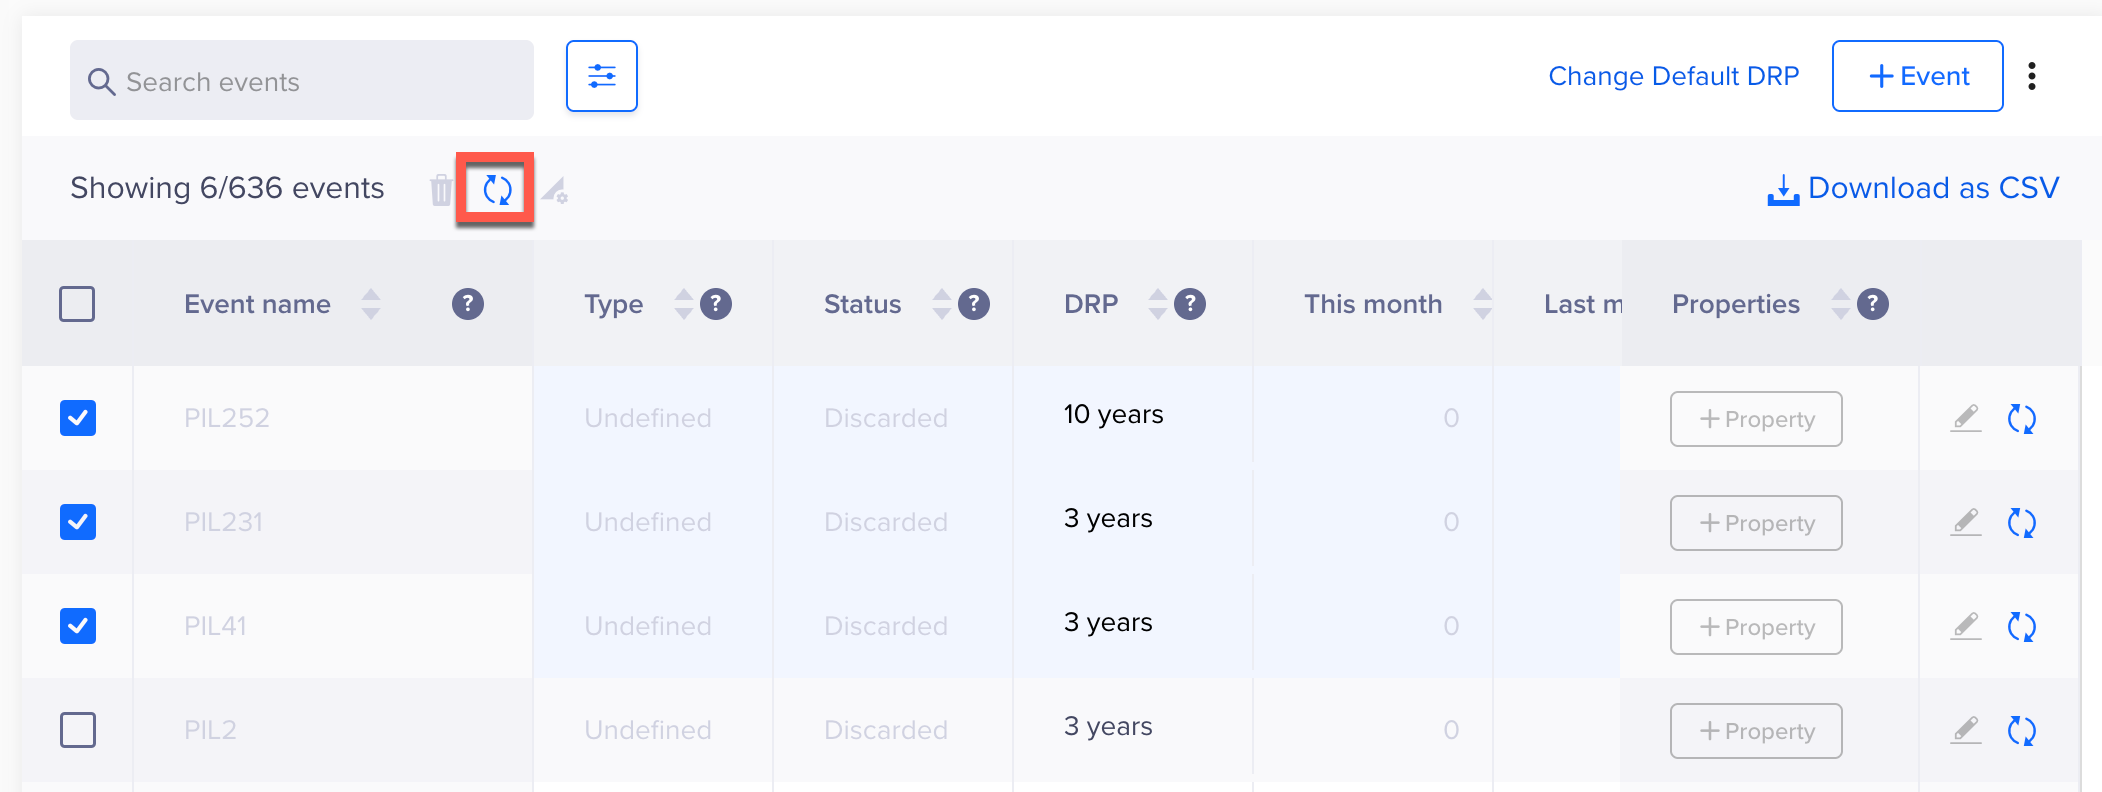
Bulk Restore Discarded Items
Restore Access
Only admin users can restore the discarded events.
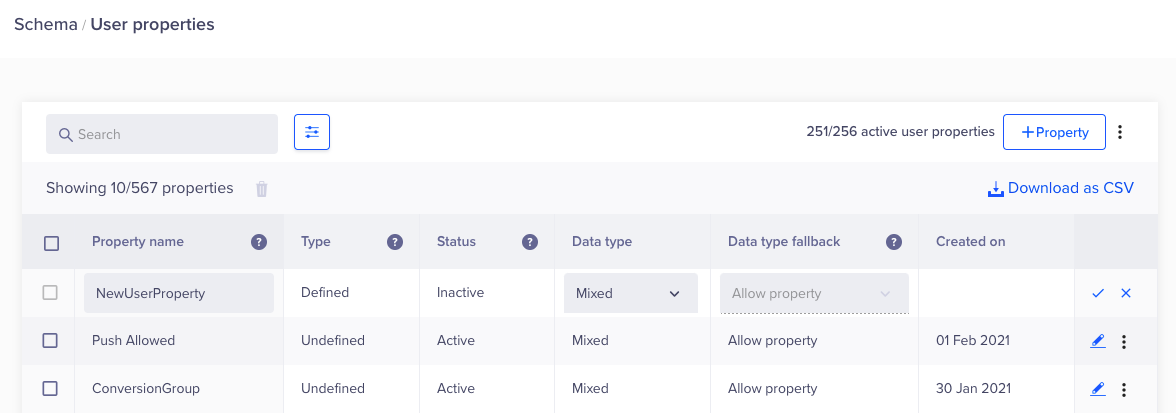
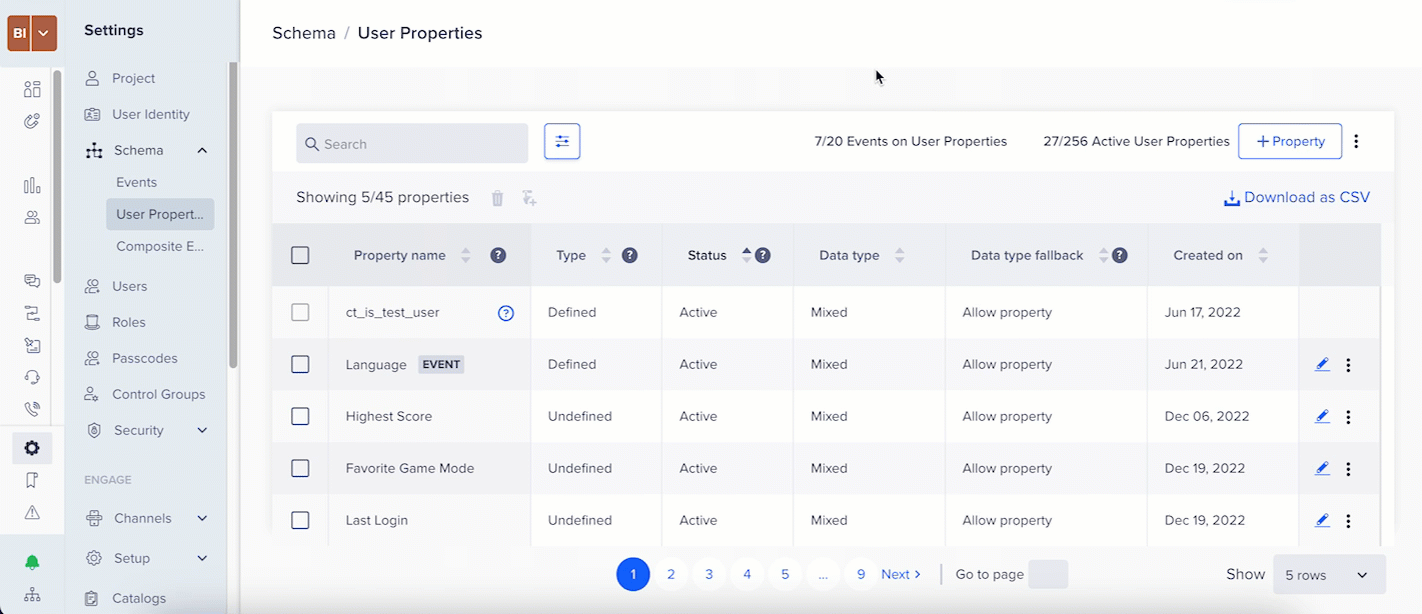
User Properties
This section shows how to manage your user properties.
- Navigate to Settings > Schema > User Properties. All the user properties are listed on this page.
- Click any of the properties on the user property row to see the property details.
From this page, you can also search and filter properties.
| Property Detail | Description |
|---|---|
| Property name | The name of the user property. |
| Type | The type of property:
|
| Status | A user property can have any of the following statuses:
|
| Data type | Defines the data type of the user property:
|
| Data type fallback | Includes the following actions:
|
| Created on | The date when the user property was created. |
Add User Property
To add a user property from this page:
- Click the +Property button.
- Enter a property name and choose a data type.
- Click the checkmark.
Add User Property
AI-Generated Descriptions for User Properties
The system now automatically generates clear and consistent descriptions using AI, whenever a description field is clicked while creating or updating a user property. You can choose to Accept or Dismiss the generated description. After accepting it, you can edit the description if needed.
This AI-generated description is further leveraged in the advanced AI features such as Prompt-to-Segmentation, Prompt-to-Analytics, and Prompt-to-Journeys.
AI-Generated Descriptions for User Properties
Edit User Property
You can edit any column; however, you can only edit names for unpublished user properties. To edit a property, click the edit icon on the property row.
- Click the edit icon on the property row.
- Edit the property name and the data type.
- Click the checkmark.
Edit User Property
Remove User Property
You can remove an unpublished property.
- Click the ellipsis icon on the property row.
- Click Remove.
After a user property is removed:
- The entire user property row is removed from the schema.
- If a user property comes in with the same name, it is considered as an undefined user property.
Discard User Property
You can discard a published user property from the schema. You can still see the property row in the schema; however, it will be marked as discarded.
- Click the ellipsis icon on the property row.
- Click Discard, and a new window displays.
- Click Discard again.
Discard User Property
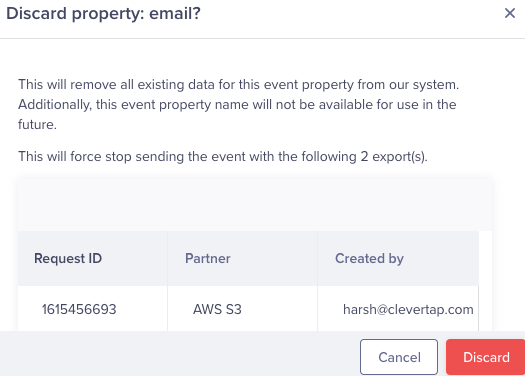
When Discarding a User Property
Exercise extreme caution when discarding a user property. This action cannot be undone. This action has an impact on your schema because it purges data for the discarded user property. It also drops any future incoming user property with the same name.
Create Linked Event for User Property
You can link an event with a user property. This allows you to trigger campaigns, conversions, and exits based on changes in user properties. For example, a gaming app has a user property named Game Level that represents a user's progress in the game. You can link an event named Game Level Upgraded to the Game Level user property. By doing so, any change in this property to a higher level will activate a campaign. The campaign will congratulate the users and grant them a reward or a unique power corresponding to their achievement.
Key Points to Remember
- This feature is supported only for messaging channels such as Push, SMS, Email, In-App, Webhooks, and remarketing channels such as Google Ads and Facebook Audiences.
- For In-App, CleverTap SDK v7.0.0 or higher is required.
- User property updates via Journeys are not supported for this feature.
To link an event with a user property:
- Navigate to Settings > Schema > User Property from the CleverTap dashboard.
- Click the
 icon and select Create Linked Event.
 - Enter the Event Name and click Create Event.
Create Linked Event
Create Linked Events in Bulk
You can select multiple user properties at a time and link a required event to it.
To create linked events in bulk:
-
Select the user properties you want to link and click the
 icon.
icon.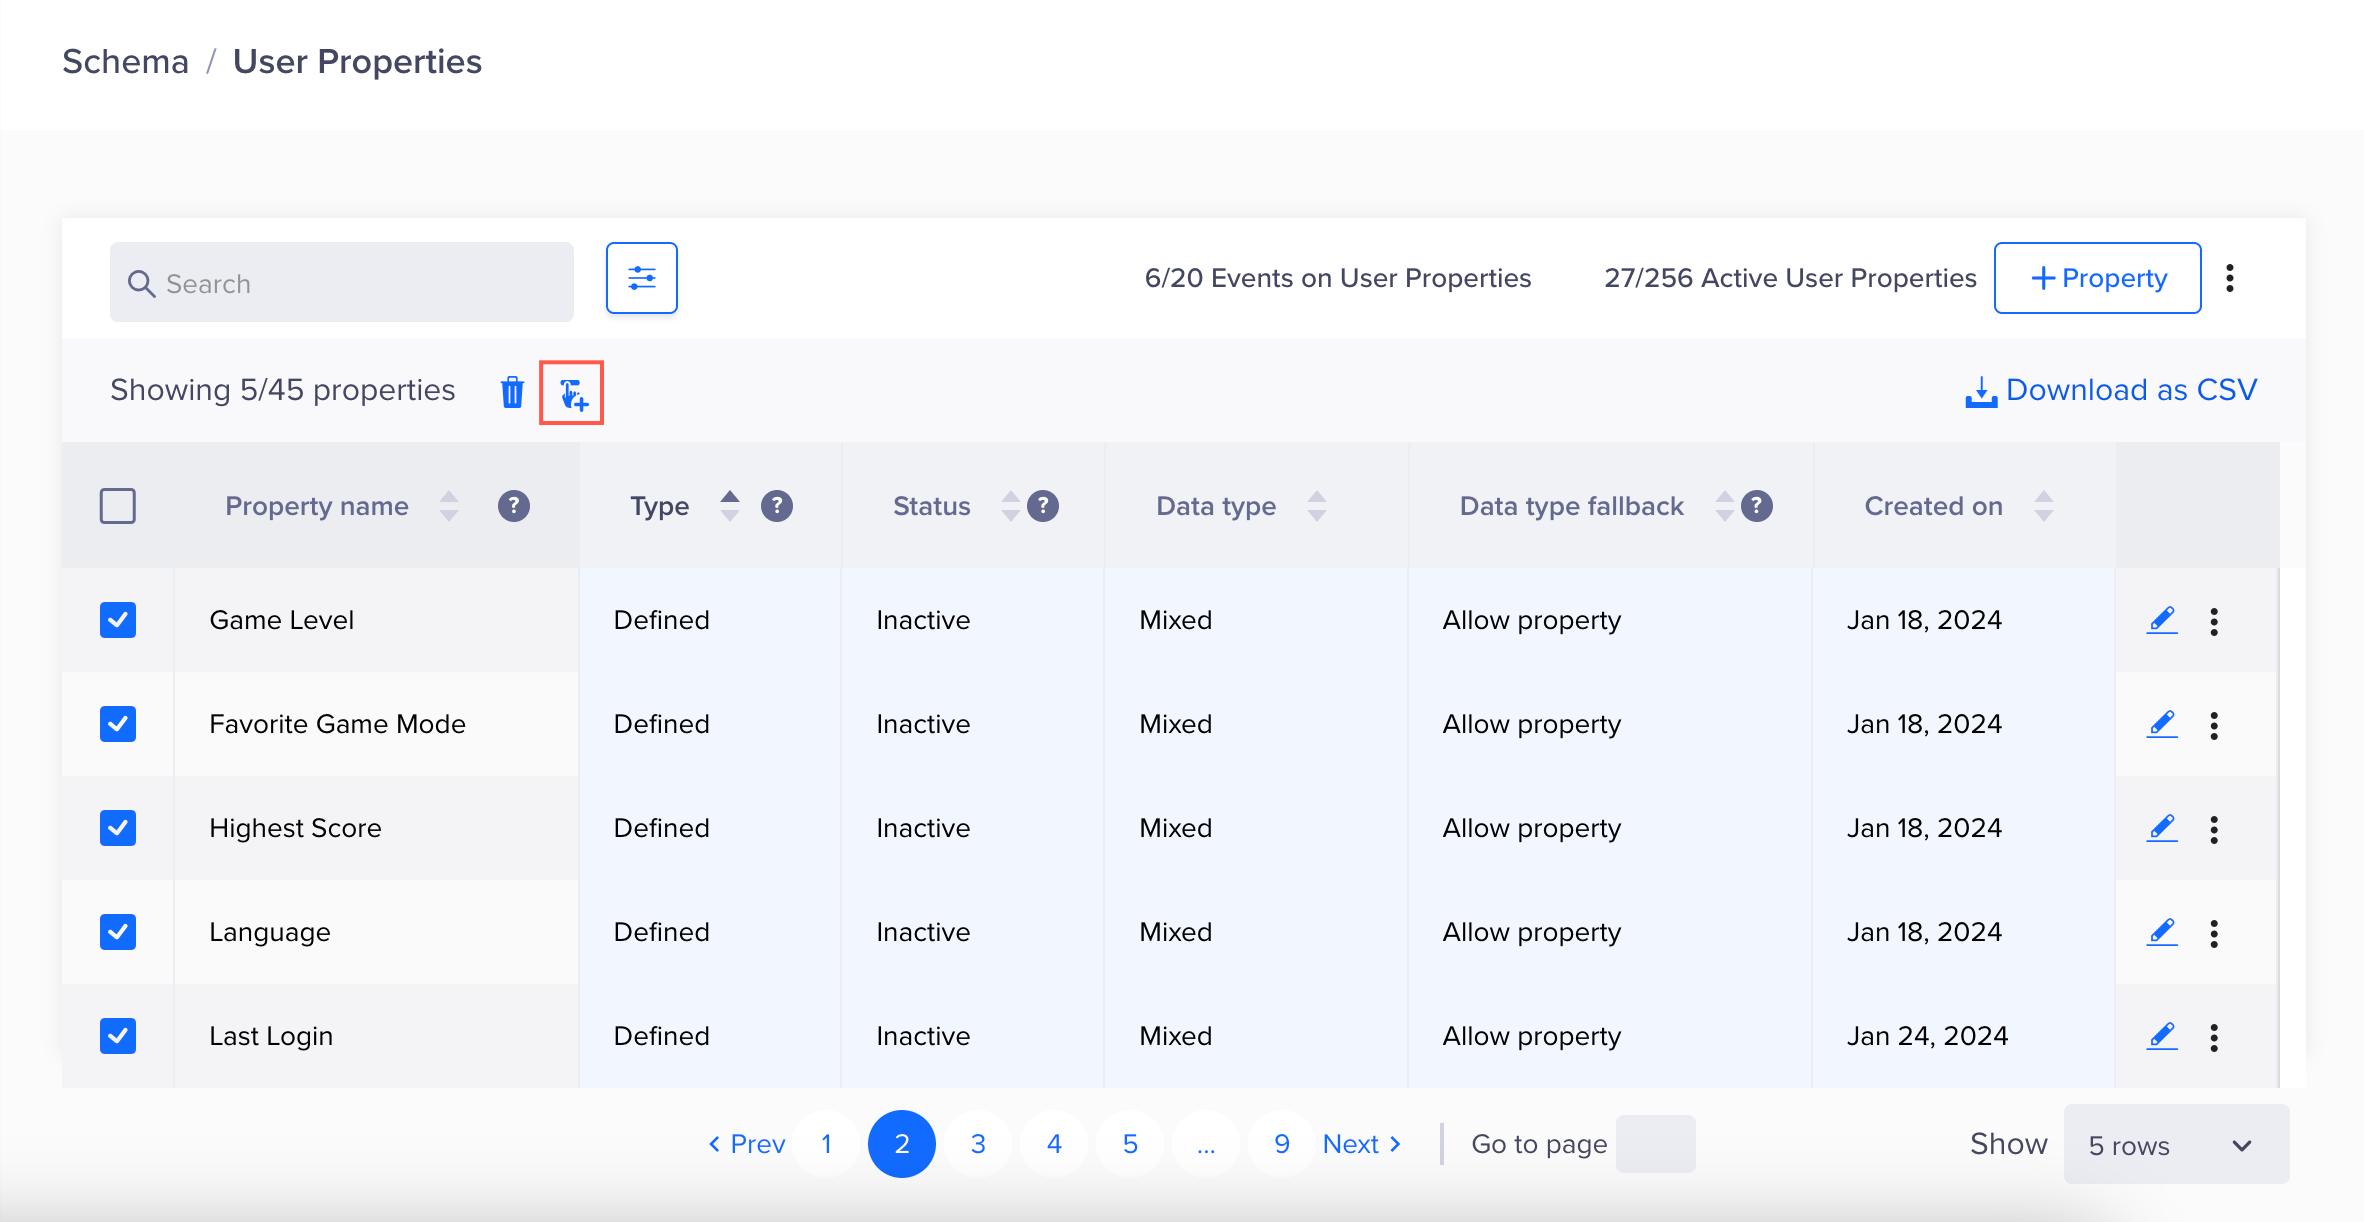
Bulk Link Events
-
Enter the events you want to link for each user property and click Create.
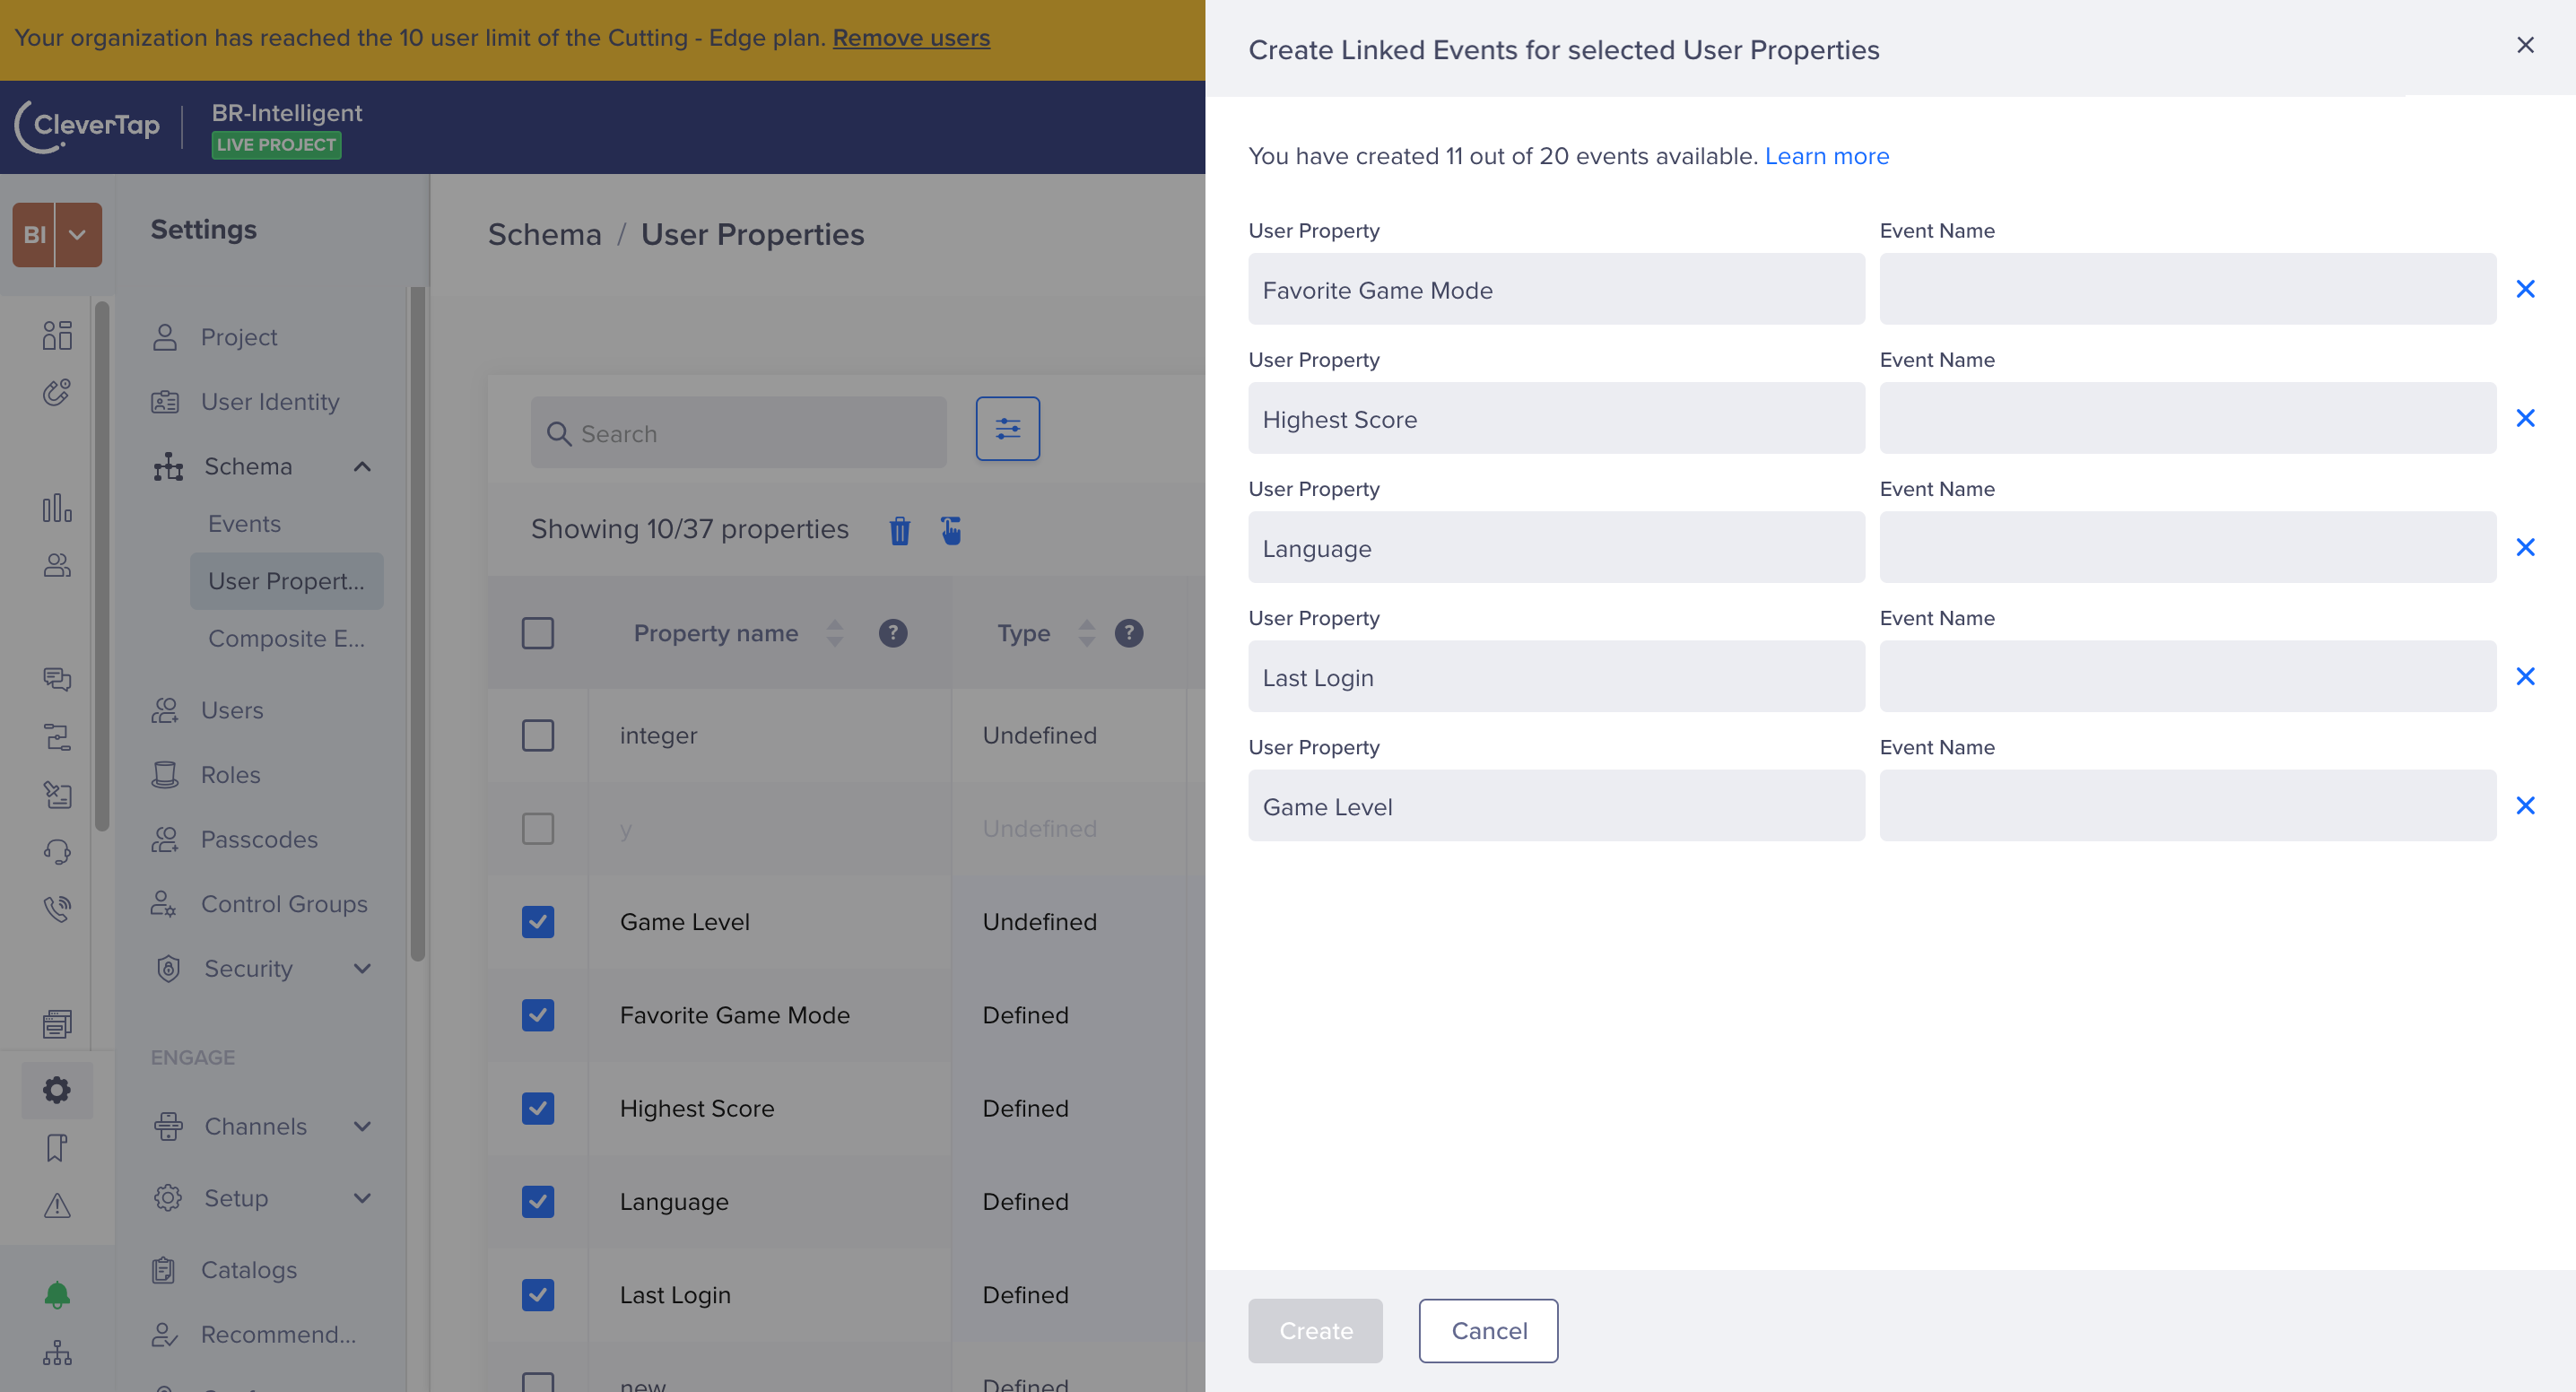
Create Linked Events in Bulk
Discard Linked Event
You can discard a linked event from the user property.
To discard linked events:
- Click the icon of the user property.
- Select Discard Linked Event and click Discard.
Discard a Linked Event
Key Points to Remember
The following are the key points to consider when creating linked events:
- You can link only one event with a user property.
- You can link events only on active properties.
- You cannot create a linked event with the same name as a system event.
- Discarding a linked event from the user property:
- Delinks the event and the user property.
- Stops receiving additional data associated with the user property.
- Does not delete any data.
System Events
System events are tracked automatically. CleverTap offers the capability to configure system events, enabling businesses to monitor and analyze user actions in their applications. However, some businesses may not have an immediate need for certain system events, resulting in potentially avoidable expenses. CleverTap allows businesses to configure those unused system events, providing a seamless process to address this issue.
Configure System Events
To configure the tracking of system events:
- Navigate to Settings > Schema > Events from the CleverTap dashboard.
- Select the event that you want to configure from the System events tab.
- Click the
 icon and select Enable/Disable from the list.
Turn Off Toggle to Disable Tracking UTM Visited
Currently, you can enable or disable tracking for the following events from the CleverTap dashboard:
Push Impressions
The Push Impression event is tracked when a push notification sent from CleverTap is delivered to a user’s device. After the toggle for Push Impressions is turned on, the CleverTap SDK starts recording an event whenever a push notification sent via CleverTap is delivered to the user’s device.
The Push Impression event has its own event properties and the users can configure these non-required event properties to optimize the cost.
To do so:
- Navigate to Settings > Schema > Events from the CleverTap dashboard.
- Select the Push Impressions event from the System events tab.
- Click the icon and select Setup push impressions from the list.
- Turn ON the Mobile Push toggle and click Save. The Push impressions tracking enables message displays on the screen.
Disable Event Property Tracking
The users can disable the tracking of some of the Push Impression event properties from the CleverTap dashboard. However, there are a few Push Impression event properties for which you do not have the option to disable the tracking. These are listed as follows:
| Property | Property Description | Configurable |
|---|---|---|
wzrk_push_amp | Indicates whether push amplification is enabled. | No |
wzrk_pn | Indicates whether the push notification is sent from CleverTap. | No |
CT Source | Specifies the source of the CleverTap campaign. | No |
wzrk_id | Specifies the CleverTap campaign ID associated with the notification. | No |
wzrk_pid | Specifies the unique ID for the push notification. | No |
wzrk_pivot | Indicates the variant used in the A/B test campaign. | No |
wzrk_acct_id | Specifies the CleverTap Account ID. | No |
CT App Version | Indicates the version of the CleverTap App. | No |
wzrk_dt | Specifies the delivery type for the notification. | No |
wzrk_acts | Refers to the CTA button included in the notification. | No |
wzrk_pn_h | Indicates the RenderMax health status of the push notification. | No |
wzrk_pn | Indicates that the notification is sent from CleverTap, if present. | No |
wzrk_bp | Displays an image in the notification if the URL is present. | Yes |
wzrk_sound | Plays the default or custom Android notification sound if present. | Yes |
nt | Displays the notification title; defaults to app name if absent or empty. | Yes |
nm | Displays the notification body; ignores the notification if absent or empty. | Yes |
wzrk_dl | Opens the specified deeplink when the notification is clicked, if present. | Yes |
wzrk_d | Ignores the notification if this key is present. | No |
ico | Displays the small notification icon from the specified URL if present and not empty. | Yes |
wzrk_pivot | Identifies the variant type in A/B testing if present and not empty.. | Yes |
wzrk_rnv | Raises the Push Impressions event if present and not empty. | No |
wzrk_nms | Displays summary text with the image if present and not empty. | Yes |
wzrk_st | Displays subtitle text next to the app name if present and not empty. | Yes |
wzrk_clr | Applies the hex color to the small icon and app name (on Android versions below Pie) if present and not empty. | Yes |
wzrk_bpds | Indicates the image rendering status with the following values:
| Yes |
wzrk_cid | Refers to the channel ID used for the push notification. | Yes |
wzrk_mutable_content | Enables rendering of rich push notification via extension class if set to true. | Yes |
wzrk_bi | Specifies the badge icon to be displayed in the push notification. | Yes |
wzrk_bc | Specifies the badge count to be shown on the app icon. | Yes |
Campaign Type | Indicates the campaign’s channel type (for example, Push, Email, SMS). | No |
wzrk_ttl | Specifies the time to live (TTL) for the notification. | Yes |
wzrk_ttl_s | Specifies the time to live for the notification in seconds. | Yes |
wzrk_cts | Records the timestamp when the notification is clicked. | No |
wzrk_ck | Defines the collapse key (typically a timestamp) for the notification. | Yes |
wzrk_collapsible | Specifies whether the notification is collapsible. | Yes |
wzrk_category | Specifies the notification category for APNS (iOS only). | Yes |
wzrk_interruption_level | Sets the interruption level on APNS (iOS only). | No |
wzrk_relevance_score | Assigns the relevance score on APNS (iOS only). | No |
To disable the tracking of Push Impression event properties:
-
From the System events tab, click the Properties hyperlink. The Push Impressions properties list opens.

-
Select the configurable property, click the
icon, and select Disable Property from the list. The Enable property tracking popup opens.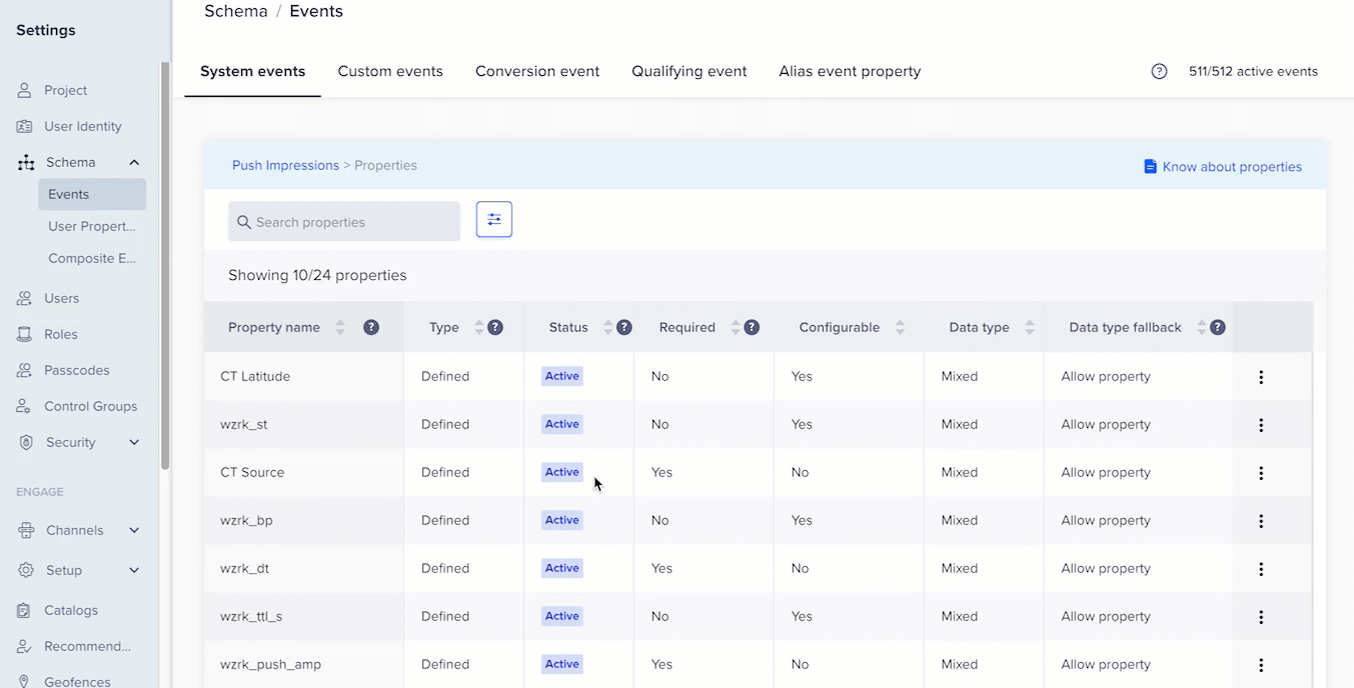
-
Click Disable to confirm your action. The Property tracking successfully disabled message displays on the screen. The status of the event property changes to Active. Once disabled, if you want to enable the tracking later, you can do so by clicking the
icon and selecting Enable Property from the list.
Key Points to Remember
The following are some of the points to consider when configuring the Push Impressions event:
- The event property tracking feature is not available for required properties.
- The Status is always Active for mandatory properties.
- The tracking of configurable properties is enabled by default for new (new users of CleverTap dashboard) or returning users (existing users who turned off push impression feature) of Push Impression feature.
- For existing users, the tracking of event properties remains as is, however, they have the additional capability to enable/disable tracking for the same.
Web Session Started
This is a web entry event similar to the App launched event. This event refers to the event triggered when a user starts a session or engages with your website. This event will be recorded in two cases:
- When a user opens a webpage.
- When a user reloads the browser after 20 minutes of inactivity.
Default Behavior
This event is disabled by default for all customers and can be configured by the customers. When enabled, it captures the unique visitors to the website in a particular session.
UTM Visited
The UTM Visited event is tracked when a user clicks on a link from a marketing campaign that has a UTM parameter defined on it. This event is also tracked when a CleverTap-integrated attribution platform, such as AppsFlyer or Branch, sends this information to CleverTap. This event is recorded for your marketing campaigns from external sources, such as Google Ads or Facebook.
Default Behavior
The UTM Visited tracking is ON for new customers by default. For existing customers, the tracking of UTM Visited remains as is. However, they have the capability to enable or disable the same.
Configuring Other System Events
For the remaining system events, you can only change the DRP.
Conversion Event
The conversion event helps track conversion.
To set a conversion event:
- Navigate to Settings > Schema > Events.
- Click the Conversion event tab.
To track revenue, set the user conversion event and revenue property. This property must be a numeric value.
Qualifying Event
To set a qualifying event:
- Navigate to Settings > Schema > Events.
- Click the Qualifying event tab.
This event qualifies users as active if they have performed the event at least once in the defined time.
Currently, the active % tab uses the qualifying event on the Trends page.
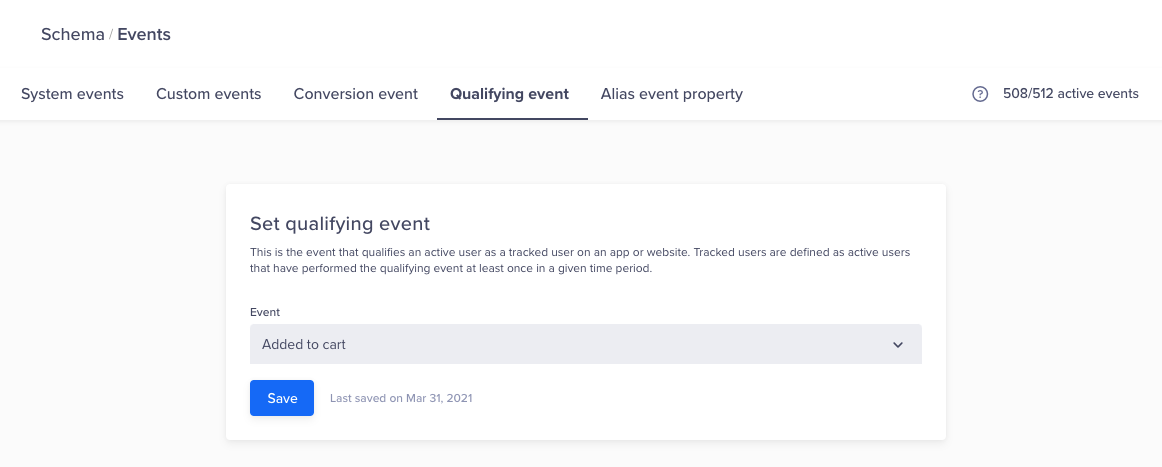
Set Qualifying Event
Download Schema Data from Dashboard
You can download event and user property data from the Schema page as a CSV file. The downloaded report includes event and property metadata, such as name, type, status, and creation date, along with the dependency columns, such as Campaign Count, Campaign IDs, Journey Count, Journey IDs, Segment Count, and Segment IDs
Event Data
To download event data as a CSV:
- Go to Settings > Schema > Events.
- From the System events or Custom events tab, click Download as CSV. A dialog appears where you choose whether to include property-level data.
- Click Download.
The following image shows the Download CSV button in the System Events tab:
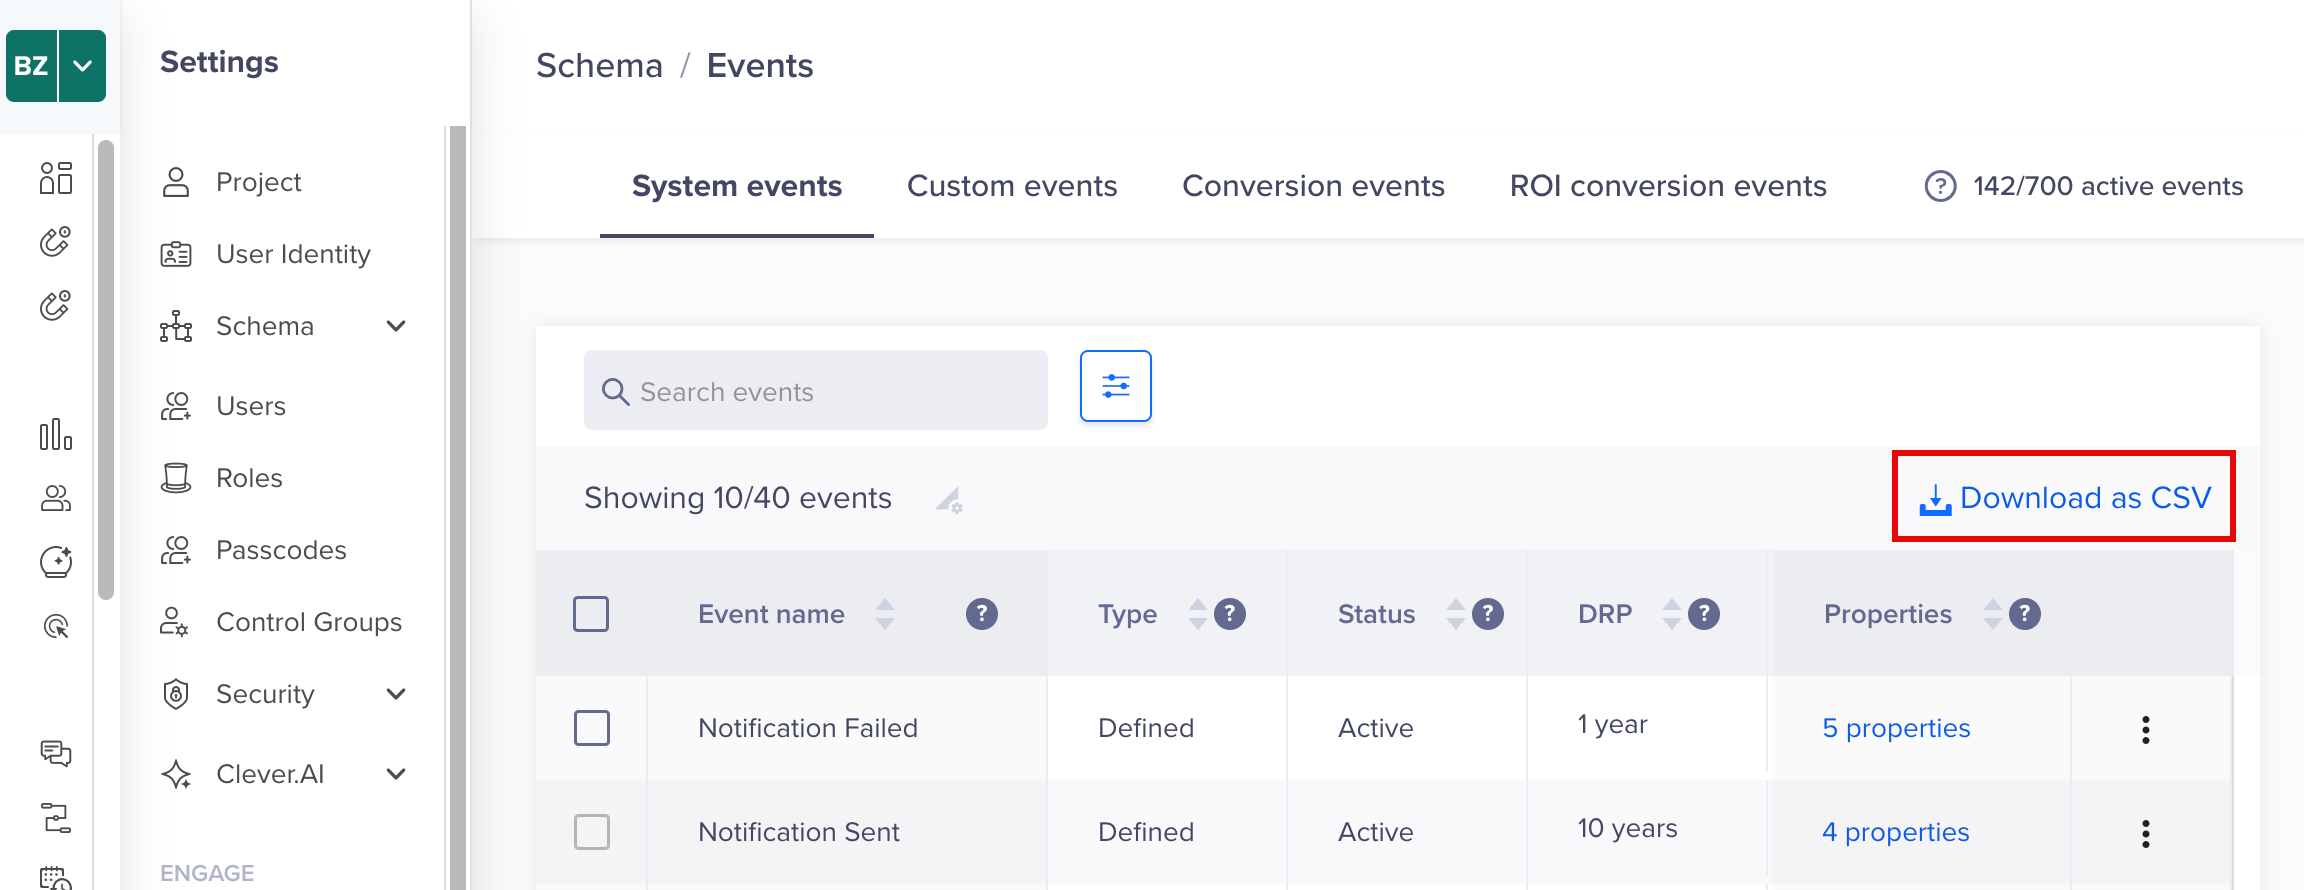
Download Event Data
User Property Data
To download user property data as a CSV:
- Go to Settings > Schema > User Properties.
- Click Download as CSV. A confirmation dialog appears.
- Click Download.
The following image shows the Download CSV button in the Custom User Property tab:
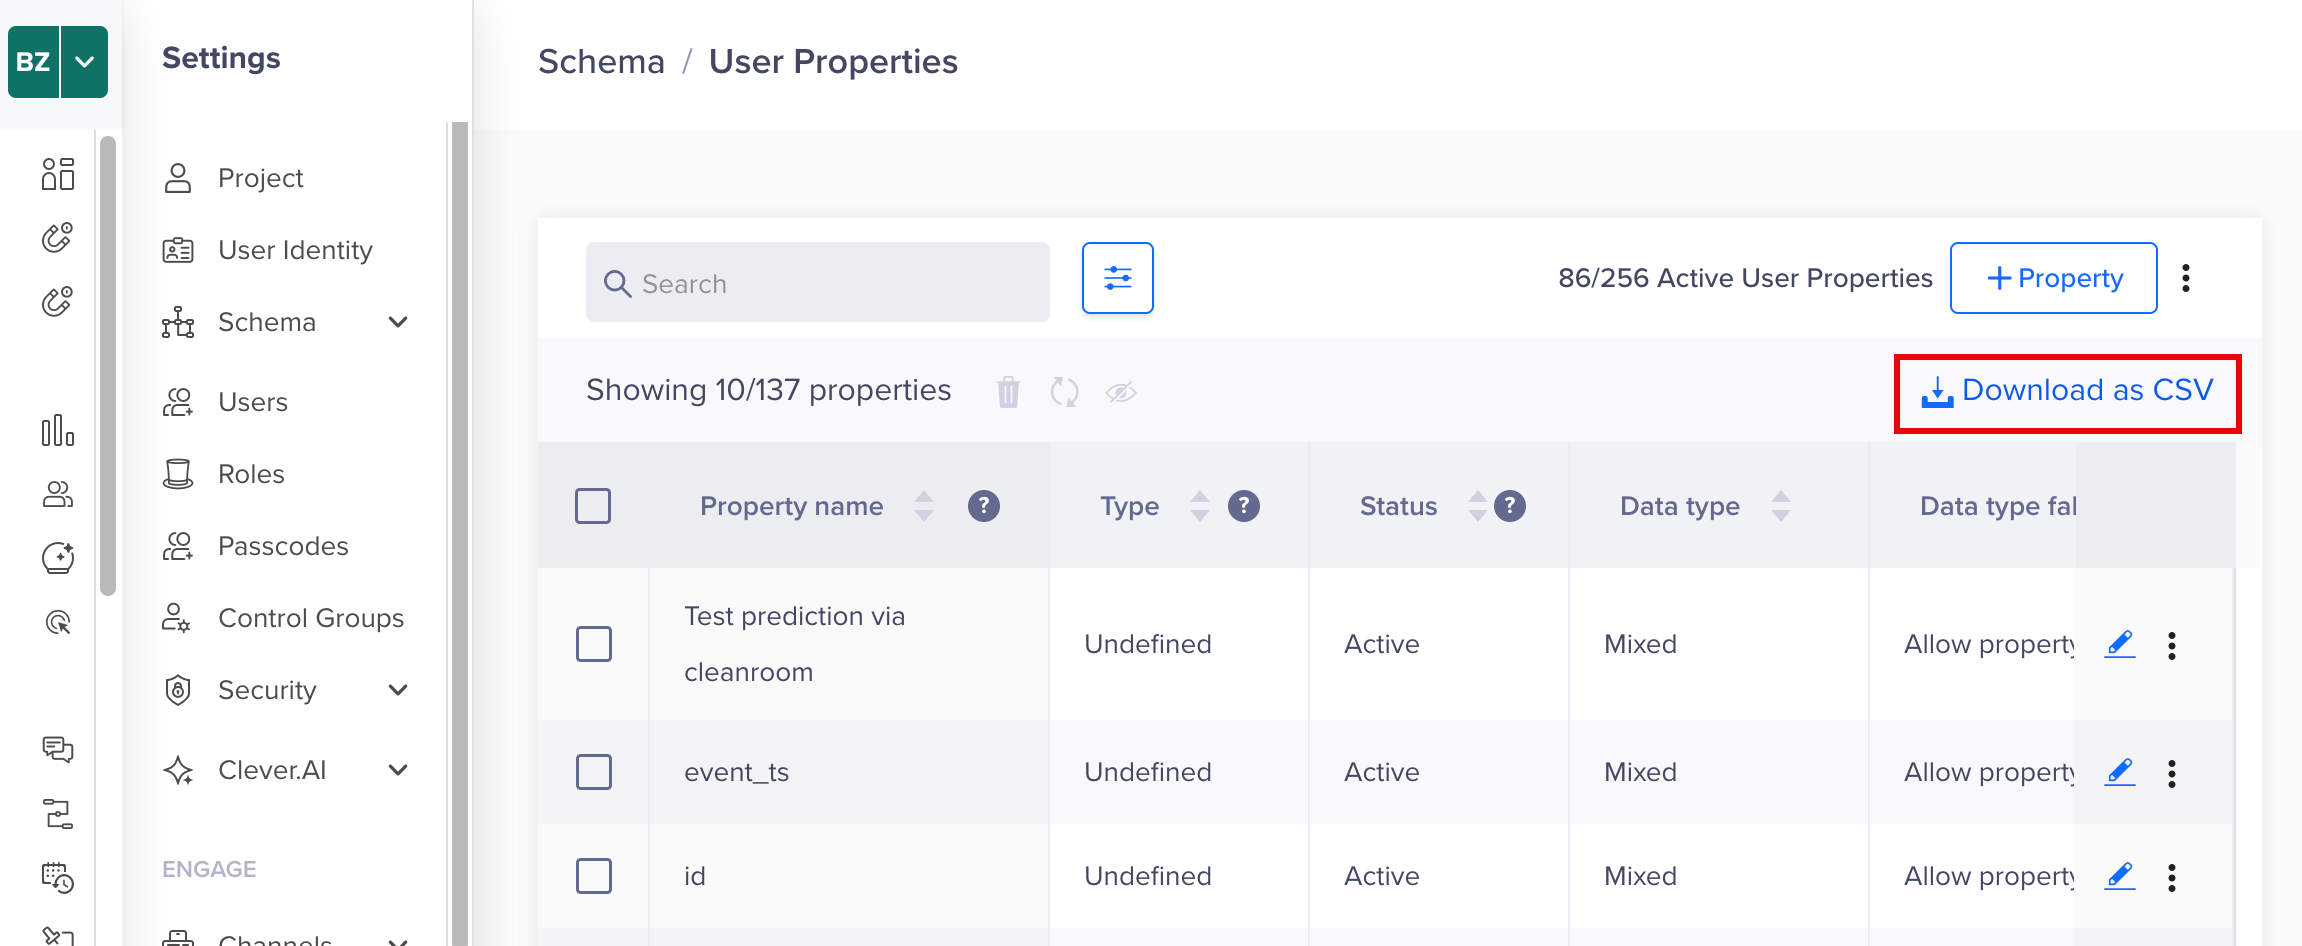
Download User Property Data
CSV Columns
The following table describes the core columns included in the downloaded CSV. The dependency columns, Campaign Count, Campaign IDs, Journey Count, Journey IDs, Segment Count, and Segment IDs, show how each schema element is used across Campaigns, Journeys, and Segments.
| Column | Description |
|---|---|
| Property Name / Event Name | Name of the schema element. |
| Type | Indicates whether the element is Defined or Undefined. A defined element has been explicitly added and configured in the schema. An Undefined element has been observed in ingested data but has not yet been formally defined. |
| Status |
|
| Created On | Date when this element was added to the schema. |
| Campaign Count | Number of campaigns that use this element. |
| Campaign IDs | IDs of the campaigns that use this element, separated by semicolons. |
| Journey Count | Number of journeys that use this element. |
| Journey IDs | IDs of the journeys that use this element, separated by semicolons. |
| Segment Count | Number of segments that use this element. |
| Segment IDs | IDs of the segments that use this element, separated by semicolons. |
Download with API
To download event data or user profile data with the API, refer to the following:
- Use the Events Schema API to download event data.
- Use the User Properties Schema API to download user profile data.
Considerations
There are some specific validations when creating events and properties. For more information, refer to Platform Considerations.
FAQs
Can we get all past behavior data for an event after discarding it?
No, we cannot get all past behavior data for an event after discarding it.
Does a discarded event appear under the user profile in the user's activity?
No, a discarded event does not appear under the user profile in the user's activity.
For how many days can I get the data of discarded events?
You will not get any event data after discarding an event. We recommend you export that event before you delete it.
If we disable the UTM Visited event from the schema, can it still be ingested through third-party mediums such as attribution tools like AppsFlyer or Customer Data Platforms (CDPs) like Segment?
When the UTM Visited event is disabled from the schema, it is dropped at the processing layer, rendering it inaccessible for ingestion from any third-party medium.
Updated 12 days ago