Conversations
Overview
Consumers across the globe are increasingly shifting from phone calls, emails, and social media platforms to real-time messaging apps. They are turning to WhatsApp, Facebook Messenger, Telegram, and other local apps to connect with family, friends, and colleagues. A similar experience is expected from brands to communicate with their users in real-time rather than waiting for responses from agents in call centers or passively communicating over emails.
Use Cases
Engaging your end-users with chat-based conversations has a huge impact on your business metrics. The following table demonstrates some use cases:
Example Industry | Use Cases |
|---|---|
Travel and Hospitality |
|
Food Delivery |
|
Streaming Media/OTT |
|
Auto Responders
You can have a set of auto-responses to answer customer queries which can help relieve your agents and also significantly reduce the response time for the customer.
Set Up FAQs
You can add an FAQ from the Autoresponders page or upload a CSV file with multiple FAQs. To do so, perform the following steps:
- From the dashboard, navigate to Conversations > Setup > Autoresponders.
- Click the Create or Edit button on the FAQs section to add FAQs.
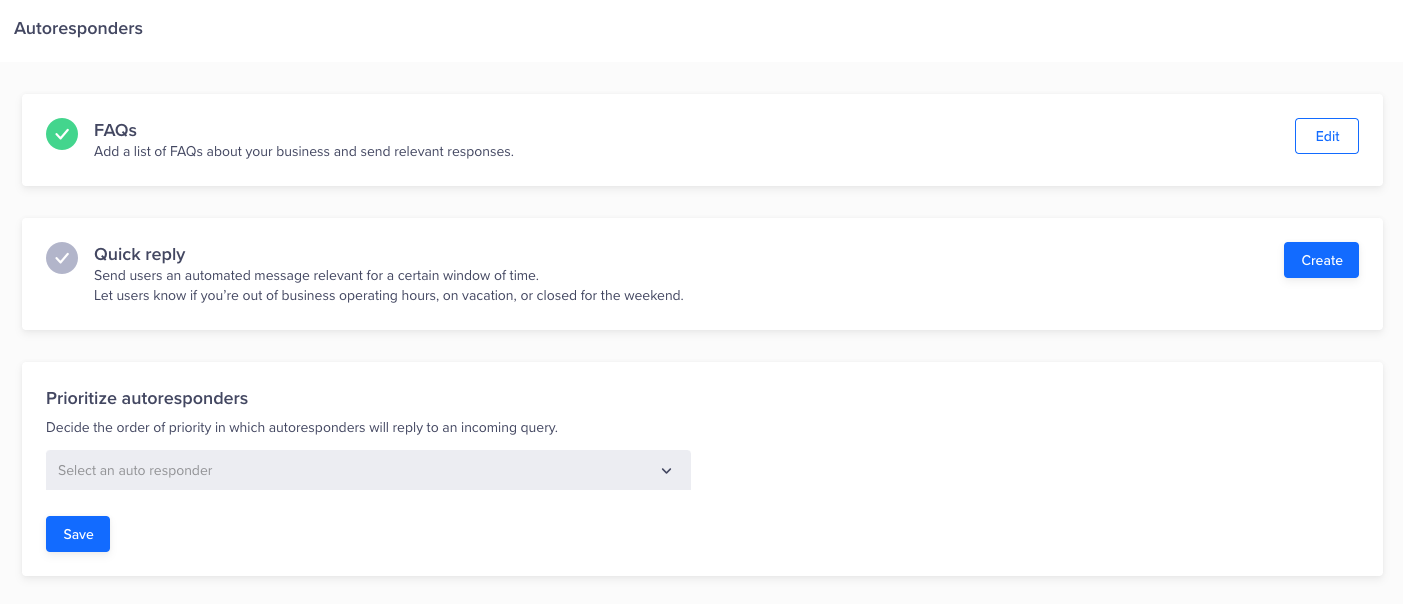
Setup FAQs
- Click the + FAQ button to add FAQs.

List of FAQs
The Create an FAQ window displays.
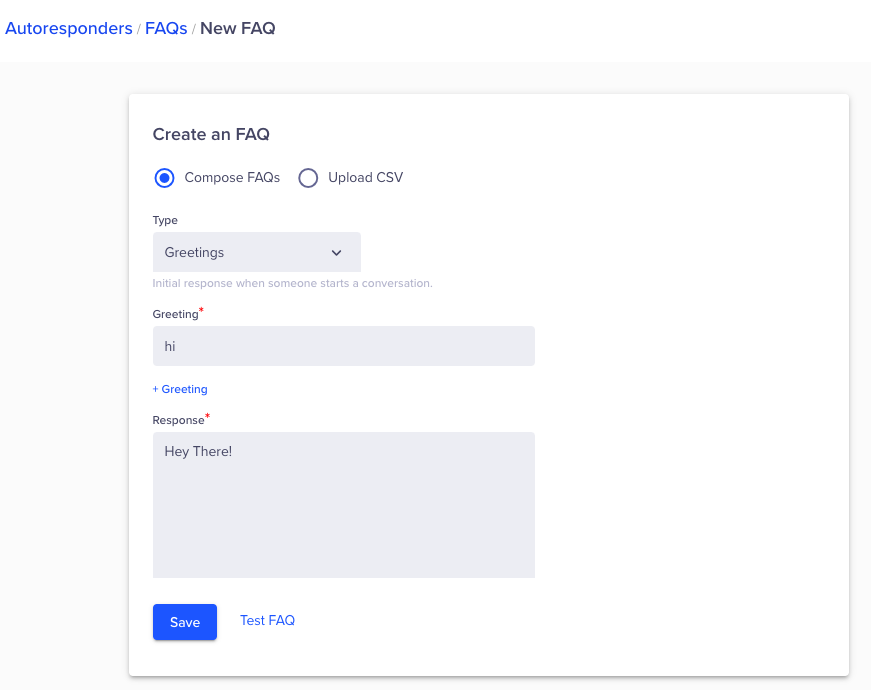
Create an FAQ
- Create a new FAQ or select Upload CSV to upload a CSV file. Download the sample CSV to view the format for uploading your FAQs.
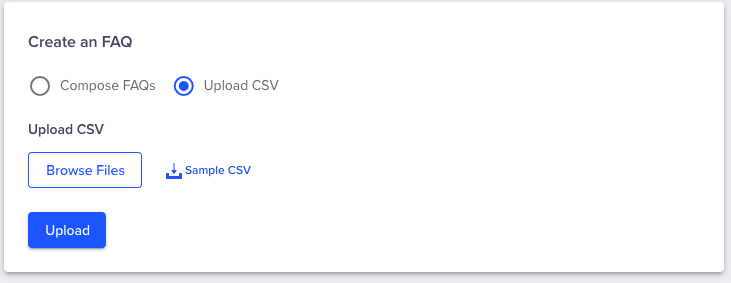
Upload FAQ using CSV
- Click the Test FAQ link to test your FAQs. It shows the specified response when you enter a keyword.
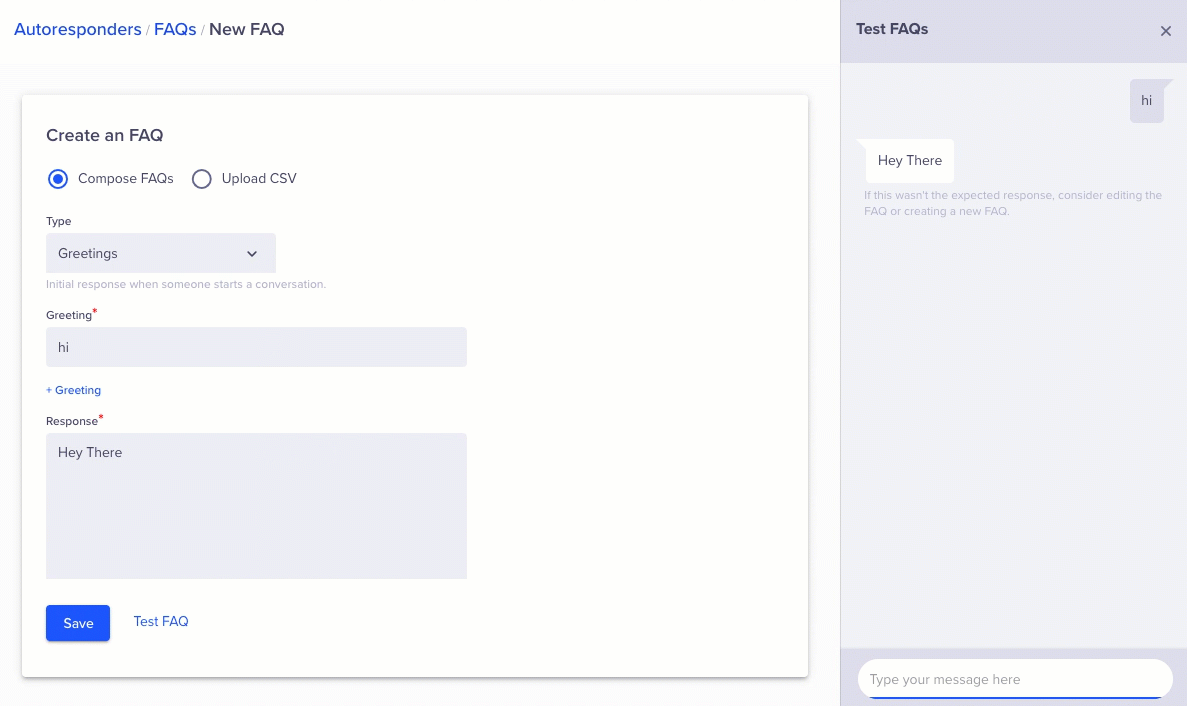
Compose FAQ
View Matched and FAQ LinksThe View Matched link displays only for a saved FAQ. Clicking the FAQ link shows you the expected answer and the mapped FAQ.
Test FAQ
When you test a response, you can see the matching FAQ for it. To test response for a saved FAQ, follow the steps:
- From the dashboard, navigate to Conversations > Autoresponders.
- Click the Test FAQ link. The Test FAQs window displays.

View FAQs
- Enter a string to test the response. The response displays a link to the matching FAQ.
- Click the View matched link to view the FAQ that best matches the response.
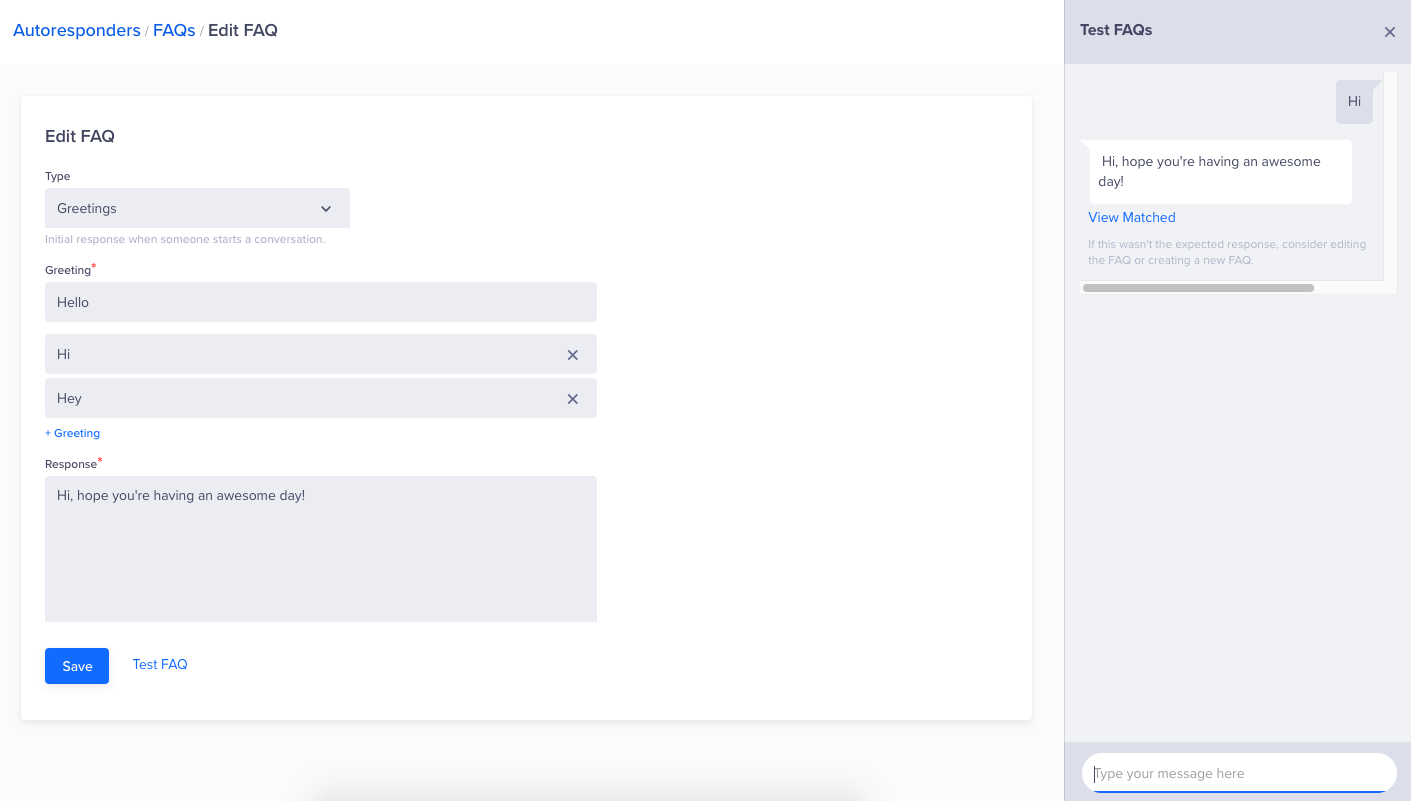
Edit an FAQ
Edit or Archive FAQs
To view the FAQ list, perform the following steps:
- From the dashboard, navigate to Conversations > Setup > Autoresponders.
- Click the Edit button on FAQs section to view FAQs.
- View, edit, clone, or archive FAQs.

Edit or Archive an FAQ
FAQ Types
You can create four types of FAQs to help distinguish your FAQs, such as:
- Greetings: Add a greeting such as hi, hello, good morning, and so on.
- General: Any conversation which is specific to your business need.
- Closing: Add an end to the conversation. For example, "Thank you for contacting us. Have a good day."
- Filler: Add a filler in the conversation. For example, "Please wait while I fetch your information."
Adding a Question to an FAQWhen setting up an autoresponder, it is mandatory to add at least one question to the FAQ. Our NLP model (on which the responder is built) ensures that if similar questions are asked by your users, the autoresponder responds with the right answer.
Set Up a Quick Reply
A quick reply can help you set the context for a conversation, generally during your non-business hours. To set up quick replies, perform the following steps:
- From the dashboard, navigate to Conversations > Setup > Autoresponders > Quick reply.
- Click the + Reply button to add quick replies. The Quick Reply page displays.
- Create a quick reply and select any of the time periods when the Quick Reply must be active:
- Always on
- During specific hours
- Between period
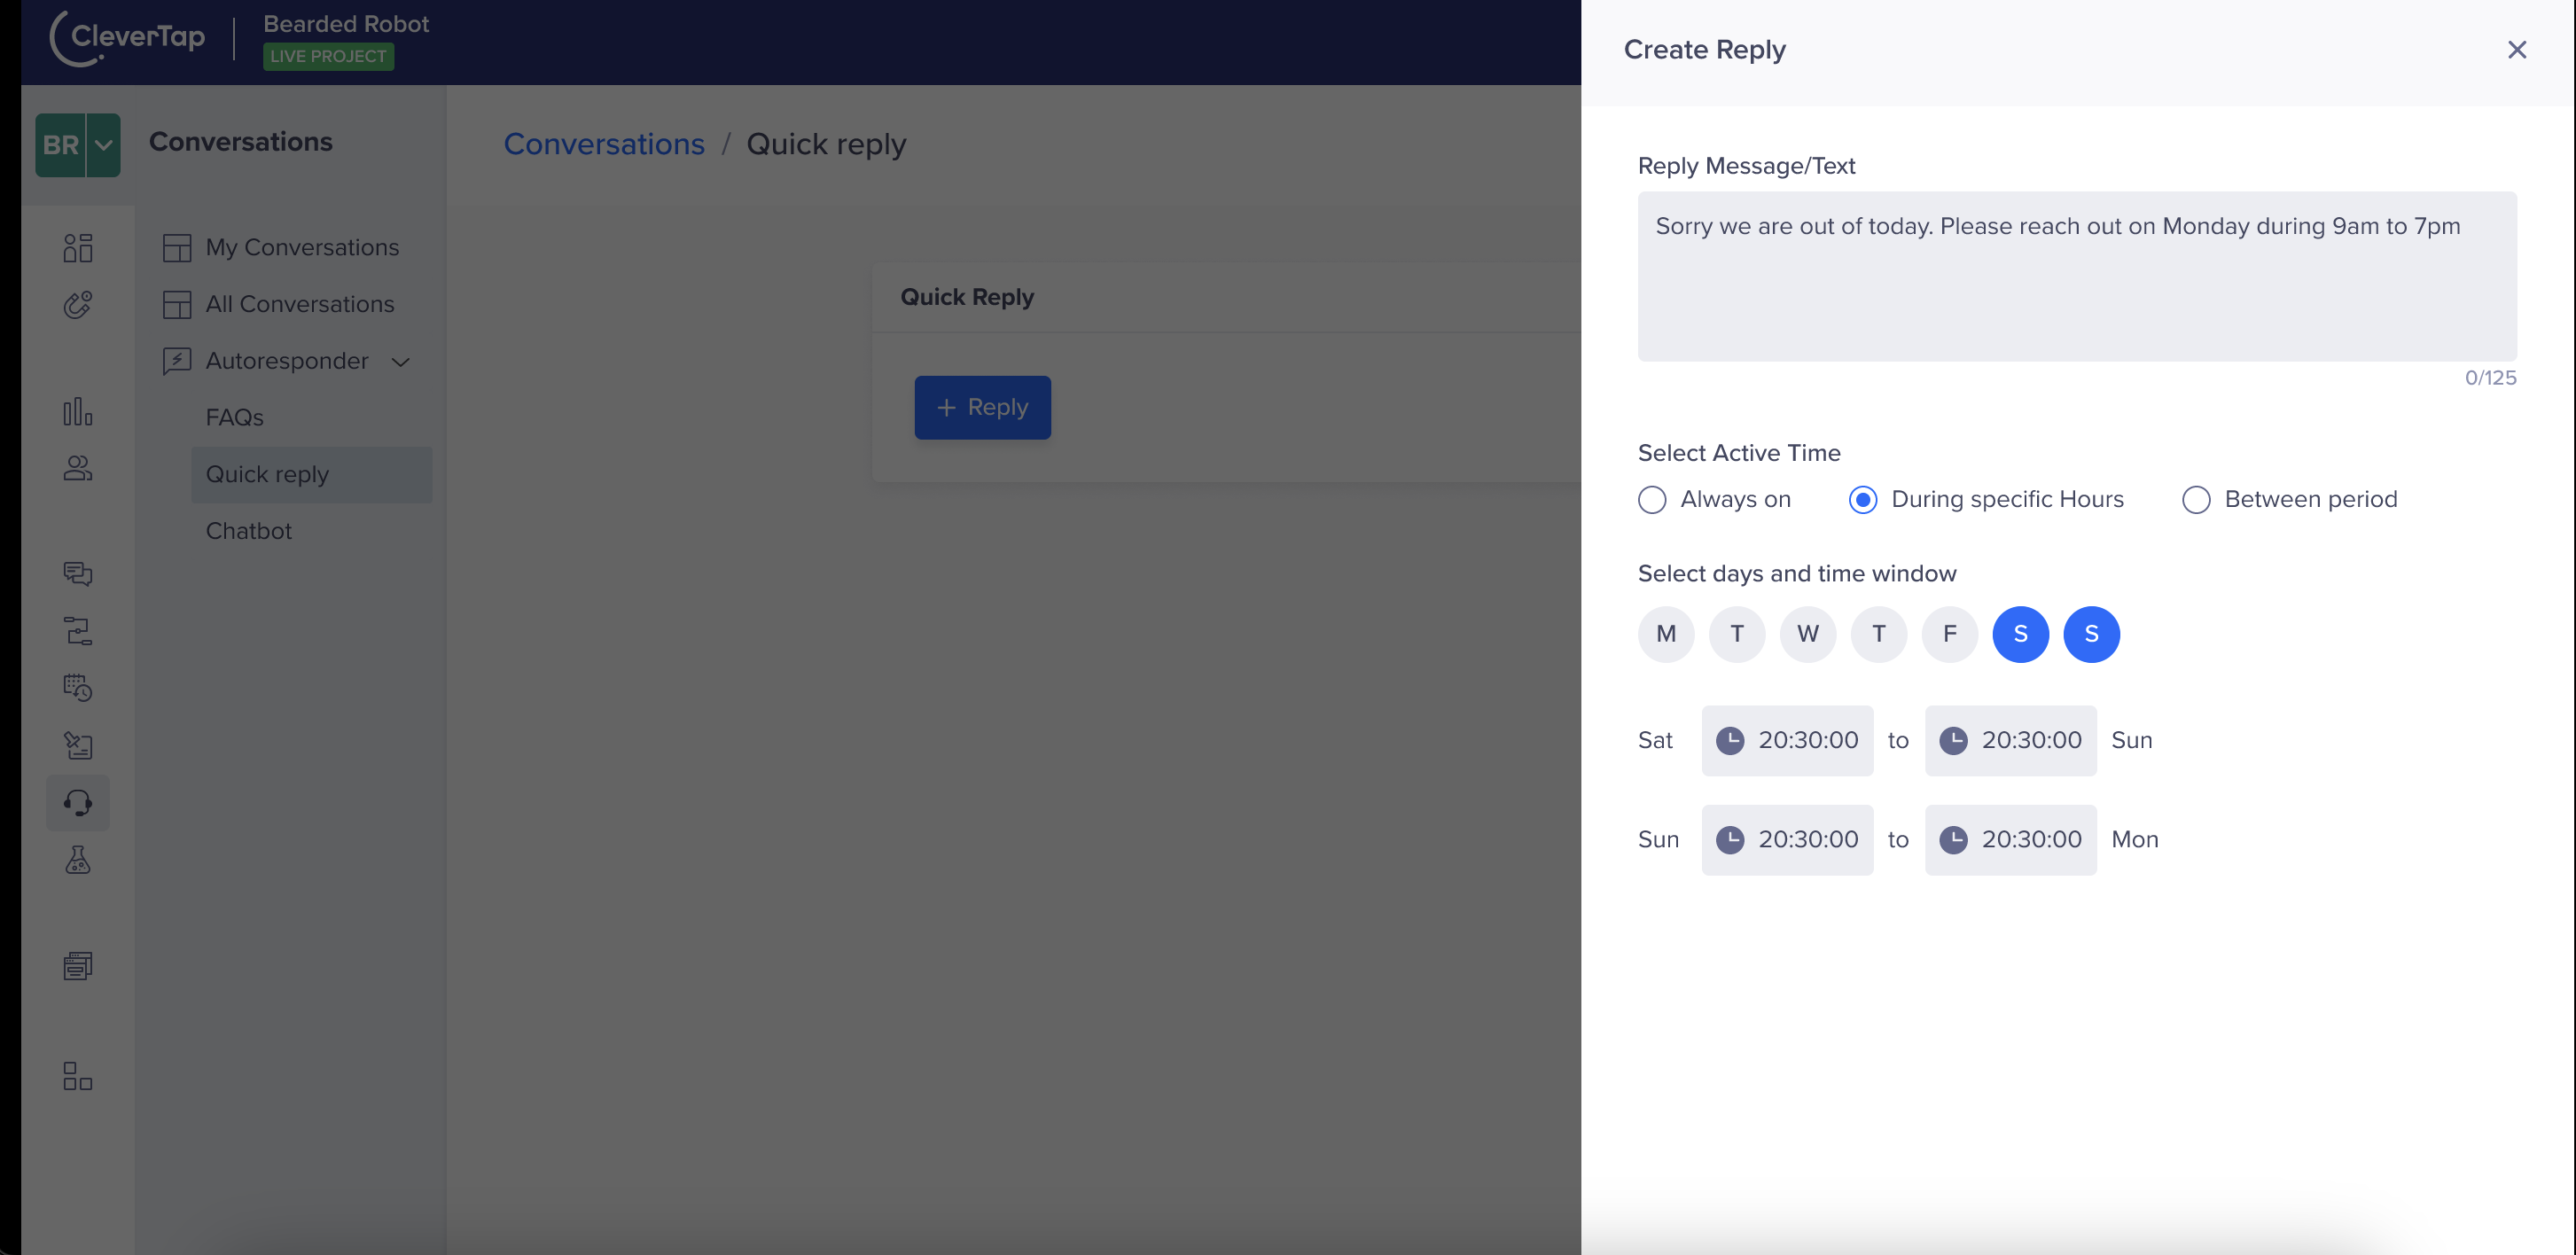
Setup a Quick Reply
Always
The Always quick reply triggers a specified response. It is triggered for all incoming messages, regardless of the time or day. It is ideal for providing immediate assistance or information to users without any time restrictions.
During Specific Hours
The During Specific Hours quick reply allows you to specify certain hours during which the predefined response should be triggered. It is useful for setting up responses that are relevant only during specific time periods, such as non-business hours support. You can even define hours on specific days such as 5.00 PM to 9.00 AM on Weekdays and all hours on Saturdays and Sundays.
Between Period
The Between period quick reply triggers responses within specific time intervals or date ranges. It is suitable for creating responses that are relevant only during certain date ranges or recurring intervals, such as holidays.
Prioritize
You can prioritize FAQs over quick replies and vice versa. To prioritize autoresponders, perform the following steps:
- From the dashboard, navigate to Conversations > Setup > Autoresponders.
- Select FAQs and Quick Reply from the list. The priority is set by the order of selection.
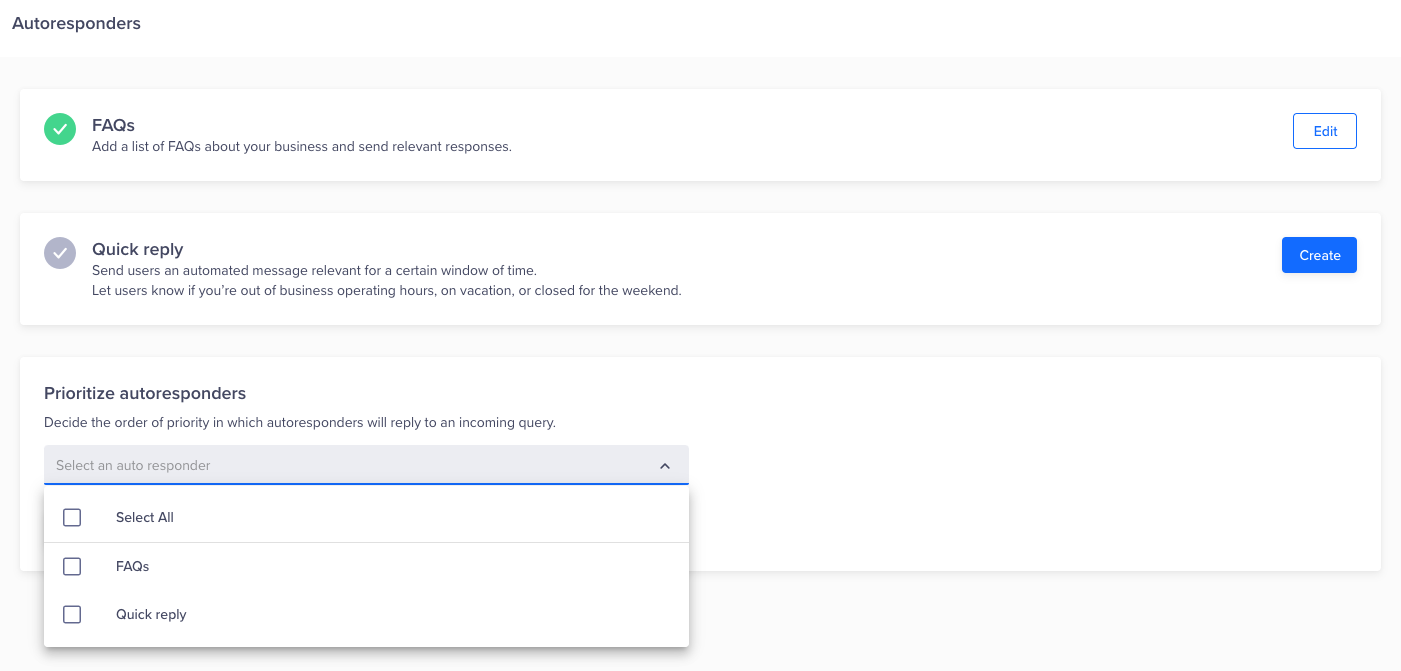
Prioritize Autoresponders
- Click Save.
Autoresponder Flow
The following image shows the flow of the autoresponder:
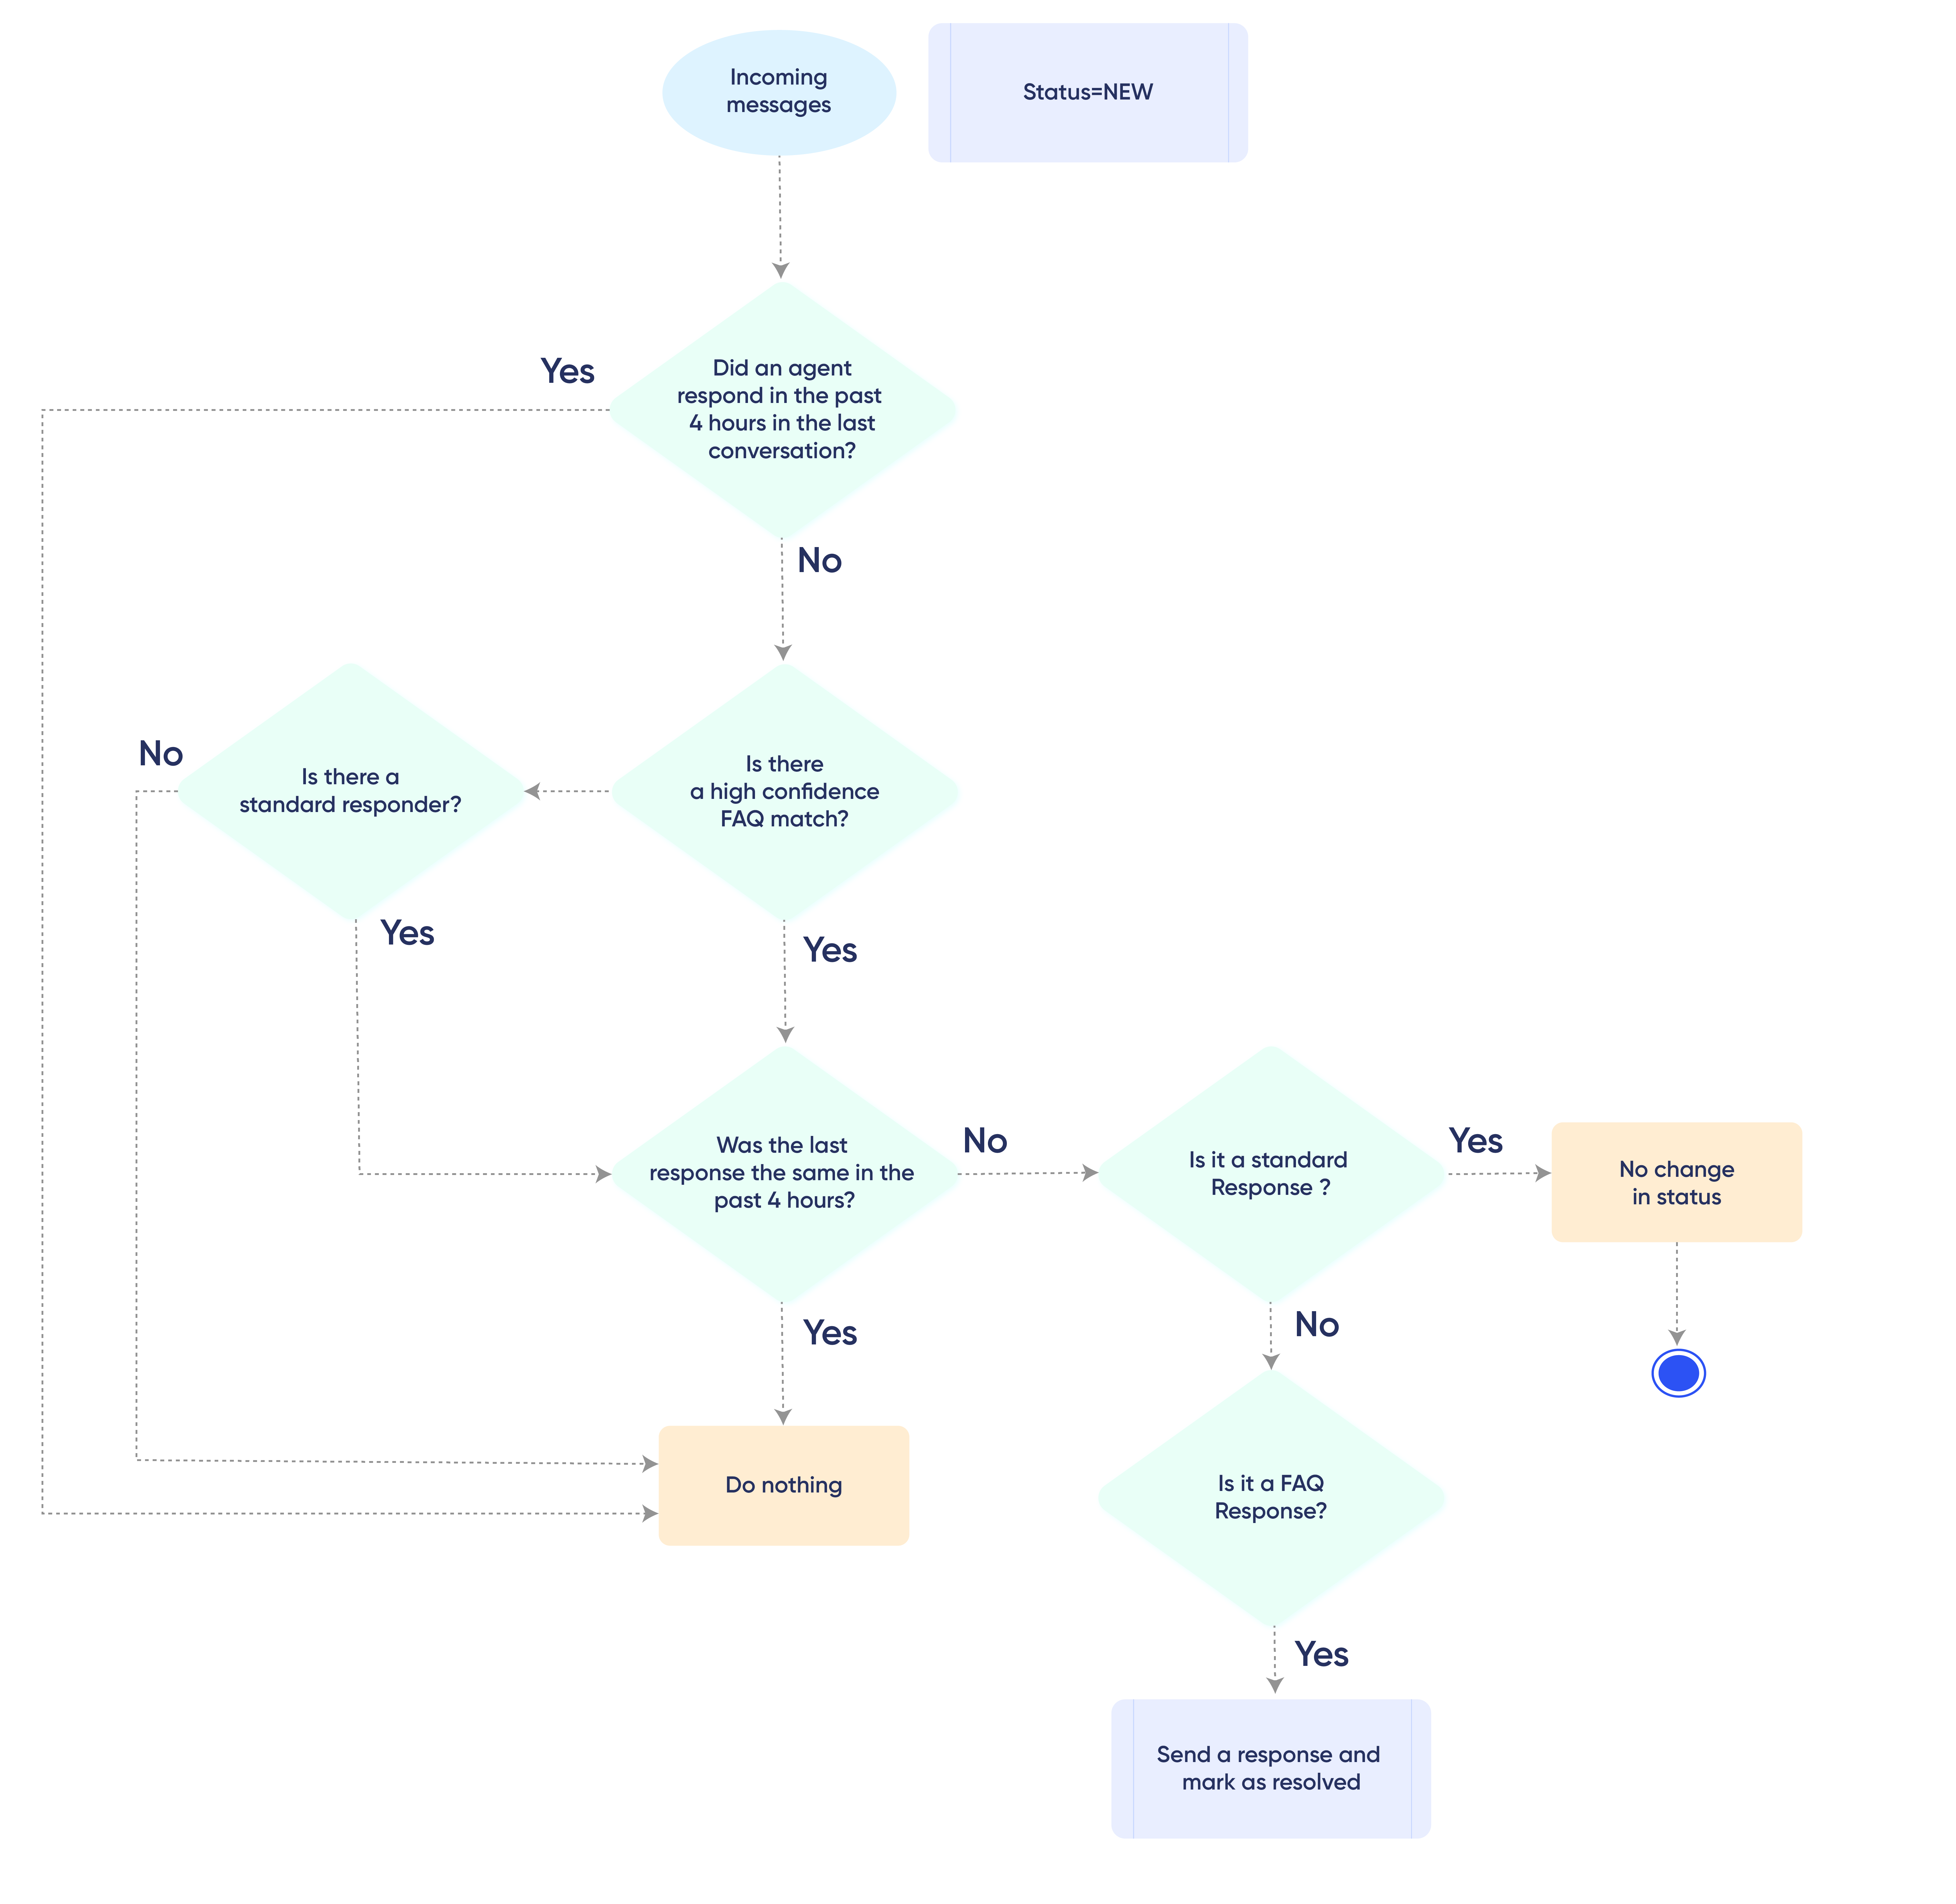
Conversation Autoresponder Flow
FAQ Responder ConfigurationThis flow assumes that the FAQ responder is configured first in the Responders chain section.
FAQ Best Practices
This section covers FAQ best practices, including:
- Check that the questions are detailed and clear. Always use complete and meaningful sentences.
Example:
- Correct: How can I recover the password of my account?
- Incorrect: Wrong password.
- Add enough context to a question. Check that the answer contains all the relevant information for the user.
Example:
- Correct: How can I return my order?
- Incorrect: How to return?
- Avoid having questions that have less than five words, however, it is okay to have short responses for closing, fillers, or greeting.
Example:
- Correct: Do you have COD as a payment option?
- Incorrect: COD please.
-
Check that the FAQ sets are contextually exclusive from each other.
-
Try to add related questions in the same FAQ to provide more context. The responder model can handle spelling errors as long as they do not affect the meaning of the sentence. Context and flow are more important than simple spelling errors or grammatical variations.
On the other hand, acronyms and lingos must be added in related questions separately.
Example FAQ: Do you have cash on delivery as a payment option?
Related example questions:
- Do you have COD as a payment method?
- Can I pay after the delivery is completed?
- The responder works best for the English language. Use of any other language for adding FAQs. For example, writing Hindi using Roman/Latin script may result in unpredictable performance.
Role Based Access: Agent Role
CleverTap has a system role of agents which gives the capability to dashboard users to access conversations. Apart from an agent, an admin can also access conversations. You can have multiple agents in the conversations dashboard.
Agent RoleAgent role is a system role along with an admin, a member, a creator, and an approver. A user who is allocated an agent role will be able to access conversations.
To assign an agent role to a dashboard user, perform the following steps:
- From the dashboard, navigate to Account > Settings > Users.
- Select a user to assign an Agent role.
For more details on user role management, refer to Role Based Access Control.
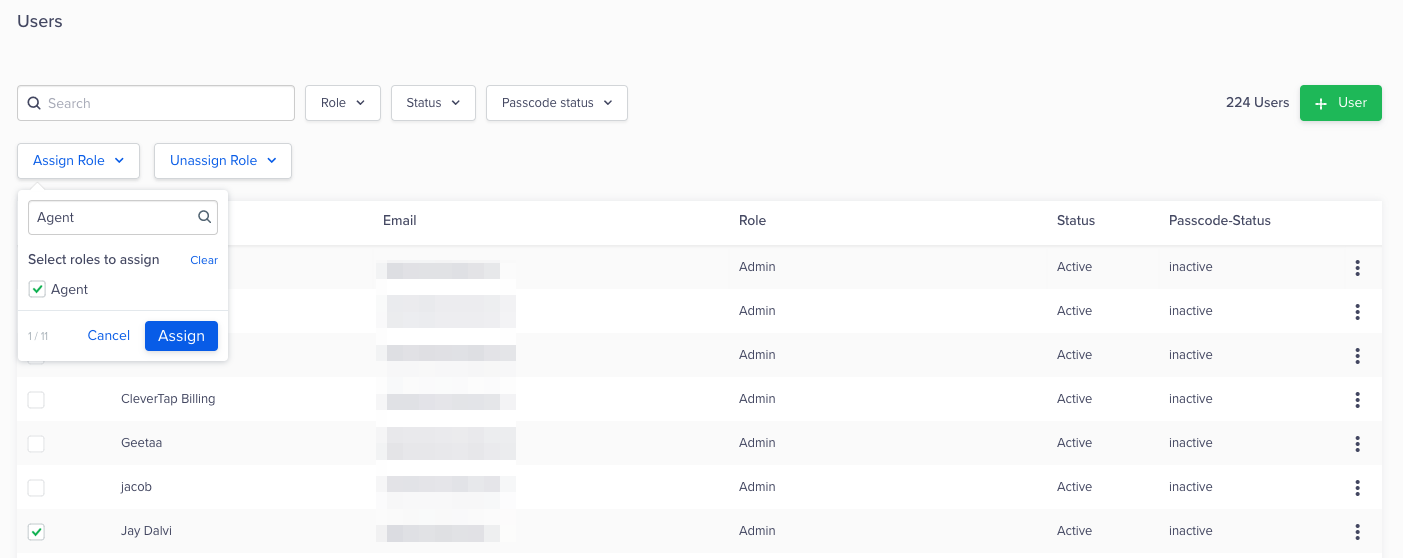
Role Based Access
If you are an authenticated user (Role = Admin or Agent), you can access conversations by clicking on Conversations from the left navigation bar.
One Agent per ConversationIt might happen that two or more agents click on the same conversation. In such cases, only the first agent can chat with the user and the agents who clicked later will not be able to chat.
The Conversations dashboard looks like the following:
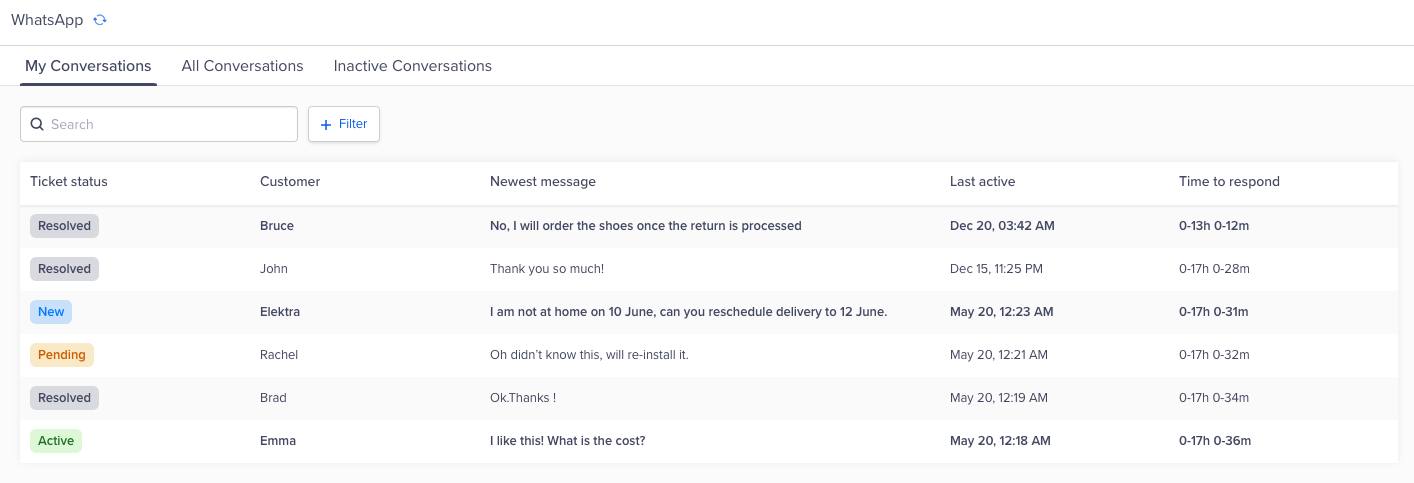
Conversation Dashboard
You see a list of conversations when you arrive on the dashboard. These conversations display when your end-users reply to one of your campaigns.
You can click any of the messages to open the chat window. The chat window is the panel that displays on the right where you can chat with your users seamlessly.
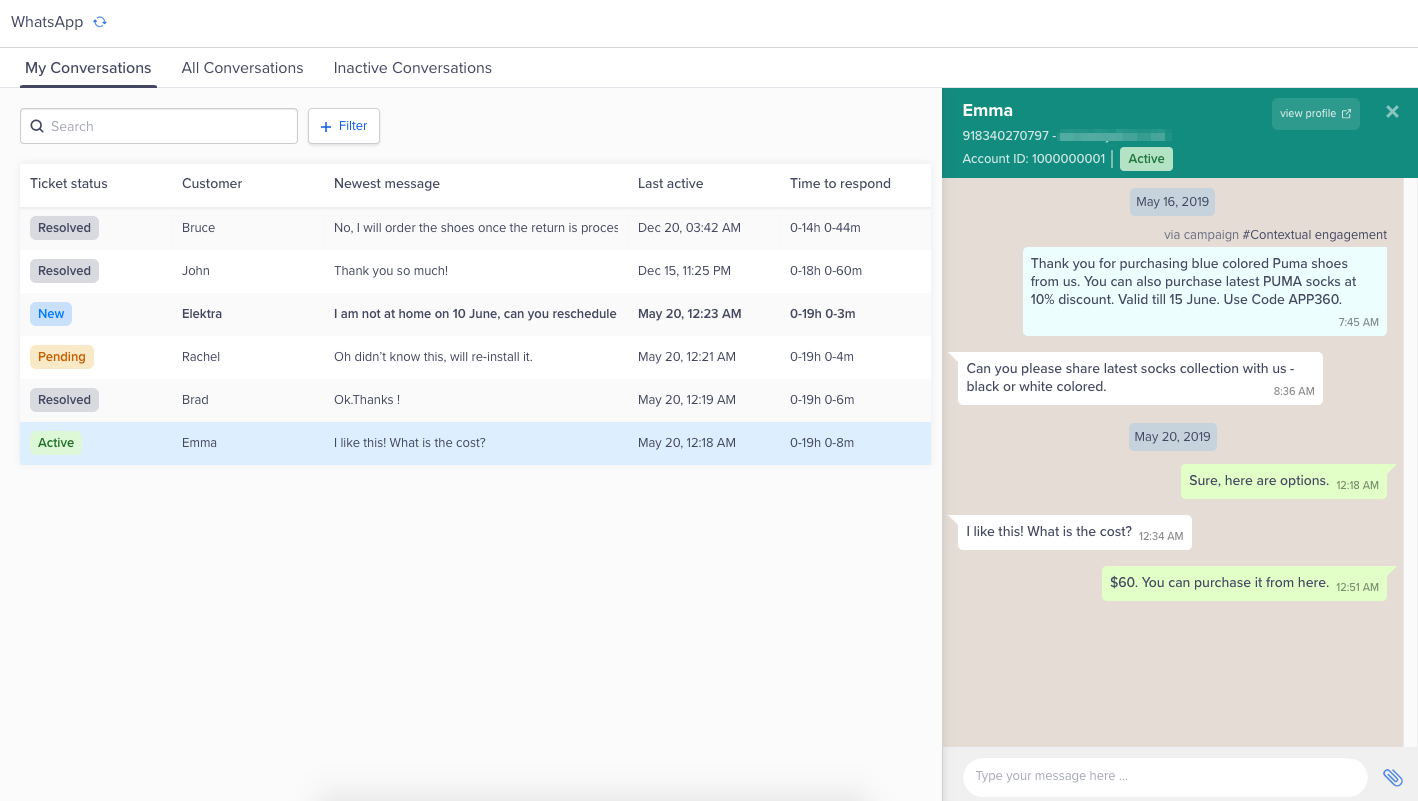
Respond to Conversations
Unlike WhatsApp campaigns where you have to use a templated messages, Conversations lets you use free form messages and attach files.
Converting User Queries into Customer Support Tickets
Customer Support TicketingCleverTap provides putting a ticket status to ongoing chats with your end-users. This helps in categorizing and later searching based on the resolution status of your customer's queries.
You can assign one of the following five ticket statuses:
- New: As soon as a user replies to a campaign message, it is marked as New. This is irrespective of the previous ticket status with that user.
- Active: When an agent replies to the user.
- Pending: When the user replies back to the agent.
- Resolved: When the agent resolves the conversation.
- Inactive: These are all conversations that are past the 24-hour conversation.
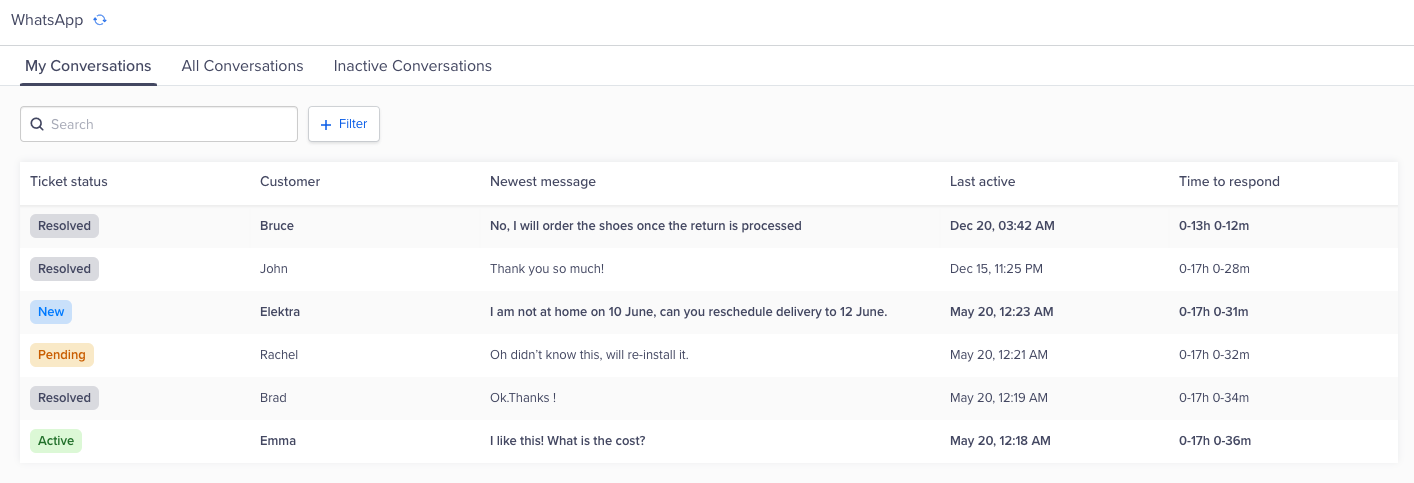
Ticketing in Conversations
Inactive ConversationsThe maximum limit for inactive conversations to appear in the inactive tab is 15.
Change Status
An agent can move the status from one to the other. As shown in the following table, tickets auto change status based on these criteria:
| Flow | Status | Location |
|---|---|---|
| When user messages you for the first time | New | All conversations |
| When your agent replies back to the user | Active | My conversations (for the agent) |
| When user replies back to the agent | Pending | My conversations (for the agent) |
| When agent resolves the conversation | Resolved | All conversation |
| When a 24-hour window expires | Inactive | Inactive conversations |
The ticket status is similar to a system profile property and hence, it is also searchable on the dashboard.
Update Status Manually
To assign a ticket to a conversation, perform the following steps:
- Cick on a conversation and close it. A pop-up displays asking you to assign a ticket before closing it.
- Select a new ticket status.
- Click Assign and close.
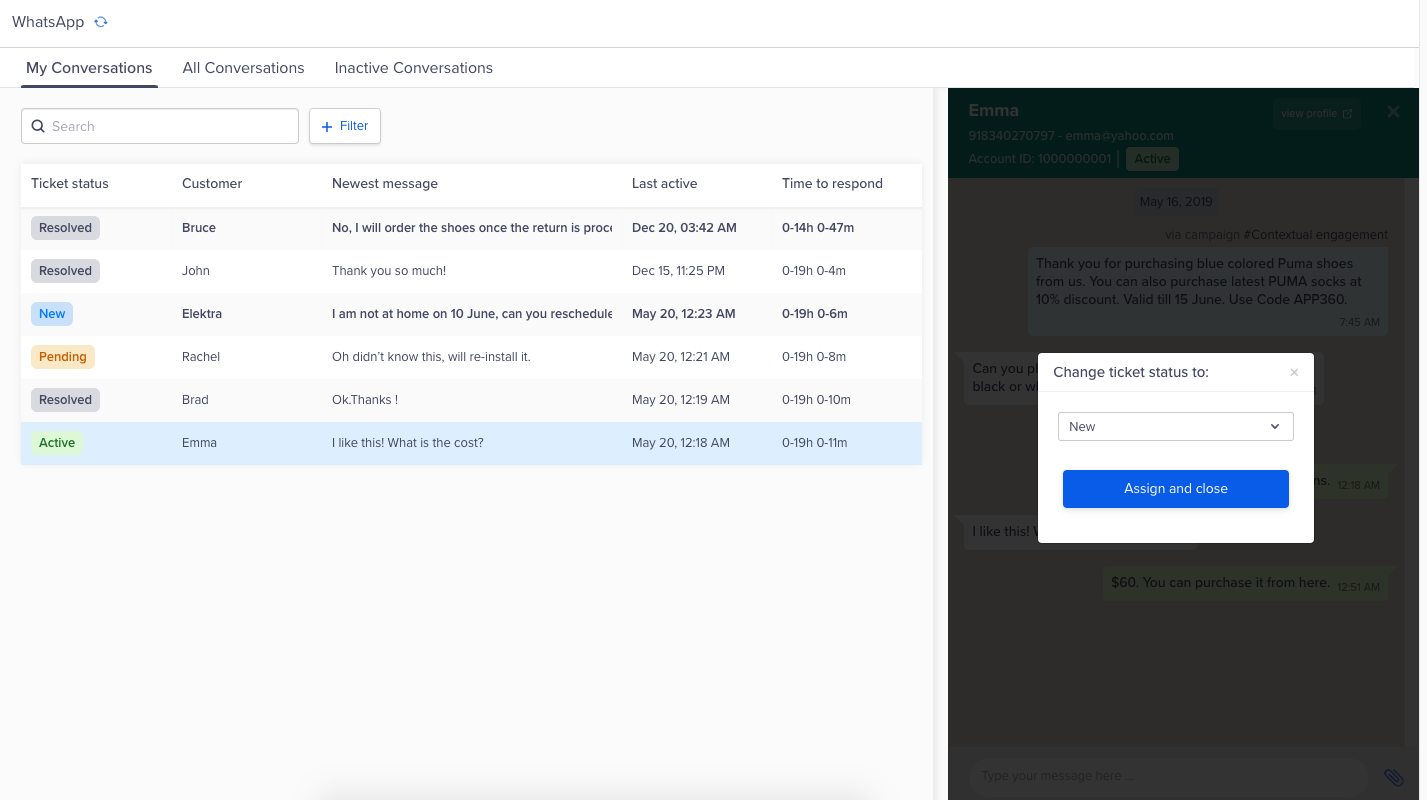
Update Conversation Status Manually
Search and Sort Conversations
If you have millions of conversations going, CleverTap provides an easy way to search your conversations by clicking on the search bar on top of the conversations dashboard.
The following filters are available:
- Search bar: Filters on user name, latest message text.
- Campaign: Filters based on campaign names.
- Label: Filters based on campaign labels.
- Ticket status: Filters based on ticket status.
Updated about 2 months ago
