Salesforce Import
Overview
Connecting your Salesforce CRM to CleverTap lets you bring CRM records into CleverTap to:
- Build a unified view of each customer that combines CRM data with app/web behavior.
- Segment users by CRM attributes (lead status, deal stage, subscription tier, and so on).
- Trigger CleverTap Journeys and Campaigns from CRM events (a new Opportunity, a closed Case, a renewed Subscription).
- Backfill historical CRM records so segmentation works from day one.
Salesforce Add-onSalesforce Import is available as an Add-On. To enable this add-on for your project, contact your Account Executive or Customer Success Manager. For trial, you can download the application from the AppExchange and use it for 30 days.
The integration is delivered through the CleverTap-managed Package (namespace: CleverTap), which you install in your Salesforce org from the AppExchange.
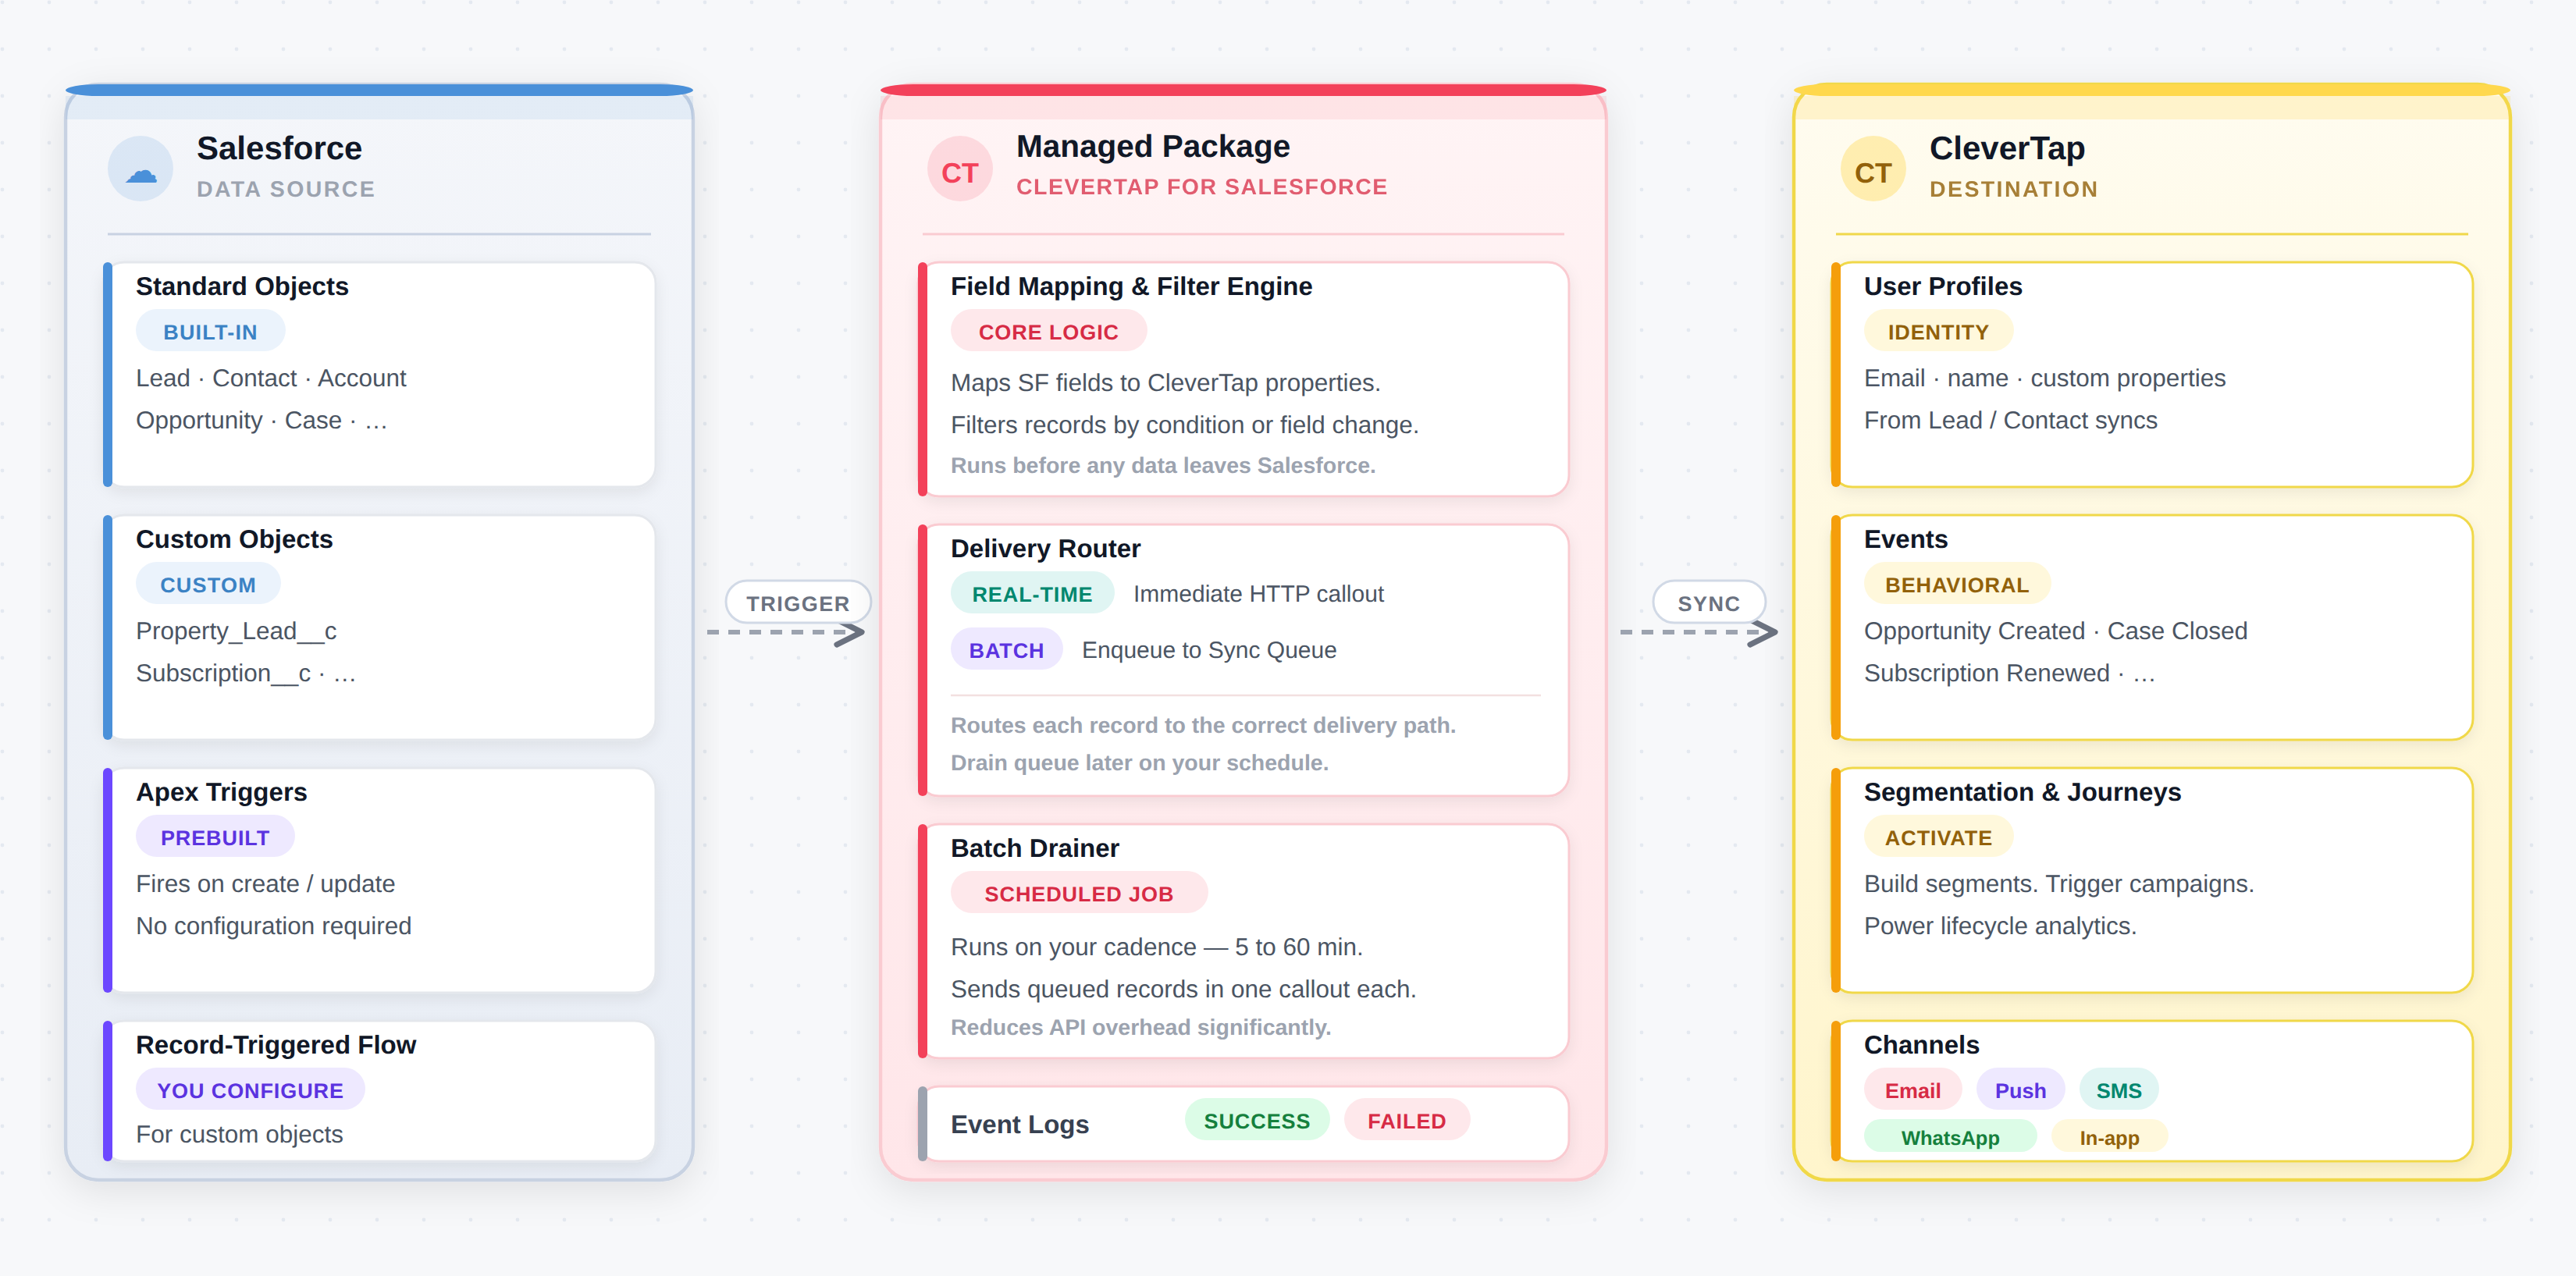
Salesforce Import Workflow
CleverTap-Managed Package
The following table shows the components present inside the CleverTap-managed Package:
| Component | Description |
|---|---|
| Pre-built Apex Triggers | Fires automatically on standard objects. They are ready to use upon installation. For more information about supported standard objects, refer to Supported Objects for Import. |
| Invocable Apex Action "Send Custom Object to CleverTap" | Lets you sync any custom object via a Record-Triggered Flow that you create once. |
| CleverTap Settings tab | Serves as the native Salesforce UI for creating connections, mapping fields, setting filters, and choosing a delivery mode. |
| CleverTap Event Logs tab | Provides a per-record log of every sync attempt, including the request payload and the CleverTap response, for monitoring and troubleshooting. |
| Batch Drainer (Scheduled Apex) |
|
Supported Objects for Import
The import flow supports the following standard objects out of the box, along with any custom objects in your Salesforce org:
- Standard Objects with Prebuilt Triggers: Lead, Contact, Account, Opportunity, Case, Campaign, Event, Task, Campaign Member, Service Appointment, Quote, Contract, Order, Product, Price Book, Asset, and Opportunity Product.
- Custom Objects: Any custom object in your org is supported. They appear in the Source Entity dropdown with a
[Custom]prefix and require a one-time Record-Triggered Flow setup. - Objects excluded from Source Entity Dropdown:
- Custom Settings
- Custom Metadata Types (objects ending in
__mdt) - Platform Events (objects ending in
__e) - Big Objects (objects ending in
__b) - External Objects (objects ending in
__x) - The internal objects of the package (
Config__c,Event__c,Sync_Configuration__c,Sync_Queue__c,Mapping__c,CleverTap_Passcode__c)
Prerequisites
Before configuring the integration, ensure you have the following:
Salesforce
- A valid Salesforce account on Enterprise, Unlimited, or Performance edition with API access enabled.
- Permission to access Object Manager, App Manager, Flow Builder, and Apex Classes.
- The CleverTap-managed package is installed from AppExchange (namespace: CleverTap).
- The CleverTap Integration Access permission set is assigned to users configuring the integration.
CleverTap
-
Admin access to the CleverTap dashboard.
-
Find the following details from your CleverTap dashboard under Settings > Project:
CleverTap Project Details
Field Description Account ID CleverTap Project ID. API Passcode Project's API passcode. For more information, refer to Account Passcode in CleverTap docs. Region The data center hosting your account (for example, in1,us1,eu1,sg1). For more information, refer to API Endpoints by region.
Import Standard Objects
The following are the key steps to import data from Salesforce to CleverTap:
- Connect Salesforce to CleverTap Account.
- Configure Sync for Either Profiles or Events.
- (Optional) Select Delivery Mode and Add Filter to Control Volume.
- Create Record-Triggered Flow for Custom Objects.
- Verify Imported Records in CleverTap.
Connect Salesforce to CleverTap Account
The CleverTap Settings tab shows the Connections list. Each connection points to one CleverTap project. To connect Salesforce to the CleverTap account, perform the following steps:
-
In Salesforce, open the App Launcher and search for "CleverTap".
-
Select CleverTap from the results.
-
Open the CleverTap Settings tab and click Add New Connection.
-
Enter the following integration details: Region, Connection Name, Account ID, API Passcode.

Add New Connection on Salesforce Dashboard
-
Click Save. The connection now appears in the Connections list. You can either delete, edit, or map a Field.
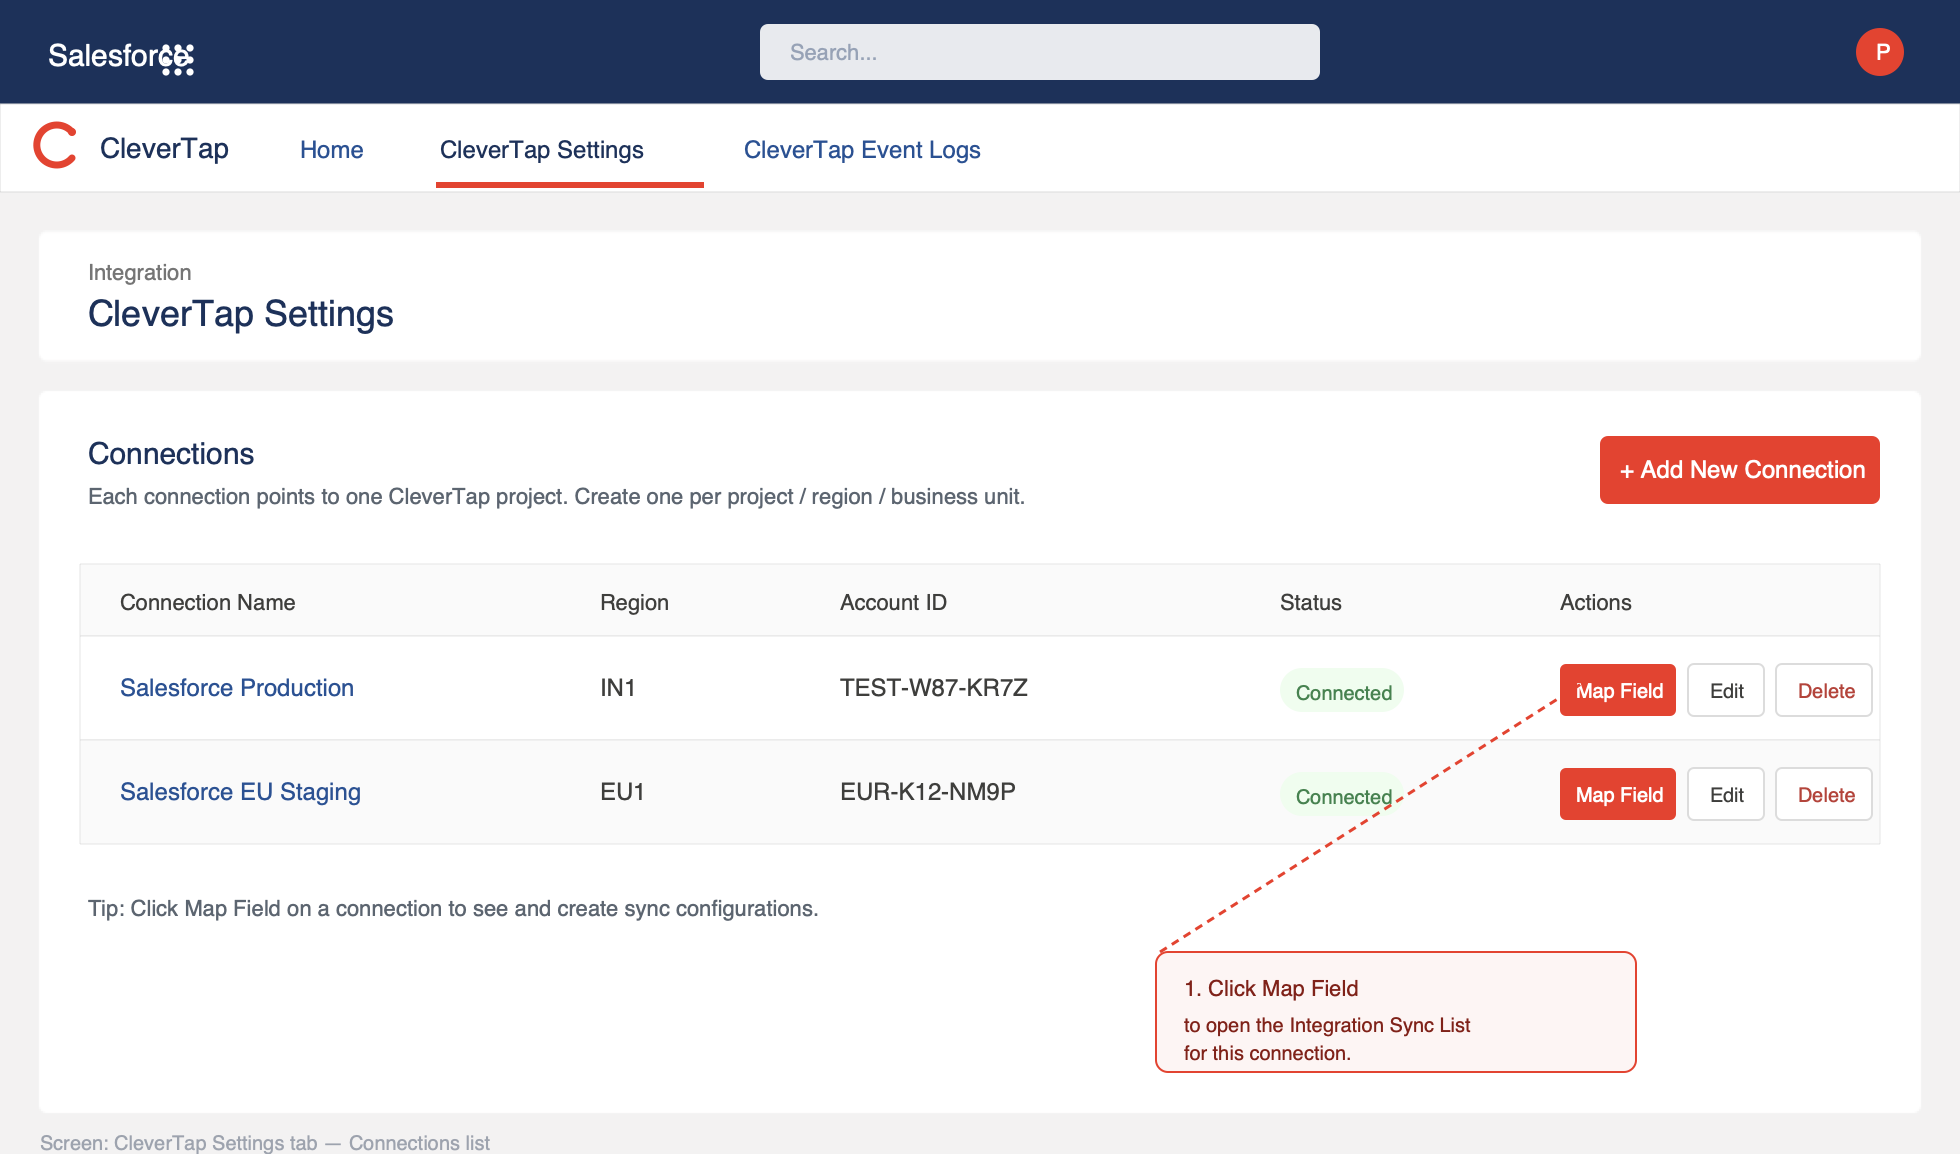
Multiple Salesforce ConnectionsYou can add multiple connections. This is useful when you want to route different Salesforce data to different CleverTap projects. For example, one connection per region or business unit.
Configure Sync for Profiles or Events
To import data from Salesforce, perform the following steps:
-
In CleverTap Settings, click Map Field for the relevant connection.
-
Click Add New Sync and enter the following details:

Add New Sync
Field Description Sync Name Enter the name for your sync, for example, Lead Profile Sync. Sync Type Select salesforce_to_clevertap. Source Entity Select the Salesforce object, for example, Lead. Target Entity Available options: - Profiles: Select Profiles to push Salesforce records into CleverTap as user profile records. This helps build a richer customer view for more effective segmentation and engagement.
- Event: Select Event to capture an activity at a point in time, for example, an Opportunity created, a Case closed, a subscription renewed, and record it against the user profile in CleverTap. You should select Event when you want to trigger a campaign from something that happened in Salesforce, or when you are doing lifecycle analytics.
Status Select Active. -
(Optional) Configure the Delivery Mode and Filter. To start with, you can keep the defaults as is.
-
Click Next. The field mapping screen opens.

Map Fields for Sync
Field Description Customer ID This is the identifier CleverTap uses to look up or create the profile. Map it to a stable, unique field, for example,
Lead.Email. Avoid mutable fields such as phone numbers or the Salesforce record ID.For more information, refer to Best Practices for Identity Mapping.
Event Name For Event import, an additional Event Name field must be mapped. It can be either a static string, such as Opportunity Created, or a mapped field. If you do not map it, the package uses a sensible default ( sf_opportunityfor Opportunity,sf_activity_eventfor Event, and so on).Additional Fields - For profiles import, map any other Salesforce fields you want to map in CleverTap (for example, FirstName, LastName, LeadSource, Status, Company).
- For event import, map the event properties you want to track. For an Opportunity event, the fields are typically Amount, StageName, CloseDate, and so on.
-
-
Click Save. The sync becomes live immediately. Any record change received by the Apex trigger is now evaluated by the filter and routed through the selected delivery mode.
NoteYou can create multiple sync configurations for the same source entity. For example, one sync can send Lead updates as profile updates, while another sends Lead status changes as events. If overlapping active configurations are detected, the package alerts you so you can review and disable any unintended ones.
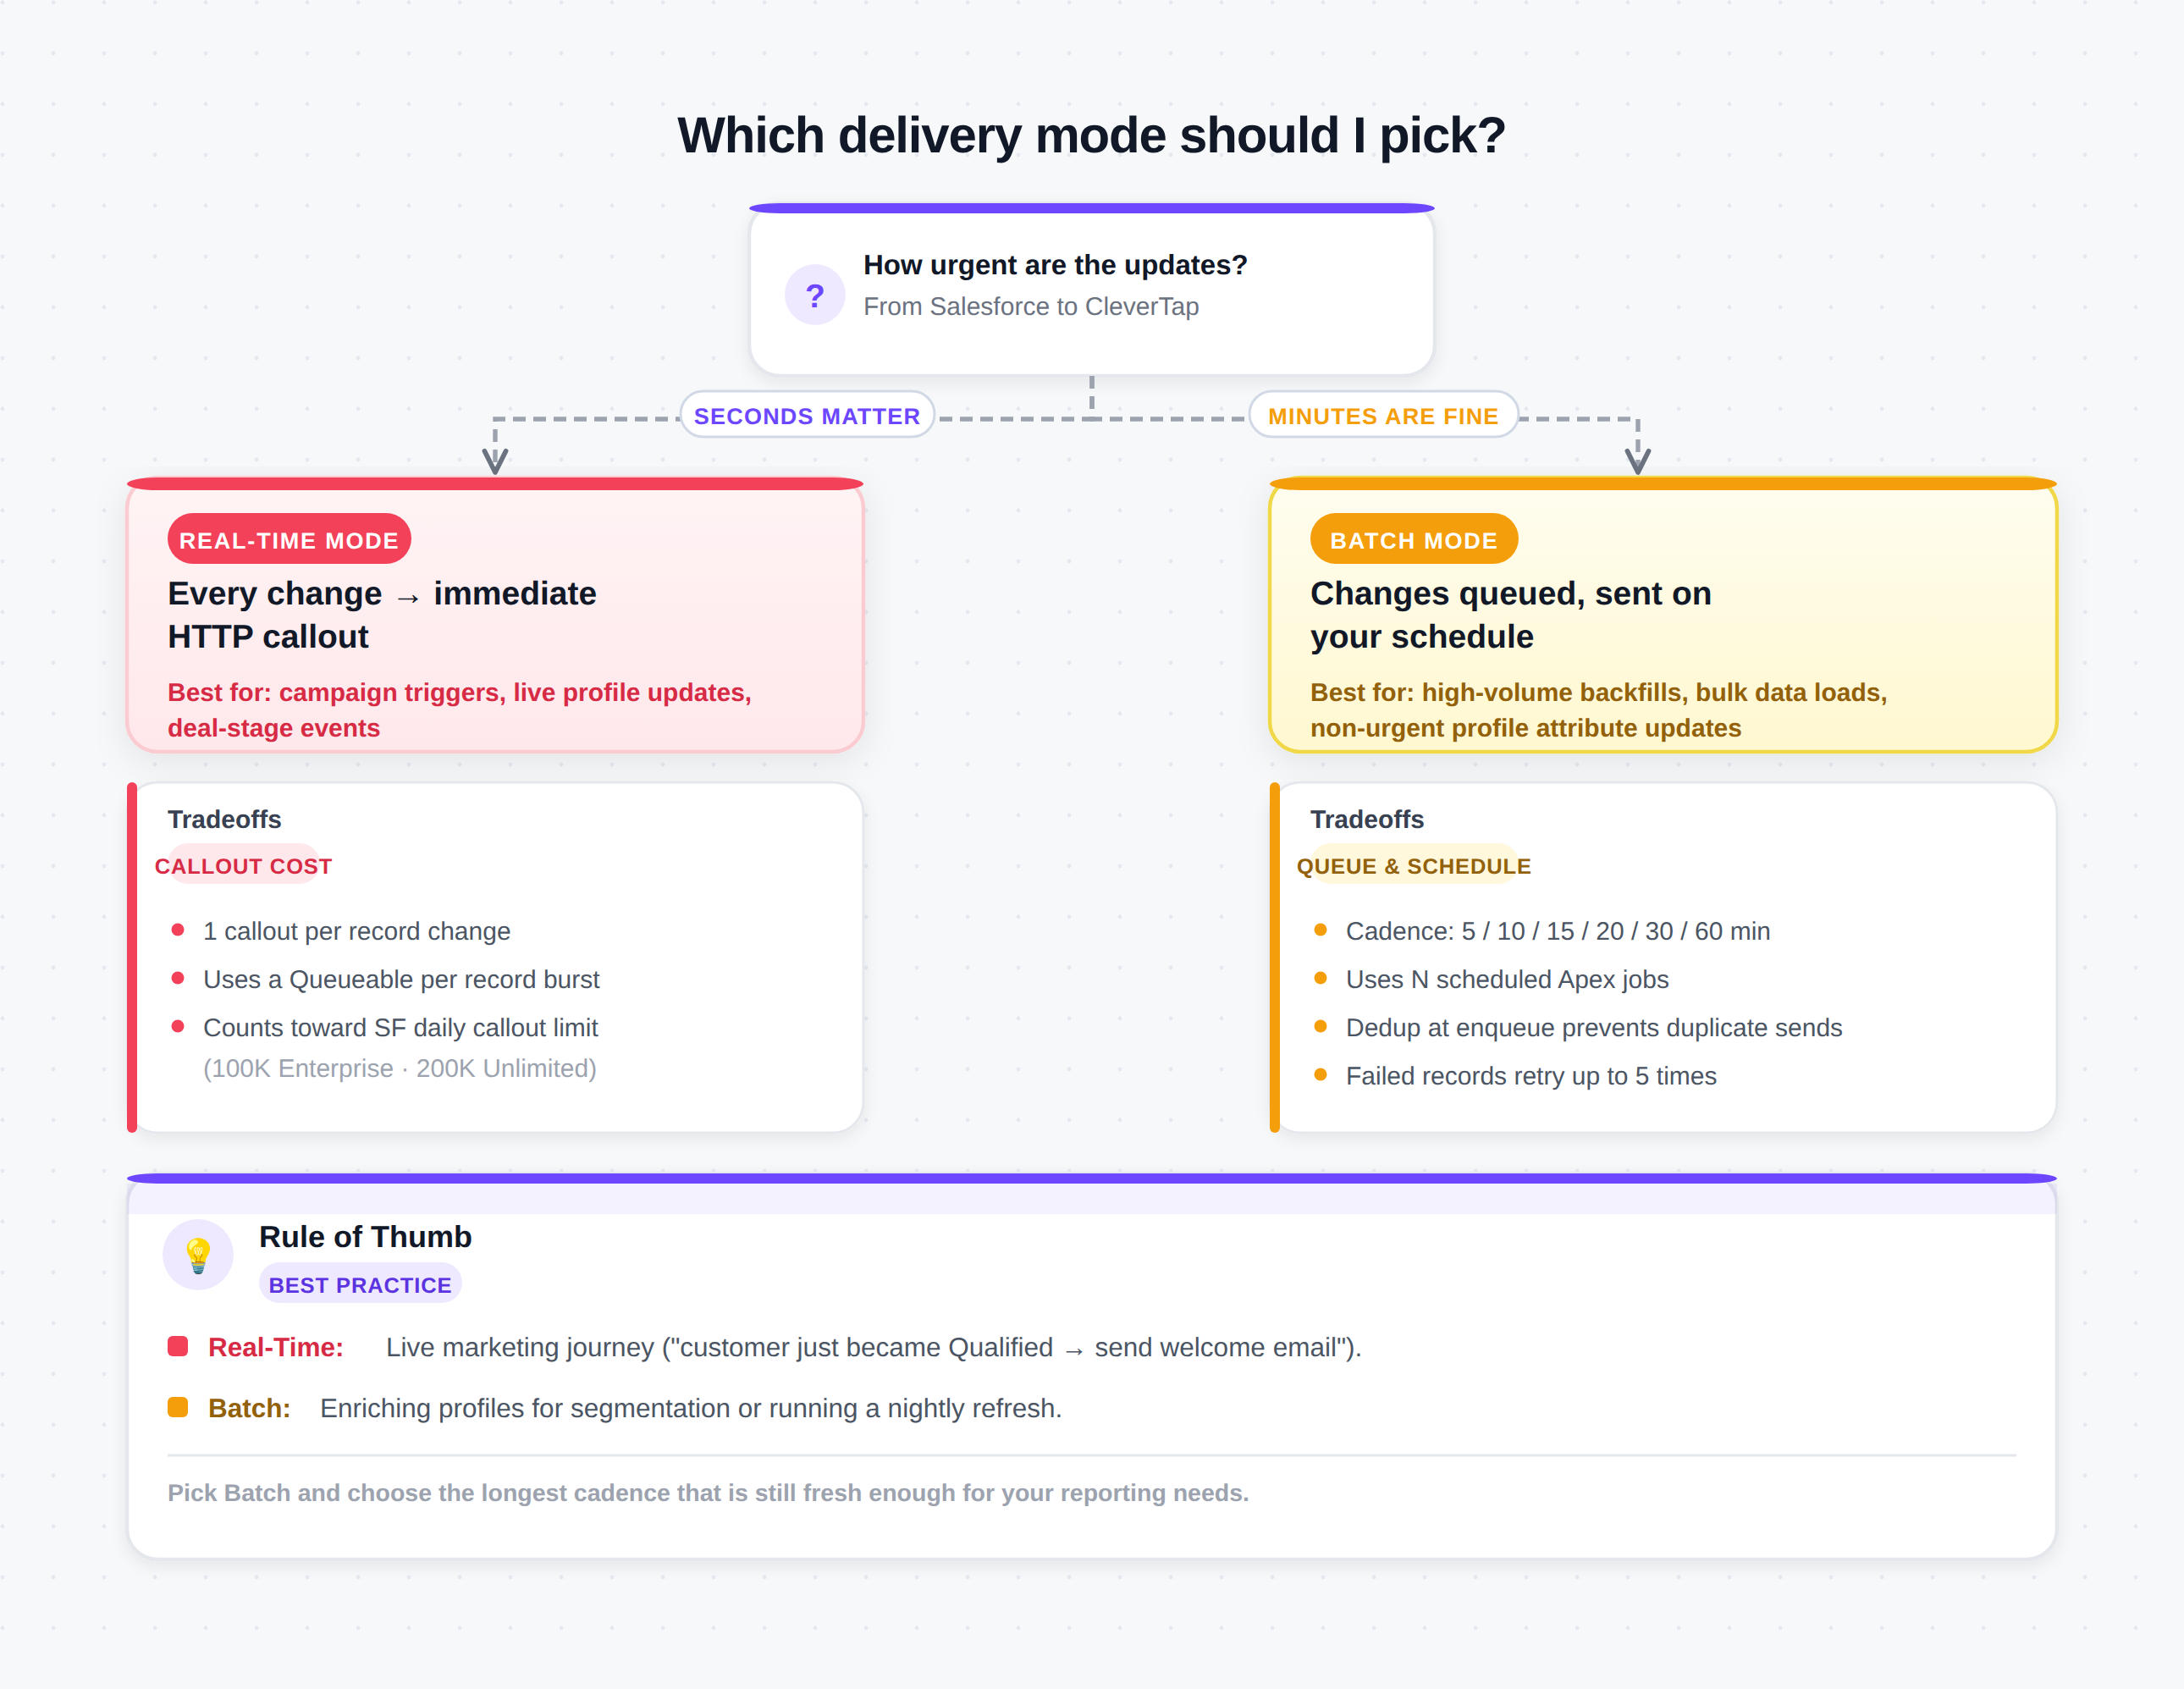
Select Delivery Mode
Every sync configuration runs in one of two modes. You set this on the sync basics screen, before field mapping.
Choose Delivery Mode
- Real-Time: Default. Every record change triggers an immediate HTTP callout to CleverTap. This is the right default for most use cases. Changes appear in CleverTap within seconds. Select this option if the data drives a live Journey or Campaign trigger.
- Pros: Lowest latency. The marketing team can respond to CRM activity in real time.
- Cons: One callout per record change. High-volume orgs that update thousands of Leads per hour can come close to the Salesforce daily callout limit (100K on Enterprise, 200K on Unlimited).
- Batch: Select this option if you are running profile enrichment, segmentation backfills, or anything that does not need to land in CleverTap within seconds. Changes are queued inside Salesforce (in a staging table called
Sync_Queue__c) and drained on a schedule you pick. One scheduled job collects all pending rows for each sync and sends them to CleverTap in one callout per record.- Pros: Predictable throughput. Best for high volume. Failed records retry automatically up to 5 times.
- Cons: Data lags by your selected cadence. Uses scheduled Apex slots. For more information, refer to Configure Batch Drainer Schedule. When you select this option, the following fields appear:
- Batch Size: The number of records sent in a single drainer call. The default value is 100, and the maximum is 1000.
- Batch Frequency Minutes: Indicates how often the drainer runs. You can select from the following options: 5, 10, 15, 20, 30, or 60.
Configure Field-Level Filters
Filters let you sync only the records that matter. Set per sync configuration. The following are the available field-level filter options:
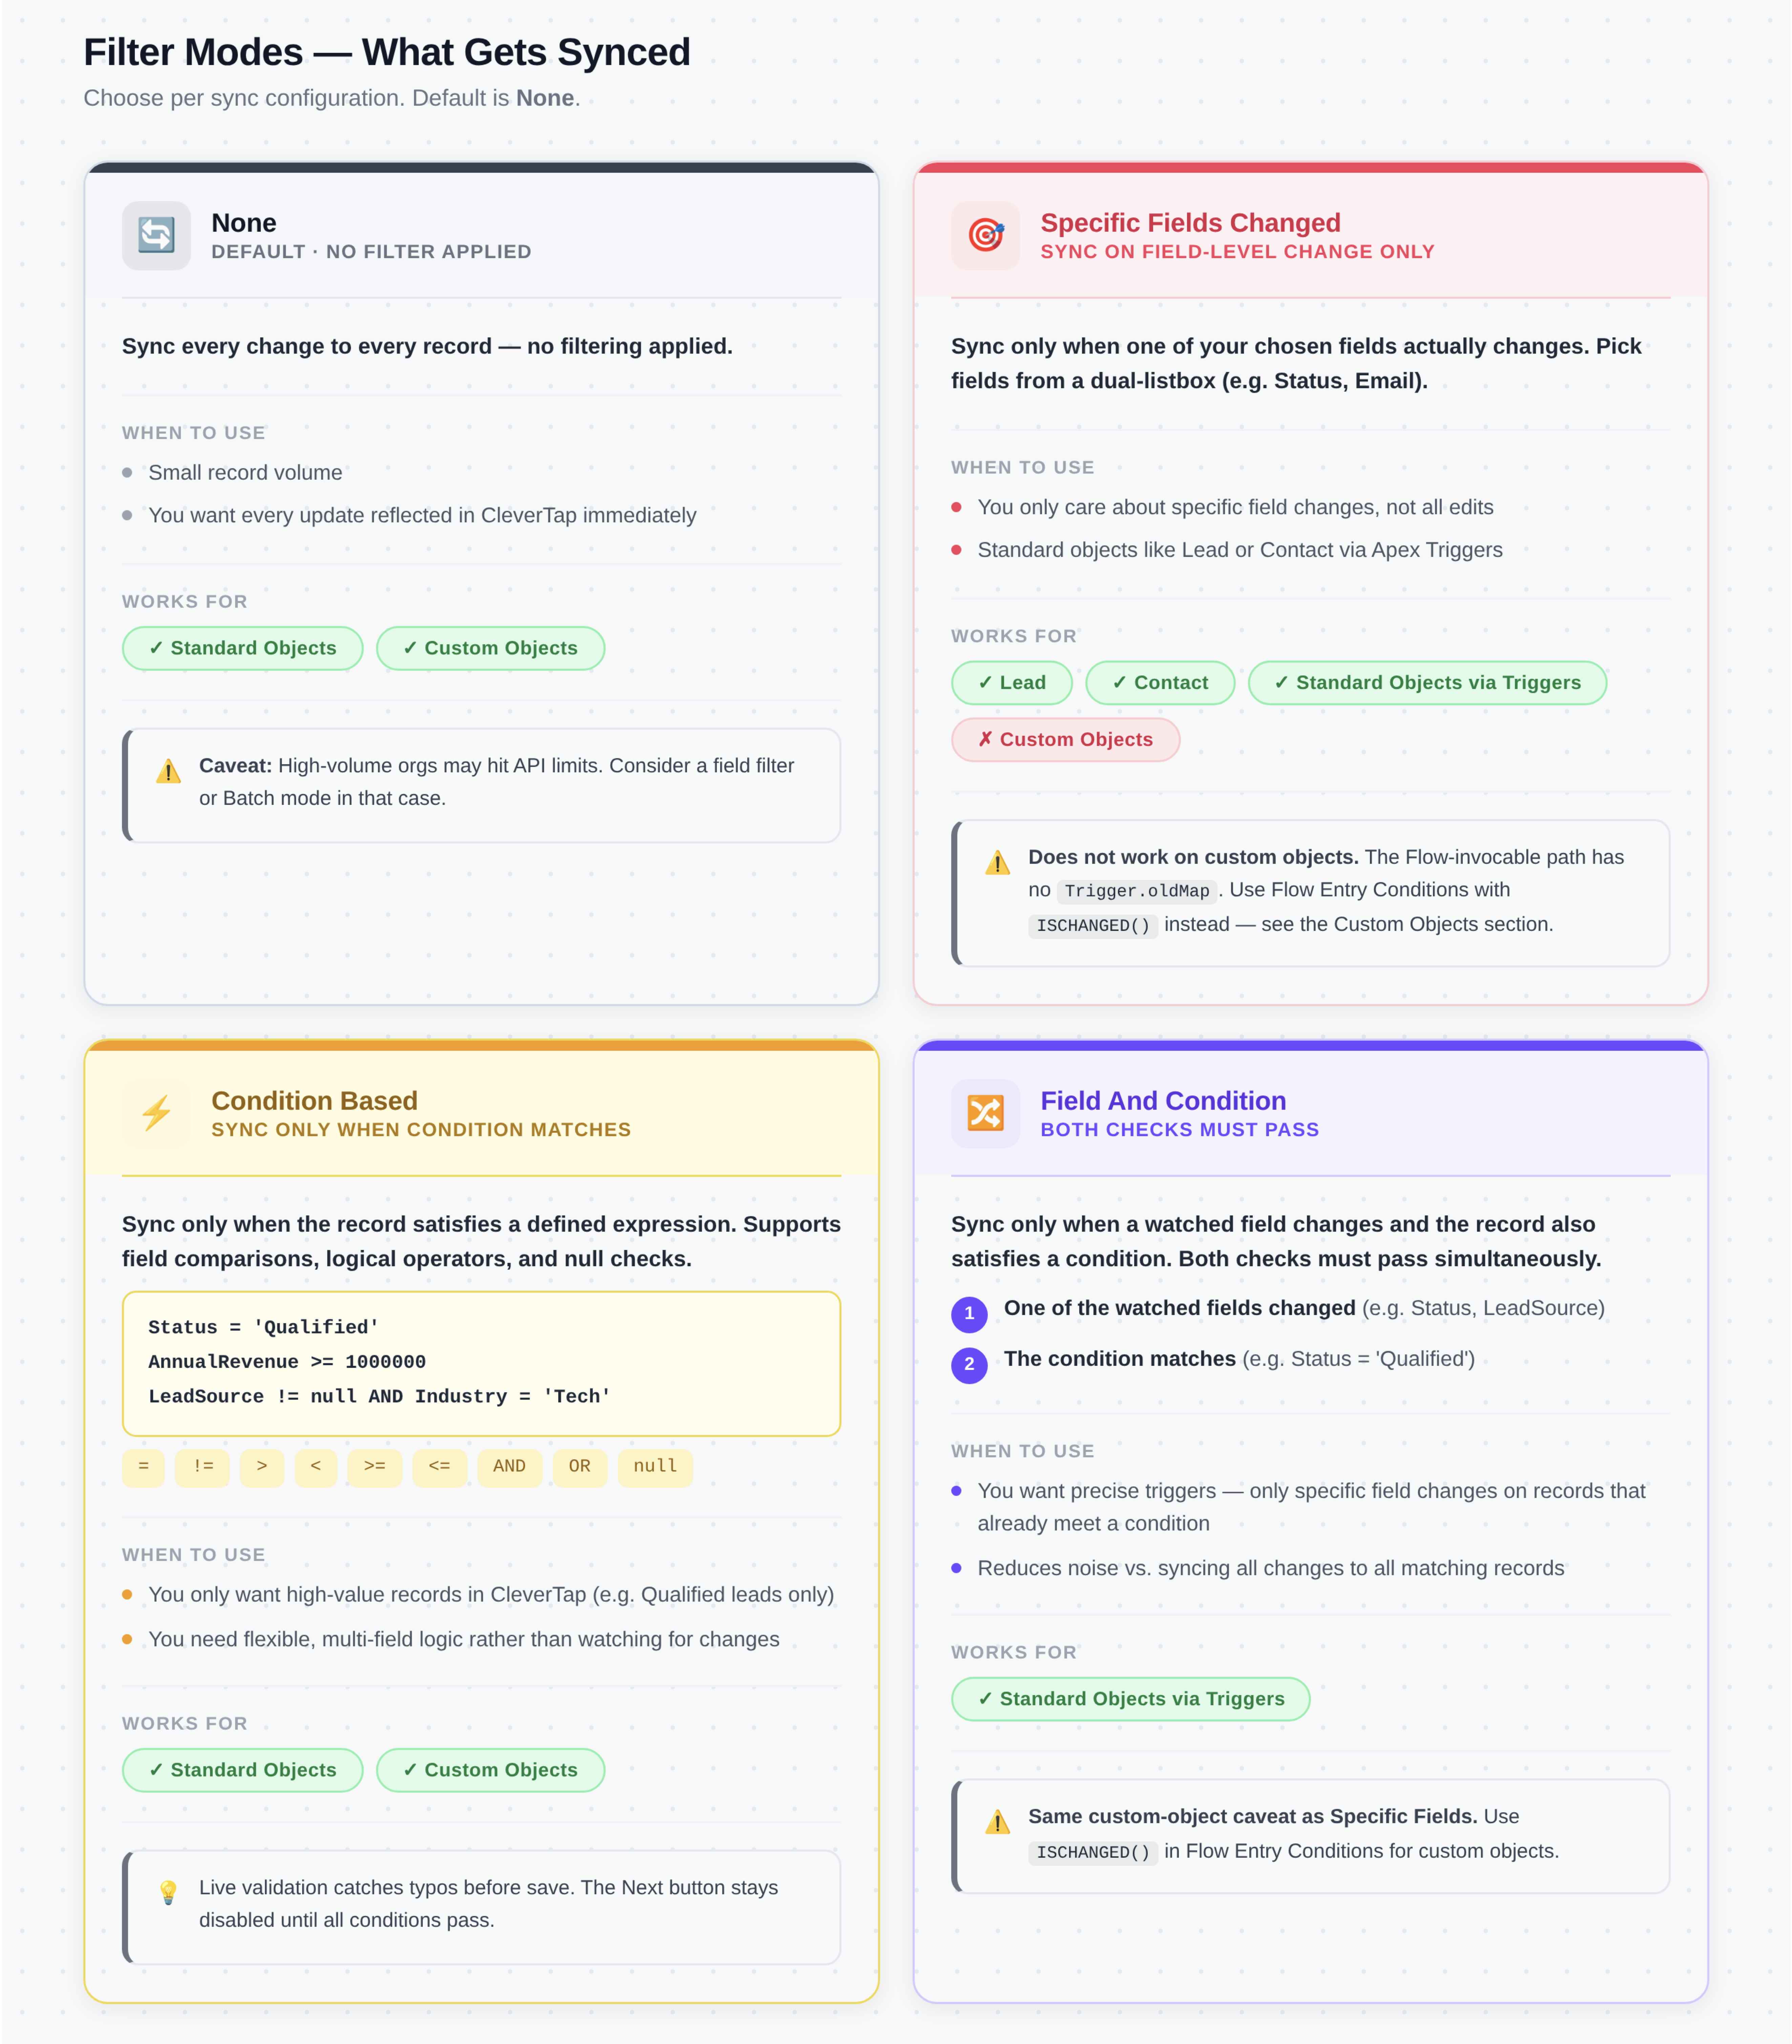
Filter Modes
-
None: Default. Syncs every change.
-
Specific Fields Changed: Sync only fires when one of your watched fields actually changes. Pick the fields from a dual-listbox.
For example,
Watched fields=Status,Email. A Lead whoseDescriptiongets edited will not fire a sync. A Lead whoseStatuschanges fromOpentoQualifieddoes. -
Condition Based: Sync only fires when the record matches a condition you write. Supports the following operators:
Operator Meaning Example =equals Status = 'Qualified'!=not equals Country != 'USA'>,<,>=,<=numeric comparison AnnualRevenue >= 1000000AND,ORcompound Status = 'Qualified' AND LeadSource != nullnullnull check LeadSource != null- String values must be wrapped in single quotes: Status = 'Qualified'.
- Numbers are unquoted: NumberOfEmployees > 50.
The package validates the expression live as you type and blocks you from clicking Next if the expression is malformed (unbalanced quotes, unknown field name, trailing AND, and so on). Use the Show available fields button next to the editor to see the valid field names on the source object.
You can use this with both Standard and Custom objects. Condition evaluation only needs the current record values, so it works fine in both the Trigger path and the Flow-invocable path. -
Field and Condition: Both conditions must be met: at least one watched field must change, and the defined condition must evaluate to true.
For example:
Watched fields:
Status,LeadSourceCondition: Status =QualifiedSync fires when:
Statuschanges toQualified(watched field changed + condition now matches)LeadSourcechanges for a Lead that is alreadyQualified(watched field changed + condition continues to match)
Sync does NOT fire when:
Descriptionchanges on a Qualified Lead (no watched field changed)Statuschanges toOpen(watched field changed, but condition no longer matches)
NoteIf you need to sync records only when a specific field changes on a custom object, move this check to the Flow’s Entry Conditions instead of relying on the CleverTap package filter.
In Flow Builder, configure the Entry Conditions of the trigger as follows:
ISCHANGED({!$Record.Status__c}) || ISNEW()This ensures the Flow runs only when the field changes (or on record creation), preventing the invocable action from being triggered unnecessarily. As a result, the CleverTap package processes only the relevant record updates.
Configure Batch Drainer Schedule
When you pick Batch as the delivery mode, the package queues records in Salesforce and drains them at a scheduled interval. To configure the Batch Drainer Schedule, perform the following steps:
-
Go to CleverTap Settings > Batch Scheduler.
-
Select the action you want to perform:

Configure Batch Drain Schedule
Field Description Schedule Starts the drainer at the current cadence. Visible when no drainer is running. Reschedule Stops the current drainer and re-creates it at the new cadence. Visible when a drainer is running. Unschedule Stops the drainer. Pending records stay in the queue and resume draining the next time you click Schedule. Run Drain Now Fires the drainer once immediately, without waiting for the next scheduled drain. Useful for testing.
Batch Scheduler
The following table lists the components present under the Batch Scheduler section:
| Component | Description |
|---|---|
| Status | Can be Scheduled or Not Scheduled |
| Cadence | The intervals at which the scheduler runs. For example, every 15 minutes. |
| Next run | When the drainer fires next (Local Time). |
| Pending in queue | The number of records waiting to be sent. A badge in orange if the value is more than 0. |
| N scheduled jobs | Number of cron jobs the package created. For more information, refer to Multiple Scheduled Jobs. |
Multiple Scheduled Jobs
Multiple scheduled jobs are created for a single cadence due to the Salesforce platform limitation. Salesforce requires a fixed-minute value in Apex cron expressions and does not support shorthand intervals such as “every 5 minutes” (for example, */5). To achieve sub-hourly schedules, the system creates one job per minute interval.
For example, for a 5-minute cadence, it creates 12 jobs (one for each 5-minute slot in an hour). Similarly, for a 15-minute cadence, it creates 4 jobs.
All these jobs run the same process and together deliver the desired frequency.
Impact
Scheduled jobs count toward Salesforce’s limit of 100 scheduled Apex jobs per org.
| Cadence | Jobs Scheduled |
|---|---|
| 5 min | 12 jobs |
| 10 min | 6 jobs |
| 15 min | 4 jobs |
| 60 min | 1 job |
Choosing Right Cadence
| Use Case | Recommended Cadence | Jobs Scheduled |
|---|---|---|
| Near real-time updates | 5 min | 12 |
| Low latency with lower resource use | 10 min | 6 |
| Standard operations | 15 min | 4 |
| Periodic refresh | 60 min | 1 |
Start with a 15-minute cadence. It offers a good balance between data freshness, system load, and job usage.
Import Custom Objects
Custom objects extend Salesforce beyond the standard data model. As the package cannot include triggers for objects that do not exist at build time, syncing custom objects requires you to set up a Record-Triggered Flow that calls an invocable Apex action (one-time setup per object).
To import custom objects from Salesforce to CleverTap, perform the following steps:
- Configure Sync.
- Create Record-Triggered Flow.
- Verify Custom Object Filter.
Prerequisites
In addition to the usual requirements, the following are prerequisites for importing custom objects:
- The custom object exists in your org (for example,
Property_Lead__c). - The fields you want to sync already exist on it.
- Access to Flow Builder in Setup.
Configure Sync
To configure the sync, perform the following steps:
- Go to CleverTapSettings and click Map Field for the relevant connection.
- Click Add New Sync and enter the following details:
- Source Entity: Choose your custom object. Custom objects show with a [Custom] prefix in the dropdown.
- Target Entity: Select Profile or Event.
- Click Next, configure the following field mappings and click Save:
- Customer ID: This field must map to a unique identifier field on your custom object.
- Event Name: Mapping for this field is required only if the Target Entity is an event. It can have a static value or be mapped from a field.
- Additional Fields: Map any custom fields to CleverTap properties.
Create Record-Triggered Flow
To create Record-Triggered Flow, perform the following steps:
-
Go to Setup from the Salesforce dashboard, then search for Flows in Quick Find.
-
Click New, select Record-Triggered Flow and click Create.
-
Configure the following Trigger:
Field Description Object Your custom object. Trigger the Flow When Select A record is created or updated. Optimize the Flow For Select Actions and Related Records. -
Click Done.
-
Add CleverTap Sync action:
-
Click
+and select Action. -
Search for Send Custom Object to CleverTap and configure the inputs:

Configure Inputs for CleverTap Sync Action
-
Record ID: Set to
{!$Record.Id}(the ID of the triggering record). If the visual picker doesn't show it, click the toggle to switch to manual entry and type{!$Record.Id}literally. -
Object API Name: Enter the API name of your custom object as plain text, for example
CleverTap__Property_Lead__c. This must be a static string, not a field reference.ImportantIn a namespaced org (which yours is, because the package is installed), custom objects you create carry the
CleverTap__namespace prefix. A custom object named Property Lead has the API nameCleverTap__Property_Lead__c, notProperty_Lead__c. Verify the exact API name in Setup > Object Manager > [Your Object] > Details.
-
-
Give the action a label (for example, "Sync to CleverTap"), then click Done.
-
-
Click Save, give the flow a name (for example, Sync Property Lead to CleverTap), and then click Activate.
Verify Custom Object Sync
To verify the custom object sync, perform the following steps:
- Open the custom object tab (for example, Property Leads) and create a new record.
- Open the CleverTap Event Logs tab.
- Find the log entry for the new record.
- Click the row dropdown, then select View Details to view the request and response. A status of Success means the record reached CleverTap.
You can verify the same on the CleverTap dashboard under Segments > Find People . Search the profile by the identity value you mapped.
Points to Remember for Custom Object FilterThe Flow-invocable path does not give the Apex action access to
Trigger.oldMap. Flows pass only the current record, not the prior state. As a result, filter modes behave differently for custom objects:
Filter Mode Behavior None Works as expected. Specific Fields Changed Not supported. Changes cannot be detected, so all updates are synced Condition Based Works as expected. Evaluates current record values only. Field And Condition Condition works, but field-change check does not. Behaves like Condition Based.
Verify Imported Records in CleverTap
After a record is created or updated in Salesforce and a matching sync is active, verify that the data reached CleverTap.
- On the Salesforce dashboard, open the CleverTap Event Logs tab.
- Find the row for the record you are verifying.
- Click the dropdown and select View Details. The following panel displays:
- Status: Success or Failure
- Response: The body CleverTap returned.
- Request: The payload sent (so you can confirm the field mapping resolved correctly).
- Copy the identity value of the record (the
Identitymapping, typically the Email). - From the CleverTap dashboard, go to Segments > Find People and search the profile by Identity.
- Paste the identity value into the input field.
- Click Find. If the sync is successful, the matching profile appears with the attributes you mapped. For event syncs, check the Activity tab.
Historical Sync
Historical sync backfills previously captured Salesforce records into CleverTap. Use this once, right after you set up a new sync, to seed CleverTap with records that existed before the integration was live.
NoteHistorical sync processes all existing records of the selected object that match the filter. On large objects this can take a while, test with a narrow filter first (for example,
CreatedDate = LAST_N_DAYS:7) before doing the full backfill.
To trigger historical sync, perform the following steps:
- Go to CleverTap Settings.
- Under Integration Sync List, find the sync you want to backfill.
- Click the dropdown next to the sync name and select Historical Sync. Historical sync is supported for both standard and custom objects, provided the sync configuration exists and is Active.
You can see the results:
- On Salesforce dashboard: CleverTap Events Logs. It displays the per-record success/failure.
- On CleverTap dashboard: Segments > Find People. It displays the records available for segmentation immediately.
Event Logs & Monitoring
The CleverTap Event Logs tab is your single source of truth for sync activity. Every sync attempt (Real-Time or Batch) produces a log row. Each row displays the following details:
| Column | Description |
|---|---|
| Record | The Salesforce record the log is for. |
| Type | The source entity, for example, Lead, Contact, your custom object, and so on. |
| Status | Success or Failure. |
| Created Date | When the sync was attempted. |
You can view the following details by clicking the dropdown and selecting View Details.
- Request body: The JSON payload that was sent to CleverTap. Confirms that your field mappings produced the values you expect.
- Response body: What CleverTap returned. On failure, this usually tells you exactly what went wrong (invalid identity, unknown event property, rate-limit error, and so on).
Error Responses
Common Failure Responses
The following are the common failure responses:
| Response | Description | Resolution |
|---|---|---|
Invalid identity | Customer ID mapping produced an empty or invalid value. | Verify the mapping points to a populated, stable field. |
Rate limit exceeded | You are sending more than CleverTap's project rate allows. | Switch the sync to Batch mode, or lower the cadence. |
Unknown event name | Event Name mapping produced an empty value. | In the sync, set Event Name as a static string, or map it to a non-null field. |
| Network error | Transient. | Record will retry on the next drainer tick (Batch mode) or on the next record change (Real-Time). |
Best Practices
Identity mapping
Accurate user attribution depends on consistent identity across syncs. Follow these rules when mapping Customer ID:
- For Profile Imports: Use the record's Email field (Lead.Email, Contact.Email) wherever possible. Emails are usually unique and stable. Avoid mutable fields like phone numbers, and avoid Salesforce record IDs — the same human has different IDs as a Lead versus a Contact, and your CleverTap profile would split.
- For Event Imports: Use the same identity field you used for the profile. If Lead profiles sync on Lead.Email, Opportunity events should also be attributed to Email (typically via the related Contact.Email), so events land on the right profile.
- For Custom Objects: Apply the same principle. Pick one stable, unique field per object and reuse it across the profile sync and any event syncs on that object.
CleverTap recommends having one identity field per person across profile and event sync. Also, before a full historical backfill, run a test sync with a narrow filter (for example, 10 records) and confirm the profiles appear correctly in CleverTap. You must write down your org's identity strategy somewhere your marketing, analytics, and CRM teams can find it.
Avoid Duplicate Syncs for Same Object
If you create two Active Sync configurations for the same source entity, each record change will be sent twice. The package displays a warning when you save the second configuration and identifies the overlap. To resolve this, deactivate the unwanted configuration or use separate target entities (for example, one for profiles and one for events) so they can work together without duplicating data.
Real-Time vs. Batch
A simple rule of thumb:
- For a Live campaign trigger, you can select Real-Time.
- For Profile enrichment/analytics/backfill, select Batch and start with a 15-minute cadence.
- In the case of Mixed needs for the same object, you can configure the following two syncs: Real-Time for the marketing-critical fields, and Batch for everything else.
Filters to Save API Volume
If a sync fires on every record update (including noise such as Description updates), you end up consuming API volume. A simple Specific Fields Changed filter on the handful of fields that marketing actually cares about (Status, LeadSource, Email) can cut callout volume by 10x on an active org with no loss of information.
Troubleshooting
Records Not Syncing At All
| Issue | Cause | Resolution |
|---|---|---|
| No event log appears after creating a record | Your Record-Triggered Flow (custom object) is not activated. | Open the flow in Flow Builder and click Activate. |
| No event log appears after updating a standard object | The sync is Inactive. | Go to CleverTap Settings > Integration Sync List and check the Status column. |
| No event log appears, even though the sync is Active | The filter is rejecting the record. | Temporarily set Filter Mode to None and try again to isolate. |
The event log shows failed for every record | The connection credentials or region are incorrect. | Edit the Connection and verify Account ID, API Passcode, and Region against the CleverTap dashboard. |
Custom Object-Specific
| Symptom | Cause | Resolution |
|---|---|---|
| No event log appears after creating a record | The Record-Triggered Flow is not activated. | Open the flow in Flow Builder and click Activate. |
| No active sync configuration found | The sync for this custom object does not exist or is Inactive. | In CleverTap Settings, verify that the sync exists with Status Active and Source Entity matches the custom object's API name exactly. |
| Missing required input parameter: recordId | The Flow Record ID input is mapped to the wrong field. | Edit the Flow action and set Record ID to {!$Record.Id} (not Owner ID or any relationship field). |
| Object API Name shows "bad value for restricted picklist" | You're on an older version of the package. | Install the latest package version, the Source Entity field is unrestricted in current versions. |
| Custom object doesn't appear in the Source Entity dropdown | Browser cache, or the object doesn't meet criteria. | Hard-refresh the browser (Cmd+Shift+R or Ctrl+Shift+R). Ensure the object is accessible and queryable, and is not a Custom Setting, Metadata Type, Platform Event, Big Object, or External Object. |
| Error: "SOQL error on field name" | A custom field API name is misspelt in the sync mapping. | Verify the field API name under Setup > Object Manager > [Your Object] > Fields & Relationships. |
Batch/Scheduler
| Symptom | Cause | Resolution |
|---|---|---|
| Pending queue count keeps growing and never drains | No drainer is scheduled. | Go to CleverTap Settings > Batch Scheduler and click Schedule. |
| The queue drains, but records keep re-entering the queue | Trigger firing twice per record change (Lead Assignment Rules, workflows, and so on). | This is expected behavior, and the dedup-at-enqueue logic prevents duplicate sends. Check the actual CleverTap event count rather than the queue fire count. |
Records marked Failed after 5 attempts | Configuration error or persistent CleverTap API issue. | Click View Details on the log entry to see the exact error. Fix the cause, then either delete the failed rows (they will not retry automatically) or re-enqueue them manually. |
| "Scheduled Apex limit exceeded" error when scheduling | Your org has too many other scheduled jobs. | Pick a longer cadence (60 min uses 1 slot vs 12 for a 5-min cadence), or reduce other unrelated scheduled Apex. |
Filter/Validation
| Symptom | Cause | Resolution |
|---|---|---|
| "Next" button stays greyed out on the sync form | Filter expression is invalid. | Check the inline error message under the expression editor. Common causes: unbalanced quotes, unknown field name, trailing AND/OR. |
| Specific Fields Changed does not affect the custom object | Flow-invocable path has no access to Trigger.oldMap. | Move the field-change check to the Flow Entry Conditions using ISCHANGED(). For more information, refer to Verify Custom Object Sync. |
FAQs
The following are some of the frequently asked questions for Salesforce Import:
What is historical data import?
Historical import backfills previously captured Salesforce records into CleverTap, making CRM data created before the integration was set up available for segmentation, analysis, and engagement. Works for both standard and custom objects.
Can I create multiple sync configurations for the same Salesforce object?
Yes. The following are some of the use cases where you can create multiple sync configurations for the same Salesforce object:
- Push the same object to multiple CleverTap accounts (different regions or business units).
- Separate profile and event syncs from the same object (one profile-target, one event-target).
- Use different field mappings for different CleverTap use cases.
Each sync configuration operates independently, with its own mapping, target entity, connection, delivery mode, and filters. If you create overlapping active configurations, a warning is displayed so you can review and adjust if needed.
How does Dedupe at enqueue work?
In Salesforce, it is common for triggers to fire multiple times during a single record creation. This happens because features such as Lead Assignment Rules, workflows, duplicate rules, and before-save Flows often perform an immediate follow-up update after the initial insert.
As a result, a newly created record may trigger:
- Once on insert
- Again, on the subsequent update, this is how Batch mode handles it.
To prevent duplicate sends, Batch mode deduplicates records at enqueue time. If a record already has a Pending queue entry for a given sync configuration, additional enqueue attempts are ignored.
For example, there are three new Leads, which means there will be three queue entries and three events in CleverTap (even if each trigger fires multiple times). Real-Time mode does not include this deduplication, as the callout happens synchronously within the trigger. If you see duplicate events in Real-Time mode, it likely means your org has automation that updates records immediately after insert.
To address this:
- Accept the duplicate behavior, or
- Add a Specific Fields Changed filter, or
- Switch the sync to Batch mode for built-in deduplication
How do I sync custom objects?
Custom object sync requires two setup steps:
- Configure the sync in CleverTap Settings, selecting your custom object from the Source Entity dropdown.
- Create a Record-Triggered Flow in Salesforce that invokes the Send Custom Object to CleverTap action.
For more information, refer to Import Custom Objects.
Why don't custom objects sync automatically like Leads and Contacts?
Standard objects have pre-built Apex triggers included in the managed package. These fire automatically on create or update. Custom objects are created after the managed package is installed, and a managed package cannot include triggers for objects that do not yet exist. The invocable Apex action + Record-Triggered Flow combo achieves the same result; it is a one-time setup per custom object.
What types of custom objects are supported?
Any standard custom data object. Automatically excluded: Custom Settings, Custom Metadata Types (__mdt), Platform Events (__e), Big Objects (__b), External Objects (__x), and internal package objects.
What is the API name format for custom objects in a namespaced org?
When the CleverTap managed package is installed, custom objects you create carry the CleverTap__ namespace prefix. A custom object named Property Lead has the API name CleverTap__Property_Lead__c. Verify the exact name in Setup > Object Manager > [Your Object] > Details > API Name.
What happens when a sync fails?
Failed syncs land in CleverTap Event Logs with the CleverTap API response. Click View Details to see the request payload and the response body. In Batch mode, failures auto-retry up to 5 times before being marked Failed; in Real-Time mode, there is no automatic retry.
Can I deactivate a sync without deleting it?
Yes. Go to CleverTap Settings > Integration Sync List, click the dropdown next to the sync name, and select Deactivate Sync. The mapping is preserved, and you can reactivate it later.
Does Real-Time mode have duplicate protection like Batch mode does?
No. Real-Time fires the callout synchronously inside the trigger; there is no queue to dedup against. If your org has automation that updates records right after insert (Assignment Rules, workflows, flows), Real-Time mode will see each trigger fire and make a callout for each. Use the Specific Fields Changed or Condition-Based filter to cut the noise, or switch to Batch mode, which does dedup.
Why does Batch mode create so many scheduled jobs?
Salesforce's Apex scheduler rejects any "every N minutes" shorthand in cron expressions. To achieve sub-hourly cadence, the package creates one scheduled job per fire-minute (12 jobs for a 5-min cadence, 4 for a 15-min cadence, and so on). They all run the same code. For more information about how it affects your org's scheduled Apex limit, refer to Configure Batch Drainer Schedule.
How do I reduce callout volume on a high-traffic Salesforce org?
Three levers, in order of effectiveness:
- Add a Specific Fields Changed filter on the fields marketing actually cares about.
- Switch to Batch mode at 15 or 30-minute cadence.
- Use a Condition-Based filter to cut out records that aren't relevant to CleverTap at all (e.g. Status != 'Closed Lost').
Can I edit a sync after it's live?
Yes, click Edit on the sync row. You can change filters, delivery mode, and mappings. Changes take effect immediately for all new record changes after save.