Create Message
Learn how to create a Push campaign using the CleverTap dashboard.
Create a New Push Campaign
Create a campaign to deliver your push message.
To create a new campaign:
- From the dashboard, select Campaigns.
- Click + Campaign.
- From the Messaging Channels list, select the Push Notifications.
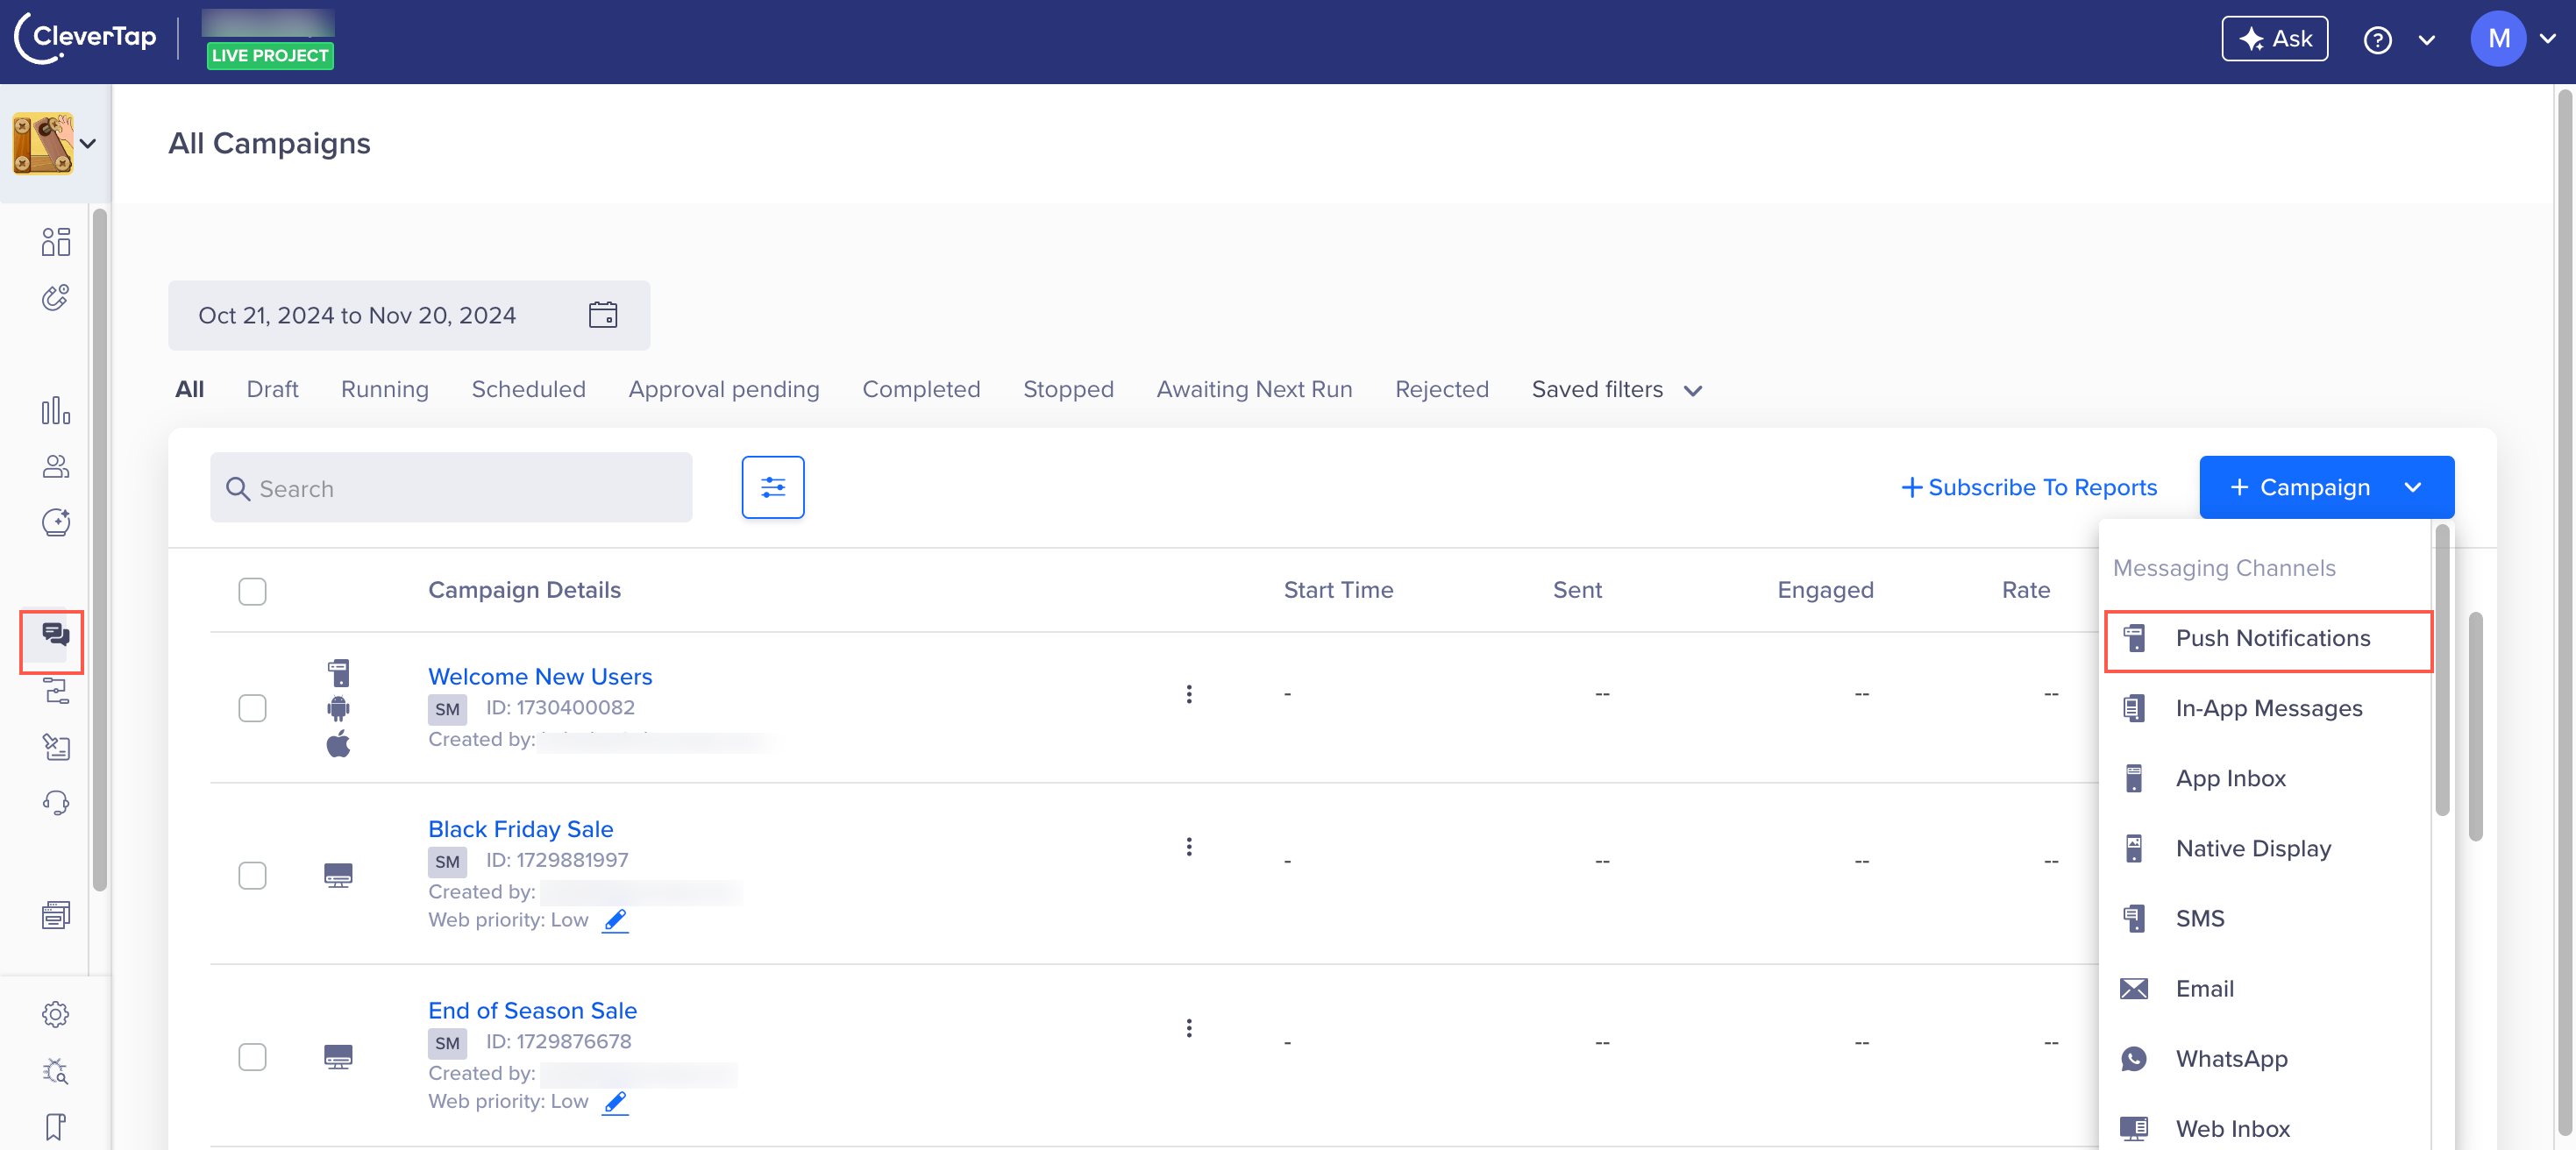
Select Messaging Channel
The Push Notification campaign page displays.
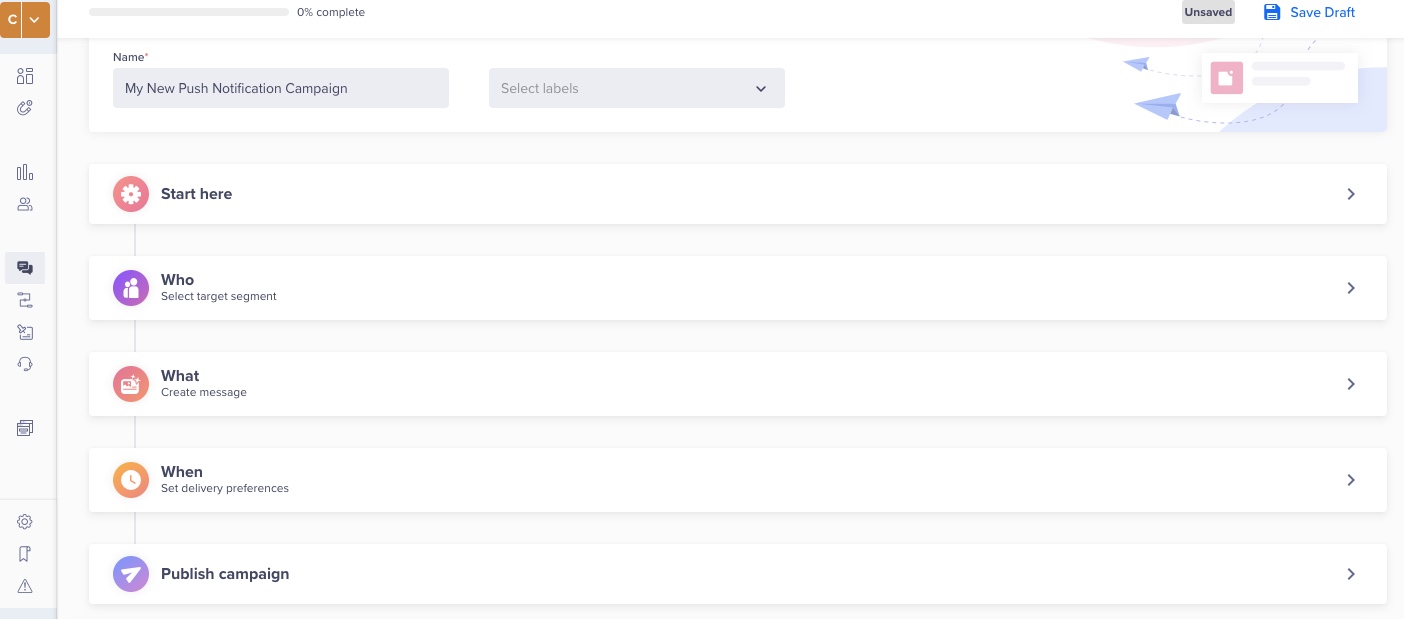
Create Campaign
- Define all the sections and publish the campaign.
Start Campaign Setup
The Start here section displays the setup information.
This section has the following parts:
- Integrated Platforms: Displays the information on platforms such as FCM, Xiaomi, or iOS. Check that the required platforms are integrated and ready for campaigns.
- Qualification criteria: Delivers the notification by Past behavior /Custom list, Live behavior, or External trigger. For more information about segmenting users, refer to Segments.
- Set a goal: Tracks your campaign conversions by setting a goal. This step is optional, but it helps you measure how effectively your campaign meets its goal.
You can define your conversion goal by selecting the Event and specifying the Conversion Time. The Conversion Time field accepts any numeric value along with a time unit such as Minutes, Hours, Days, Weeks, or Months. This allows you to define conversion windows such as 10 days, 72 hours, or 2 months. The value can range from a minimum of 1 minute to a maximum of 5 months.
For example, if you set the conversion time to 5 Minutes, the system counts conversions within 5 minutes of the goal event.
Your campaign goal can be as broad or as specific as you want. For example, you can answer questions such as: How many users were influenced to purchase an X amount? or How many first-time visitors purchased red shoes worth at least X and blue jackets worth at least Y?
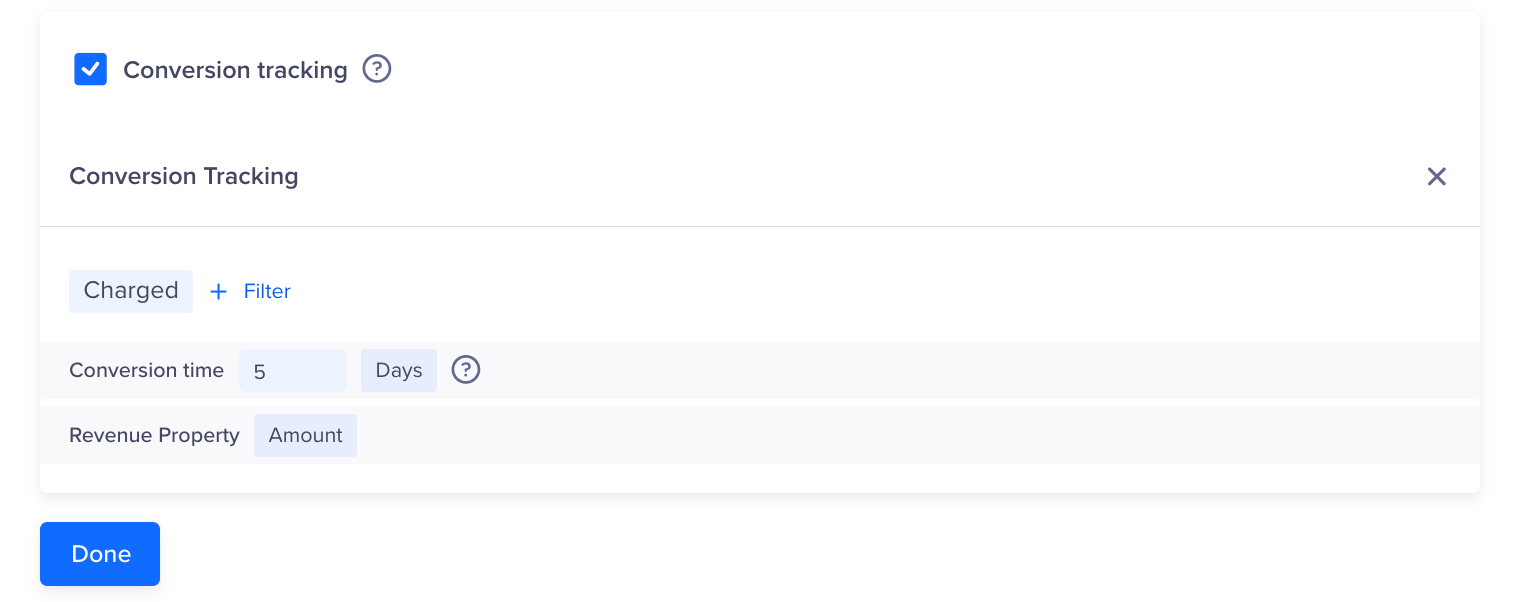
Set Conversion Time
Define the Audience-Who
You must indicate the target audience for your campaign from the Who section. You can specify your target audience from the Target segment section. You can create a new segment or use a previously saved user segment from the segment list.
For Past Behavior segments, you also calculate the estimated reach.
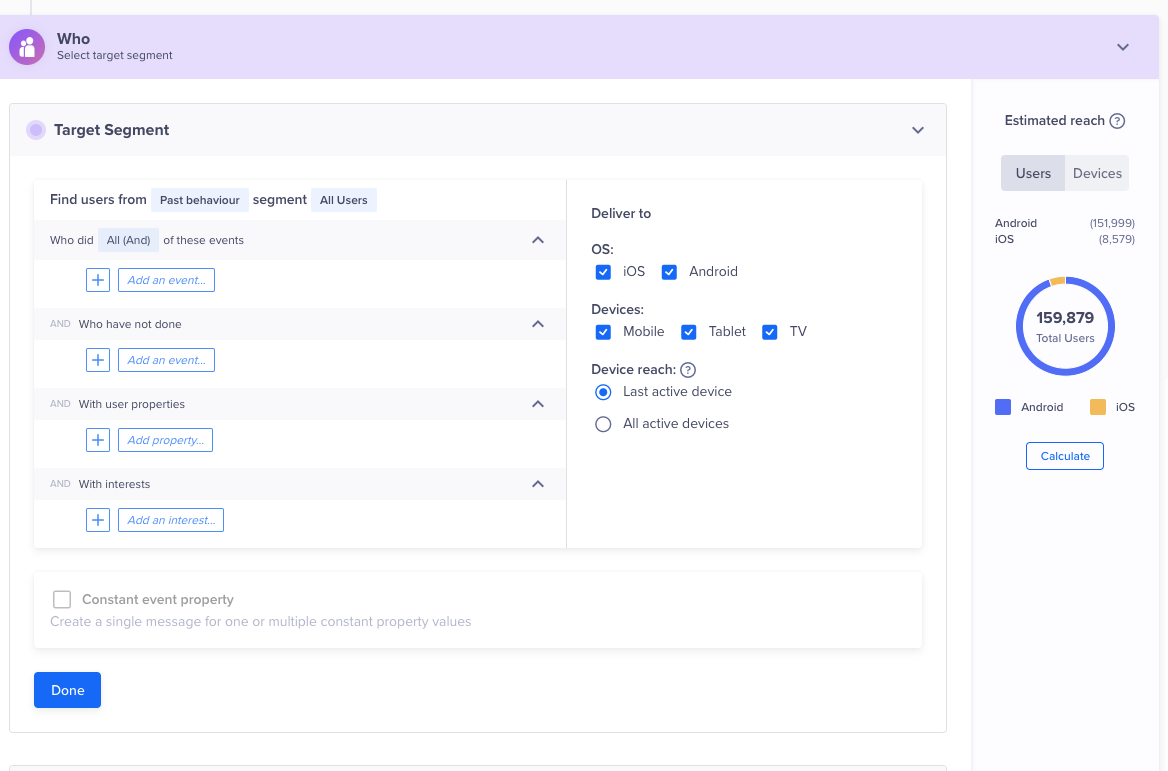
Define Target Segment - Who
Segment
If you want to create an ad-hoc segment, you can select a type of segment on which to base your campaign. You can create the target based on past user behavior and user properties or live (ongoing) user behavior. The latter is helpful to send out real-time, triggered campaigns.
Delay > 24 HoursWe recommend creating a Past Behavior campaign for all campaigns where the delay is greater than 24 hours for a live inaction campaign.
For instance, you can create a live Inaction within time campaign that targets users as soon as they add a product to their cart but do not finish transacting within 10 minutes; that is the golden window within which most users transact on iOS and Android app platforms.
On this basis, you would then set up the Who by sending this campaign to all users who qualify or limit the users who qualify under Estimated reach.
Deliver Action-Based Messages
You can trigger a message based on an action. Users receive messages when they perform an action in the app instead of waiting for the next app launch. It makes the messages more contextual and increases conversion. Campaigns with delays and app inbox coupled with a push message do not trigger instant messages.
Deliver Messages based on Past Behavior (PBS)
You can also target users their past user behavior. For past behavior campaigns, you also have an option to calculate estimated reach. The estimated reach shows the number of users that qualify for the campaign criteria and the number of reachable users via mobile push.
Filter by User Properties
Using the With user properties filter in the Who section, you can segment your campaign to reach users who meet specific criteria.
For example, you can send a push notification to English-speaking female users who live in the United States.
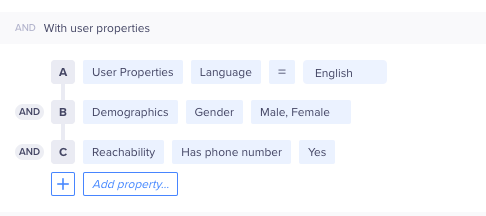
Filter by User Properties
The following table explains the various property types:
Property Type | Description | Example |
|---|---|---|
User Properties | Custom user profile properties that you define and send to CleverTap. | Customer Type = Platinum |
Demographics | Demographics filters include Age and Gender. | Age = 25 to 40 years |
Geography | User's coarse location. Filters include Country, Region, and City. CleverTap's SDK can automatically detect this from the user's IP address. | Country = United States |
Geography Radius | User's exact location. You can select a city, and then define the target radius. You can also select multiple cities. You can send this information using CleverTap's SDK. For more information, refer to the iOS and Android developer guides. | Locations = San Francisco, USA; Paris, France |
Reachability | ||
App Fields | App fields filters include App Version, Device Make, Device Model, OS Version, and CleverTap SDK Version. This information is sent by CleverTap's SDK for each device that has your app which means a single user can have multiple devices associated with their user profile. | OS Version = 10 |
To know more about what segments can be used, see Segments.
Constant event property
This is an advanced feature that allows you to hold a property constant across the selected events. For more information, refer to Constant Event Property.
Calculate Estimated Reach
The Estimated Reach option allows you to preview how many users meet your targeting criteria in an online trigger campaign before publishing it. This helps you validate audience size and adjust filters to ensure the campaign reaches the intended users.
Estimated Reach is particularly useful when you select the Filter on past behavior and user properties option. You can view both the estimated user count and device count.
To calculate the estimated reach, perform the steps below:
- Select Filter on past behavior and user properties.
- Click Calculate in the right panel. The result shows the estimated number of users or devices for that segment. You can view the following:
- Total Users: The number of users that match the filters.
- Breakdown by Platform and Devices: The users count on Android, iOS, or both, and on different devices.
- Visual Indicator: A chart summarizing the share by operating system.
The estimate, based on the latest available event data, updates each time you apply or modify filters. It reflects stored event data and is not a real-time count. This helps you plan and refine your audience before sending the campaign.
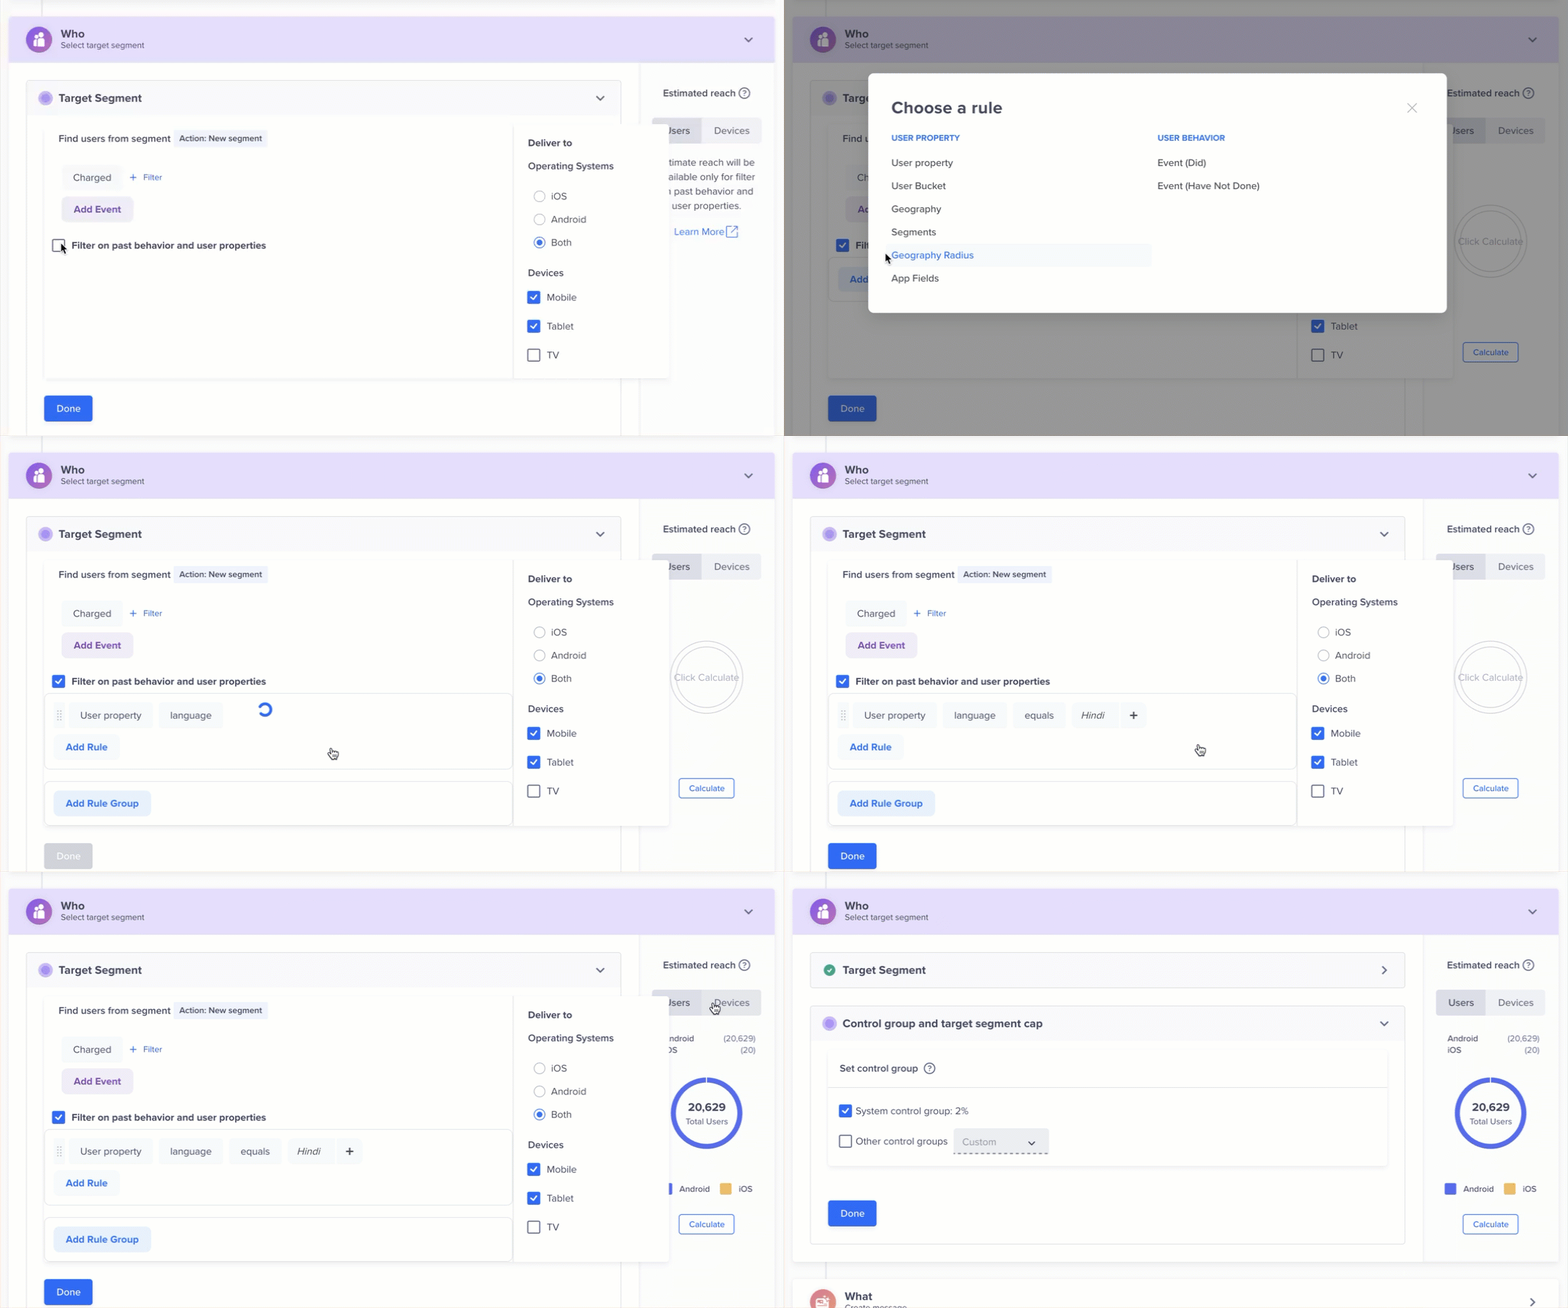
Calculate Estimate Reach
Control Group
You can define the control group to compare and measure the results of your campaign. For more information on control groups, see Control Groups.
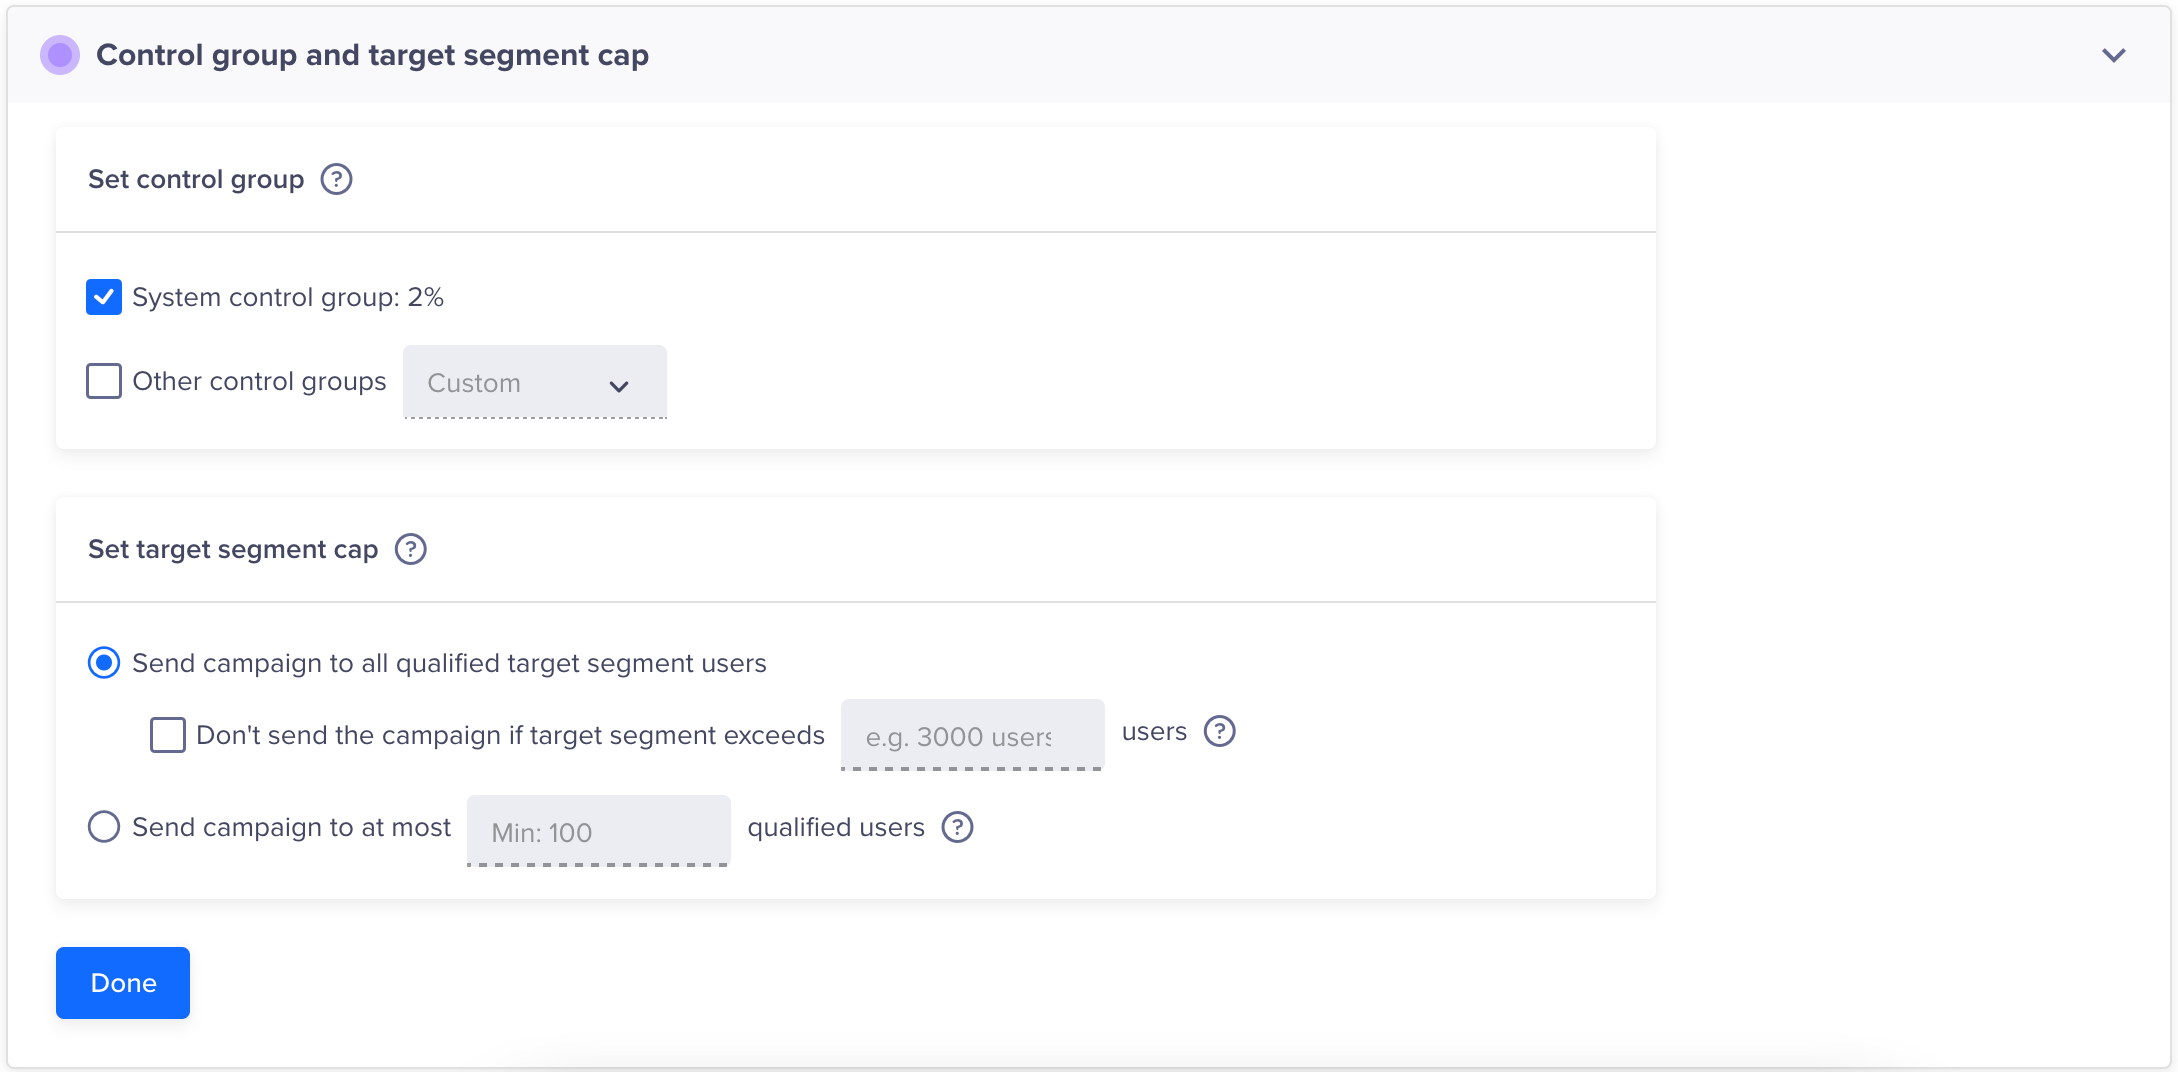
Control Group
Targeting Cap
You can limit the number of users receiving the message.
A relevant use case is a limited offer where you want to distribute a fixed number of coupon codes. If the total reach for your campaign exceeds the number of coupon codes you can distribute, then you can limit the number of users who will receive the message to precisely the number of coupons you want to distribute.
Campaign Limit
- Ensure that you set a limit of at least 100, regardless of the qualified user segment size.
- For Past Behavior A/B Test campaigns, CleverTap recommends setting the Send campaign to at most value slightly above the Variant distribution percentage. Click Calculate to find the estimated reach of the campaign and adjust the value accordingly. For example:
Qualified users = 2000
Variant distribution = 10%
Calculated users for the variant = 200
Recommended cap: Slightly above the Calculate users for the variant value (for example, 210)
This ensures the campaign limit accounts for the A/B Test sample size, enabling the declaration of a winner without the campaign getting stuck.

Target Cap in Campaign
Define Message Content- What
You can have up to four variations of message content in the What section:
Message Types
You can create the following types of messages for your notification:
- Single Message
- AB Test
- Split Delivery
- By User Property
Single Message
This message type allows a single message copy to be set up for the entire audience. This message copy can be personalized for each qualifying user. This message type is best suited for use cases where the message doesn’t vary much based on user properties such as language, geography, and so on.
A/B Testing
A/B testing helps you understand what type of message copy works best to get clicks from users.
You can test up to three message variants on a test group, and the variant that gets the most clicks is declared the winning variant and is automatically sent to the rest of your target audience.
When creating multiple variants for a campaign, you can also auto-copy what is already present in a current variant.
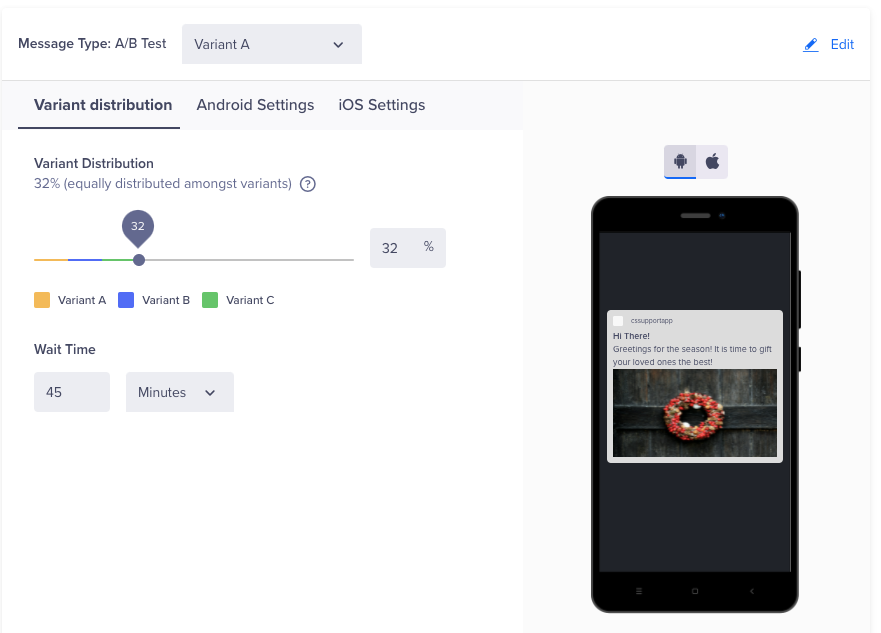
A/B Test Variant Distribution
A/B Testing for Past Behavior Segments
For campaigns sent to Past Behavior Segments (grouping of users based on what they have done in the past), you have two options: launch the A/B test to a percentage of your target audience or send out an absolute number of messages. In either case, we deliver the variants equally to the test audience.
For example:
- If you test three messages (Variant A, Variant B, Variant C).
- Your campaign reach is 2,000,000 users.
- Your test population is 15% of the campaign reach (300,000 users).
Then, we send:
- Variant A to 100,000 users.
- Variant B to 100,000 users.
- Variant C to 100,000 users.
After delivering 300,000 messages, we calculate the winning message over this test group based on the number of click-throughs. In this example, we then automatically send the winning message to the remainder of your target audience, which is 1,700,000 users.
Note that for A/B testing, we ensure there is always an equal number of messages sent for each variant, so there is no bias introduced during the test phase and that the best-performing message is always declared the winner.
A/B Testing for Live User Segments
With campaigns sent to live user segments (triggered campaigns), messages are delivered immediately when a user’s activity matches your selected criteria. For example, you can send a message when the user has completed a booking or purchase. Because it is impossible to determine the reach of triggered campaigns upfront, you need to decide how many total messages to send for A/B testing before a winner is declared.
Triggered Campaign ExampleIf you select 500 users as your test audience, we will alternate delivery of Variant A and Variant B as users qualify for the campaign. After a total of messages are sent (Variant A – 250 and Variant B – 250), we then decide the winner based on the number of clicks and continue only with this winning message for the duration of the campaign.
Deciding on a test audience for A/B testing triggered campaigns requires some estimation. We recommend you check the total messages sent for similar triggered campaigns in the past to get a sense of how many users may qualify. If you select a test audience that is too small such as 25 users, you will get a statistically insignificant sample. Suppose your test group size exceeds the total number of users who ultimately qualify for that campaign. In that case, no winner will be declared, and each message variant will be alternatively delivered for the campaign's duration.
Split Delivery
For some campaigns, you want to send multiple variants of a message to your entire target audience without selecting a winner. With split delivery, you choose what percentage of your target audience receives each variant and we deliver them accordingly. After the campaign is completed, navigate to the campaign stats to compare how each message performed.
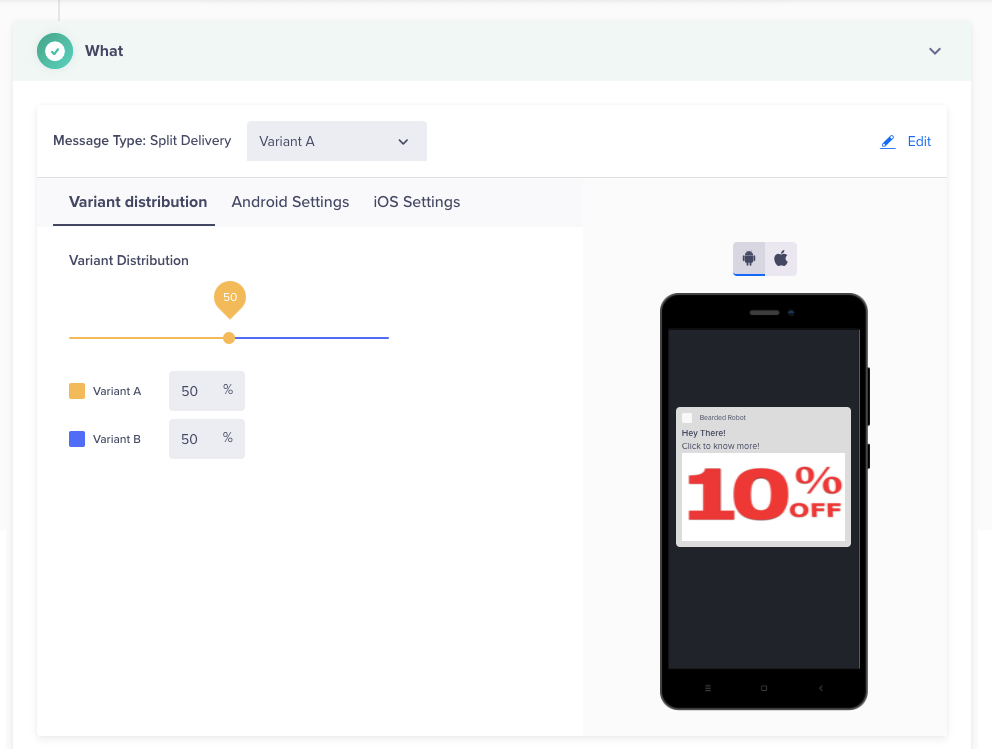
Split Delivery Variant Distribution
You can add up to three message variants when creating a campaign. You specify the percentage of your audience that will receive each variant. The messages are delivered in the specified proportions throughout the campaign.
For example:
If you have a campaign reach of 2,000,000 users and you want to test three variants (A, B, and C) with equal distribution, you might set it up as follows:
- Variant A: 33.33% (approximately 666,667 users)
- Variant B: 33.33% (approximately 666,667 users)
- Variant C: 33.33% (approximately 666,667 users)
After the campaign is completed, you can analyze the performance of each variant.
By User Property
If you would like to send different message variants to your target audience based on the user properties they possess, this campaign type is your best bet. A good example would be sending a localized update to people based on their preferred language.
Similar to creating A/B test variants, you can use the + button to add multiple variants based on a user property value.
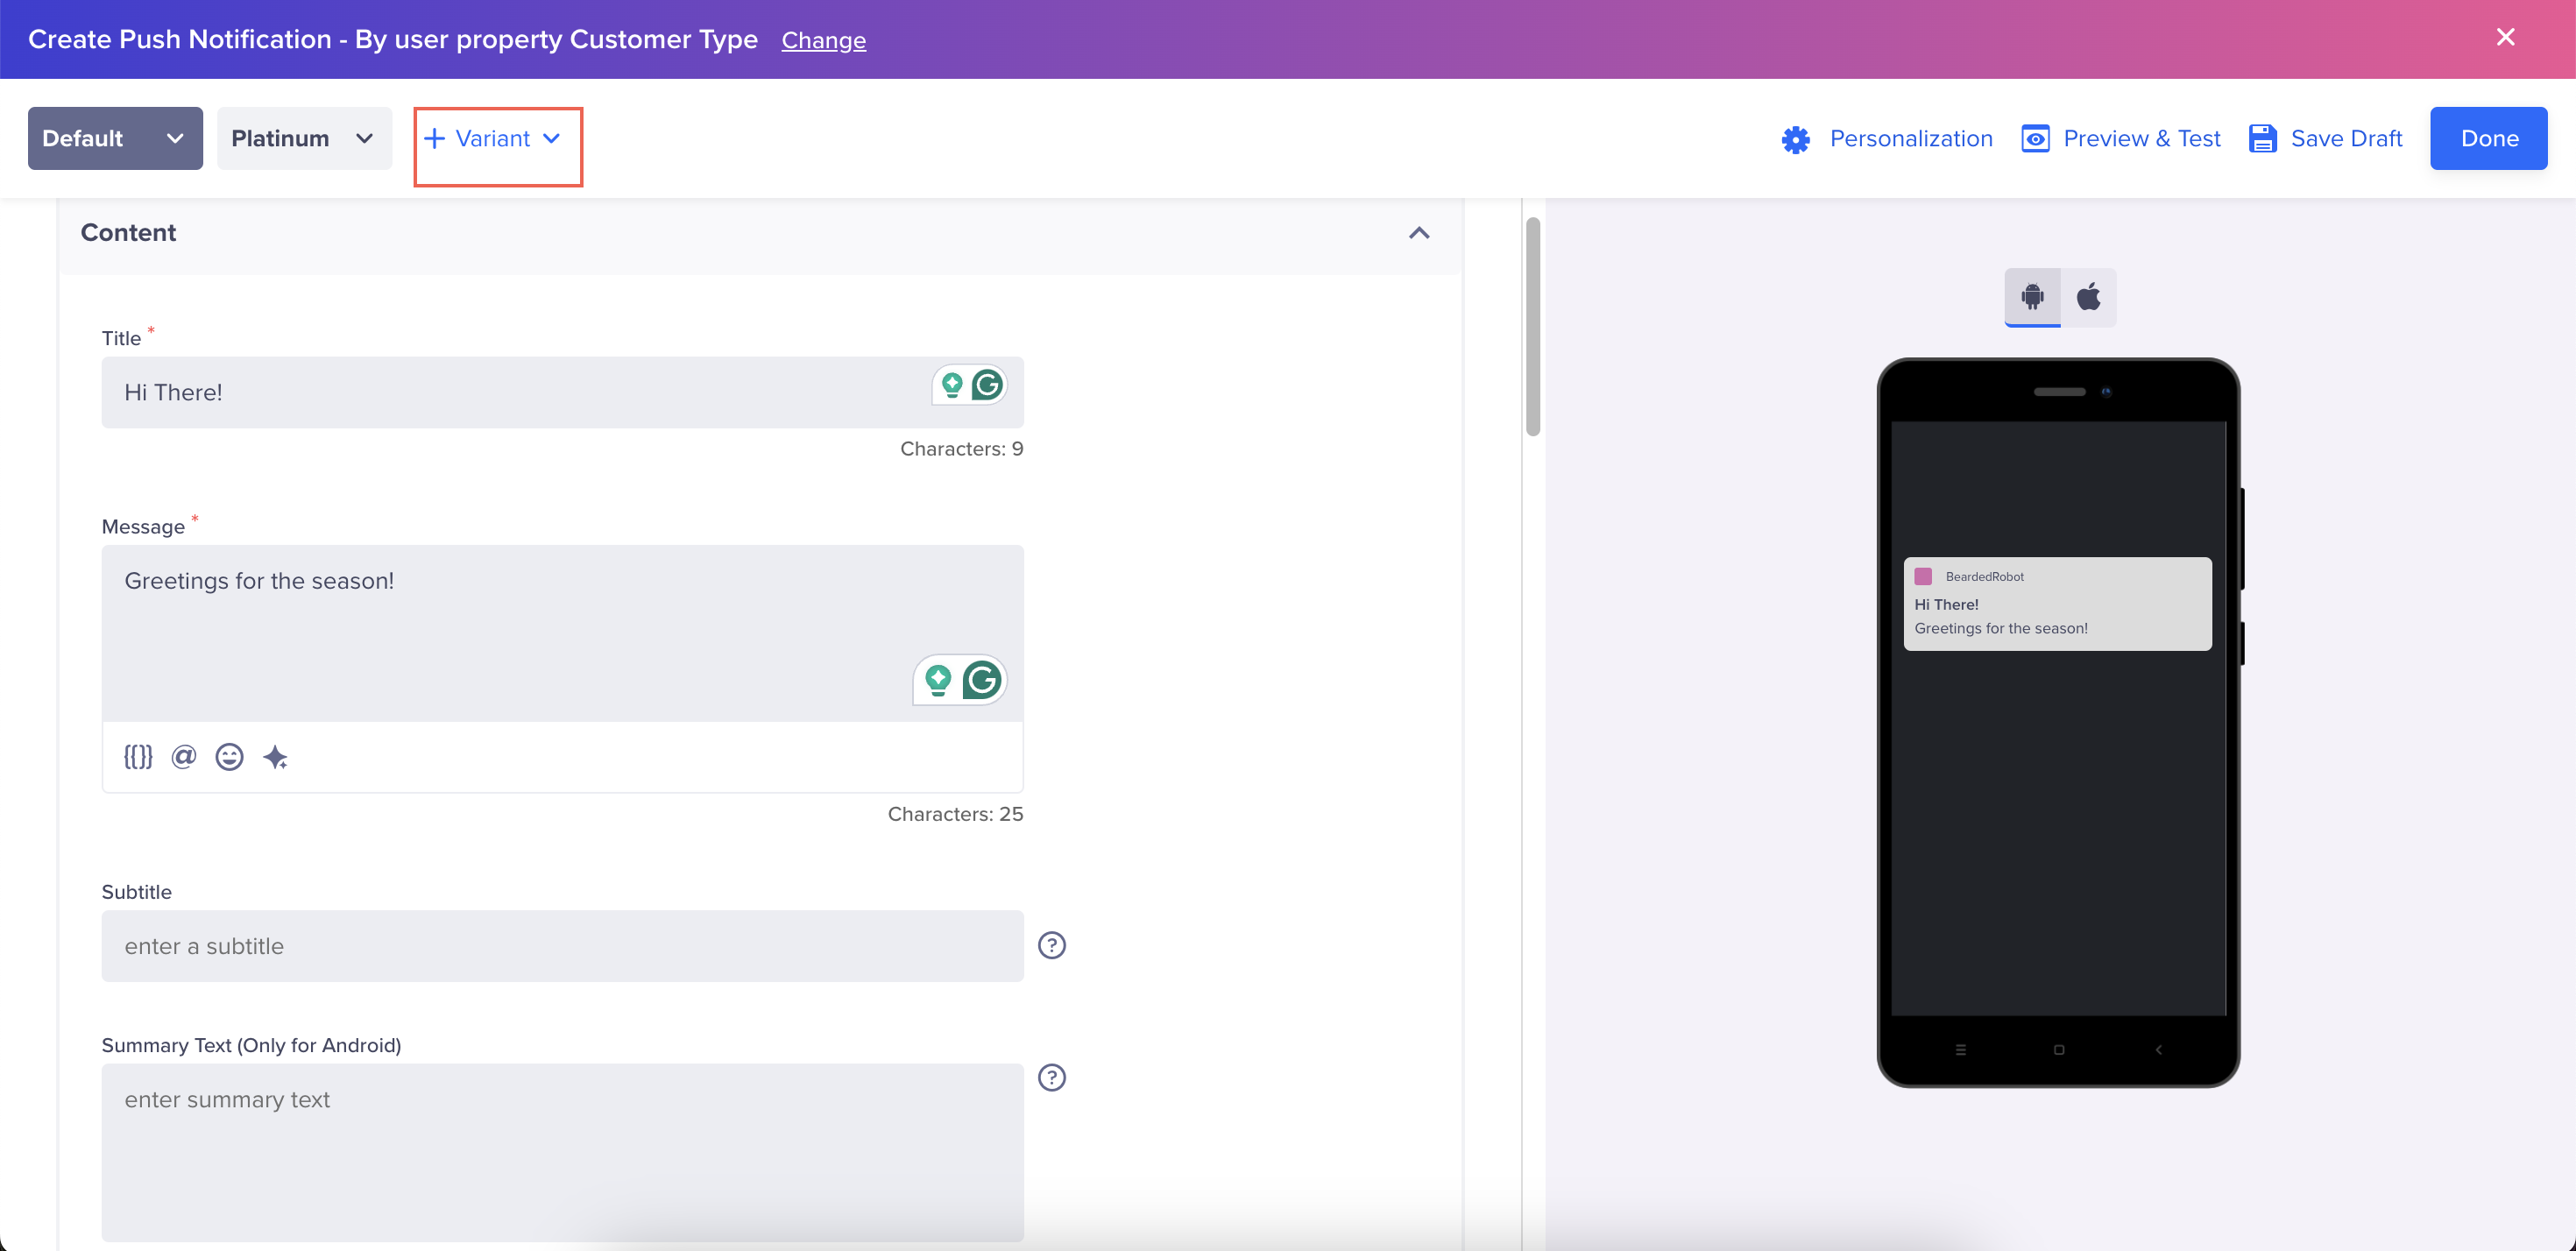
Message Variant by User Property
In the example below, we have used the Customer Type user property so users with different customer type property values receive corresponding copies of the campaign based on their different levels (Silver, Gold, or Platinum).
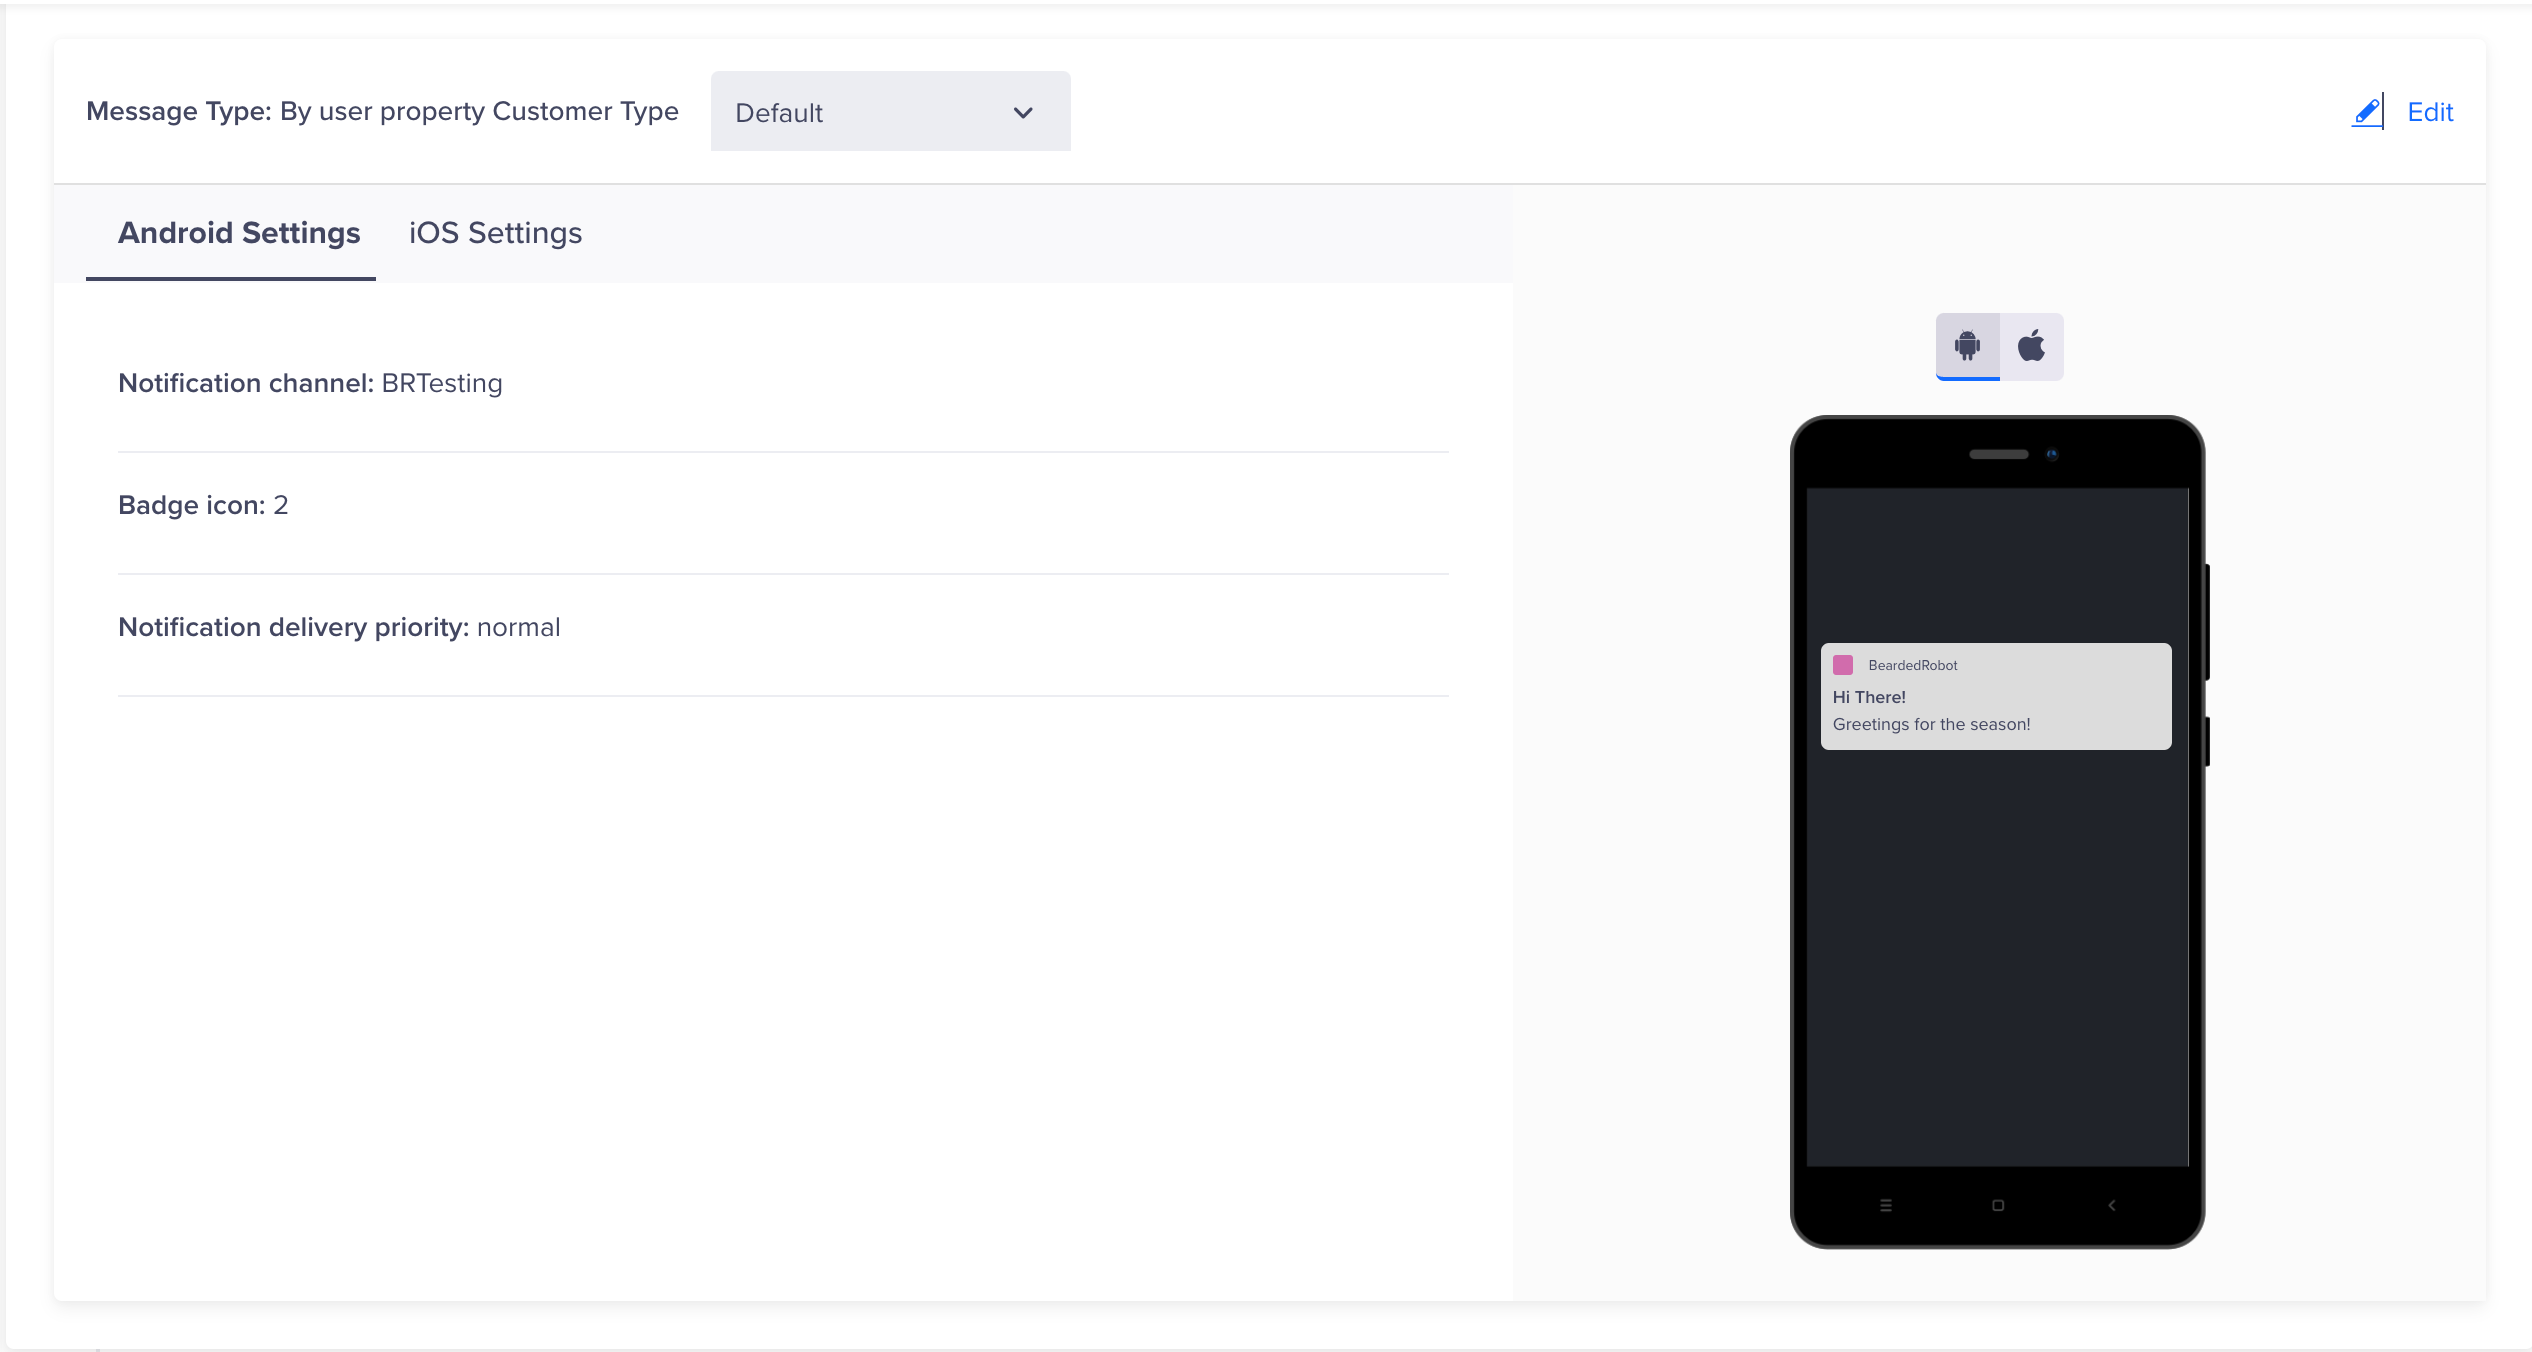
Message by Customer Type
Define Campaign Schedule- When
You can set up the When section to schedule the campaign start and end using the options below:
Past behavior campaigns can be scheduled to run:
- On a specific date and time.
- On multiple specified dates and times.
- Recurring at a periodicity you set.
Live campaigns can be set up on a specific event:
- In response to a user event.
- User event/inaction combination (e.g., abandoned cart scenario).
- Based on a date event property value of an event (for example, a reminder for upcoming travel booking).
Delivery preferences
You can apply global campaign limits to determine how many push notifications each app user receives per day. If you want to override these settings for an important campaign, you can click on the Don’t apply global campaign limits to this campaign checkbox.
You can also click the Advanced checkbox to specify Do Not Disturb (DND) hours during which notifications from this push campaign are prevented from going out, either by discarding them or delaying delivery after DND hours such as 9 PM to 9 AM.
Since past behavior campaigns can have scheduled times, you have the option to stop a campaign delivery after a certain cut-off time or even deliver at the specified time in the user’s timezone. For more information, refer to Delivery in User’s Timezone.
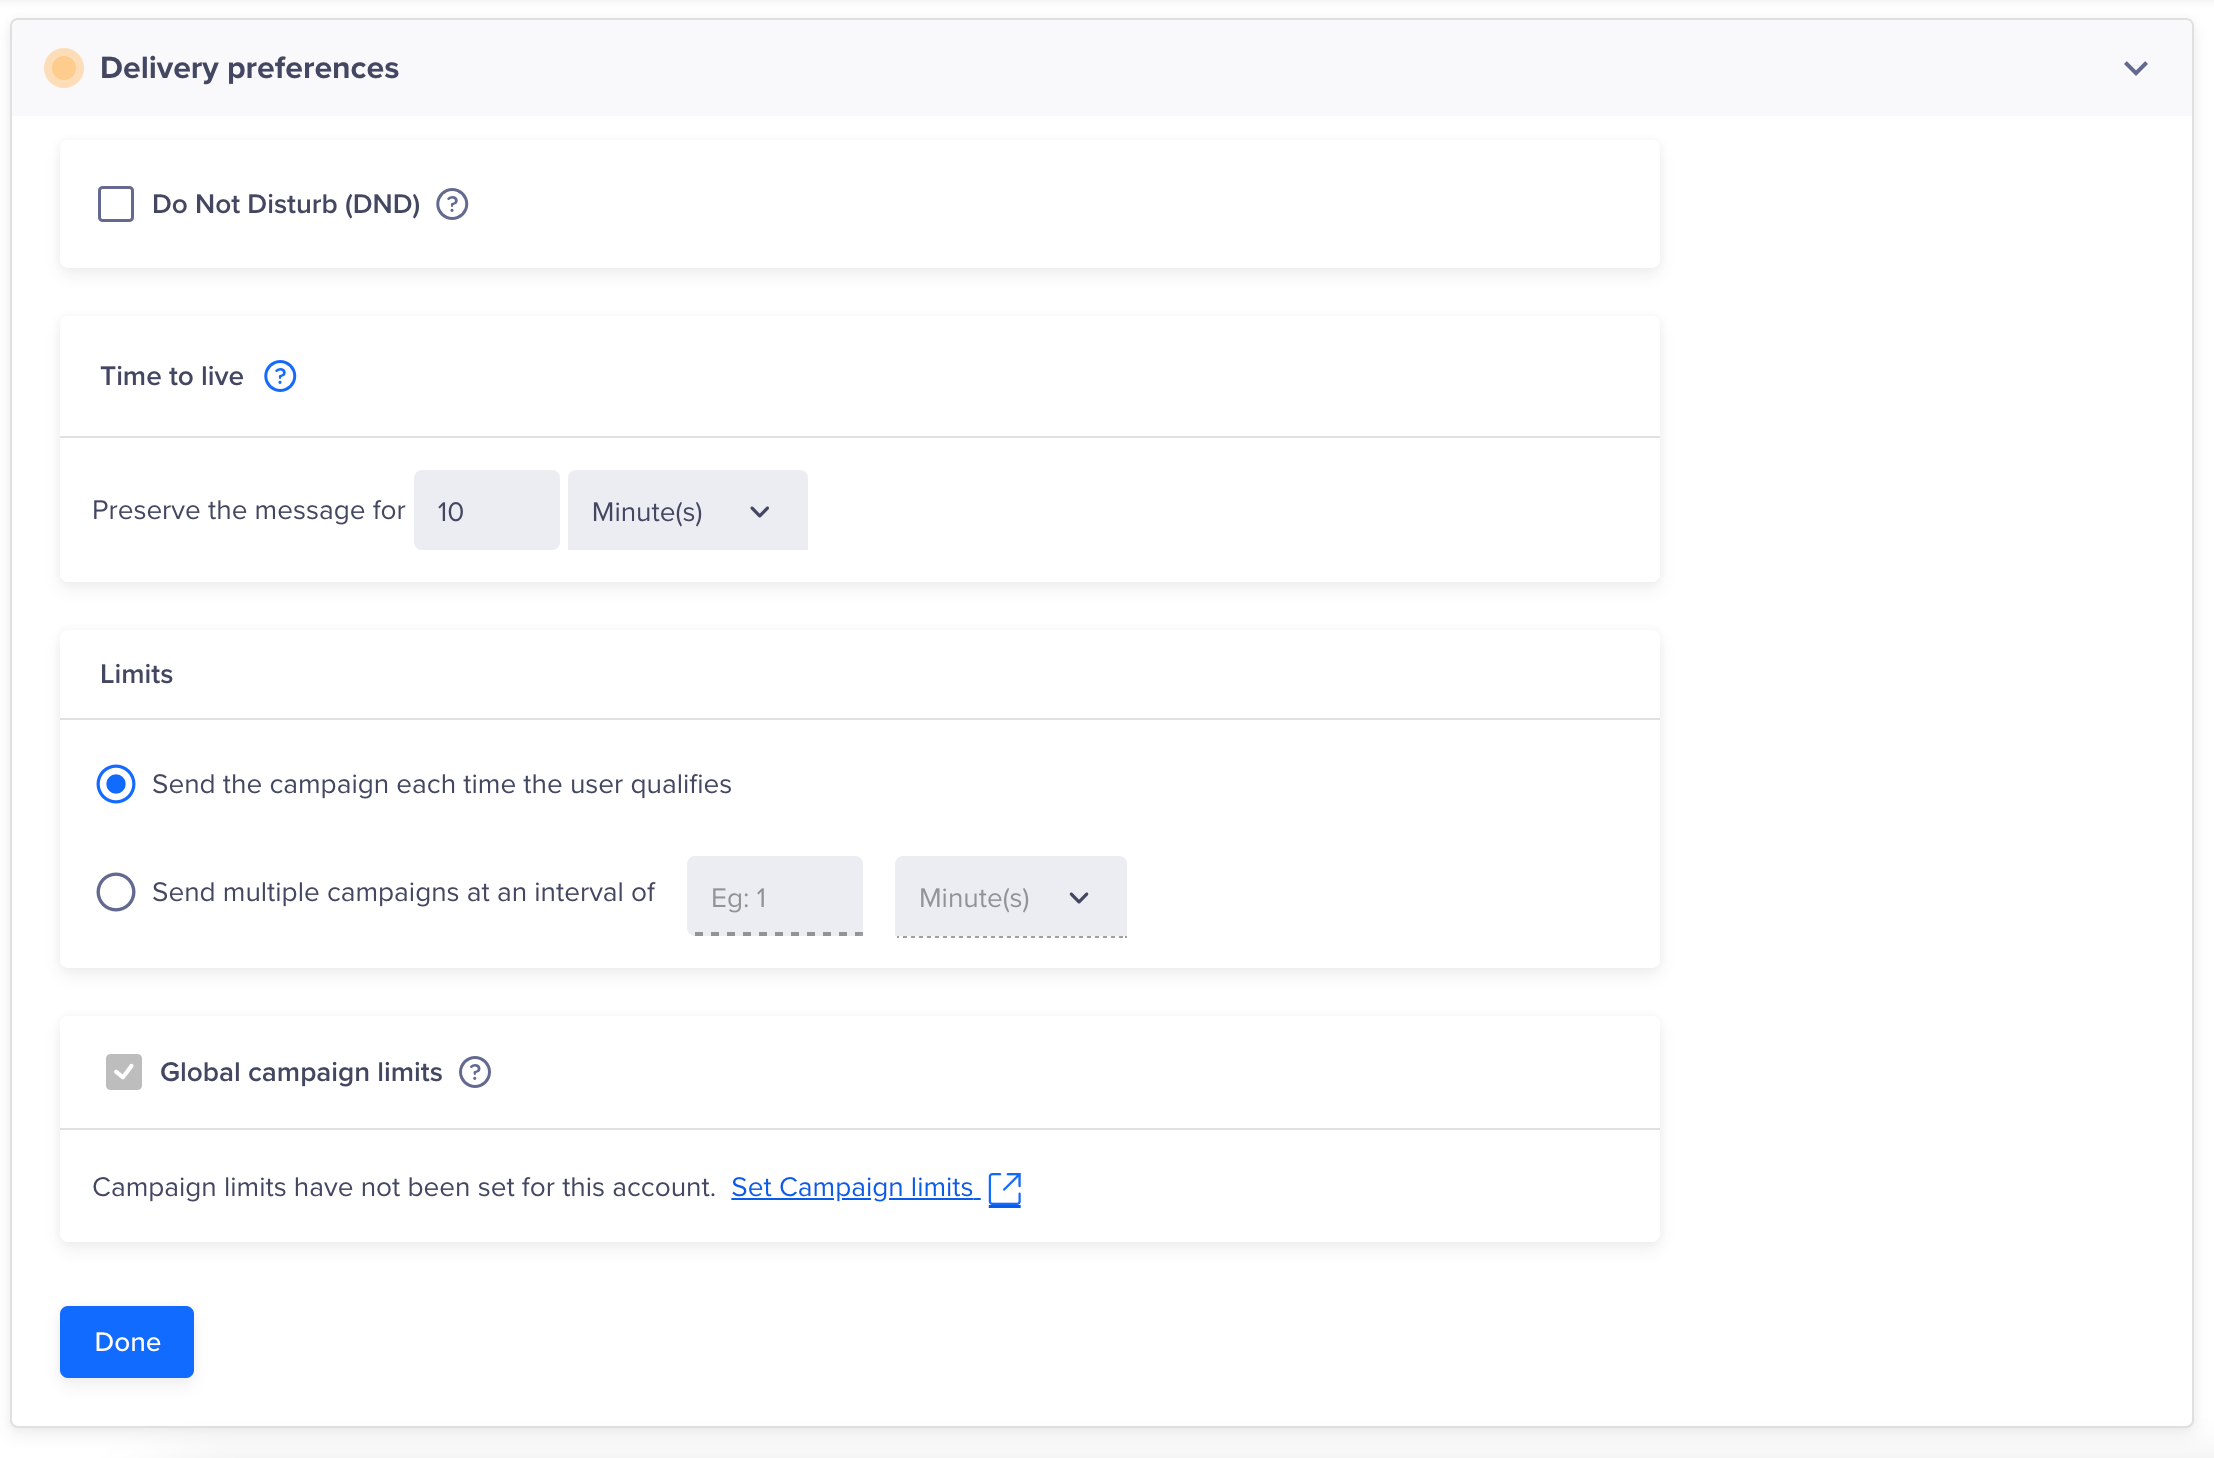
Message Delivery Preference
Recurring DayIf you specify a recurring day for a campaign such as the 7th of each month, then the campaign will start for the specified day and ignore the creation date. This is a precaution to avoid sending a campaign unintentionally on a prior date.
Time to Live
Time to Live is the notification's persistence sent to an end user. Push services such as FCM, APNS, XPS, Baidu, and HMS manage Time to Live. They regulate the time the system monitors user device status to deliver a push notification. Whenever the user is online during the set TTL period, the notification is delivered. Any user not coming online will not receive the push notification, and no notifications are attempted after the TTL period is over.
There are two ways to configure the TTL for push notification delivery. Conceptually, they are referred to as Relative TTL or Absolute TTL.
- Relative TTL: Push services attempt to send the notification only for the duration mentioned here. Specify the duration you want the notification to live.
Select the first option to specify a TTL duration and ensure a push notification is active until the user is online if unavailable and there are no hard time limits. - Absolute TTL: Push services send the notification only until the specified time here. State the time until when you want the notification to live.
Select the second option to specify a TTL time limit to ensure a push notification is active until the specified date and time.

Time to Live for a Message
NoteAbsolute TTL is available only for the following campaign types:
- Send Now
- Schedule for later except recurring schedules and Best time for every user.
Absolute TTL is not available if global throttle limits are applied.
Relative TTL is available for all campaign types.
Use Cases
| Industry Type and Target Group | Need | Don't Need | TTL Selection |
|---|---|---|---|
| A ride-sharing app running campaigns to target office-goers in the morning. | They want the push notification to be sent to office goers during the morning peak hours, ideally between 7:30 and 10:30 a.m. | Notification should not be sent in the afternoon as it loses the relevance. | They would keep the campaign scheduled time at 7:30 a.m. and set the relative TTL for 3 hours. This would ensure that the notification is sent between 7:30 a.m. and 10:30 a.m. |
| A cricket information app wants to provide latest updates to their users' regarding the cricket match/es scheduled for the day. | They want to send a push notification to their users advising on the coin toss of a particular match scheduled at 7pm. | Notification should not be sent after 7:10 pm as it is no more relevant. | Campaign will be triggered at 7 pm and the absolute TTL will be set to 7:10 pm. Any user who comes online after 7:10 pm will not get the notification even if they qualified initially. |
Cut-off
The campaign cut-off time defines a daily boundary for message delivery and ensures no notifications are sent after the specified time. Select the Cut-off checkbox and specify the time to stop sending the notification when the number of target users is large, causing a significant delay in processing the user queue. This is useful if the campaign is time-sensitive and a later time makes the notification irrelevant.
However, it is important to note:
- This setting does not stop the entire campaign permanently if there are notifications left to dispatch.
- If there are notifications that could not be delivered before the cut-off time (due to throttling or queue backlogs), those will be sent after midnight on the next day, assuming they are still eligible for delivery.
TipIf you want to ensure that undelivered messages do not get sent the next day, you can combine the cut-off setting with a DND window or restrict the campaign’s end date/time.

Campaign Cut-Off Time
For example, if a campaign is configured with a Throttle limit (100 messages/minute) and a Cut-off time of 9:00 PM, then Clevertap does not send notifications to the push services after that time on that particular day. Instead,
- Message delivery will pause at 9:00 PM.
- Any unsent notifications from the queue will resume delivery the next day at 12:00 AM.
Use Case
| Industry Type and Target Group | Need | Don't Need | Usage Scenario |
|---|---|---|---|
| An e-commerce app has around 10 million users and is running a 'Discount' sales offer which would end at 12 am. | They want to send the push notification to all of their users at the same time. | Notification should not be sent after 12 am as the notification would lose its relevance. | Assuming that the processing of the user queue takes 10 mins, set the cutoff to 11:50 pm. |
Preview & Test
Once you are all done setting up the content of your campaign in the What section, you have the option to send a test push notification to any CleverTap user profile you have marked as a Test profile. You can also send a test message to your internal audience with personalized values. For more information, refer to Preview & Test.
Click the Preview & Test button from the message editor to test a message.
Publish Campaign
After testing and once you are satisfied with the appearance of your campaign, finalize your campaign with the following steps:
- Click Continue to view your campaign summary. The overview page displays.
- View your campaign summary, then click Publish Campaign.

Publish Campaign
Explore our Push Notification: Best Practices blog for actionable insights on crafting compelling push notifications.
Check out our Creative Push Notifications guide for ideas that go beyond the basics and drive engagement.
Updated about 1 month ago
