Product Experiences (Legacy)
This document explains our Legacy Product Experience features.
Feature AvailabilityA new and enhanced version of Product Experiences is now available. New customers (CleverTap for Enterprise or CleverTap for Startups) who have not enabled the legacy functionalities can use this feature. The methods for the legacy Product Experiences feature have been deprecated and will be removed from the code. The existing users can continue to use the legacy Product Experiences till September 2024.
Overview
With Product Experiences, you can change the behavior and appearance of your app remotely without an update. This helps you to deliver in-app personalization experience to your app users and test their response. You can use product config to modify app behavior and feature flags to add or remove features from your app without performing an app store deployment.
You can remotely configure your app with product config. The configuration can be anything, including the look and feel of the app and the workflow for users.
For example, you want to enable dark mode on your app; however, you want the following additional options:
- You want to test it first on iPhone users who live in New York.
- You must also be capable of disabling the feature if it needs more work.
You can create a product config for this improvement and test the response to your app. Before using product config, you must complete the necessary setup.
Set up
To run a product config or a feature flag, you must create keys and segments for your app.
Create Keys
These are the keys that you have defined in your app code. You can map these keys from the CleverTap dashboard and control the configuration of your app.
To create keys:
- Navigate to Product Experiences > Setup > Keys
- Click +Key to create a new key.
NoteThe name of the key defined here must match the name of the key defined in the app. This name cannot be changed later. You can add up to 500 keys.
- Add the Key definition.
You can now activate or deactivate the dark mode based on the keys. The default value that the app is expecting for this key is 3. These values are set in your app. Assume the key value 3 means activate the feature, and 4 means to deactivate the feature.
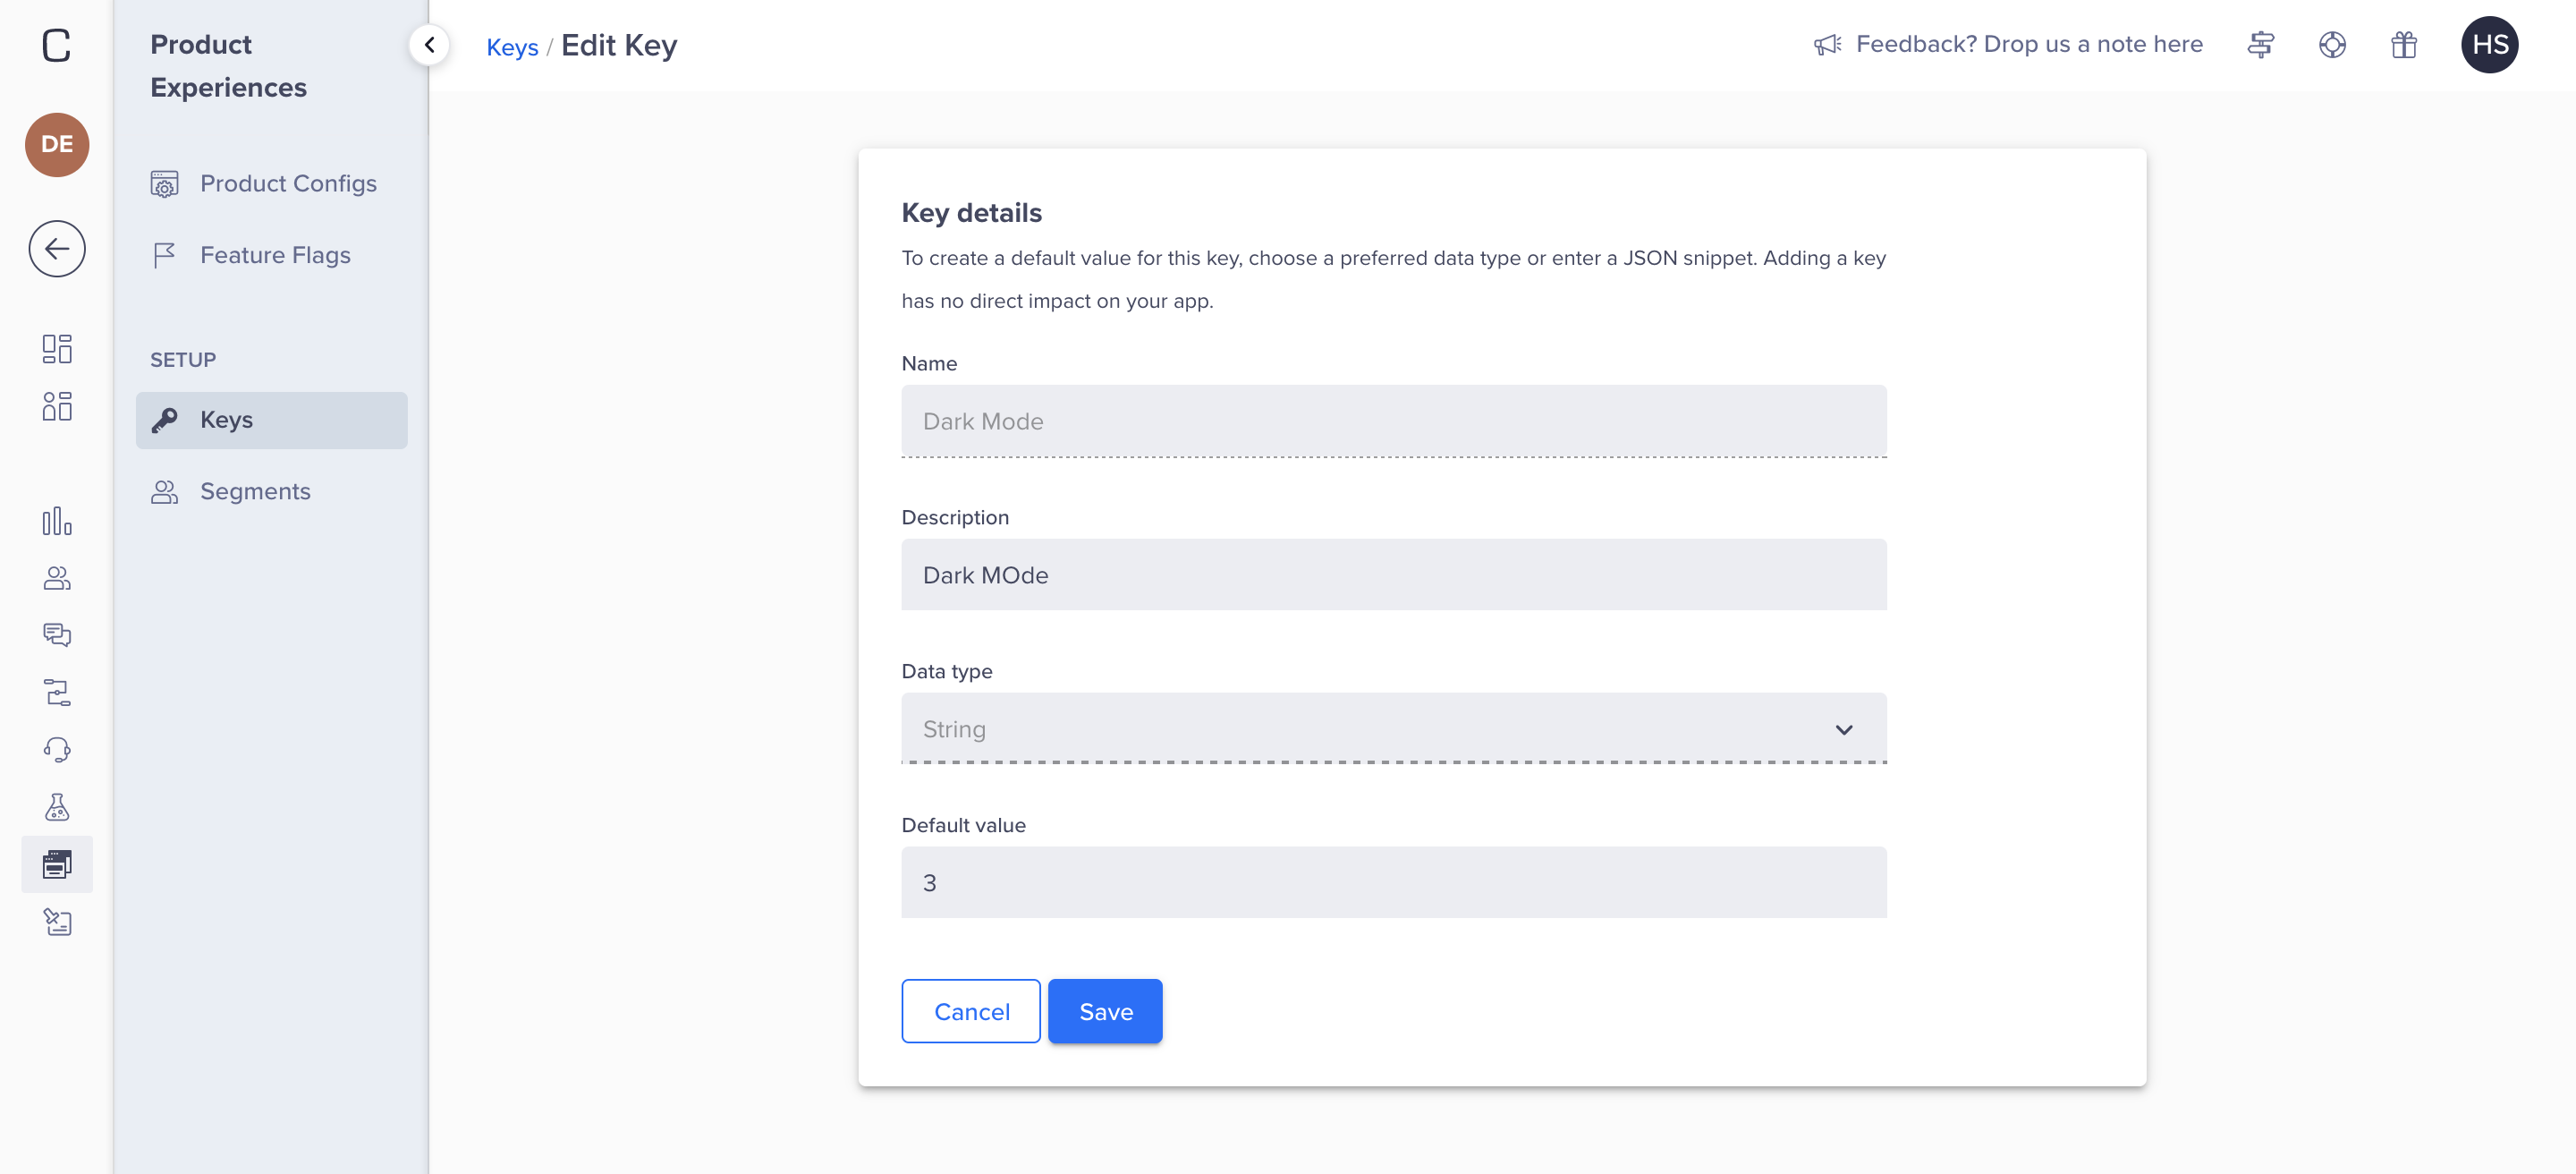
- Click Save. The
dark_modekey is now listed on the Manage Keys page.
Edit/Archive Keys
To edit/archive keys:
- Navigate to Product Experiences > Setup > Keys. The Keys page displays.
- Click the ellipsis menu to edit or archive a key. Only the default value and description can be edited after saving a key.
You can view all the archived keys by selecting the Archived Keys box at the bottom of the key's list. If a key is used in a product config or feature flag then it cannot be archived.
Create Segments
The segments are the target users who will receive app changes.
To define the segments:
- Navigate to Product Experiences > Setup > Segments
- Click +Segment to create a new segment.
- Name the segment.
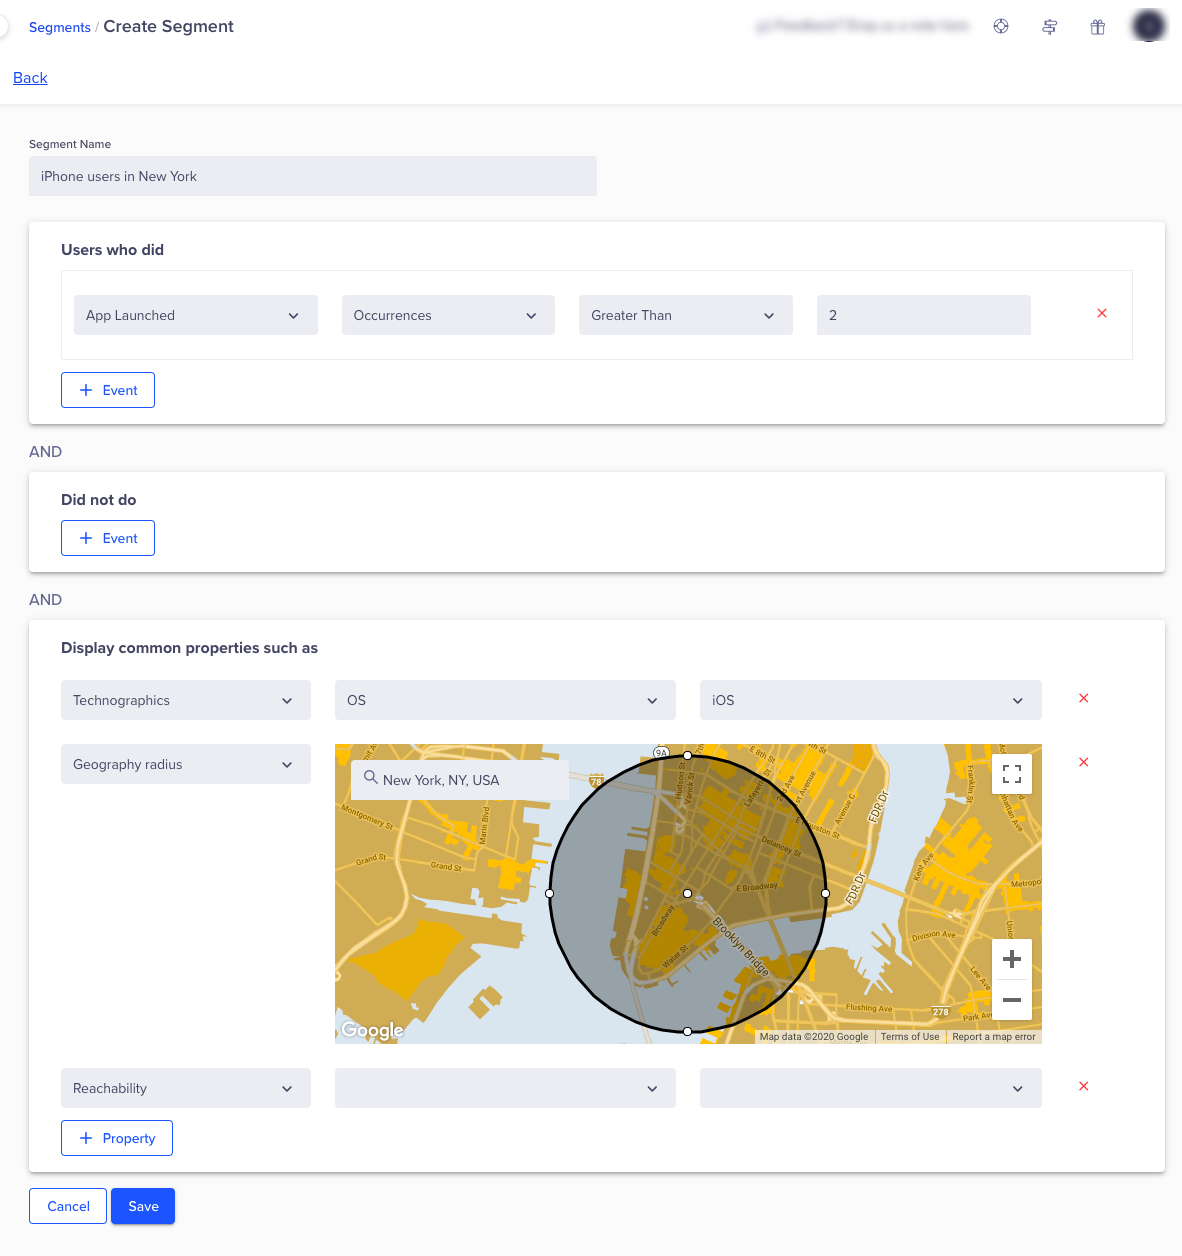
- Create a segment by users who performed and/or did not perform an event. You can also create segments for user properties such a demographics, geography, and so on. For our example, create a segment of iPhone users living in New York.
- Save the segment.
Edit/Clone a Segment
To edit/clone a segment:
- Navigate to Product Experiences > Setup > Segments. The Segments page displays.
- Click the ellipsis menu to edit or clone a segment. For example, you may want to edit the city and create another user segment for Miami.
Product Config
Create Product Config
You can have multiple members of your team create product config with multiple keys and segments. You can then group these keys.
To create a product config:
- Navigate to Product Experiences > Product Config. The Product Config page displays.
- Click the +Product Config button to create a new product config. The create a Product Config page displays.
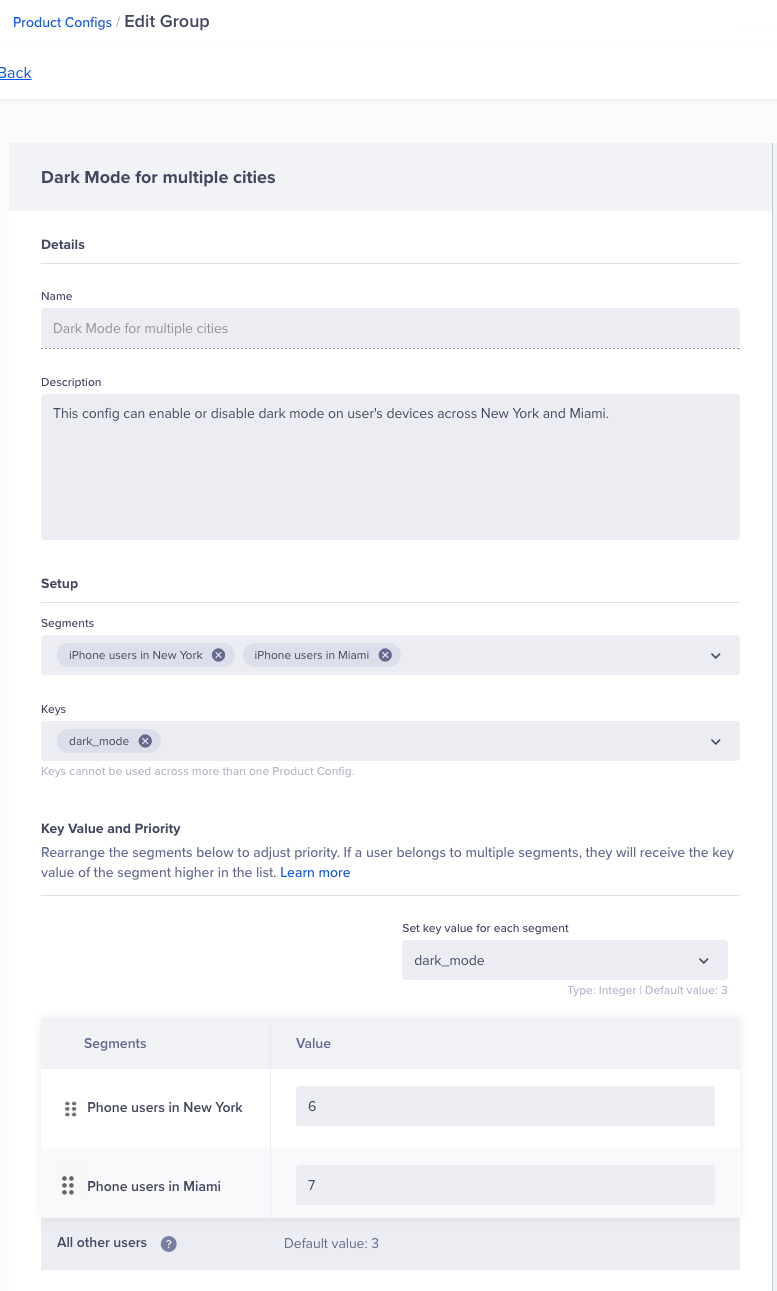
- Enter the name and description for your product config. For our example, name the product config as dark mode.
- Select the Segments and Keys for your product config group. The keys are the keys that you have assigned in your app for each element or feature and the segments are the group of users who will receive this feature.
For example, select the "iPhone users in New York" and "iPhone users in Miami" as Segments and "DarkKey" as the_Product Config Key. For more information on creating keys, refer to Keys.
NoteA key can only be used in one product config.
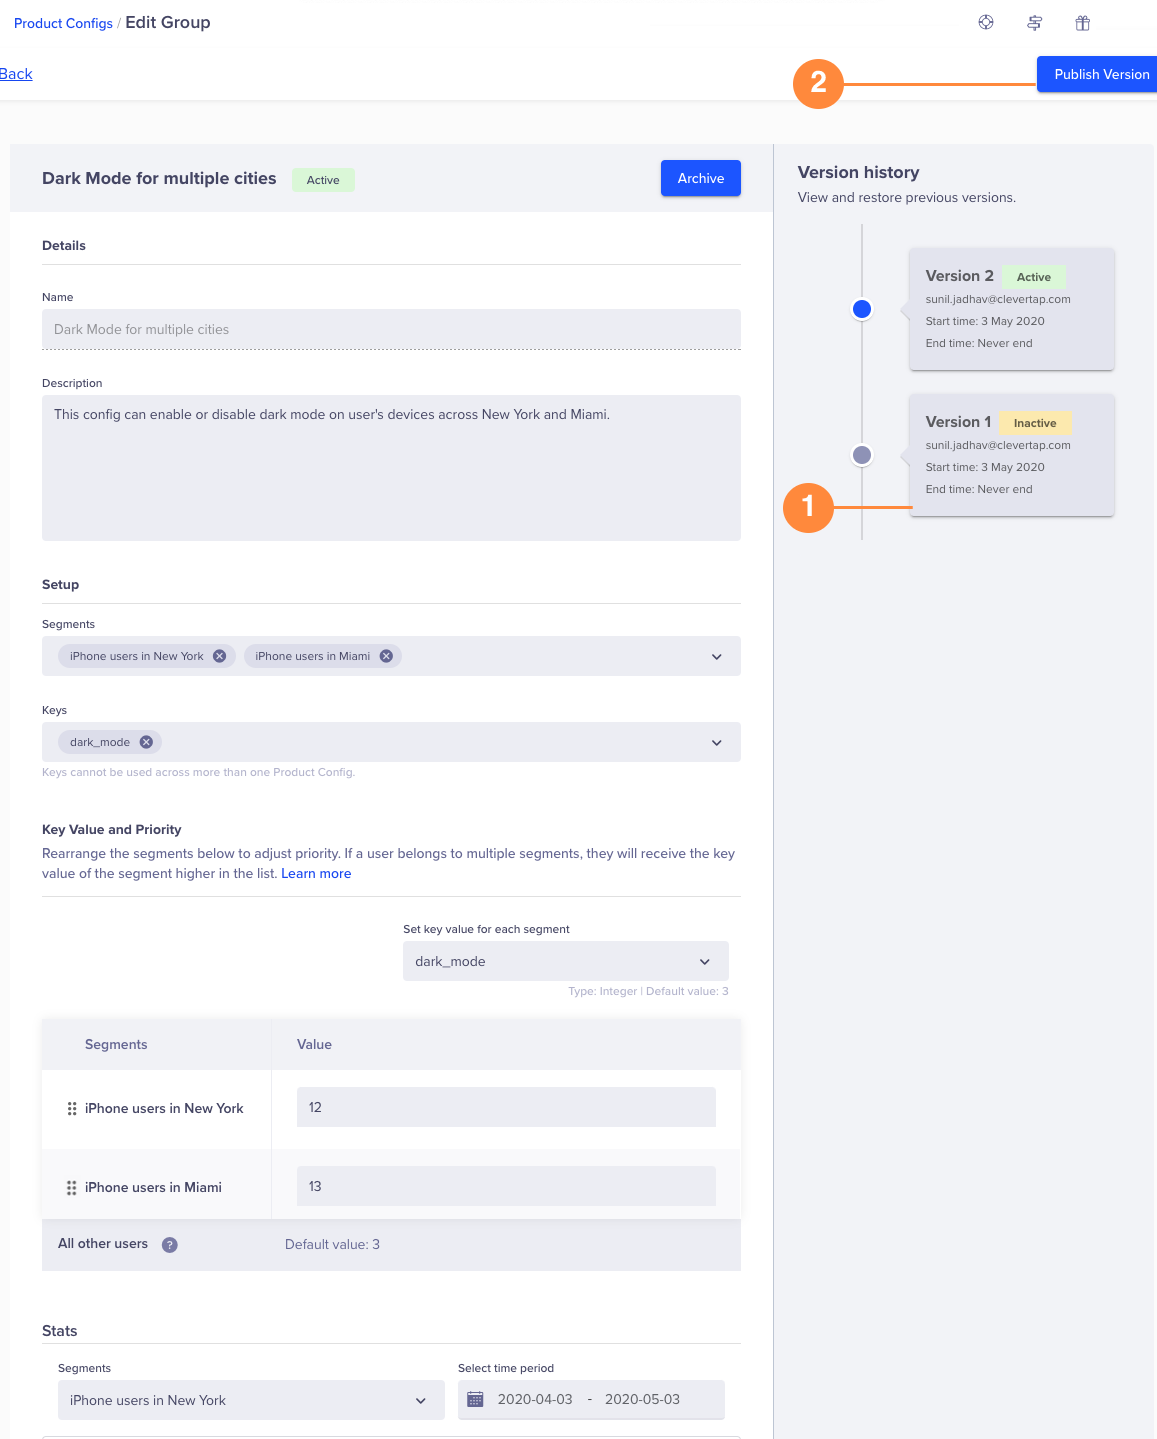
- Add the value and set the priority for your product config keys. Drag the
 icon up or down to change segment priority.
 - Publish your product config or schedule it to be published at a later date.
Edit/Archive Product Config
To edit a product config:
- Navigate to Product Experiences > Product Config. The Product Config page displays.
- Click the ellipsis menu to edit or archive a product config.
NoteAny changes to a product config are saved in a new version. You can always revert to an earlier version.
View Statistics
The stats will show you the distribution and value of the key stats for your product config. To view stats for a product config:
To view product config stats:
- Navigate to Product Experiences > Product Config. The Product Config page displays.
- Click the product config from the list and scroll down to view the stats.
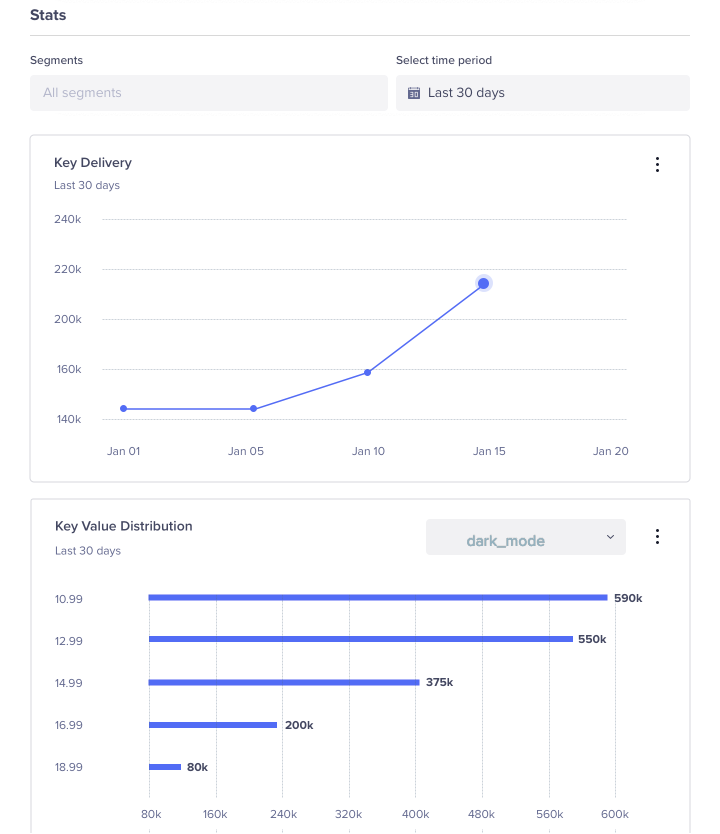
You can view the following information:
- You can see a trend of the total number of keys delivered for all segments or a particular segment from the first chart.
- In the second box, you can further break it down to get the count of each type of key value-wise.
Product Config Version
A new version is created every time you edit a product config. If the current config is not working for some reason, you can always revert to an older version of the product config.
To revert to an older version:
- Navigate to Product Experiences > Product Config. The Product Config page displays.
- Click the ellipsis menu to edit a product config. The versions appear on the right side.
- Click the required version number and publish. The selected version becomes active and the current version becomes inactive.
Feature Flags
You can have canary releases using feature flags. You can remotely turn on or turn off features on your app.
For example, you want to want to enable an automatic playlist of recommended videos on your app. This is a really great feature but it freezes the app screen for some versions of iOS. You want the following options:
- You must be able to target iPhone users.
- You want to test it on 20% of New York users and 30 % of Miami users before you roll it out to all users.
- You must also be capable of disabling the feature if it needs more work.
Feature flags can enable or disable a feature with a simple toggle. You can also test the feature on your users before you make it available to everyone. Your users will now have access to the feature and add to a better experience.
Create Feature Flags
To create feature flags:
- Navigate to Product Experiences > Feature Flags. The Feature Flags page displays.
- Click the +Feature Flag button to create a new feature flag. The create a Feature Flag page displays.
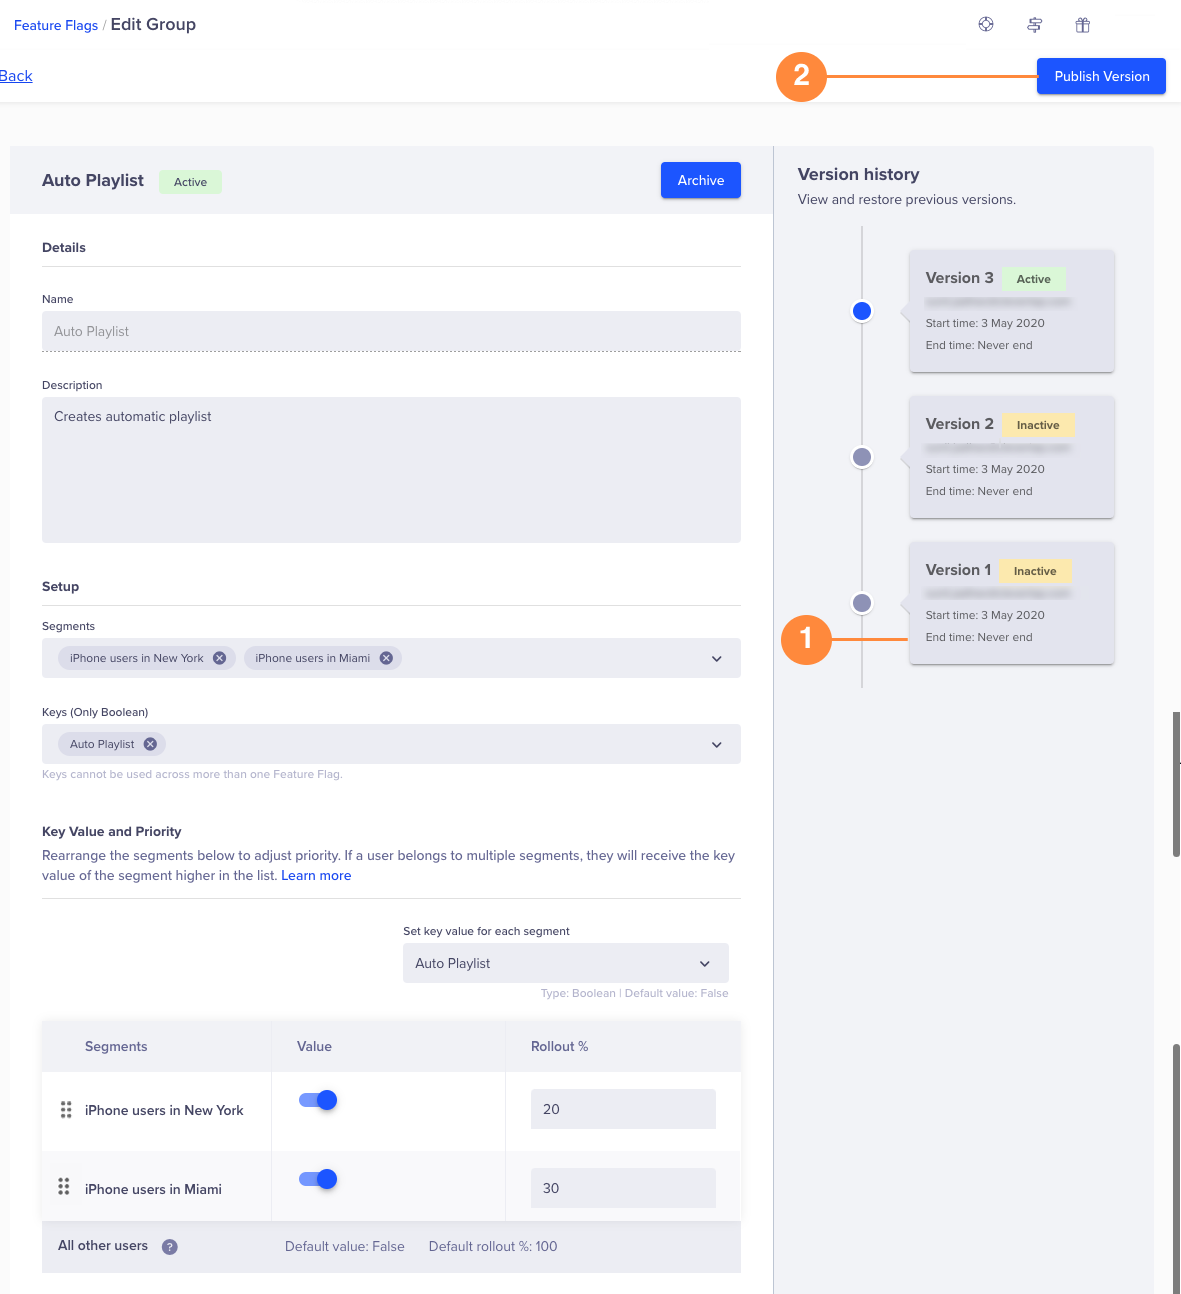
- Enter the name and description for your feature flag. For example, create an Auto Playlist Feature Flag.
- Select the Segments and Keys for your feature flag. The keys are the keys that you have assigned in your app for each feature and the segments are the group of users who will receive this feature.
For example, select the "iPhone users in New York" and "iPhone users in Miami" segment. Select the key called Auto Playlist key. For more information on creating keys, refer to Keys.
NoteA feature flag can have only boolean values, that is, true or false. A key can only be used in one feature flag.
- Under Key value and priority, add the key value for each segment.
- Toggle the selected segment and define the percentage of users who will receive this change.
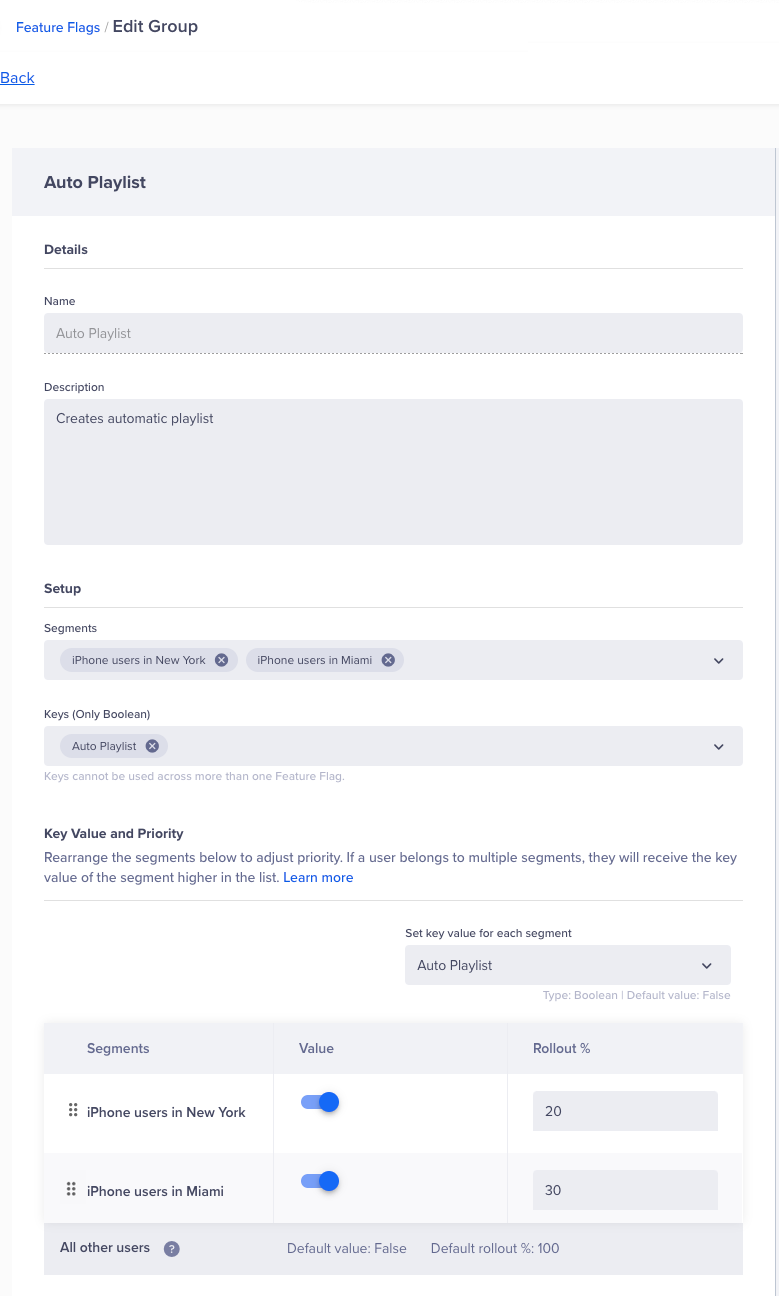
- Publish your feature flag or schedule it to be published at a later date.
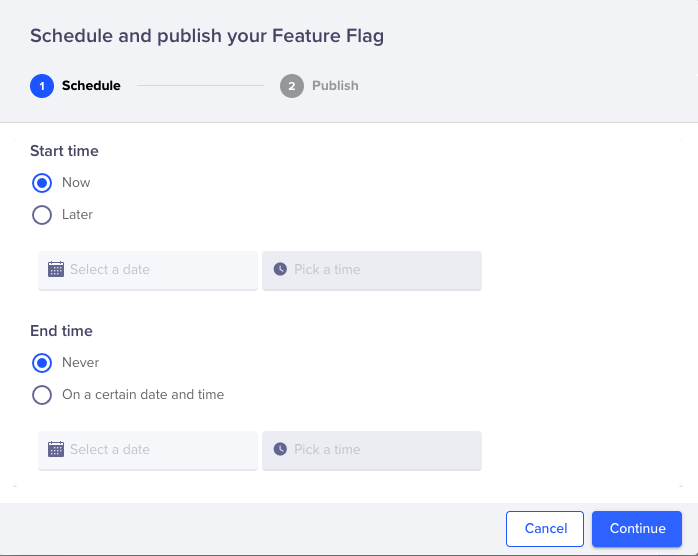
Edit/Archive Feature Flags
NoteAny changes to a feature flag are saved in a new version. You can always revert to an earlier version.
View Statistics
The stats will show you the distribution and value of the key stats for your feature flag. To view stats for a feature flag:
To view feature flag stats:
- Navigate to Product Experiences > Feature Flags. The Feature Flag page displays.
- Click the feature flag from the list and scroll down to view the stats.
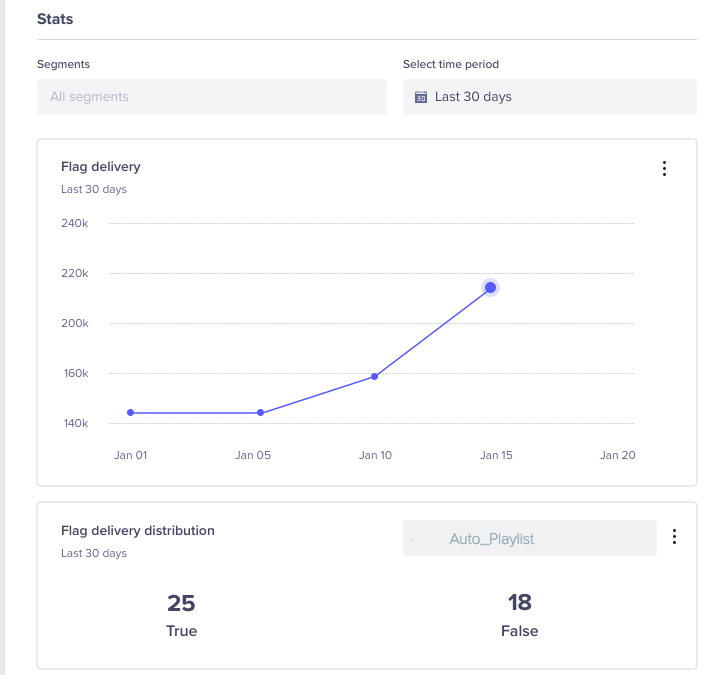
You can view the following information:
- You can see a trend of the total number of keys delivered for all segments or a particular segment from the first chart.
- In the second box, you can further break it down to get a count of each type of key value-wise
Feature Flag Version
A new version is created every time you edit a feature flag. If the current feature is not working for some reason, you can always revert to an older version of the feature flag:
- Navigate to Product Experiences > Feature Flag. The Feature Flag page displays.
- Click the ellipsis menu to edit a feature flag. The versions appear on the right side.
- Click the required version number and publish it. The selected version becomes active and the current version becomes inactive.
Role-Based Access Control for Product Experiences
Role-based access control (RBAC) is supported for Product Experiences. If you have advanced RBAC enabled for your account, admins can customize permissions and access roles. There are three standard system roles: Admin, Creator, and Member.
If you do not have advanced RBAC, the Admin role will have read and write access for all setups (keys, segments, goals, and settings), product config, feature flags, and A/B tests. Creator will have read and write access to experiences and experiments. The creator will have only read access to setup (keys, segments, and goals), and the Member role will have only read access for product config, feature flag, and A/B tests. Members will also have read access to set up.
For more information, refer to Role-Based Access Control.
Video Tutorial
For further information, you can watch the following video on product configs and feature flags:
Updated about 1 month ago
