AMP For Email
Learn about CleverTap's AMP feature
Overview
AMP for Email features interactive elements that email readers can use to take action from the inbox. It can also fetch and present the latest information each time you open an email.
These dynamic emails, coupled with CleverTap personalization, power compelling emails that provide a fun and exciting experience.
For example, AMP emails can include forms, carousels, accordions, sidebars, timestamps, and responsive layouts. The email message content can be updated in real time whenever you open these emails.

Feature AvailabilityAMP for Email is available only with Email Booster Max/Advanced Email add-on. Contact your Customer Success Manager to upgrade your plan.
Advantages of AMP for Email
AMP for Email brings a subset of the AMP web components and standards to email, allowing a historically static medium to provide interactive, secure, and data-driven experiences.
AMP for Email has a wide range of potential applications. For example, AMP emails can allow users to:
- Create interactive emails that feel like a webpage. You can help your readers experience your business webpage through emails, just like an app.
- Create emails with more in-mail capabilities and personalization. A static email is not actionable without opening a browser and becomes obsolete quickly. However, AMP for Email enriches the email experience with added support for dynamic content and interactivity while still keeping users safe.
To experience the delightful possibilities with AMP for Email, refer to Gmail AMP for Email Playground.
How does AMP for Email work?
Traditionally, a marketing or a transactional email is a multipart message with two different parts delivered as different MIME types.
- HTML: This is what most email clients support.
- Plain Text: Originally, this was the only way to send emails. When the HTML MIME type was rolled out, not all email clients supported HTML, or readers could set their client to display only the text version. The text part still acts as a fallback for the HTML part.
AMP for Email works by creating an AMP markup that looks like HTML but is a new specification. It is delivered using a third, additional MIME type (on top of existing types i.e. HTML and Plain Text).
The AMP HTML version is delivered only to the inboxes of service providers that currently support AMP, such as Gmail, Yahoo Mail, FairEmail, and mail.ru. All other clients fall back to the HTML version.
Supported Email providers and Clients
Supported Email Service Providers (ESPs)
Currently, CleverTap supports AMP through Sendgrid.
Supported Email Clients
The following email services can display AMP content:
Requirement for AMP Emails
To display AMP content to your end users, you must register with email clients. To register your sending address to all the supported email clients, follow the steps listed below:
Create and Send Production-ready AMP Emails
You must demonstrate an understanding and compliance with the AMP email format. Emails must have the following:
-
A domain authentication such as SPF, DKIM, and DMARC matches Top-Level Domain (TLD). It must have the From address used for sending emails.
-
A fallbacktext/html MIME part.
-
Comply with all client sender requirements:
- Gmail: GooglePrivacy & Terms
- Verizon Media (Yahoo Mail)
- Verizon Media Privacy Policy - US
- For other countries, visit here.
- Mail.ru
-
Send a production-ready AMP email to the following addresses:
- [email protected]
- [email protected] (recommended only if you have more than 5000 users with the mail.ru domain)
- [email protected]
Recommendations
- We recommend adding carousels to your existing email template for the verification email sent in production.
- We recommend uploading the three receiving email addresses via a CSV upload and creating a campaign to send the verification email. After sending the email, these three addresses can be opted out.
Fill Global Form
You must complete the AMP for Email: Sender Registration form. This is the only form you need to fill out to be allowed to send AMP emails for all supporting email clients.
Complete Form for Each Sending AddressYou must complete the registration process for each of the From addresses separately. For example, if you want to send AMP emails from two different From addresses, such as [email protected] and [email protected], you must fill out two forms for each of these addresses.
Wait for Confirmation
Each email client notifies you of your allowlist status via email. If you have any issues, contact the AMP for Email Working Group via GitHub repository for AMP for Email.
Important
- Providers require you to register all the from email addresses from which you plan to send AMP emails.
- Always refer to the latest support information about AMP for Email provided by the email services because it may vary over time.
- Adding your from email address to Gmail's allowlist can take up to three weeks.
- No confirmation emails will be sent by Yahoo Mail. After 7 days, AMP will begin functioning for Yahoo Mail if it satisfies all client sender requirements.
Test AMP Emails
Always test your AMP emails before sending out production emails to your target audiences. This ensures a great user experience for all your users.
Debug and Test EmailsAlways test your emails before sending them out to a larger audience. The AMP website provides a great AMP for Email checklist to test your emails.
Test Specific Clients
Some email clients may require additional steps to test your AMP emails. For any specific requirements, refer to their developer documentation.
Gmail
Gmail documentation provides guidelines to Test your AMP emails in Gmail.
You can use Gmail's Gmail AMP for Email Playground to draft AMP emails, see a live preview, and have your emails sent to your own Gmail account for testing.
Mail.ru
The Mail.ru website provides detailed steps on enabling testing in your Mail.ru client for your AMP emails.
Mail.ru users can use the Mail.ru AMP Playground to send an email to themselves for testing.
HTML Fallback for AMP Emails
Every AMP email must have an HTML fallback. It ensures a seamless inbox experience for all recipients. Here are the cases to cover with a fallback:
- AMP emails expire after 30 days. The recipient will see the HTML (or plain text) fallback if the email is opened after expiration.
- The fallback is essential for recipients using email providers that do not support AMP.
- Forwarded emails do not display AMP content. If a recipient receives AMP content and then forwards the email to another person, that person will only see the fallback.
Create AMP Campaign
Compose and test AMP content for your email from the CleverTap dashboard. AMP for Email is available via the following templates in the CleverTap Email Editor:
- Email with custom HTML & AMP
- Email with drag and drop
- Pre-built Templates: Includes easy-to-use templates for User Feedback, NPS Survey, Accordion, Carousel, and Tabs.
You can access these templates from the AMP Templates tab under the What section in the Email campaign builder.
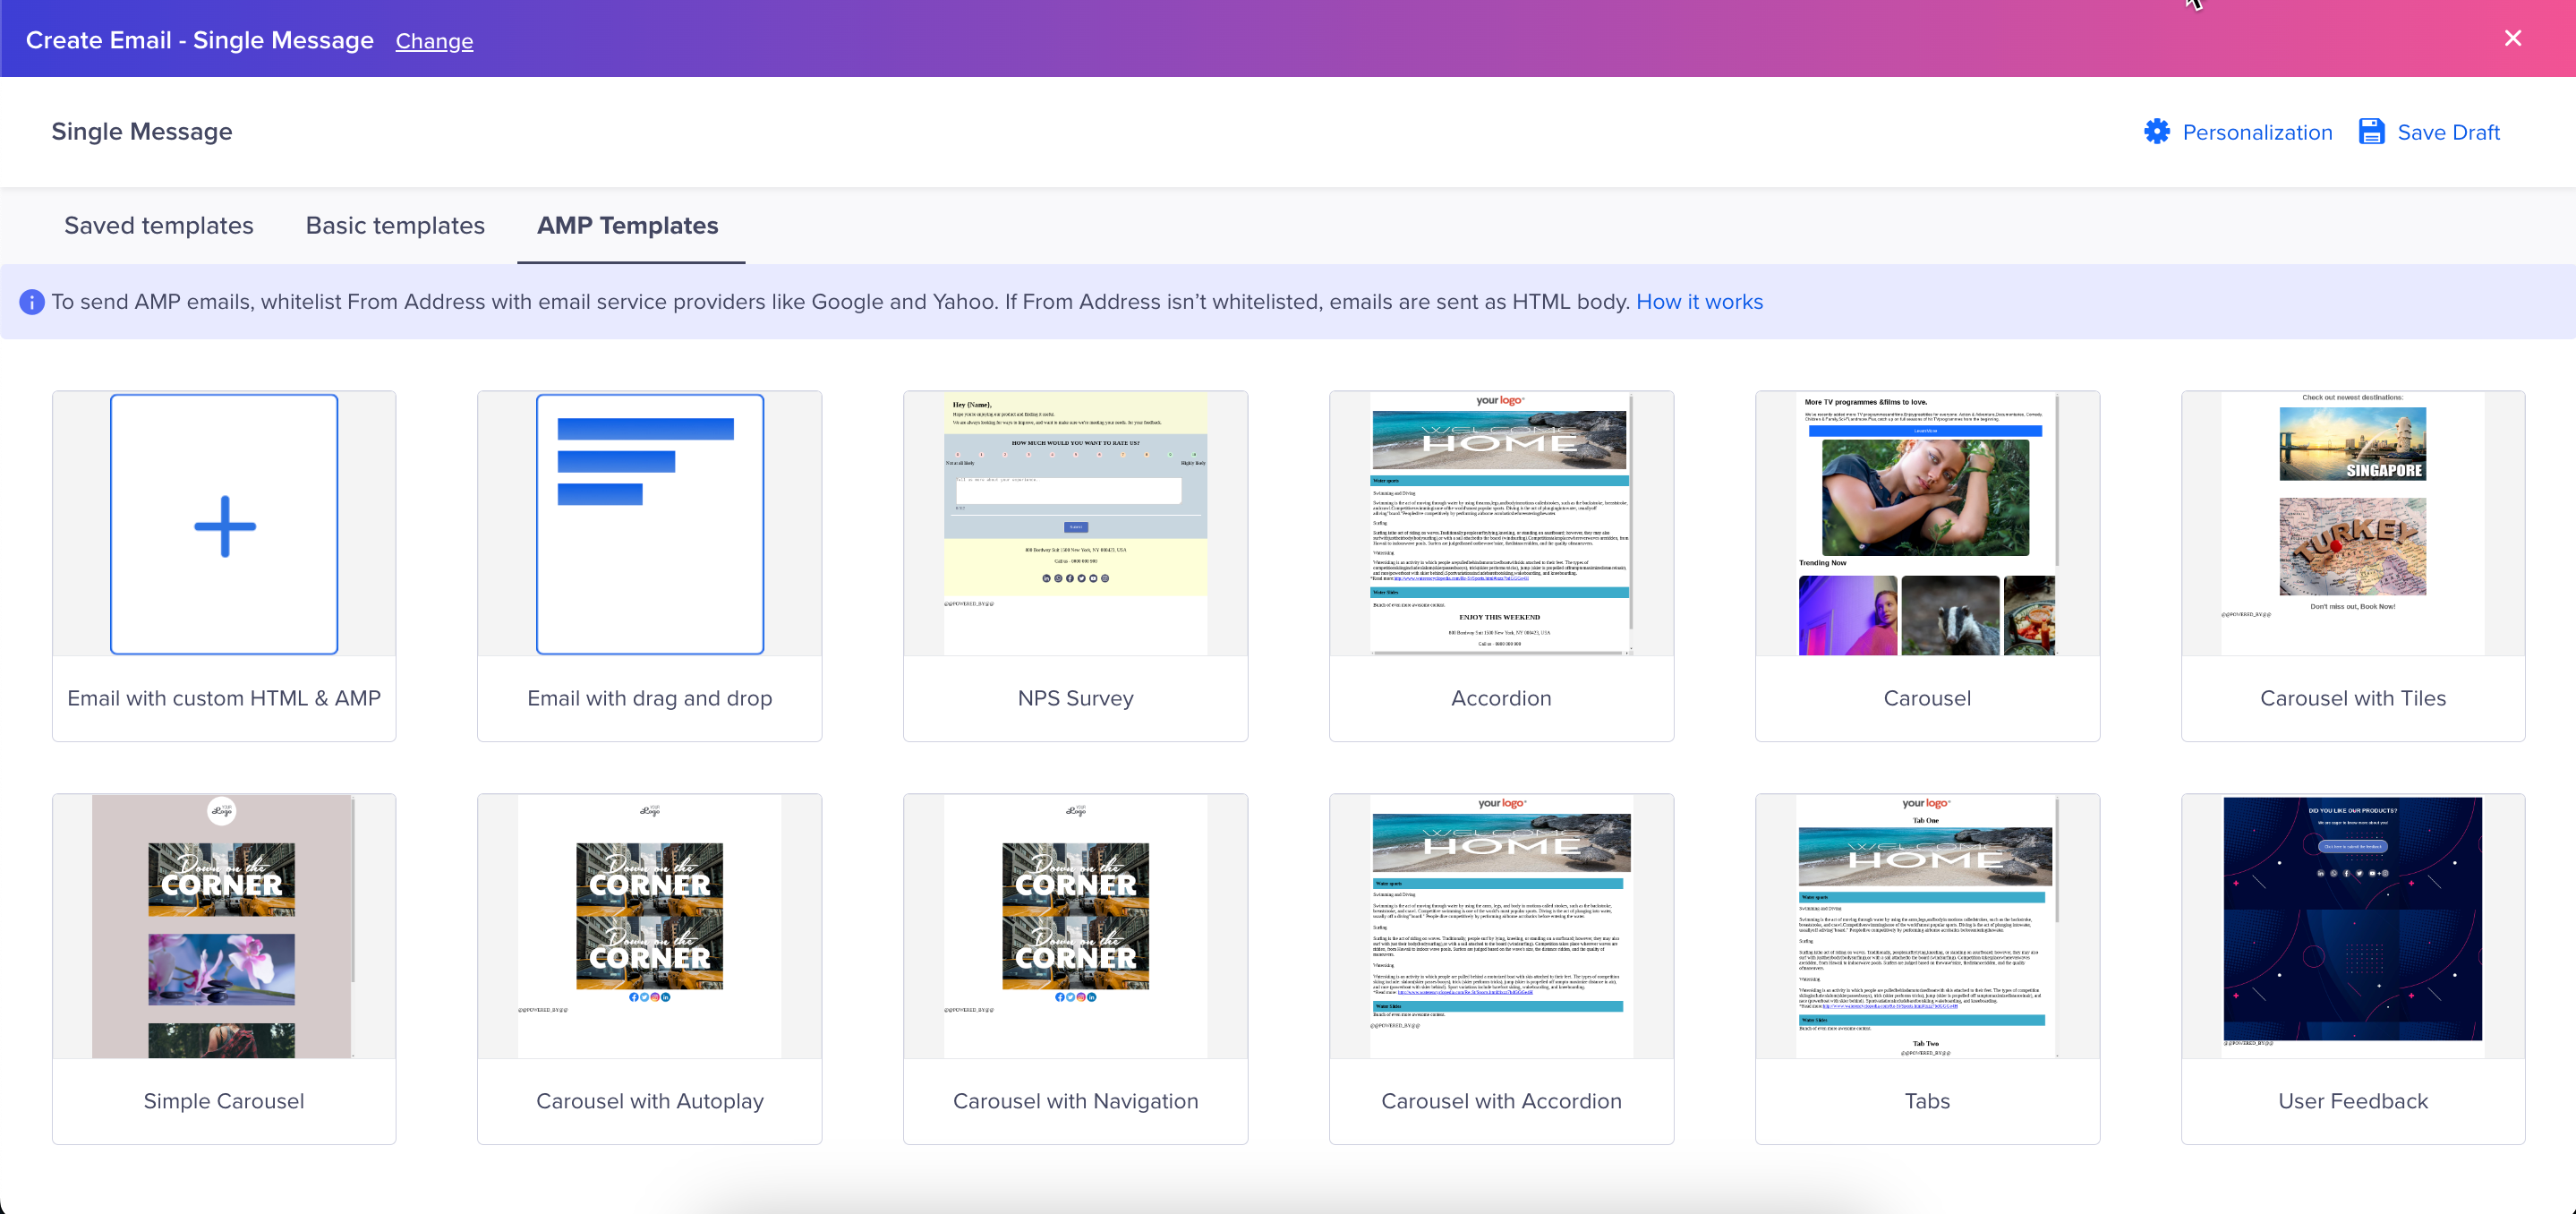
AMP Templates
Email with Custom HTML & AMP
The Email with Custom HTML & AMP template combines custom HTML coding with the use of AMP in email messages. To create an AMP email:
- Select the Email with custom HTML & AMP template.
- Create your message as follows:
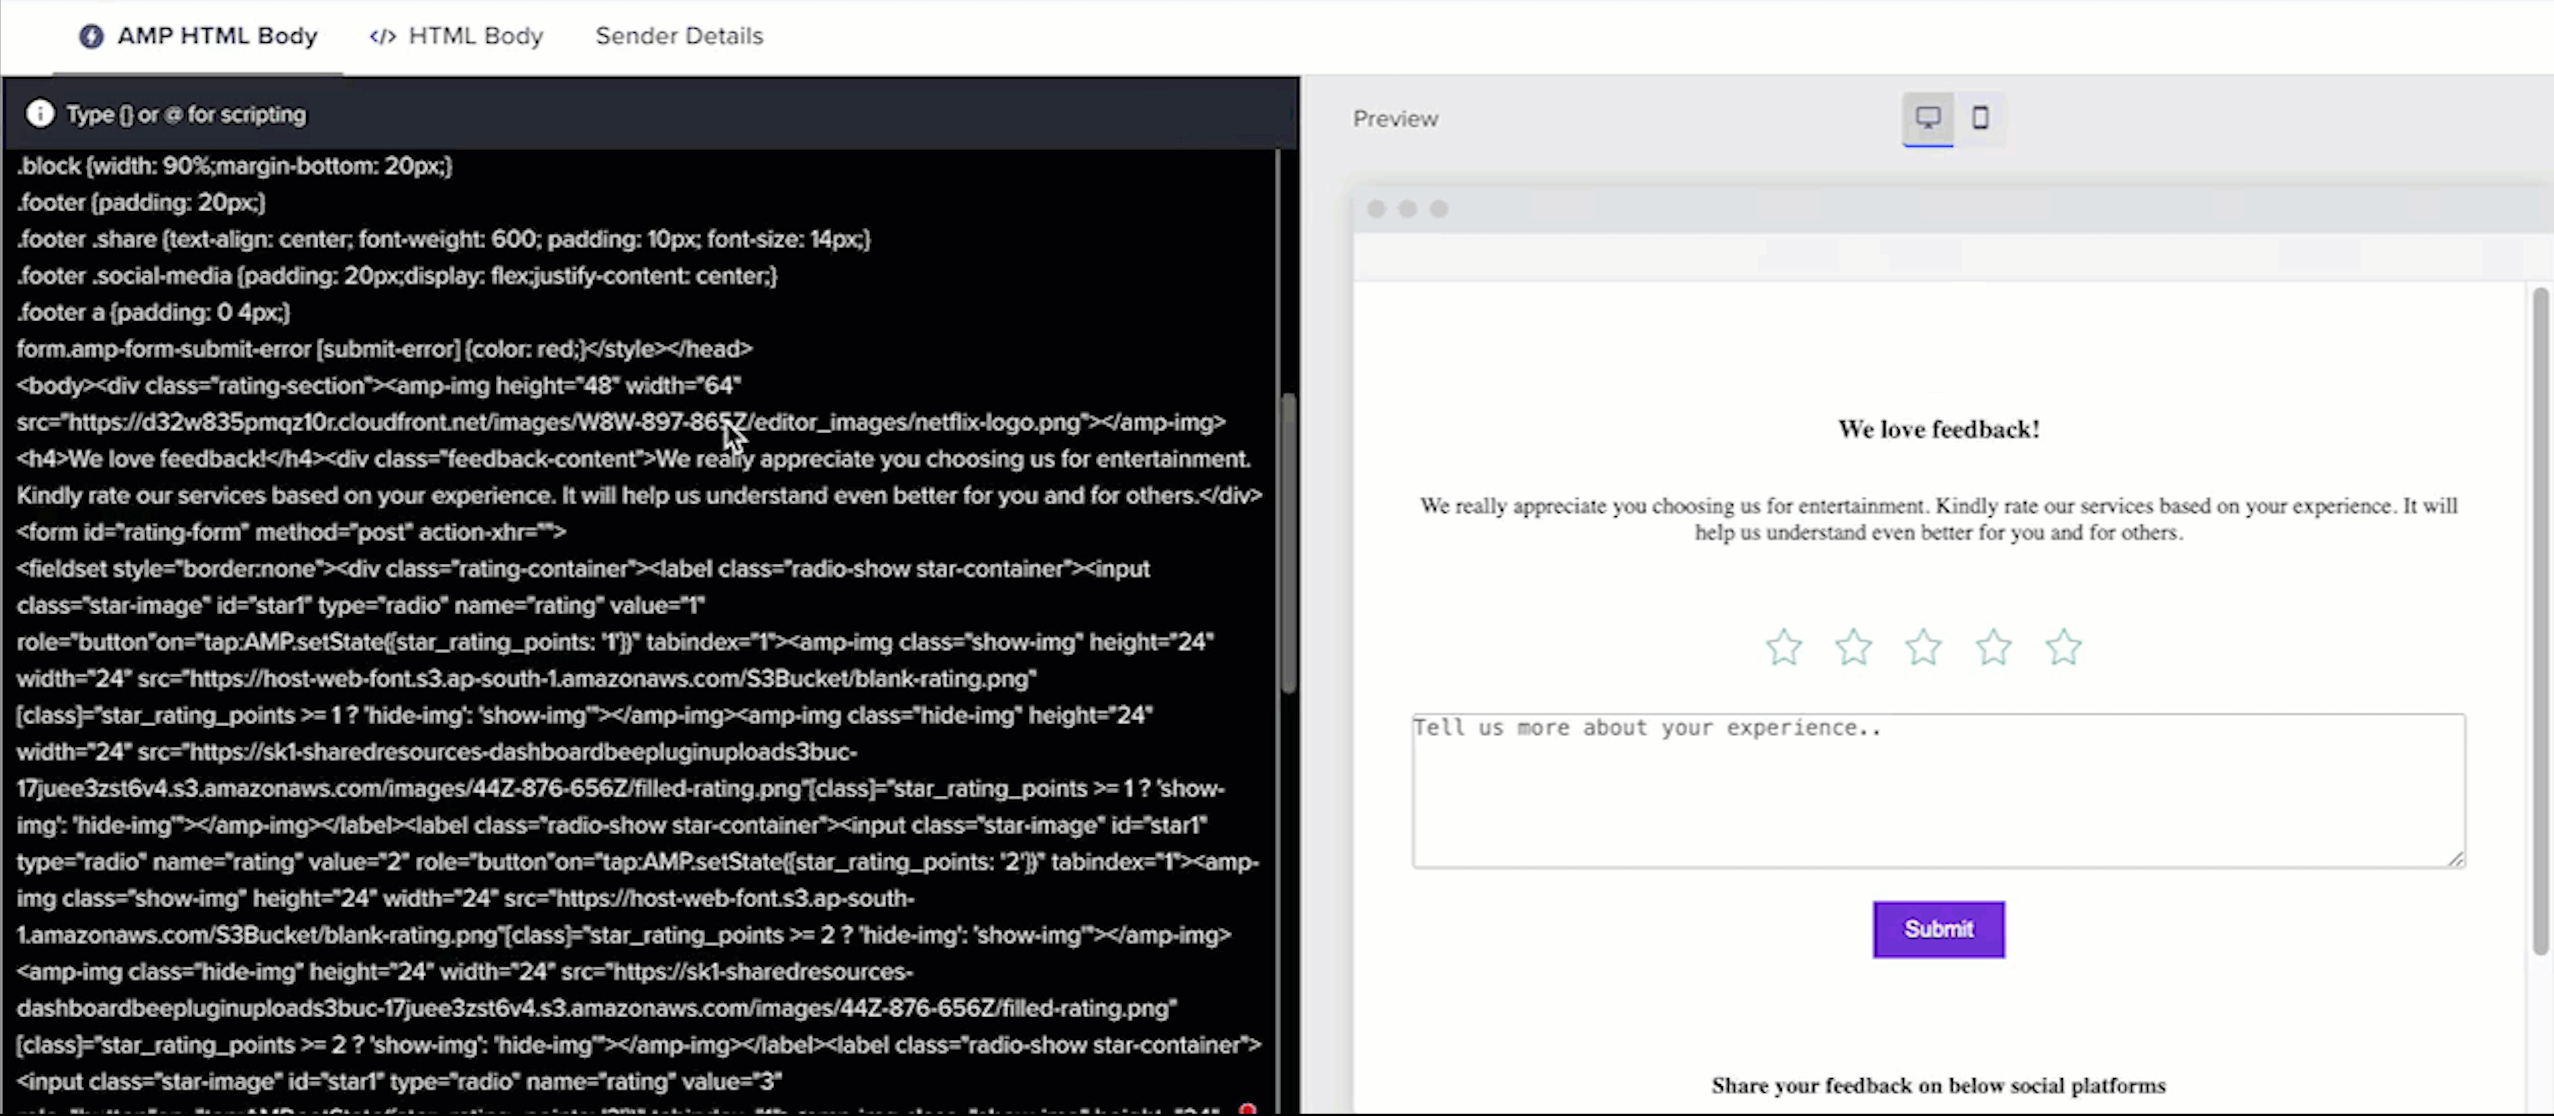
- AMP HTML Body: Add your AMP HTML code in the AMP for Email HTML box. You can preview your AMP for Email messages on the right side of the screen.
Sample AMP for Email Message
Validate AMP for Email CodeFrom the AMP HTML Body Editor, you can also ensure that your AMP-powered emails are properly structured, and error-free. This enables you to deliver engaging, interactive email experiences to your audience, backed by thorough AMP for Email code validation. If the HTML code does not have any errors, it is highlighted as Valid else it is highlighted as "X Errors", where X indicates the number of errors in the HTML code (see the following figure). To learn more about how to resolve these errors, refer to the FAQ section.
AMP for Email Code Validation
- HTML Body: You can use this option to create the fallback HTML for recipients using inbox clients that do not support AMP. You can preview your HTML message on the right side of the screen.
Sample HTML Fallback Message
- Click Preview & Test to preview the email and send it to test profiles before sending it to your customers. Select the compatible Email Service Provider to send the test email.
View in Browser Support
The View in Browser option for AMP emails allows recipients to view the AMP email content on a webpage within a separate tab of the web browser. This option provides a fallback solution for recipients whose inbox clients do not support AMP email. For example, Apple Mail, Outlook, etc.
By providing the View in Browser option, you can ensure that the recipients can still view and engage with the AMP email content, even if their email client does not support AMP. You can use this feature by typing @speciallink and selecting View In Browser AMP option.
View AMP Email in Browser
When they click on the View in Browser link, it opens a web browser window or tab where they can see the AMP email content and interact with it as intended.
Preview of View AMP Email in Browser
Similarly, you can use the View in Browser HTML option to address potential rendering issues for emails (such as image-heavy emails) that might occur across various email clients and devices. Email clients have different capabilities and may interpret HTML and CSS code differently, which might lead to inconsistent email rendering. By providing the option to view the email in a browser, recipients can ensure that the email is displayed as intended, regardless of the email client's limitations.

View HTML in Browser
Email with Drag and Drop Template
The Email with drag and drop template allows you to create AMP emails with an image carousel. To create an email with AMP using the Drag and Drop editor:
-
Select the Email with drag and drop template.
-
Create your message as follows:
-
AMP Email
- Drag and drop the Carousel tile to the editor.
- Add the carousel images for the campaign messages. Toggle ON the Autoplay option to play the images automatically, displaying each image for a predetermined duration before moving on to the next one. This automatic advancement continues until the user interacts with the carousel or until it reaches the last card in the sequence. When you toggle OFF this option, the user needs to manually interact with the carousel to view the next or previous card. This provides more control to the user, allowing them to explore the content at their own pace.
-
AMP Email Using Drag & Drop Editor
- HTML Fallback
It is essential to create an HTML fallback so that emails look good for all email clients. You can add content and choose to hide it on AMP to ensure that these blocks do not render when AMP email is rendered and are included only in the fallback HTML emails. This content block outline will have an icon that indicates that this content is hidden in AMP.
HTML Fallback using Drag & Drop Editor
- Click Preview & Test to preview the email and send it to test profiles before sending it to your customers. Select the compatible Email Service Provider to send the test email.
Carousel Email Client SupportCarousel via Drag and Drop Editor is currently only supported on Gmail for Android, Gmail for iOS, and Gmail for Web.
AMP Forms
AMP Forms allows you to create forms where users can submit inputs within the body of the email. You can choose to customize CleverTap's readily available NPS Survey or User Feedback templates to gather feedback from the users or create your own.
NPS Survey Template
Type @ and then select @speciallink. Select the Submit Form option for CleverTap to capture the form input and reflect the same on the dashboard. CleverTap captures the user response in the Form Submitted event.
Select Submit Form Option
For example, if the user selects 9 as a rating, the following information is captured:
| Event Name | Event Property Key | Event Property Value |
|---|---|---|
| Form Submitted | Rating | 9 |
If you want to change the name of the event under which the form input is captured or capture additional event properties, append the query parameters to the ACTION-XHR URL. For example,
@SpecialLinks - Submit Form| default: "Action-XHR"?event=PRODSURVEY¤cy=USD&price=5
Now, PRODSURVEY is a custom event. Key values, such as action buttons, will be event properties.
| Event Name | Event Property Key | Event Property Value |
|---|---|---|
| PRODSURVEY | currency | USD |
| PRODSURVEY | price | 5 |
Examples
AMP for Email allows for a wide variety of use cases.
Hello World
<!--
     Below is the mininum valid AMP4EMAIL document. Just type away
     here and the AMP Validator will re-check your document on the fly.
-->
<!doctype html>
<html ⚡4email data-css-strict>
<head>
  <meta charset="utf-8">
  <script async src="https://cdn.ampproject.org/v0.js"></script>
  <style amp4email-boilerplate>body{visibility:hidden}</style>
</head>
<body>
  Hello, AMP4EMAIL world.
</body>
</html>
<!doctype html>
<html ⚡4email data-css-strict>
<head>
<meta charset="utf-8">
<script async src="https://cdn.ampproject.org/v0.js"></script>
<script async custom-element="amp-accordion" src="https://cdn.ampproject.org/v0/amp-accordion-0.1.js"></script>
<style amp4email-boilerplate>body{visibility:hidden}</style>
</head>
<body>
<p>Section1, Section 2, Section 3 can be expanded/collaped</p>
<amp-accordion>
<section>
<h4>Section 1</h4>
<p>Lorem ipsum dolor sit amet, consectetur adipiscing elit, sed do eiusmod tempor incididunt ut labore et dolore magna aliqua. Ut enim ad minim veniam, quis nostrud exercitation ullamco laboris nisi ut aliquip ex ea commodo consequat. Duis aute irure dolor in reprehenderit in voluptate velit esse cillum dolore eu fugiat nulla pariatur. Excepteur sint occaecat cupidatat non proident, sunt in culpa qui officia deserunt mollit anim id est laborum.</p>
</section>
<section>
<h4>Section 2</h4>
<div>Interdum et malesuada fames ac ante ipsum primis in faucibus. Integer placerat dapibus sem. Duis rutrum tristique quam, et pulvinar urna. Praesent eget quam dui. Vivamus egestas posuere lorem, ut tempus magna aliquam et. Nulla eu sagittis mauris. Aliquam tincidunt id turpis sit amet consectetur. Phasellus sit amet dignissim felis. Quisque lobortis, eros scelerisque aliquet tincidunt, quam tellus pulvinar lorem, vitae porta nulla velit at turpis. Aliquam erat volutpat.</div>
</section>
<section>
<h4>Section 3</h4>
<figure>
<amp-img src="https://www.google.com/images/background/p1.jpg"
width="1080" height="610" layout="responsive" alt="an image"></amp-img>
</figure>
</section>
</amp-accordion>
<p></p>
<p>For below, when collpased, Show More is displayed, when Expanded, Show
Less is displayed, Below example shows a different title based on whether
the section is expanded or not.</p>
<amp-accordion>
<section>
<h4>
<span class="show-more">Show more</span>
<span class="show-less">Show less</span>
</h4>
<p>Id lacus amet. Aliquam eos nunc ut scelerisque lacinia, eu rutrum id,
vestibulum aliqua vivamus luctus eu rhoncus ut, sodales id. Velit
lacus, fermentum neque et sagittis, ac venenatis volutpat, dolore neque
feugiat proin fermentum odio, odio arcu
in eu wisi. </p>
</section>
</amp-accordion>
<p></p>
<p> "Show more" is displayed initially and once clicked on, it remains
expanded and cannot be collapsed, also the button disappears, Below is an
example, which hides the "Show more" button once it's been clicked.</p>
<amp-accordion id="hidden-header">
<section>
<h4>
<span class="show-more">Show more</span>
</h4>
<p>Id lacus amet. Aliquam eos nunc ut scelerisque lacinia, eu rutrum id,
vestibulum aliqua vivamus luctus eu rhoncus ut, sodales id. Velit
lacus, fermentum neque et sagittis, ac venenatis volutpat, dolore neque
feugiat proin fermentum odio, odio arcu
in eu wisi. </p>
</section>
</amp-accordion>
<p>Nested Accordian below, here there are more accordians within the section
2 accordian</p>
<amp-accordion>
<section>
<h4>Section 1</h4>
<p>Bunch of content.</p>
</section>
<section>
<h4>Section 2</h4>
<amp-accordion class="nested-accordion">
<section>
<h4>Nested Section 2.1</h4>
<p>Bunch of content.</p>
</section>
<section>
<h4>Nested Section 2.2</h4>
<p>Bunch of more content.</p>
</section>
</amp-accordion>
</section>
</amp-accordion>
<p>Auto-Collapsing Accordions below, here the first accordian will auto
collapse when another accordian is clicked on</p>
<amp-accordion expand-single-section>
<section>
<h4>Section 1</h4>
<p>Id lacus amet. Aliquam eos nunc ut scelerisque lacinia, eu rutrum id,
vestibulum aliqua vivamus luctus eu rhoncus ut, sodales id. Velit
lacus, fermentum neque et sagittis, ac venenatis volutpat, dolore neque
feugiat proin fermentum odio, odio arcu
in eu wisi. </p>
</section>
<section>
<h4>Section 2</h4>
<p>Id lacus amet. Aliquam eos nunc ut scelerisque lacinia, eu rutrum id,
vestibulum aliqua vivamus luctus eu rhoncus ut, sodales id. Velit
lacus, fermentum neque et sagittis, ac venenatis volutpat, dolore neque
feugiat proin fermentum odio, odio arcu
in eu wisi. </p>
</section>
<section>
<h4>Section 3</h4>
<p>Id lacus amet. Aliquam eos nunc ut scelerisque lacinia, eu rutrum id,
vestibulum aliqua vivamus luctus eu rhoncus ut, sodales id. Velit
lacus, fermentum neque et sagittis, ac venenatis volutpat, dolore neque
feugiat proin fermentum odio, odio arcu
in eu wisi. </p>
</section>
</amp-accordion>
<p></p>
<p>Animated Accordions - The animate attribute animates the expansion and
collapse of accordion sections. For below accordians, the expansion and the
collapse should be slow and smooth, not abrupt</p>
<amp-accordion animate>
<section>
<h4>Section 1</h4>
<p>Id lacus amet. Aliquam eos nunc ut scelerisque lacinia, eu rutrum id,
vestibulum aliqua vivamus luctus eu rhoncus ut, sodales id. Velit
lacus, fermentum neque et sagittis, ac venenatis volutpat, dolore neque
feugiat proin fermentum odio, odio arcu
in eu wisi. </p>
</section>
<section>
<h4>Section 2</h4>
<amp-img src="https://www.google.com/images/background/p2.jpg" layout="responsive"
width="60" height="40">
</amp-img>
</section>
<section>
<h4>Section 3</h4>
<p>Id lacus amet. Aliquam eos nunc ut scelerisque lacinia, eu rutrum id,
vestibulum aliqua vivamus luctus eu rhoncus ut, sodales id. Velit
lacus, fermentum neque et sagittis, ac venenatis volutpat, dolore neque
feugiat proin fermentum odio, odio arcu
in eu wisi. </p>
</section>
</amp-accordion>
</body>
</html><!doctype html>
<html ⚡4email data-css-strict>
<head>
<meta charset="utf-8">
<script async src="https://cdn.ampproject.org/v0.js"></script>
<style amp4email-boilerplate>body{visibility:hidden}</style>
<script async custom-element="amp-carousel" src="https://cdn.ampproject.org/v0/amp-carousel-0.1.js"></script>
<style amp-custom>
.emailbody {
padding: 16px;
}
.images {
max-width: 100%;
}
</style>
</head>
<body>
<div class="emailbody">
<div class="images">
<amp-carousel width="700" height="450" layout="responsive" type="slides">
<amp-img src="https://www.google.com/images/background/p1.jpg" width="700" height="450"
layout="responsive" alt="a sample image"></amp-img>
<amp-img src="https://www.google.com/images/background/p2.jpg" width="800" height="600"
layout="responsive" alt="a sample image"></amp-img>
<amp-img src="https://www.google.com/images/background/p3.jpg" width="700" height="450"
layout="responsive" alt="another sample image"></amp-img>
<amp-img src="https://www.google.com/images/background/p4.jpg" width="700" height="450"
layout="responsive" alt="and another sample image"></amp-img>
<amp-img src="https://www.google.com/images/background/p5.jpg" width="700" height="450"
layout="responsive" alt="and another sample image"></amp-img>
</amp-carousel>
</div>
</div>
</body>
</html><!--
## Introduction
This sample demonstrates how to build an AMP-powered email that contains a simple interactive survey.
-->
<!-- -->
<!doctype html>
<html ⚡4email lang="en" data-css-strict>
<head>
<meta charset="utf-8">
<script async src="https://cdn.ampproject.org/v0.js"></script>
<script async custom-element="amp-form" src="https://cdn.ampproject.org/v0/amp-form-0.1.js"></script>
<style amp4email-boilerplate>body{visibility:hidden}</style>
<style amp-custom>
.container {
max-width: 500px;
margin: auto;
font-family: sans-serif;
padding: 1em;
text-align: center;
}
.block {
display: block;
width: 100%;
}
.m1 {
margin: 1em 0;
}
label {
margin-bottom: 0.5em;
}
</style>
</head>
<body>
<div class="container">
<!--
The main content of the email, an image and a short description of the event.
-->
<div>
<amp-img class="m1" width="600" height="314" layout="responsive" src="https://amp.dev/static/img/sharing/default-600x314.png"></amp-img>
<p>It’s been a busy few days at the latest AMP conference. We hope you had a good time!</p>
</div>
<hr>
<!--
To make the survey, we use an `amp-form` with radio button input fields.
The second step of the form, free text input, is hidden initially and gets displayed after the user selects a rating, as this triggers a `change` event.
When the form is submitted, we display a short confirmation message to the user by using `<div submit-success>`.
-->
<form method="post" action-xhr="https://ACTION-XHR">
<div class="m1">
<p>How would you rate this year's conference?</p>
<input type="radio" id="rating1" name="rating" value="3" on="change:step2.show" required>
<label for="rating1">Great</label>
<input type="radio" id="rating2" name="rating" value="2" on="change:step2.show">
<label for="rating2">Not bad</label>
<input type="radio" id="rating3" name="rating" value="1" on="change:step2.show">
<label for="rating3">Meh</label>
</div>
<div class="m1" id="step2" hidden>
<label class="block" for="info">Would you like to tell us more?</label>
<textarea class="block" id="info" name="name" rows="5"></textarea>
</div>
<input type="submit" value="Send feedback">
<input type="reset" value="Clear">
<div class="m1" submit-success>
Thank you for submitting feedback.
</div>
</form>
</div>
</body>
</html>Skipping Curly Braces in Amp-Mustache Templates
AMP Mustache , an AMP email component is a simple, structured templating system based on mustache. It allows you to add dynamic content to your AMP emails and personalize them.
AMP HTML email content may contain amp-mustache templates, that is, double or triple curly brace expressions within the amp-mustache templates. These braces are similar to CleverTap Liquid Tags and are evaluated as user properties and liquid tag variables.
You must wrap the expressions with raw code liquid tags to identify them correctly. For example, add {{%raw}}{{cart_items}} {{%endraw%}} liquid tags to tell the editor that it is AMP code.
<amp-list src="https://amp.dev/static/samples/json/cart.json" layout="fixed-height" height="80" binding="no">
    <template type="amp-mustache">
      <div id="cart">
        {% raw %}{{#cart_items}}{% endraw %}
        <div class="cart-item">
          <span>{% raw %}{{name}}{% endraw %}</span>
          <span>{% raw %}{{quantity}}{% endraw %}</span>
          <span>{% raw %}{{price}}{% endraw %}</span>
        </div>
        {% raw %}{{/cart_items}}{% endraw %}
        {% raw %}{{^cart_items}}{% endraw %}
        <div>Your cart is empty!</div>
        {% raw %}{{/cart_items}}{% endraw %}
      </div>
    </template>
  </amp-list>
For more information, refer to AMP Mustache.
AMP for Email Campaign Stats
For AMP Emails, we have introduced a new event property called mimeType with the system events: Notification Viewed(Open) and Notification Clicked (Clicks). This property helps you understand the performance of your AMP emails. For more information, refer to AMP Email Campaign Stats.
You can also analyze who viewed AMP emails by navigating to Analytics > Events page.
Analyze Who Viewed AMP Emails
You can view the event distribution for AMP and HTML email by navigating to the Trends & Properties tab under the Analytics > Events page.
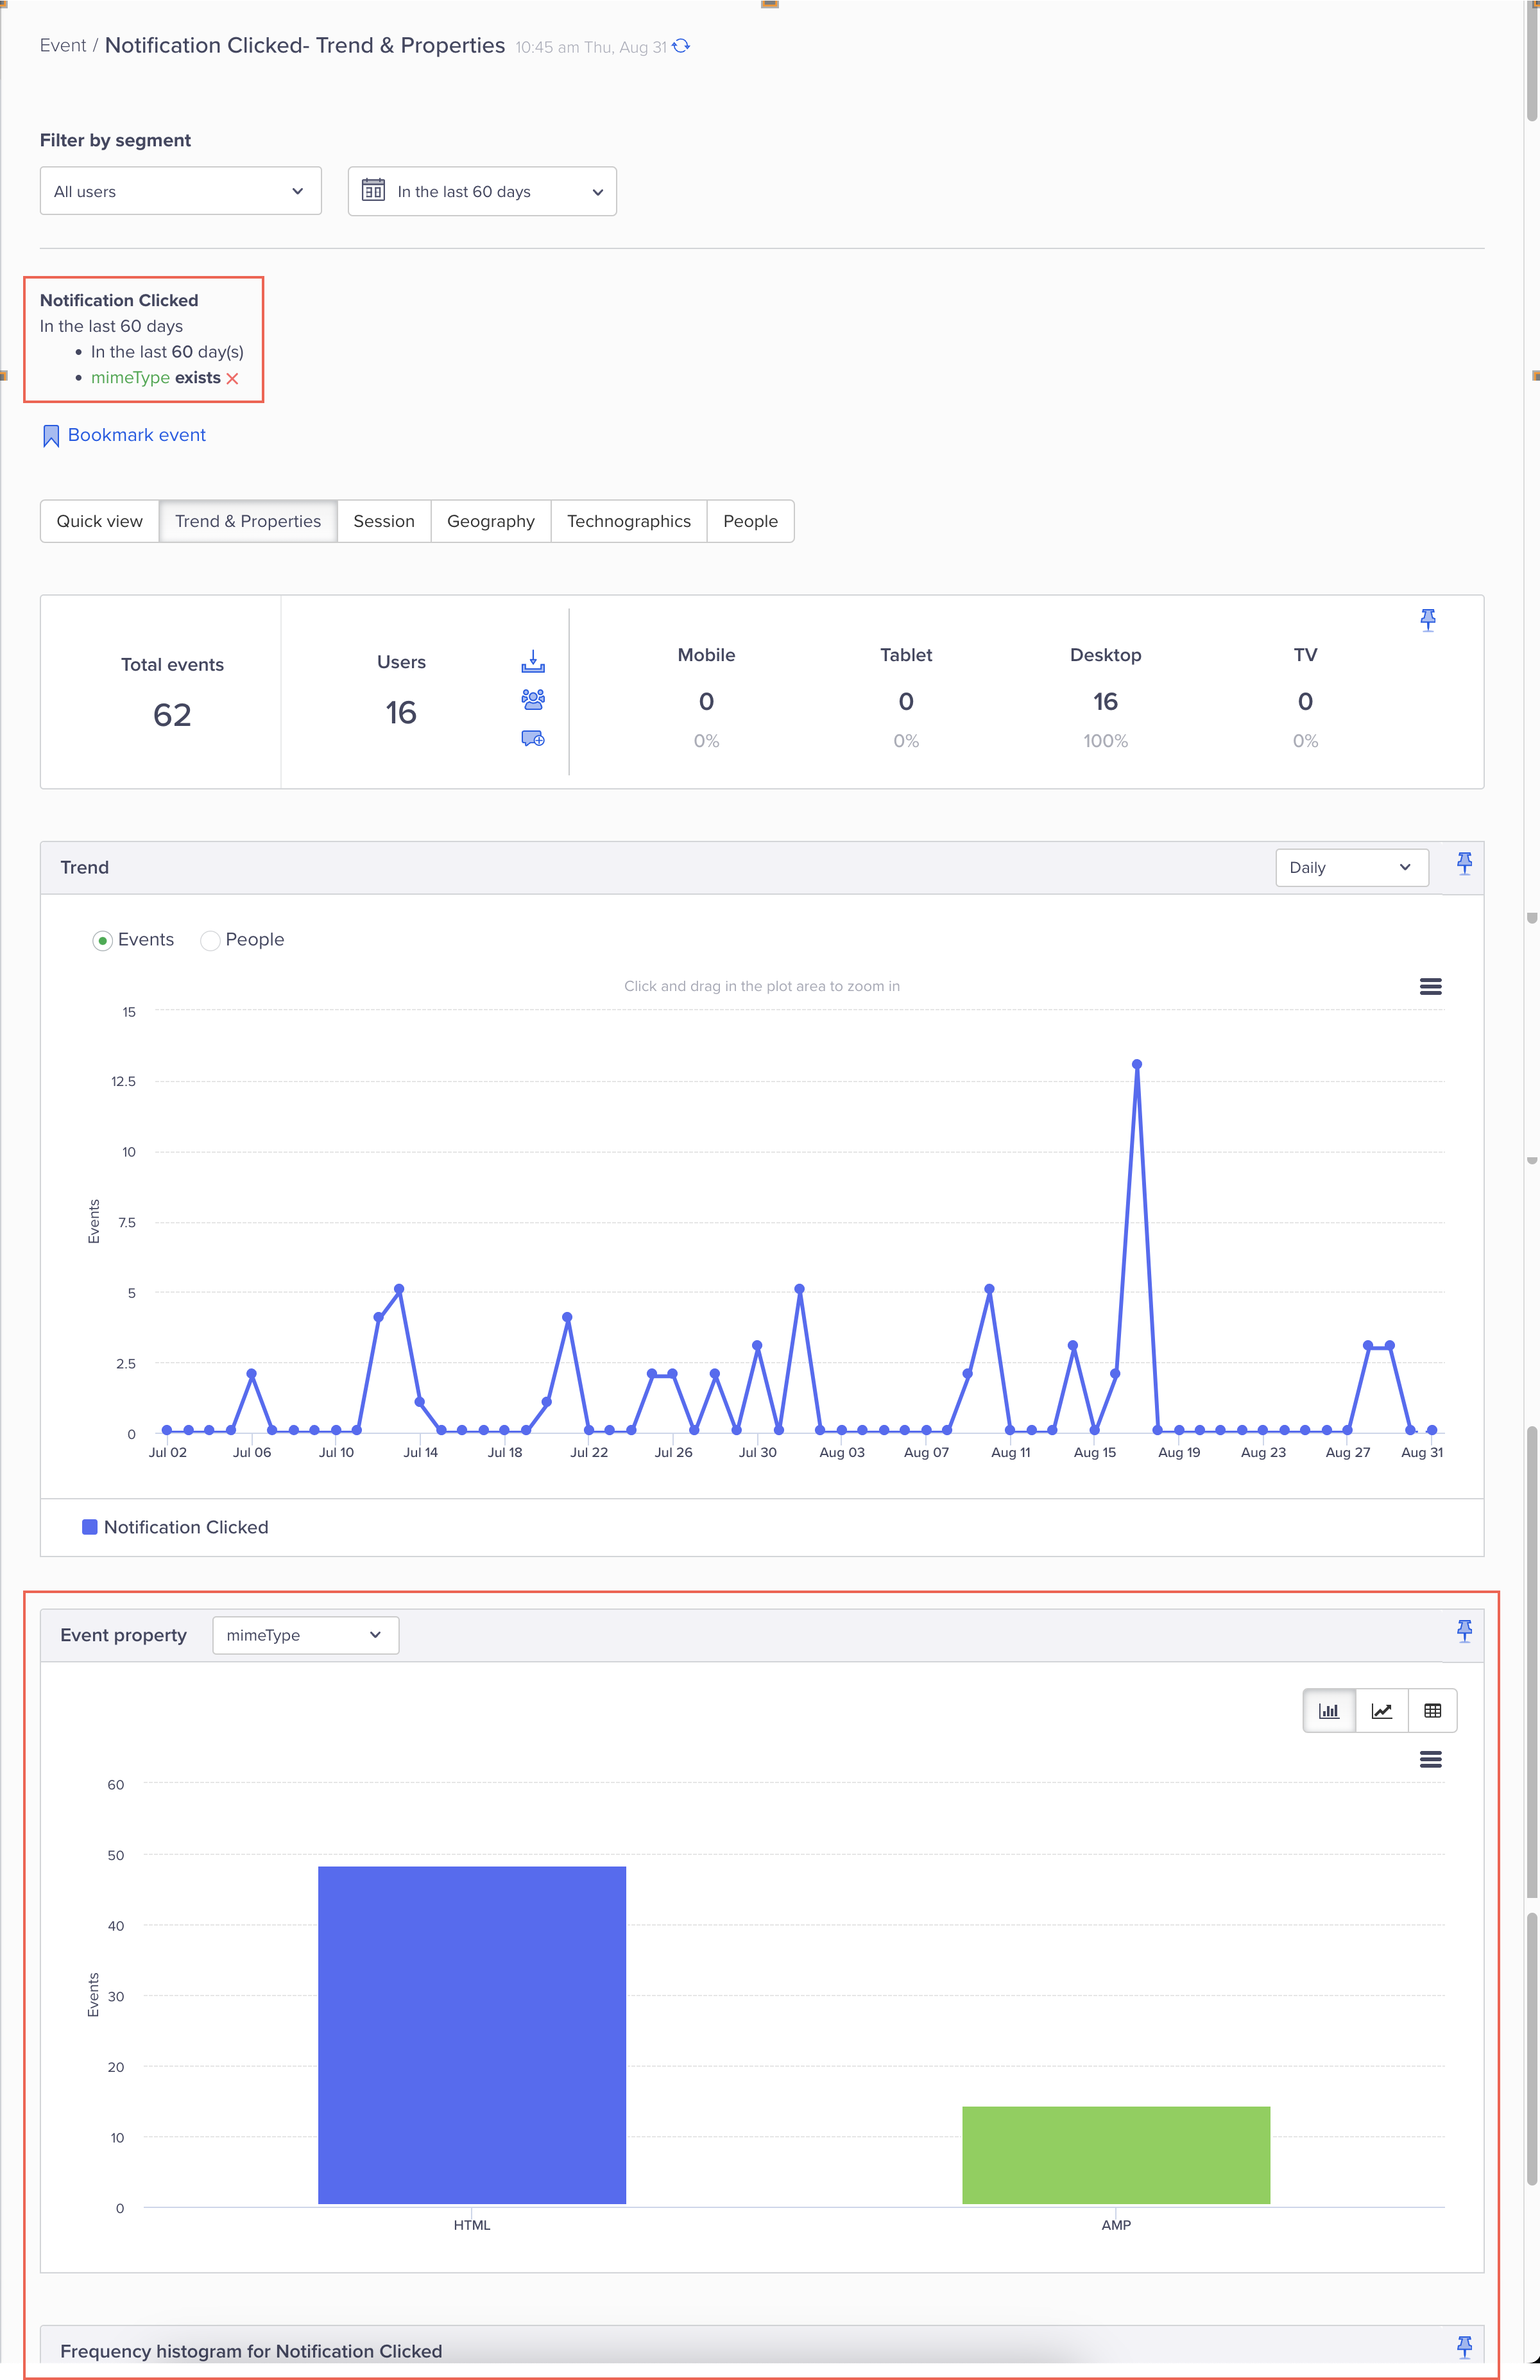
Event Distribution for AMP and HTML Emails
FAQs
Q. How do I track unsubscribed for AMP emails?
A. The tracking of unsubscribes is the same as HTML emails.
Q. What are the components supported for AMP?
A. AMP for Email supports various components such as forms, lists, accordions, GIF images, and so on. For more information, refer to AMP for Email Supported Components.
Q. How can I resolve the errors that Email Editor detects in the AMP code?
A. If the Email editor detects the error(s) in the AMP code, you can resolve the same by simply copying the code and pasting it to the AMP playground. The AMP Playground helps identify the exact error. The playground does not recognize @SpecialLink and you can ignore such errors. After all the errors are resolved, you can then copy the same code and paste it on the CleverTap dashboard.
Video Tutorial
AMP Email Campaign Using Custom HTML
Refer to the short tutorial below to get started with AMP Email campaigns.
Resources
The following are the helpful resources to get you started with AMP for Email: