Setup
Understand how to setup webhooks
Set Up Webhooks
Webhooks send an HTTP API request to a specified endpoint on your server, including information about the user, such as event details or user properties. As part of the setup, you will configure this endpoint on your server to receive and process the webhook requests.
To set up your first CleverTap webhook:
- Navigate to Settings > Engage > Channels> Webhooks from the CleverTap dashboard.
- Click + Add Webhook.
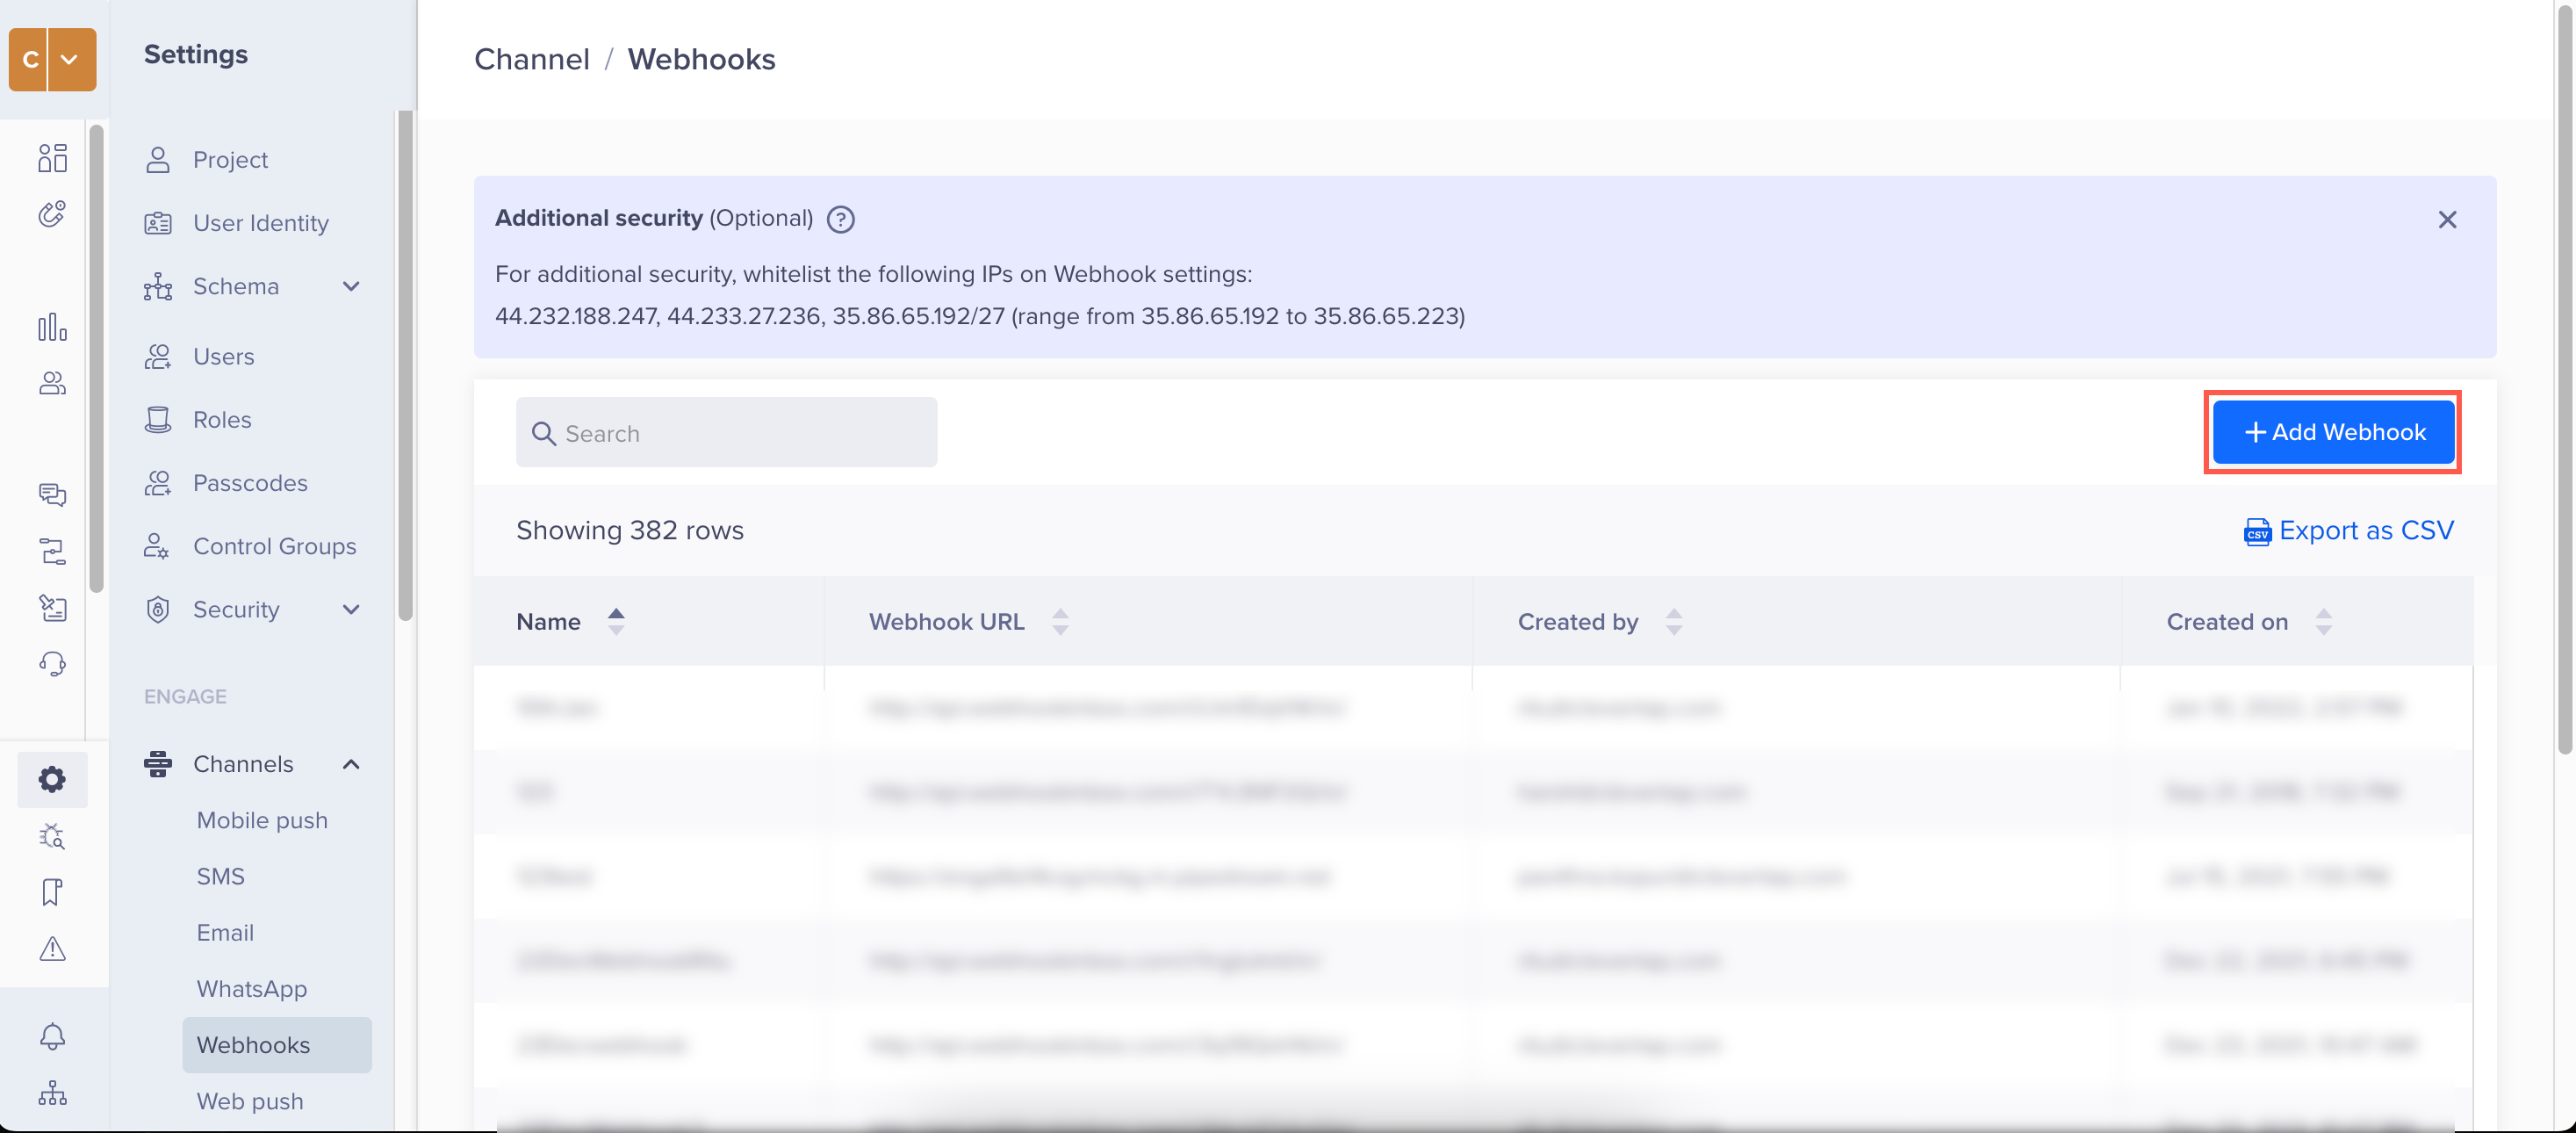
Add a Webhook
- Configure the webhook template.
HTTP MethodsThe following four HTTP methods are available for webhooks templates:
- POST
- GET
- DELETE
- PUT
- Add a webhook Name and Destination URL. If you currently do not have an endpoint created on your server to receive the webhook, you can use requestcatcher.com to create and test endpoint.
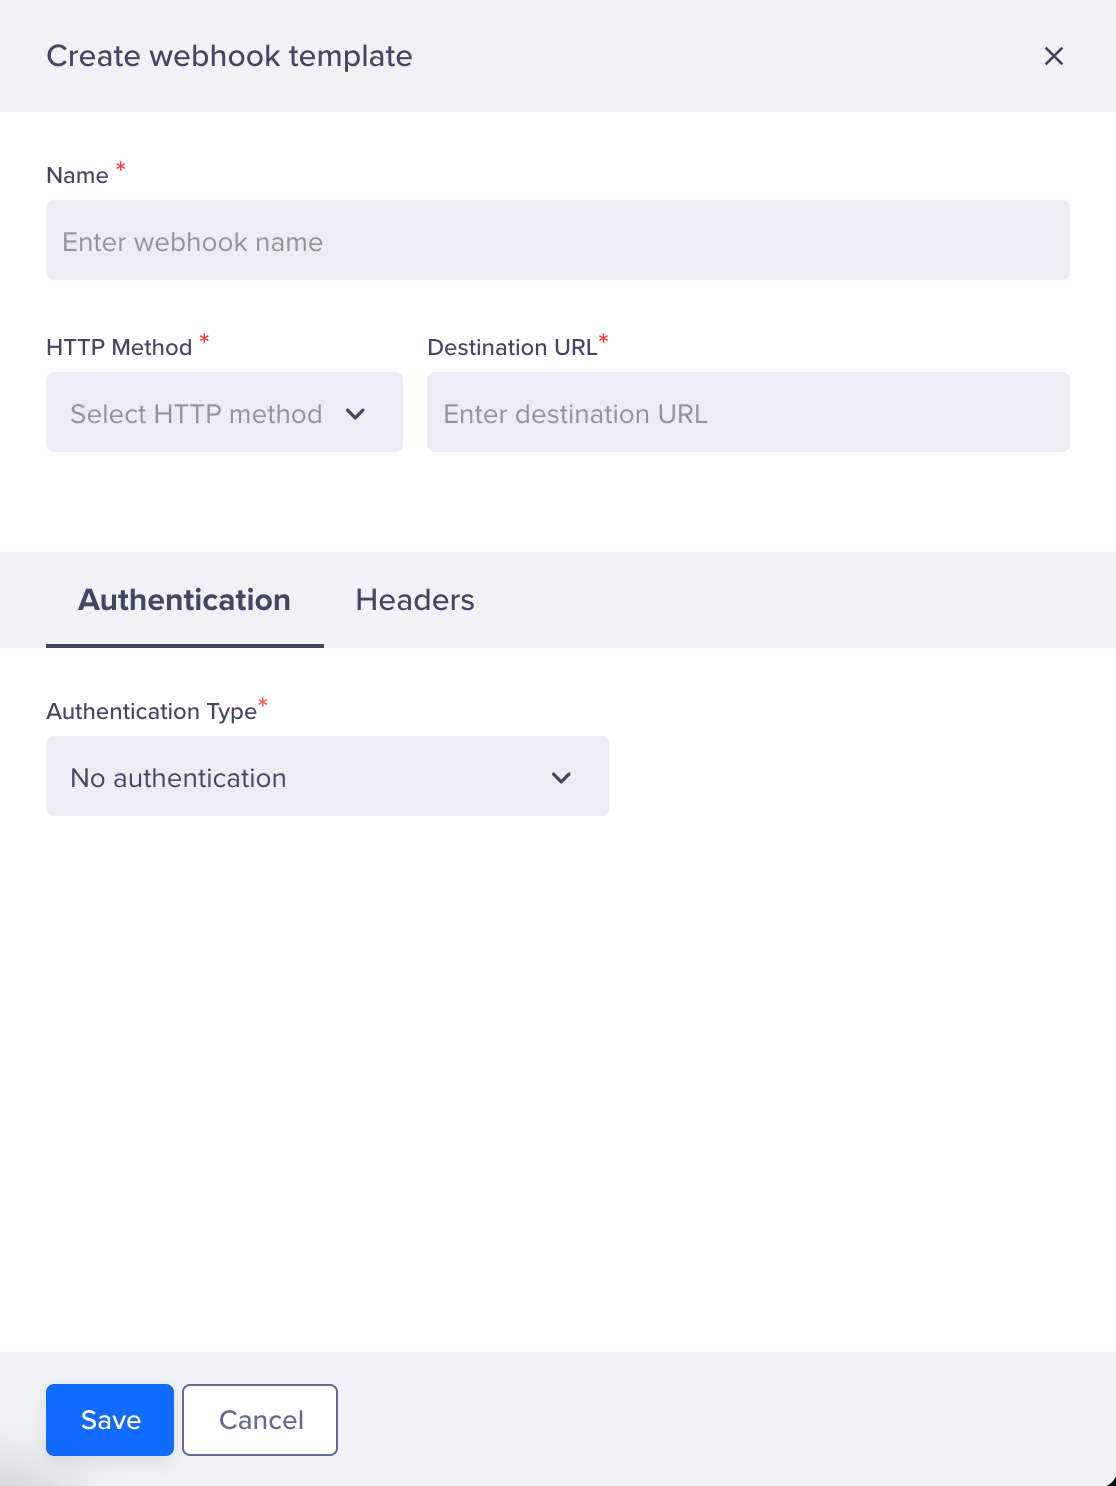
Configure Webhook Template
Select Authenticaton type from the Authentication tab.
- Click Create. CleverTap sends the following payload to your configured endpoint:
{
   "is_test":true,
   "targetId":1234,
   "key_values":{
      "key":"value"
   },
   "profiles":[
      {
         "Identity":"UserId",
         "Email":"[email protected]",
         "push_token":"Token"
      },
      {
         "Identity":"UserId",
         "Email":"[email protected]",
         "push_token":"Token"
      },
      {
         "Identity":"UserId",
         "Email":"[email protected]",
         "push_token":"Token"
      },
      {
         "Identity":"UserId",
         "Email":"[email protected]",
         "push_token":"Token"
      },
      {
         "Identity":"UserId",
         "Email":"[email protected]",
         "push_token":"Token"
      }
   ]
}
CleverTap saves the template if your endpoint responds with an HTTP status 200 OK

Sample Webhook Setup
Webhook ErrorsCleverTap sends the request and waits for three seconds for a response from the endpoint. If the endpoint URL fails to respond then CleverTap retries the request. If the retry attempt fails, the campaign stats page is updated with the error "Webhook Dispatch Failed."
Also, another probable cause for the error is if the webhook endpoint is temporarily unavailable or down.
Partner Tool for Setup
Another option besides setting up an endpoint on your server to listen to CleverTap webhooks is using a partner tool to report certain events. Let us consider a sample use case for better understanding.
For your recently published In-App rating campaign, you want to capture details of customers who provide negative feedback. You can configure a webhook that captures details of all the customers submitting less than or equal to three ratings and create a support ticket for it on Zendesk. Creating the support ticket will help your customer support team to reach out to them.
For more information about how to set up a webhook and create a CleverTap webhook campaign to report tickets on Zendesk based on customer ratings submitted, refer to the detailed integration guide.
Authentication Type
Webhook authorization on CleverTap ensures that only verified sources can send data through your Webhooks. It uses one of the following methods:
- No authentication: Authenticate users by adding credentials such as a password or token via the Headers tab.
- Basic Authorization: Authenticate using a username and password in the request headers to verify the sender's identity.
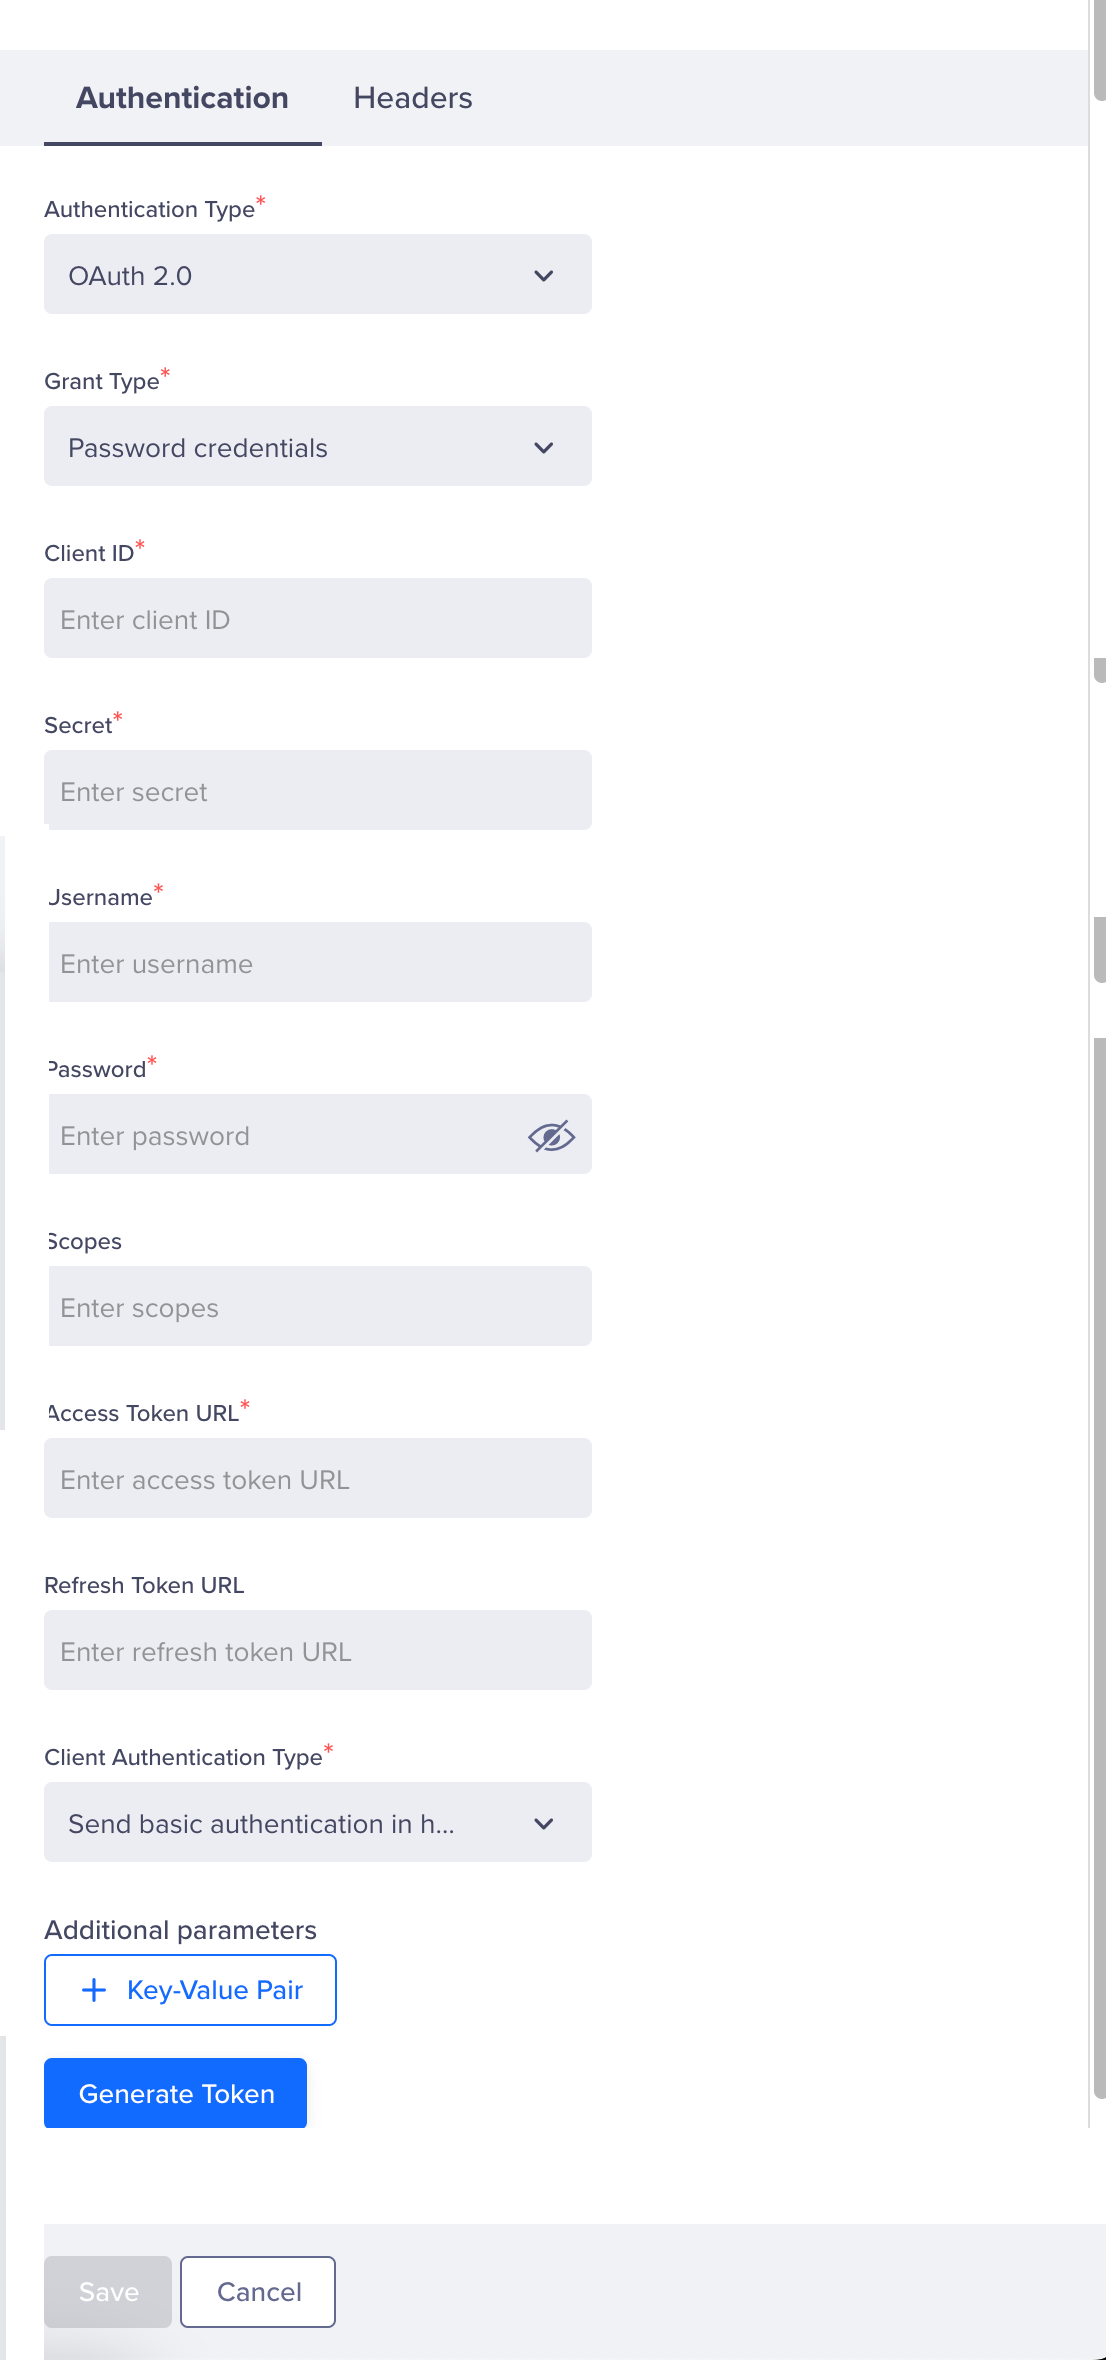
- OAuth 2.0: Authenticate requests by obtaining an access token from CleverTap and adding the token to the request headers to ensure that only authorized systems can send data.
Basic Authentication
Basic Authentication is a simple authentication method where the client sends an HTTP request with the following:
- Key:
Authorization - Value: 'Basic '+ base 64 encoding of a user ID and password separated by a colon.
Security AdvisoryThe Basic authentication method suits webhooks sent to internal systems behind a firewall or secure infrastructure.
Set Up Webhooks Using Basic Authentication
When setting up a webhook with Basic Authentication, CleverTap includes an Authorization header in every HTTP request sent to your server. The header follows the format shown below:
"Basic " + base64 encoding('YOUR_USERNAME:YOUR_PASSWORD')OAuth 2.0
OAuth is a secure authentication framework that lets CleverTap access resources for you without sharing your credentials. This method involves authenticating requests using an access token, which is added to the request headers to ensure that only authorized systems can access resources.
This ensures that CleverTap securely accesses third-party data or services by obtaining proper authorization from customers and leveraging secure tokens to manage API requests without exposing sensitive customer credentials by leveraging secure tokens.
Configure OAuth 2.0
CleverTap recommends using this method when you need a more secure and scalable approach to managing webhook authentication, especially when interacting with external APIs or services. To configure OAuth 2.0 on the CleverTap dashboard:
-
Navigate to Settings > Channels > Webhooks and click + Webhook. The Create webhook template window opens on the right.
-
Add a webhook Name and Destination URL. If you currently do not have an endpoint created on your server to receive the webhook, you can use requestcatcher.com to create an endpoint for testing purposes.
-
Select OAuth 2.0 from the Authenticaton Type list.
-
Select either from the following Grant Type list:
-
Enter the required details after setting up the Grant Type:
Configure OAuth 2.0
Field Description Client ID - A unique identifier issued to the requesting application (here, CleverTap) when it registers with an authorization server.
- It helps the authorization server recognize the application that makes the request and applies relevant authorization policies.
Secret - A confidential key issued to CleverTap during registration.
- It is used to authenticate the identity of the client application (here, CleverTap) and must be kept secure.
- It works alongside the Client ID to authenticate the identity of the requesting application and to prevent unauthorized parties from impersonating the requesting application.
Username* - A unique identifier issued to the resource owner, which is necessary when the OAuth flow requires a user's credentials.
- It is required when you are using the Password Credentials grant type, where the application needs to directly authenticate the user.
Password* - It works alongside the username to authenticate the resource owner (user) directly when the OAuth flow requires a user's credentials.
- It is required when you are using the Password Credentials grant type, where the application needs to directly authenticate the user.
Scopes - The parameters in OAuth that define the specific permissions requested by the client application.
- They control what parts of a user's account the client (here, CleverTap) has access to, such as reading profile data and so on.
Access Token URL The endpoint on the authorization server where a client application (CleverTap) sends a request to obtain an access token. Refresh Token URL* The endpoint on an authorization server where a client application sends a request to obtain a new access token using a refresh token. This field is available only when using Password Credentials grant type. Client Authentication Type - The method used by a client application to prove its identity to the authorization server in OAuth 2.0 flows.
- This ensures that only the authorized client can request tokens or access protected resources.
- The following are the available options:
- Send Basic Authentication in Header: Include an Authorization header with encoded username and password.
- Send Bearer Authentication in Header: Include an Authorization header with an access token obtained from OAuth.
NoteThe fields indicated with * indicate that those are required only when using Password Credentials Grant Type.
- Click Generate. This creates the Access Token using the provided credentials, which are displayed below:
- Map the Access Token and Refresh Token (when using the Password Credentials grant type).
- Select an expiry option from the Expiry dropdown.
The generated OAuth response includes a key with an expiry, which is not encoded.
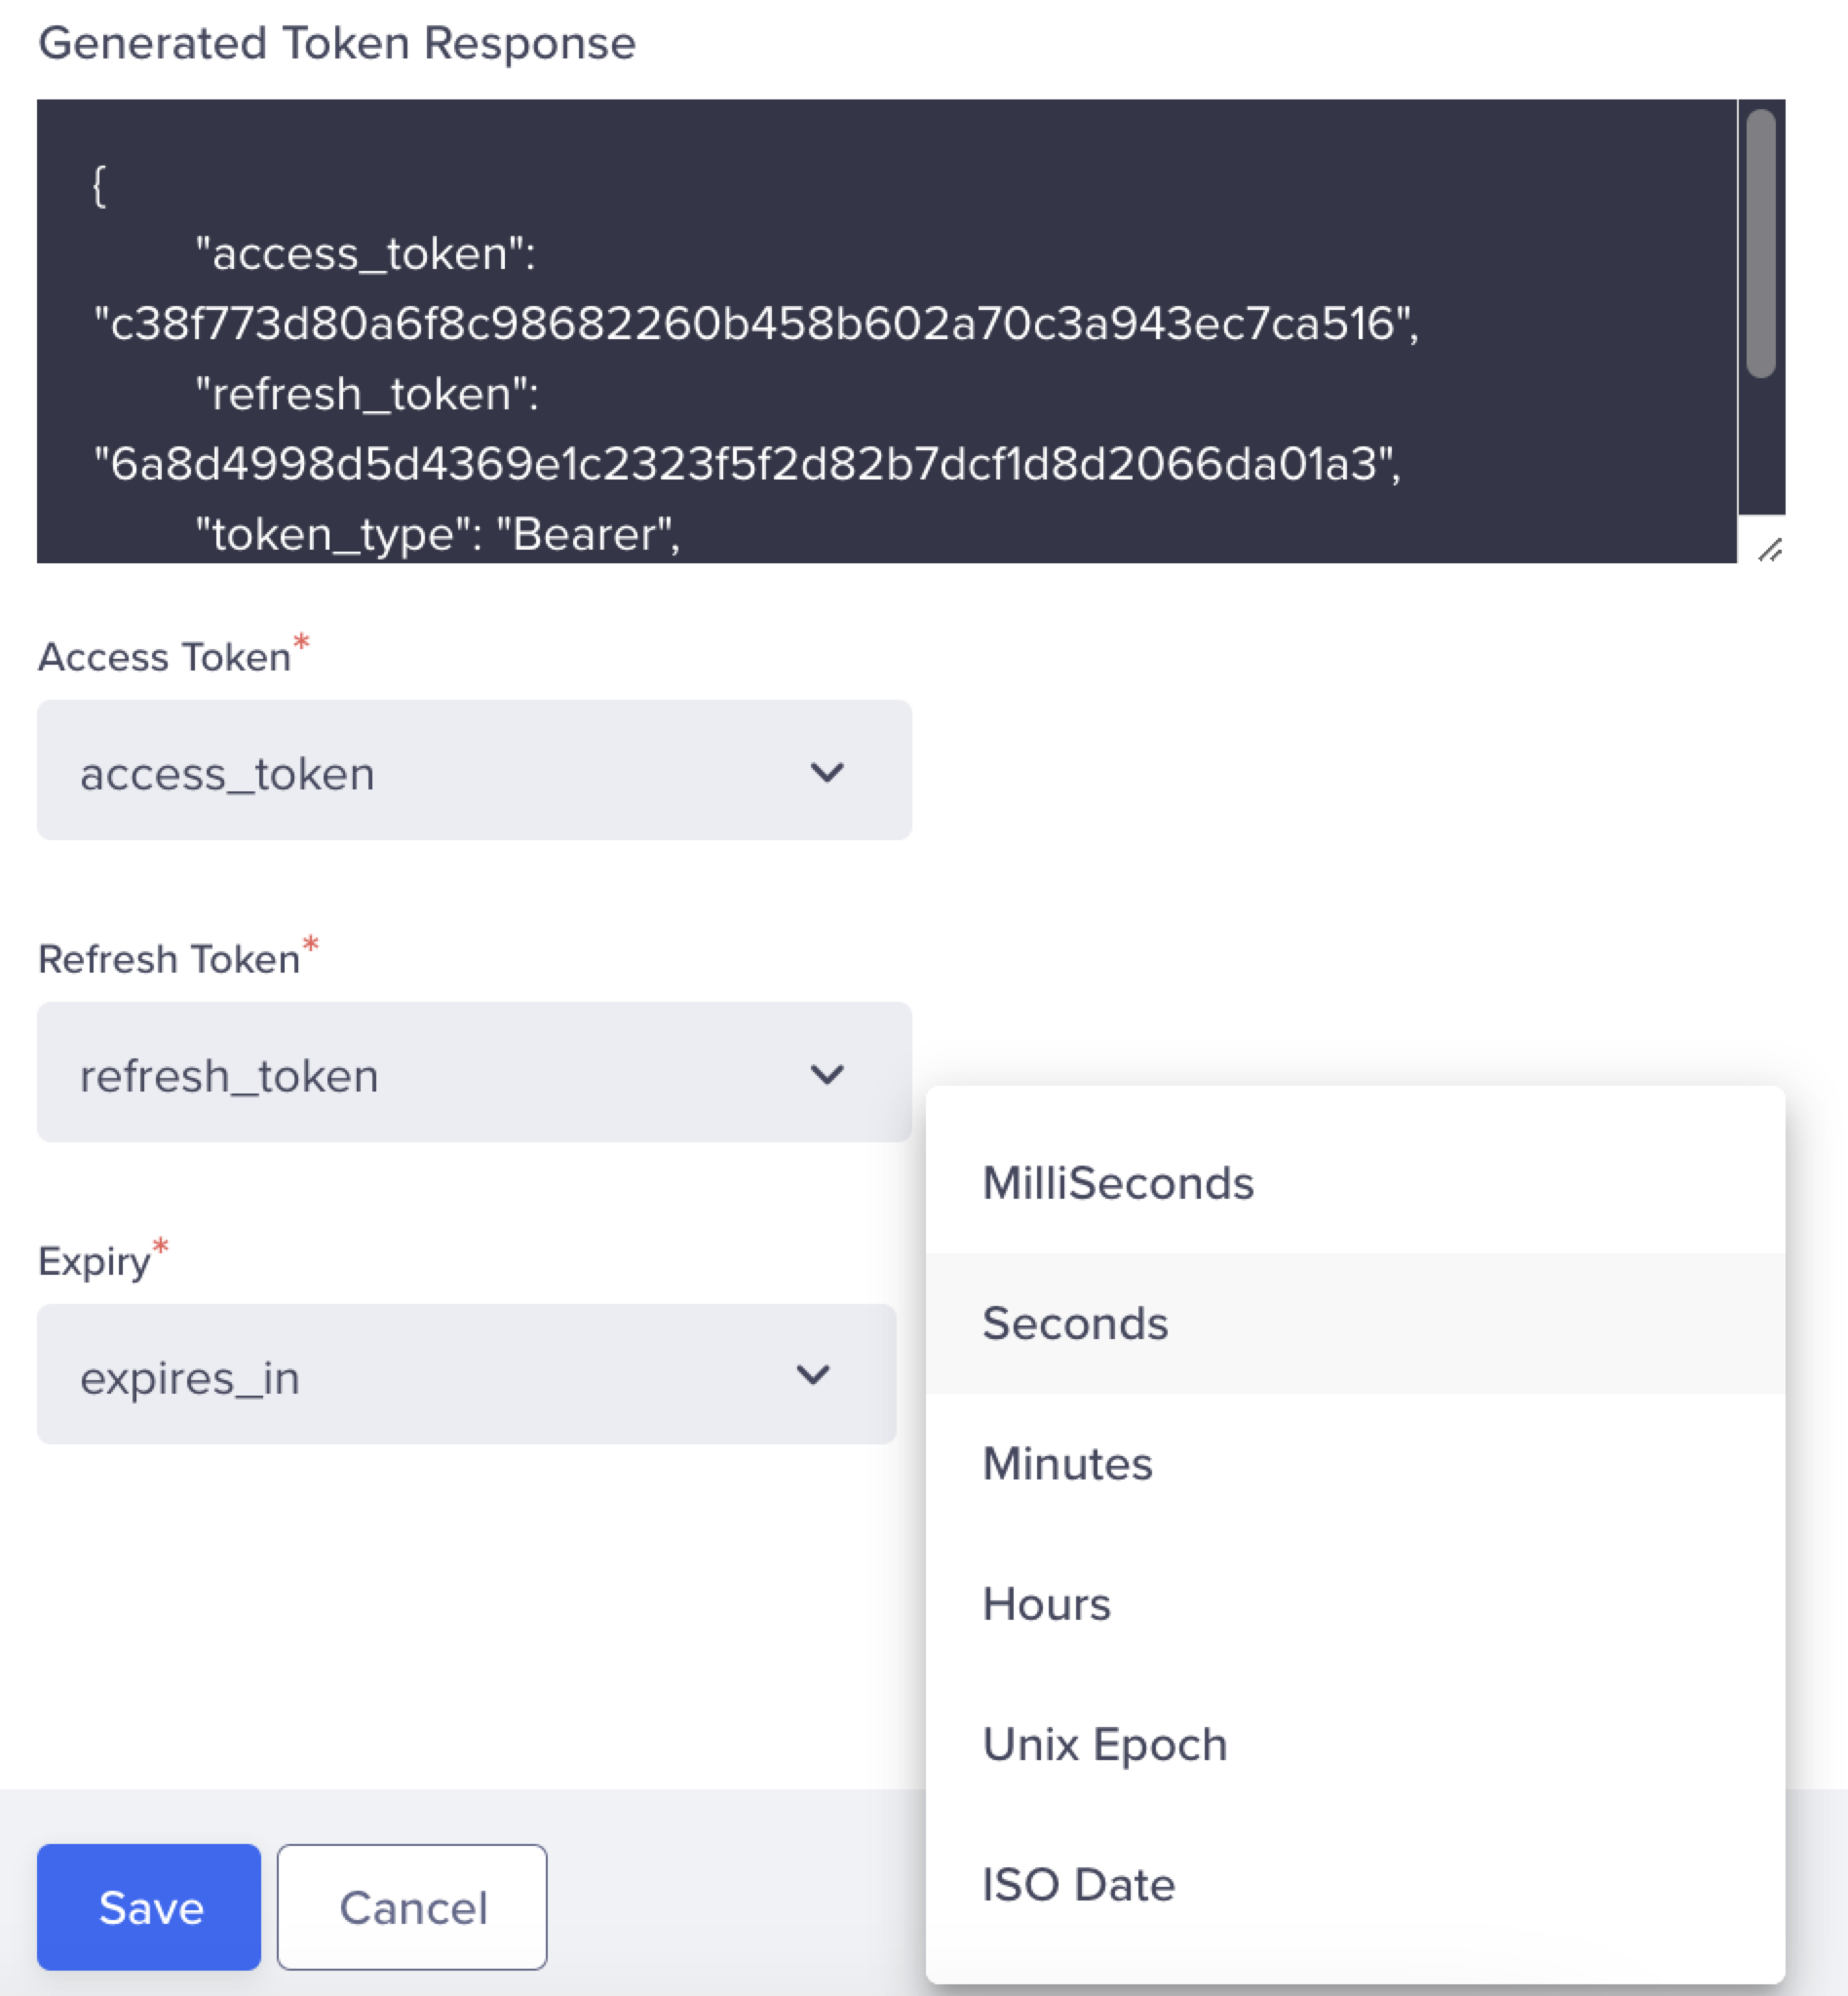
Select Expiry from Expiry Dropdown
- Click + Key-Value Pair and enter the headers for the API.
- Click Save to create a webhook.
Grant Type
Grant Type in OAuth refers to the method CleverTap uses to obtain an access token from the authorization server. In CleverTap, there are two methods to obtain the access token:
Using Password Credentials
This method involves providing a username and password to obtain an access token. It is typically used when the application has direct access to user credentials. Here is the detailed flow:
Password Credentials Flow
- Provide User Credentials: The user provides their credentials (username and password) to CleverTap.
- Send Credentials to Authentication Server: CleverTap sends the user credentials to the authorization server. This request must include the following in the request header: Client ID and Client Secret Key.
- Receive Access Token: If the user credentials are correct, the authorization tool responds with an access token.
- Use Access Token: CleverTap uses this access token to make authorized requests to the resource server.
- Validate Access Token: The resource server validates the access token before responding to your application's request.
Using Client Credentials
This method involves providing a client ID and client secret key to obtain an access token. This method does not require a username and password for the OAuth flow; instead, it relies on these credentials to authenticate the application and generate a token for secure interactions. Here are the detailed steps:
Client Credentials Flow
- Send Authorization Request to Authorization Server: CleverTap makes an authorization request to the authorization server using the Client Credentials, such as Client ID and Secret Key.
- Receive Access Token: The authorization tool responds with an access token if the client credentials are accurate.
- Use Access Token: CleverTap uses this access token to make authorized requests to the resource server (for example, accessing user data).
- Validate Access Token: The resource server validates the access token before responding to the request.
FAQs
Q. What are the timeouts and retry limits for Webhook?
A. The timeout for Webhook is 5 seconds with a retry limit of 2 times. For more information, refer to the Channel-Specific Timeouts and Retries.
Updated 8 months ago