Salesforce Export
Overview
Integrate CleverTap with Salesforce CRM to export user profile data, event properties, and campaign responses in real time via a secure webhook. The webhook uses the OAuth 2.0 Client Credentials flow to authenticate with Salesforce and delivers data directly to a custom Apex REST endpoint, enabling CRM enrichment and workflow automation from CleverTap campaigns.
The integration is divided into two parts:
- Salesforce Dashboard Setup: Create the External Client App, custom object, and Apex REST class.
- CleverTap Dashboard Setup: Configure the OAuth 2.0 webhook provider and launch a webhook campaign.
Use Cases
-
Log NPS and Survey Responses
Send Net Promoter Score feedback and in-app survey responses from CleverTap into Salesforce for customer success tracking and case creation.
-
Send Leads from Campaigns
Export lead details captured through CleverTap forms or campaigns into Salesforce for timely follow-up by your sales team.
-
Sync Event and Product Feedback
Capture user responses to webinars, product launches, or promotional events, and send them to Salesforce to trigger workflows or update lifecycle stages.
-
Enrich CRM with Behavioral Data
Add product usage metrics, feature interaction logs, and event-level insights to Salesforce user profiles for segmentation and targeted outreach.
Prerequisites
Before configuring the integration, ensure you have the following:
Salesforce
- A valid Salesforce account on Enterprise, Unlimited, or Performance edition with API access enabled.
- Permission to access Object Manager, App Manager, Flow Builder, and Apex Classes.
- Permission to create an External Client App in Salesforce.
- Familiarity with the OAuth 2.0 Client Credentials Flow.
CleverTap
Access to add Webhook providers and create campaigns on the CleverTap dashboard
Connected Apps Retiring in SalesforceSalesforce is retiring Connected Apps in favor of External Client Apps.
Set Up Salesforce Dashboard
Configure Salesforce to receive data from CleverTap by performing the following three steps in order:
Create External Client App
The External Client App generates the OAuth Client ID and Client Secret that CleverTap uses to obtain an OAuth access token as follows:
-
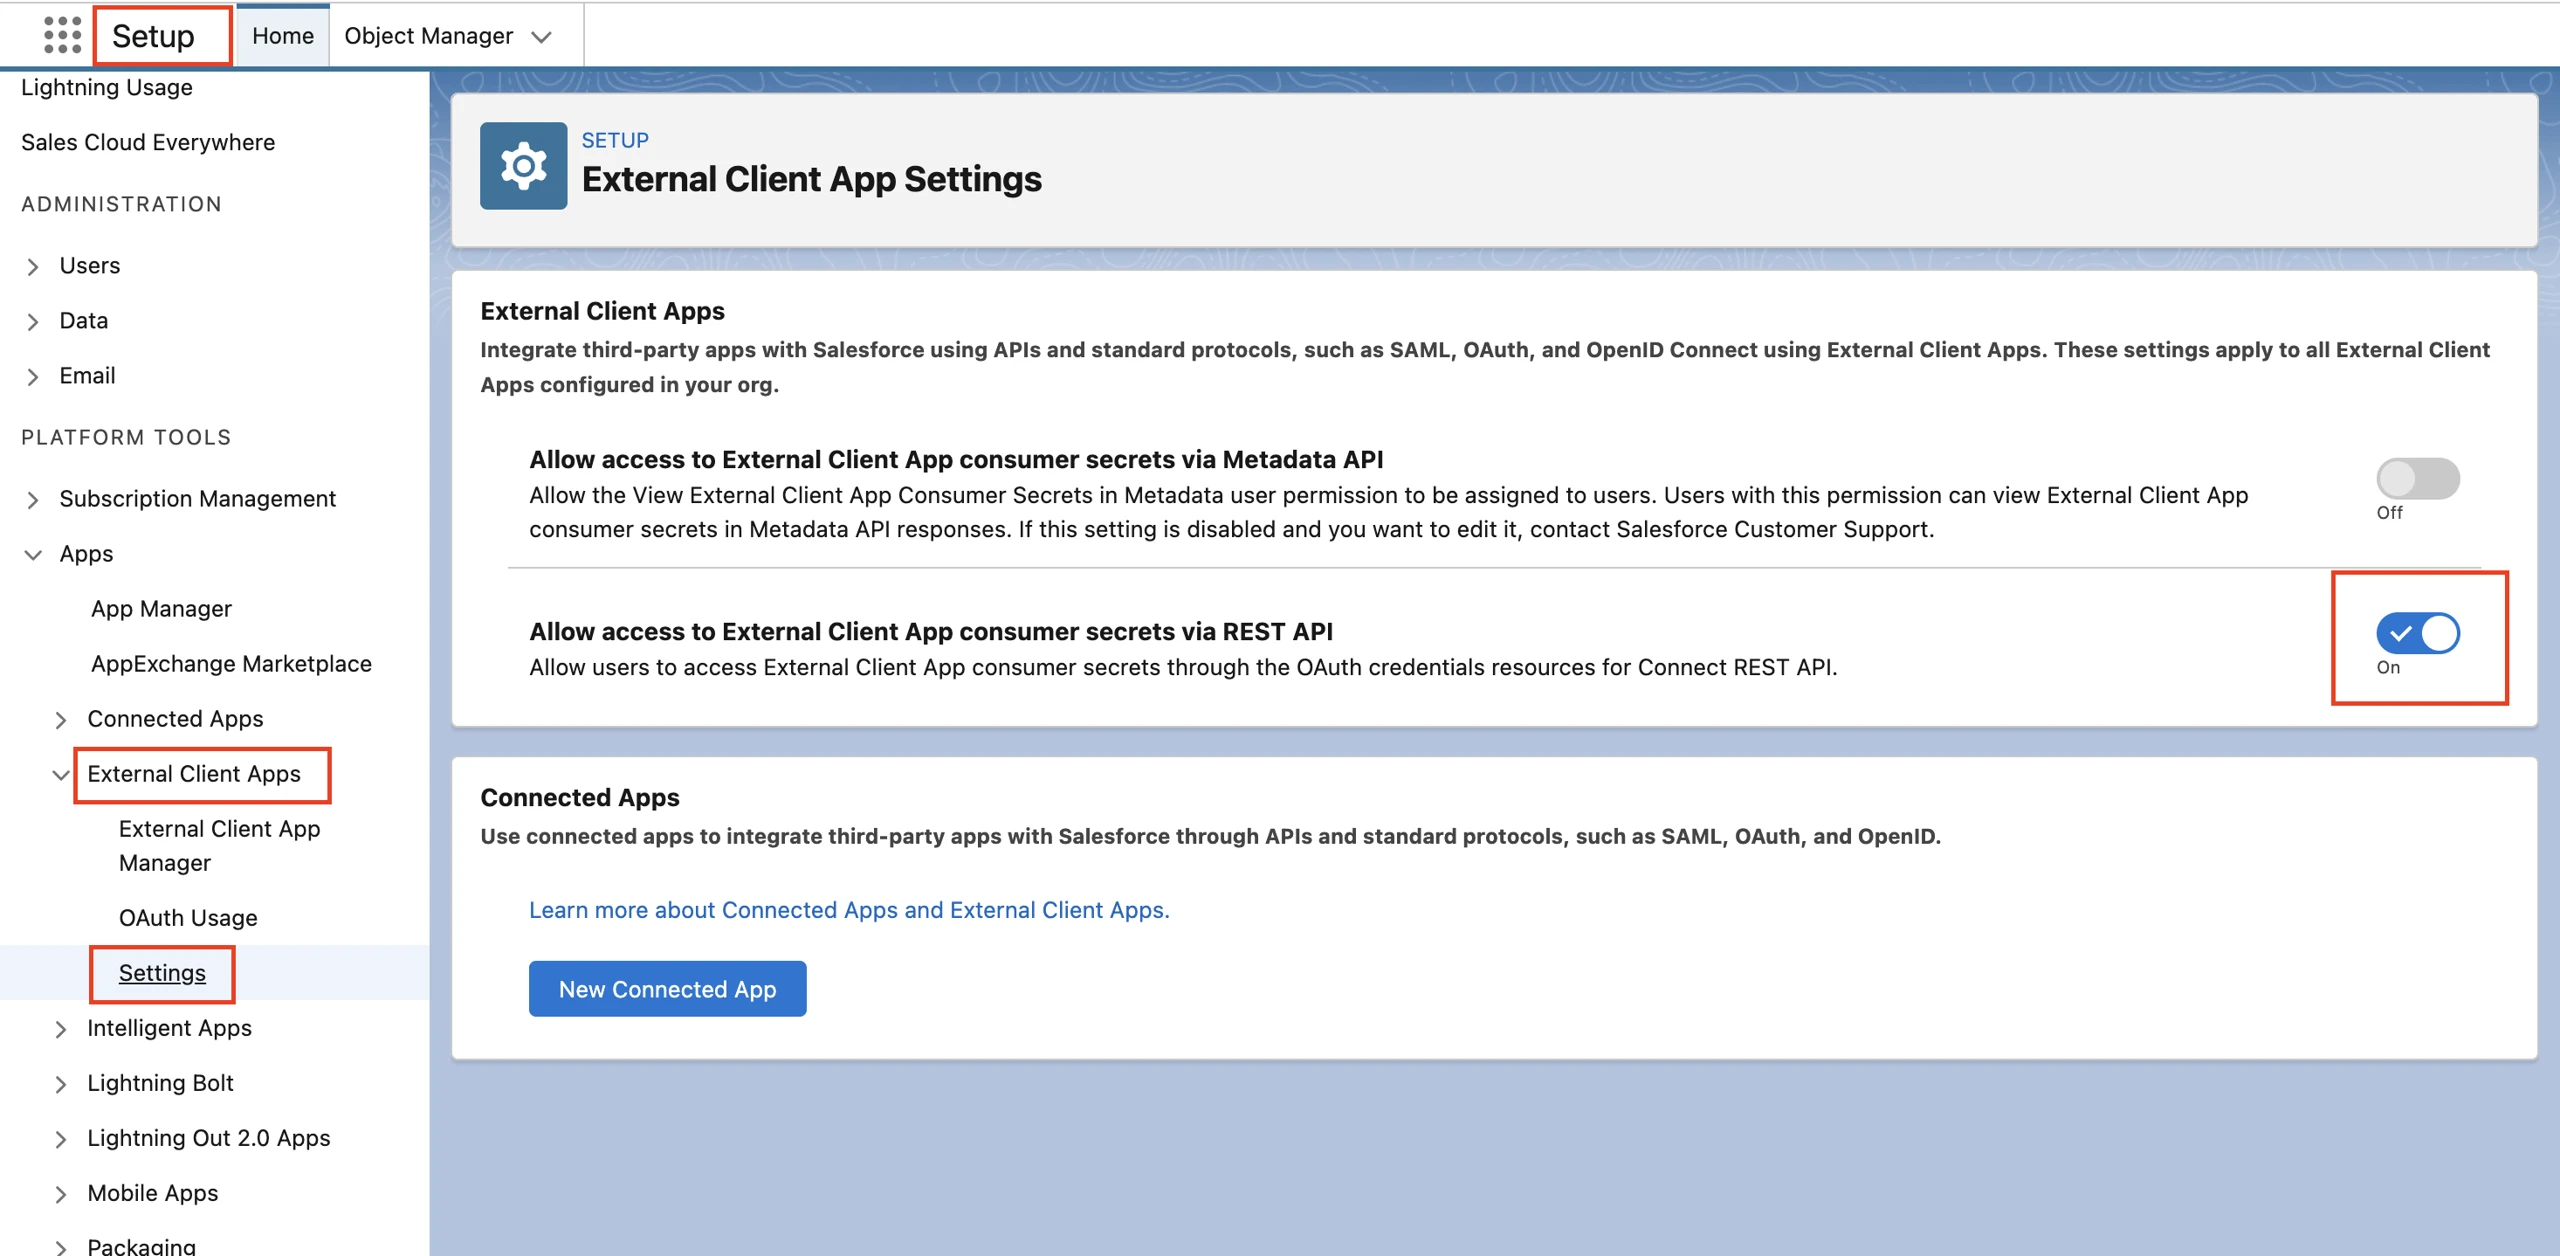
From the Salesforce dashboard, open Setup.
-
Go to Platform Tools > Apps > External Client Apps > Settings.
-
Toggle ON the Allow access to External Client App consumer secrets via REST API and Allow creation of connected apps options.
Create External Client App
-
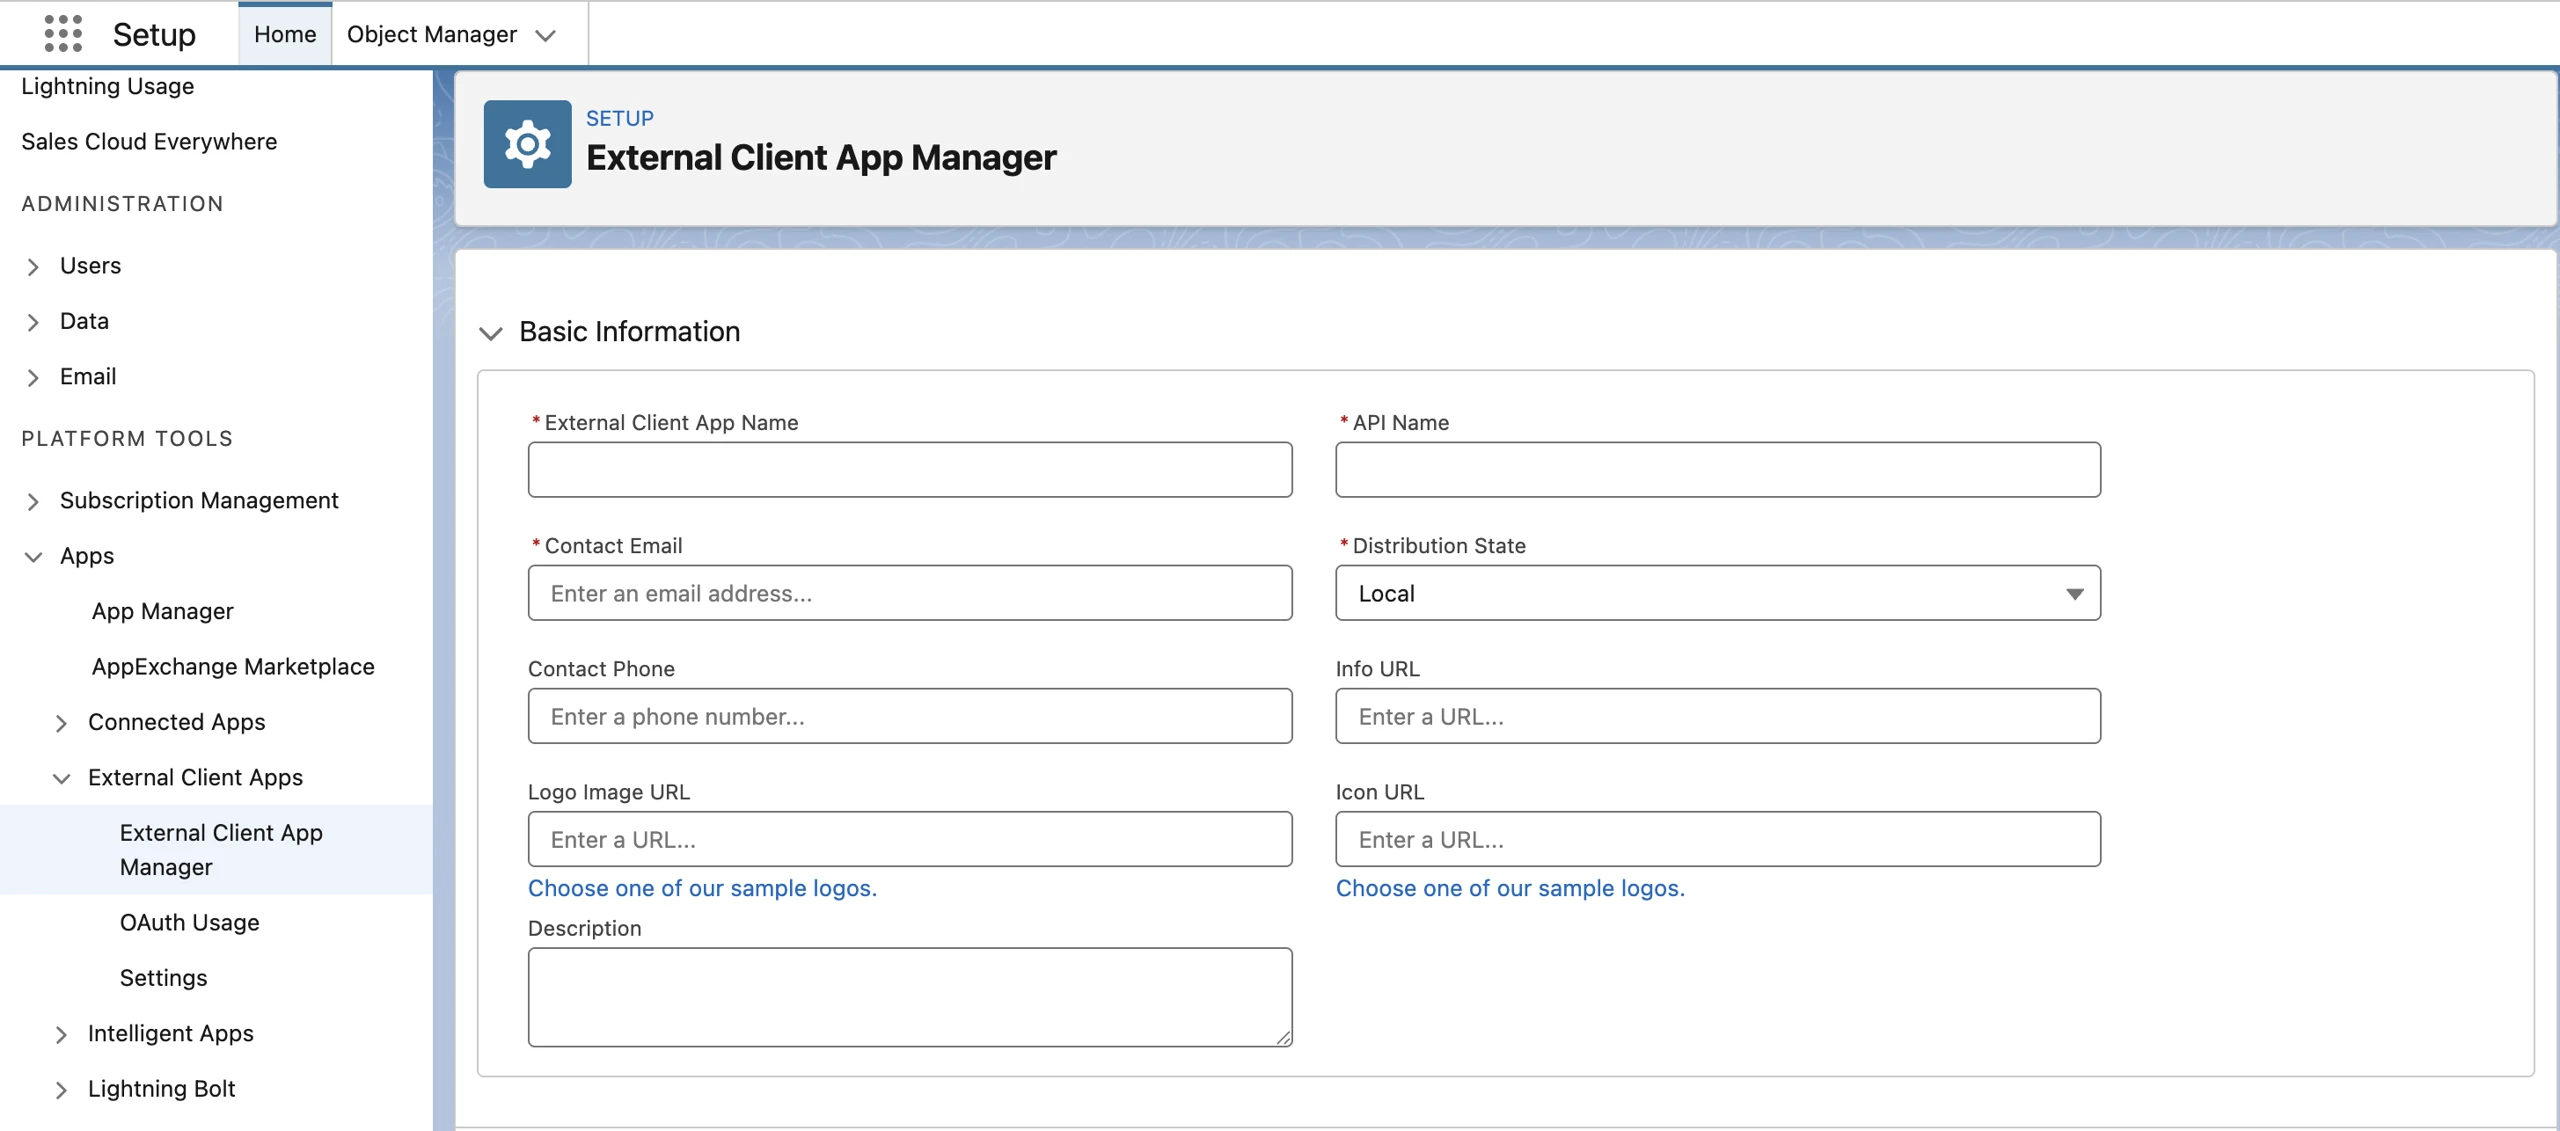
Go to External Client App Manager and click New External Client App.
-
Enter the following details:
Basic Information - External Client App
App Settings & OAuth Scopes - External Client App

Flow Settings & Security - External Client App
Section Field Description Basic Information External Client App Name Enter a descriptive name for the app (for example, CleverTap Exports).API Name Use the auto-generated value or specify a custom name if required. Contact Email Enter a valid email address for integration-related notifications. Distribution State Keep it Local. API (Enable OAuth Settings) Enable OAuth Select this option to configure OAuth 2.0 authentication for the app. App Settings Callback URL Use https://<instanceURL>/services/oauth2/callback as a placeholder
For instanceURL, look at your browser URL when logged into Salesforce. It will look like https://<your-domain>.my.salesforce.com/.Your instance URL is: https://<your-domain>.my.salesforce.com.
So the callback endpoint will be: https://<your-domain>.my.salesforce.com/services/oauth2/callback
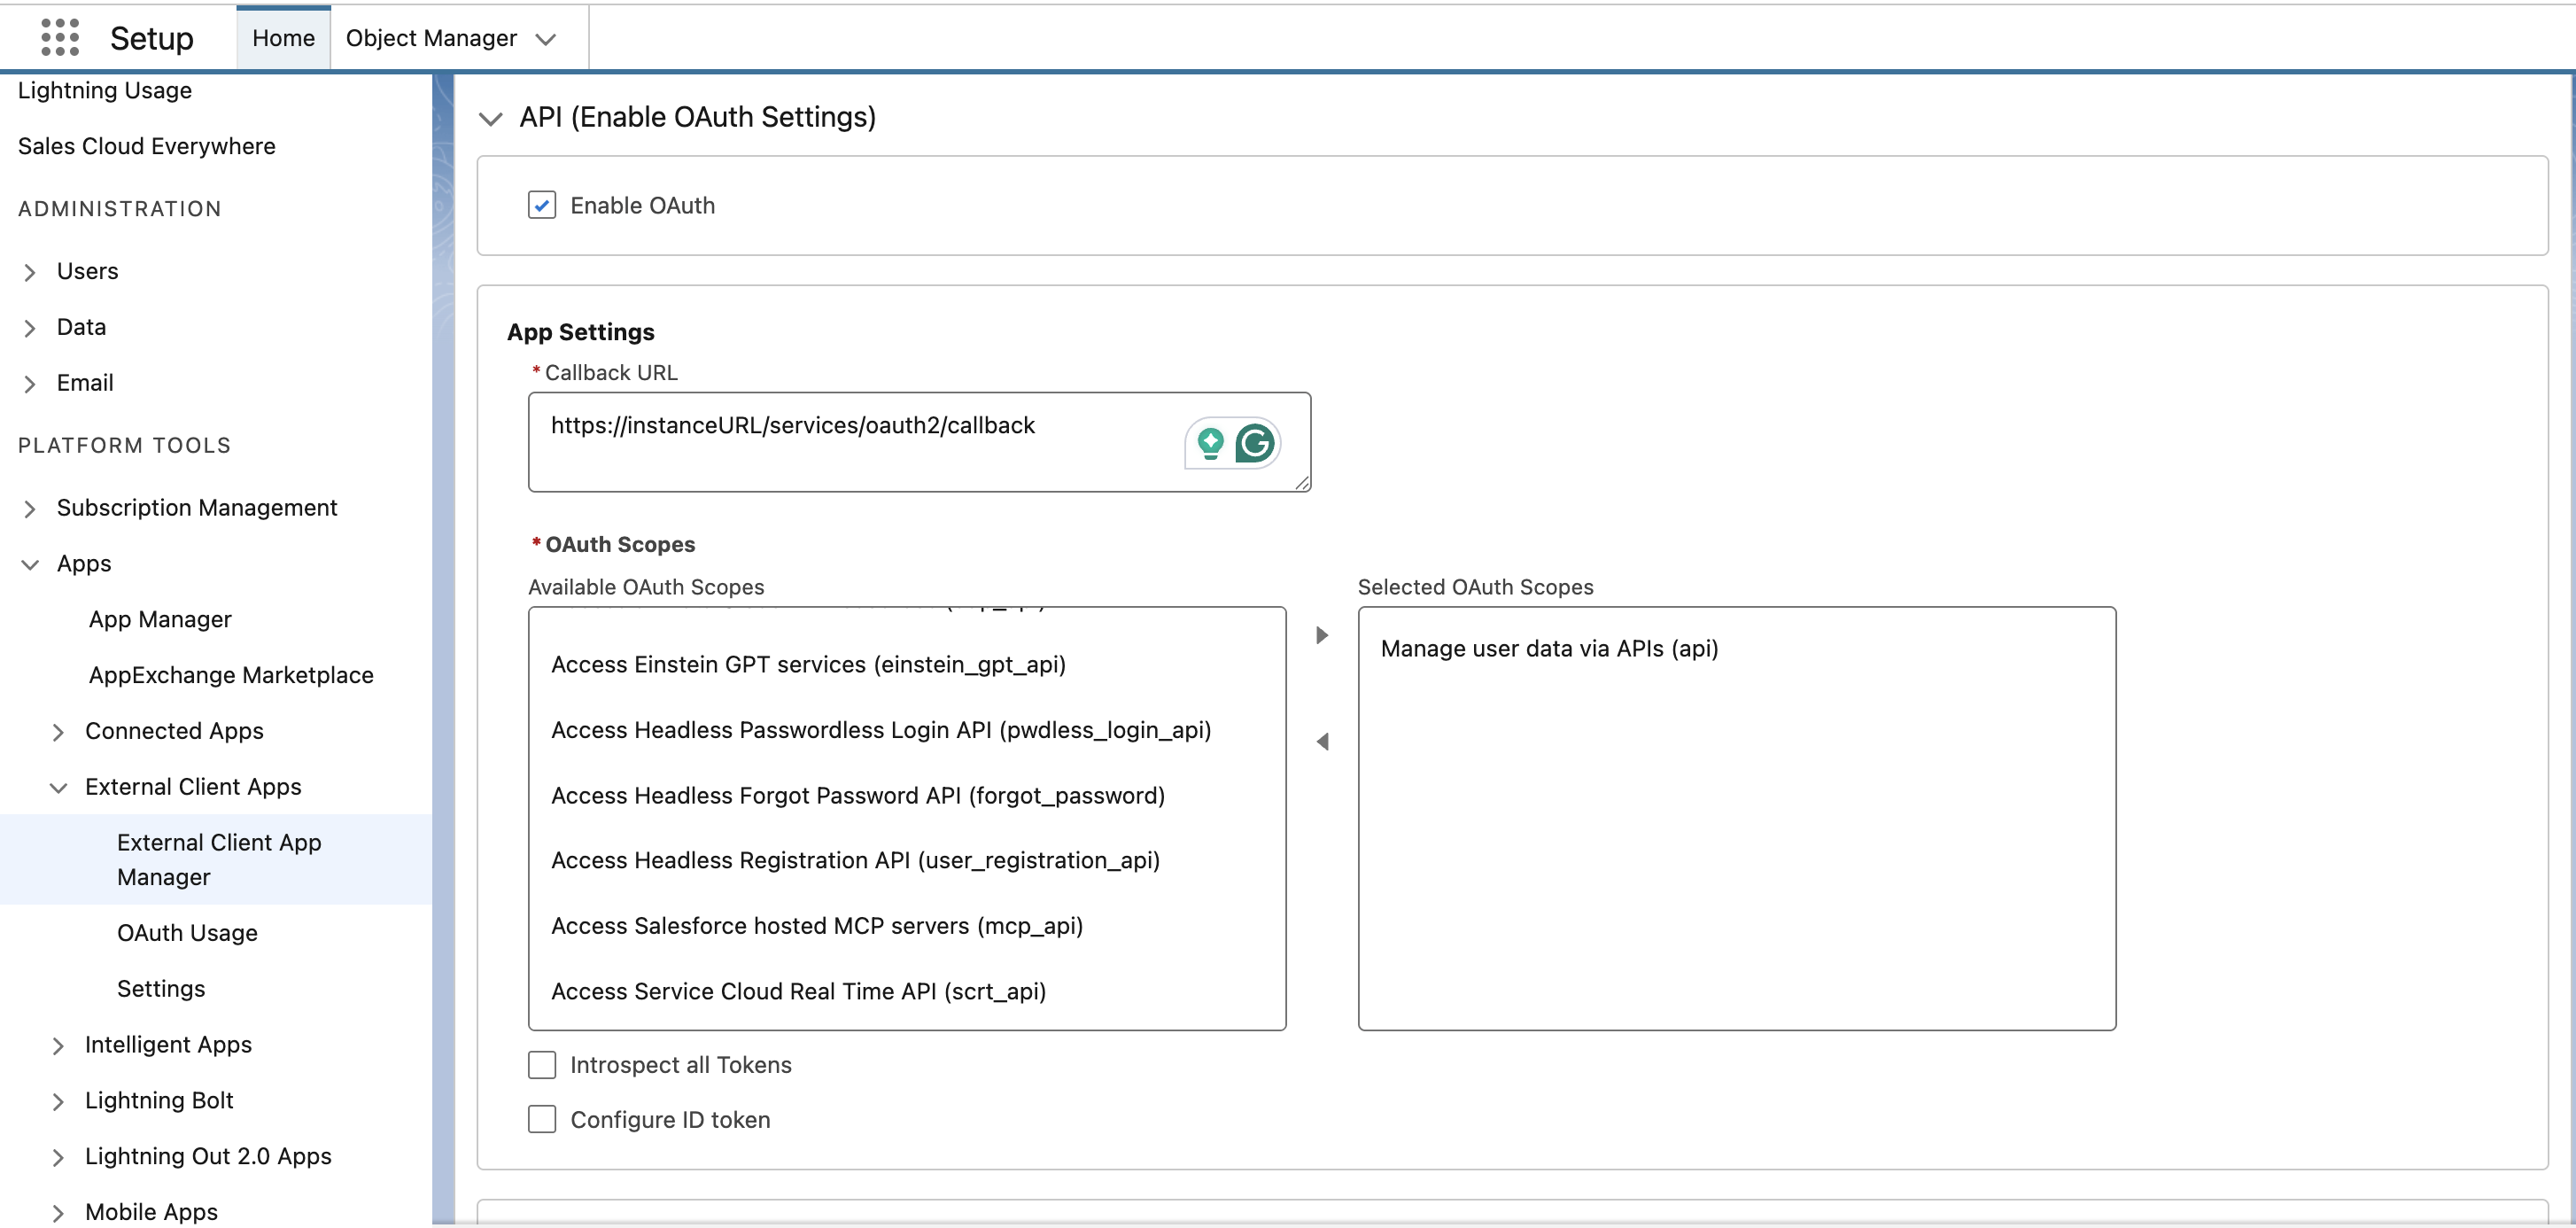
OAuth Scopes Select Manage user data via APIs (api) and click Add to authorize API permissions. It grants access to all REST API endpoints, including your custom class. Flow Enablement Enable Client Credentials Flow Select this option to allow OAuth token generation via client credentials. Enable Token Exchange Flow Select this option to support token exchange as part of the OAuth flow. Require a secret for Token Exchange Flow Enable to ensure the client secret is required for token exchange Security Require a secret for Web Server Flow Enable secure Web Server OAuth flow with a client secret. Require a secret for the Refresh Token Flow Enforce the use of client secret when refreshing tokens. Other Options All remaining settings, such as digital signatures, refresh token rotation, Issue JSON Web Token (JWT)-based access tokens for named users, and so on Leave these disabled unless specifically required by your Salesforce org.
-
-
Save the app, then open Policies and configure the following:
Configure OAuth Policies & App Authorization
- OAuth Policies
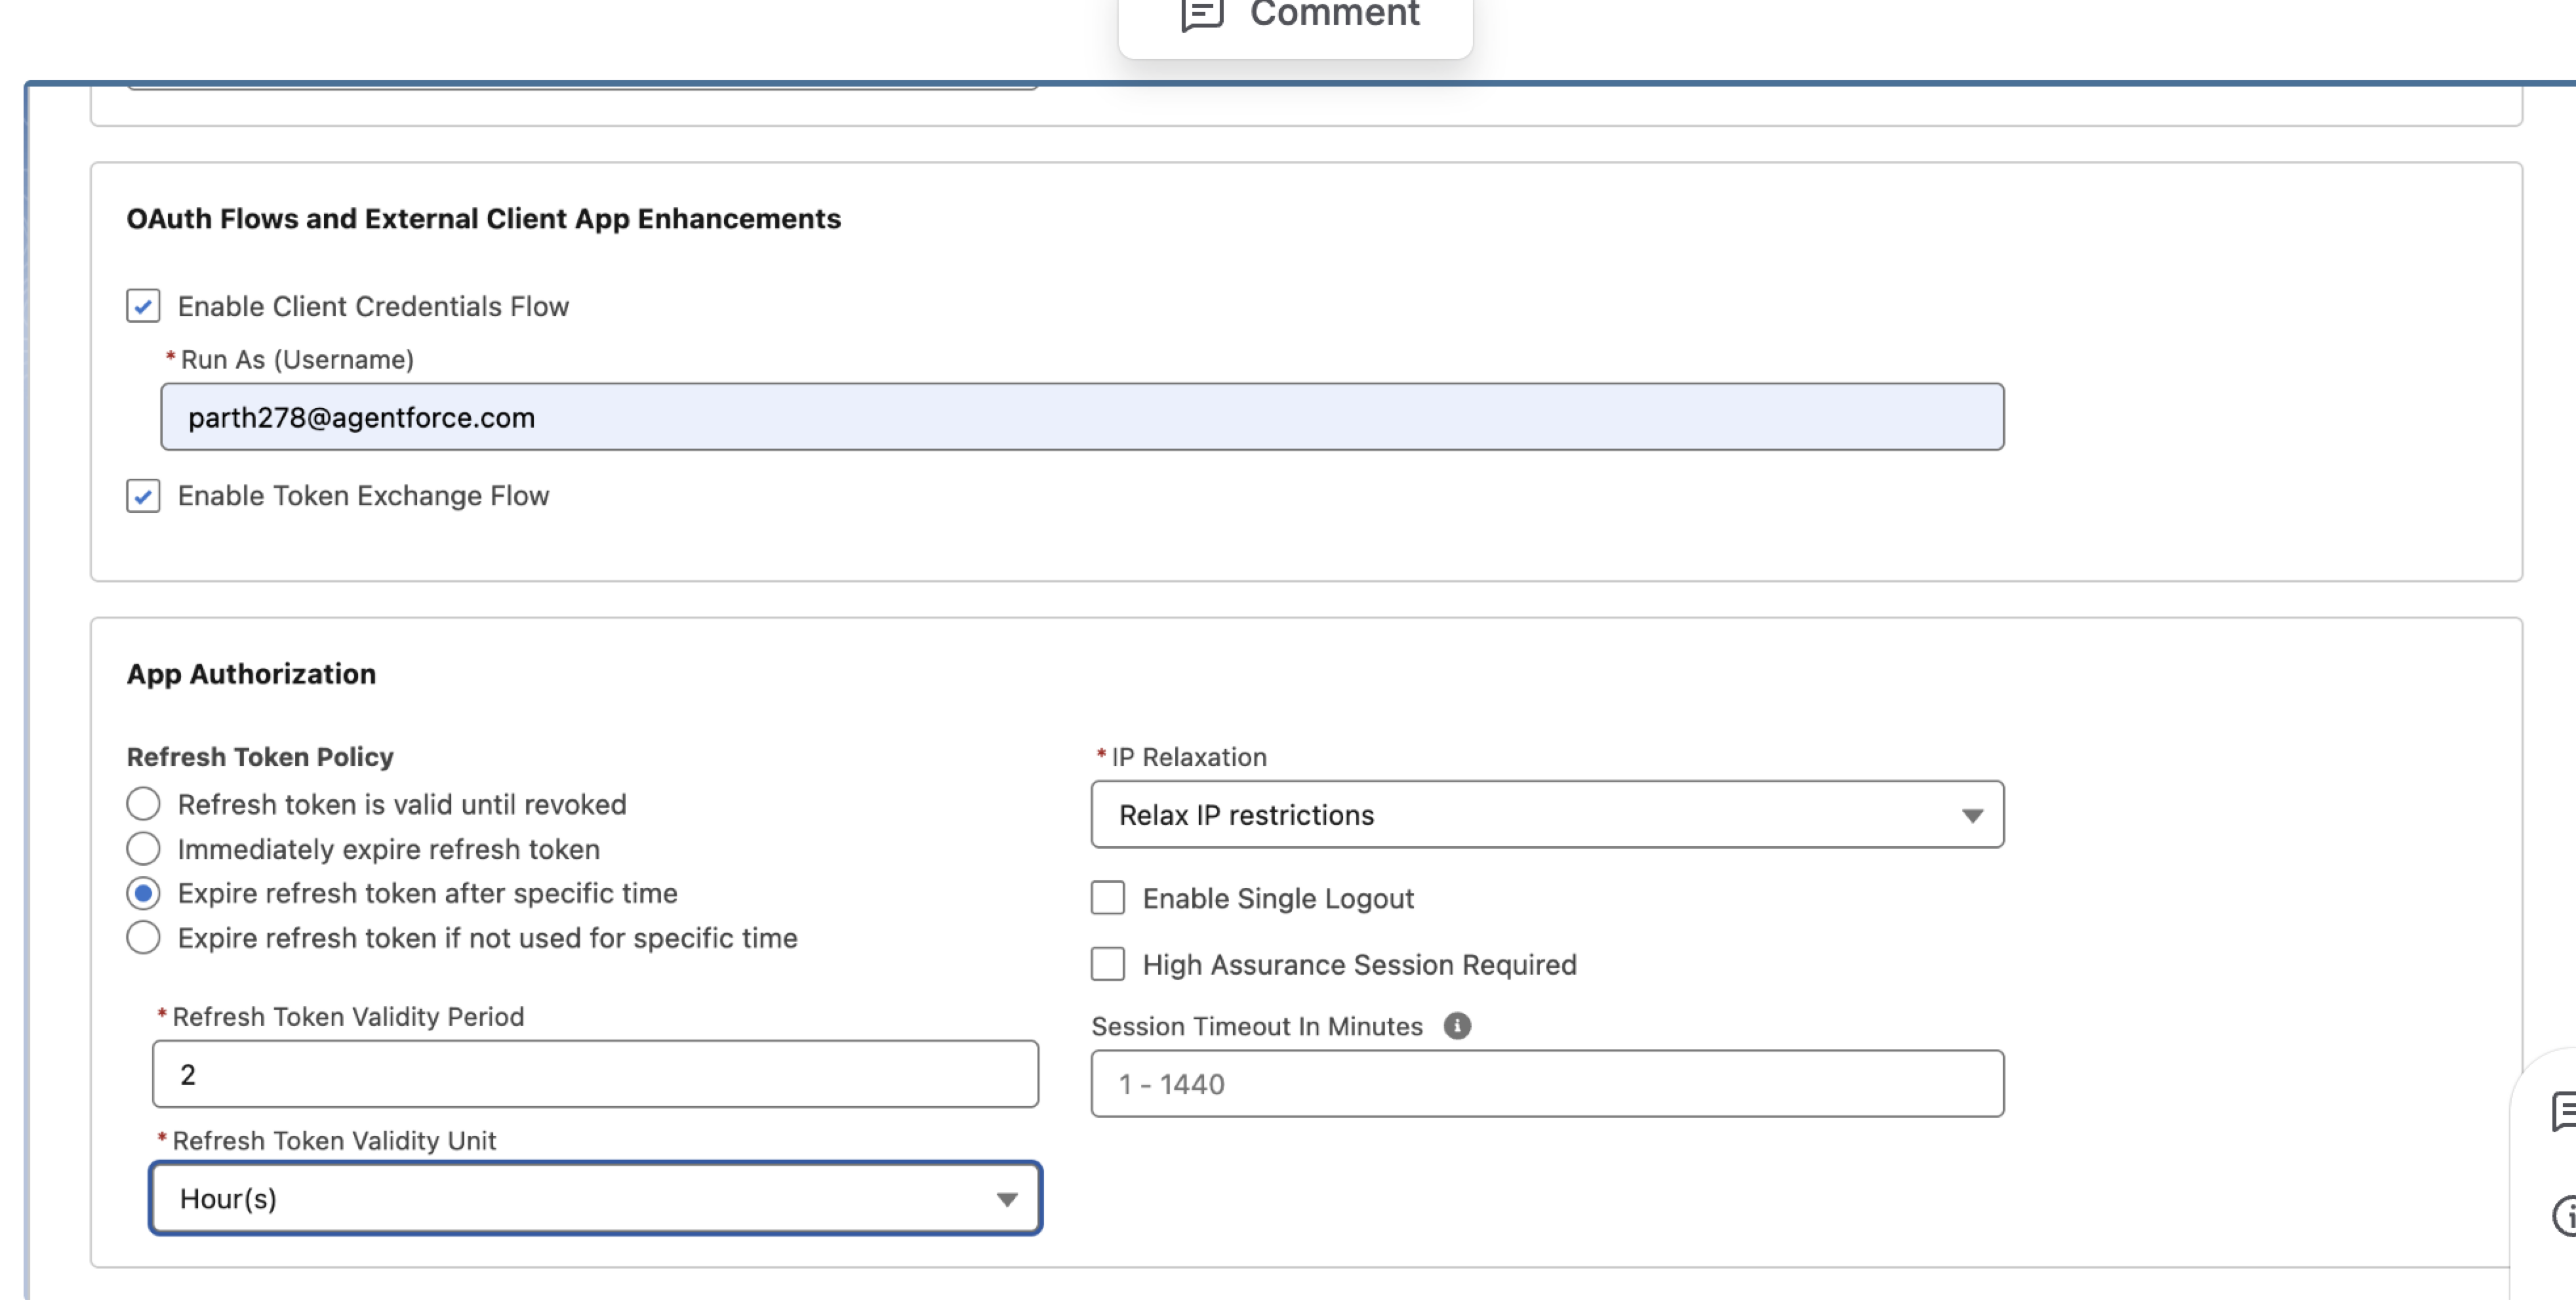
- Select the Enable Client Credentials Flow option.
- Under Run As, enter the username of the Salesforce user whose permissions will be used when CleverTap writes data. This user must have API access and write permission on the target custom object.
- Select the Enable Token Exchange Flow option.
- App Authorization
- Refresh Token Policy: Select Expire refresh token after a specific time and set validity to 2 hours.
- IP Relaxation: Set to Relax IP restrictions.
- OAuth Policies
-
Navigate back to Settings > OAuth Settings and click Consumer Key Secret to retrieve your Client ID and Client Secret. Copy and save them securely, as you will need them while configuring the webhook in CleverTap.
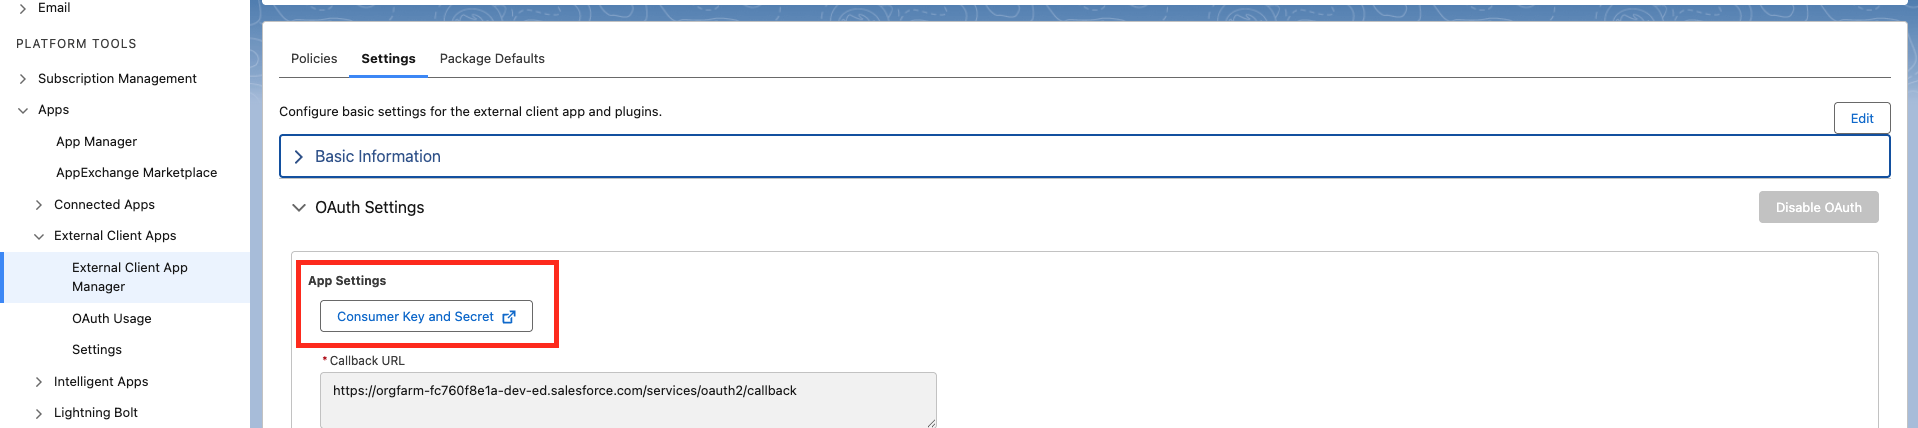
Copy and Save Client ID and Client Secret
NoteExternal Client Apps do not support the legacy
grant_type=passwordflow. For Apex REST API access, theapiscope alone is sufficient.
Create Custom Object
Create a custom object in Salesforce to store the data CleverTap will send. The example below creates an object for NPS feedback; adapt field names to your use case.
-
Go to Setup > Object Manager.
-
Click Create and select Custom Object.
-
(Optional) Enable Launch New Custom Tab Wizard after saving this custom object to create a tab for viewing records.
-
Click Save.
-
Copy the full API Name from the object details page, as you will need it when writing the Apex class. In a namespaced org, this will include the
CleverTap__prefix (for example,CleverTap__CleverTap_NPS__c). -
Copy API Name (including the
CleverTap__ prefix and __csuffix) for each field as you will reference these in the Apex class. -
Under Fields & Relationships, click + New Field to add relevant data fields. For example,
- Field Label:
userId, Data Type: Text - Field Label:
npsScore, Data Type: Number - Field Label:
timestamp, Data Type: Date/Time
- Field Label:
-
Copy the Field Names, as we will need them while creating the Apex class.
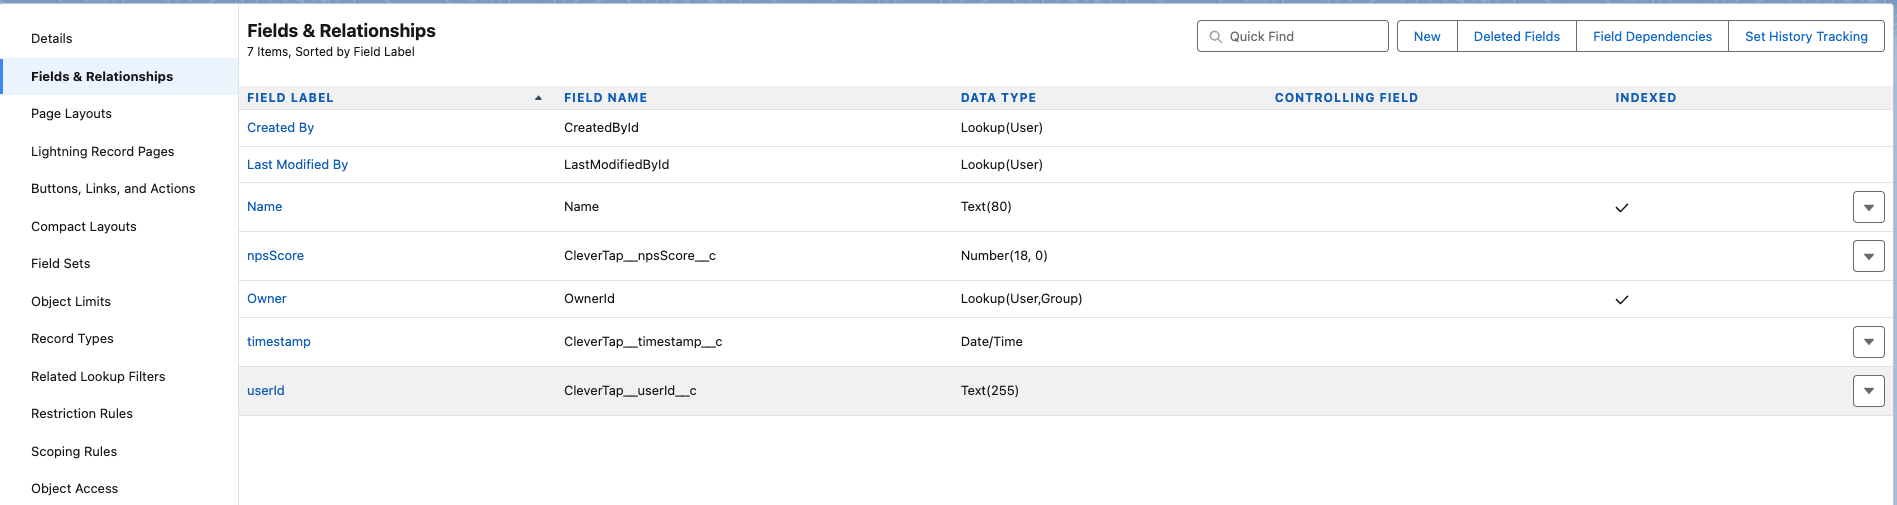
Add New Field - Fields & Relationships
NoteAfter creating the object, ensure the appropriate permissions and tab visibility are configured for the profiles that will access it.
Create Apex REST Class
The Apex REST class exposes a POST endpoint that receives the CleverTap webhook payload and writes it to the custom object. Custom Apex classes provide full control over payload parsing, validation, and transformation before storage. To create an Apex REST class, perform the following steps:
-
Go to Setup > Apex Classes and click New.
-
Paste the following example code (adapt field names to match your custom object):
@RestResource(urlMapping='/InsertNPSFeedback')
global with sharing class InsertNPSFeedback {

    global class NPSRequest {
        public String userId;
        public Integer npsScore;
        public String timestamp;
    }

    @HttpPost
    global static String doPost() {
        try {
            NPSRequest input = (NPSRequest) JSON.deserialize(
                RestContext.request.requestBody.toString(), NPSRequest.class
            );

            // CleverTap__CleverTap_NPS__c is the API name from the custom object.
            // Field API names (CleverTap__userId__c, etc.) include the namespace prefix.
            CleverTap__CleverTap_NPS__c record = new CleverTap__CleverTap_NPS__c(
                Name = 'NPS-' + input.userId,
                CleverTap__userId__c = input.userId,
                CleverTap__npsScore__c = input.npsScore,
                CleverTap__timestamp__c = String.isNotBlank(input.timestamp)
                    ? DateTime.valueOf(input.timestamp.replace('T', ' '))
                    : DateTime.now()
            );

            insert record;
            return 'Success';
        } catch (Exception e) {
            return 'Error: ' + e.getMessage();
        }
    }
}
-
Click Save to compile and activate the class.
After saving, note the URL mapping from the
@RestResource(urlMapping='/...')annotation and your org's namespace prefix. In this example, the URL mapping is/InsertNPSFeedback, and the namespace isCleverTap, producing the final destination URL:https://<your-domain>.my.salesforce.com/services/apexrest/CleverTap/InsertNPSFeedback
ImportantThe namespace prefix must be included in the URL path when calling an Apex REST class deployed as part of a managed package. Missing the namespace will result in a 404 Not Found response.
Set Up CleverTap Dashboard
Configure the webhook provider and campaign in CleverTap:
Configure OAuth 2.0 Webhook Provider
To configure OAuth 2.0 Webhook Provider, perform the following steps:
-
From the CleverTap dashboard, go to Settings > Channels > Webhook.
-
Click + Add Webhook.
-
Enter a name for your webhook (for example, NPS data to Salesforce CRM).
-
Set the HTTP Method to POST.
-
Enter the following endpoint in the Destination URL field and replace
your-domain,namespace_prefix, andInsertNPSFeedbackbased on what you received while creating a Custom Apex class:https://<your-domain>.my.salesforce.com/services/apexrest/namespace_prefix/InsertNPSFeedback -
Under Authentication Type, select OAuth 2.0 from the dropdown.
-
Under Grant Type, select Client Credentials.
-
Enter the Client ID and Client Secret received under the Create an External Client App section.
-
In the Access Token URL, enter the following URL and replace
your-domainwith the actual value:
https://<your-domain>.my.salesforce.com/services/oauth2/token -
Set Client Authentication type as Send bearer authentication in header.
-
Click Generate Token. CleverTap requests a new access token from Salesforce using the configured values. If the token is returned successfully, proceed to the mapping step.
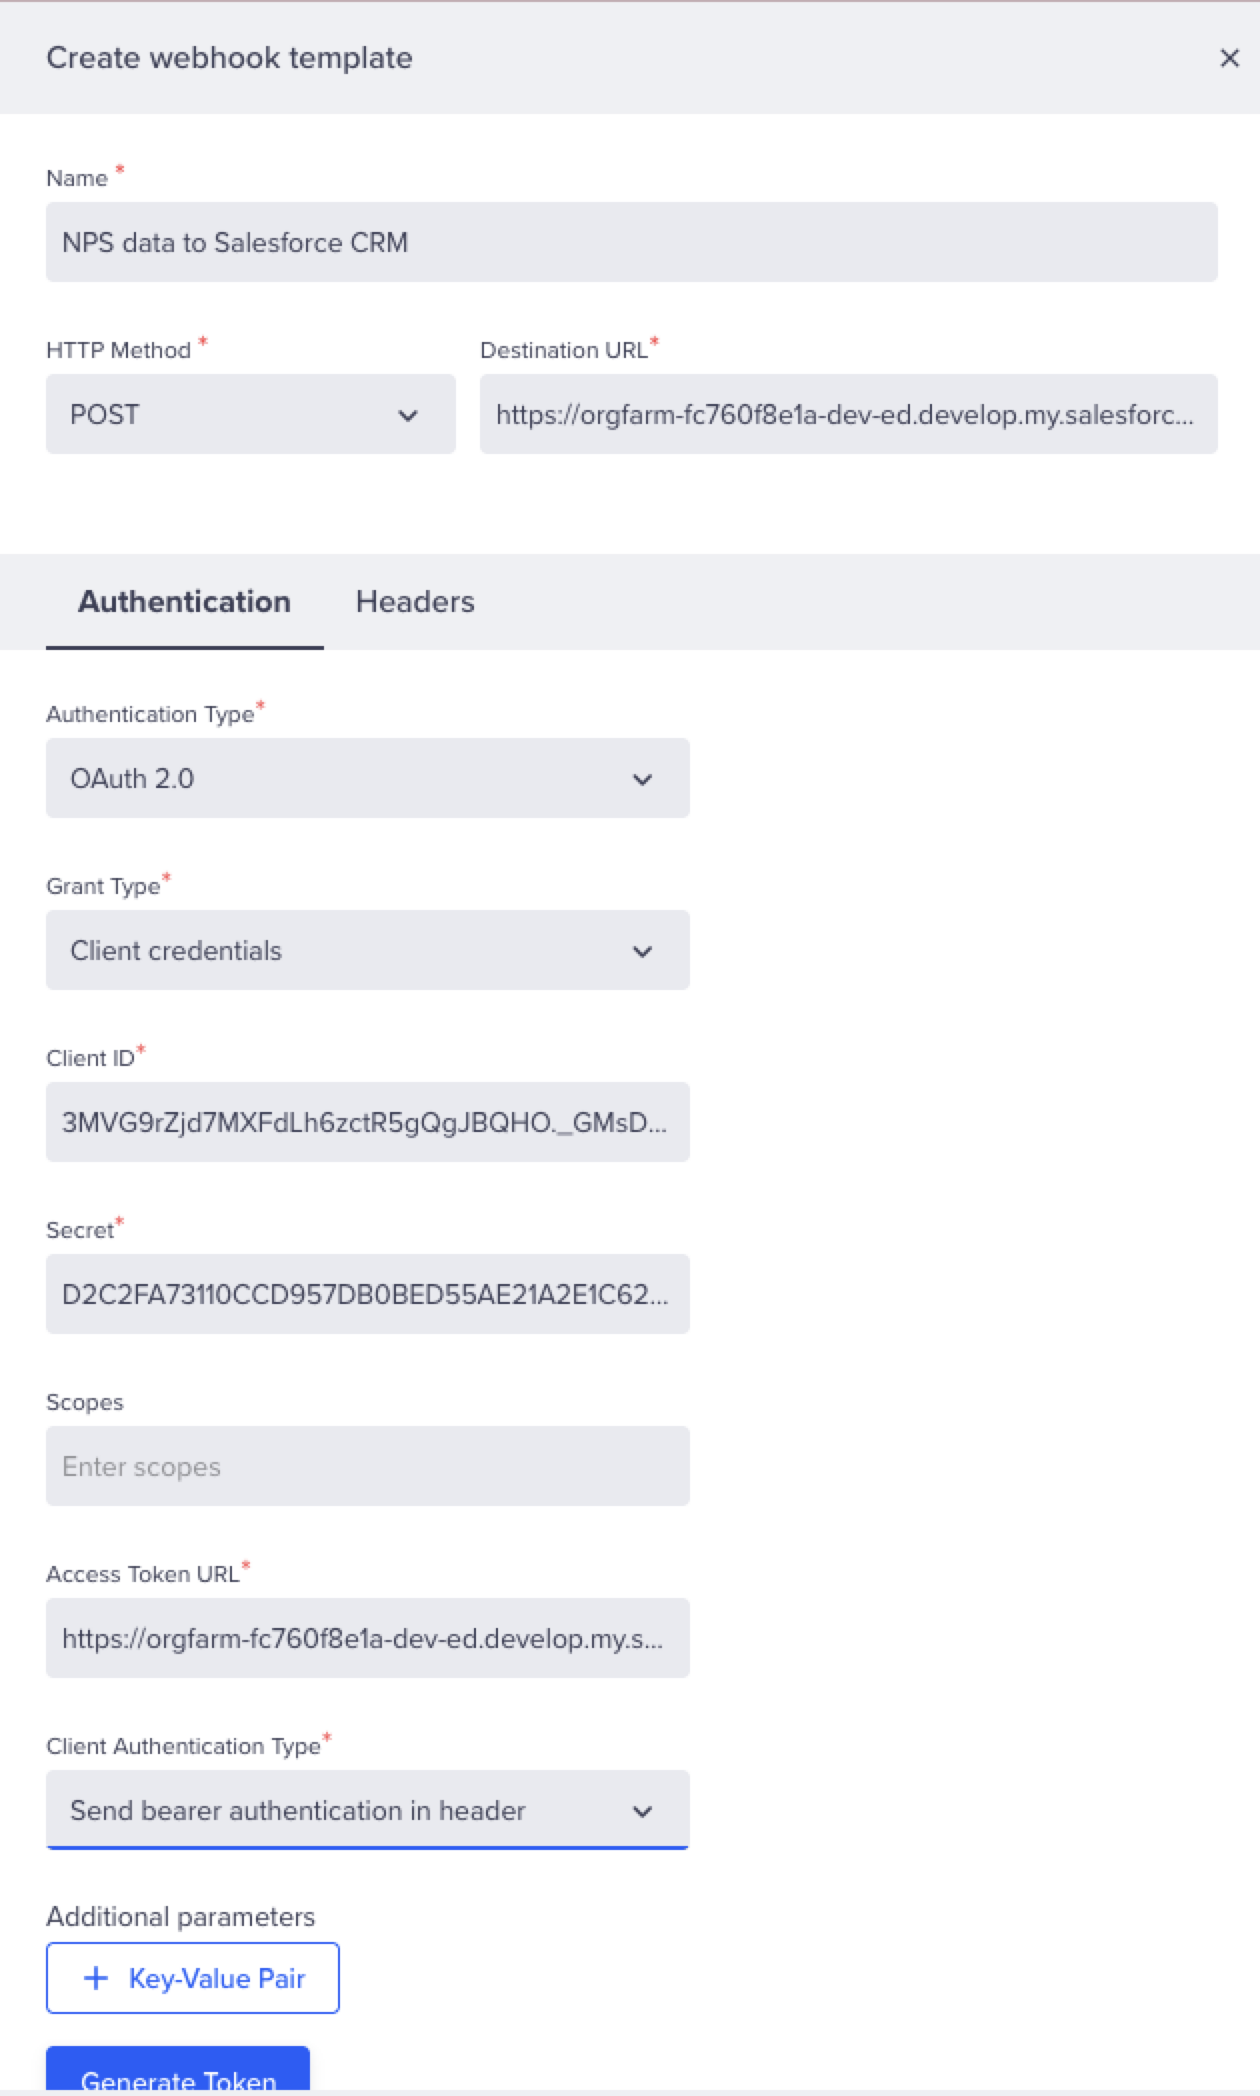
Create Webhook
-
After successful token generation, map the returned Access Token and Expiry fields, as shown below, to finalize the configuration, then click Save.
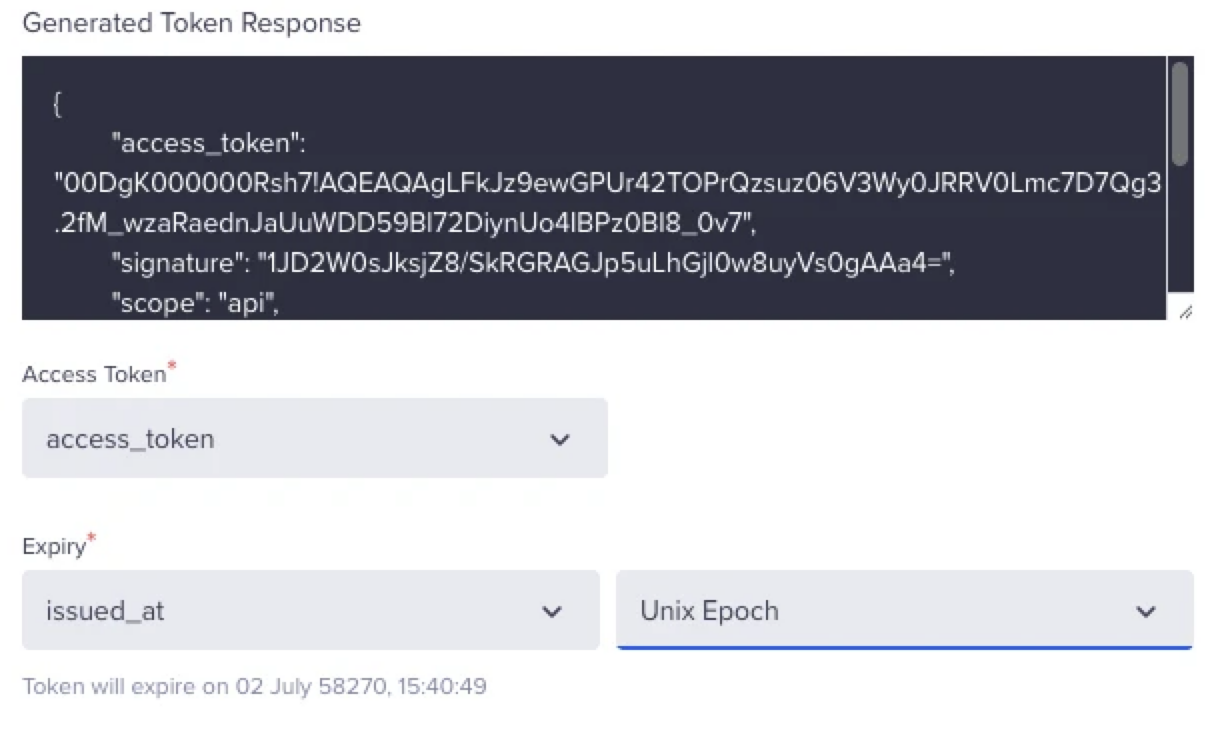
Generate Token Response
Key Value Access Token access_token Expiry issued_at Expiry Unity Time Unix Epoch
-
NoteCleverTap automatically refreshes the access token before it expires using the stored Client ID and Client Secret. No manual token management is required.
Create Webhook Campaign
Configure a campaign that sends user-specific data to Salesforce through the webhook provider.
-
Go to Campaigns and click + Campaign.
-
Select Webhook as the messaging channel.
-
Define your audience (segment, event trigger, journey entry, or one-time audience) under the Who section.
-
In the When step, configure the trigger or schedule for the campaign.
-
Under the What section:
- Select your Salesforce webhook (for example, NPS data to Salesforce CRM) as the provider.
- Under Webhook Content, set the format to JSON.
- Select Custom Body and define the request payload to match the structure expected by your Apex REST class. Use the
{{}}and@buttons (or manually type{{ }}) to insert dynamic profile fields and event properties.
{
  "userId": "{{ Profile.Identity | default: \"0\" }}",
  "npsScore": {{ Event["User Rating"] | default: "0" }}
}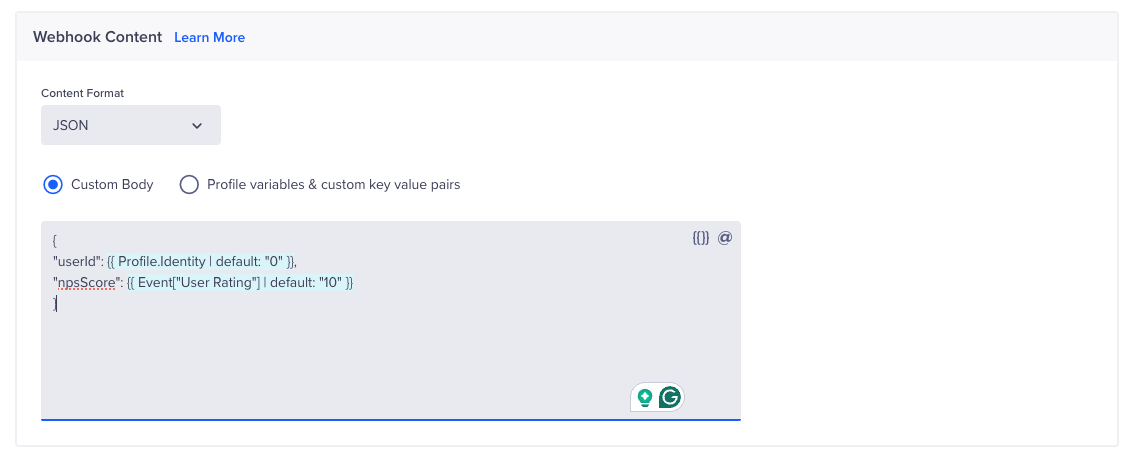
Example Payload
-
Click Preview to test the payload against sample user data and then click Publish.
Verify Integration
After the campaign is published and qualifying users are processed, verify that data is reaching Salesforce:
- In Salesforce, go to the CleverTap NPS tab (or whichever custom object you configured).
- Confirm that new records are being created with the expected field values.
- Click any record to verify that field values match the payload sent by CleverTap.
If records are not appearing, refer to Troubleshooting.
Troubleshooting
| Issue | Cause | Resolution |
|---|---|---|
| Token generation fails with "invalid_client" | Client ID or Client Secret is incorrect, or the External Client App has not been authorized. | Regenerate Consumer Key and Secret from the External Client App. Ensure that a Run As user is set under Policies > OAuth Policies. |
| Token generation fails with "no valid scopes" | OAuth scopes are missing, or the Run As user is not configured. | Add the Manage user data via APIs (api) scope and ensure that a Run As user is configured in the Client Credentials Flow policy. |
| Webhook returns 404 Not Found | Namespace prefix missing from the destination URL. | Ensure the URL includes the CleverTap namespace: /services/apexrest/CleverTap/InsertNPSFeedback. |
| Webhook returns 401 Unauthorized | Access token expired, or Run As user lacks permissions. | Regenerate the token in CleverTap. Ensure that a Run As user has API access and write permission on the target custom object. |
| Webhook returns 500 error | Apex class is throwing an exception (for example, invalid field reference or field type mismatch). | Check Setup > Environments > Logs > Debug Logs for the Run As user. Verify that field API names and data types match between the payload and the custom object. |
| Records are not appearing in Salesforce | Apex class catches the exception and returns Error: ... as a 200 response. | Open the campaign delivery report in CleverTap and inspect the response body for error messages. |
grant_type=password does not work | External Client Apps do not support the legacy password grant. | Use the Client Credentials flow as documented above. |
FAQs
How often does CleverTap refresh the OAuth token?
CleverTap automatically refreshes the access token before it expires using the Client ID and Client Secret stored with the webhook provider. The refresh happens transparently; no manual intervention is required.
Can I route data to multiple custom objects from one CleverTap account?
Yes. Create a separate Apex REST class and webhook provider for each custom object. Each webhook can be used in separate campaigns. Alternatively, create a single Apex REST class that inspects a payload field (such as recordType) and inserts into different objects based on the value.
Does the webhook retry on failure?
Yes. CleverTap automatically retries failed webhook deliveries with exponential backoff. Persistent failures are logged in the campaign delivery report and the webhook error logs.
What happens if the Salesforce org is down?
Failed requests are retried by CleverTap. If retries are exhausted, the delivery is marked as failed in the campaign report. No user data is lost in CleverTap itself; the source record remains available for subsequent campaigns.