Understand what are custom dashboards in CleverTap
Overview
The Custom Dashboards is a feature in CleverTap that allows you to create and customize your board. CleverTap provides a set of default dashboards, such as the Today View, which you can use to analyze user activity in your application.
Each custom dashboard you create is composed of cards, which are widgets you can pin to the board to track the metrics of your interest. You can pin cards and track the metrics using one of the following features: events, funnels, segments, trends, cohorts, and pivots.
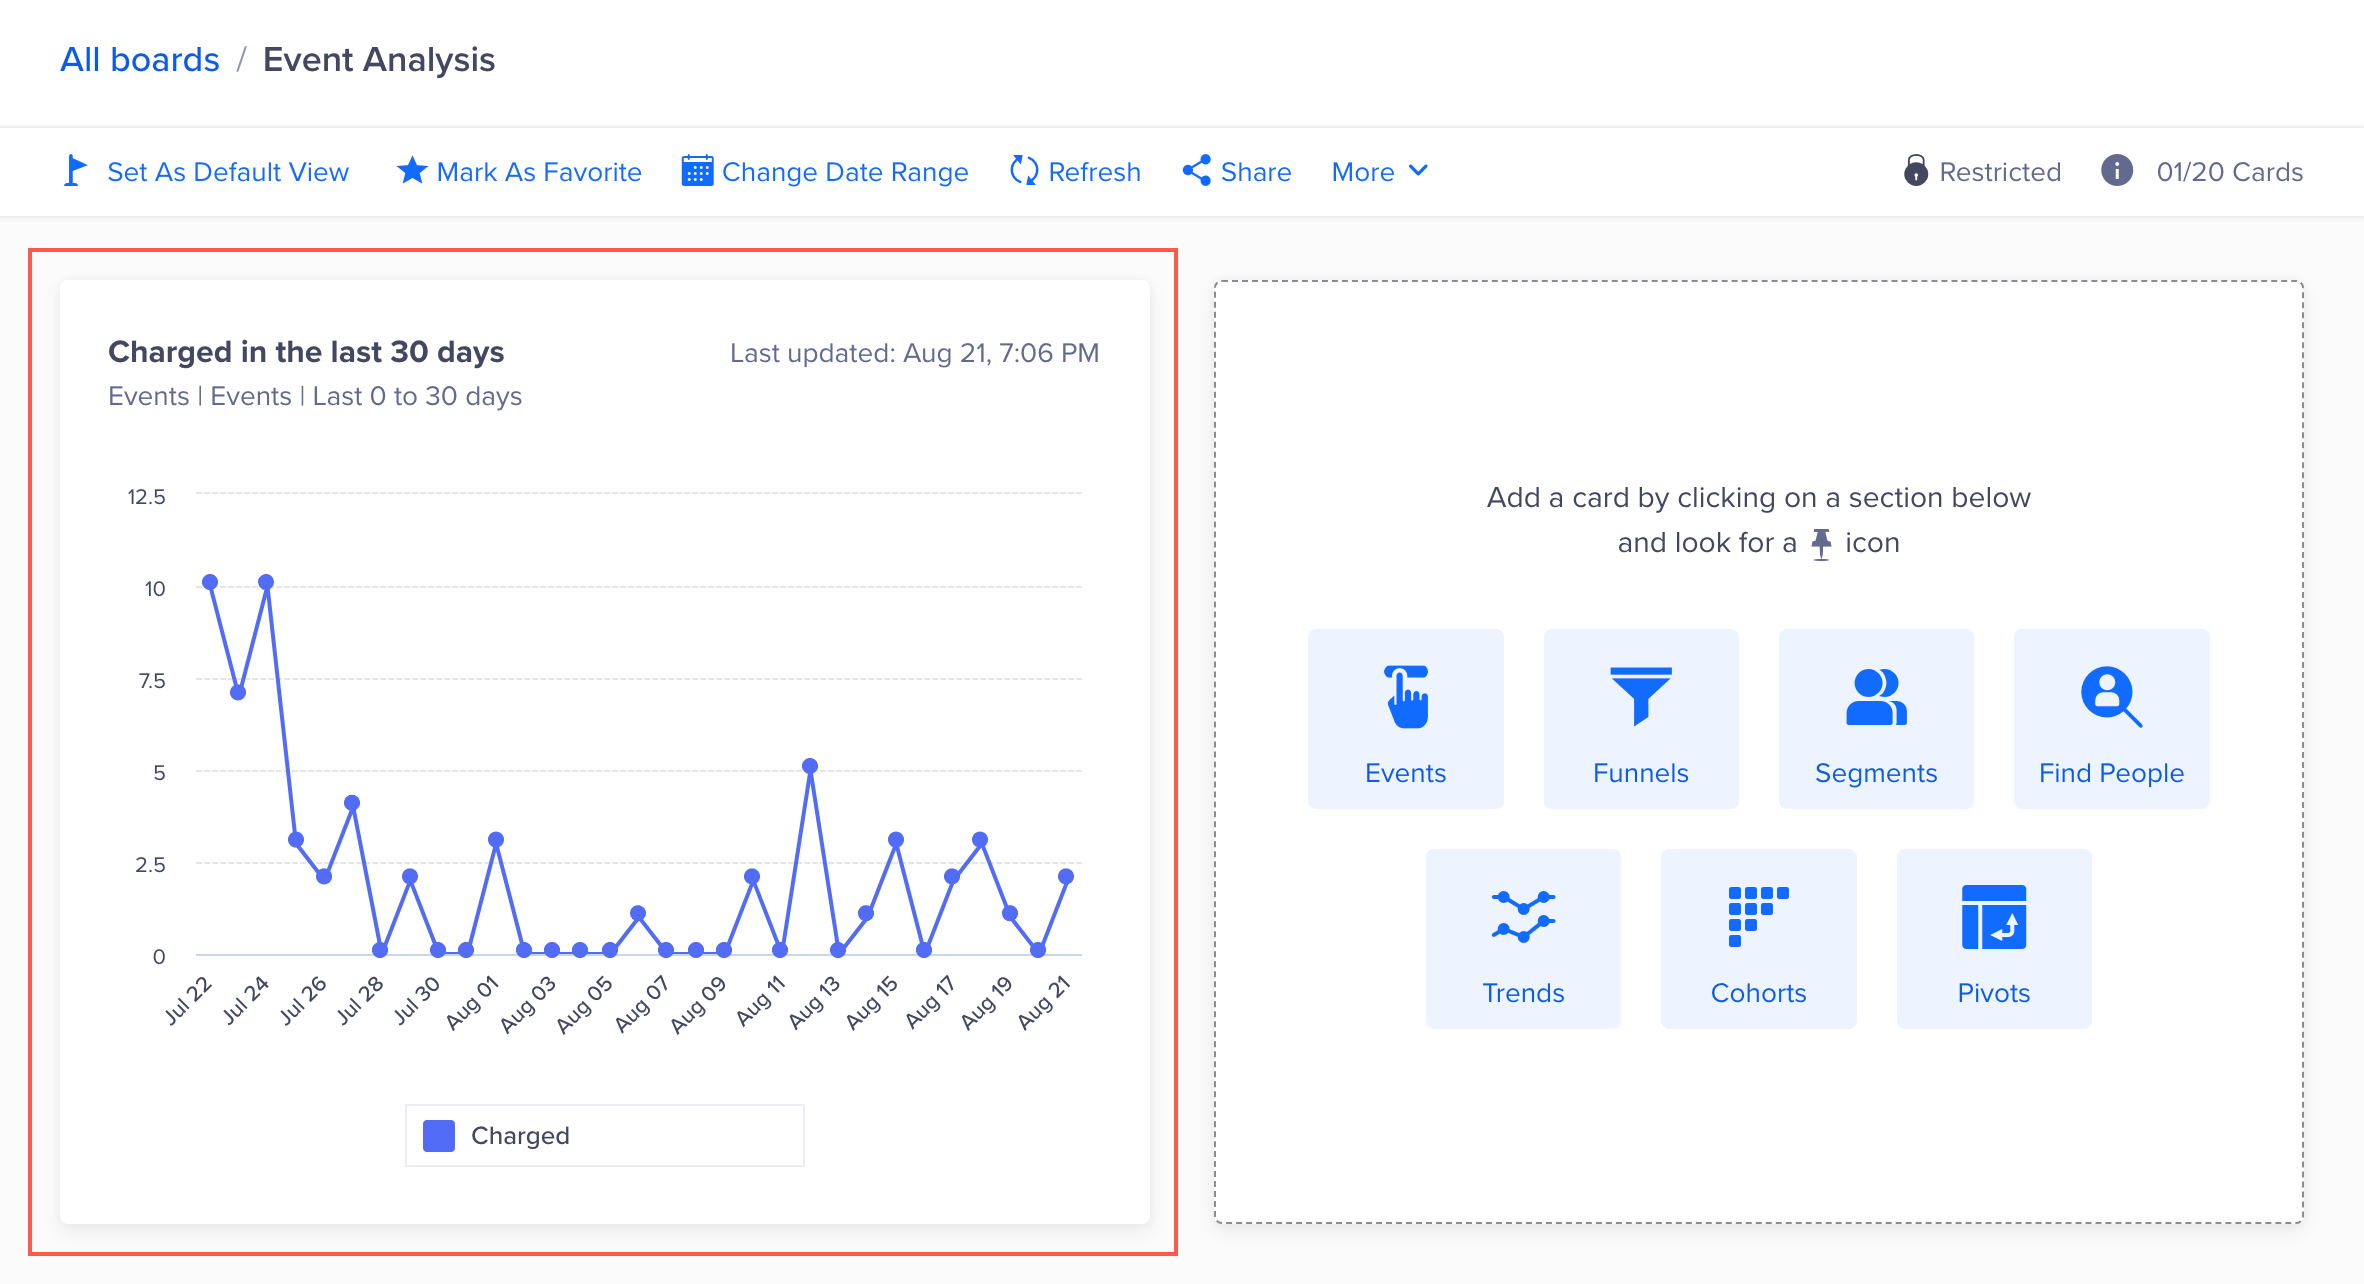
For example, if you want to track the following metrics for the last 30 days:
Number of users who performed App Launched and Charged events
Number of users who performed the Charged event
You can create a custom dashboard and add cards to track the above metrics, as shown in the following figure. You can also pin those cards to the dashboard.
Custom Dashboard Overview
After you build your custom dashboard, you can also share the board with others in your organization.
Custom dashboards can have the following features:
The board's section provides information about different boards created for the project and the operations that can be performed on these boards. On this page, users can view a list of all boards:
Created by them,
Shared with them, and
Public boards that are available for users in their organization.
To access boards on the CleveTap dashboard, navigate to Boards > All Boards. The All boards page opens.
List of Boards and Cards
Create a Custom Dashboard
This section covers how to create a custom dashboard. To create a board:
Navigate to Boards from the left navigation menu.
Click + Board.
Enter your board name and click Create.
Creating a Board
Operations
You can perform the following actions on a particular board:
Sort
You can sort the boards by the date on which the board was created and the person who created the board. To sort the boards, click the icon under Created by and Created on columns.
Sort Boards
Search
You can search the boards by board name or creator's email ID. To search boards, enter the search criteria under the Search text box
Search Boards
Mark As Favorite
You can mark a board as a favorite by performing the following steps:
Select the board from the Boards > All boards page.
Click Mark As Favorite from the top of the page.
Mark a Board as Favorite
The message Board marked as favorite successfully! displays at the top of the board page, and the board gets added to the Favorites section on the left navigation.
Favorite Boards
Change Date Range
You can view the data for the different periods by changing the date range of all cards on the board, as shown below:
View Cards based on Date Range
Refresh
You can refresh the dashboard to view the most recent information by clicking Refresh from the top of the page.
Refresh the Dashboard
Share
CleverTap provides restricted dashboard access so that the dashboard owner can control the members who can view and contribute to the insights captured on the dashboard. The dashboard owner can add or remove members from the access list and can control access levels.
To share a dashboard, perform the following steps:
Create your custom dashboard.
Click Share. The Share Board popup displays with restricted permissions by default. Use the search box to view and add users to this board.
🚧
Share Board
The Share option is only visible to the board's creator.
Select a user and click Send. An email is sent to the user with a link to the board.
Select as many users as needed before clicking Send to add multiple users.
Share the Board
📘
Change Default Board Permissions
You can change the default permissions by clicking the Change link on the Share Board and selecting the appropriate permission.
User Permissions to Access Boards
Clone
This option is used when you want to track the same metrics with minor changes. Anyone who has access to your project can clone the board by clicking More and then selecting Clone from the list.
Clone a Board
Edit
You can rename the board by clicking More and then selecting Edit from the list.
Edit a Board
Delete
You can delete the boards you created by clicking More and then selecting Delete from the list.
Delete a Board
Edit User Permissions
You can also edit the user's permissions to either Viewer (view-only access), Editor (view and edit access), or remove the user completely. To do so:
Click Share and select the permission from the list next to the user name.
Select Viewer or Editor. You can remove the user access by selecting Remove.
Click Save.
Edit User Permissions
Board Limits
The following table describes a list of board limits:
Plan Type
Limits
Paid Plans (Enterprise/Business)
Each user can create up to 100 boards.
Users can pin up to 20 cards per board.
Users can share the board within the organization.
Cards
This section provides information about different operations that can be performed on the card. Select the board to view all the included cards.
Operations
You can perform the following actions on a particular card:
Pin a Card
When you create your new board, you start with an empty board. CleverTap allows you to pin Event details, Segments, Funnels, Cohorts, Trends, or Pivots to a particular card.
You can pin a card on a board in the following two ways:
Consider the example where you want the number of users who performed Charged event in the last 30 days. To pin the card for these metrics to the Board:
Click Events from the empty board.
Select Charged event and select the required Date Range from the Events page.
Click the icon.
Enter the Card name and select an existing board or create a new board by selecting Pin to a new board.
Click Pin to view the metrics on the custom dashboard whenever required.
Pin Event to a Custom Board
The pinned card is visible on the board:
View Card on a Custom Board
Pin a Card from Analytics
Users can pin Event details, Segments, Funnels, Cohorts, Trends, or Pivots to a particular card. Consider the example of pinning a card that shows information about a particular segment.
📘
Note
The steps listed below can also be followed to pin any chart that provides the Pin to board(s) option.
To pin a card of the example metrics:
Navigate to Segment > Segments, from the dashboard.
Select a segment.
Click the icon to pin the report to an existing or new board.
Pin a Card on the Board
Enter the Card name and select the board where you want to pin this card.
Pin a Segment to Custom Board
📘
Other Analytics Features
The following steps can also be performed for Events, Funnels, Segments, Find People, and Trends.
Rename a Card
You can change the card's name when you hover over any card on a board. To do so:
Click the icon and enter the new name.
Click the icon to save the changes.
Rename a Card
Customize a Card
This is applicable only to the Funnels card. You can customize a Funnel card and rename the following:
Funnel Steps
Legends
To do so:
Click the icon from the funnel card.
Click Customize Card.
Rename the required Funnel Steps or Legends.
Click Customize.
Customize a Funnel Card
Refresh
You can view the most recent data for a card by clicking the icon.
Refresh the Card to View Recent Data
Delete
You can delete the card by clicking the icon.
Delete a Card
📘
Delete Cards Access
Only the creator of the board or the administrators can delete cards on public boards.
Resize
You can resize the card by clicking the icon.
Resize a Card
Move
You can reorder the sequence of cards by clicking the icon.
Move a Card on the Board
Access Control
The action that a user can perform on the dashboard may vary depending on the type of access, as shown in the following table:


 icon.
icon.


 icon and enter the new name.
 icon to save the changes.
 icon from the funnel card.