Create Promo Campaigns
Learn how to create and configure a Promo Campaign from scratch using the step-by-step campaign builder.
Overview
This document provides detailed instructions on creating and configuring a Promo Campaign using the Campaign Builder. It guides you through the key steps to set up your campaign, including defining your campaign goals, selecting the right target audience, choosing the campaign type, and customizing your settings.
Create Promo Campaign
Go to Promotions > Promo Campaigns and click Create Campaign. The New Promotion Campaign page opens. To create a Promo Campaign, perform the following five key steps:
- Define Qualification Criteria
- Select Target Segment
- Set Up Reward
- Set Up Delivery Preference
- Publish Campaign
Define Qualification Criteria
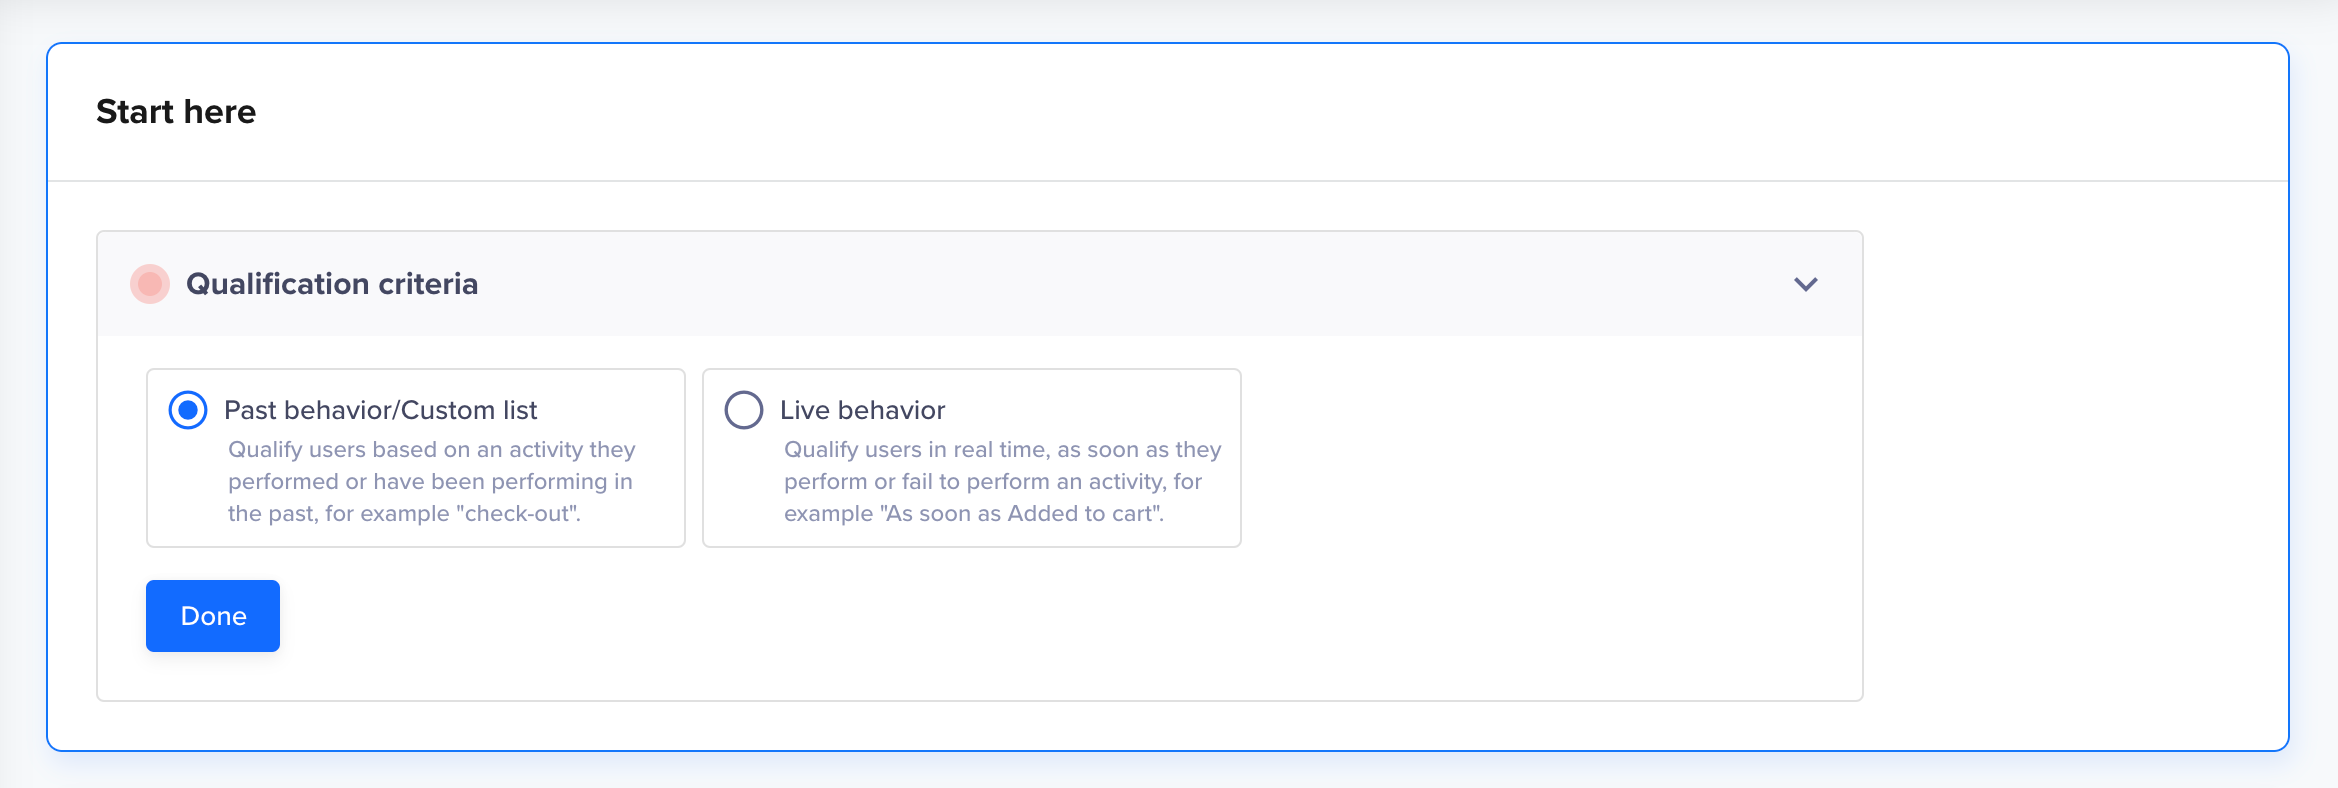
The Start Here section is where you choose how users will qualify for the reward. The qualification criteria provide the following options:
- Past behavior/Custom list: Target users based on actions performed in the past or a custom list uploaded to the CleverTap dashboard. For example, you can target users who have not done a transaction in the last 6 months, and offer them a 20% discount coupon.
- Live behavior: Trigger rewards in real-time when a user performs or does not perform an event. For example, you can trigger a reward when a user adds items to their cart but does not complete the checkout process within a set timeframe.
Define Qualification Criteria
Select Target Segment
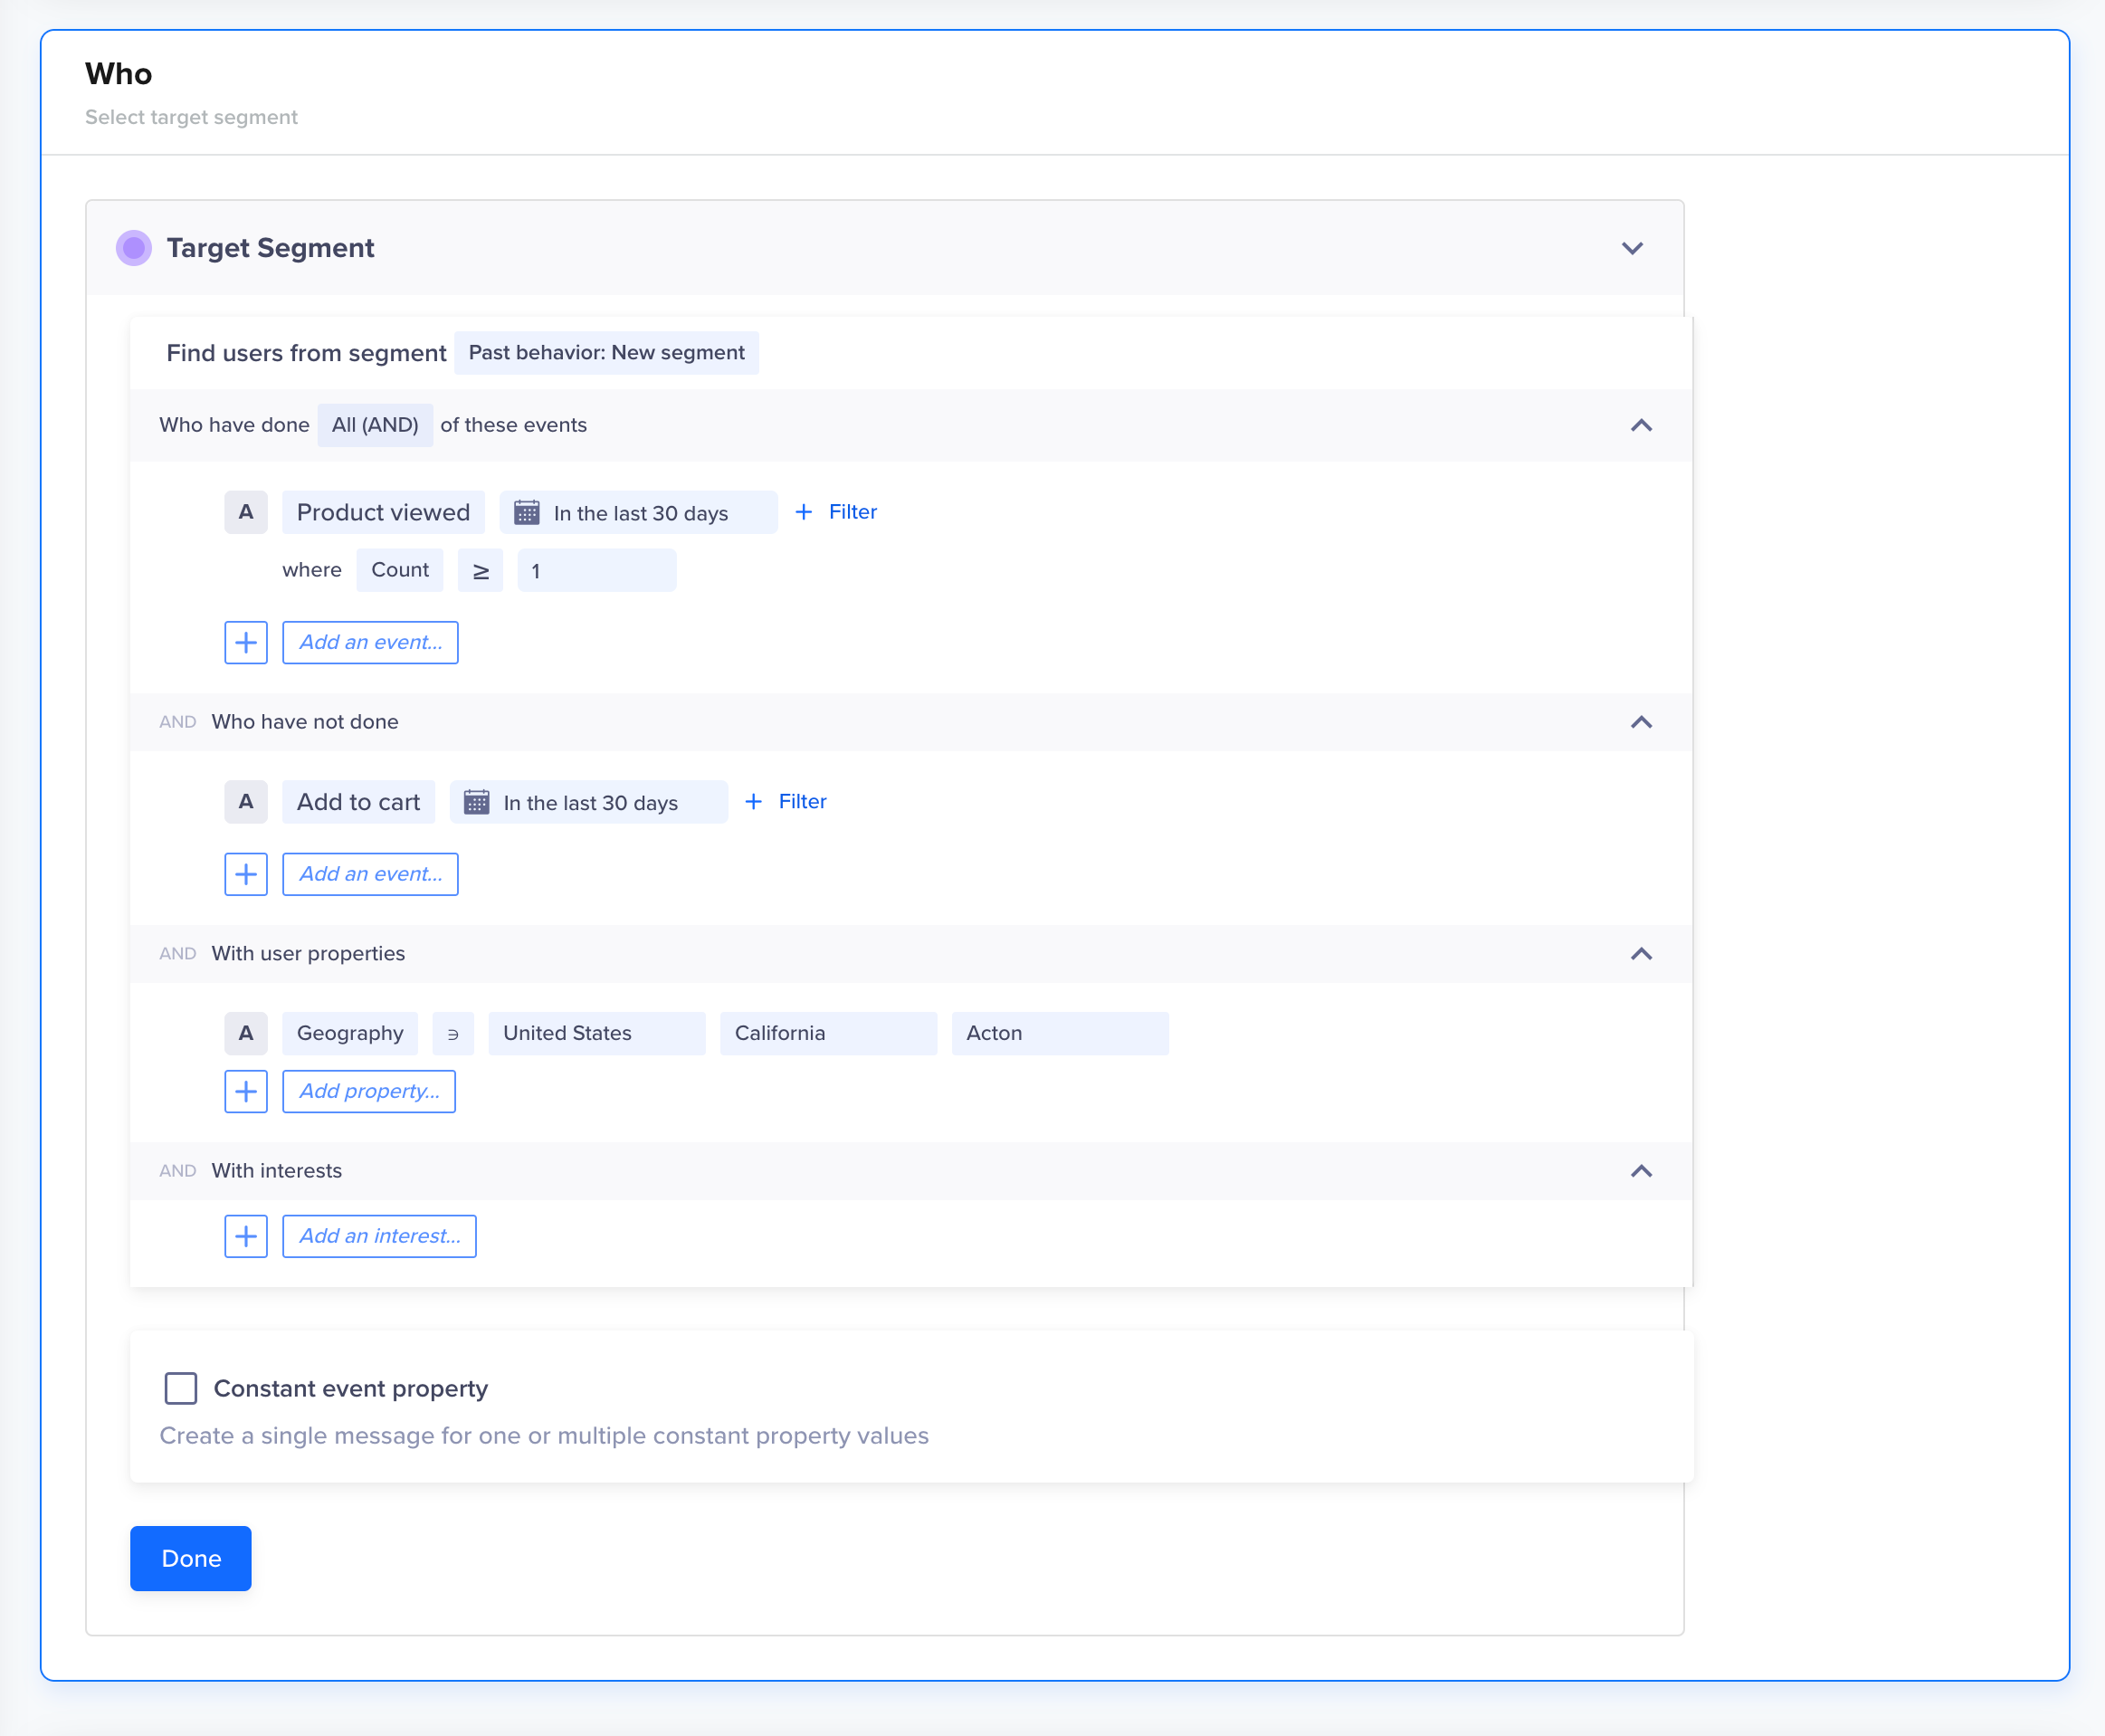
The Who section allows you to define who should receive the reward using the rule builder. The Target Segment rule builder lets you select users from an existing saved segment or create a new segment using event and property-based rules as follows:
- Find users from segment: Select users from a saved segment or define a new one.
- Create rules based on events: Build custom logic using event and property-based conditions
- Users who have done specific events
- Users who have not done certain events
- Users who have common user properties, such as device type and location, are part of a particular segment, and so on.
- Users who have common interests or share common behavioral traits or usage patterns, such as frequent shoppers or high-engagement users.
- Option to enable Constant event property, which keeps event property values fixed during evaluation. It is useful when comparing multiple events with shared attributes. For example, you can lock the Product ID property across both events to find users who viewed and purchased the same product.
Select Target Segment
Set Control Group and Target Segment Cap
After defining your target segment, expand the Control group and target segment cap panel to configure two optional controls:
- A control group for measuring campaign impact, and
- A cap on how many users receive the reward
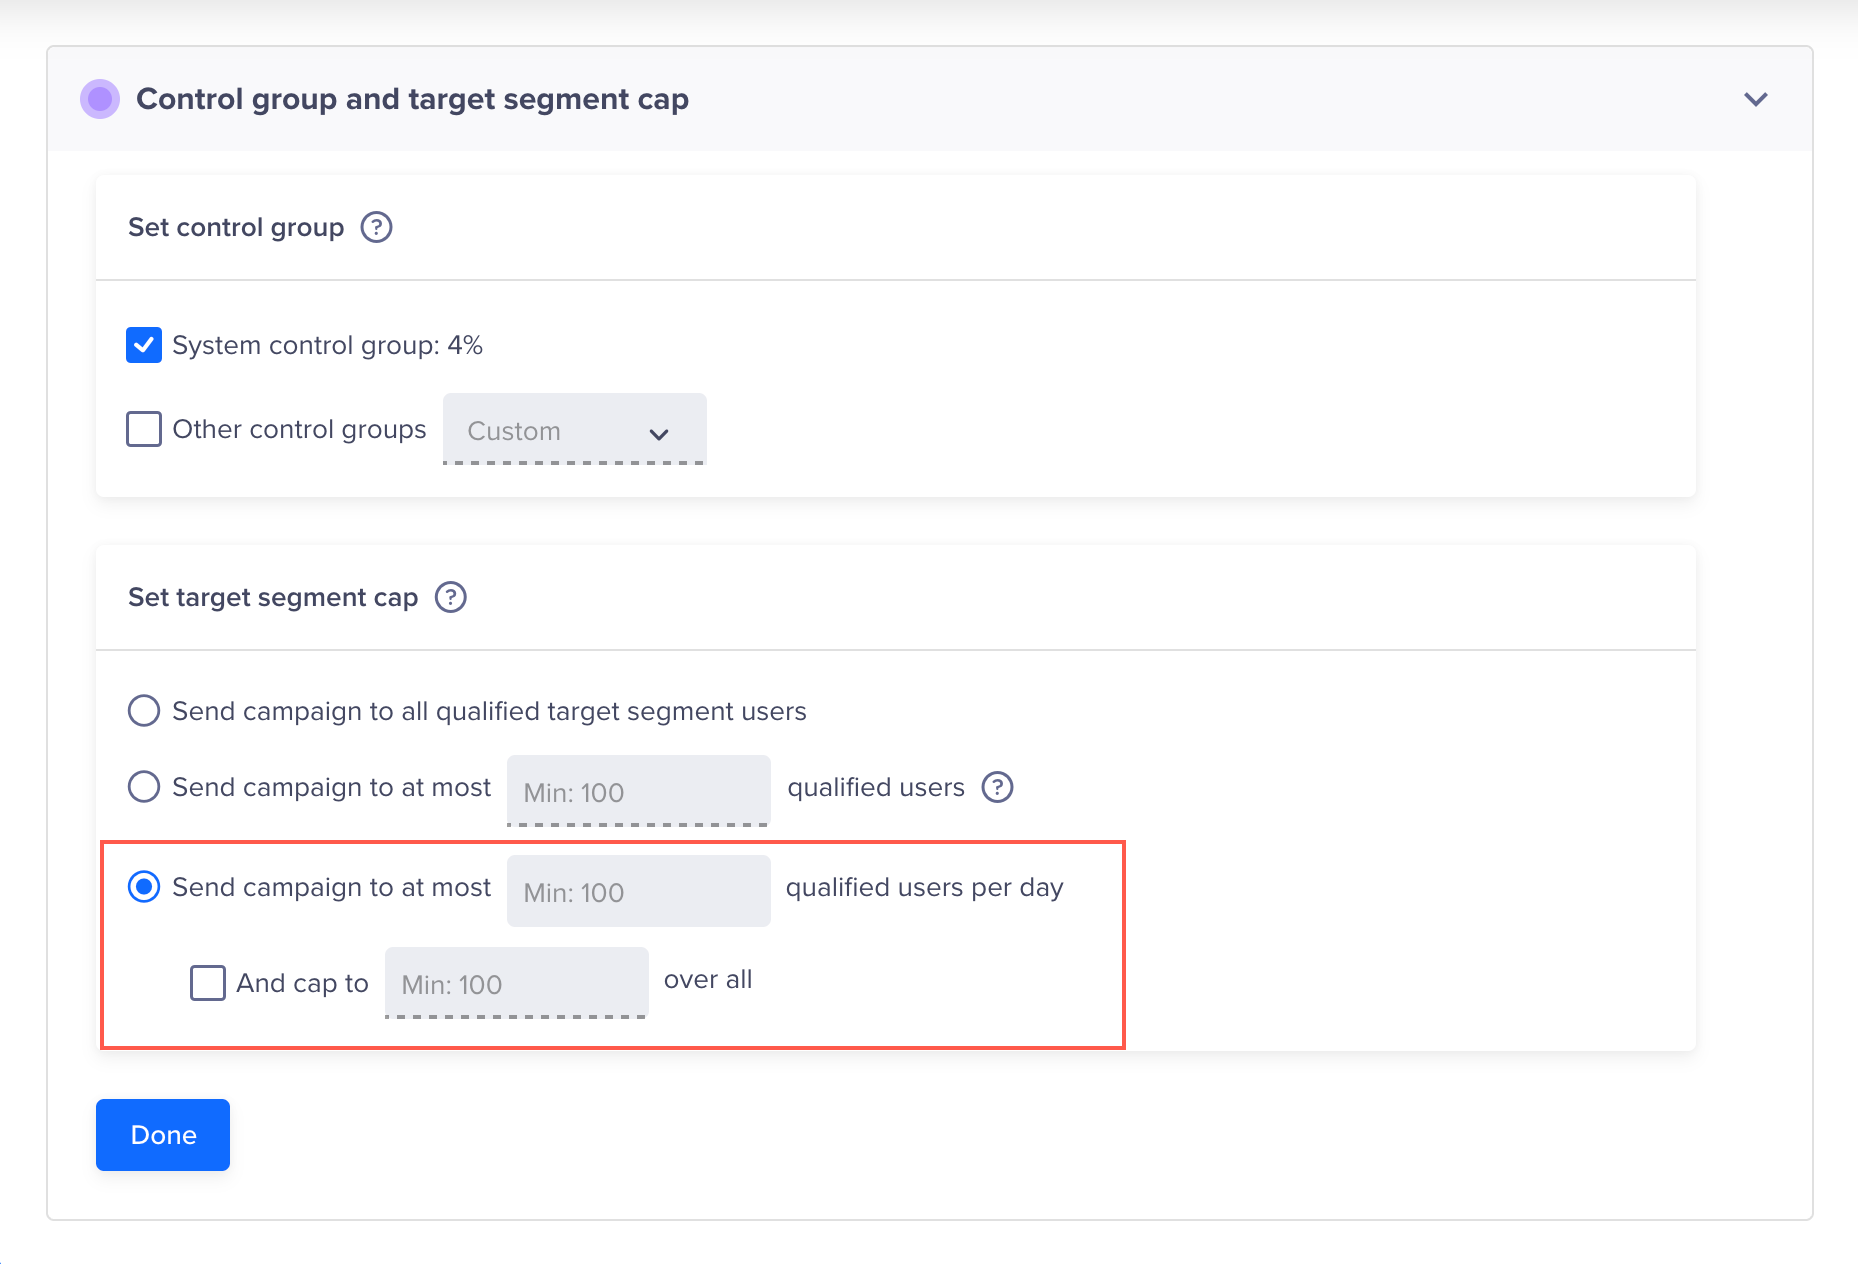
Set Control Group
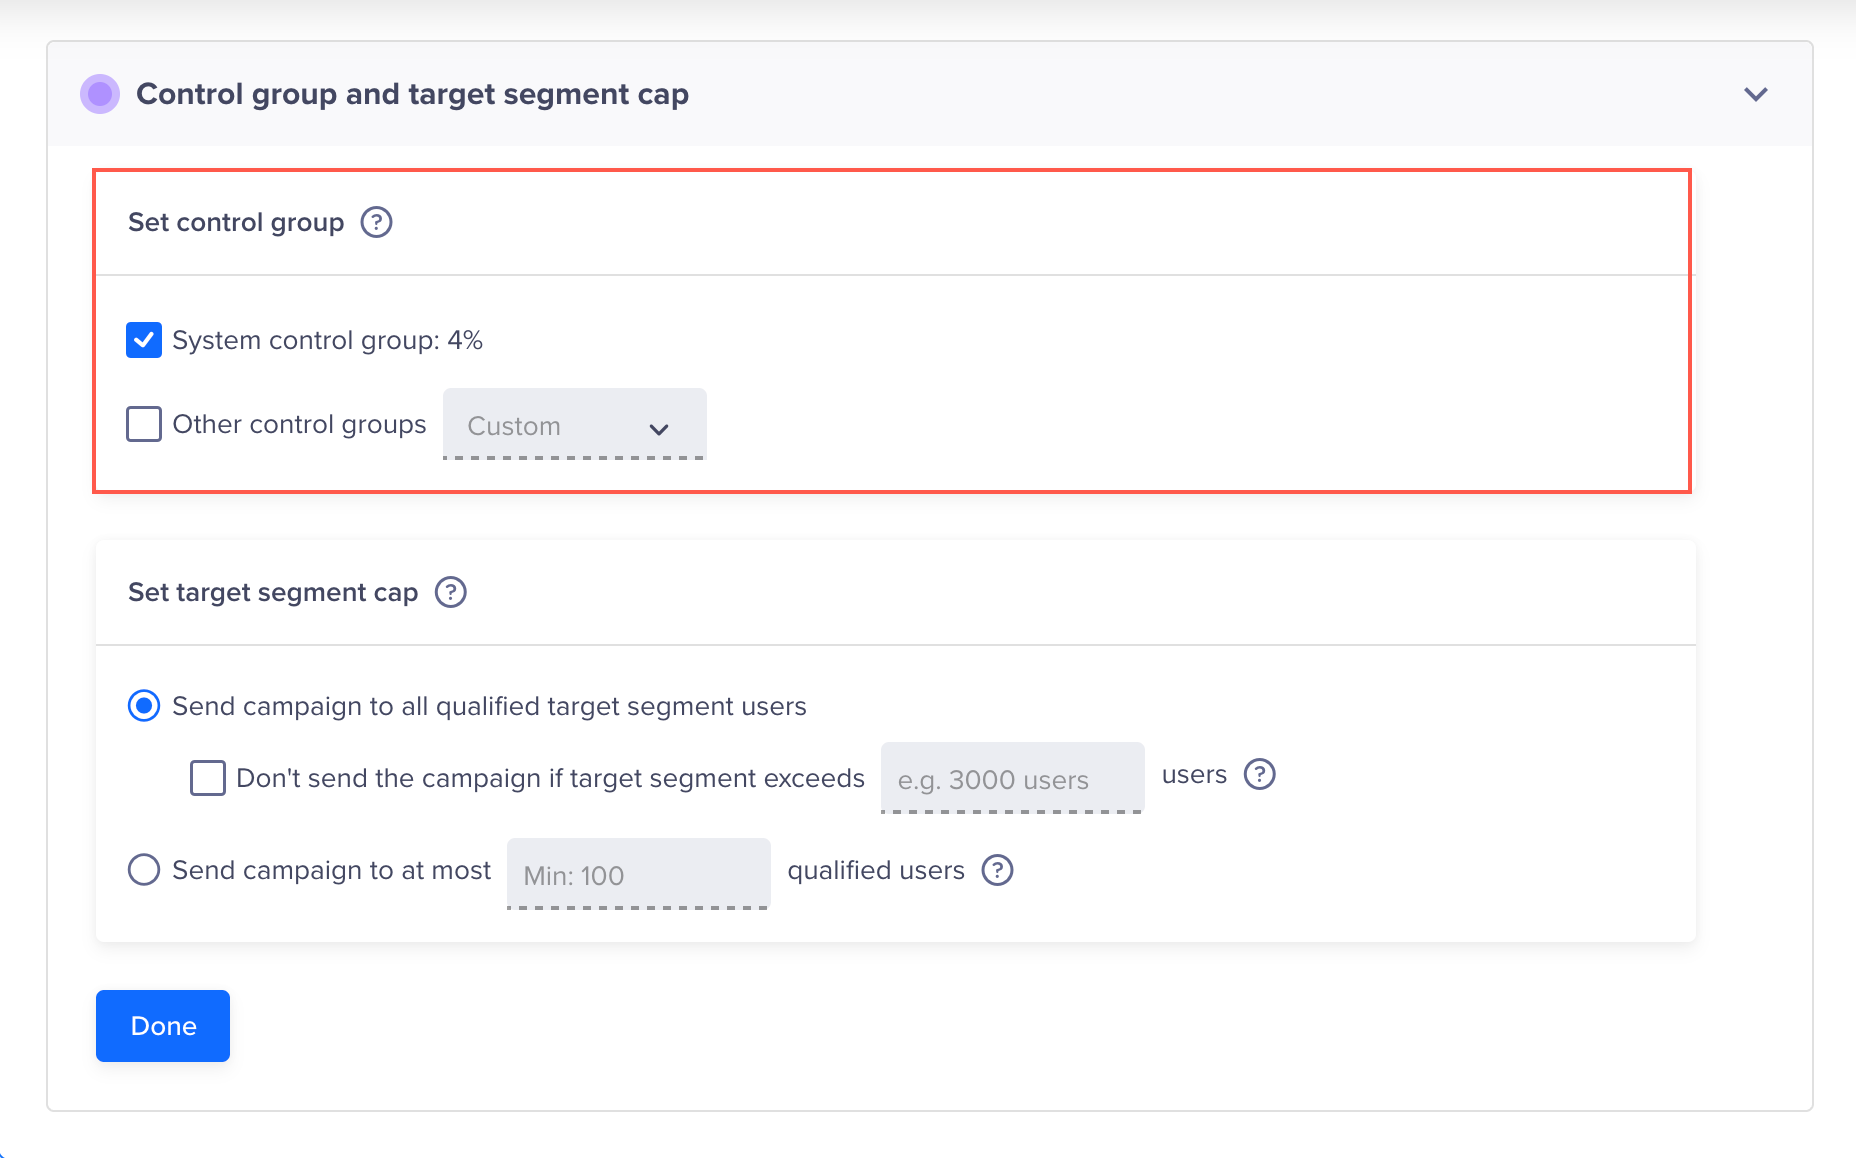
The control group is a subset of qualified users who do not receive the reward. Their behavior can be compared with users who receive it, giving you a true measure of campaign impact.
Set Control Group
The following control group options are available:
- System Control Group: Selected by default. Randomly excludes a system-defined percentage of qualified users (for example, 4%) from receiving the reward.
- Other Control Groups: (Optional) Select a custom control group from the dropdown if additional control groups are configured at the account level.
NoteThe System control group percentage is set at the account level and cannot be changed from within the campaign builder. To modify it, go to Settings > Control Groups. For more information, refer to Control Groups.
Set Target Segment Cap
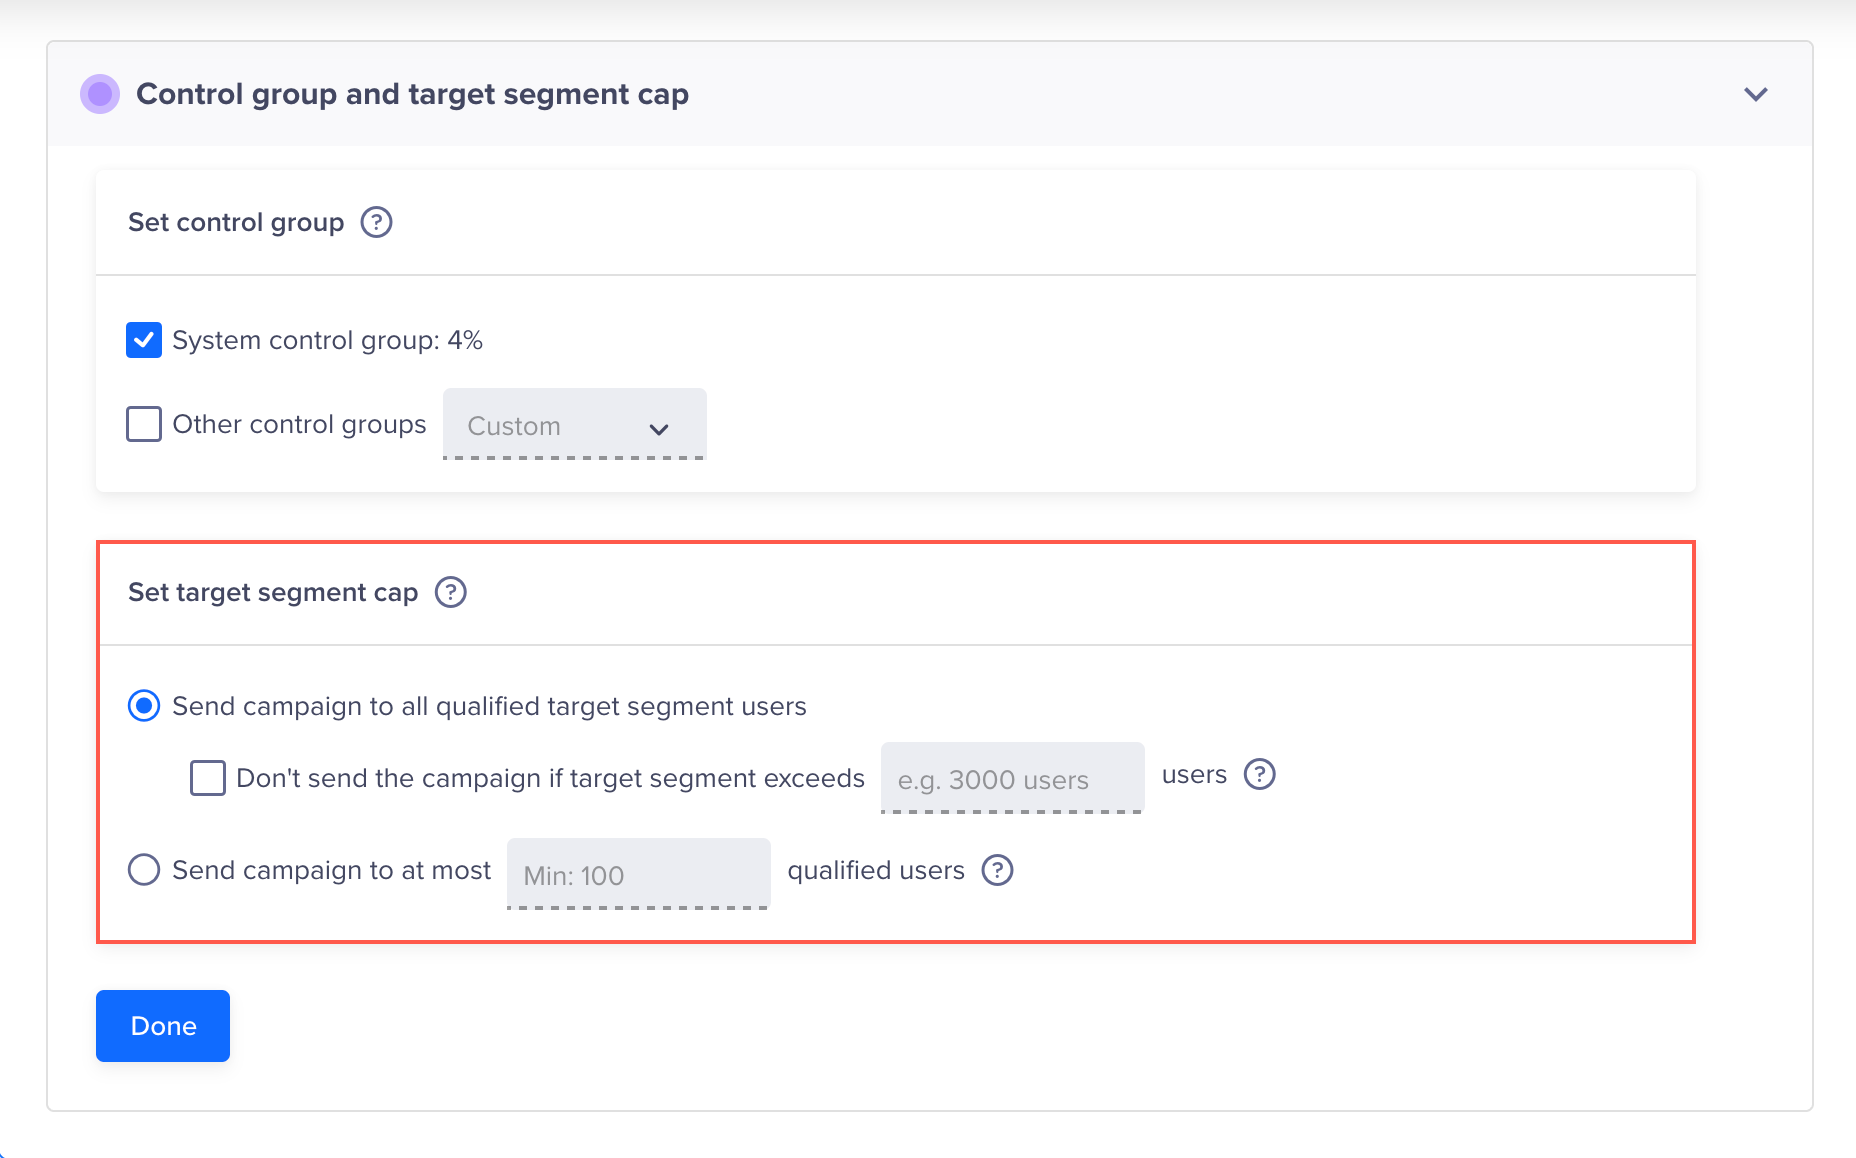
The target segment cap controls how many users from the qualified segment actually receive the reward.
Set Target Segment Cap
The available options and their behavior vary depending on the campaign type (Past Behavior/Custom List or Live Behavior) selected in the Select Target Segment section. The following segment cap options are available based on the selected campaign type:
Option 1: Send campaign to all qualified target segment users
Distributes the reward to every user who qualifies based on the segment rules defined in the Select Target Segment section.
For Past Behavior and Custom List campaigns, you can also select the Don't send the campaign if target segment exceeds [X] users option to set an upper threshold. If the qualified segment size exceeds the specified limit, CleverTap does not send the campaign. This protects reward budgets on limited-inventory campaigns such as bulk coupon codes.
Option 2: Send campaign to at most [X] qualified users
Limits the total rewards distribution to X users across the entire campaign run. For example, if your qualified segment has 50,000 users and you enter 5,000, only 5,000 randomly selected users will receive the reward when the campaign runs.
Option 3: Send campaign to at most X qualified users per day (available only for live campaign types)
Limits the total rewards distribution to X users per day, with qualification in real time.
Additionally, you can also select And cap to [X] over all to cap the cumulative upper limit. This sets the total number of users who can receive the reward over the campaign's lifetime. Once this overall cap is reached, the campaign stops distributing rewards, even if the daily cap has not been met that day.
For example, if you set the daily cap to 500 users and the overall cap to 2,000 users, the campaign rewards up to 500 users each day. Once 2,000 total users have been rewarded across all days, the campaign stops distributing rewards regardless of how many days remain.
Set Per Day Capping
Note
If you only set the daily cap without enabling And cap to [X] over all, rewards continue distributing at the daily rate until the campaign's end date is reached.
Set Up Reward
The What section allows you to define the reward type for your Promo Campaign. Depending on your selection, the configuration options vary. CleverTap supports the following reward types:
Set Up Delivery Preferences
The When section defines when the campaign starts and ends, and the controls available vary based on whether you select a Past Behavior Segment (PBS) or a Live Behavior Segment.
For Past Behavior Segments or Custom List (PBS)
When you select Past Behavior or Custom List Segment, the When section shows the following options:
| Option | Description | Example / Use Case |
|---|---|---|
| Send Now | Launches the campaign immediately using the current timestamp and the account timezone (for example, GMT+05:30 Asia/Kolkata). | Run a flash-sale promotion as soon as it is configured. |
| Schedule for Later | Let's you choose a future start date and time. You can also adjust the timezone if required. | Schedule a promo to start at 6:00 PM on a Friday evening to capture higher traffic. |
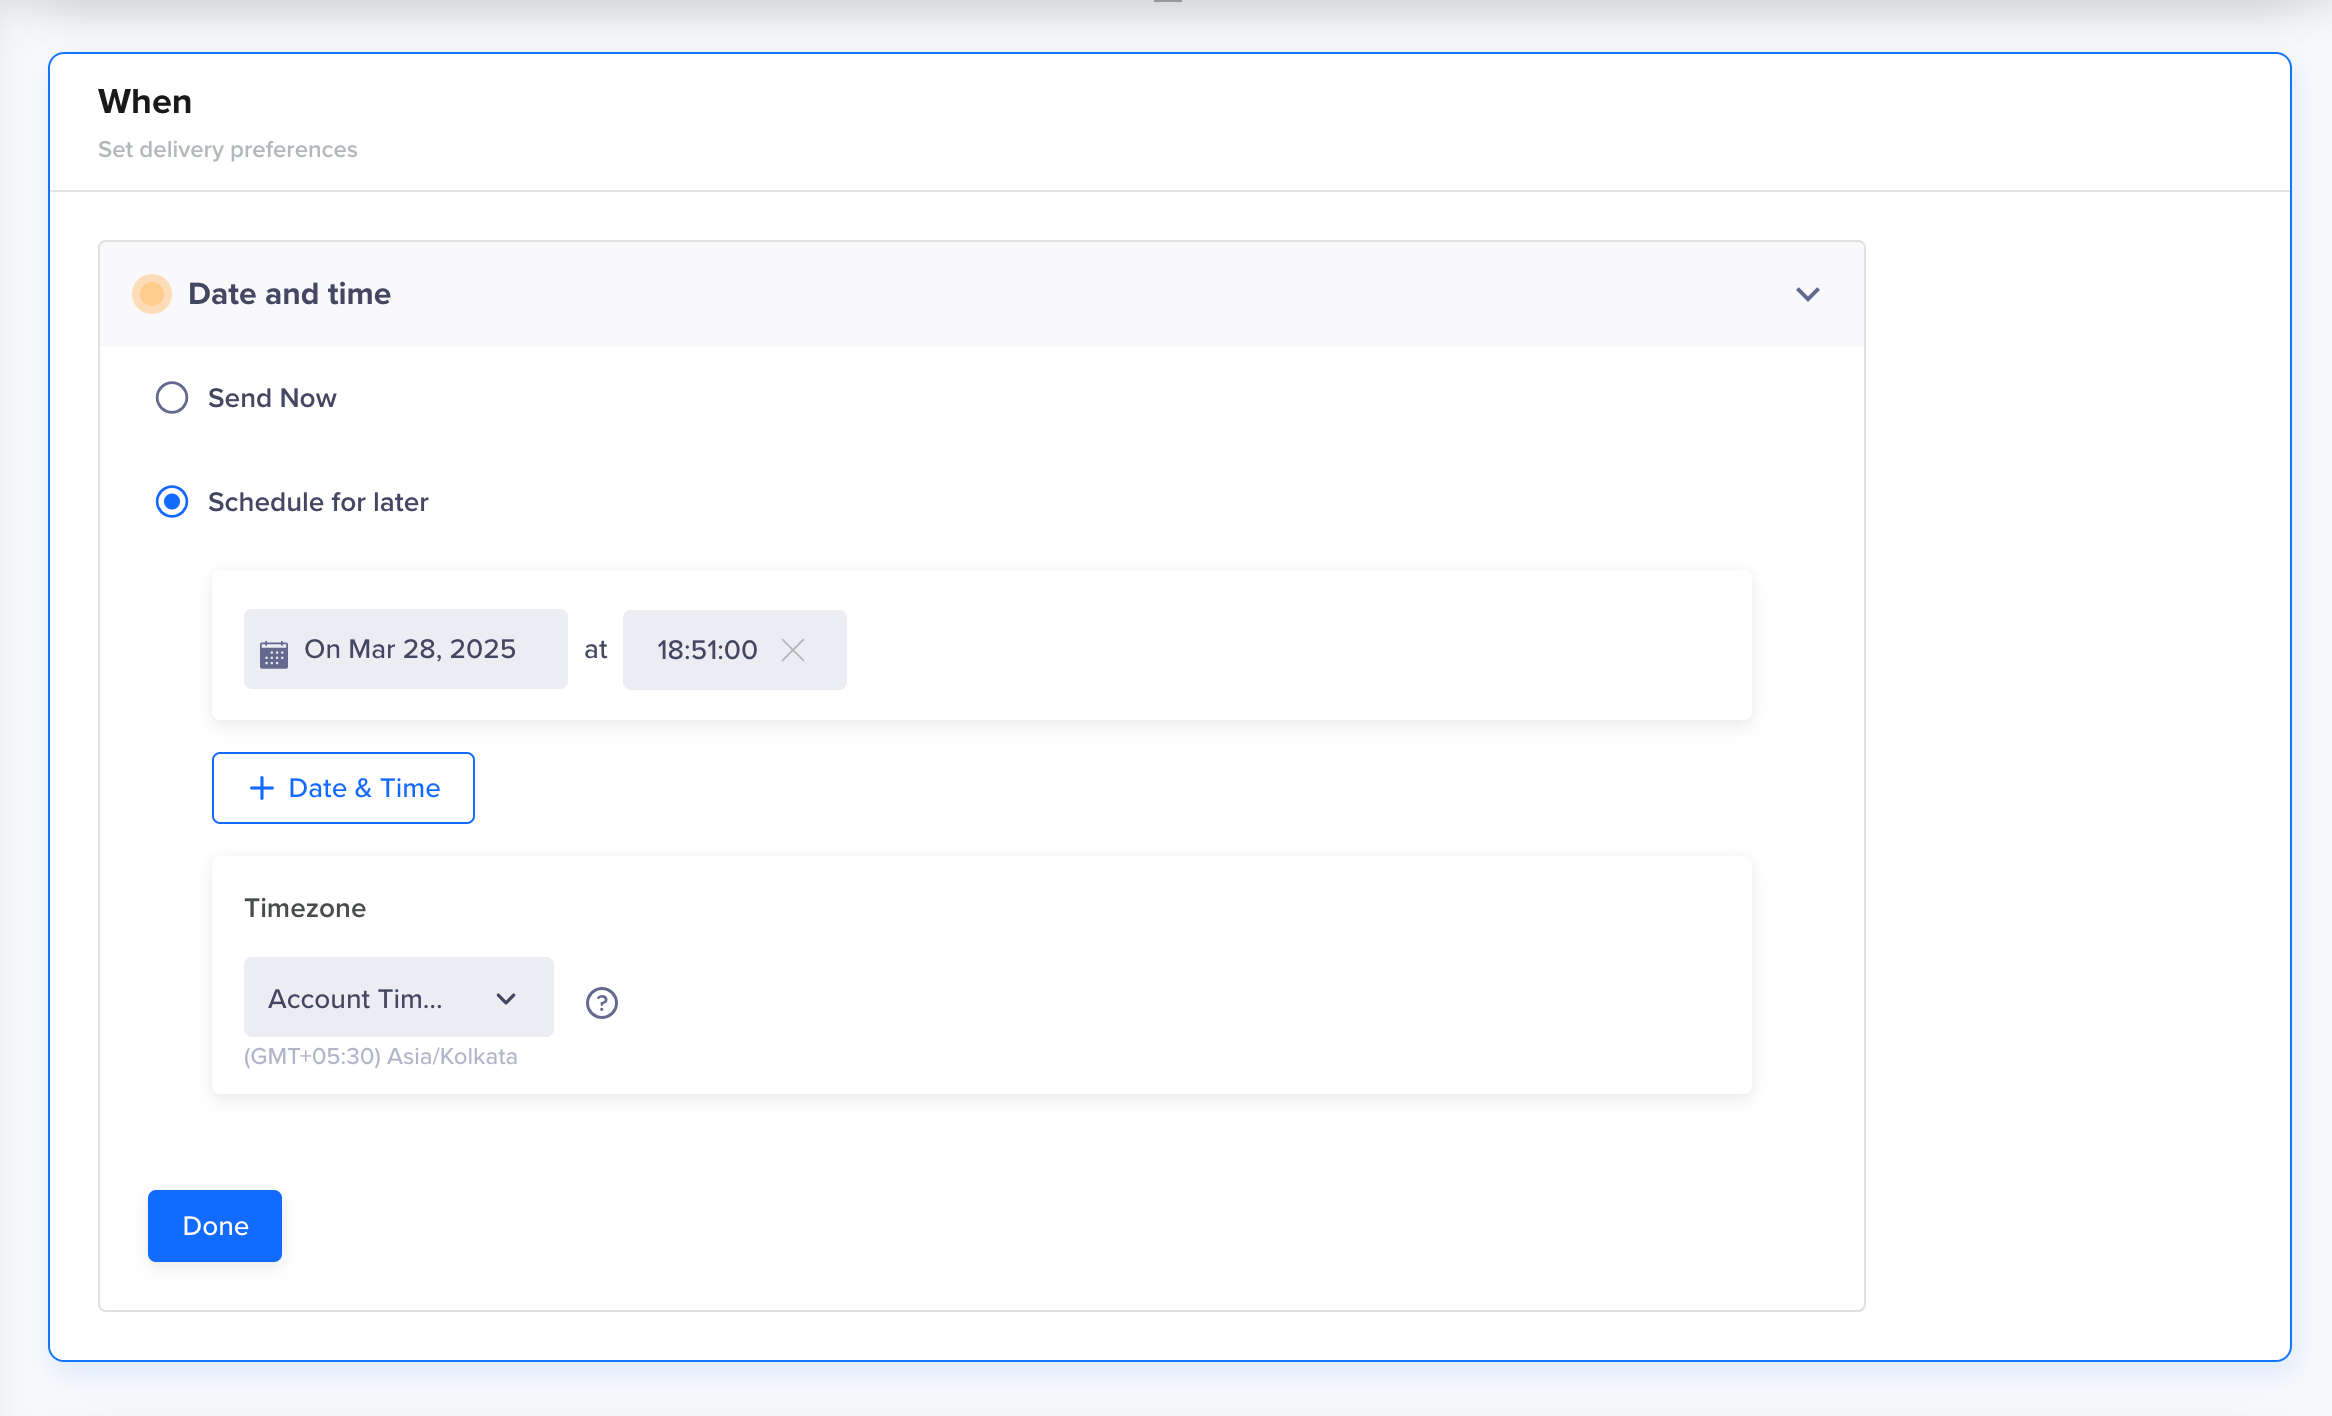
Set Delivery Preferences in Past Behavior/Custom List Segments
For Live Behavior Segments
When you select Live Behavior Segment, the When section shows the following options:
| Option | Description | Example / Use Case |
|---|---|---|
| Start Date and Time | Choose when the campaign should start.
| Start the live campaign immediately to capture ongoing cart abandonment events, or schedule it to go live on the morning of a sale day. |
| End Date and Time | Choose when the campaign should stop. Never: Campaign keeps running until manually stopped.
| End the campaign automatically at midnight on the final day of a seasonal sale. |
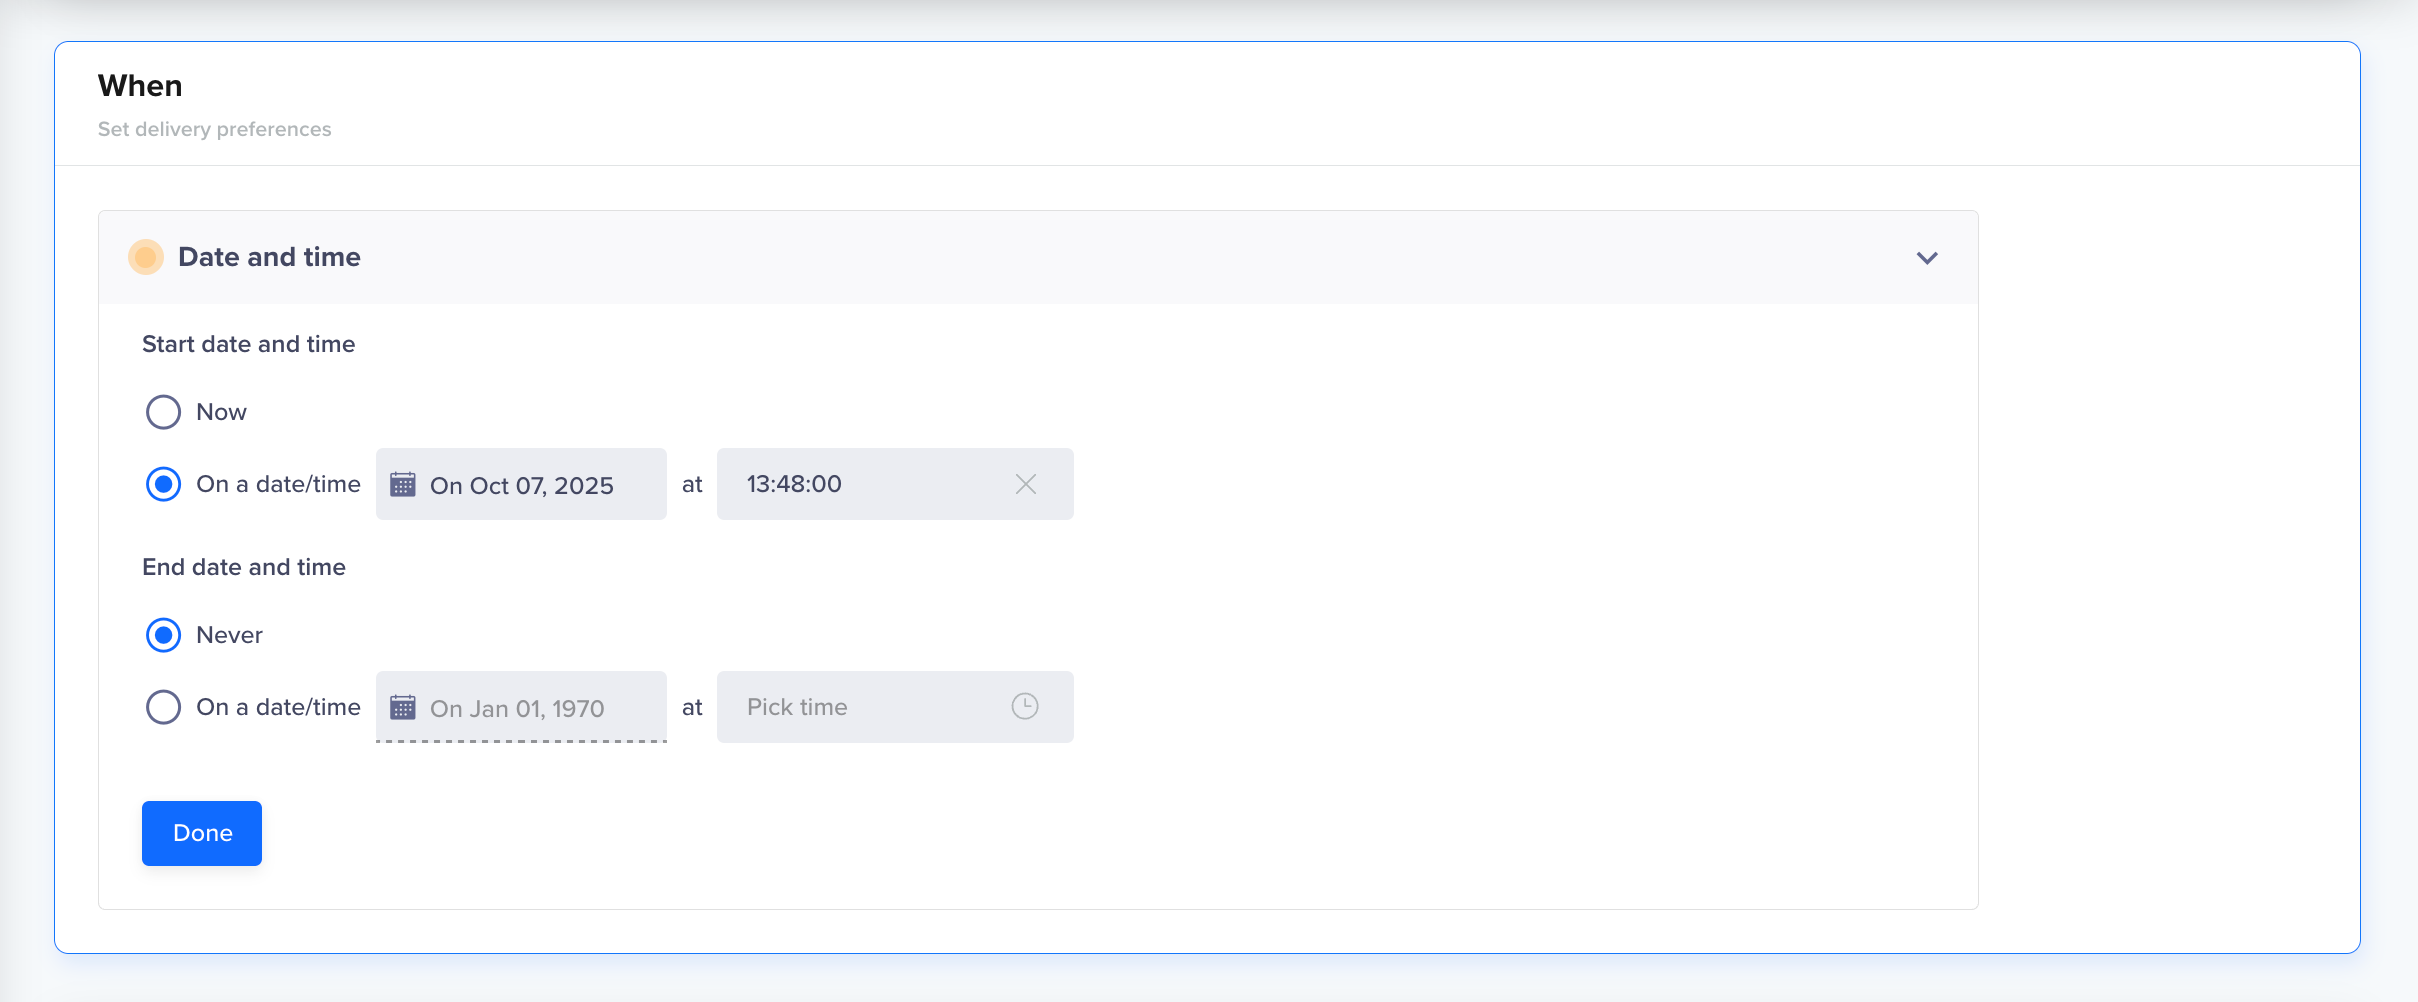
Set Deliver Preference in Live Behavior Campaigns
Publish Campaign
Once you define all the above sections, click Publish Campaign to activate or schedule the campaign.
Publish Campaign
Reward Types
Each reward type includes different configuration settings, described in the sections below:
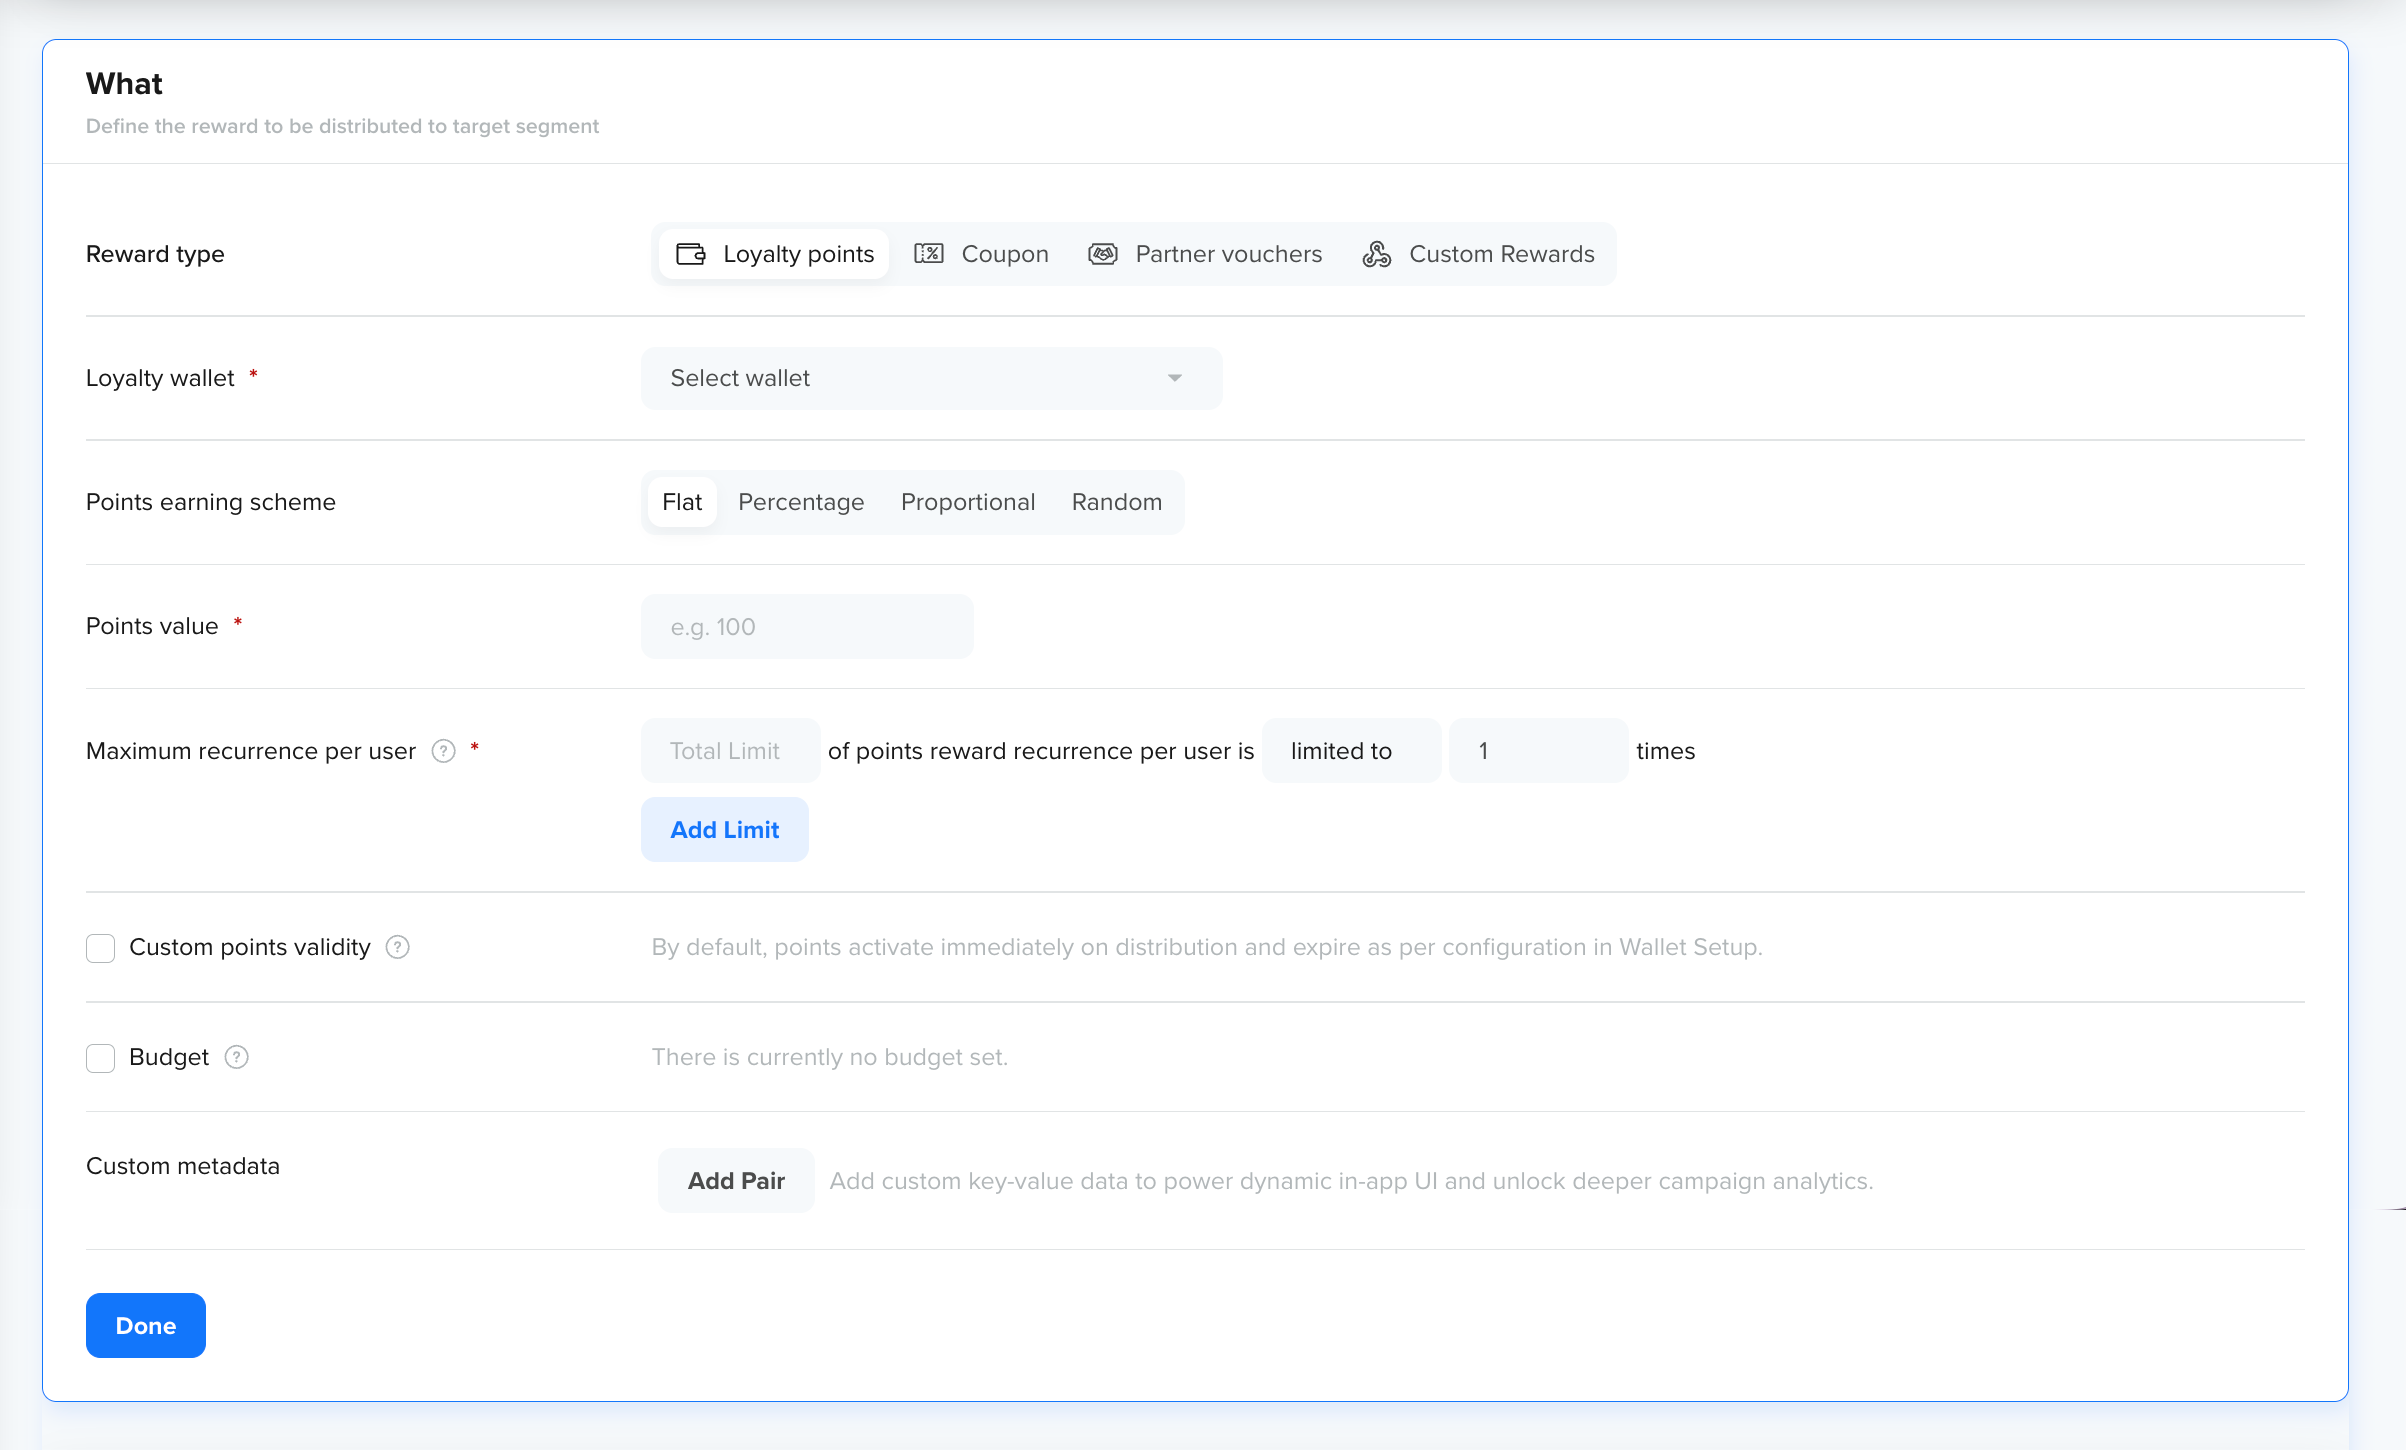
Loyalty Points
Use Loyalty Points to incentivize users with loyalty points that can be accumulated and redeemed within your app or platform. This option requires that wallets be pre-created in your CleverTap account.
The following configuration options are available when Loyalty Points is selected:
| Option | Description | Example / Use Case | Available In |
|---|---|---|---|
| Loyalty wallet | Select the wallet from the dropdown. Ensures that points are distributed to the correct wallet. | You can reward users based on context if you have multiple wallets (for example, Grocery vs. Food). | Past Behavior/Custom List + Live Behavior Segments |
| Points earning scheme | Define how points are calculated when users qualify. Options include:
|
|
|
| Points value | The input control for Points value changes based on the selected Points Earning Scheme:
|
|
|
| Distribution bias (For Random scheme only) | Control distribution pattern that allows you to select the following options:
|
| Past Behavior/Custom List + Live Behavior Segments |
| Max points per reward | Define the maximum number of points that can be awarded in a single transaction or instance. Applicable only when using Percentage or Proportional earning schemes in Live Behavior campaigns. Not available for Flat or Random schemes. | Cap points at 500 per purchase, even if the % calculation exceeds this value. | Live Behavior Segments |
| Maximum recurrence per user | Control how many times a single user can receive the reward. Multiple limits can be combined (for example, total + per day/week/month). | If the total limit is 5 and the per-day limit is 2, the user can receive the reward up to two times per day until they reach a total of 5 rewards. | Live Behavior Segments only |
| Custom points validity | Define the activation and expiry lifecycle of awarded points. |
| Past Behavior/Custom List + Live Behavior Segments |
| Budget | Define the budget to control how rewards are distributed. Budget can be set at two levels:
| If the Per Campaign Budget is 5,000 points, rewards stop once the campaign collectively distributes 5,000 points, even if more users qualify. If the Per User Budget is 500 points, each user can only receive up to 500 points during the campaign, even if they continue qualifying. | Live Behavior Segments only |
| Custom metadata | Add dynamic key–value pairs to pass additional data into the wallet points payload. Each row has two modes:
| Add {'{'}' "orderId": "12345", "promoType": "festival" {'}'} as custom metadata to track order-related rewards. | Past Behavior/Custom List + Live Behavior Segments |
Points to Consider
- Custom Activation does not check user behavior. It delays redemption so businesses can increase net profit on orders.
- Wallet must be pre-configured in your account.
Set Up Loyalty Points in Rewards
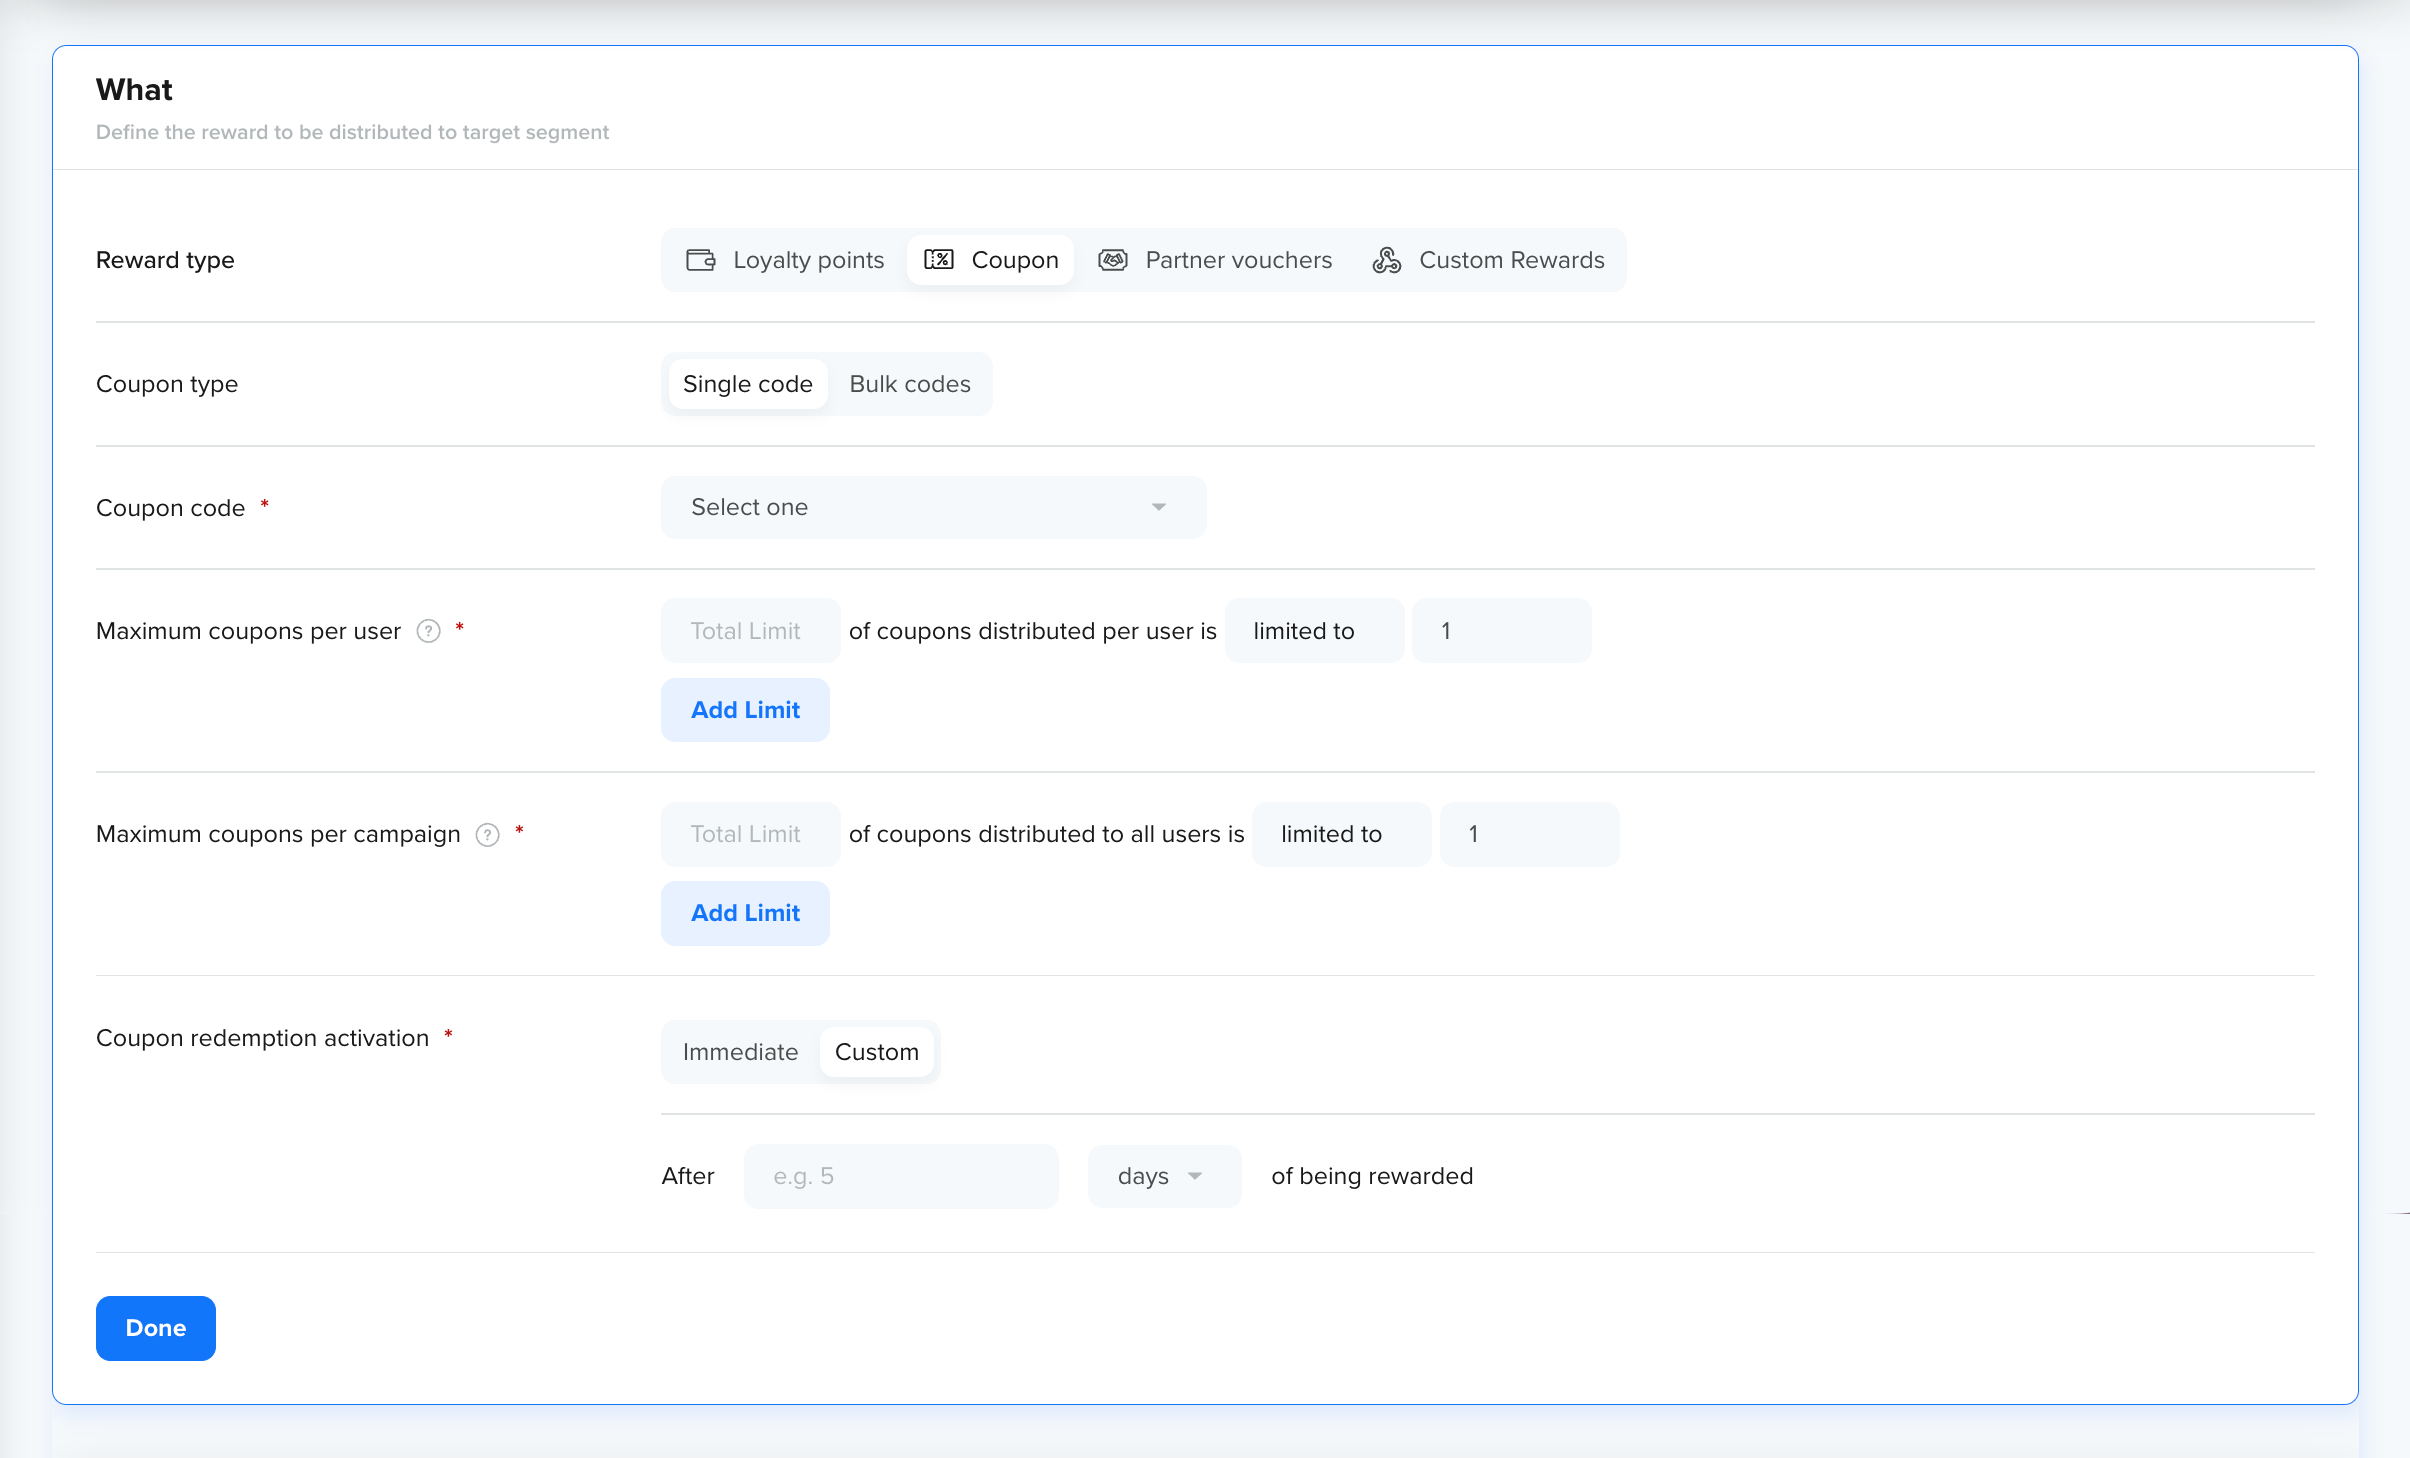
Coupons
Use Coupons to provide users with discount codes or special offers. Coupons must be pre-created in CleverTap and active.
The following configuration options are available when Coupons is selected:
| Option | Description | Example / Use Case | Available In |
|---|---|---|---|
| Coupon Type | Choose Single Code (shared) or Bulk Codes (unique). |
| Past Behavior/Custom List + Live Behavior Segments |
| Coupon code | Select from available coupons that match the type. Coupon must be active and not fully redeemed. | Dropdown lists valid Single or Bulk codes. | Past Behavior/Custom List + Live Behavior Segments |
| Max coupons per user | Defines how many times the coupon can be rewarded to the same user. This does not control redemption. If a user-level redemption limit is 2 and the same coupon is rewarded twice, user can redeem 4 times total. | Selecting Limit = 1 means each user can only be rewarded the coupon once. | Live Behavior Segments only |
| Max coupons per campaign | Defines the total number of coupon codes that the campaign can distribute. | Selecting Limit = 1000 means the campaign stops distributing coupons after 1000 coupons are issued. | Live Behavior Segments |
| Coupon redemption activation | Define when coupons can be redeemed, immediately or after a custom delay. |
| Past Behavior/Custom List + Live Behavior Segments |
Set Up Coupons in Rewards
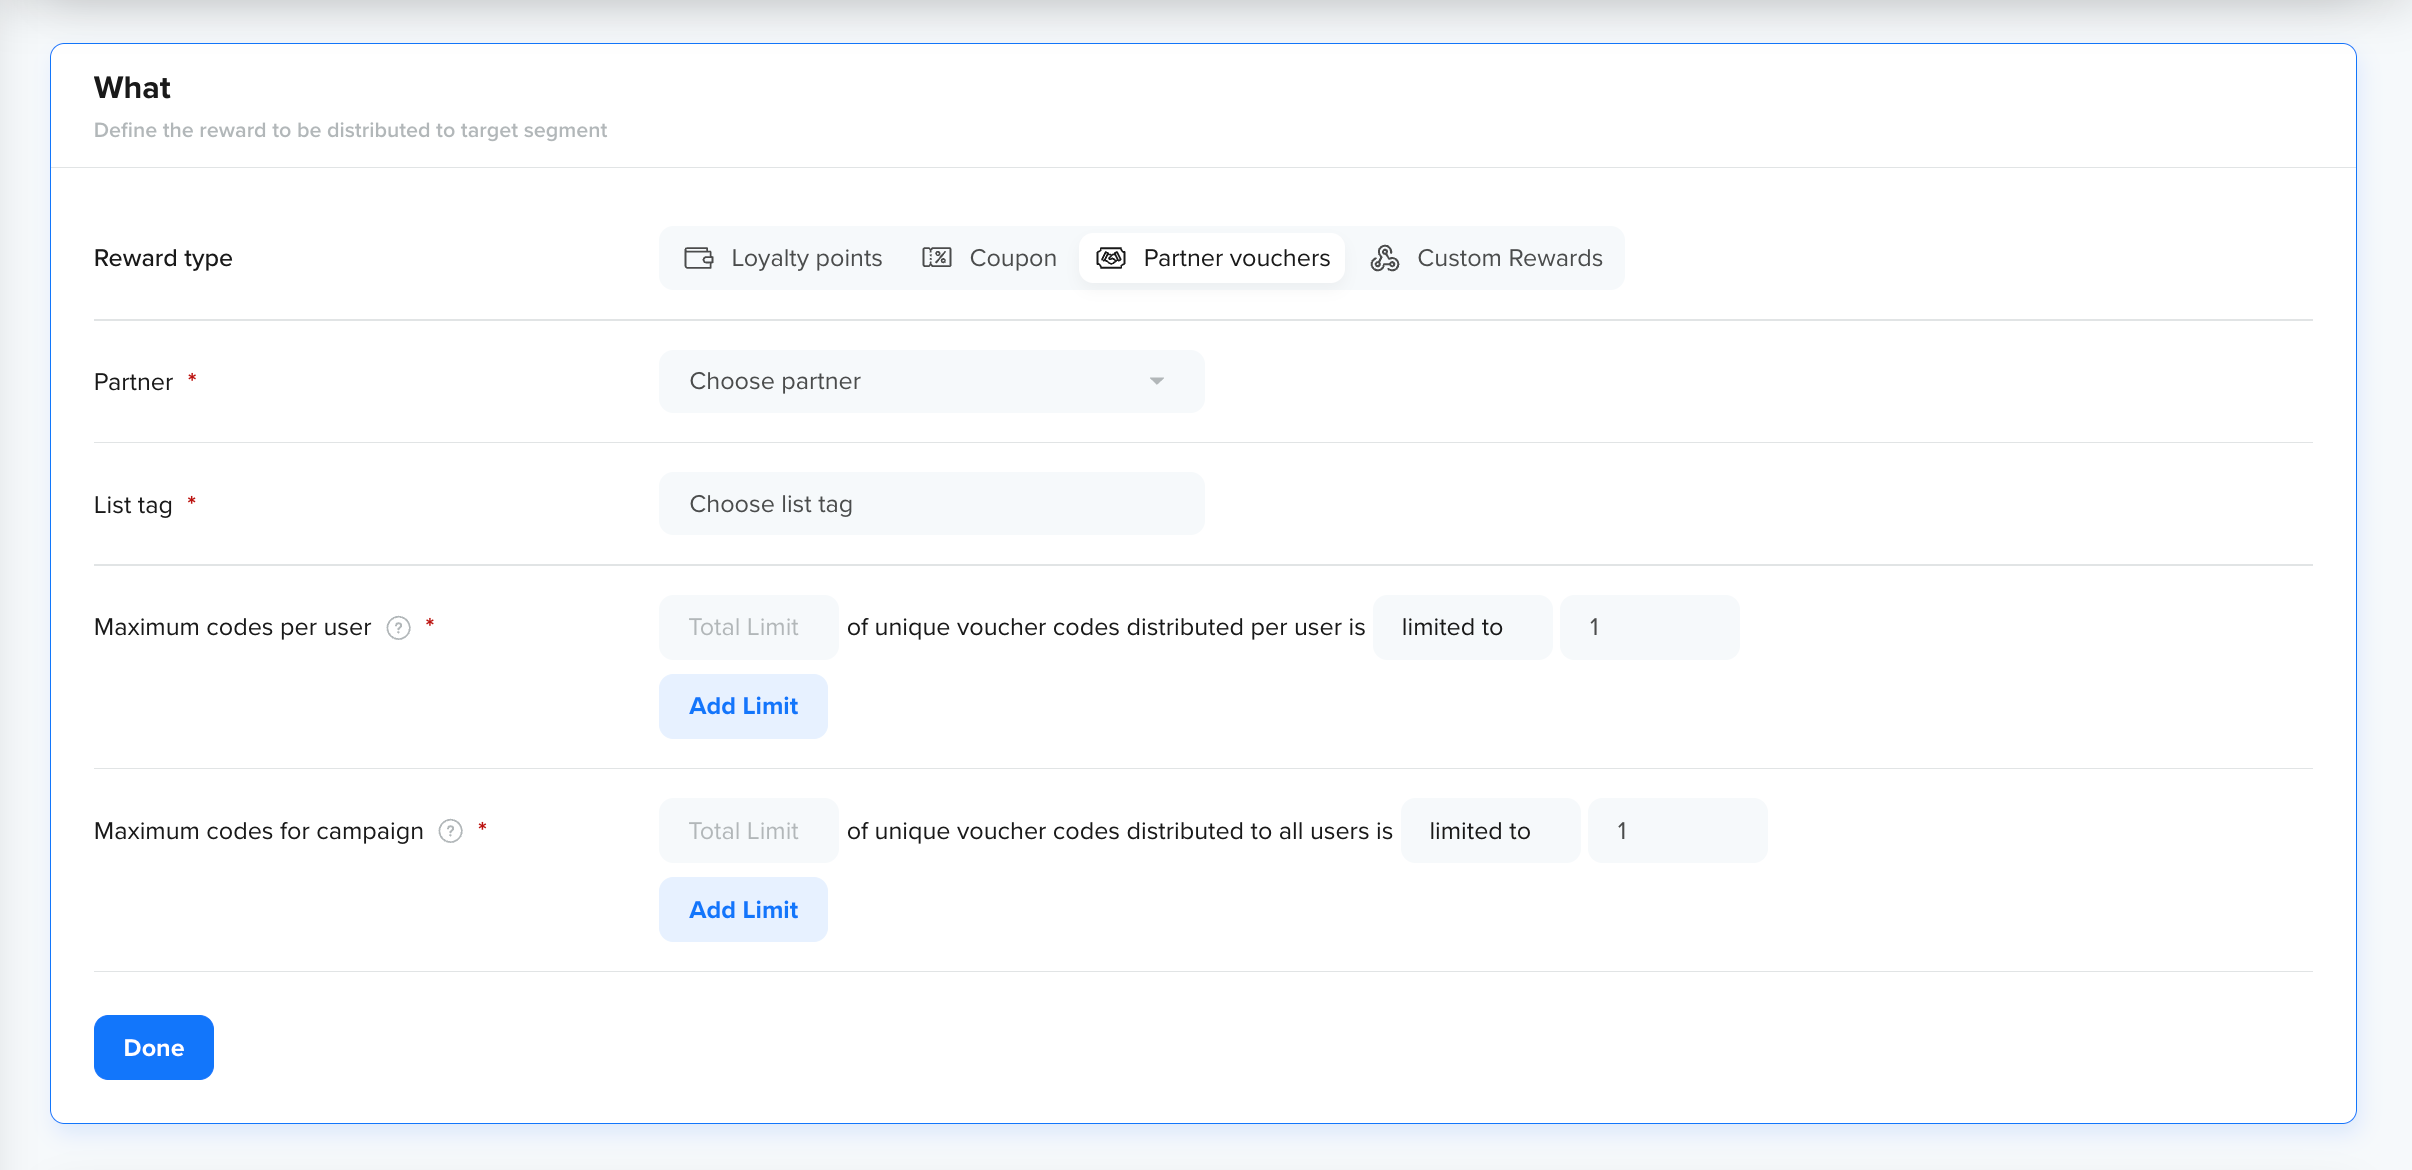
Partner Vouchers
Use Partner Vouchers to distribute unique codes provided by third-party providers integrated with your account.
The following configuration options are available when Partner Vouchers is selected:
| Option | Description | Example / Use Case | Available In |
|---|---|---|---|
| Partner | Select from integrated and active voucher providers. | Pick Amazon Gift Cards provider. | Past Behavior/Custom List + Live Behavior Segments |
| List tag | Select the voucher batch (list tag) for distribution. Codes are auto-assigned uniquely to users. | Batch Holiday2025 with 10,000 gift codes. | Past Behavior/Custom List + Live Behavior Segments |
| Max codes per user | Defines how many times the voucher can be rewarded to the same user. This does not control redemption. If a user-level redemption limit is 2 and the same voucher is rewarded twice, user can redeem 4 times total. | Selecting Limit = 1 means each user can only be rewarded the voucher once. | Live Behavior Segments only |
| Max codes per campaign | Defines the total number of voucher codes that the campaign can distribute. | Selecting Limit = 1000 means the campaign stops distributing vouchers after 1000 vouchers are issued. | Live Behavior Segments |
Set Up Partner Vouchers in Rewards
Note
- Only active, unexpired voucher lists are displayed.
- No preview of voucher details is available.
- System ensures each user receives a unique, unused code.
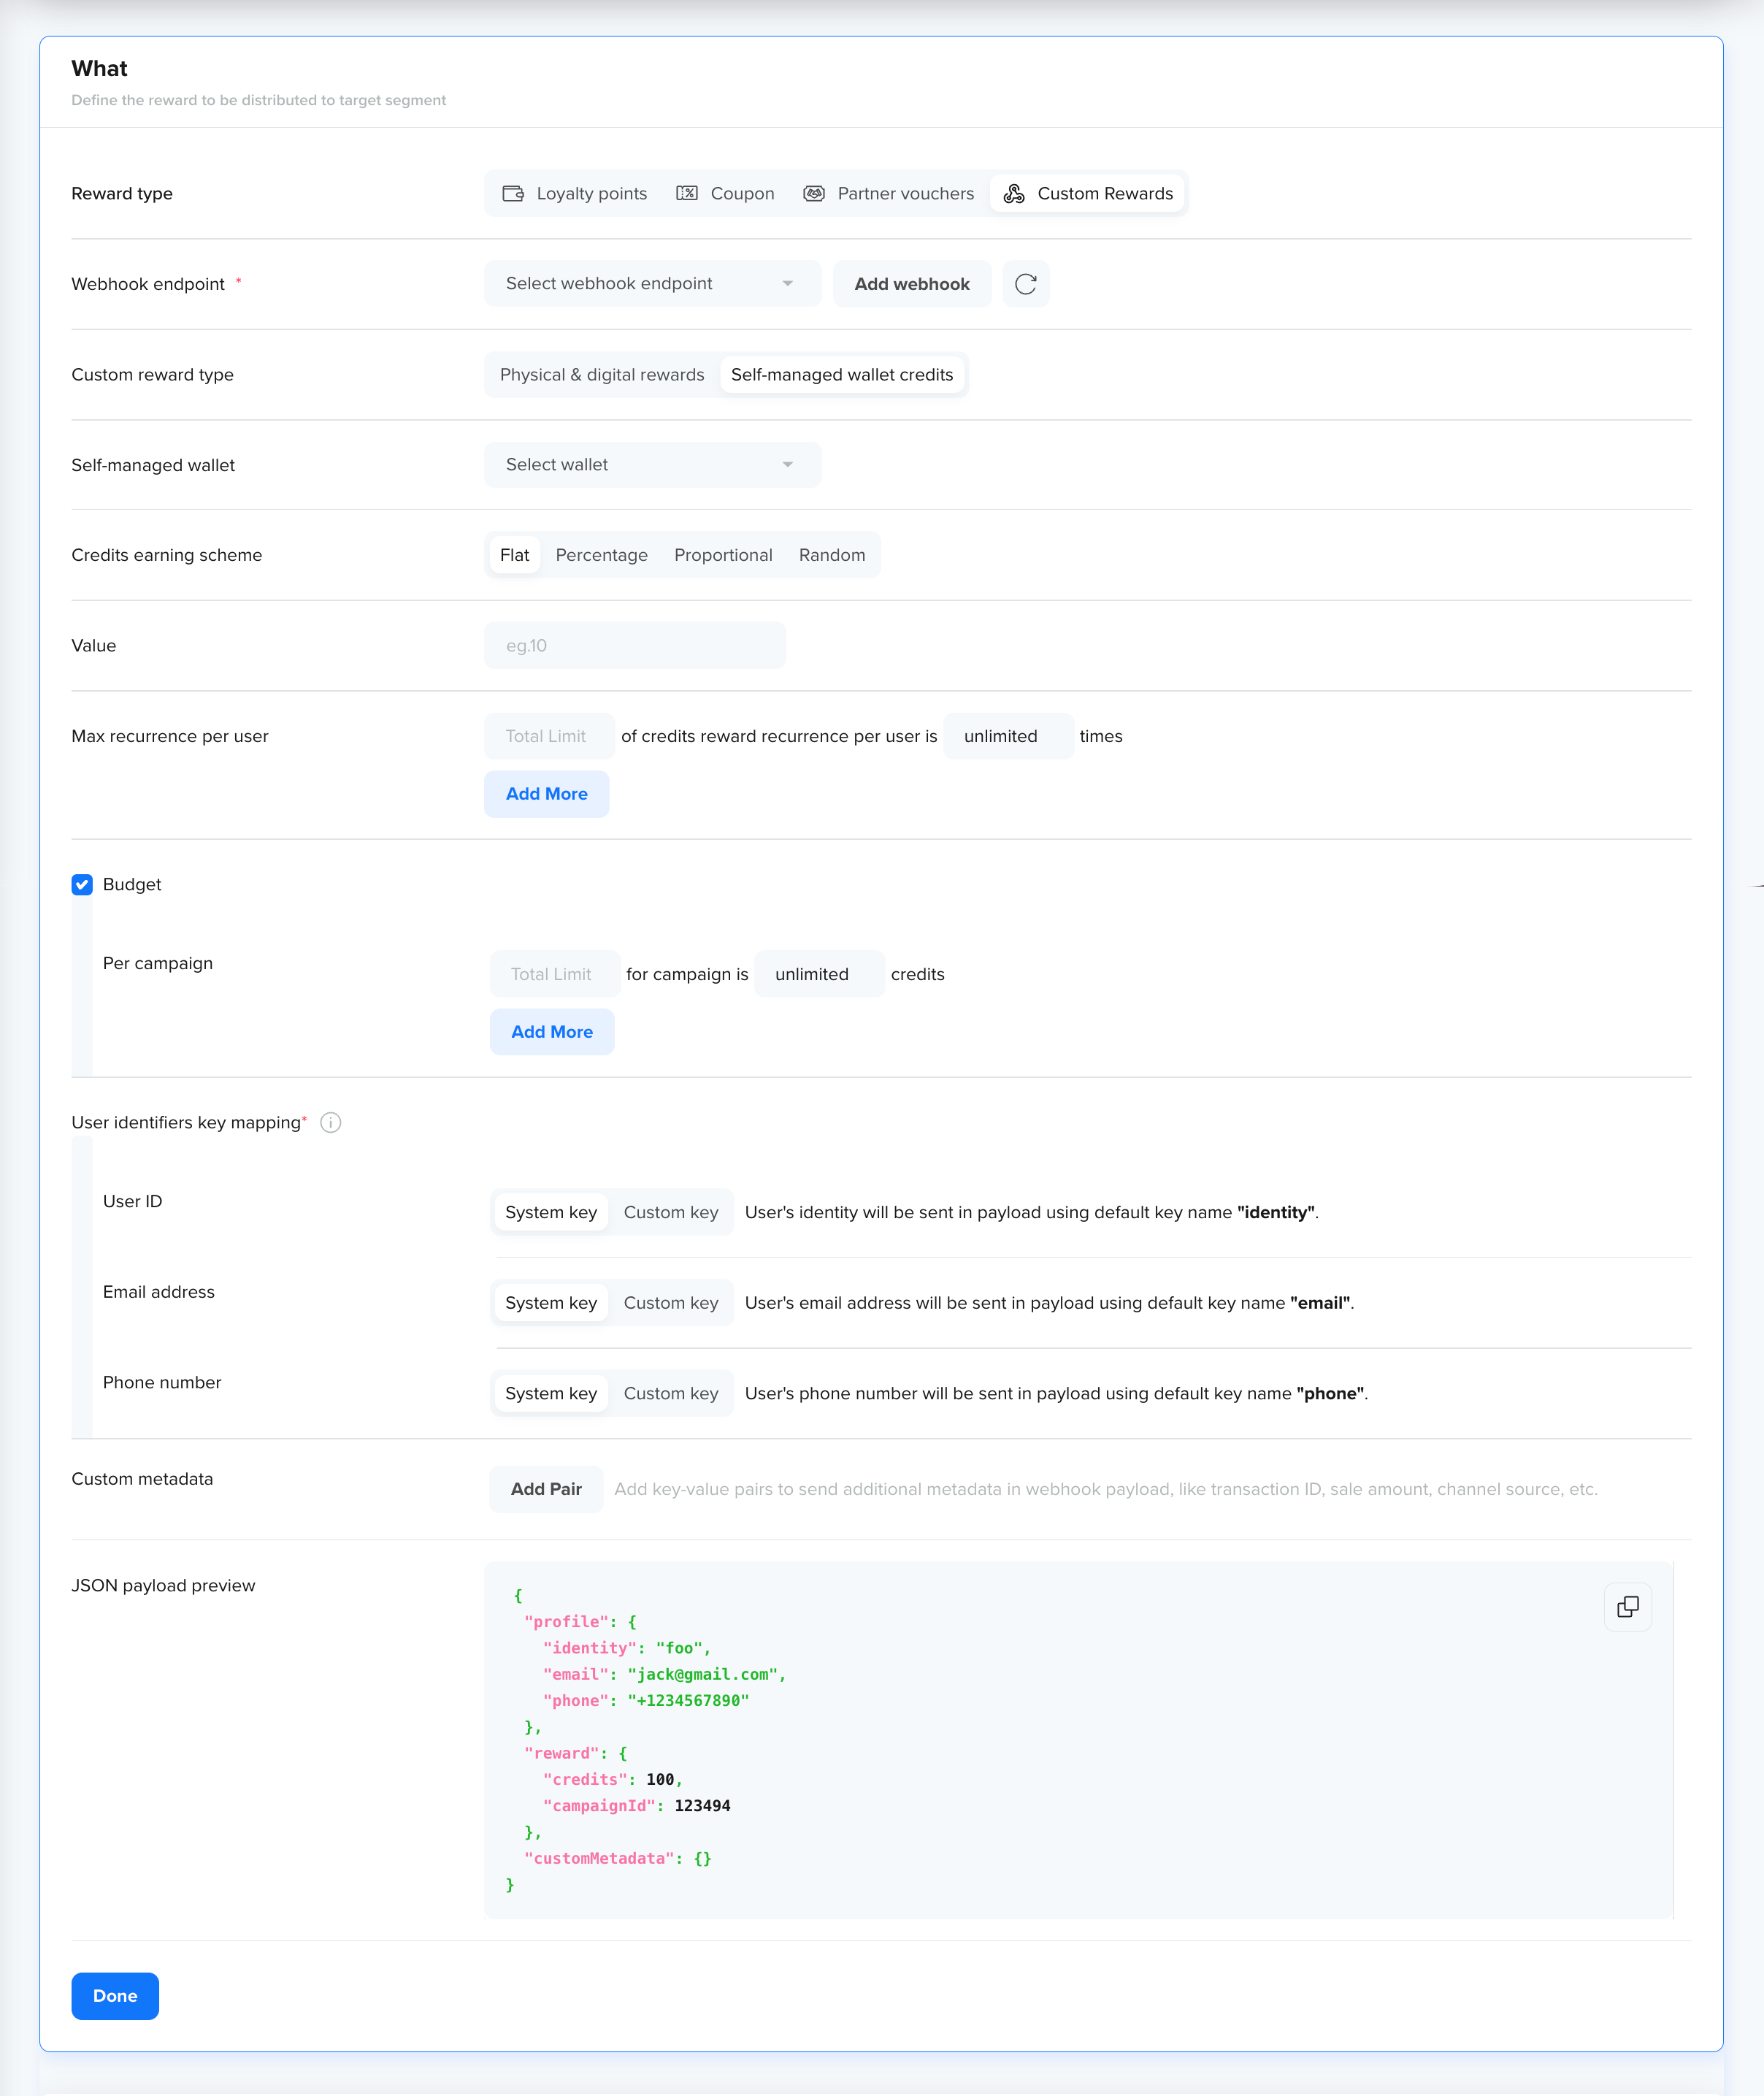
Custom Rewards
Use Custom Rewards to integrate external reward systems. When a user qualifies, CleverTap triggers a webhook call to your configured endpoint, enabling you to issue rewards such as third-party gift cards, credits, or custom incentives.
The following configuration options are available when Custom Rewards is selected:
| Option | Description | Example / Use Case | Available In |
|---|---|---|---|
| Webhook endpoint (mandatory) | Select a pre-configured webhook endpoint from the dropdown. If none exist, click the link provided to add a new configuration. | Connect to an external gift card provider API endpoint. | Past Behavior/Custom List + Live Behavior Segment |
| Custom reward type | Select whether to issue Physical & digital rewards (tangible gifts) or Self-managed wallet credits (monetary/credit-based). | Physical & digital: Send a Bluetooth speaker as a gift. Self-managed: Credit ₹200 to a user's wallet. | Past Behavior/Custom List + Live Behavior Segment |
| Physical & digital rewards | Choose a reward that must be pre-created in your account. | Select "Amazon Voucher" or "Smartwatch". | Past Behavior/Custom List + Live Behavior Segment |
| Max recurrence per user | Allows you to control how many rewards can be granted per user on a daily, weekly, or monthly basis. | Max per user = 1 reward in a week | Past Behavior/Custom List + Live Behavior Segment |
| Self-managed wallet credits | Choose a wallet from the dropdown (must be pre-created). | Select a wallet to reward credits or money. | Past Behavior/Custom List + Live Behavior Segment |
| Credits earning scheme (only for Self-managed wallet credits) | Choose how to define wallet credits. Options include:
|
|
|
| Value | The input control for the credits value changes based on the selected credits Earning Scheme:
|
|
|
| Distribution bias (For Random scheme only) | Control distribution pattern that allows you to select the following options:
|
| Past Behavior/Custom List + Live Behavior Segments |
| Max credits per rewards (only for Percentage and Proportional schemes) | Enter the maximum credits per reward. | Setting 100 means each user can get a maximum of 100 credits per reward. | Past Behavior/Custom List + Live Behavior Segment |
| Max recurrence per user | Allows you to control how many rewards can be granted per user on a daily, weekly, or monthly basis. | Max per user = 1 reward in a day | Past Behavior/Custom List + Live Behavior Segment |
| Budget | Defines how many rewards can be distributed.
|
| Past Behavior/Custom List + Live Behavior Segment |
| User identifiers key mapping | Map CleverTap's default user identity fields (User ID, Email address, Phone number) to your webhook payload keys. Each field supports the following modes: System key (CleverTap's default field names) or Custom key (specify your own key names). | Map CleverTap's identity field to your external system's customerId or use default mapping for email and phone. | Past Behavior/Custom List + Live Behavior Segment |
| Custom metadata | Add dynamic key-value pairs to include contextual data in the reward payload. Duplicate keys are not allowed. | Add {'{'}' "orderType": "electronics", "promoType": "festival" {'}'} as custom metadata to track order-related rewards. | Past Behavior/Custom List + Live Behavior Segments |
| Preview JSON Payload | Displays a live JSON preview that includes reward metadata and configured key-value parameters. | For example, refer to JSON Payload | Past Behavior/Custom List + Live Behavior Segment |
Set Up Reward in Custom Rewards
Points to Consider
Before you begin:
- Ensure you configure the webhook endpoint before creating the campaign.
- Verify that the endpoint can handle campaign volume, retries, and logging.
During setup:
- Physical & Digital Rewards and Self-managed Wallet Credits have separate configuration options; choose the appropriate type based on your use case.
- The reward payload is fully customizable and scales automatically with campaign volume.
- Custom Rewards give maximum flexibility but require your external system to handle issuance and redemption.
JSON Payload for Custom Rewards
{
  "user": {
    "userId": "12345",
    "email": "[email protected]",
    "phone": "+1234567890"
  },
  "reward": {
    "type": "custom",
    "value": 100,
    "metadata": {
      "orderType": "electronics",
      "promoType": "festival"
    }
  }
}
Best Practices
Maximize campaign effectiveness and avoid common pitfalls with the following best practices for setup, execution, and management:
- Use Segments Wisely: Tailor rewards with meaningful segmentation.
- Test Before Scaling: Start small to validate campaign performance.
- Set Limits: Always define per-user and per-campaign limits.
- Reward Inventory: Ensure sufficient reward stock throughout the campaign.
Updated 3 months ago