Talon.One
Loyalty Partner
Introduction
Talon.One is a platform that allows you to create highly customizable promotional campaigns with the help of the Campaign Manager feature. With this integration, you can automate coupon generation and delivery to specific customer segments. You can embed Talon.One generated coupon codes directly into messages delivered through CleverTap. Thereby optimizing the reach by sending campaigns at the right time on the right channels.
For any issues with this integration, contact Talon.One Support team.
Prerequisites for Integration
The following are the prerequisites for setting up the integration:
- Must have integrated Talon.One SDK or API. For more information about detailed steps, refer to Talon.One Integration.
- Must have access to CleverTap account.
Send Talon.One Coupon Code Through CleverTap
To send the Talon.One coupon code through CleverTap:
Set Up Webhook in Talon.One
To set up a webhook in Talon.One:
- Ensure that you set up the payload as per the parameter and authentication headers recommended by Clevertap. For more information, refer to Upload Events API.

Set Up a Webhook from Talon.One Dashboard
Display in Rule Builder CheckboxEnsure that you select the Display in Rule Builder checkbox to enable webhook for your campaign.
- Select the request Verb from the dropdown list and then enter the URL. The following table lists the API endpoint for the region of your account:
| Region | API Endpoint | CleverTap Dashboard URL |
|---|---|---|
| India | in1.api.clevertap.com | https://in1.dashboard.clevertap.com/login.html |
| Singapore | sg1.api.clevertap.com | https://sg1.dashboard.clevertap.com/login.html |
| United States | us1.api.clevertap.com | https://us1.dashboard.clevertap.com/login.html |
| Indonesia | aps3.api.clevertap.com | https://aps3.dashboard.clevertap.com/login.html |
| Middle East (UAE) | mec1.api.clevertap.com | https://mec1.dashboard.clevertap.com/login.html |
| Europe (default region) | api.clevertap.com | https://eu1.dashboard.clevertap.com/login.html |
- Enter the following CleverTap account details to set up the authentication headers:
- Project ID
- Passcode
These details are obtained by navigating to the Settings > Project page of the CleverTap dashboard.
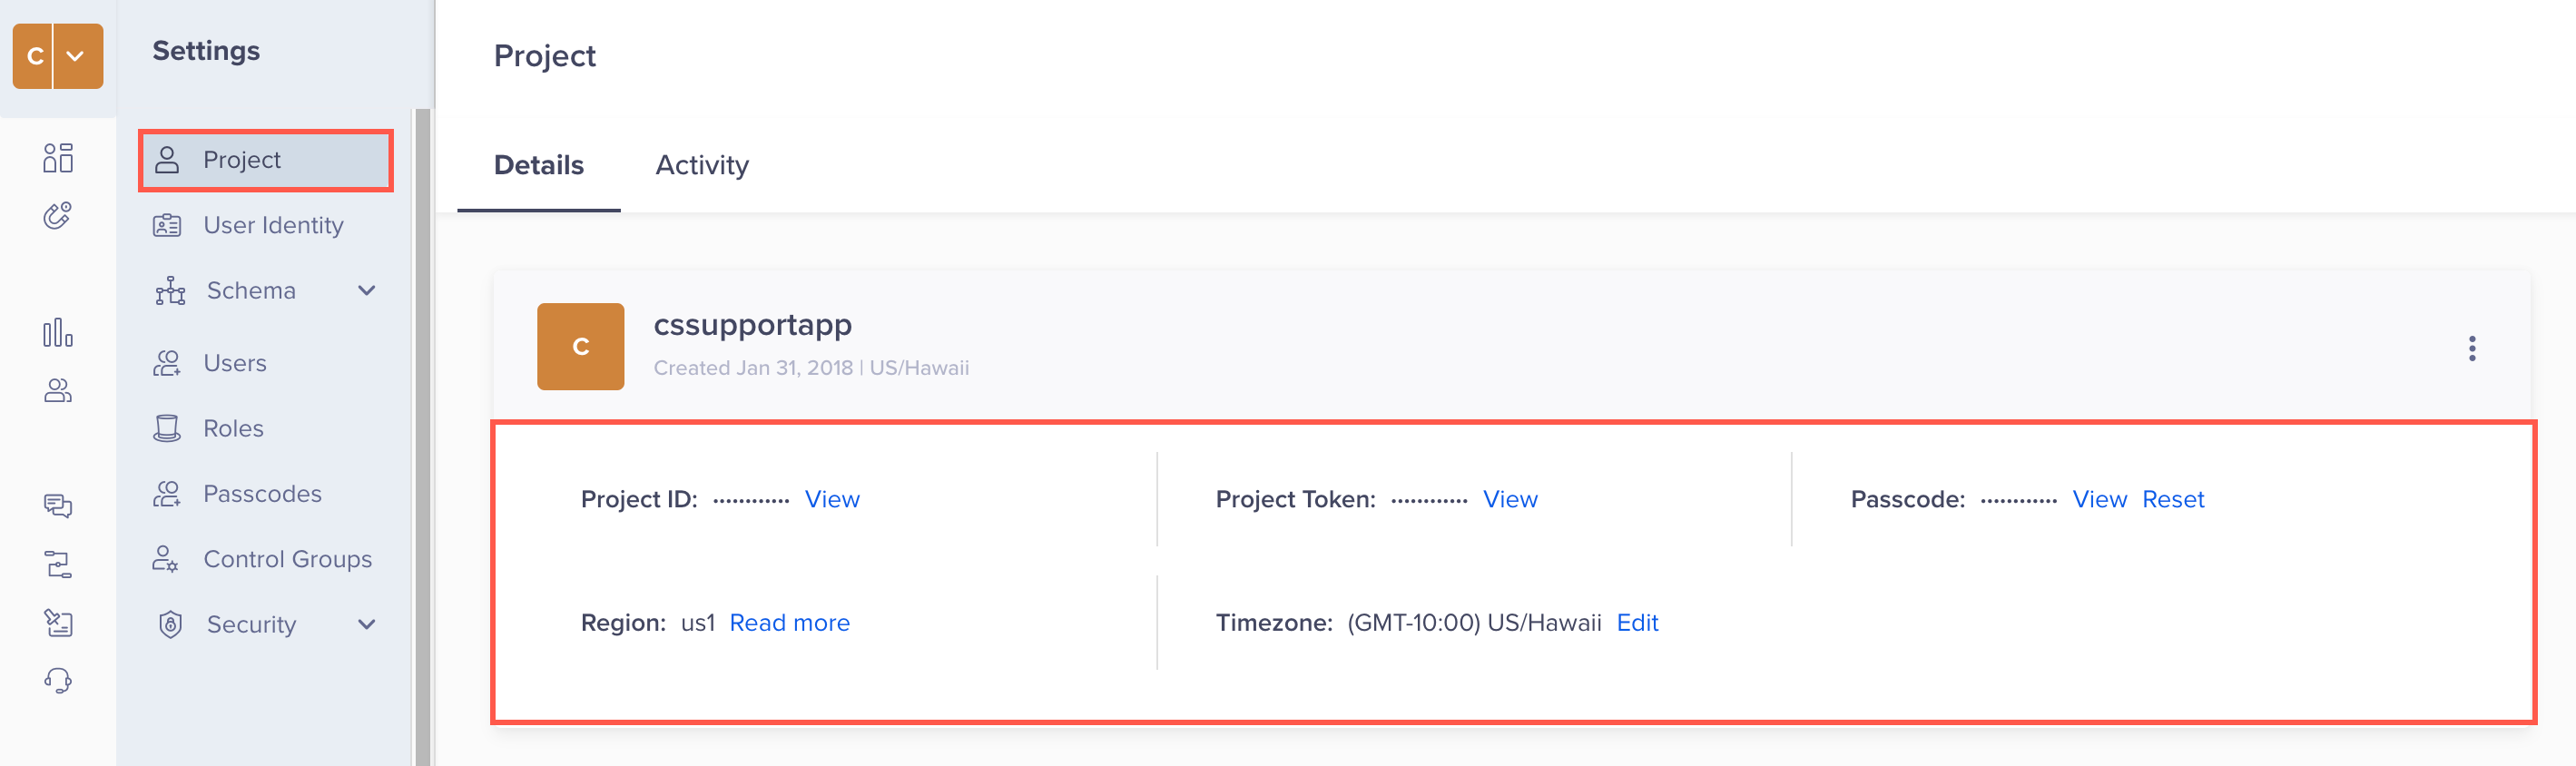
CleverTap Project Details
- Set up the parameters in the webhook payload for sending coupon codes and update them to match your campaign requirements.
{
  "d": [
     {
         "type": "event",
         "evtName": "Coupon Generated",
         "$source": "Talon.One",
         "identity": "${$ProfileID}",
         "evtData": {
             "CouponGenerated":"${$CouponCode}"
         }
     }
     ]

 }
Payload Parameters
- The
evtNameparameter defines the EventName displayed on the CleverTap dashboard when selecting the campaign action. You can define theevtNameas per your preference.- The
identityis a mandatory parameter. This parameter is passed as theuserID/ProfileID, which CleverTap uses to effectively trigger the required engagement action.
Set Up a Campaign in Talon.One
To set up a campaign in Talon.One:
- Create a campaign.
- Ensure that you add the Create a Coupon Code effect.
- Select the Store generated value in session checkbox to send the effect-generated coupon code to CleverTap.
Applying Effects to CampaignsWhen applying effects to the campaign, ensure that you Create the Coupon Code and then Create a Webhook Trigger.

Applying Effect to Talon.One Campaign
Identify UserUse a universal ID as the
profile IDto identify the user across Talon.One and CleverTap dashboards.
Create a Campaign in CleverTap
You can use Email, SMS, and Push channels on the CleverTap dashboard to send coupon codes generated on Talon.One dashboard.
Create an Email Campaign
- Navigate to Messages > Campaigns.
- Click + Campaign.
- From the Messaging Channels list, select the messaging channel.

Create an Email Campaign from CleverTap Dashboard
The Campaign page displays.

New Email Campaign Page
- Select Live behavior under Start here section and then click Done.
- Select Service Provider from the dropdown list.
You can also Add a Service Provider by clicking Add a new service provider link. After adding a provider, click Refresh to reflect the changes.

Select Email Service Provider
- Click Done.
- (Optional) Set a goal for your campaign and then click Done.
- Select Single action:New segment from the Find user from segment list with conditions as shown in the following figure:

Select Target Segment for Email Campaign
- Fetch the coupon code by typing “@” in the Email Editor under What section, which invokes a dropdown with the relevant event attributes.
- Select the coupon code that was pushed as the attribute in the webhook.

Define Message Body and Fetch the Coupon Code in the Message Body

Email Campaign Preview
For the remaining steps, follow the steps listed under the create campaign section of the respective messaging channels:
Updated 8 months ago