Census
Customer Data Platform
Overview
Census is a Reverse ETL platform that makes it easy to connect your data warehouse to sales, marketing, and other customer-facing tools that drive your business.
With CleverTap and Census integration, you can:
- Import user data from Census into CleverTap to create personalized campaigns.
- Import customer events into CleverTap to keep them updated with data from the Census.
- Enhance customer experiences by integrating data from other interactions, such as website visits or app usage.
This powerful combination boosts customer engagement and drives impactful marketing and business results.
Support For IntegrationThis integration is managed and continuously improved by Census. The CleverTap and Census integration has undergone stringent testing to ensure seamless functionality. For any questions or issues, contact Census for support and resolution.
Prerequisites for Integration
The following are the prerequisites:
- Ensure you have a Census account.
- Ensure you have a CleverTap account with valid Account ID, Passcode, and Region.
Integrate Census with CleverTap
This process involves the following two major steps:
Add CleverTap as a Destination on Census
To add CleverTap as a destination in Census:
-
Go to Connections from your Census dashboard and click + New Destination.
-
Search for CleverTap and select it.
-
Enter the following details:
| Field | Description |
|---|---|
| Account ID | Locate the Project ID under Settings > Project from the CleverTap dashboard. |
| Account Passcode | Locate the Passcode under Settings > Project from the CleverTap dashboard. For more information, refer to Account Passcode. |
| Region | Locate Region for the API endpoint you want to select under Settings > Project. To find the API endpoint for your region, refer to API endpoints based on your data center region. |
- (Optional) Click Test to test the connection and verify your entered credentials.
- Click Finish to add CleverTap as a destination once the connection is verified.

Add New Destination
Connect Data Source in Census
Set up your preferred data source in Census to sync and manage data efficiently. To do so:
- Add a Data Source:
- Go to the Sources section from the Census dashboard and click + New Source.
- Select your preferred data source (For example, Google Sheets, databases, or data warehouses).
- Follow the on-screen prompts to configure the connection and provide the required credentials, authentication tokens, or endpoint URLs as needed, based on the source.
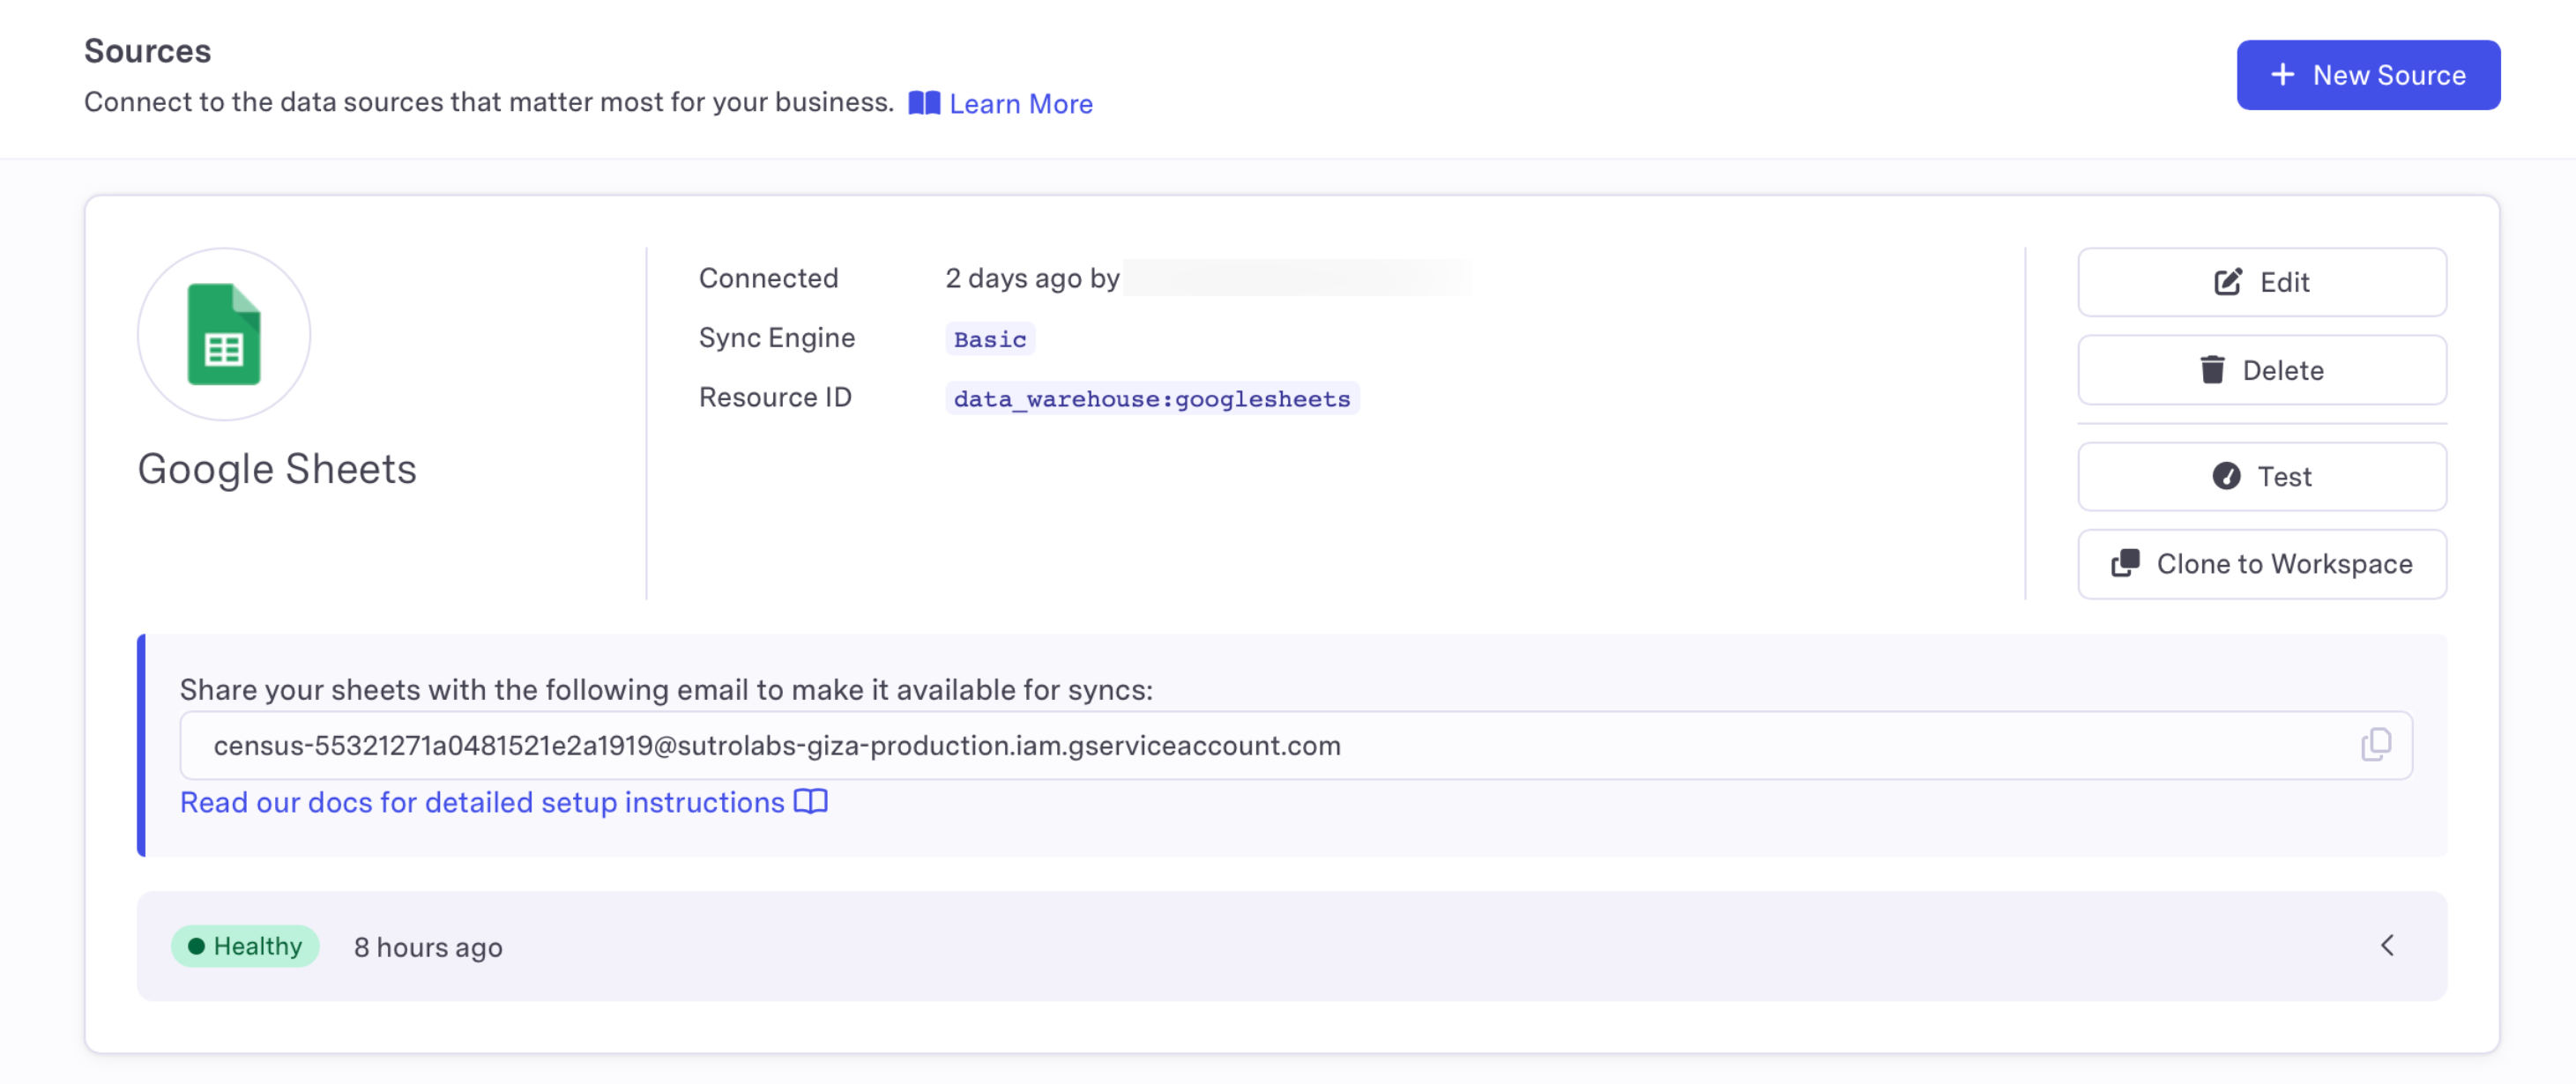
Add New Source
- Test the Connection: After completing the setup, click Test to verify the details and ensure the source is successfully connected.
For detailed instructions, refer to Census.
Send Data from Census to CleverTap
Import customer data, including user profiles and events, from your data sources into CleverTap to enhance targeting and engagement.
IMPORTANTIf your data source, such as Google Sheets, does not update in real-time, the information sent from Census to CleverTap might not capture the latest user actions or events. For instance, if a user updates their profile or makes a purchase but the Google Sheet has not synced yet, CleverTap receives outdated data until the sheet is refreshed. To maintain up-to-date information, consider syncing the data more frequently or switching to a real-time data source.
Send Profiles to CleverTap
To import user profiles from your data warehouse into CleverTap:
-
Go to Syncs and + Create a new Sync from your Census Dashboard.
-
Under Select a Source, choose a connection and its source.
-
Select the schema and the table you want to sync.
-
Select CleverTap as a Connection from the Select a Destination dropdown and select Profile under the Object dropdown.
For more detailed instructions, refer to the Census Documentation on CleverTap Integration.
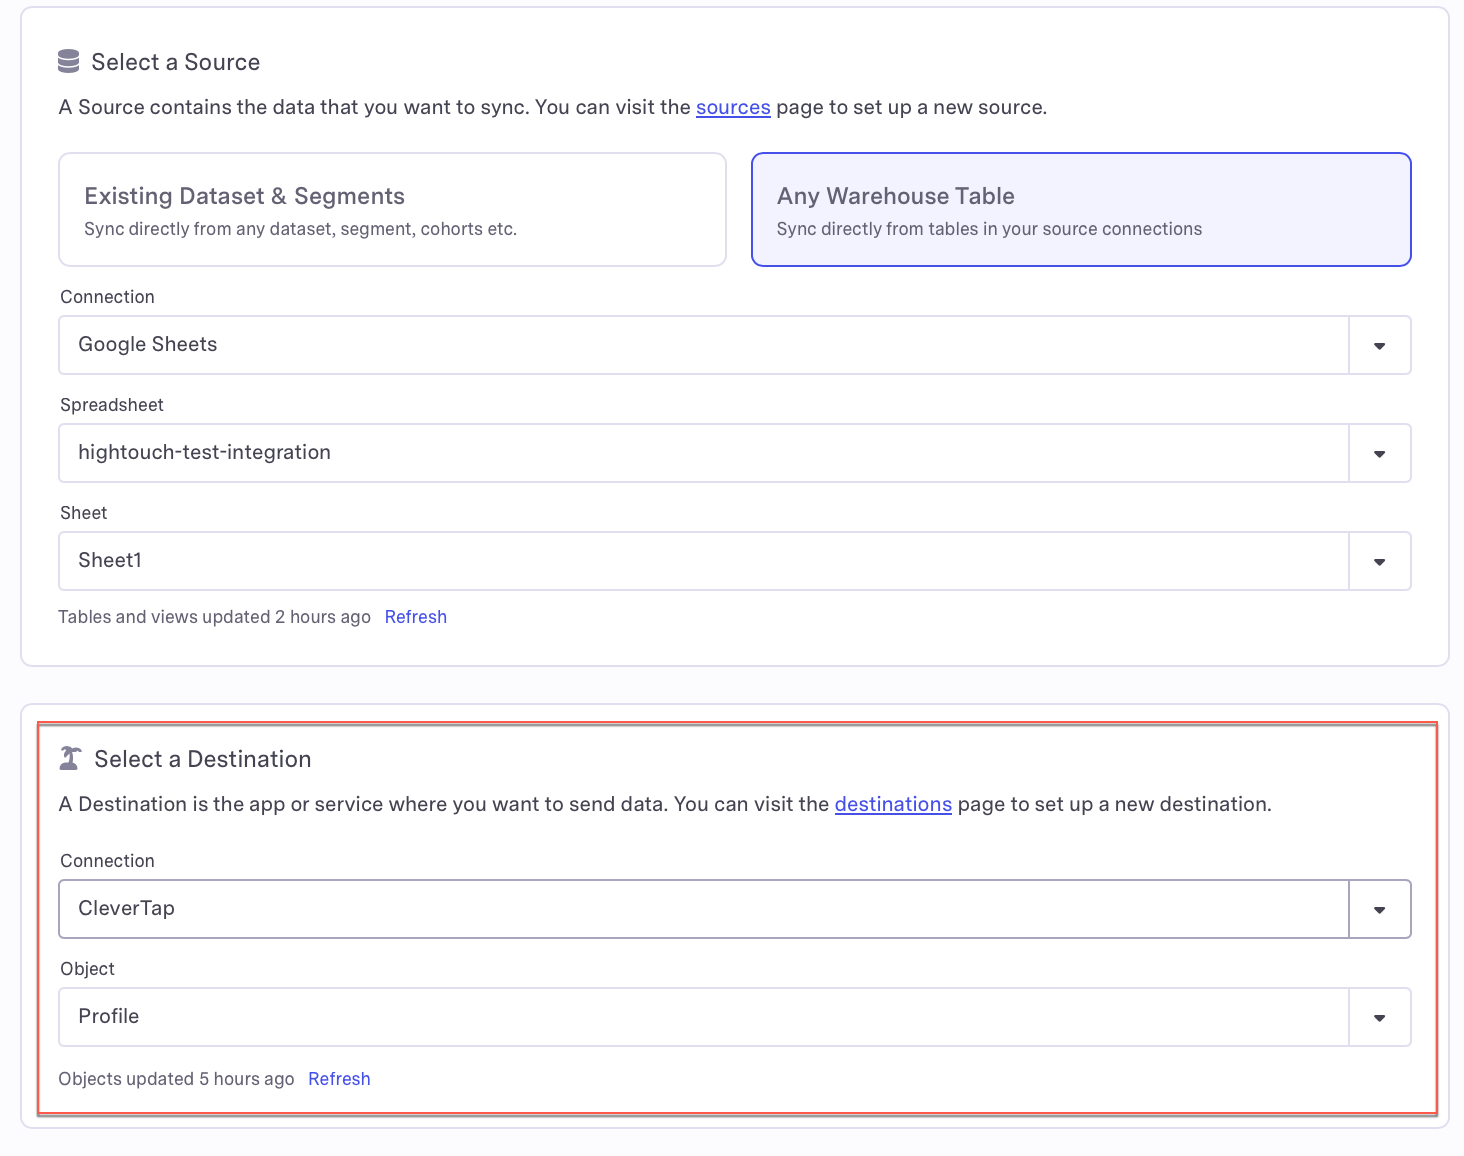
Select a Destination
- Select a Sync Behavior. CleverTap supports Update or Create.

Sync Behavior.
- Select a Sync Key defines the key identifier for matching data in CleverTap. Census uses this key to determine which data to sync during each run. The column and field must have the same unique value.
For example, useuser_idas the primary identity key (mapped to User Identity in CleverTap).
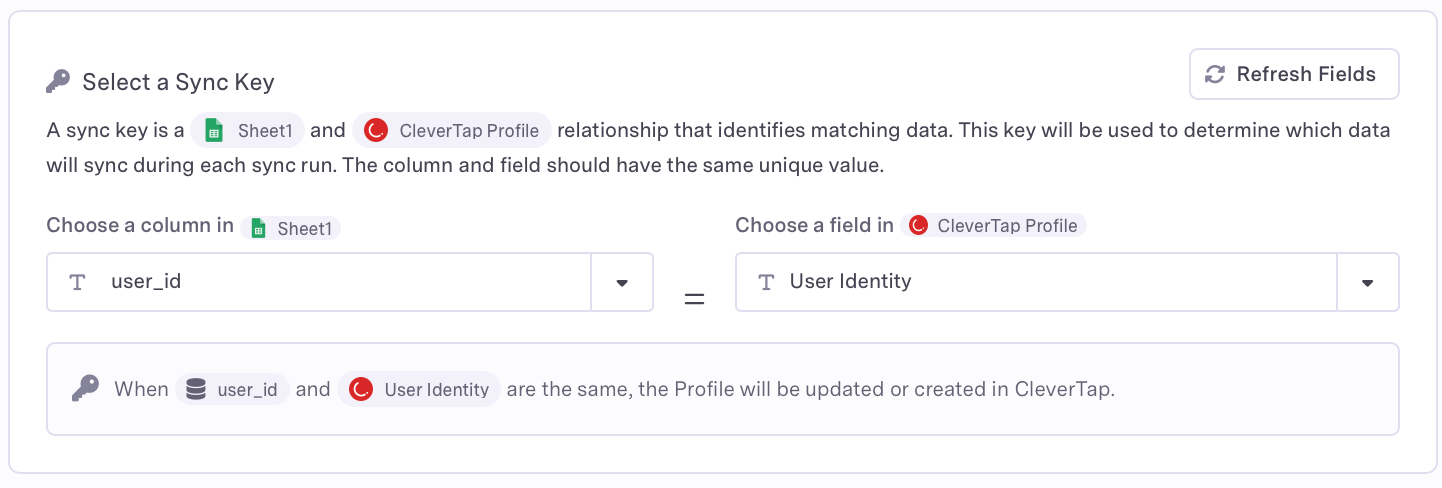
Sync Key
- Under Set Up CleverTap Field Mappings, select Specific Columns properties or Sync All Columns properties.
- Specific Columns: Specify exactly which columns apply to the destination.
- Sync All Columns: Sync all columns from the source to the destination. Any new columns will be automatically added.
Map source columns to CleverTap profile fields (for example,username ➔ Name,email ➔ Email). When you add a mapping, Census automatically matches some of the standard properties in CleverTap. You can also opt to create new properties inside CleverTap.
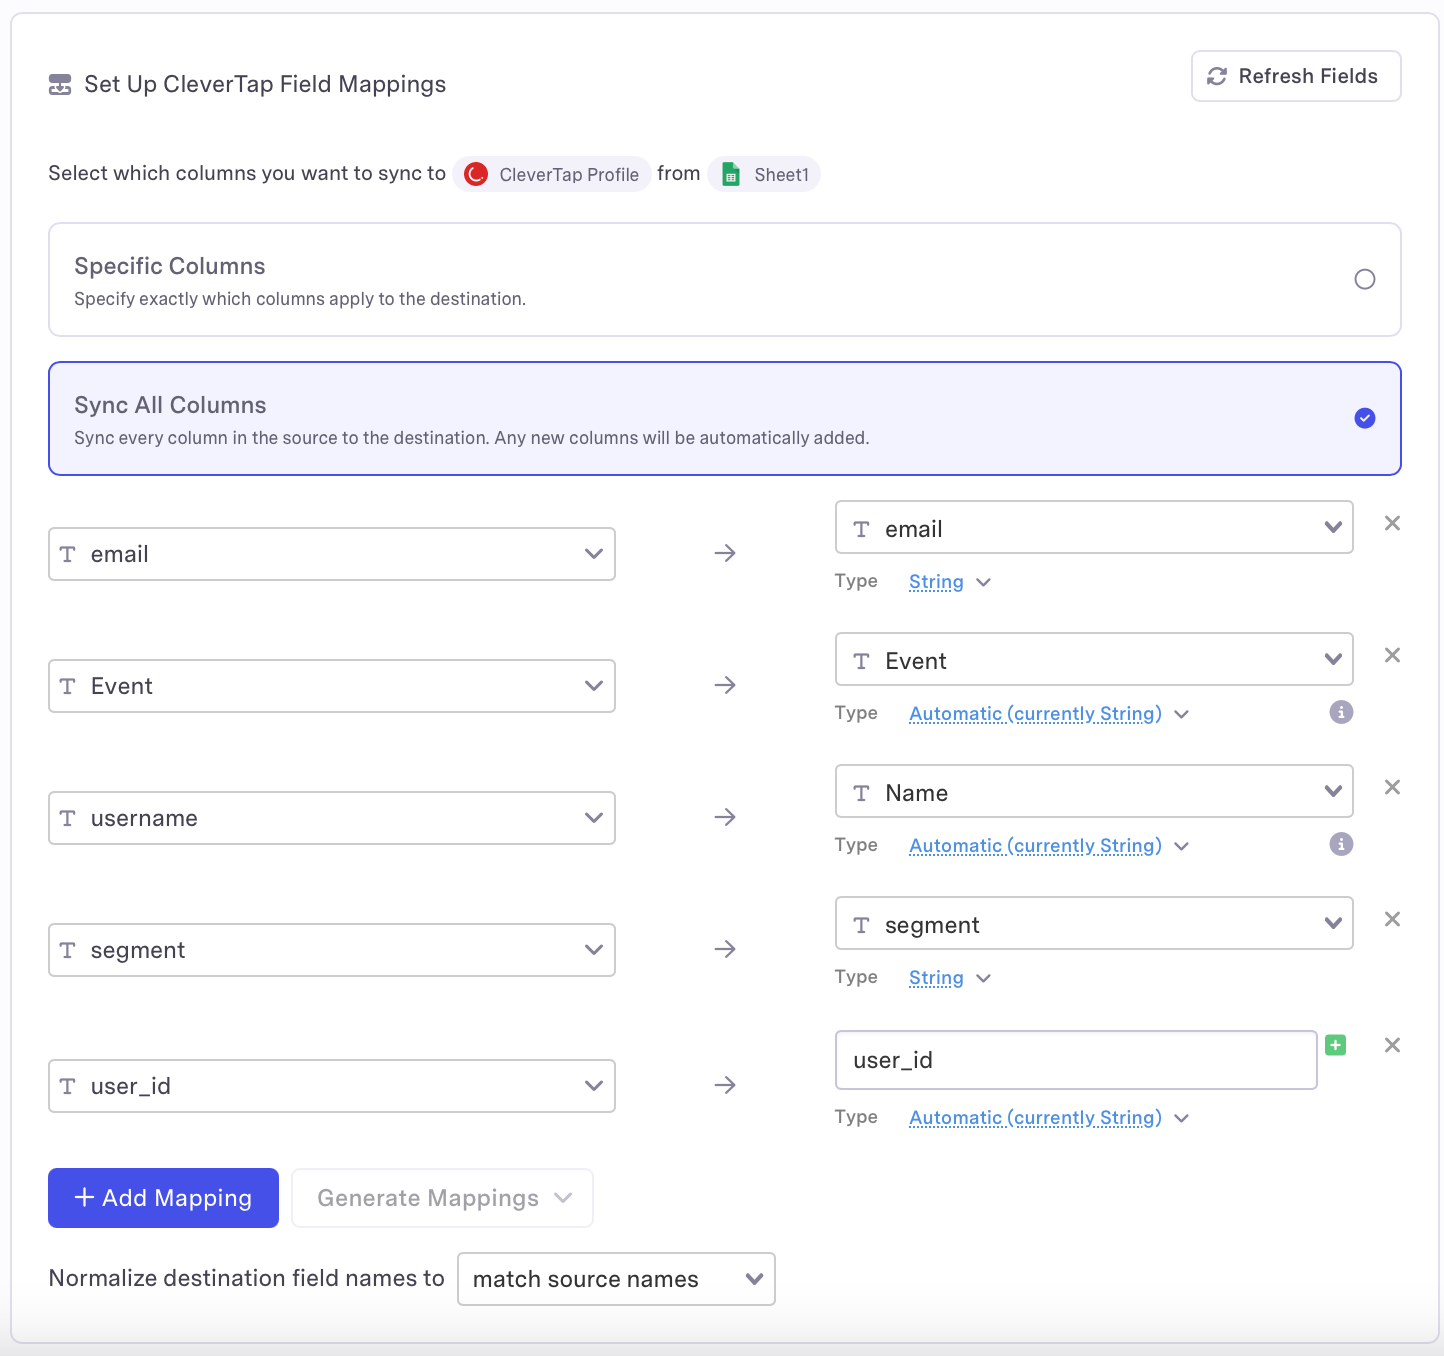
Set Up CleverTap Field Mappings
- Confirm Sync Details: After configuring the sync, confirm your sync details and click Create Sync to set up the new sync.
- Set Sync Trigger: Configure either a manual (One-Time Sync) or automatic (Periodic Sync) trigger for the sync.
- One-Time Sync: To trigger an immediate sync, select Run Sync Now. This initiates an instant, one-time data sync.
- Periodic Sync: To schedule regular updates, select Sync Trigger and define the schedule to run sync automatically. This ensures that data between Census and CleverTap remains up-to-date, with profiles and events continuously updated.
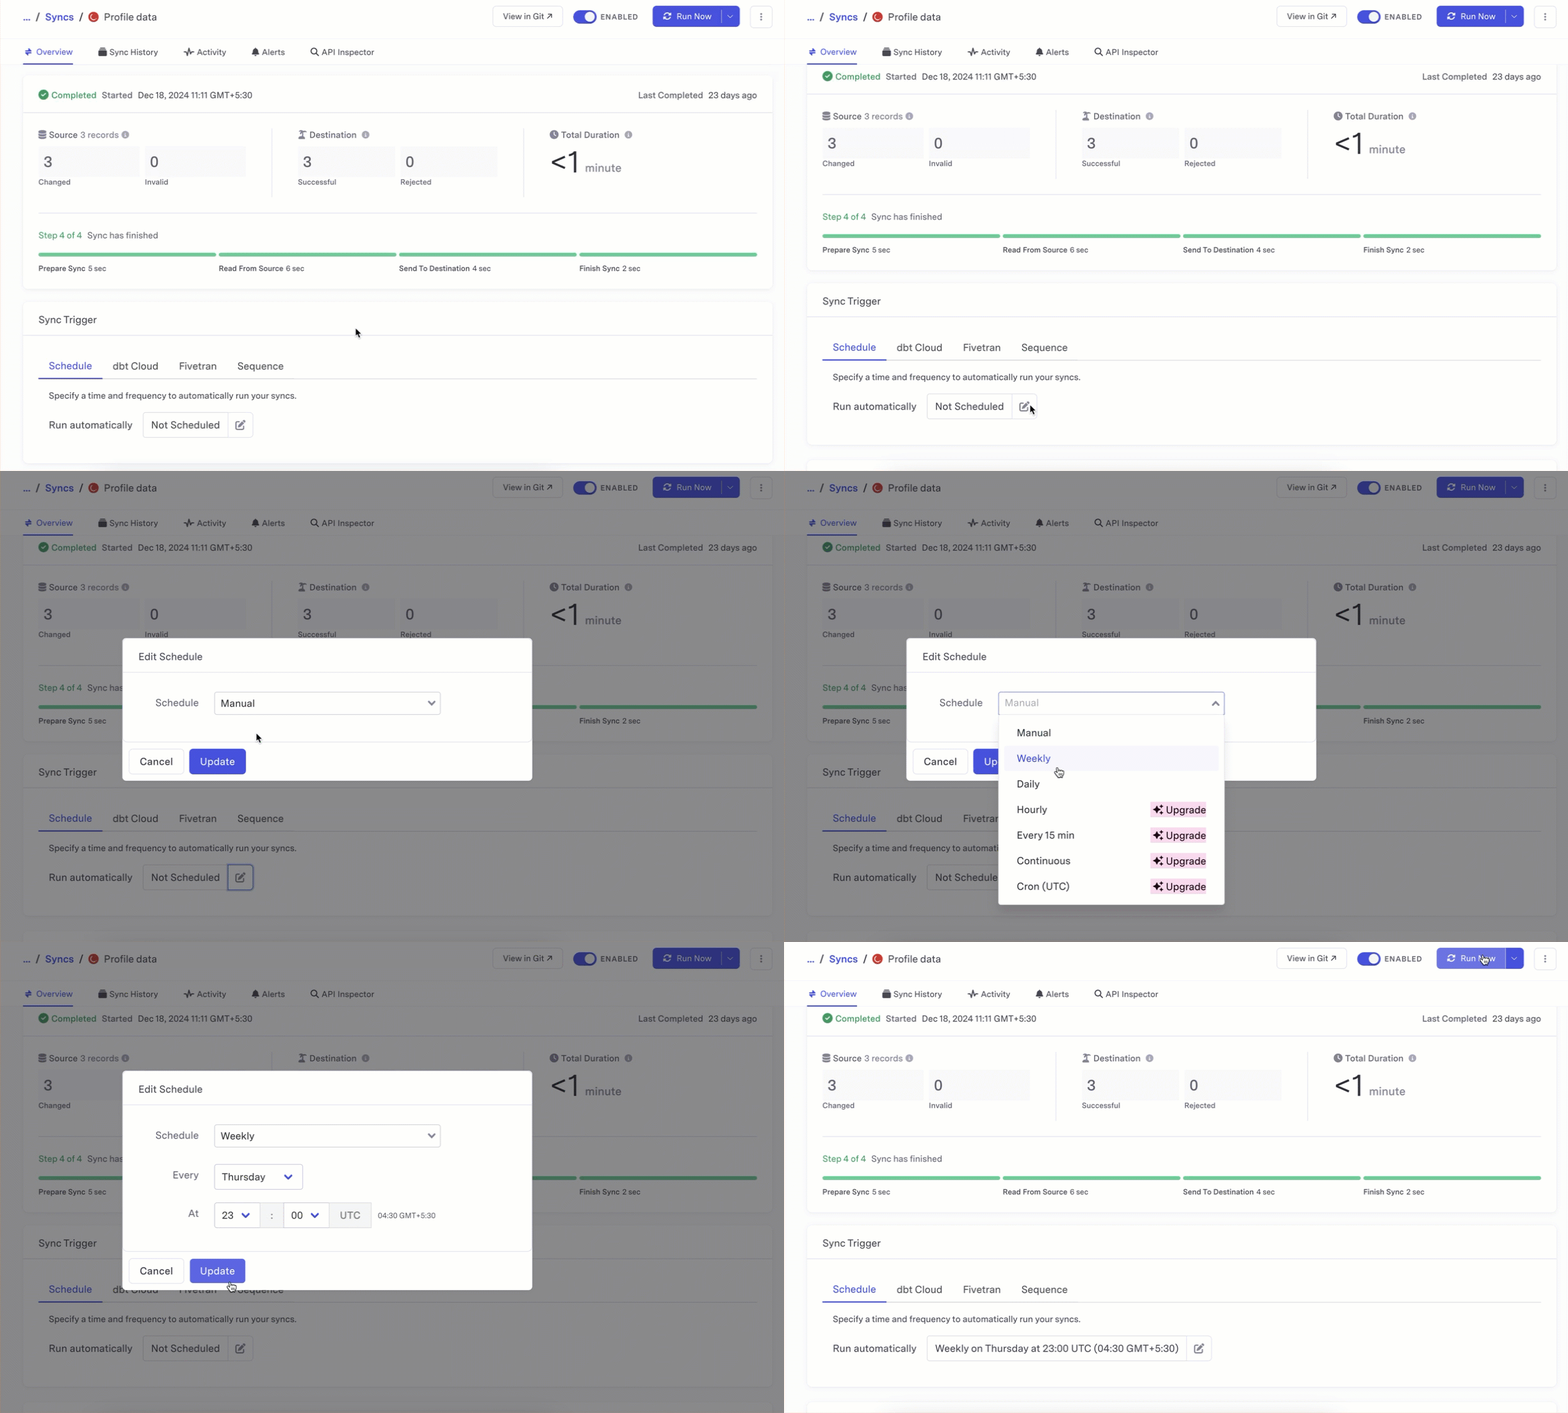
Set Sync Trigger
Go to the Segments page from the CleverTap to confirm the synced profile data.

Segments
Send Events to CleverTap
To send events from your data warehouse to CleverTap:
-
Go to Syncs and click + Create a new Sync on your Census Dashboard.
-
Under Select a Source, choose a connection and its source.
-
Select the schema and the table you want to sync.
-
Select a Destination:
- Under Select a Destination, choose CleverTap as a connection.
- Under Object, select Event.
For detailed instructions, refer to the Census Documentation on CleverTap Integration.
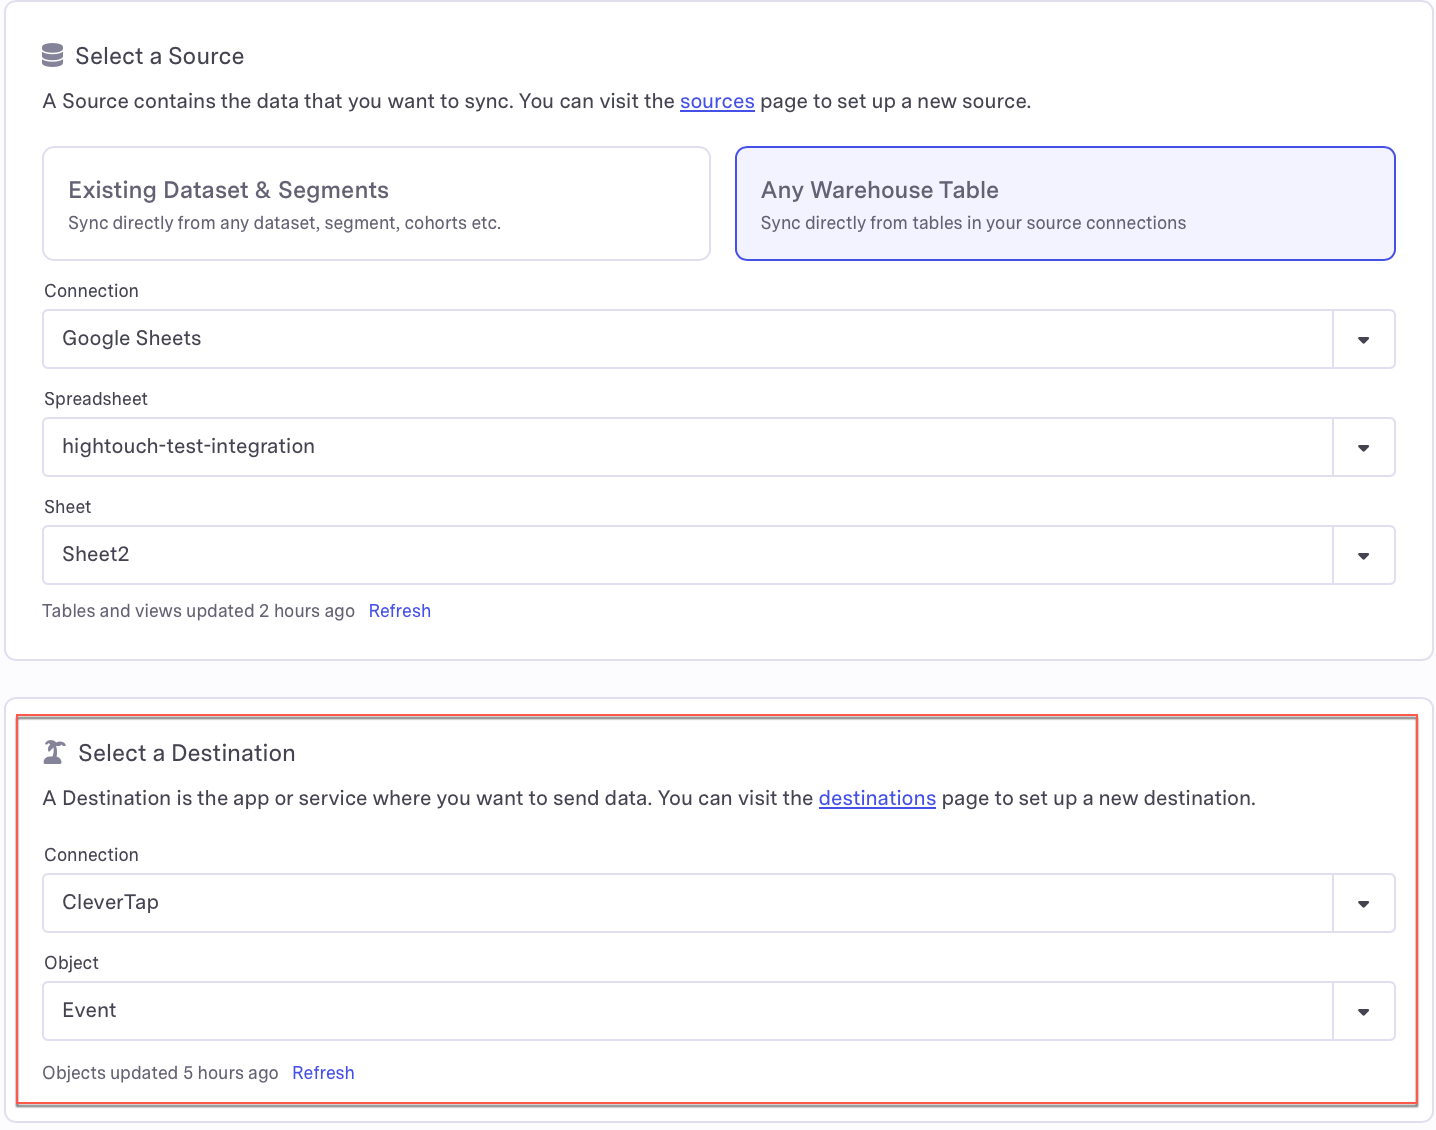
Select a Destination
- Select a Sync Behavior. The sync behavior determines how changes are handled between the source and CleverTap. If you select Send, an event is created on CleverTap every time new records are detected in the source system.

Sync Behavior
- Select a Sync Key. The Sync Key is a column that identifies unique records in the source, such as
user_id. When a new sync key is detected, an event is raised on Clevertap.

Sync Key
- Under Set Up CleverTap Field Mappings, select whether you want to sync specific or all properties.
When you add a mapping, Census automatically matches standard properties in CleverTap. You can also create new properties in CleverTap if needed. Syncing Event Name (Action) and User Identity (Customer ID) is mandatory.- Configure Event Syncing: Use
user_idor another unique identifier to link events to user profiles. Map source columns to CleverTap event fields, such as:transaction_value ➔ Transaction Valueorcurrency ➔ Currency - Map Columns : Map the source columns (for example,
user_email) to corresponding fields in CleverTap. This ensures the correct data is sent to the proper fields. - Assign Data Type: Ensure each field is assigned the correct data type (for example, String, Number, Date, Boolean) for proper data processing.
The following example shows the mapping for the Charged eventtransaction_value ➔ Transaction Valuecurrency ➔ Currencyproduct_category ➔ Product Categorydiscount_applied ➔ Discount Applied
- Configure Event Syncing: Use
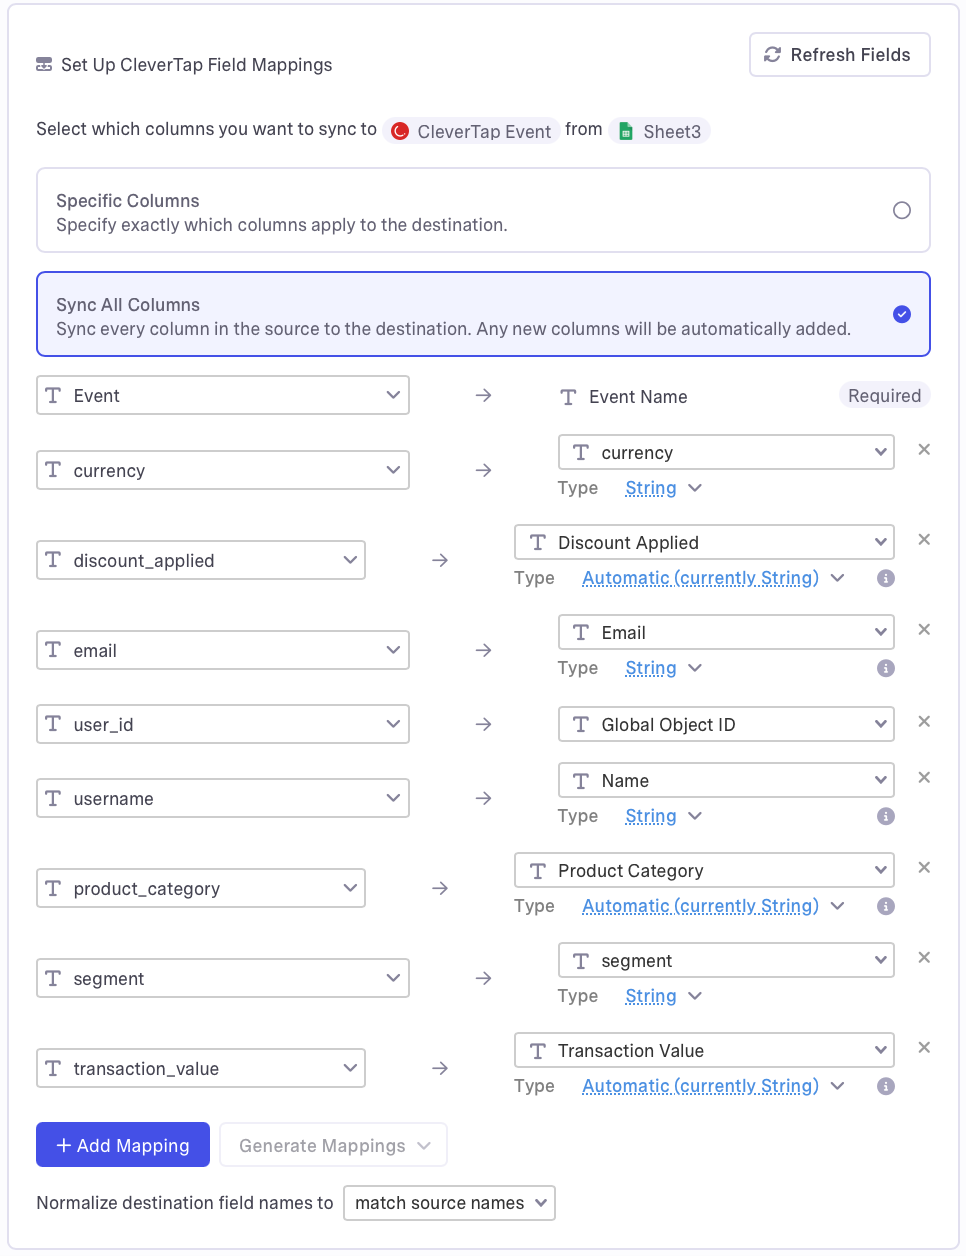
Set Up Field Mapping
- Confirm Sync Details: After configuring the sync, confirm your sync details and click Create Sync to set up the new sync.
- Set Sync Trigger: Configure either a manual (One-Time Sync) or automatic (Periodic Sync) trigger for the sync.
- One-Time Sync: To trigger an immediate sync, select Run Sync Now. This initiates an instant, one-time data sync.
- Periodic Sync: To schedule regular updates, select Sync Trigger and define the schedule to run sync automatically. This ensures that data between Census and CleverTap remains up-to-date, with profiles and events being updated continuously.
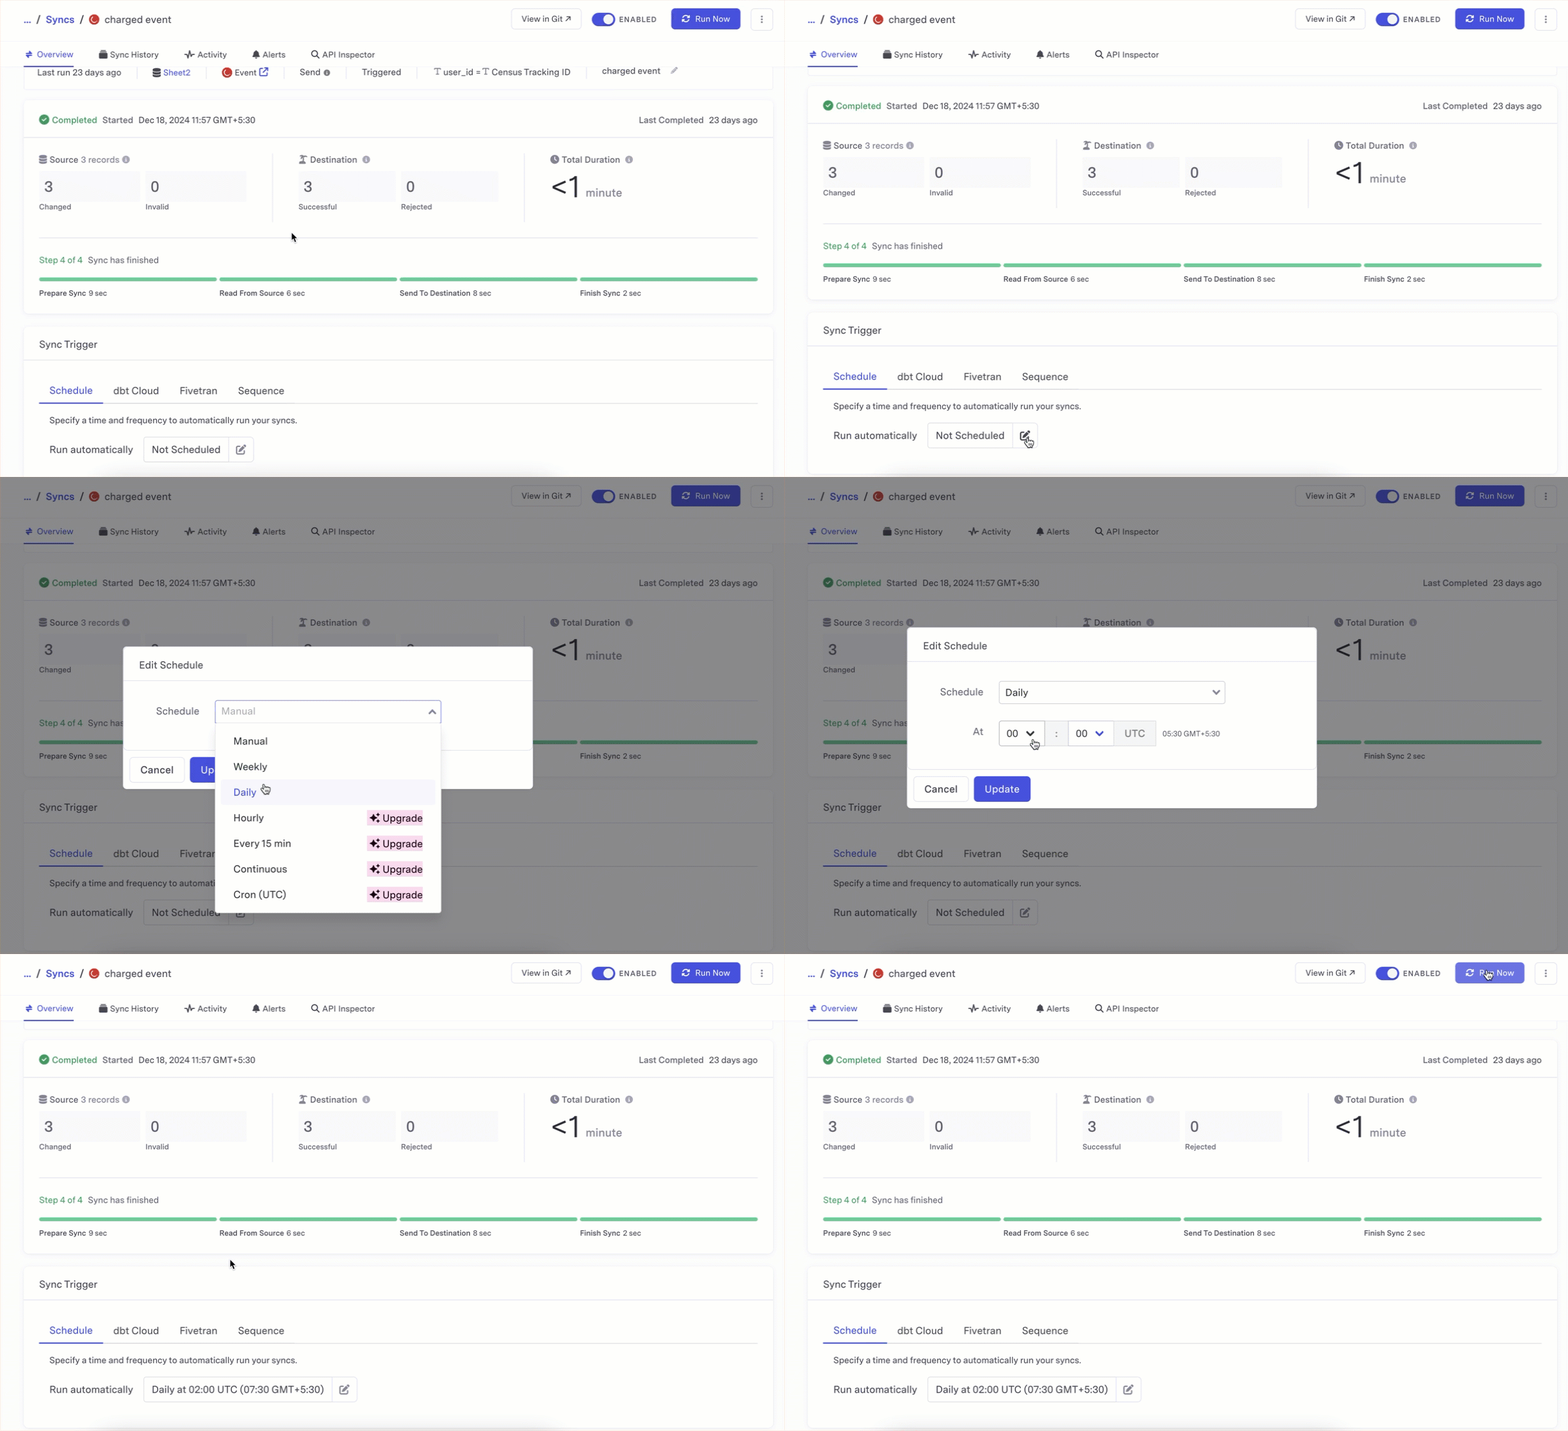
Sync Trigger
You can verify the synced event data by navigating to User Profiles or Event Analytics from the CleverTap dashboard.
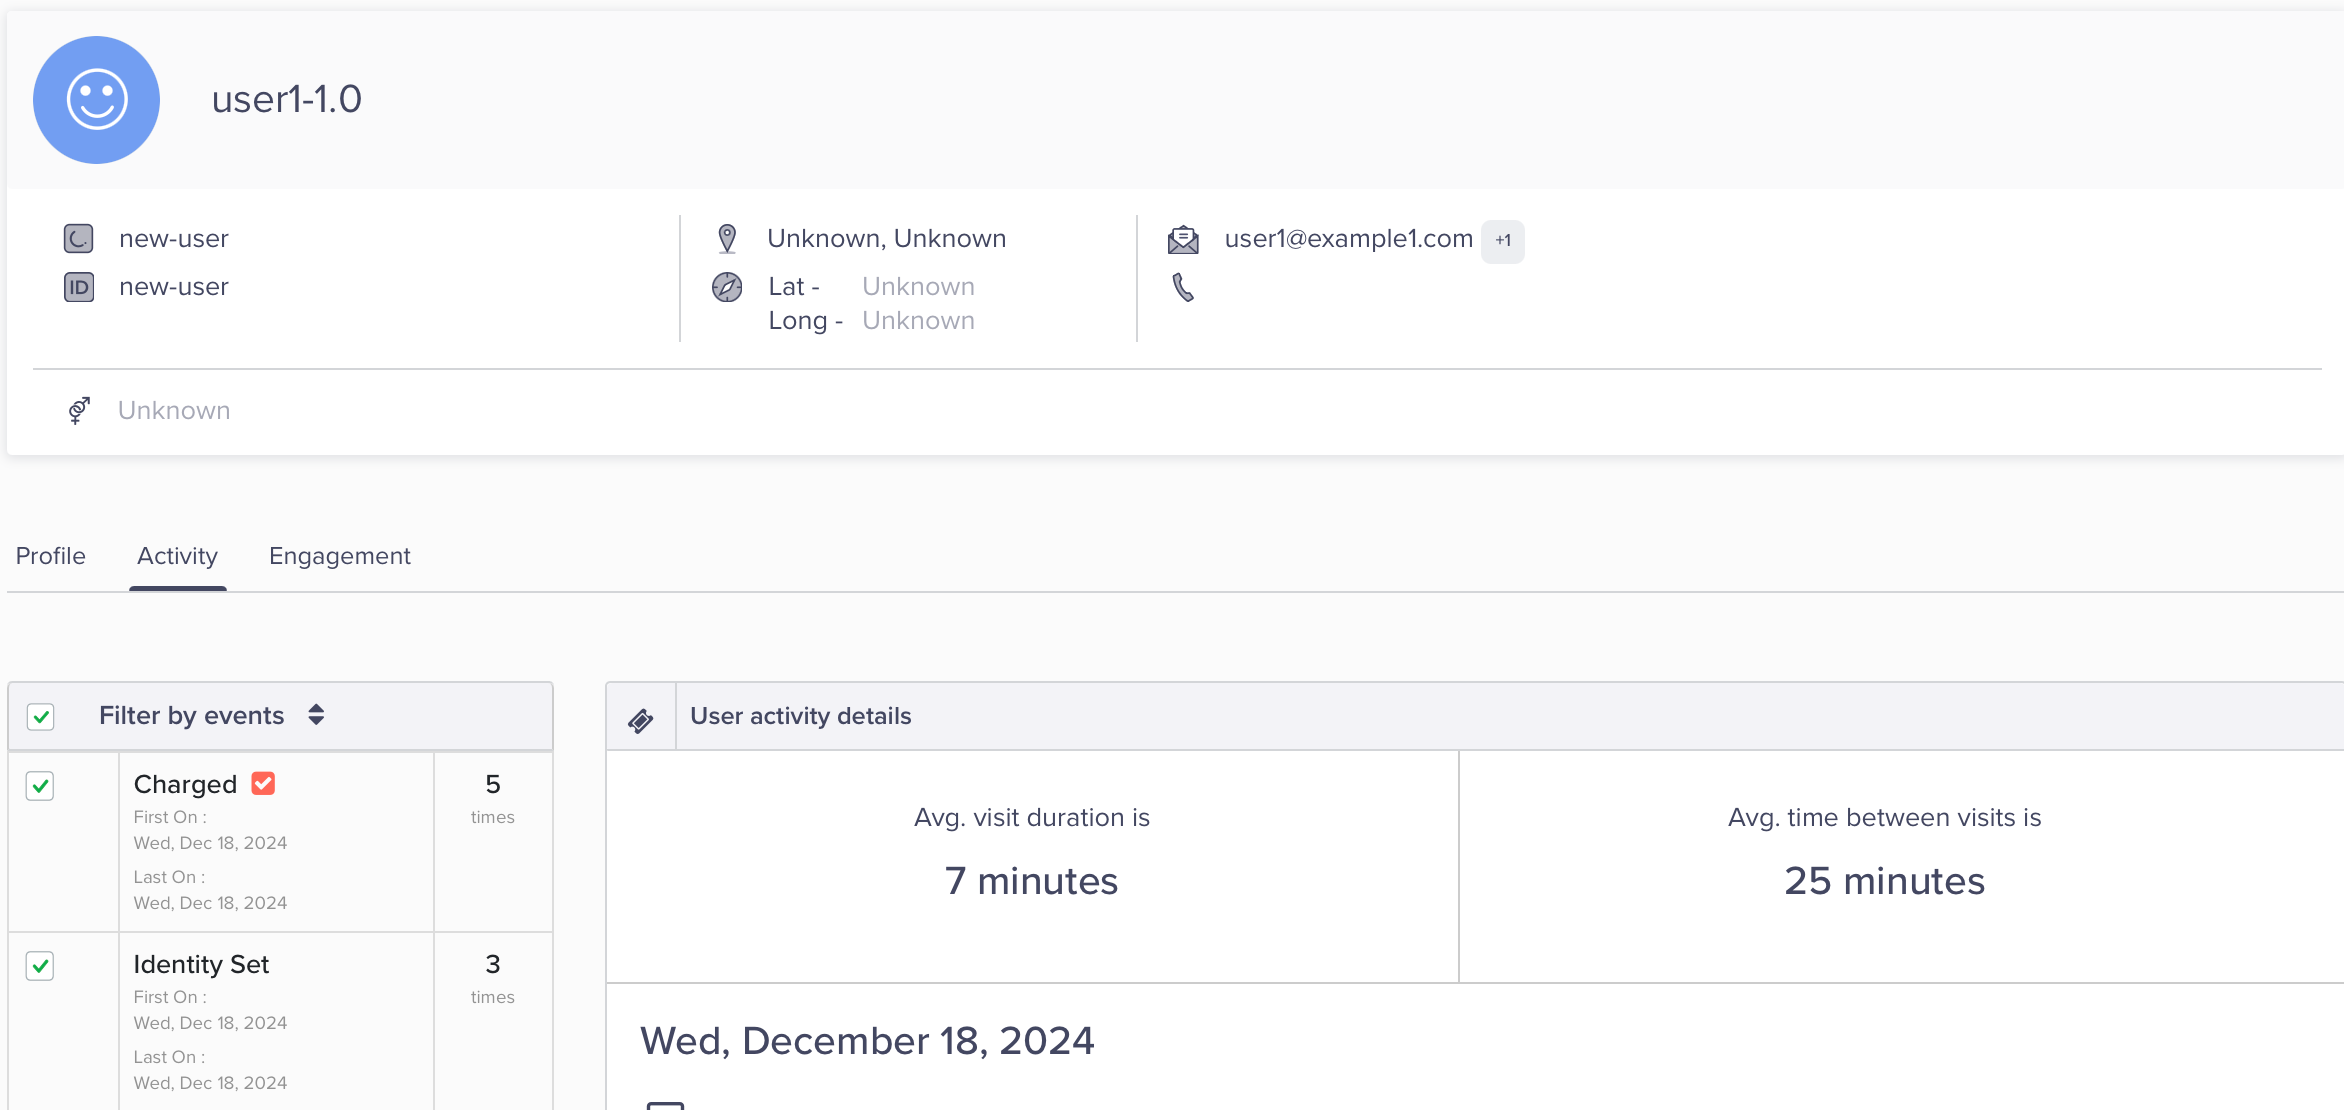
User Profiles CleverTap Dashboard
FAQs
What types of data can I sync to CleverTap from Census?
You can sync user profiles and event data from different data sources supported by Census, including data warehouses, Google Sheets, and databases.
How frequently can I sync data?
Syncs can be scheduled periodically or triggered on demand based on the business requirements.
What happens if I map a field incorrectly?
Incorrect mapping can lead to inaccurate data being updated in CleverTap. You can modify the field mapping in Census to resolve the issue and re-sync.
Can I sync historical data?
You can configure Census to include historical data during the initial sync.
Who should I contact for support?
For any issues or queries, contact Census at [email protected].
Updated about 2 months ago
