Profile Exports
Learn how to use Profile Exports to send selected user data to your downstream systems and customize the format and structure to suit your pipeline.
Overview
Profile Exports allow you to securely export user profile data from CleverTap to external cloud storage platforms such as Amazon S3, Google Cloud Storage, or Microsoft Azure. You can configure export to centralize customer data, integrate with existing analytics workflows, and ensure the data warehouse platform always has the latest profile information.
With Profile Exports, you can:
- Export to Multiple Cloud Storage Platforms: Send profile data to Amazon S3, Google Cloud Storage, or Microsoft Azure blob storage.
- Customize Data Structure: Organize files with flexible folder structures and naming conventions.
- Optimize Export for Cloud Storage Platform: Select file formats (CSV, JSON, XML, Parquet) that work best with your data pipeline.
- Granular Identity Selection: Export either a single identifier per profile using fallback logic or export all selected identities. You can also export account identity values [Identity, Email, and Phone], and the CleverTap ID.
- Select Data for Export: Choose specific user properties, communication preferences, and device attributes to export. Rename and reorder the columns to suit your data pipeline.
- Manage Schema: Lock your export schema or automatically include new properties.
- Schedule Exports: Run one-time exports or set up recurring daily exports with incremental updates.
Use Cases
Profile Exports support a variety of use cases across marketing, data science, and compliance functions:
- Data Warehousing & Business Intelligence: Export user profiles to your data warehouse (for example, BigQuery, Snowflake, Redshift) for advanced analytics and reporting. Use daily incremental exports to sync updates efficiently, without reprocessing the full dataset.
- Custom Identity Reconciliation: Export all identity fields along with the CleverTap ID to map CleverTap profiles to identifiers in your internal systems. Fallback logic ensures that each record has a usable, prioritized identifier, even if one or more fields are missing.
- Privacy & Compliance: Include only the properties necessary to comply with data privacy regulations.
- Exclude Personally Identifiable Information (PII) by deselecting sensitive fields.
- Lock the schema to avoid accidental inclusion of new sensitive attributes.
- Use communication preference fields to ensure marketing campaigns respect user opt-outs.
- Compliance & Archival: Schedule periodic exports to create backups of user data for regulatory compliance and long-term archival purposes.
Prerequisites
Before creating a profile export, ensure your cloud storage environment is ready and your CleverTap account has the necessary permissions. Depending on the cloud platform you are using:
- Configure Amazon S3 Integration
- Configure Google Cloud Storage Integration
- Configure Microsoft Azure Integration
You must have write access permissions on the cloud storage platform you use to create and manage exports.
Create Export
To create an export, perform the following steps:
-
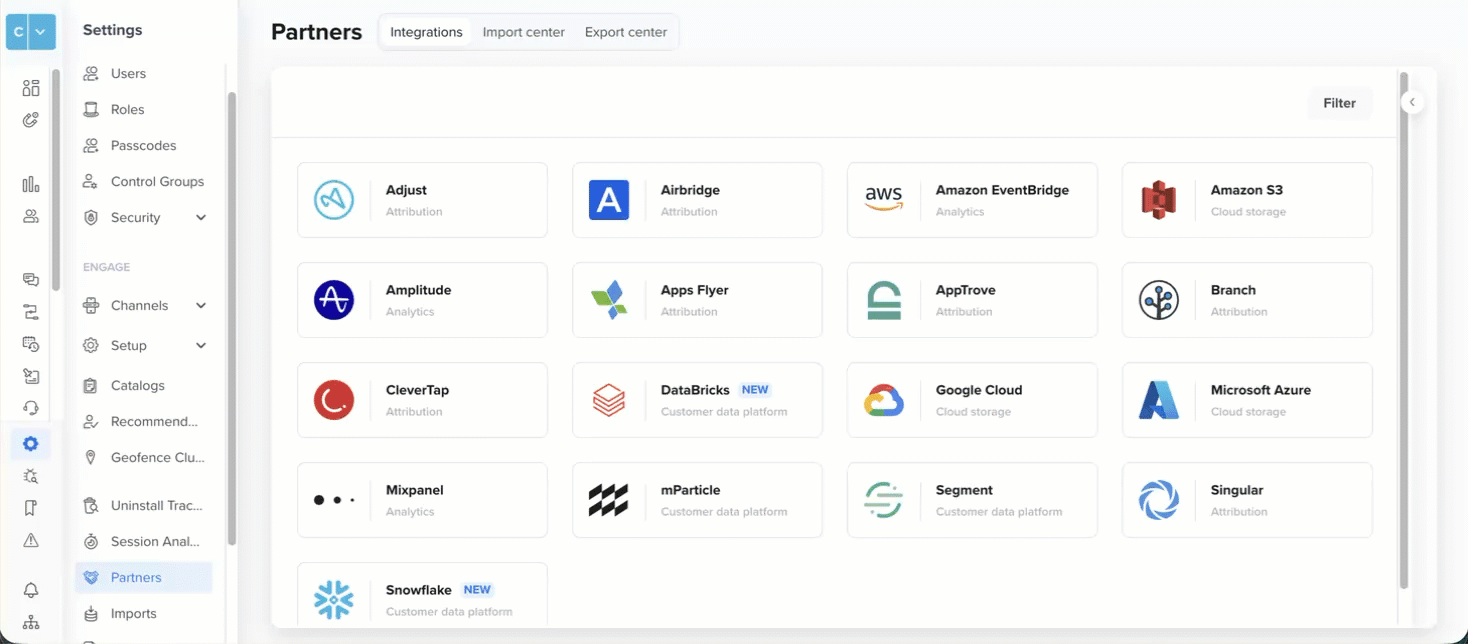
Go to Settings > Partners and select Export center.
-
Click Create Export, select Profiles and click Next.
-
Select the Partner to which you want to send the export and click Start. The export setup includes the following four main steps:
Create Export
- Configure Storage & File Details: Configure the destination, folder structure, file format, and naming conventions.
- Select User Identifiers: Define which user identifiers to export and their order.
- Configure Properties & Order: Select user properties, device information, and communication preferences.
- Define Schedule: Set up one-time or recurring export schedules.
However, if you have an existing profile exports created with the legacy flow, perform the following steps to create an export:
- Stop the existing export and create a new export using the enhanced flow with the same or improved settings.
- Verify the new export runs successfully and produces the expected output.
- Update your data warehouse systems to process files from the new export location.
Migration from Legacy Exports
- Legacy exports continue to run without interruption. You can view and edit legacy exports using the Switch to legacy option.
- You cannot migrate legacy exports to the new flow directly. You must stop the legacy export and create a new export using the enhanced flow.
Configure Storage & File Details
In this section, you will define the destination, folder organization, file format, and file naming for your export. Use the live Preview on the screen to validate paths and filenames as you configure them.
-
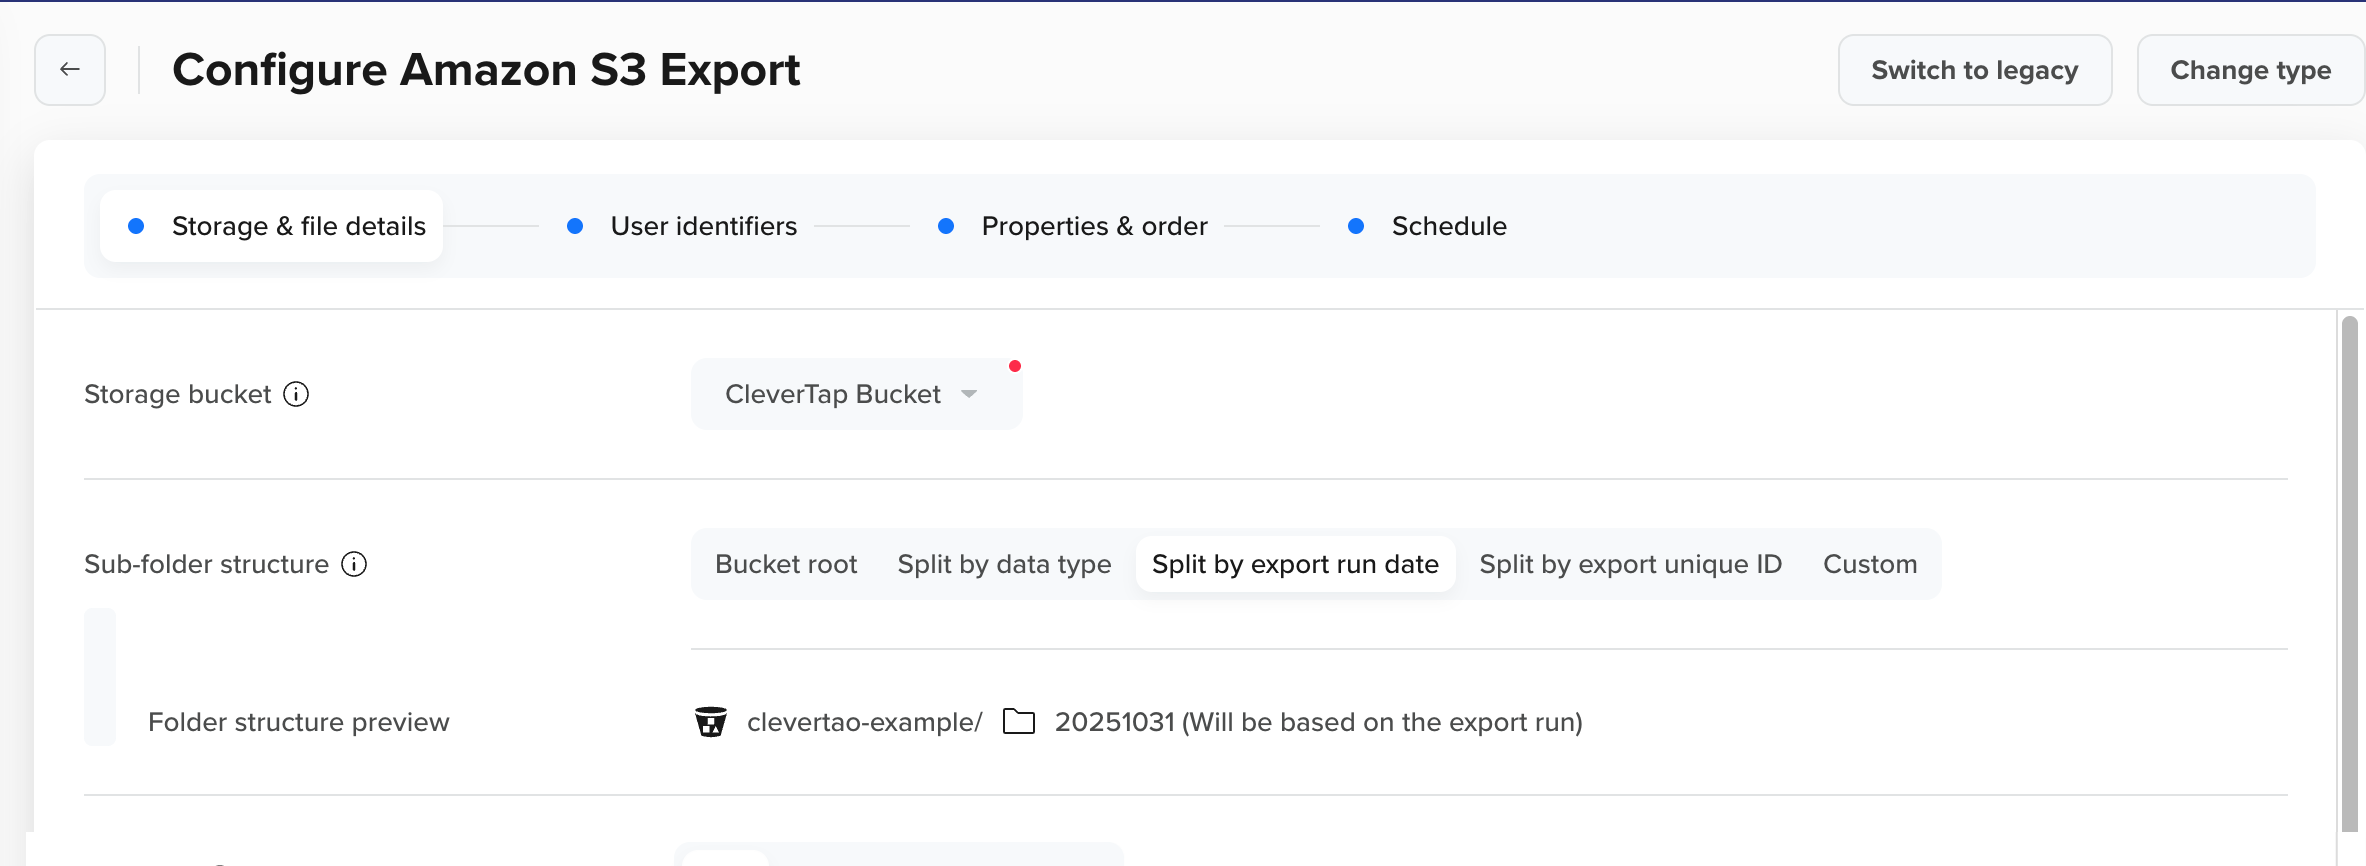
Select Storage Bucket
Choose the cloud storage bucket or blob container where you want to export profile data. The dropdown displays all integrated storage destinations configured in your account. -
Set Up Sub-folder Structure
Choose how CleverTap should organize folders within your bucket or container using the following options. The folder structure preview updates in real-time as you configure each option.-
Bucket root: Files are stored directly in the root of your bucket with no sub-folders.
Preview:/{bucket-name}/file.csv.gz -
Split by data type: Creates top‑level folders such as
events/andprofile/. Profile exports will be stored underprofile/.
Preview:/{bucket-name}/profile/file.csv.gz -
Split by export run date: Partitions files by the export run date so each day’s data lands in its own folder. This is ideal for date-based ingestion pipelines.
Preview:/{bucket-name}/2025-10-03/file.csv.gz -
Split by export unique ID: Creates a sub-folder using the unique export ID assigned to each export configuration.
Preview:/{bucket-name}/1761650178/ -
Custom: Build your own folder structure using dynamic variables. Click {{}} to insert variables and use
/to create subfolders.
The following are the supported variables:-
{{Account-id}}: Your unique CleverTap account identifier. -
{{Export-id}}: Unique export ID assigned to each export run. -
{{Timestamp}}: EPOCH timestamp when the export runs. -
{{Instance-id}}: Database identifier for your account (typically 0–23). -
{{Date}}: Export run date inyyyy-mm-dd.
Example:{{date}}/run-{{export-id}}
Preview:/{bucket-name}/2025-10-03/run-1761650178/file.csv.gz\
-
-
Set Up Sub-Folder Structure
- Select File Format
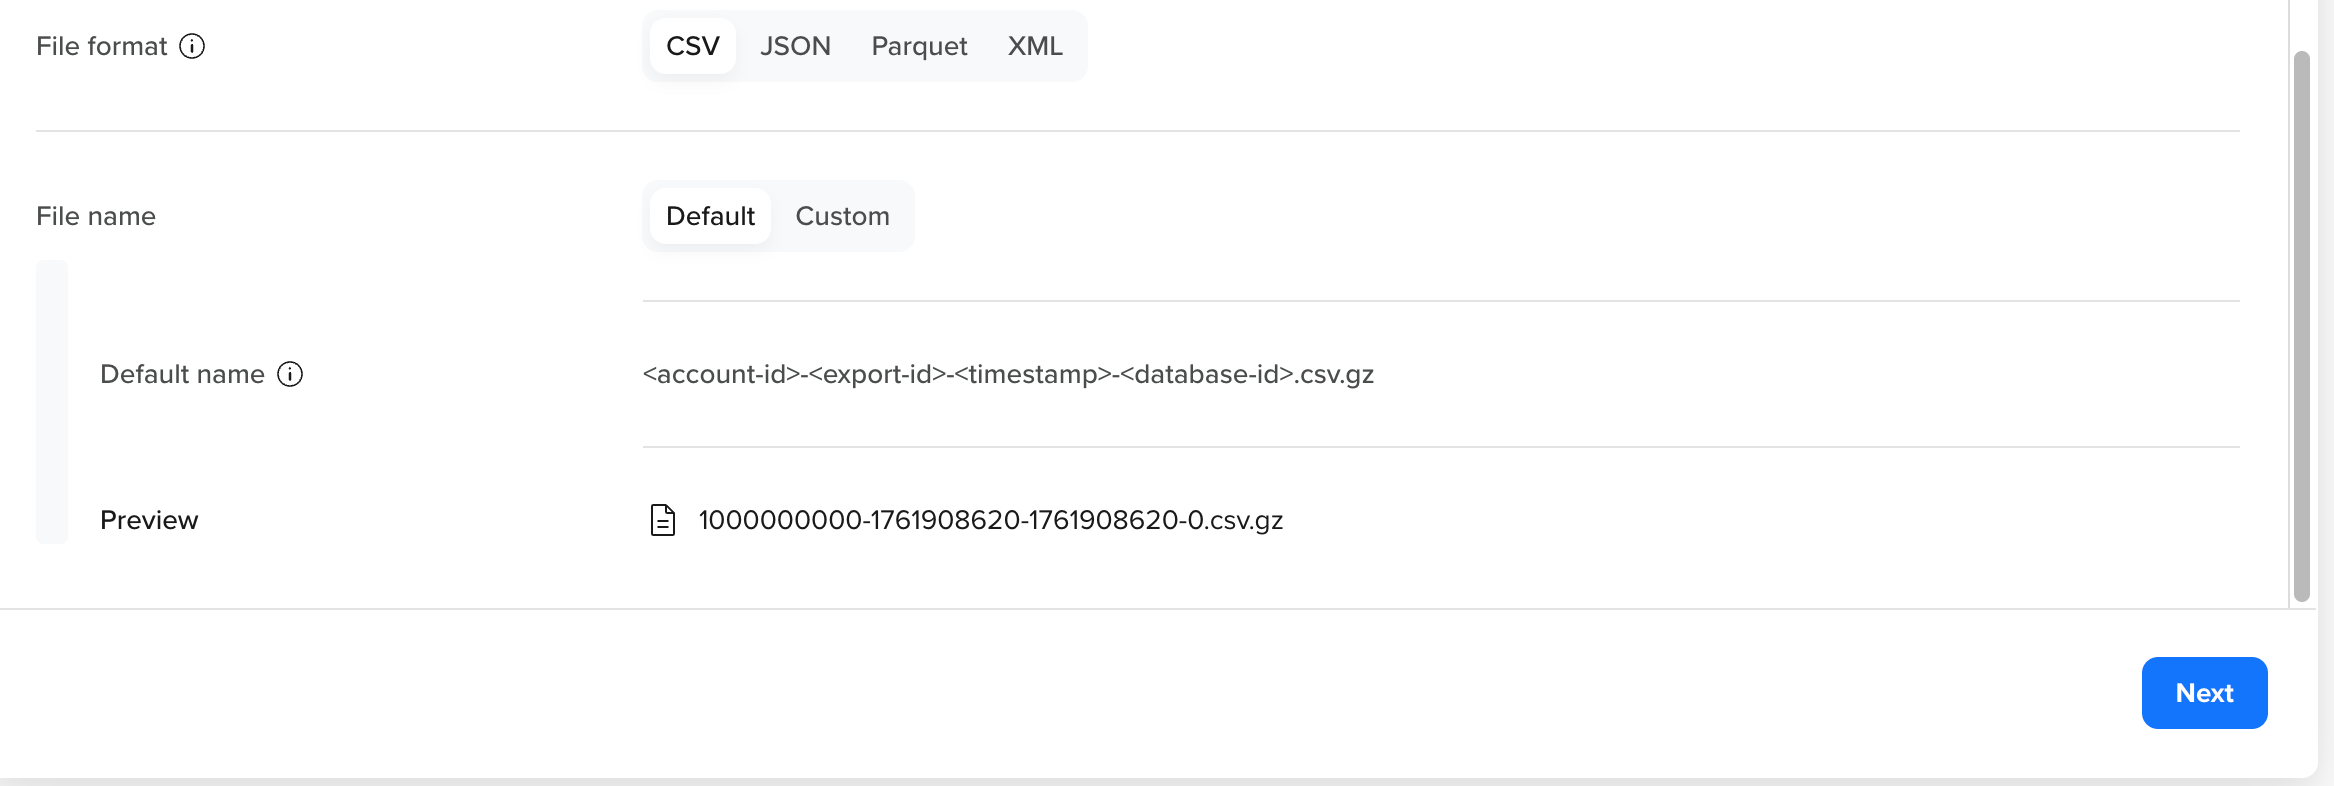
Select the file format for your exported data. To minimize post-processing, select the format that your downstream platforms can process most efficiently.
You can choose from the following formats:
- CSV: Flat tabular file with a header row. All selected fields are exported, even if the values are null.
- JSON: Structured JSON format, ideal for flexible data parsing
- Parquet: A compressed, column-based format designed for analytics and large-scale data storage.
- XML: A structured format suited for systems that need nested data.
Note
- Parquet files are saved as .parquet by default (without additional compression). If compression is enabled, they are saved as .parquet.gz.
- CSV, JSON, and XML files are automatically compressed using Gzip and saved as .gz files.
- Define File Name Convention
Define how each file is named inside the innermost folder created by Sub folder structure. If you select Default, CleverTap applies a standard structure. If you select Custom, the input field and dynamic variable picker are enabled. Ensure that required variables are included and correctly separated. The Preview shows the exact filename based on your input.- Default file name: The default format is
<account‑id>-<export request id>-<timestamp>-<database id>.<format>.gz. For example,100000000-1761651721-1761651721-0.csv.gz. - Custom: Create a custom filename using supported dynamic variables. Click {{ }} to insert variables and combine them with fixed text. For example, the custom file name convention
profiles-{{date}}-{{export-id}}.csv.gzresolves toprofiles-2025-10-03-1761651721.csv.gz). By default, the timestamp and instance ID are always appended to the end of the filename to ensure that the content is not overridden.
The following are the supported variables:-
{{Account-id}}: Your unique CleverTap account identifier. -
{{Export-id}}: Unique export ID assigned to each export run. -
{{Timestamp}}: Epoch timestamp when the export runs. -
{{Instance-id}}: Database identifier for your CleverTap account (typically 0–23). -
{{Date}}: Export run date inyyyy-mm-dd.
-
- Default file name: The default format is
Select File Format and Define File Name
- Click Next to choose user identifiers.
Select User identifiers
Choose which user identifiers to include in the export and how they appear in the output file. These settings enable data warehouse platforms to accurately match user profiles across multiple identifiers.
-
Select Identity & Define Order
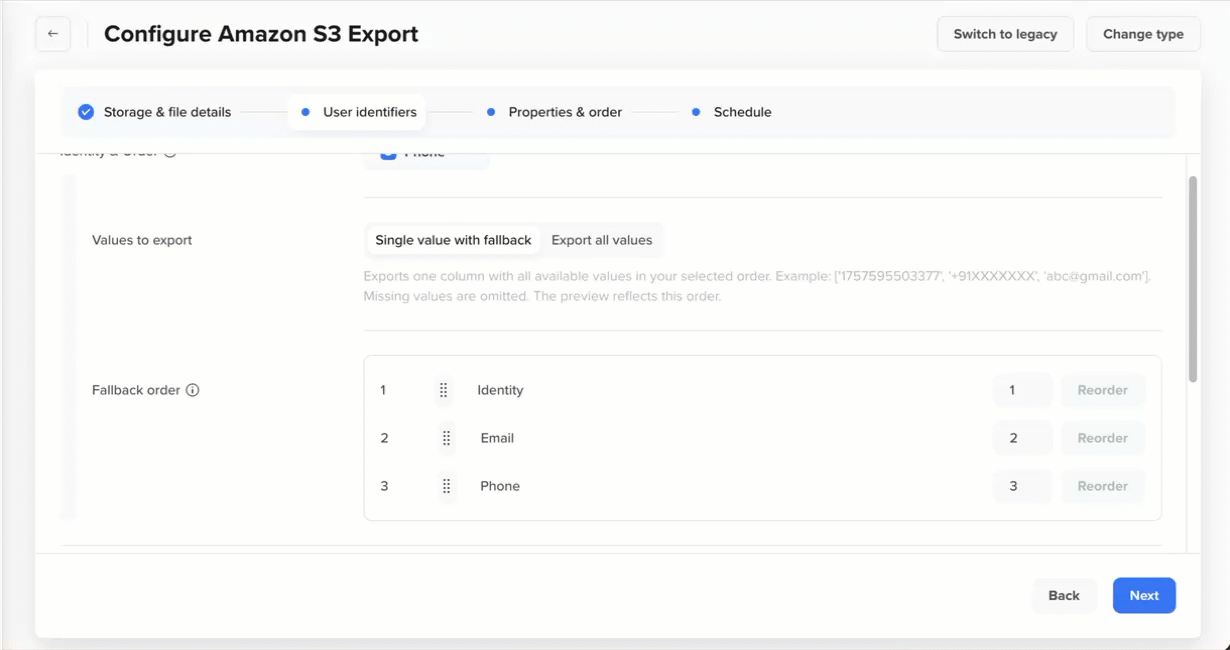
Use the dropdown to select which identifiers to export and click Apply. You must select at least one identifier. Options include:-
Identity: Your account-defined user identifier
-
Email: The email address stored in the user profile.
-
Phone: The phone number stored in the user profile.
-
Custom: A business-specific identifier (for example,
crm_id).
Select Identity
-
-
Define Export Preference
Choose how identifier values are written and define priority. Drag to reorder or enter position numbers.-
Single value with fallback: Exports one identifier value per profile following your priority order. If the first identifier is unavailable, CleverTap uses the next available identifier as per your defined sequence. Use the Reorder option to set priority by dragging rows or entering position numbers. For example, if the priority order is
Identity → Email → Phone → CRM ID [Custom properties], CleverTap exports the first available identifier in that order for each user.
Define Export Preference when Exporting Single Value for Identity
-
Export all values: Exports all selected identifiers in the identity column, listed in order of priority. Missing values are omitted. Select this option when reconciliation, deduplication, or identity joins are required downstream.
-
-
(Optional) Select Account-Defined User Identity
Turn ON the toggle to add all_identities, which exports all account-defined identifiers (Identity, Email, Phone) for each profile. If a user does not have a value for one or more of these identifiers, those values are omitted from the list.
Example: If a profile has identities user_123, user_456, and email [email protected], the output will be:[user_123, user_456, [[email protected]](mailto:[email protected])]. -
Select CleverTap ID
Select this option to include the following in your export:- clevertapId: A unique, system-generated identifier assigned to each user profile. For more information, refer to CleverTap ID.
- clevertapIds: A list of all historical CleverTap IDs associated with the profile, useful for tracking users across devices and merged profiles.
-
Preview Output
Review how the selected identifiers will appear in the export. The live preview updates based on your selection and priority order, allowing you to verify: Fallback behavior, Data structure, and Sample output format.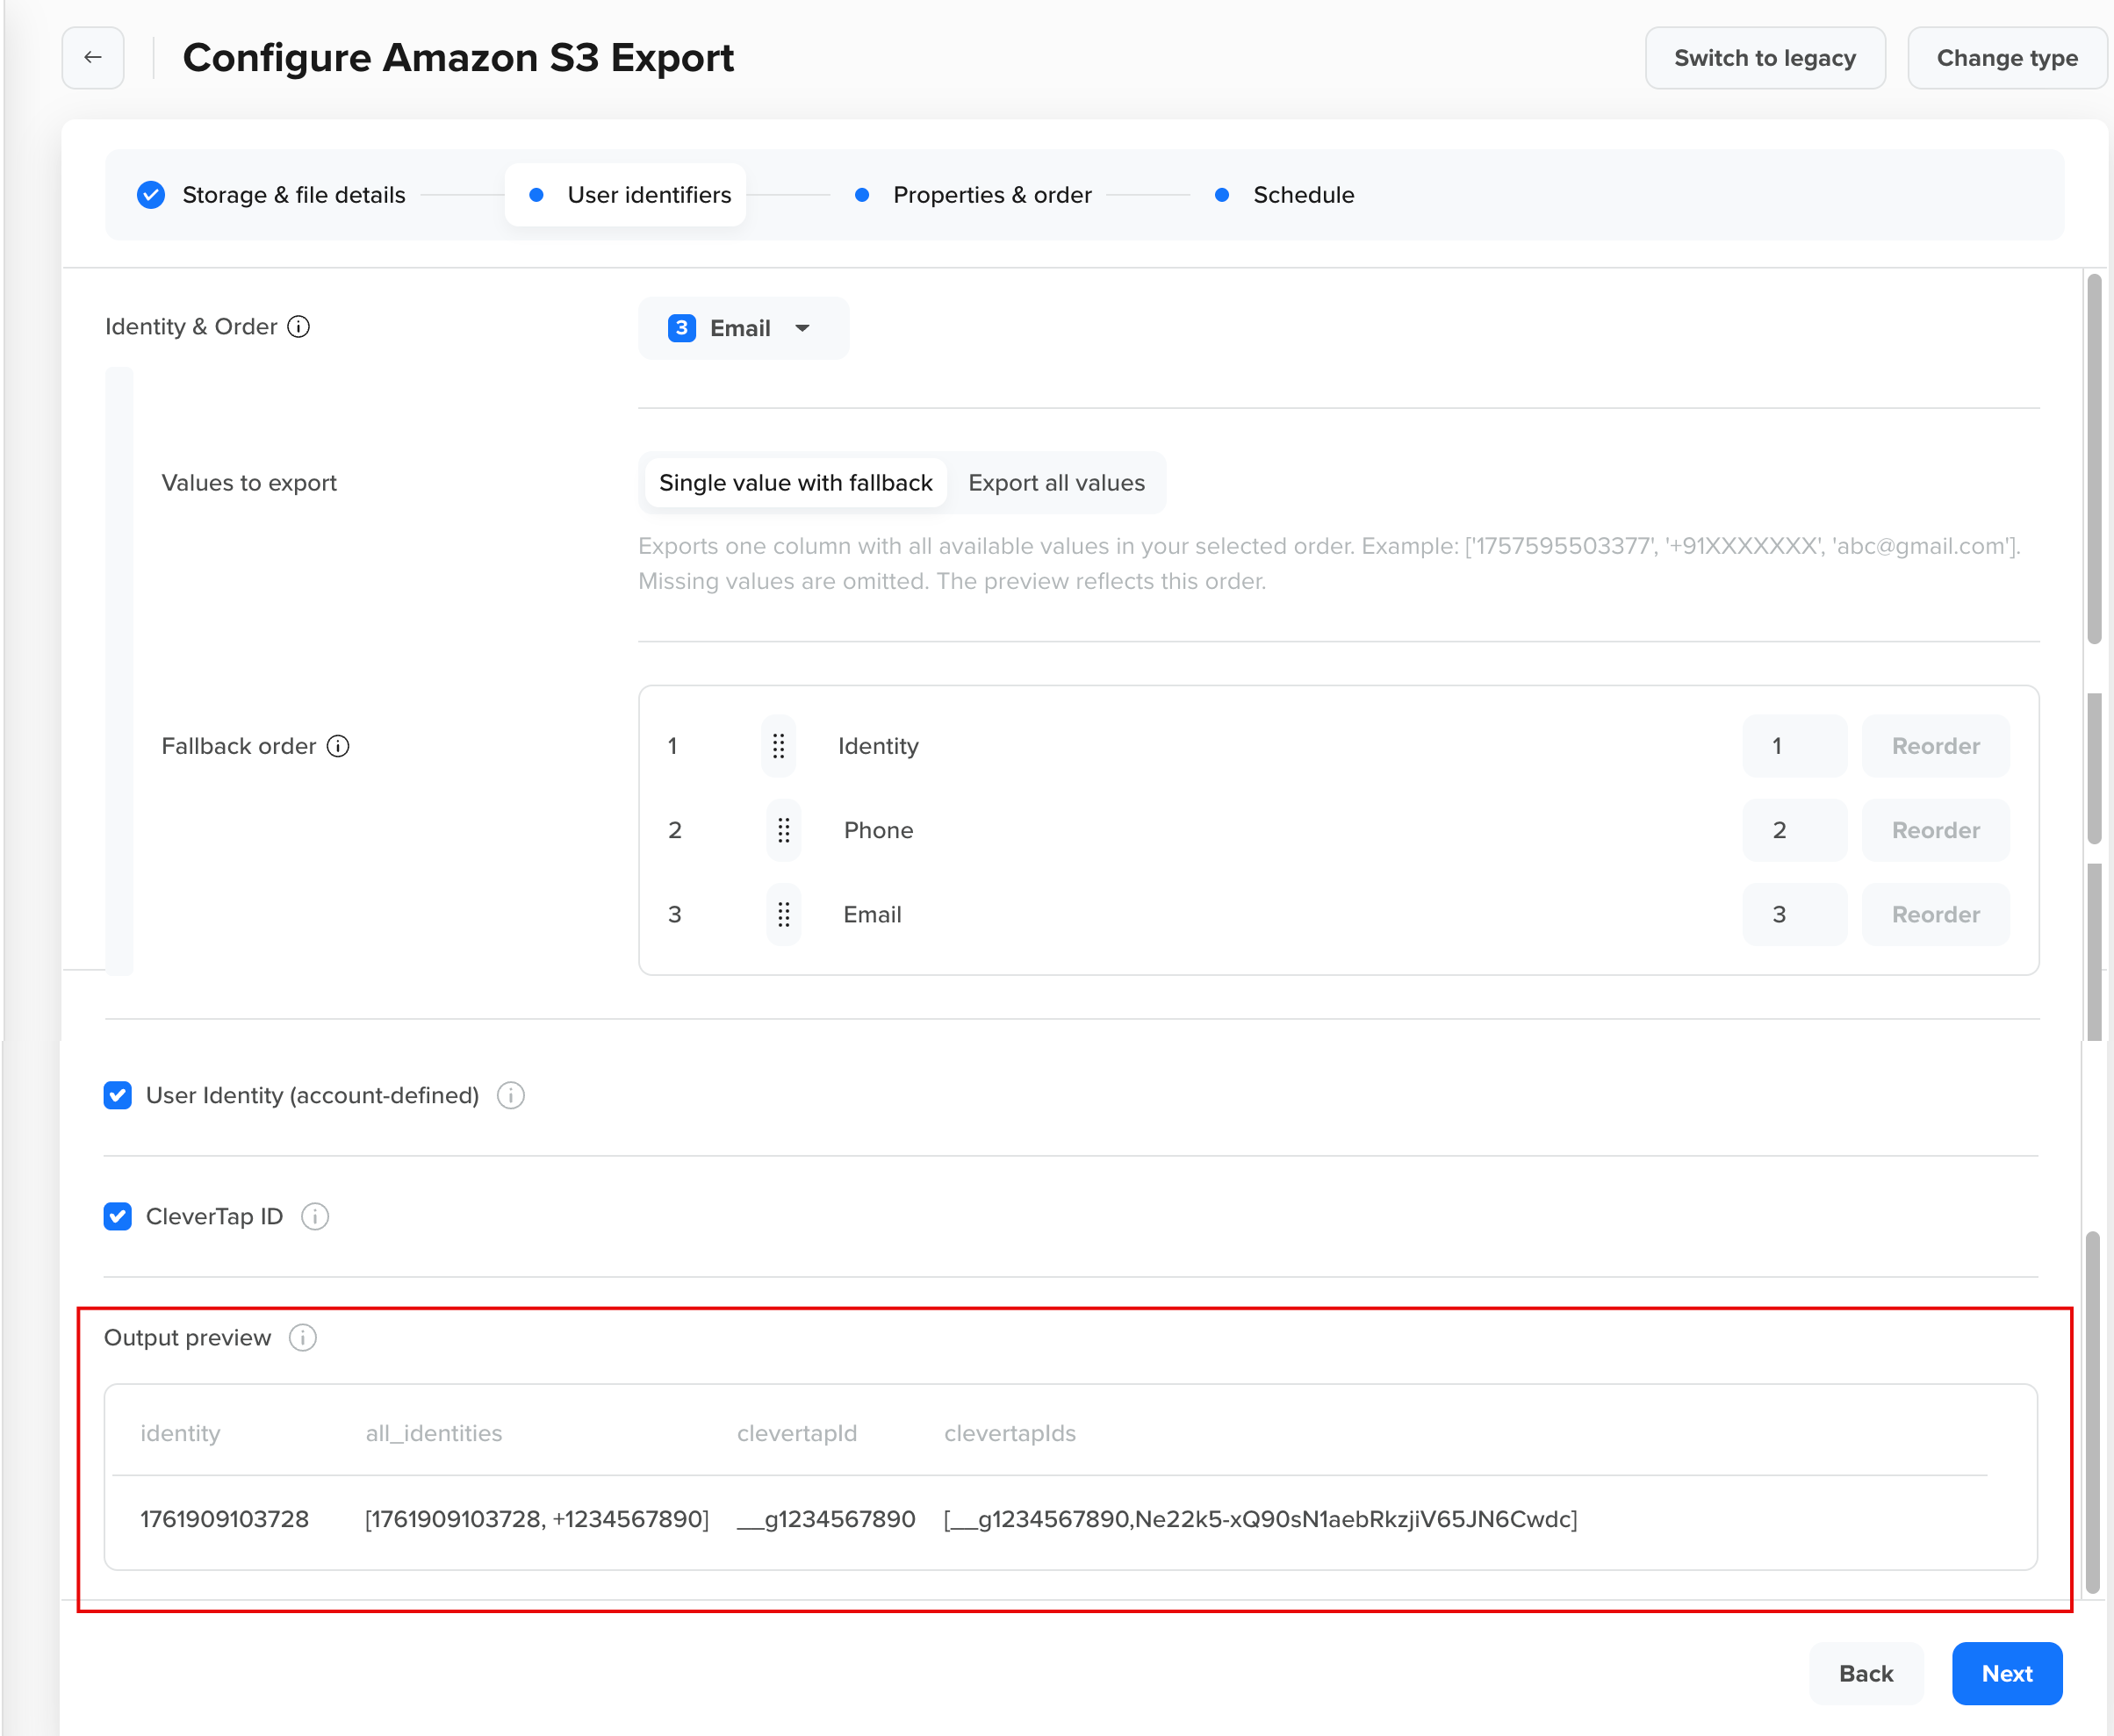
Preview Output
-
Click Next to proceed to the Properties & order step.
Configure Properties & Order
Configure which properties to include in the export, as well as how they are labeled and ordered. Use the live Preview to verify selected fields, headers, and column order.
-
Include Device Attributes
Device-level identifiers captured for the profile. This information is included by default in the export.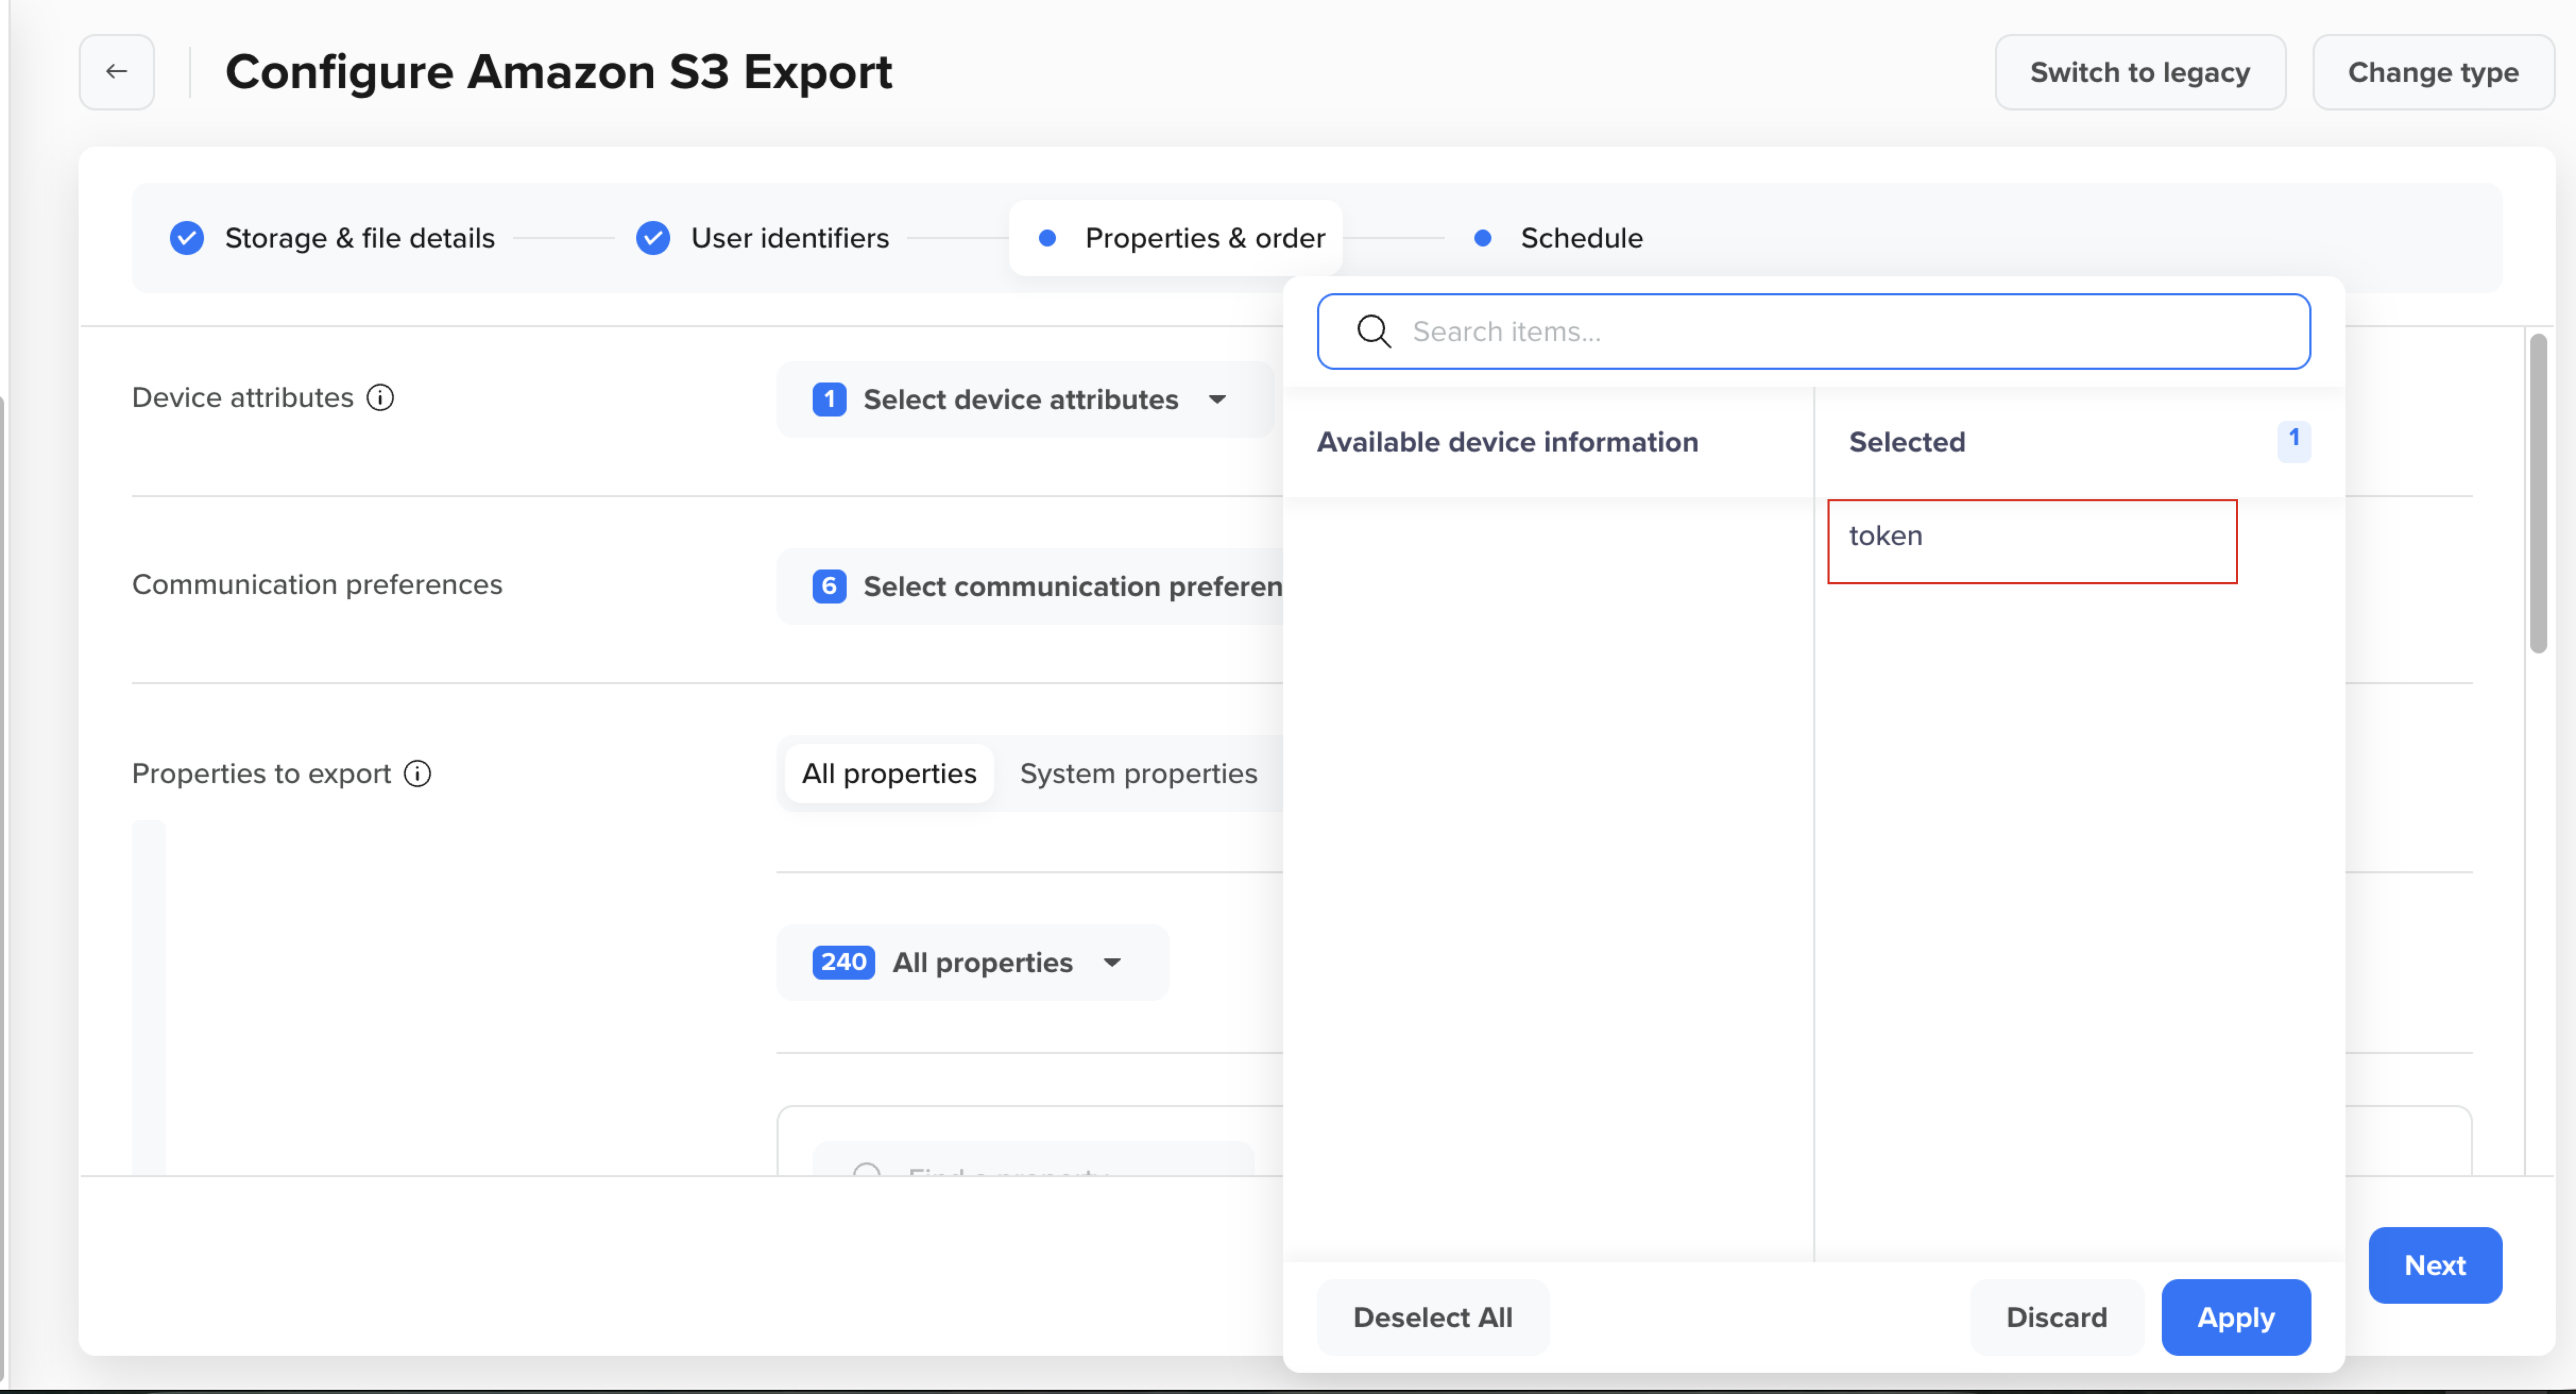
Include Device Attributes
-
Add Communication Preferences.
Include the user's opt-in/opt-out status across messaging channels. Select one or more options from the dropdown:MSG-push,MSG-webpush,MSG-email,MSG-sms,MSG-whatsapp, andsubscriptionGroups(subscription group preferences for messaging channels). Selecting multiple items adds multiple columns. If a profile has no value for a selected item, the corresponding column appears blank.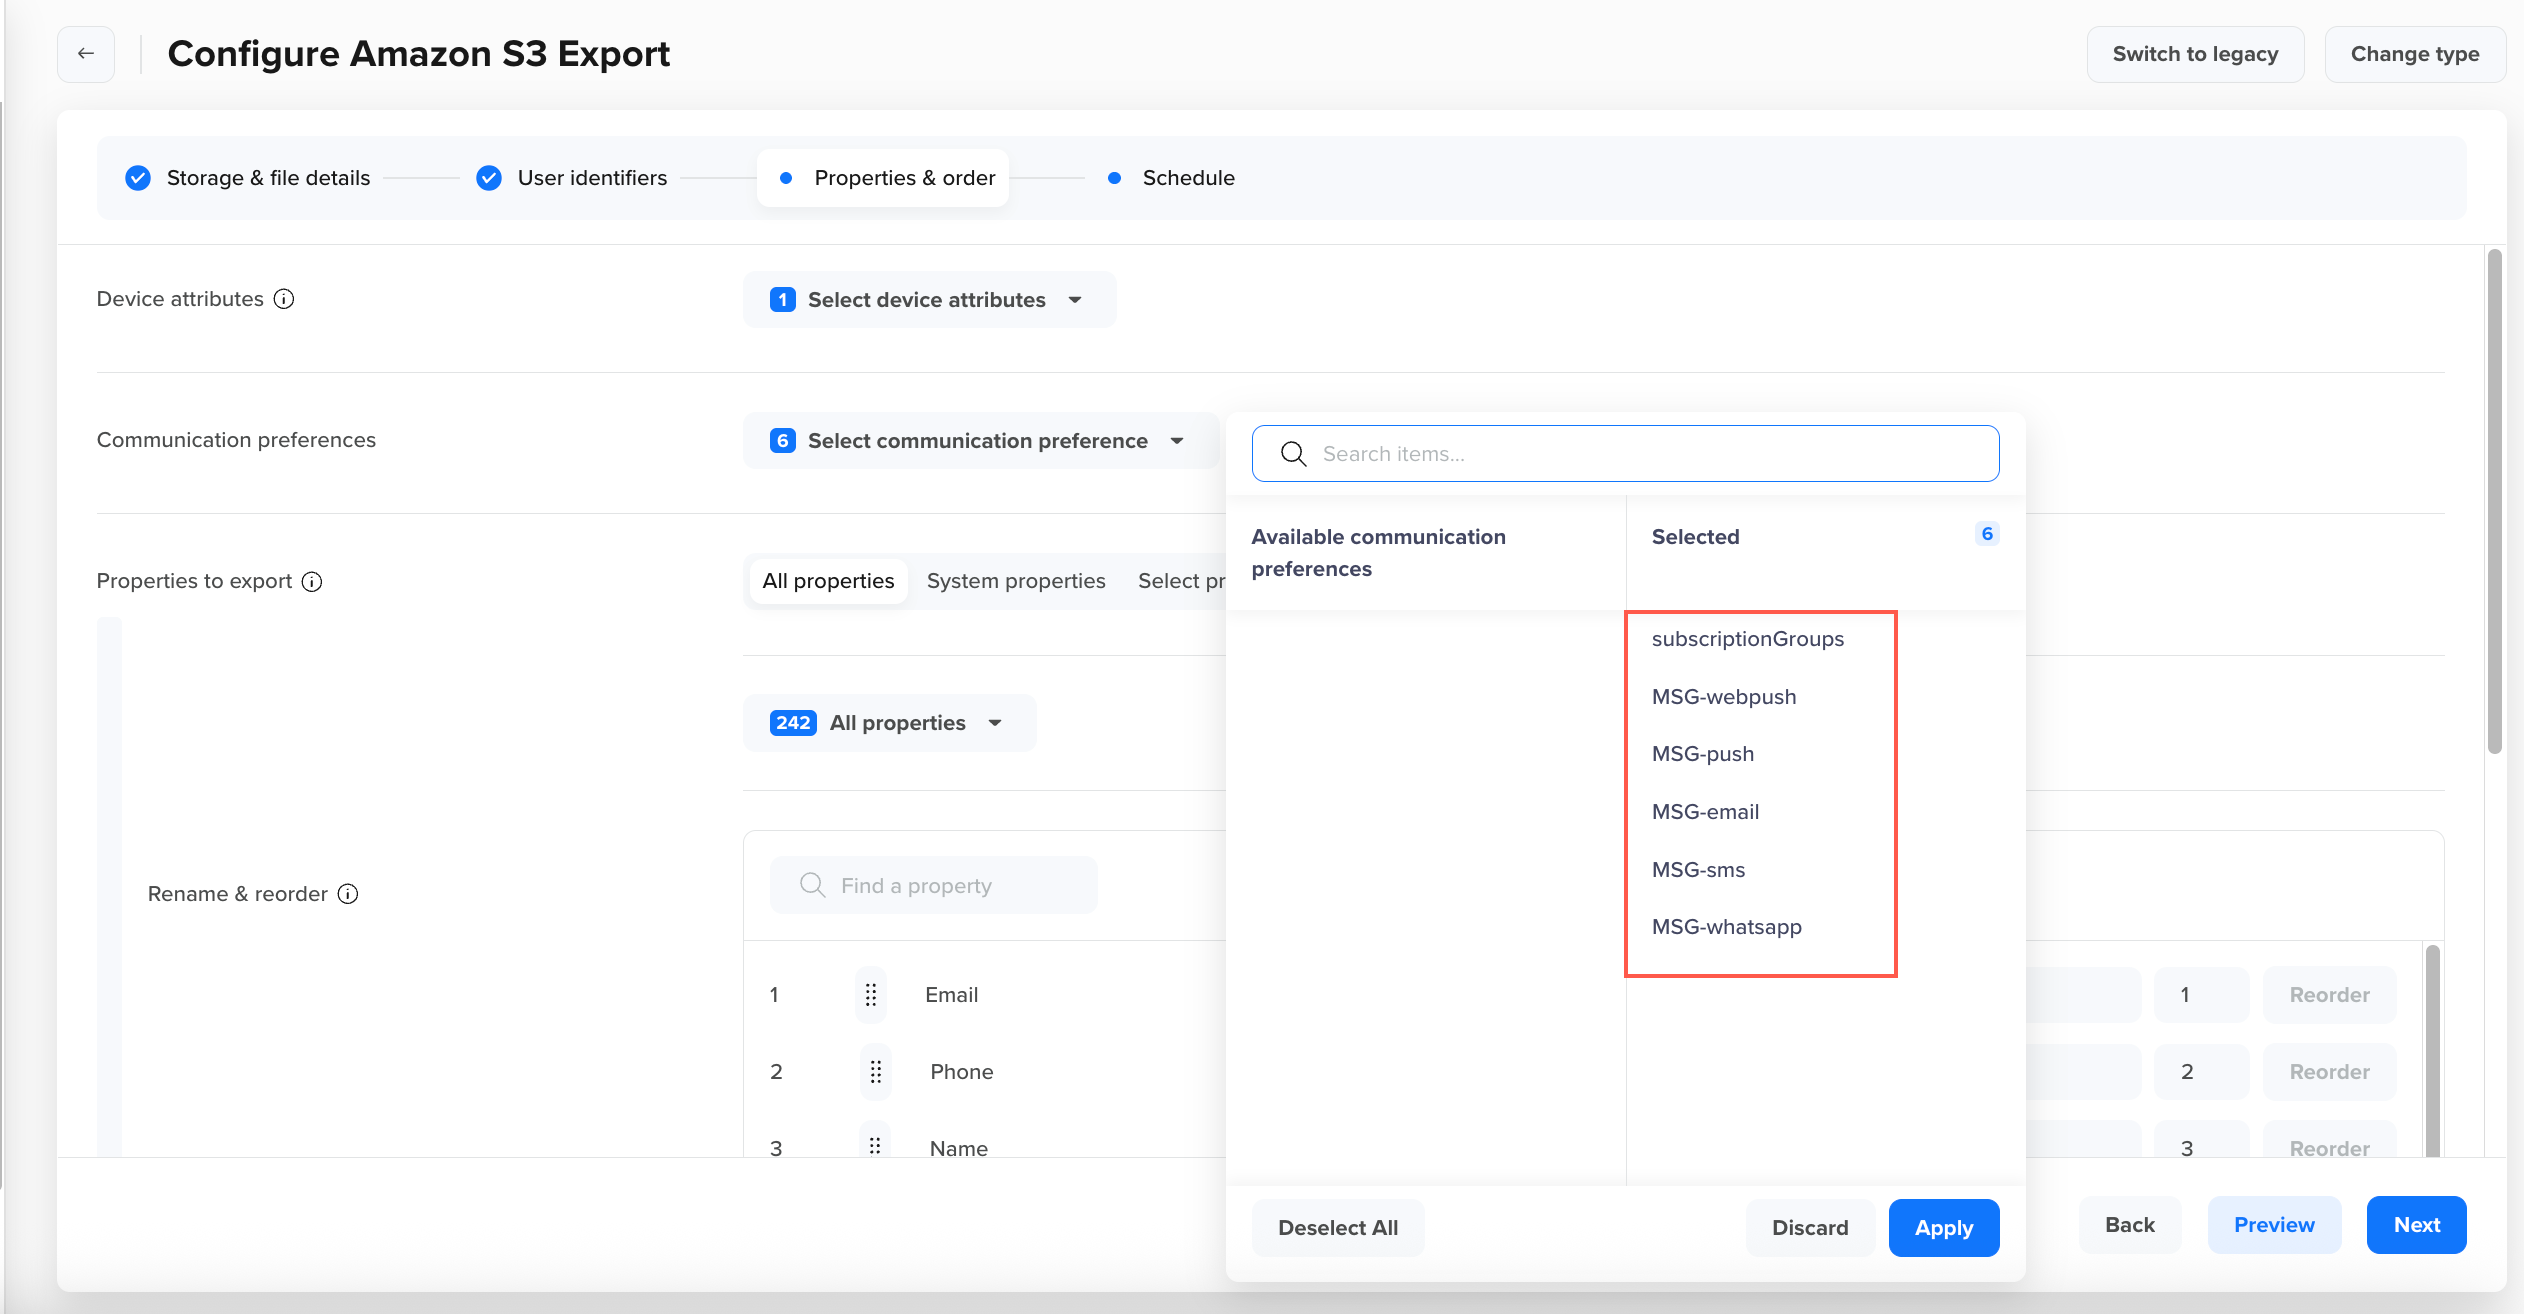
Export Communication Preferences
-
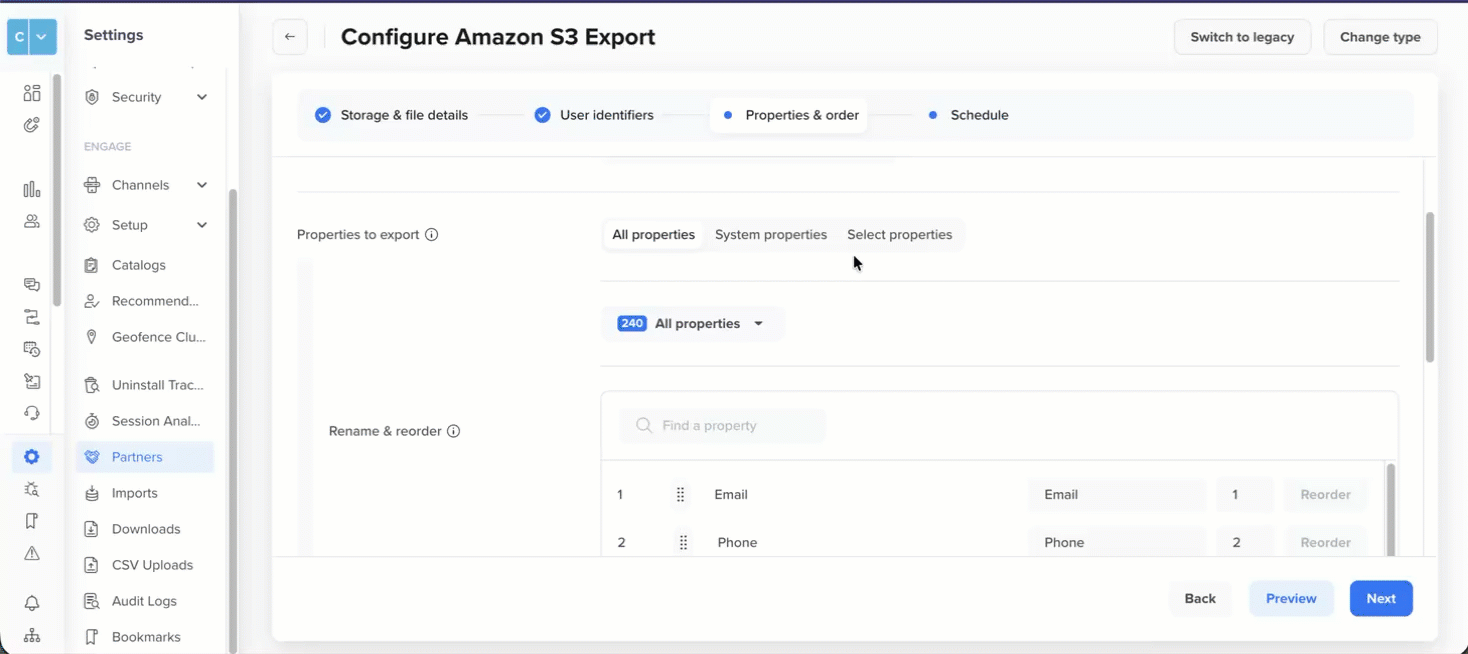
Select User Properties
Choose which profile properties to export:-
All user properties: Exports all system and custom user properties. For more information, refer to User Properties.
-
System properties: Exports only CleverTap system properties such as Name, Gender, DOB, Email, Phone, and Photo. For more information, refer to System Properties.
Note
Properties like Lat, Long, and CT_Test_User are available under all user properties and selected properties.
-
Selected properties: Pick specific fields from your schema (for example, Email, Phone, Customer Type). For more information, refer to Custom Properties.
Select User Properties to Export
-
-
Rename & Reorder Properties:
Customize the column names and the order of selected properties. Use the Selected properties dropdown to rename or reorder the selected properties (for example, changePhonetoPhone Number).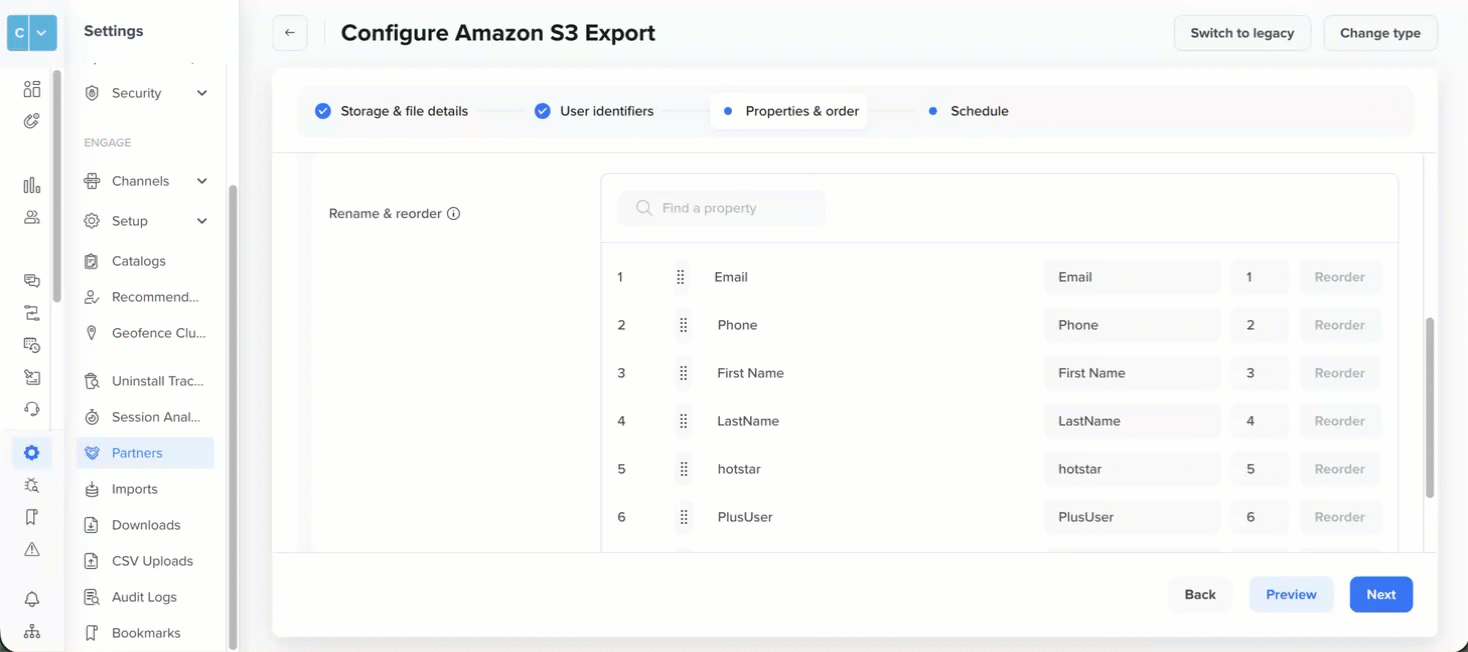
Rename and Reorder User Properties to Export
Points to Consider
- Renaming only affects the column header in the export; it does not change the original property name.
- Use the search bar to find specific fields.
- Drag rows to rearrange columns, or use the Reorder button to set the export sequence.
- If a property is missing for a profile, the column still appears but remains blank and the Key in the JSON file will be removed.
- Reordering does not impact data collection or internal storage — it only affects the file structure.
- If two or more properties have the same name, then the property present last in the order will only be exported. So avoid having two properties with the same name
- Manage Schema Updates
Control how new properties are handled in future export creation. This option appears only when you choose to export all properties in the previous step.- Add new properties at the end: Automatically append any new properties (system or custom) as new columns at the end of the export file. For example, if you later add a property named loyalty_tier. It will be included as a new column at the end of the next export and onwards.
- Lock current schema: Keep the file structure fixed. New properties are excluded until manually added. For example, if you add loyalty_tier, it will not appear in the export until you update the schema configuration.
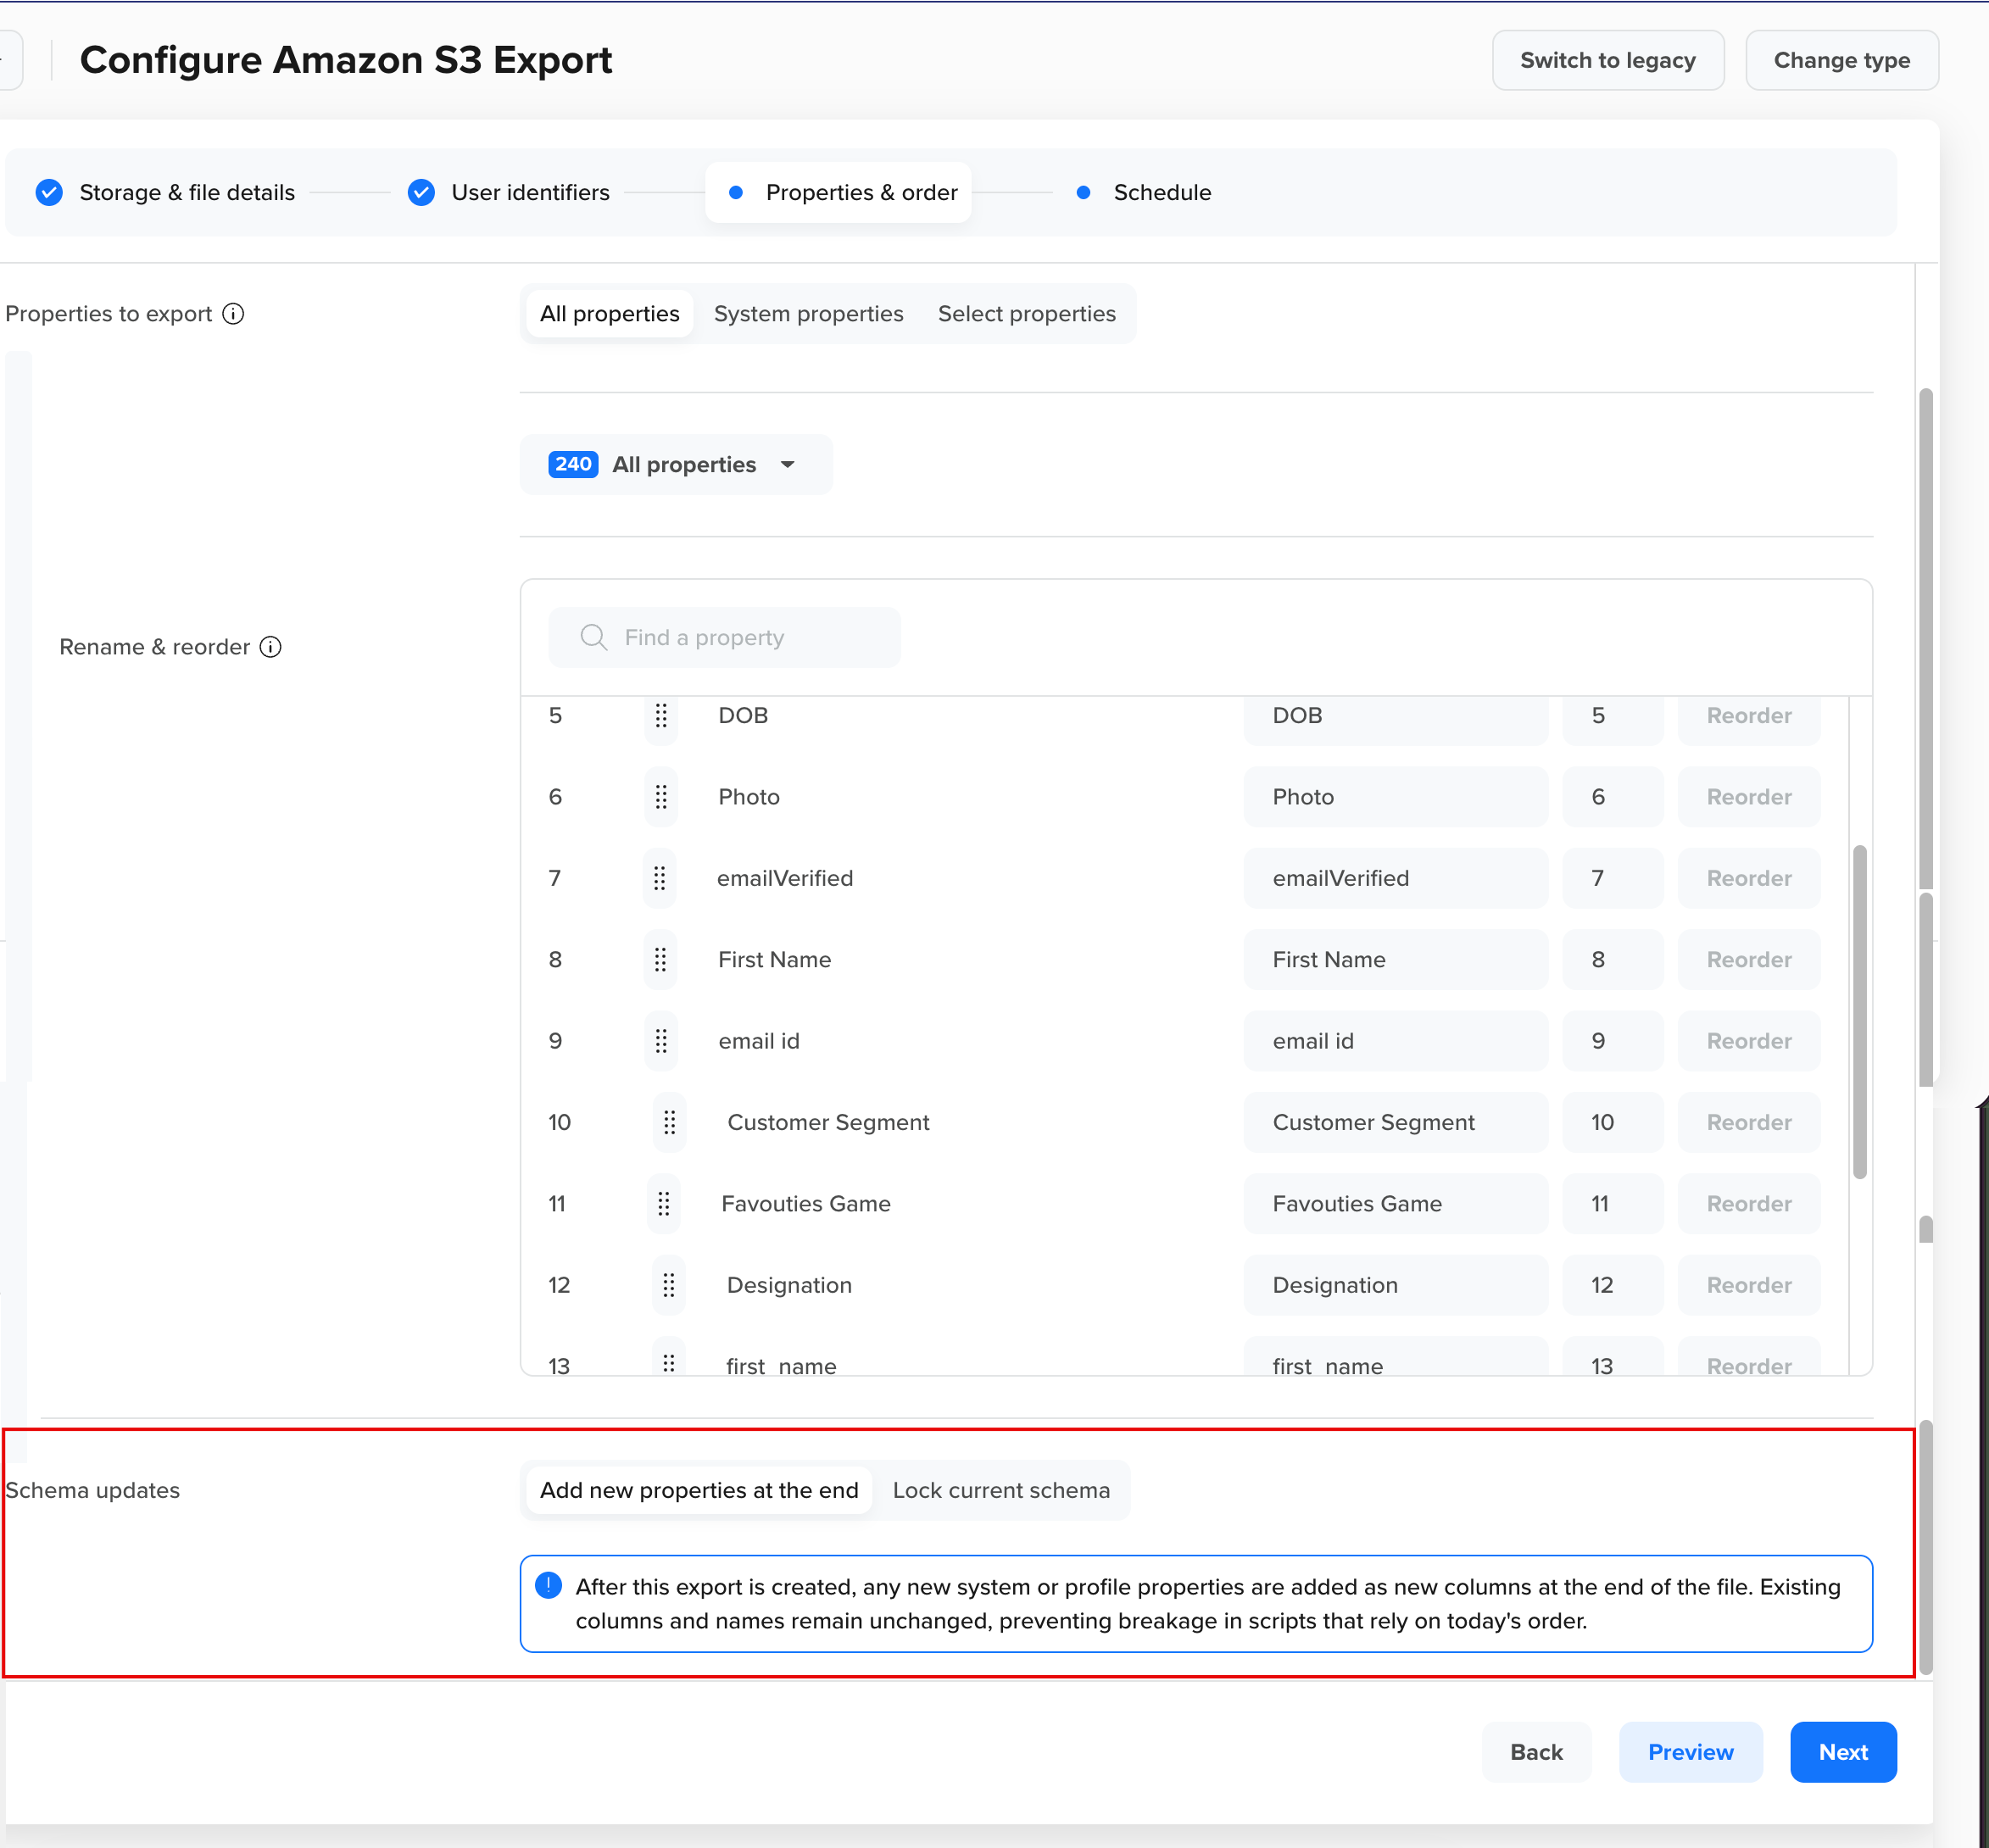
Manage Schema Updates
TipChoose Add new properties at the end if you want to capture all user data automatically. Choose Lock current schema if your downstream pipelines require a fixed schema structure.
- Click Preview to review the complete data structure and click Next to configure the export schedule.
Define Schedule for Export
Define how often data should be exported to your destination.
-
Choose Frequency
Select how often the export should run:- One-time: Immediately runs a one-time export using the current configuration. Use this for ad-hoc analysis or initial data migration.
- Recurring: Automatically exports data every 24 hours. The frequency is fixed to once per day. Use when downstream systems expect a daily file.
-
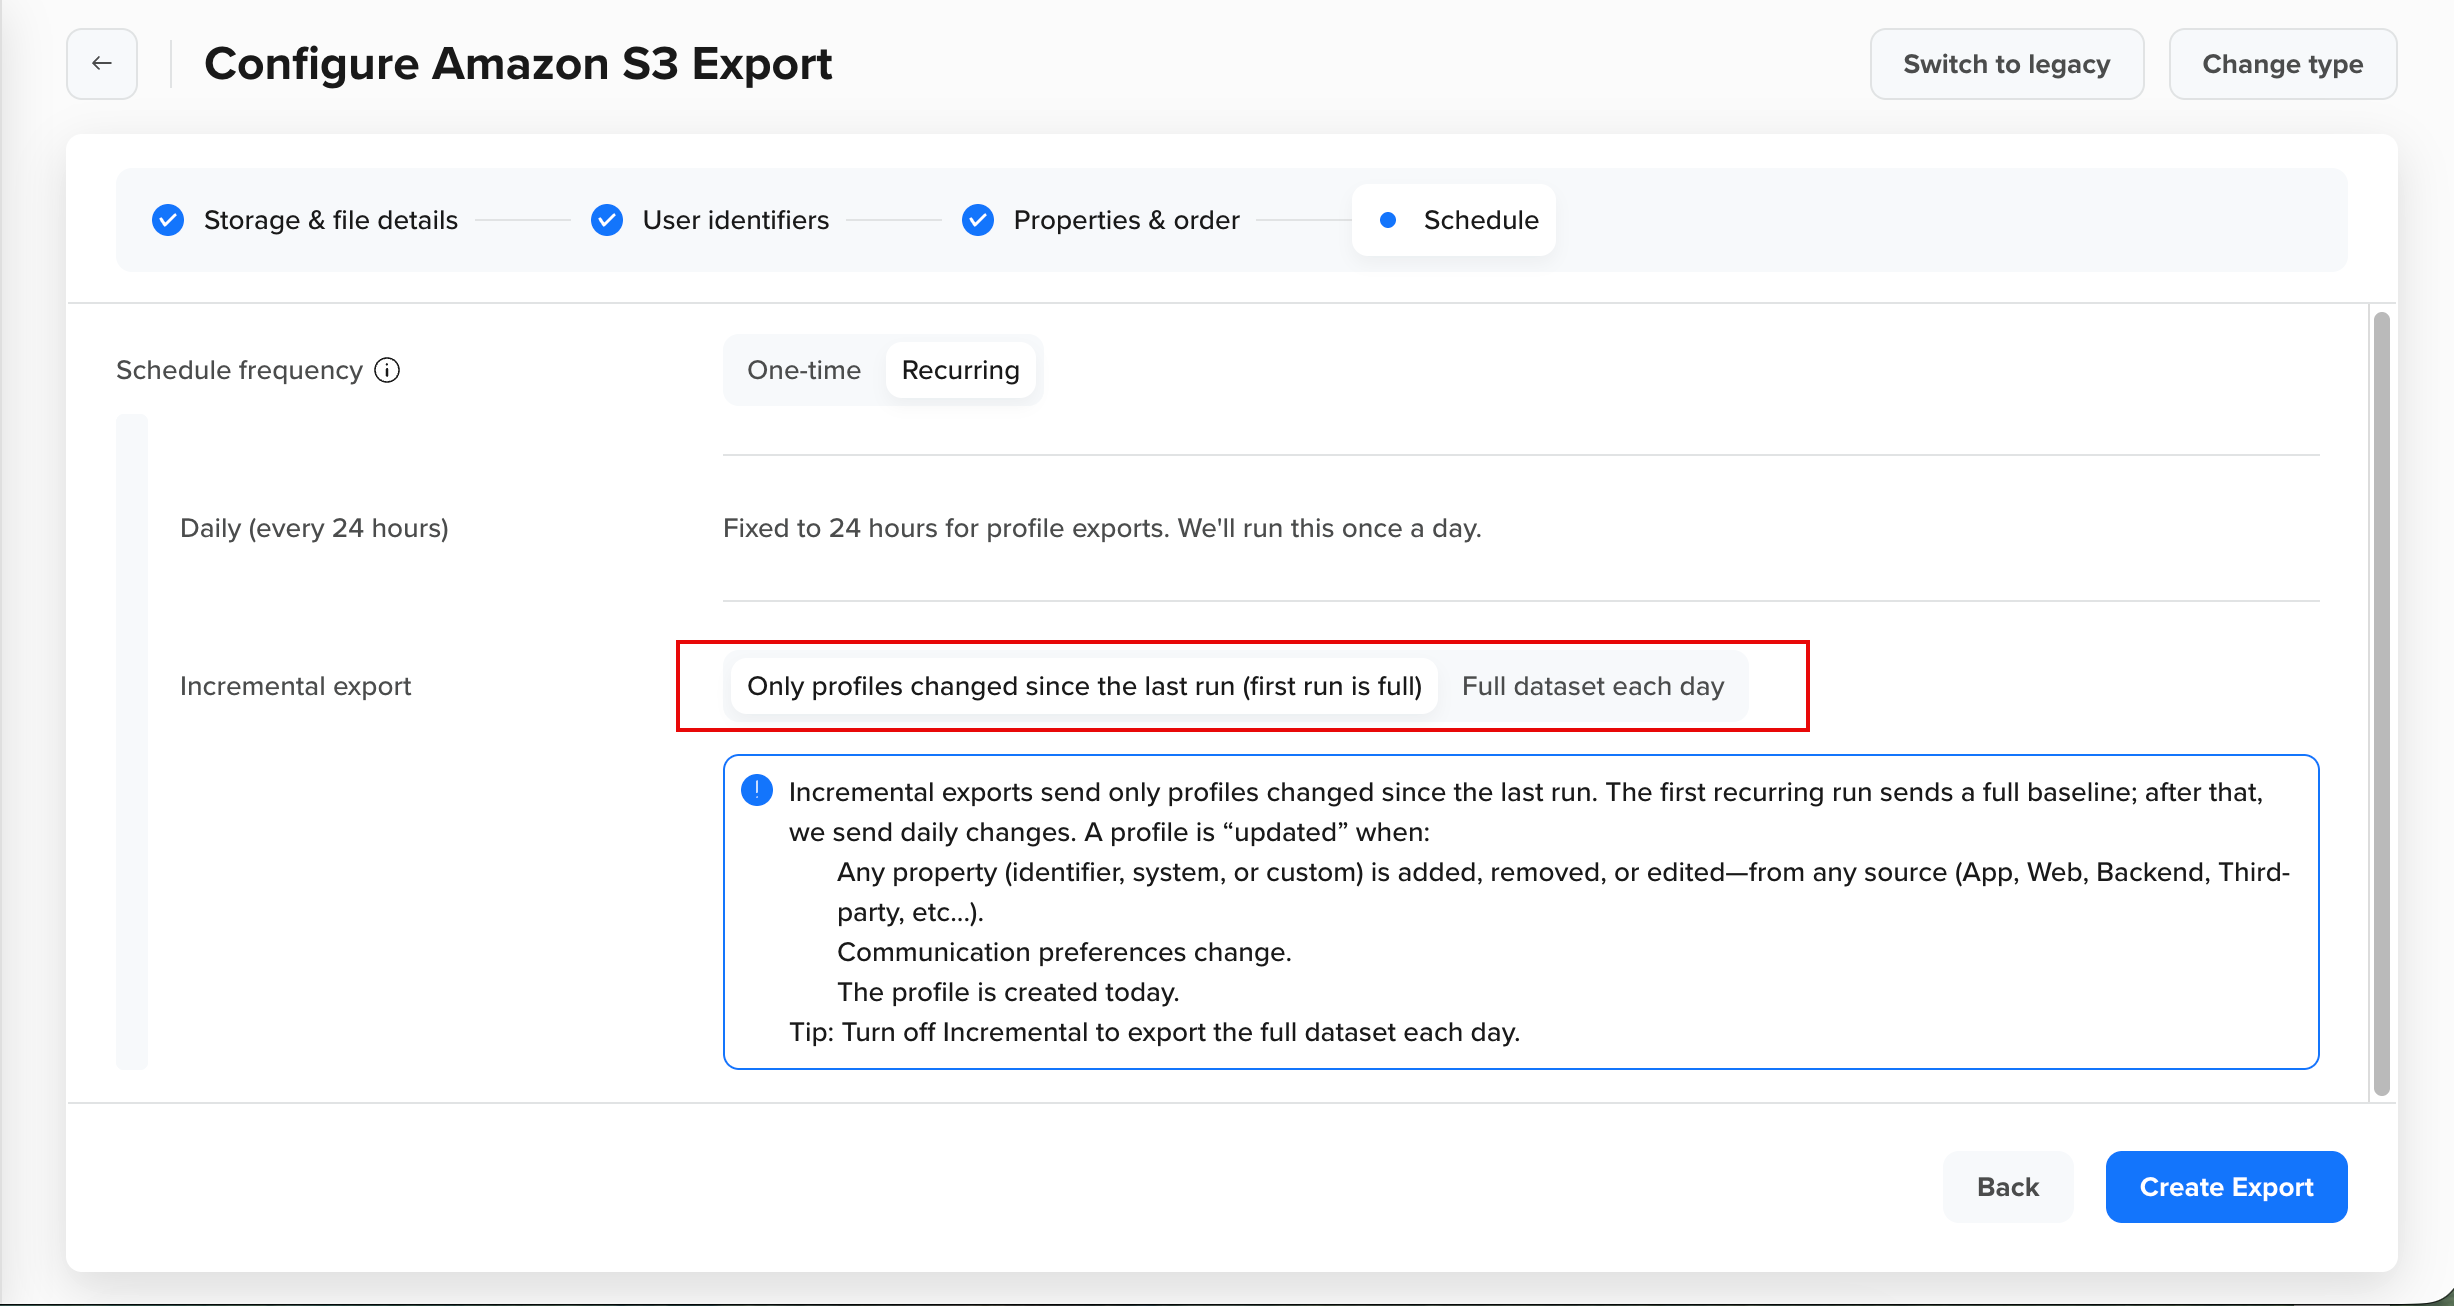
Select Export Type
For recurring exports, choose how CleverTap determines which profiles to export:-
Only profiles changed since the last run (first run is full): The first run exports all profiles. Future runs export the following profiles:
-
A new profile was created since the last run.
-
A profile is updated. A profile is considered updated if:
- An identifier or user property is added, removed, or modified.
- A communication preference (for example, MSG-email, MSG-sms, MSG-push) changes.
-
-
Full dataset each day: Export all profiles in every run. Each daily run exports the complete dataset, regardless of changes. Use this if your downstream systems require a daily full refresh.
Create Recurring Export
-
-
Click Create to complete the creation of your export.
File Output Structure
Exported profile files follow this consistent column order:
- User Identifiers: Identity, All Identities, CleverTap ID based on the configuration done in Step 2.
- Device Information: Device Token
- Communication Preferences: MSG-push, MSG-push-all, MSG-email, MSG-sms, MSG-whatsapp, subscriptionGroups (if selected).
- User Properties: System and custom properties in the order you define.
{
  "identity": "XXXXXXX",
  "all_identities": "[XXXXXXX]",
  "clevertapId": "__g1234567890",
  "clevertapIds": ["__g1234567890","Ne22k5-xQ90sN1aebRkzjiV65JN6Cwdc"],
  "token": "XXXXXXX",
  "subscriptionGroups": {
    "group1": "Subscribed",
    "group2": "Unsubscribed",
    "group3": "Subscribed"
    },
  "MSG-webpush": "XXXXXXX",
  "MSG-push": "XXXXXXX",
  "MSG-email": "XXXXXXX",
  "MSG-sms": "XXXXXXX",
  "MSG-whatsapp": "XXXXXXX",
  "Email": "XXXXXXX",
  "Phone": "XXXXXXX",
  "Name": "XXXXXXX",
  "Gender": "XXXXXXX",
  "DOB": "XXXXXXX",
  "Photo": "XXXXXXX",
  "Favouties Game": "XXXXXXX",
  "Designation": "XXXXXXX",
  "Blood Group": "XXXXXXX"
}
<?xml version="1.0" encoding="UTF-8"?>
<root>
<Profile>
<identity>XXXXXXX</identity>
<profileIdentities>
<entry>
<key>all_identities</key>
<value>[XXXXXXX]</value>
</entry>
<entry>
<key>clevertapId</key>
<value>__g1234567890</value>
</entry>
<entry>
<key>clevertapIds</key>
<value>[__g1234567890,Ne22k5-xQ90sN1aebRkzjiV65JN6Cwdc]</value>
</entry>
</profileIdentities>
<device>
<entry>
<key>token</key>
<value>XXXXXXX</value>
</entry>
</device>
<commPrefs>
<entry>
<key>subscriptionGroups</key>
<value>
{
"group1": "Subscribed",
"group2": "Unsubscribed",
"group3": "Subscribed"
}
</value>
</entry>
<entry>
<key>MSG-webpush</key>
<value>XXXXXXX</value>
</entry>
<entry>
<key>MSG-push</key>
<value>XXXXXXX</value>
</entry>
<entry>
<key>MSG-email</key>
<value>XXXXXXX</value>
</entry>
<entry>
<key>MSG-sms</key>
<value>XXXXXXX</value>
</entry>
<entry>
<key>MSG-whatsapp</key>
<value>XXXXXXX</value>
</entry>
</entry>
</commPrefs>
<profileProps>
<entry>
<key>Email</key>
<value>XXXXXXX</value>
</entry>
<entry>
<key>Phone</key>
<value>XXXXXXX</value>
</entry>
<entry>
<key>Name</key>
<value>XXXXXXX</value>
</entry>
<entry>
<key>Gender</key>
<value>XXXXXXX</value>
</entry>
<entry>
<key>DOB</key>
<value>XXXXXXX</value>
</entry>
<entry>
<key>Photo</key>
<value>XXXXXXX</value>
</entry>
<entry>
<key>Favouties Game</key>
<value>XXXXXXX</value>
</entry>
<entry>
<key>Designation</key>
<value>XXXXXXX</value>
</entry>
<entry>
<key>Blood Group</key>
<value>XXXXXXX</value>
</entry>
</profileProps>
</Profile>
</root>| identity | all_identities | clevertapId | clevertapIds | token | subscriptionGroups | MSG-webpush | MSG-push | MSG-email | MSG-sms | MSG-whatsapp | Phone | Name | Gender | DOB | Photo | Favouties Game | Designation | Blood Group | |
|---|---|---|---|---|---|---|---|---|---|---|---|---|---|---|---|---|---|---|---|
| XXXXXXX | [ "XXXXXXX" ] | _g1234567890 | [__g1234567890,Ne22k5-xQ90sN1aebRkzjiV65JN6Cwdc] | XXXXXXX | { "group1":"Subscribed", "group2":"Unsubscribed", "group3": "Subscribed" } | XXXXX | XXXXX | XXXXX | XXXXX | XXXXX | XXXXX | XXXXX | XXXXX | XXXXX | XXXXX | XXXXX | XXXXX | XXXXX | XXXXX |
  [
  {
  "column_name": "identity",
  "column_type": "VARCHAR",
  "nullValue": "YES",
  "key": null,
  "defaultValue": null,
  "extra": null
  },
  {
  "column_name": "profileIdentities",
  "column_type": "MAP(VARCHAR, STRUCT(member0 VARCHAR, member1 VARCHAR[]))",
  "nullValue": "YES",
  "key": null,
  "defaultValue": null,
  "extra": null
  },
  {
  "column_name": "device",
  "column_type": "MAP(VARCHAR, STRUCT(member0 BOOLEAN, member1 INTEGER, member2 BIGINT, member3 FLOAT, member4 DOUBLE, member5 VARCHAR))",
  "nullValue": "YES",
  "key": null,
  "defaultValue": null,
  "extra": null
  },
  {
  "column_name": "commPrefs",
  "column_type": "MAP(VARCHAR, STRUCT(member0 BOOLEAN, member1 INTEGER, member2 BIGINT, member3 FLOAT, member4 DOUBLE, member5 VARCHAR, member6 MAP(VARCHAR, STRUCT(member0 BOOLEAN, member1 INTEGER, member2 BIGINT, member3 FLOAT, member4 DOUBLE, member5 VARCHAR))))",
  "nullValue": "YES",
  "key": null,
  "defaultValue": null,
  "extra": null
  },
  {
  "column_name": "profileProps",
  "column_type": "MAP(VARCHAR, STRUCT(member0 BOOLEAN, member1 INTEGER, member2 BIGINT, member3 FLOAT, member4 DOUBLE, member5 VARCHAR))",
  "nullValue": "YES",
  "key": null,
  "defaultValue": null,
  "extra": null
  }
]| identity | profileIdentities | device | commPrefs | profileProps |
|---|---|---|---|---|
| XXXXXXX | {"all_identities":{"member0":"[XXXX,XXXX]","member1":null}, "clevertapId":{"member0":"XXXXXX","member1":null}, "clevertapIds":{"member0":null,"member1":["XXXXX"]}} | [{token: { 'member0': "XXXXXX", 'member1': "XXXXXX", 'member2': "XXXXXX", 'member3': "XXXXXX", 'member4': "XXXXXX", 'member5': "XXXXXX", 'member6': "XXXXXX" }}] | [{ subscriptionGroups: { 'member0': "XXXXXX", 'member1': "XXXXXX", 'member2': "XXXXXX", 'member3': "XXXXXX", 'member4': "XXXXXX", 'member5': "XXXXXX", 'member6': "XXXXXX" }, MSG-webpush: { 'member0': "XXXXXX", 'member1': "XXXXXX", 'member2':"XXXXXX", 'member3': "XXXXXX", 'member4': "XXXXXX", 'member5': "XXXXXX", 'member6': "XXXXXX" } }] | [{ Email: { 'member0': "XXXXXX",'member1': "XXXXXX", 'member2': "XXXXXX", 'member3': "XXXXXX", 'member4': "XXXXXX", 'member5': "XXXXXX", 'member6': "XXXXXX" }, Phone: { 'member0': "XXXXXX", 'member1': "XXXXXX", 'member2': "XXXXXX", 'member3': "XXXXXX", 'member4': "XXXXXX", 'member5': "XXXXXX", 'member6': "XXXXXX" } }] |
Manage Export
This section outlines how to track the status of your data exports, stop them when needed, and filter them efficiently based on your requirements.
Stop Export
Stop a running export by hovering over the export and clicking Stop. The export status on the Export center page is displayed as Stopped.

Stop Export
Export Status
Each export has a status that reflects its current state in the export lifecycle as follows:
- Pending: Indicates that the export has been created and is awaiting the scheduled run to begin. In the case of recurring exports, after each successful run, the status returns to Pending, indicating that the next daily run is scheduled and waiting to begin. The status changes to Running once the next execution starts.
- Running: Indicates that the export is in progress, processing, and transferring profile data.
- Stopped: Indicates that the export was manually stopped and will not run again.
- Done: Indicates that the one-time export finished successfully.
Best Practices
Follow these best practices to ensure your profile exports are reliable, organized, and compatible with downstream systems:
- Use Clear File Naming Conventions
Create descriptive file names using dynamic date variables to help identify and process exports chronologically. - Structure Folders by Date
Organize exports using date-based folders (e.g., yyyy-mm-dd or {{Date}}) to simplify processing in your data pipelines. - Enable Incremental Exports
Use incremental exports for large datasets to minimize processing time, enhance performance, and reduce storage costs. - Manage Schema Carefully
- Lock the schema if downstream systems require a fixed column structure.
- Use Add new properties at the end to automatically capture newly added data fields without affecting existing columns.
- Monitor Export Delivery
Configure alerts in your cloud platform to detect delays or missing files and troubleshoot failures quickly. - Validate Exported Data
Run data quality checks to confirm the exported files match your expectations before loading them into downstream systems. - Monitoring & Error Handling: If your export fails:
- Check that your storage credentials (IAM policy, service account key, or SAS token) are valid.
- Ensure the bucket or container exists and is accessible.
- For GCP exports, a 403 error often indicates that the service account key is invalid.
FAQs
Can I run a one-time Profiles export if a recurring Profiles export is active?
Before running a one-time profile export, stop any scheduled recurring profile export.
How long are exported files retained in my cloud storage?
CleverTap does not delete exported files. Your cloud storage bucket lifecycle policies control file retention.
Can I export profiles for specific segments?
Profile Exports export all profiles in your account. To export specific segments, use the Profile API with segment filters or post-process exported files.
How do I include deleted properties in my export?
If a property is deleted from the CleverTap schema but still exists in an active export, it continues to be exported.
What is the maximum file size for exports?
CleverTap automatically splits large exports into multiple files. File size depends on your profile count and selected properties.
Can I schedule recurring exports more frequently than 24 hours?
Profile Exports support only a 24-hour frequency for recurring exports. For more frequent exports, consider using the Profile APIs.
How are large exports chunked?
We chunk the data across multiple files for larger exports. File sizes are limited to ~100 MB to make them more consumable. The file index indicates the file number in the series.
How do I handle schema changes in my data warehouse?
Use the Add new properties at the end option to append new columns automatically. Update your warehouse schema to accommodate new columns, or use the "Lock current schema" option to prevent changes.
Can I export profiles to multiple buckets
Currently, CleverTap allows only one recurring profile export to be created.
Can I change the folder structure or file name after creating an export?
Currently, you cannot edit the new version of the profile export.
Can I schedule exports more frequently than once per day?
For profile exports in the new export flow, the frequency is fixed to 24 hours. Event exports allow more frequent schedules (down to every 4 hours), but profile exports always run daily.
How does recurring export work?
On day one, the entire user profile data is sent. From day two onwards, only updates or additions are exported (for example, new profiles or updates to user properties/communication preferences). You can export data as frequently as every 4 hours and up to once every 24 hours.
Why do I see an error when creating the export?
Check that the bucket or container name matches exactly and that the IAM policy, service account key or SAS token is valid. Regenerate keys if necessary.
What should I do if my export fails?
If your export fails, follow these steps to troubleshoot the issue:
- Verify your storage credentials — Make sure your IAM policy (AWS), service account key (GCP), or SAS token (Azure) is valid and has the required write permissions.
- Check bucket or container access — Ensure the target bucket or container exists and is reachable from CleverTap.
- Check for the following error codes:
- A 403 error in GCP usually indicates an invalid or expired service account key.
- For other platforms, refer to your cloud provider’s error documentation for further guidance.
What other ways can I export data from CleverTap?
- Export via API (see API Overview).
- Find People: Download the profile data directly from the CleverTap dashboard through Segments → Find People → View Details → download under Total users.
Updated 2 months ago