Create A/B Tests
Learn how you can create and manage your A/B Tests and optimize your app's user experience.
Overview
To help you start with A/B Testing on CleverTap, this document describes the fundamentals of creating and managing an A/B test.
Key Terminologies for A/B Tests
Before we create an A/B Test, it is essential to understand the following terminologies:
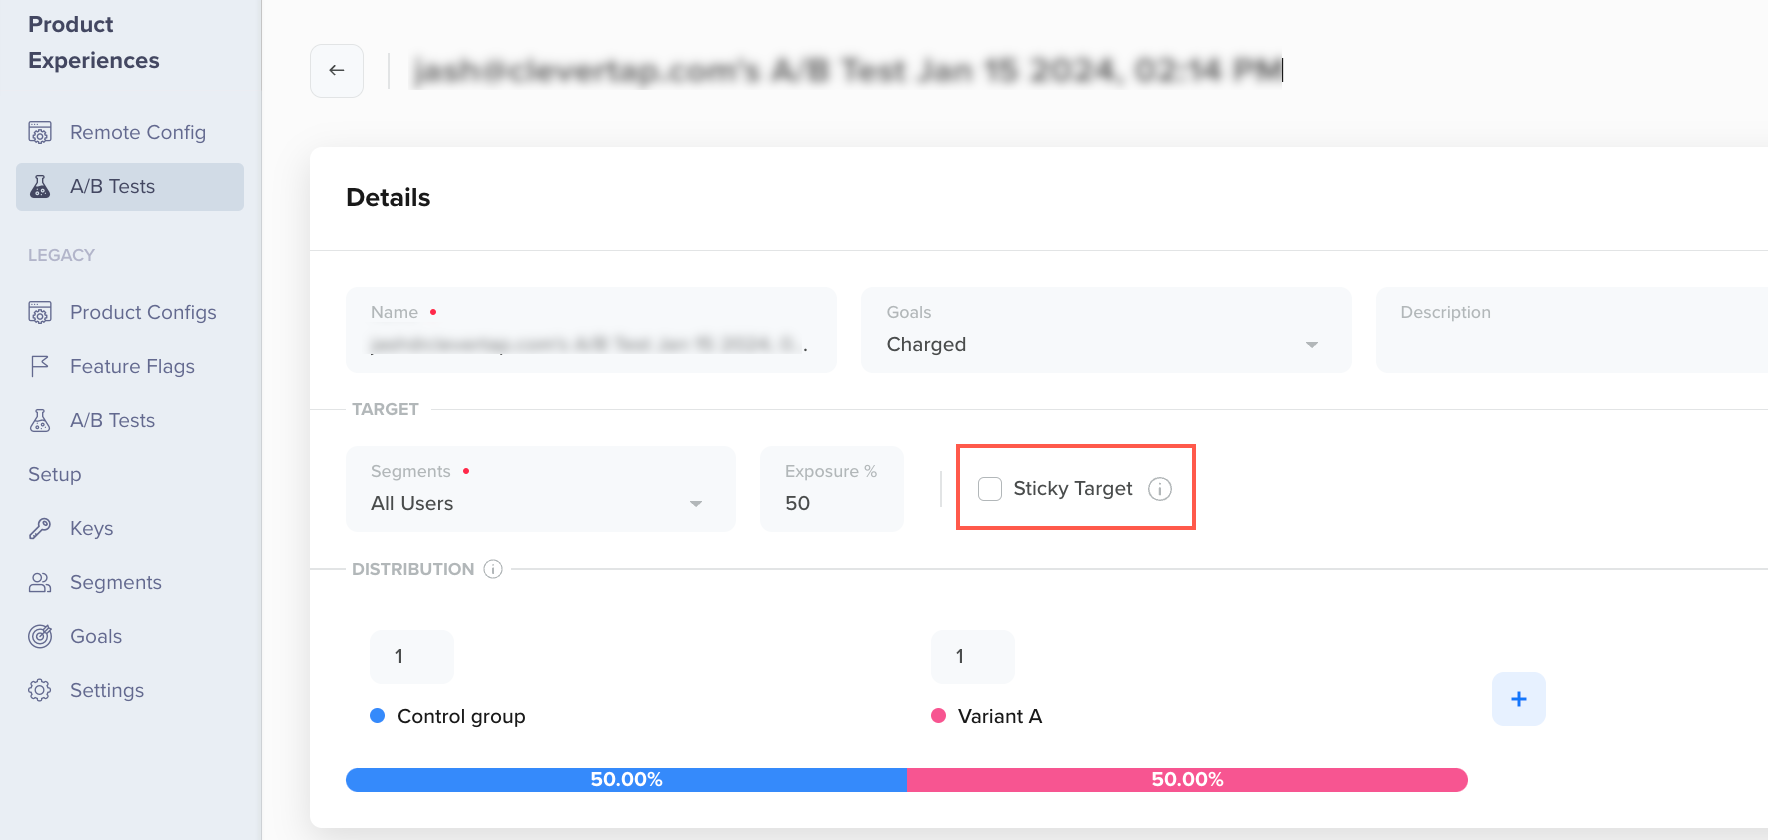
Sticky Target
A sticky target refers to a specific and unchanging group of users within the A/B test. Let us consider an example to understand this better. Consider a subscription platform that wants to conduct an A/B test for a new feature for their Premium Plan users. They have a substantial number of users on the Free plan, and they want to exclude data from these users as they cannot utilize the new feature.
For this, they can set up a target segment using the user property Subscription Status set to Premium to achieve this. Subsequently, if they want to exclude users from the A/B Test who initially entered as Premium users but did not renew and switched to the free version, they must clear the Sticky Target option. This action ensures that users who were initially on the Premium Plan but later switched to the Free Plan are not included in the test group.
Sticky Target
Goals
The Goals field allows you to define the objective of your A/B Test. Setting up goals helps you measure the success of different test variations and understand how well they perform in terms of driving user engagement, conversions, or other desired outcomes.
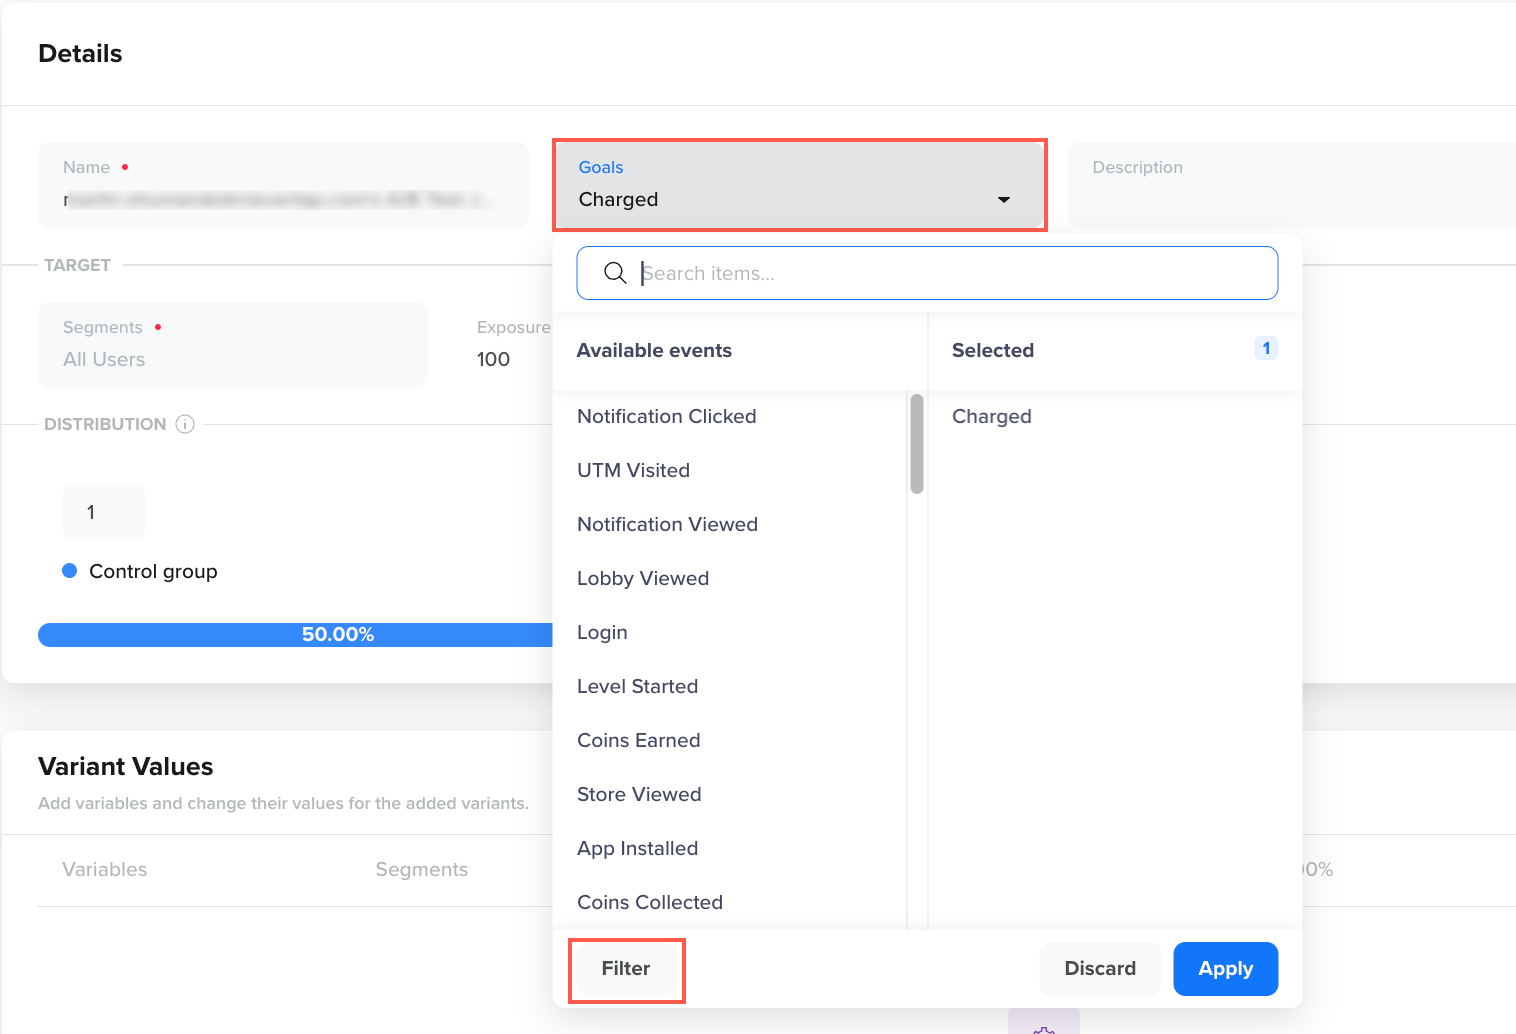
Define Goal Event
Filter Goal Event
You can further refine and narrow down the scope of the users for whom you want to measure the goal achievement using the Filters as shown in the above image.
You can further filter your goal event based on a particular property or also add an Aggregate event property to get additional metrics in the Results. The Aggregate by event property represents the numerical value obtained as a result of the average or sum of an event property for the target audience.
You can select up to five events that you may want to establish as the objective for your A/B Test. You can further select up to three event properties to narrow down the events that are counted towards your goal.
For example, the business wants to find out the total aggregate amount for the purchase amount greater than $25 (see the following image).
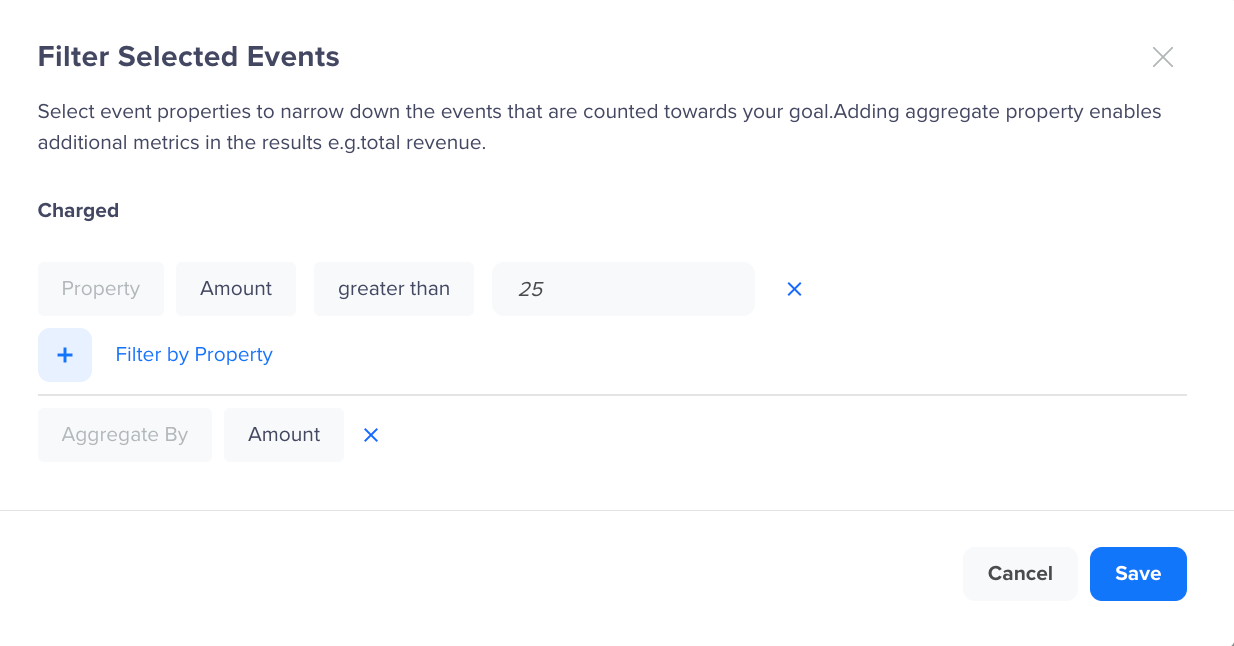
Filter Selected Events
Exposure
Exposure enables you to specify the percentage of your audience that will be exposed to your A/B Test. For instance, you can test the variant on a smaller segment, such as 10% of the total audience.
When performing A/B Tests, it is essential to consider how many people you want to include and how quickly you want to see the results. As a best practice, it is recommended to start the test with a smaller audience and then slowly include more people to roll out the winning variant to everyone (100%).
By default, all users who fit the criteria for the test are included in the A/B test. However, if you want to start with a smaller group of people, you can specify the percentage under the Exposure field before starting the test.
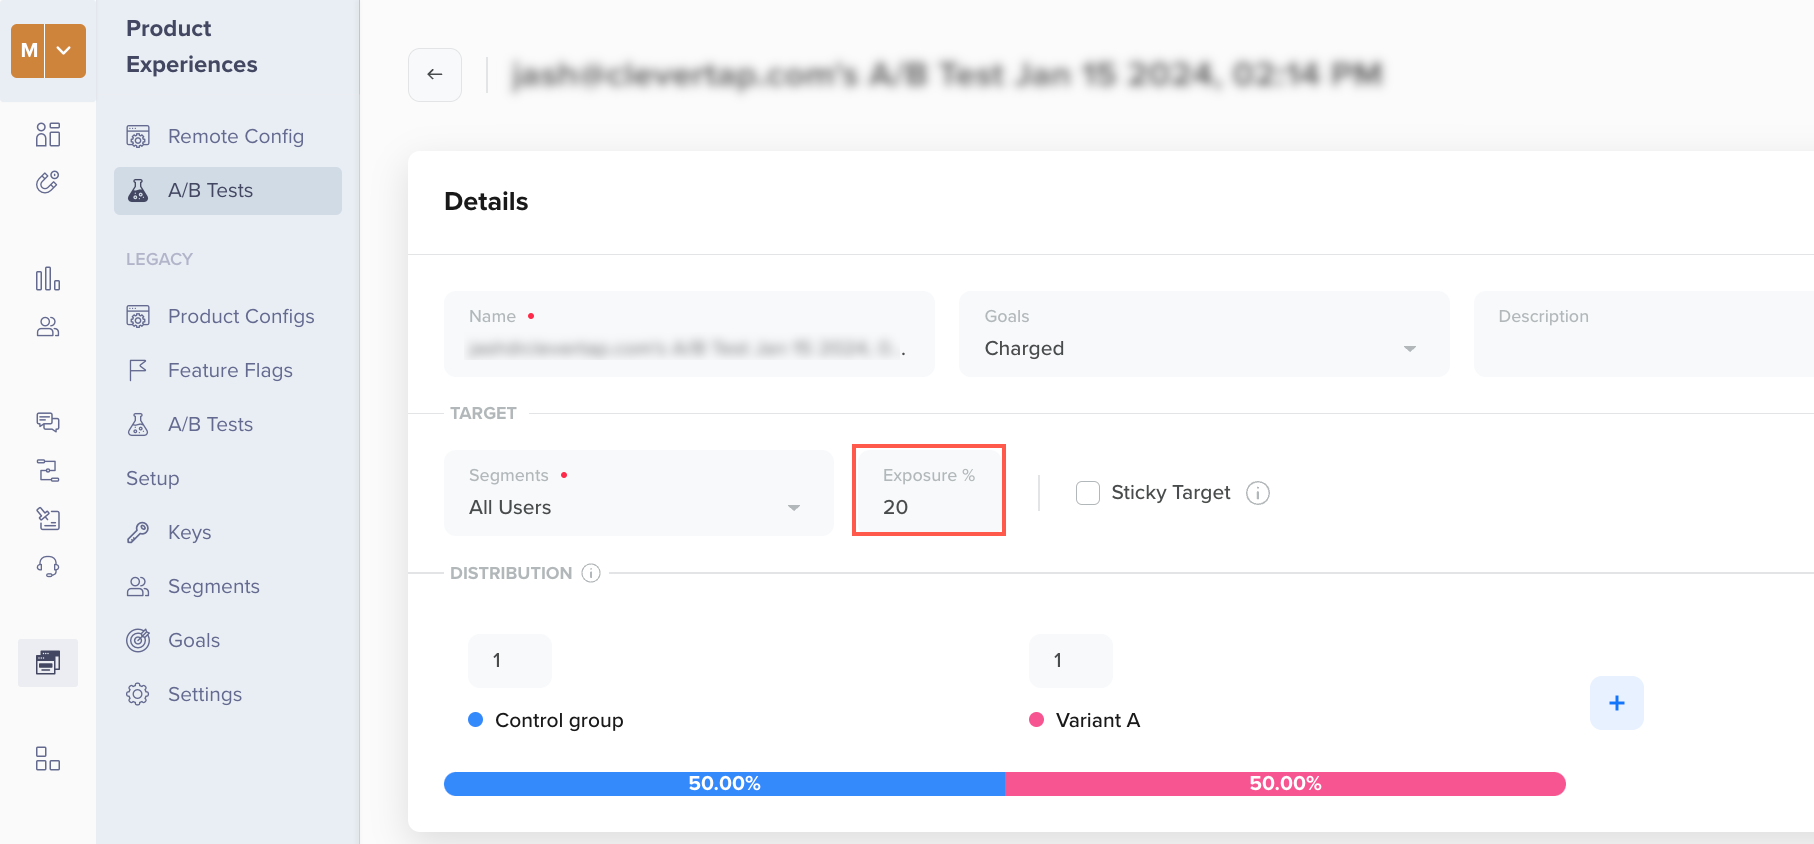
Set Exposure
ExposureOnce an A/B test begins, audience size can only be increased, not reduced. Adjustments in the Exposure impact only new users, not those already in the test. Therefore, it is recommended to start the test with a smaller audience and then slowly include more people.
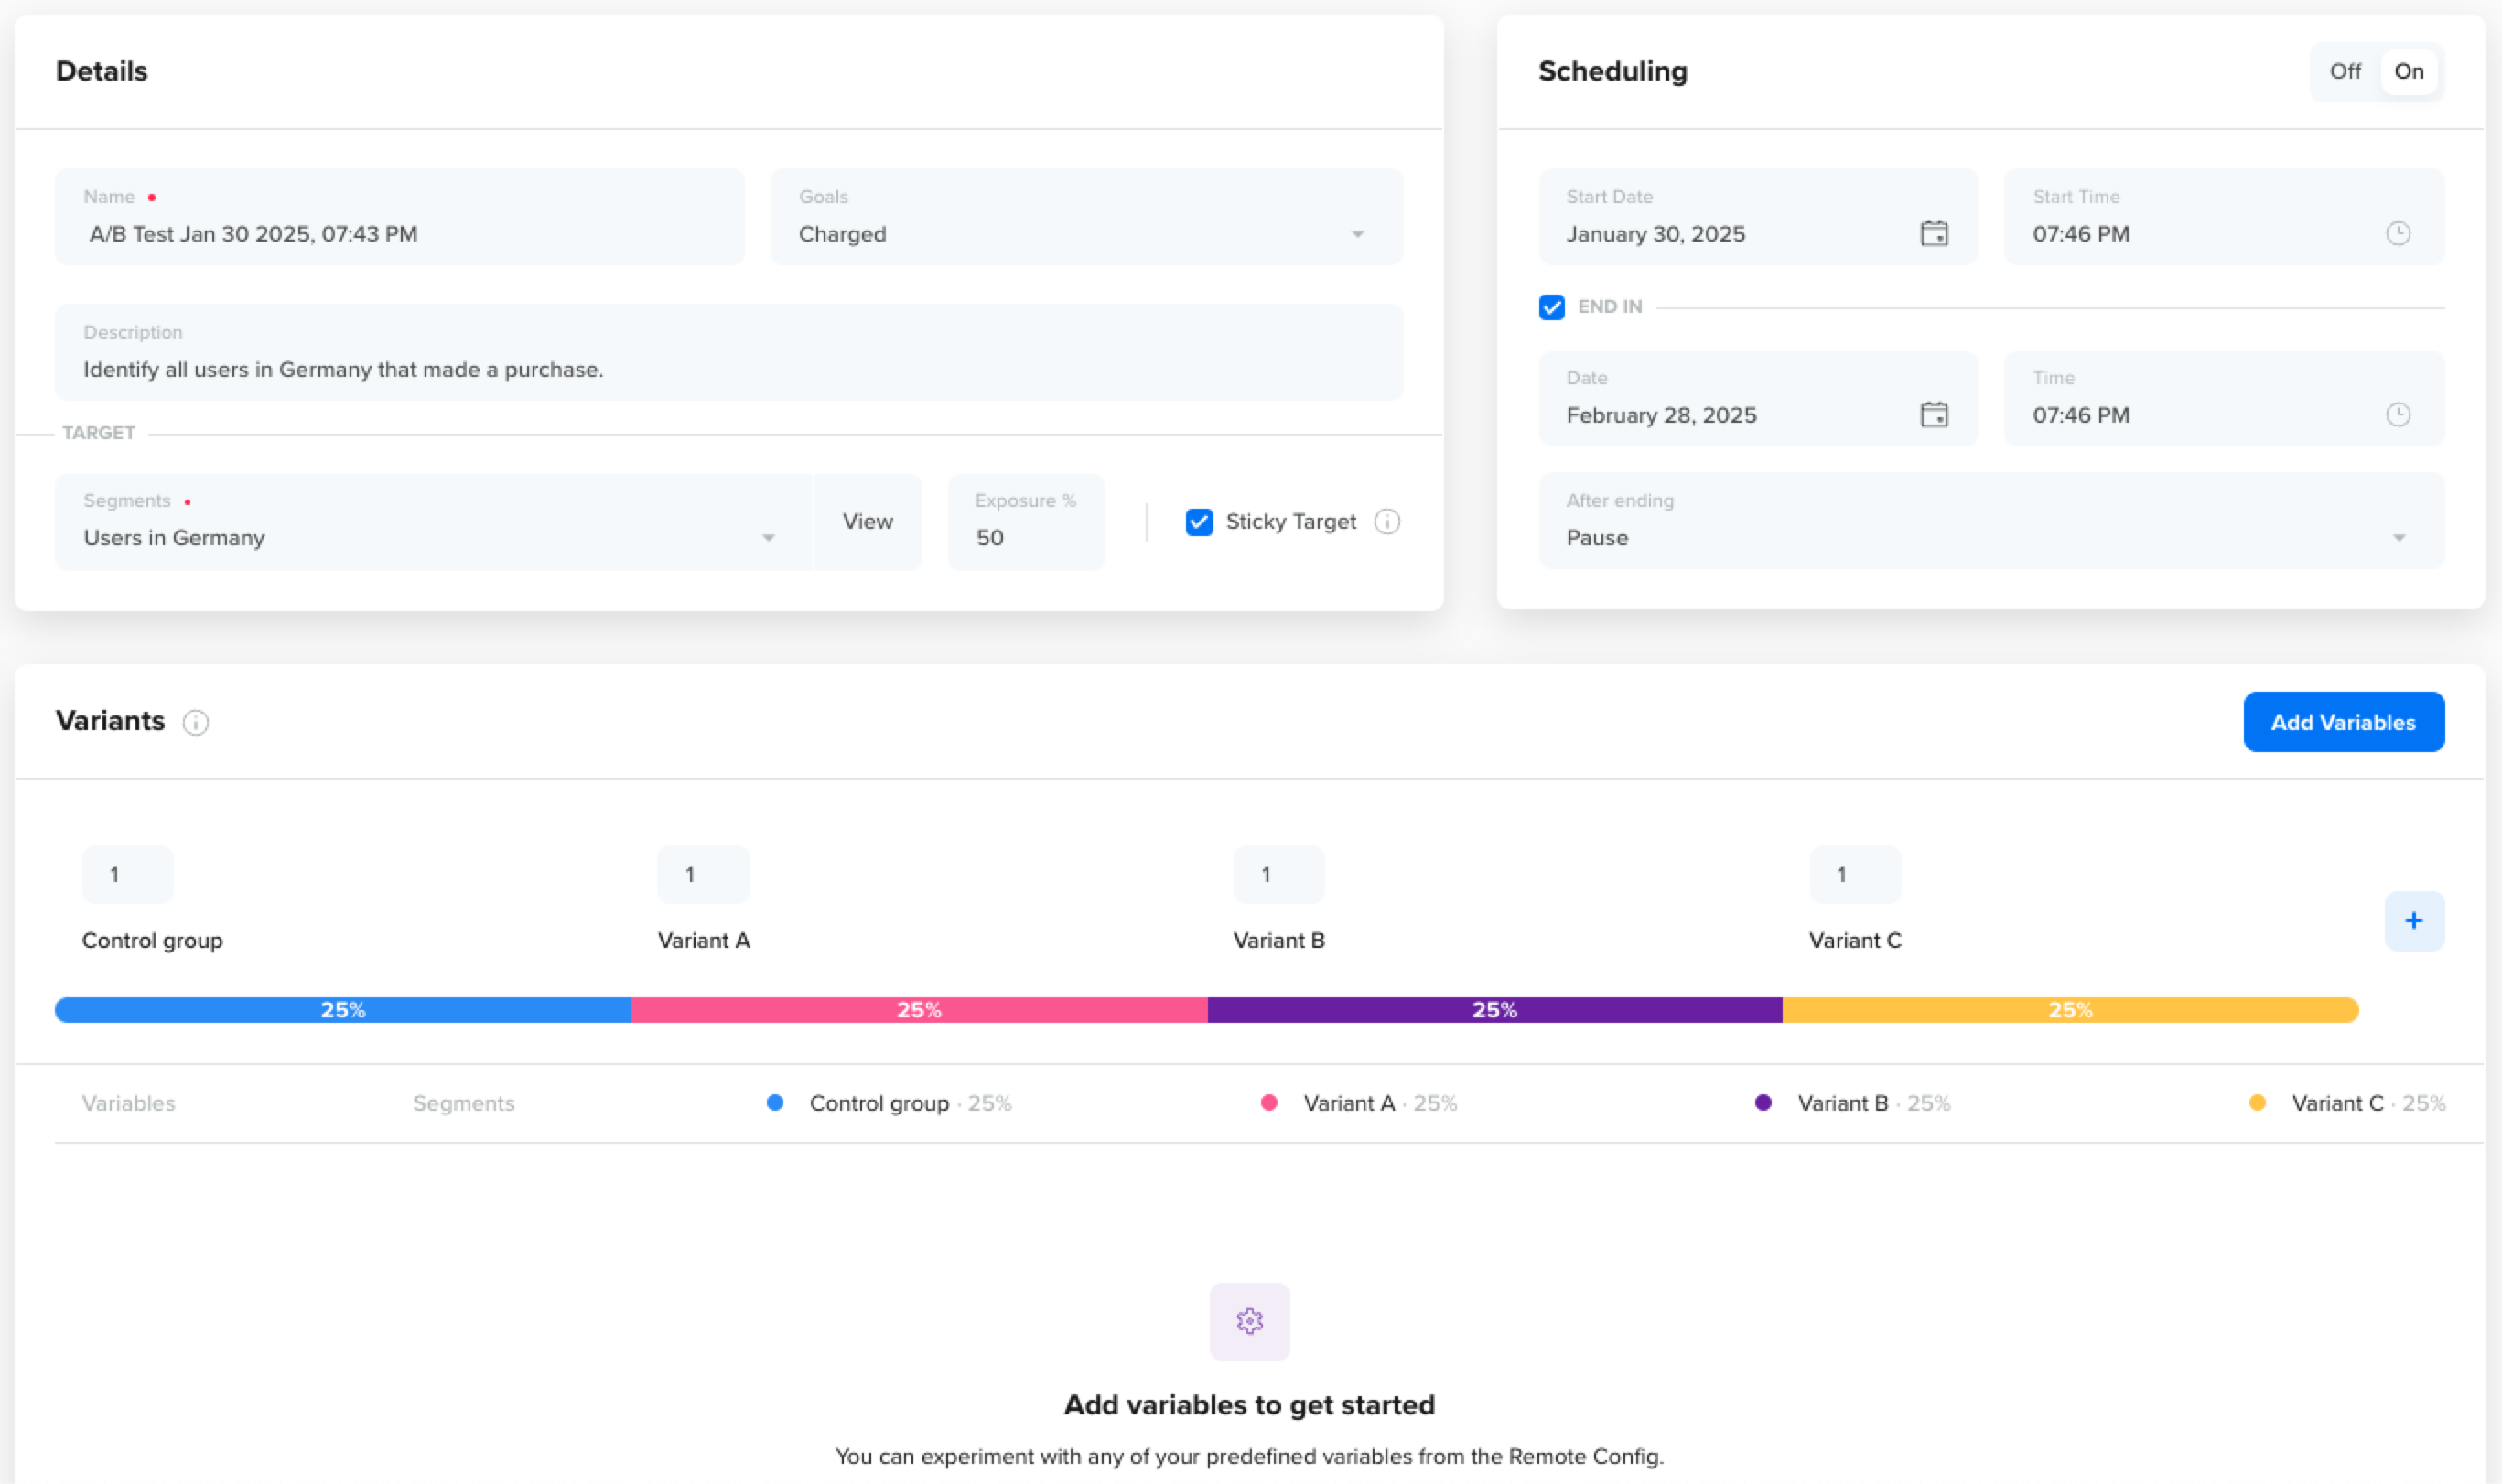
Distribution
The distribution indicates the percentage of users that are distributed between the control group and other variants. The distribution is done based on the weights assigned to each of them. Based on the weights, the variant percentages are calculated dynamically and presented visually to illustrate how each variant contributes to the A/B Test.
Upon initiating the experiment, users are initially distributed equally between the control group and variant A, with a default weight distribution of 1:1. If additional variants B and C are introduced, each is assigned an equal weight of 1. Consequently, every variant includes an equal number of users, resulting in a distribution of 25% for each variant.
Variant DistributionChanges to the distribution are not permitted after an experiment is published and is either running or paused.
Create A/B Test
To create a new A/B Test for variables:
-
Click Create A/B Test from the A/B Tests page.
-
Define the custom name for your A/B Test.
-
Under the Goals field, select your event Goal. Select the event filters under Filter to narrow down the target audience for whom you want to measure the goal achievement. For example, consider a business willing to analyze impactful revenue-generating purchases. They can achieve this by filtering the Purchase event based on the Order Value property.
Create AB Test
- (Optional) Enter the Description for your A/B Test to add contextual information (up to 1024 characters) about your test.
- Select the target segment for your A/B Test from the Segment dropdown. You can select previously saved segments or create a new one. If you want to target all your users at once, you also have the option to select the All Users segment, as shown below.
- Define the percentage (0-100%) of eligible users from the selected segments who will be exposed to the experiment under the Exposure field. The default exposure value is 100%.
- Select Sticky Target to retain variant values for users who initially met the experiment criteria and later became ineligible. This retention lasts for the entire duration of the experiment. ().
- Define the distribution between the Control group and the additional Variants by assigning weights.
- Select the variables you want to experiment with for the A/B Test. It allows you to change the values of those variables for different variants.
Consider a scenario where a variable representing a Call to Action (CTA) possesses a blue color in Variant A. You can generate an additional variant for that variable, this time featuring a red color.
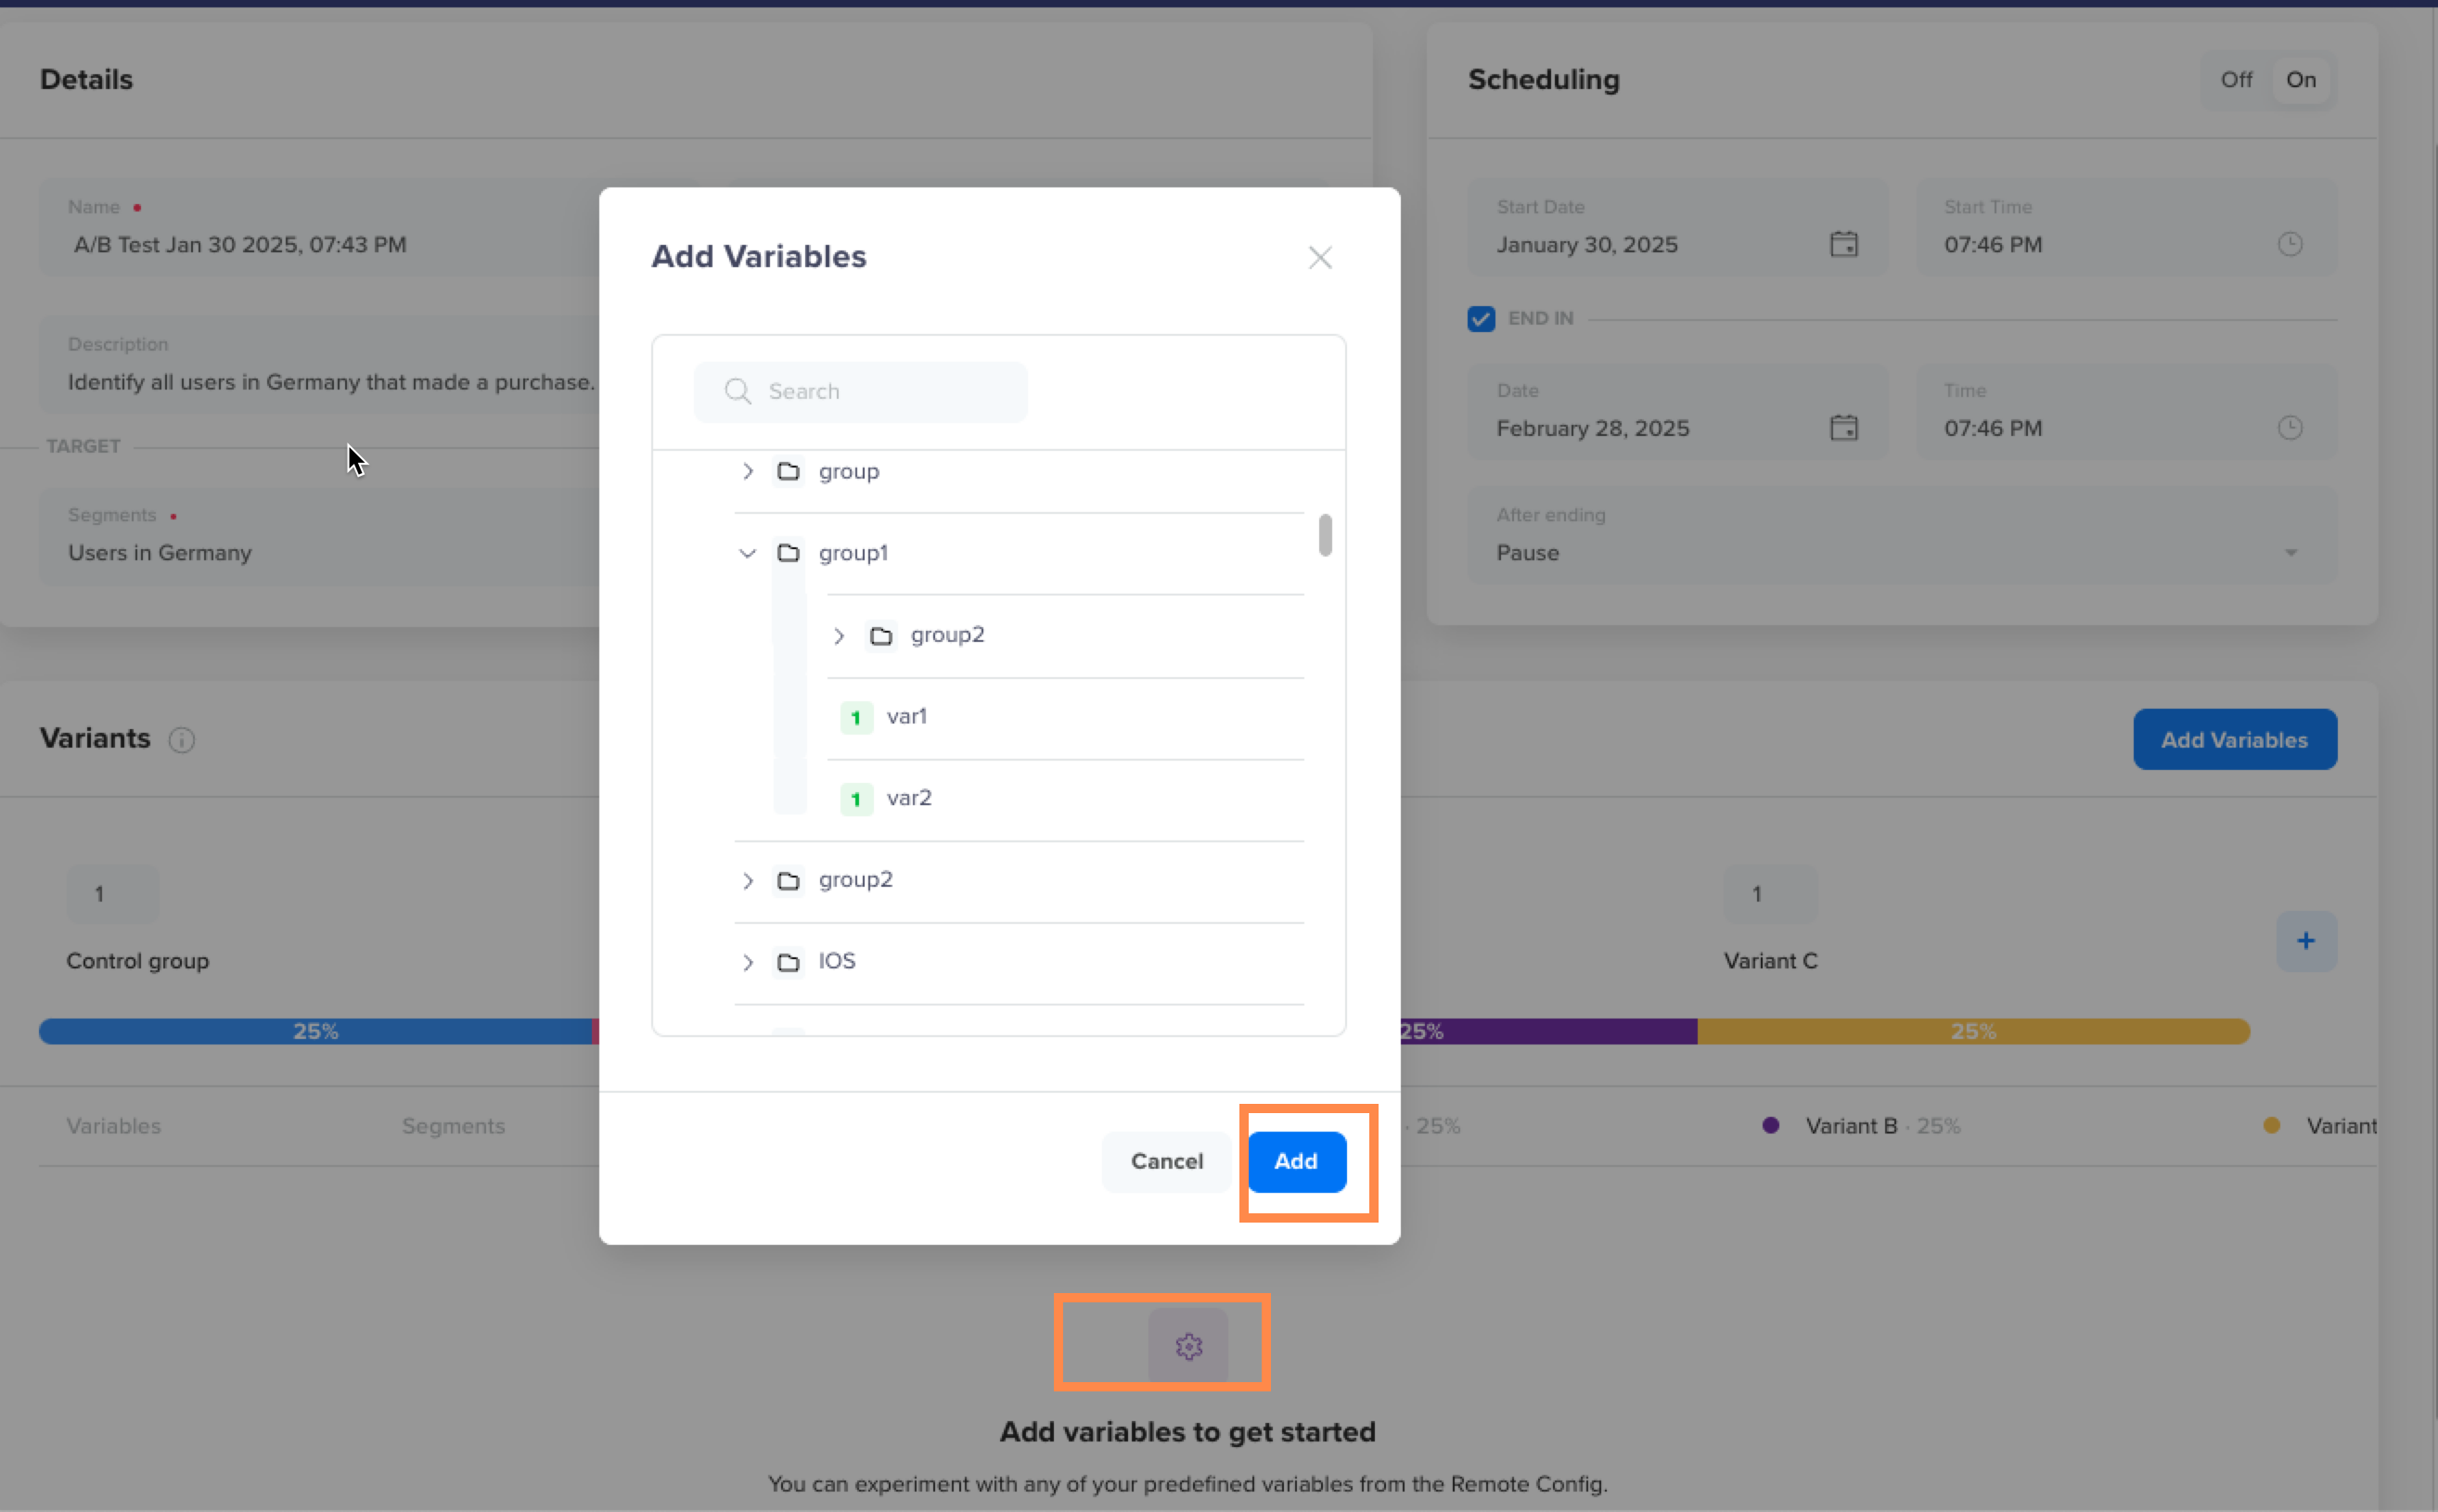
Add Variables for A/B Test
NoteThe variables available for conducting the A/B Tests are the ones defined in the Remote Configuration, along with their override segments. You can conduct an A/B Test either for all the override segments or for a particular override segment.
- From the Scheduling section, toggle to schedule the A/B Tests. You can select the start and end date for the test. You can also select if the A/B test must pause or finish after the selected date.

Schedule an A/B Test
- Click Publish Now from the top right corner. The users now start qualifying and entering the A/B Test.
You can monitor the metrics for each variant from the Results section and declare the winner variant accordingly. Refer to A/B Test Results to learn how to analyze and conclude your A/B Tests.
Manage A/B Tests
The following table represents the list of actions permitted after an A/B Test is published:
| Sr. No. | Actions | Permitted? (Yes/No) |
|---|---|---|
| 1 | Change the experiment name | Yes |
| 2 | Change experiment description | Yes |
| 3 | Add or Remove Goals | Yes |
| 4 | Increase Exposure | Yes |
| 5 | Add or Remove segment | No |
| 6 | Decrease exposure percentage | No |
| 7 | Change Distribution percentage | No |
| 8 | Adding a new variant | No |
| 9 | Remove variant | No |
| 10 | Add new variables | No |
| 11 | Edit Variables values | No |
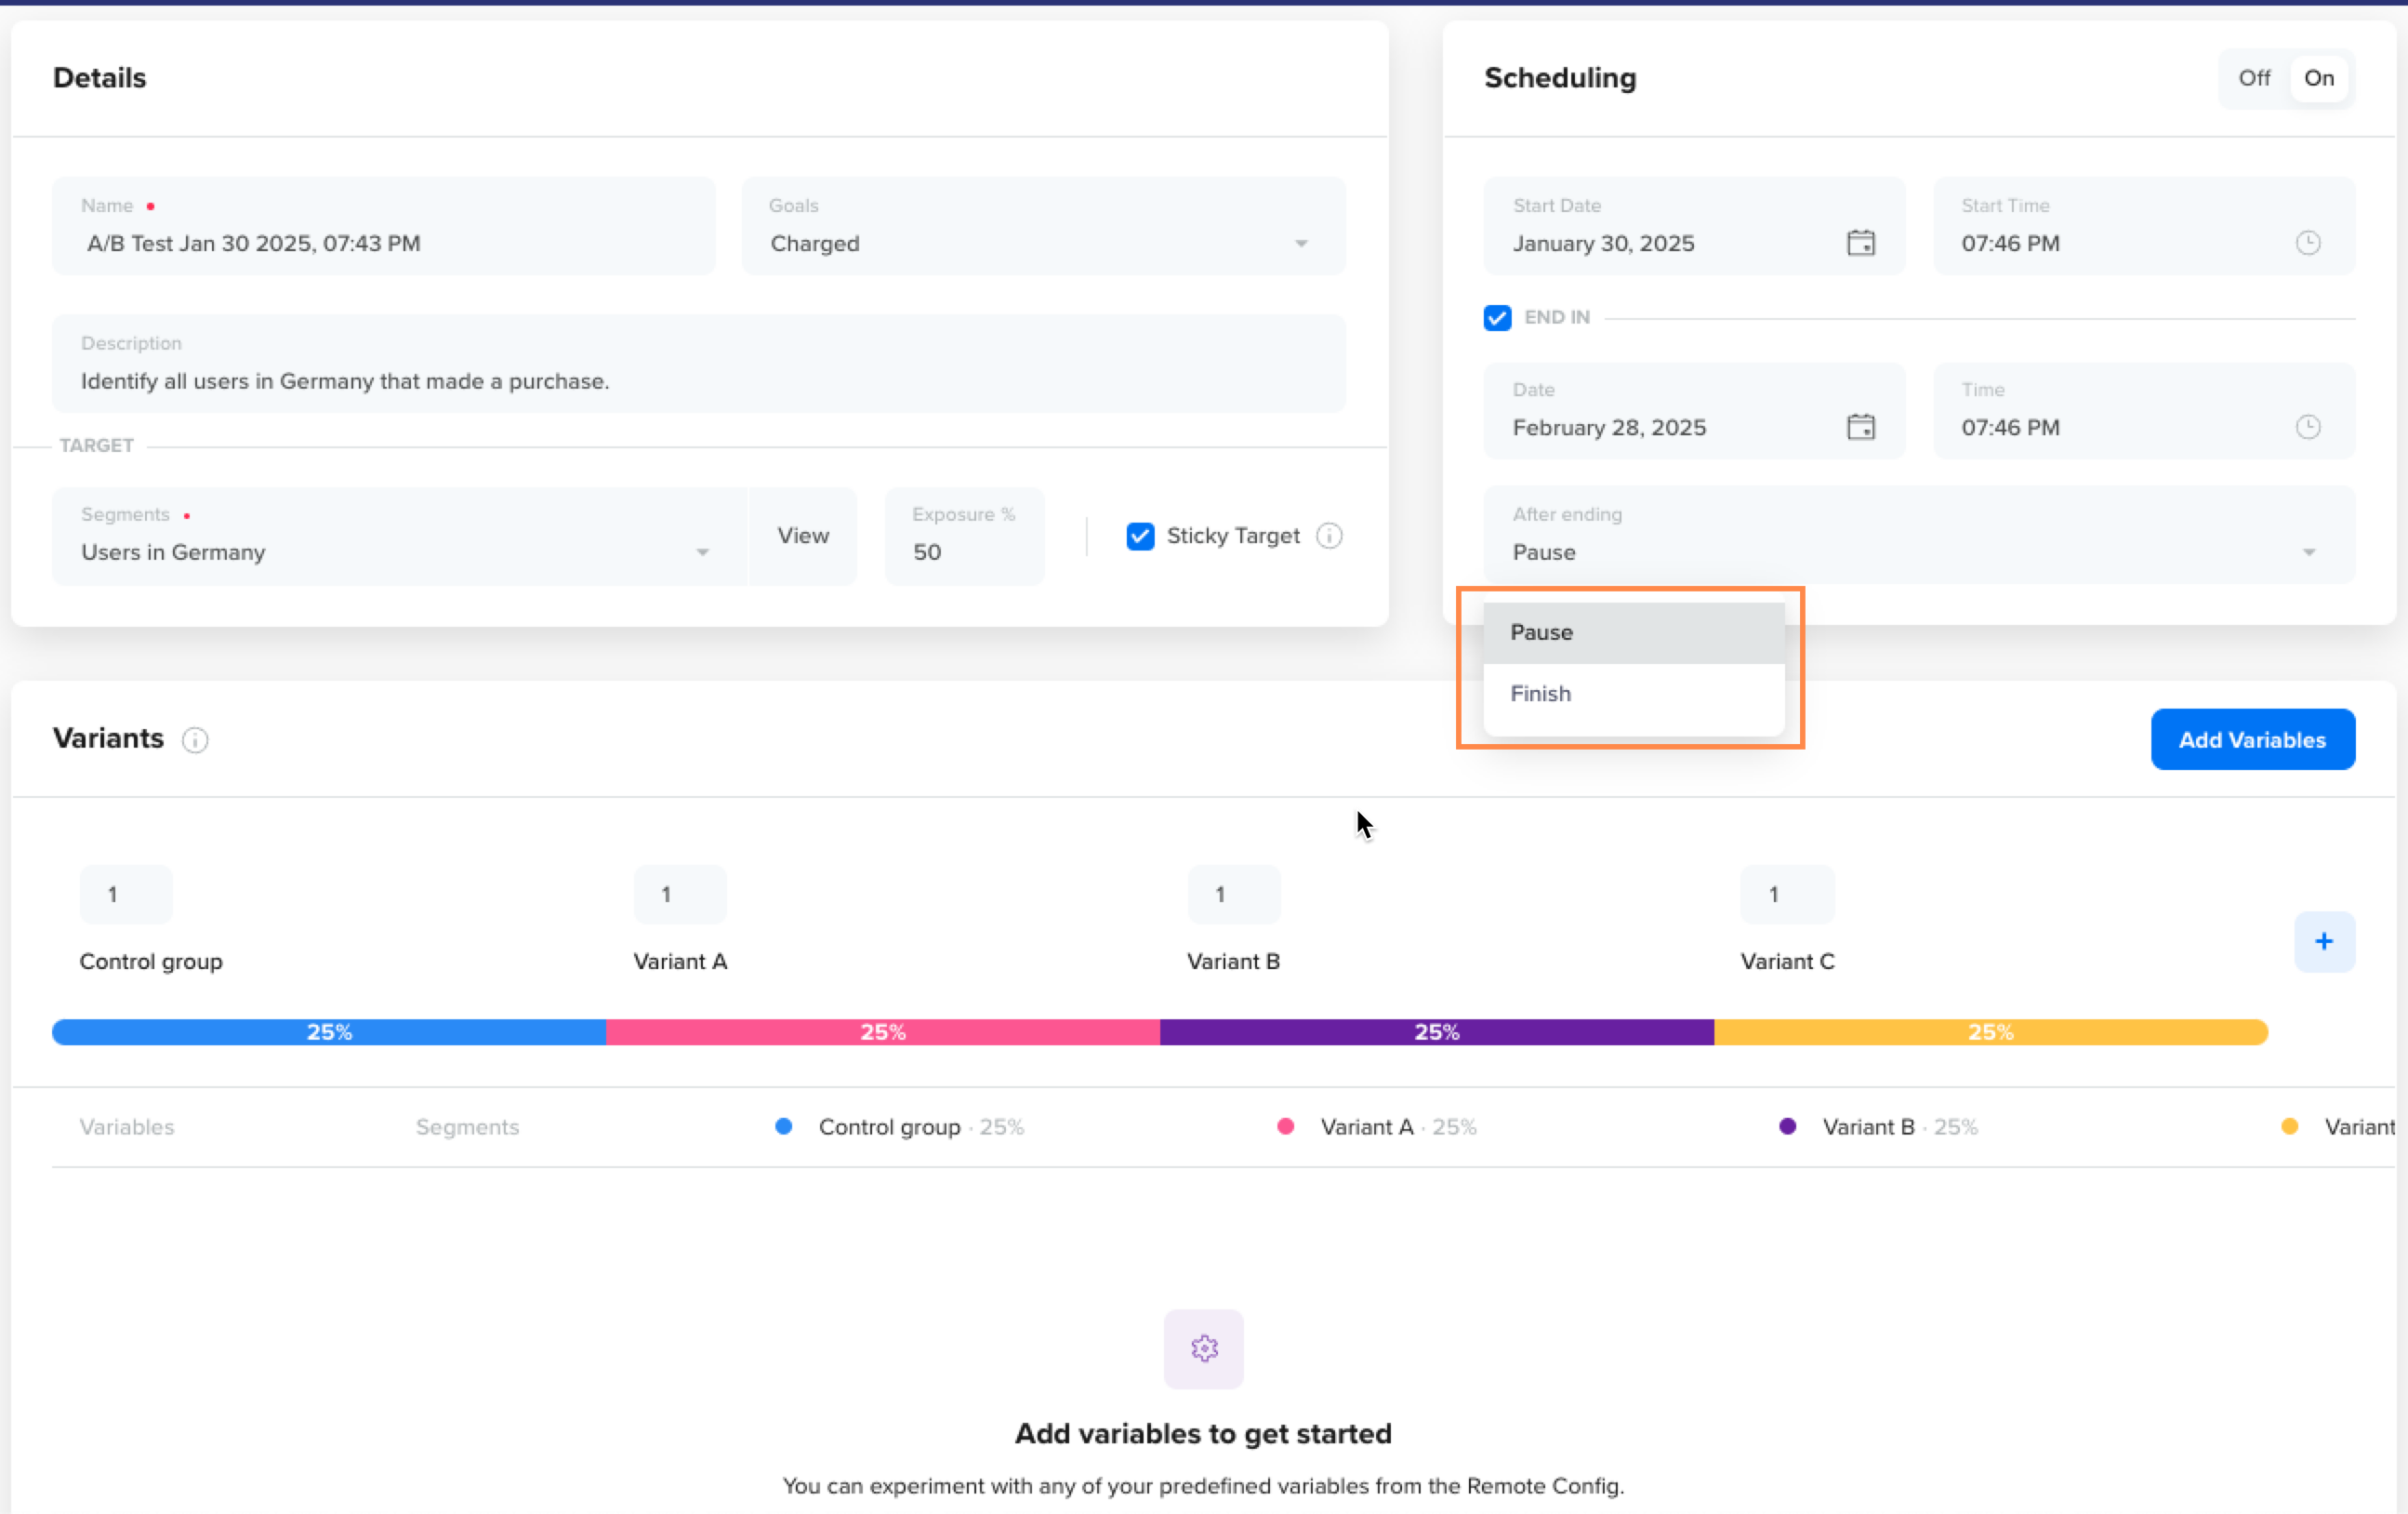
You can also either pause a particular A/B Test or finish it after declaring the winner variant based on the metrics displayed under the Results section.
Pause A/B Test
To pause the A/B Test:
- Go to the required A/B Test.
- Click the ellipsis icon from the top right corner and click Pause (refer to the following figure).
Pause or Finish your A/B Test
Pausing the test prevents new users from joining the experiment. However, users who have already entered the test continue to experience the variant they were assigned. So, the test remains active for existing users, but no new users become a part of it until you resume the test.
Finish A/B Test
After collecting substantial information, you can analyze the metrics, declare the winner variant and finish your A/B Test. The following scenarios arise based on the winner variant you declare:
-
Scenario 1: Declaring Control Group as the winner variant.
In this case, no changes are made to the variables present under the Remote Config. The test concludes, and all users receive the default experience.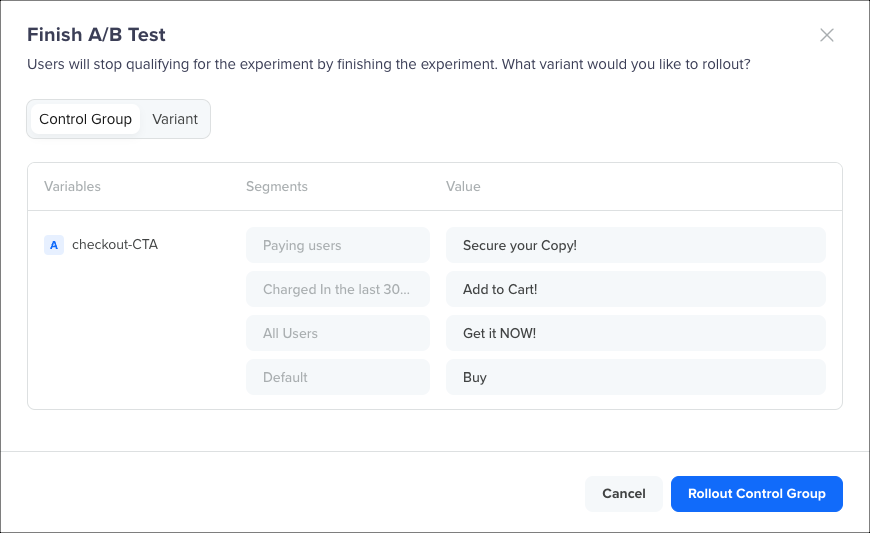
Rollout Control Group
-
Scenario 2: Declaring any variant as the winner with the target segment as_All Users_.
In this case, CleverTap automatically applies the winning variant variables and values to the Remote Config. These new variable values supersede the existing ones, impacting all users.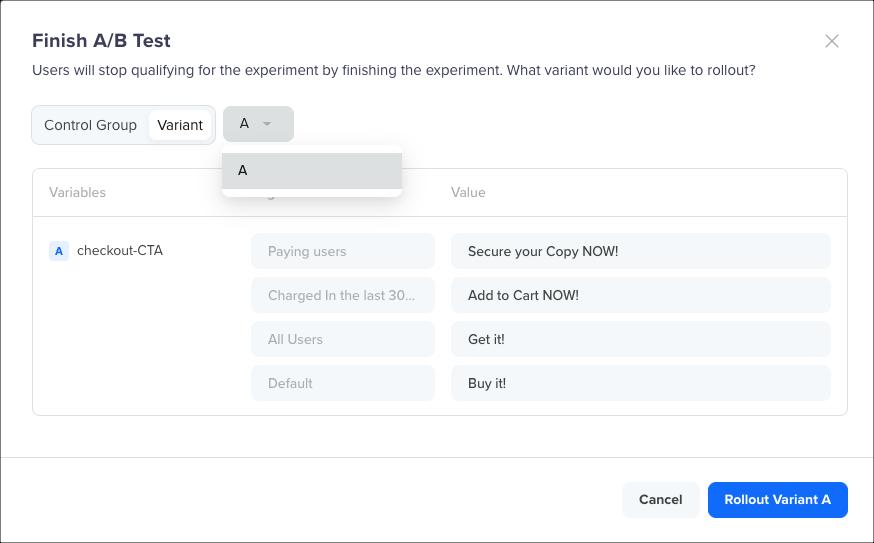
Rollout Winning Variant
Declaring a Winner Variant for a Custom Target Segment- Declaring a winning variant for a custom target segment is not supported at the moment. Consequently, the automated rollout of the victorious variant to the Remote Config is unavailable.
- If an A/B test with a custom target segment concludes as winner, the behavior defaults to Scenario 1. In this scenario, the Control Group is declared as the winner, and the Remote Config state remains unchanged.

Finish A/B Test
Finish A/B TestIf there is an ongoing draft for a variable in use within your A/B Test on the Remote Config page, you cannot finish the A/B Test. You must first Publish or Discard the draft from the Remote Config page to be able to finish the A/B Test.
Clone A/B Test
The clone functionality allows you to replicate an existing AB test. To do so:
- Go to Product Experiences > A/B Tests from the CleverTap dashboard. All the A/B Tests are listed.
- Click the
 icon next to the A/B Test you want to clone and click Clone.
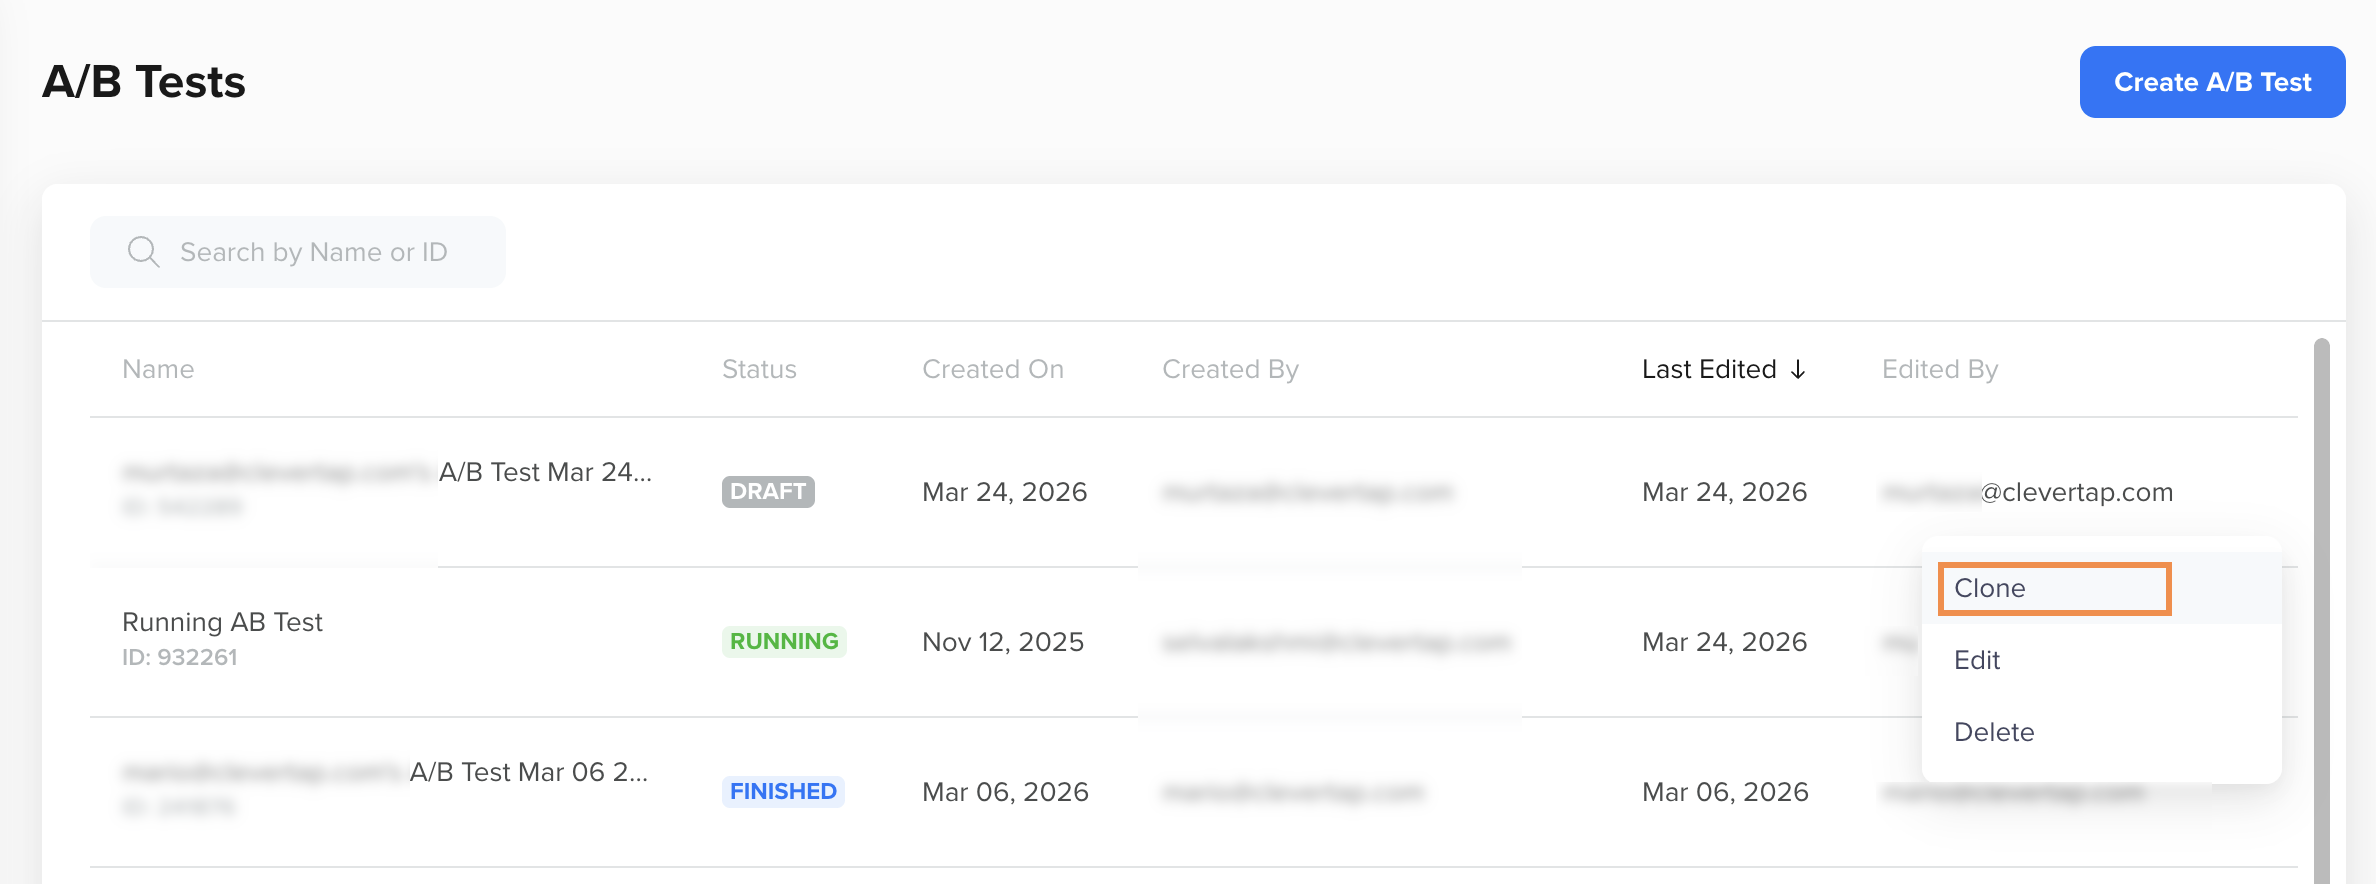
Clone Selected A/B Test
Edit A/B Test
All active A/B Tests except those in the Stopped, Completed, or Rejected state can be edited. To do so:
- Go to Product Experiences > A/B Tests from the CleverTap dashboard. All the A/B Tests are listed.
- Click the icon next to the A/B Test you want to edit and click Edit.
The edit functionality gives you the ability to add/update/delete the variables in a specific AB test, along with name, goal, and description. The Segments cannot be edited to avoid discrepancies in the stats.
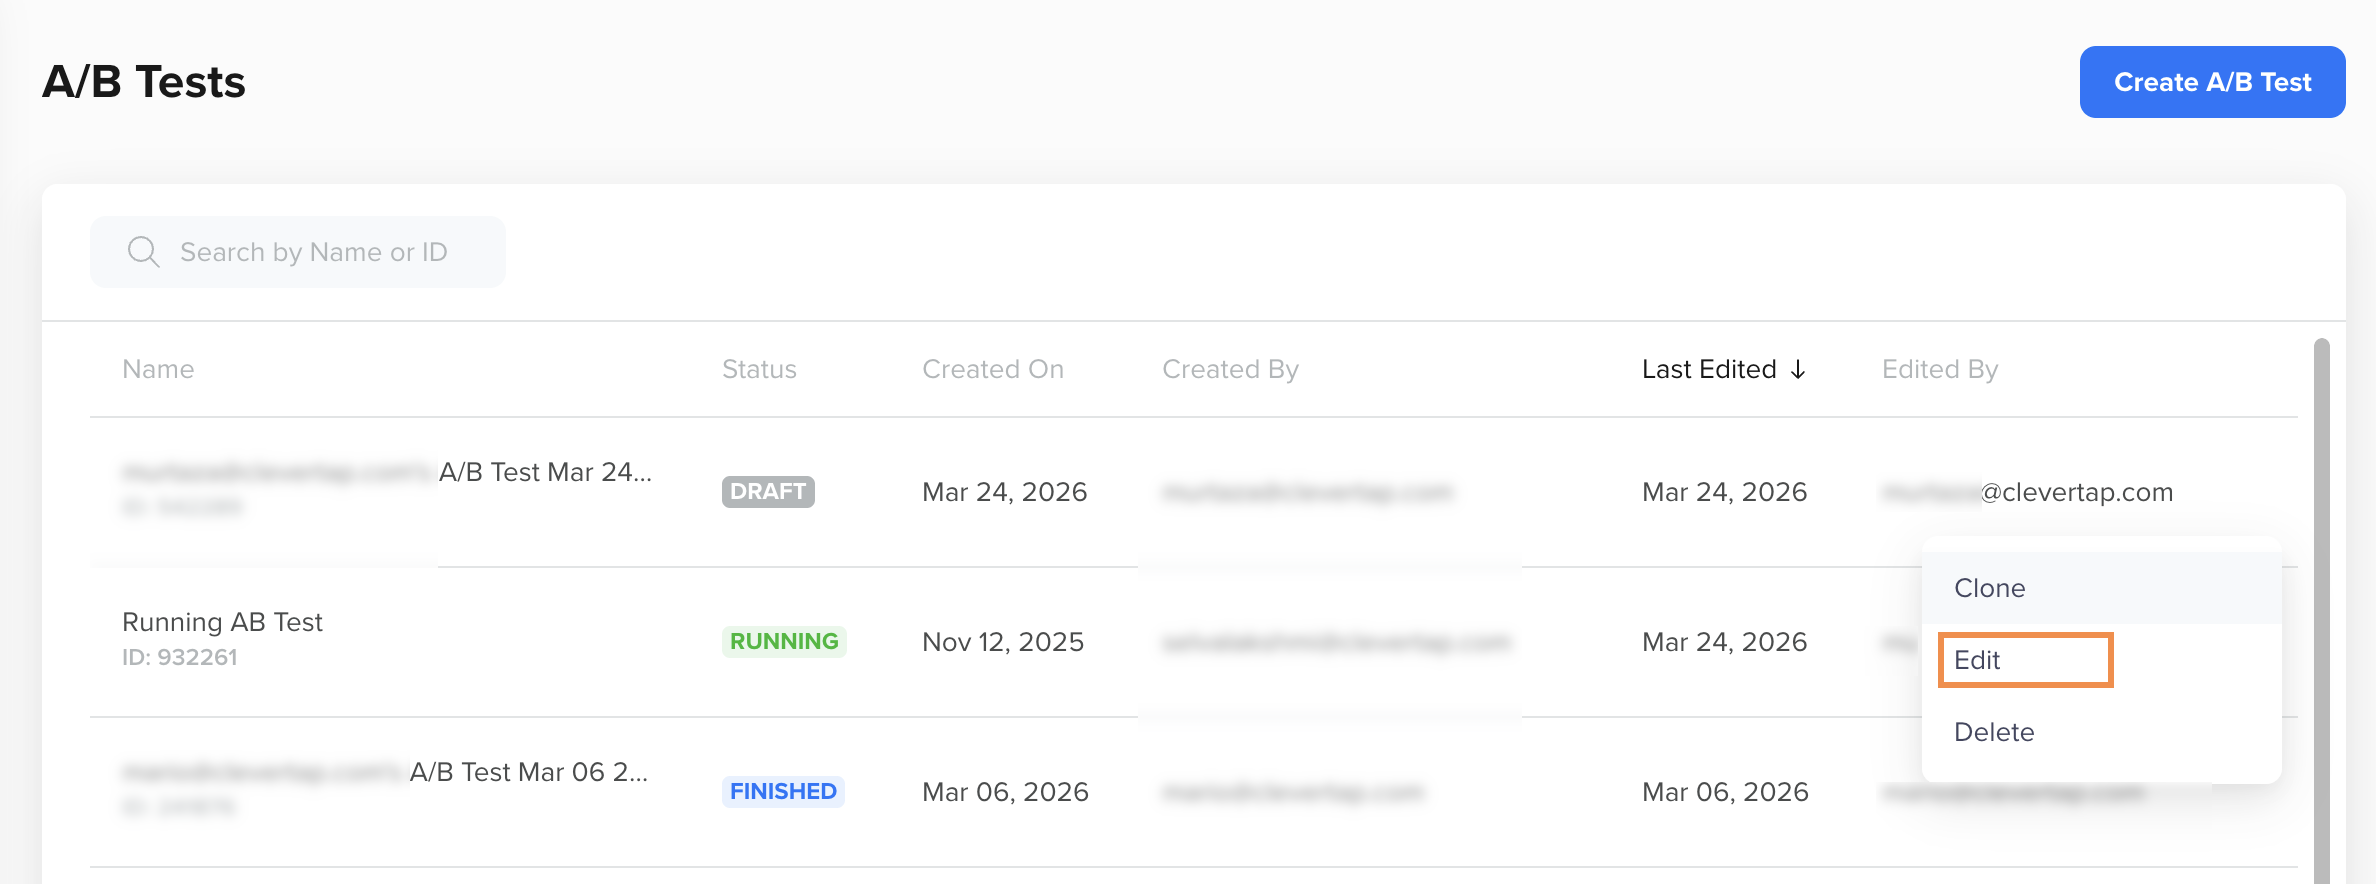
Edit Selected A/B Test
Updated 2 months ago