Create Message
Learn how to create an App Inbox campaign using the CleverTap dashboard.
Create a New Campaign
To create a new campaign:
- From the dashboard, select Campaigns.
- Click + Campaign.
- From the Messaging Channels list, select the messaging channel.

Select Messaging Channel
The campaign page displays.

Create App Inbox Campaign
Define all the sections and publish the campaign.
Start Campaign
The Start here section displays the setup information.
This section has the following parts:
- Qualification criteria: Deliver the notification by Past Behavior, Custom List, or Live behavior. For more information about segmenting users, refer to Segments.
- Set a goal: Tracks your campaign conversions by setting a goal. This step is optional, but it helps you measure how effectively your campaign meets its goal.
You can define your conversion goal by selecting the Event and specifying the Conversion Time. The Conversion Time field accepts any numeric value along with a time unit such as Minutes, Hours, Days, Weeks, or Months. This allows you to define conversion windows such as 10 days, 72 hours, or 2 months. The value can range from a minimum of 1 minute to a maximum of 5 months.
For example, if you set the conversion time to 5 Minutes, the system counts conversions within 5 minutes of the goal event.
Your campaign goal can be as broad or as specific as you want. For example, you can answer questions such as: How many users were influenced to purchase an X amount? or How many first-time visitors purchased red shoes worth at least X and blue jackets worth at least Y?
Set Conversion Time
Define the Audience
You must indicate the target audience for your campaign. You can specify your target audience from the Target segment section. Here, you can create a new segment or use a previously saved user segment from the segment list.
For Past Behavior segments, you also calculate the estimated reach.
Define Target Audience
Segment
If you want to create an ad-hoc segment, you can select a type of segment on which to base your campaign. You can create the target based on past user behavior and user properties or live (ongoing) user behavior. The latter is helpful to send out real-time, triggered campaigns.
Delay > 24 HoursWe recommend creating a Past Behavior campaign for all campaigns where the delay is greater than 24 hours for a live inaction campaign.
For instance, you can create a live Inaction within time campaign that targets users as soon as they add a product to their cart but do not finish transacting within 10 minutes.
On this basis, you would then set up the Who by sending this campaign to all users who qualify or limit the users who qualify under Estimated reach.
Deliver Action Based Messages
You can trigger a message based on an action. Users receive messages when they perform an action in the app instead of waiting for the next app launch. It makes the messages more contextual and increases conversion. Campaigns with delays and app inbox coupled with a push message do not trigger instant messages.
WarningWhen multiple Triggered App Inbox campaigns are created for a single event scheduled to run simultaneously, CleverTap delivers the first campaign that was created.
Deliver Messages based on Past Behavior (PBS)
You can also target users basis their past behavior. For past behavior campaigns, you also have an option to calculate estimated reach to view how many:
- Number of users that qualify for the campaign criteria.
- Number of users that are reachable via mobile push as of now.
Filter by User Properties
Using the With user properties filter in the Who section, you can segment your campaign to only reach users who meet specific criteria.
For example, you can send a push notification to English-speaking female users who live in the United States.

Filter by User Properties
The following table explains the various property types:
| Property Type | Description | Example |
|---|---|---|
| User Properties | Custom user profile properties that you define and send to CleverTap. | Customer Type = Platinum |
| Demographics | Demographics filters include Age and Gender. | Age = 25 to 40 years Gender = Female |
| Geography | User's coarse location. Filters include Country, Region, and City. CleverTap's SDK can automatically detect this from the user's IP address. | Country = United States State = California City = San Francisco |
| Geography Radius | User's exact location. You can select a city, and then define the target radius. You can also select multiple cities. You can send this information using CleverTap's SDK. For more information, refer to the iOS and Android developer guides. | Locations = San Francisco, USA; Paris, France |
| Reachability | Reachability filters include Has email address, Has phone number, Unsubscribed email, and Unsubscribed SMS. | Unsubscribed email = No |
| App Fields | App fields filters include App Version, Device Make, Device Model, OS Version, and CleverTap SDK Version. This information is sent by CleverTap's SDK for each device that has your app which means a single user can have multiple devices associated with their user profile. | OS Version = 10 |
To know more about what segments can be used, see Segments.
Constant event property
You can also hold a property constant across the selected events. For more information, see Constant Event Property.
Calculate Estimated Reach
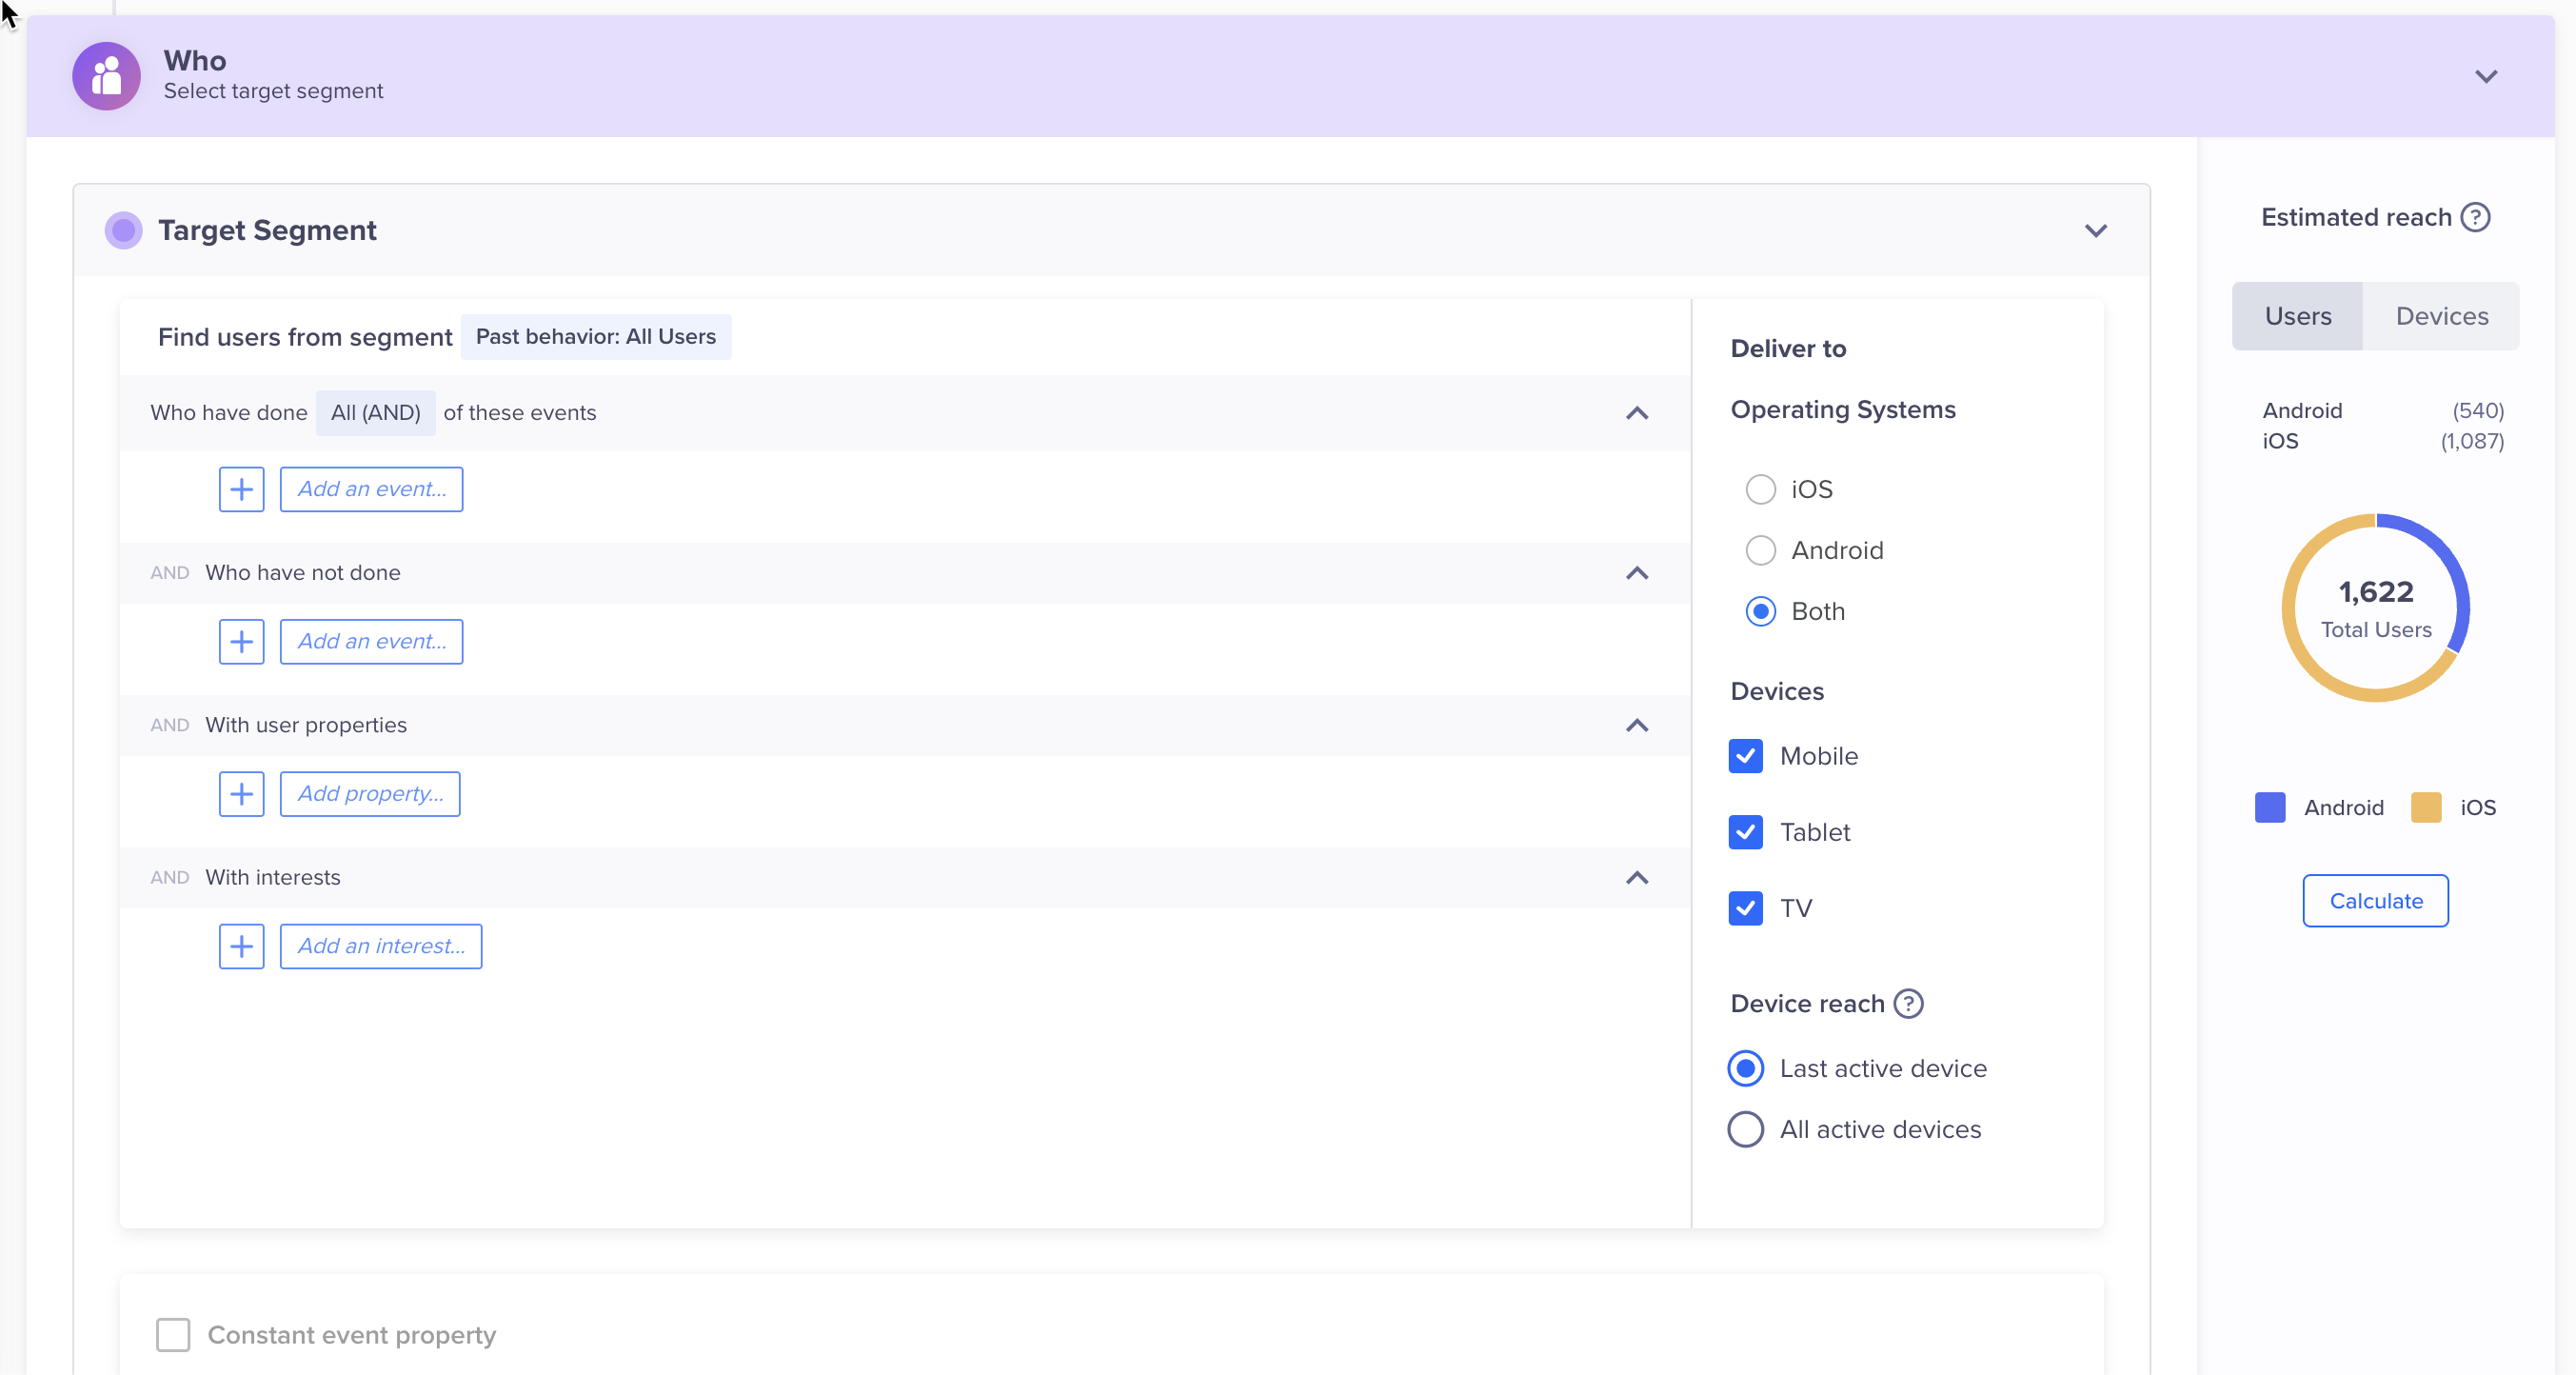
The Estimated Reach option allows you to preview how many users meet your targeting criteria in an online trigger campaign before publishing it. This helps you validate audience size and adjust filters to ensure the campaign reaches the intended users.
Estimated Reach is particularly useful when you select the Filter on past behavior and user properties option. You can view both the estimated user count and device count.
To calculate the estimated reach, perform the steps below:
- Select Filter on past behavior and user properties.
- Click Calculate in the right panel. The result shows the estimated number of users or devices for that segment. You can view the following:
- Total Users: The number of users that match the filters.
- Breakdown by Platform and Devices: The users count on Android, iOS, or both, and on different devices.
- Visual Indicator: A chart summarizing the share by operating system.
The estimate, based on the latest available event data, updates each time you apply or modify filters. It reflects stored event data and is not a real-time count. This helps you plan and refine your audience before sending the campaign.
Calculate Estimate Reach
Control Group
You can define the control group to compare and measure the results of your campaign. For more information, refer to Control Groups.

Define Control Group
Targeting Cap
You can limit the number of users receiving the message.
A relevant use case is a limited offer where you want to distribute a fixed number of coupon codes. If the total reach for your campaign exceeds the number of coupon codes you can distribute, then you can limit the number of users who will receive the message to precisely the number of coupons you want to distribute.
Campaign LimitEnsure that you set up a limit of 100 or more, regardless of the qualified user segment size. If the limit specified is less than 100, an error occurs.
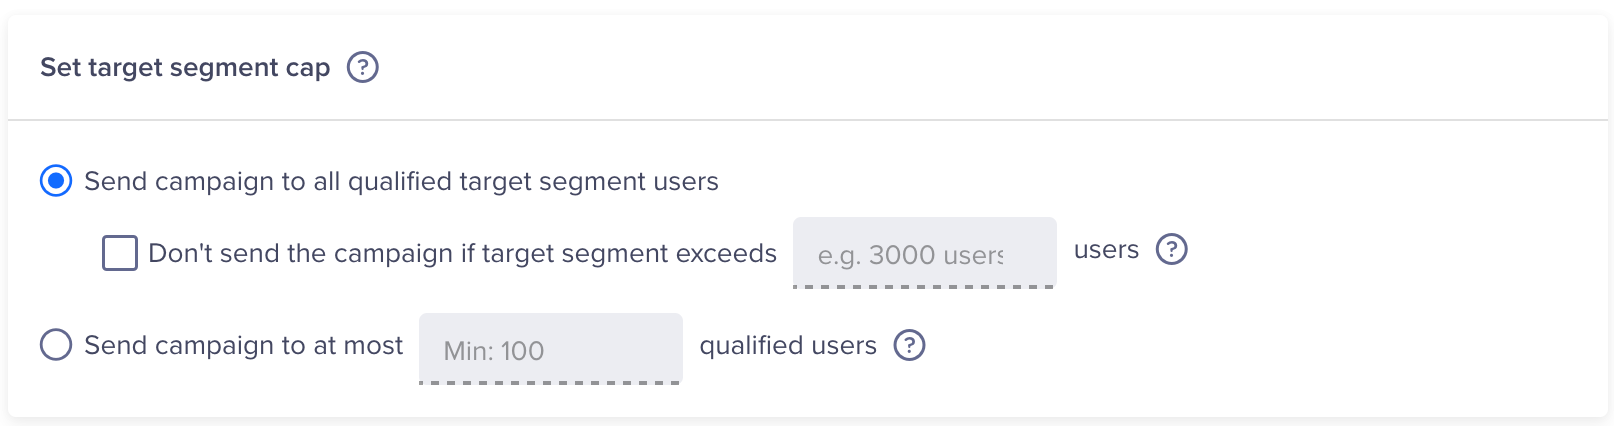
Set a Target Cap
Define the Message Content
Now, you can set up the What, which is the campaign content with four different options:
- Single Message
- AB Test
- Split Delivery
- By User Property
Click Go To Editor to create your message.
App Inbox Templates
You have the following four choices of message templates to create your message:

App Inbox Message Templates
Simple Message
A simple message consists of the following elements:
(a) Title.
(b) Message.
(c) Media (optional): jpg, gif, mp4 video, and mp3 formats are supported.
(c) Call to action (optional).
For example, the user receives the app inbox message stating "Your order has been accepted by the restaurant after placing an order.

App Inbox Notification - Simple Message
Carousel Message with Content
This is a multi-slide template where you can draft up to five slides containing images with content. The carousel in the user app displays in the form of right and left scrolls. This is a rich template that can be used in situations such as promoting a list of products or movies that will release this weekend.
You can also add a link for each carousel message to navigate the users to that particular page.

App Inbox Notification - Carousel Message with Content
Along with the advertising images, you can add the related headline in the message content and use personalization in these messages.
Carousel Message without Content
This template is similar to the one right above but without a title text and messages. Carousel messages without content can be made attractive to grab the user's attention and convey your purpose for the campaign. You can add promotional campaign creatives about your products as an image without any text message.
Message with Icon
This template is similar to the simple message with the extra ability to include an additional icon placeholder. You can add a single image in the given format along with any personalized or generic title and text that you would like to send to the users.
App Inbox Editor
The message builder for App Inbox is where you can create a rich message to engage your targeted audience.
Enter your text and message.
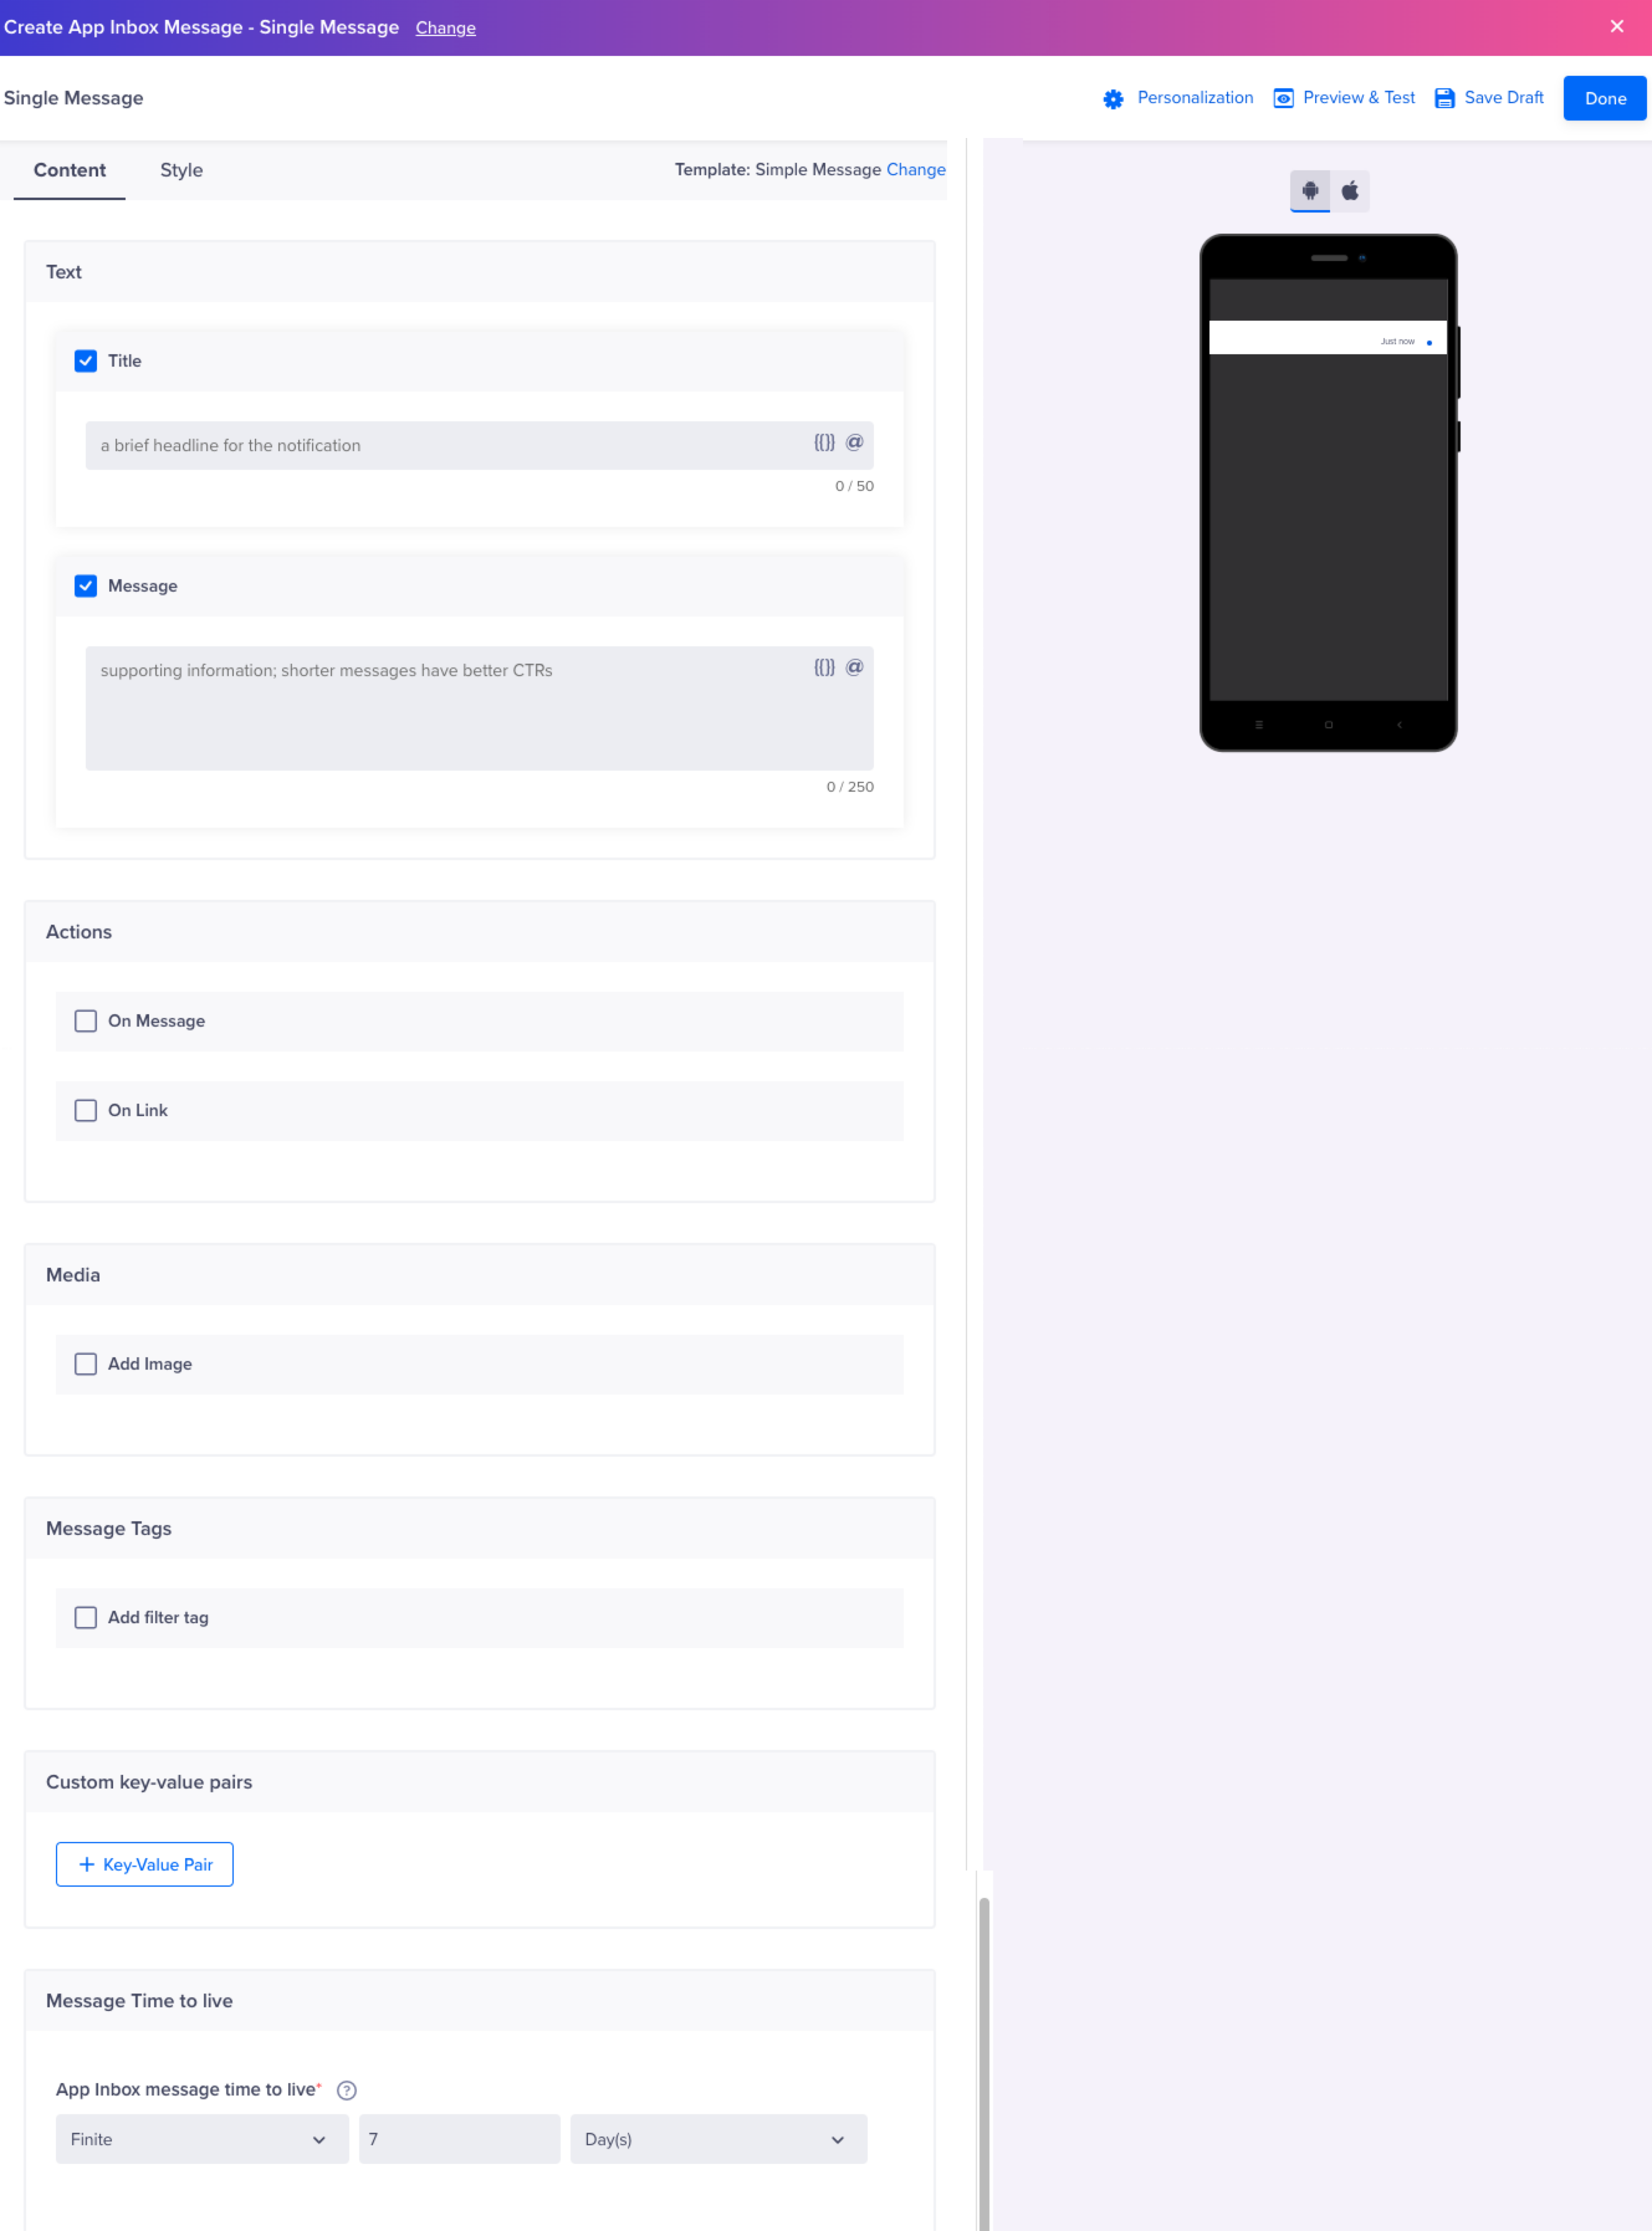
App Inbox Editor
Call to Action
App Inbox enables various types of call to action (CTA) to cater to different use cases for the client.
Choose from one of the following five types (Optional):
- Click-on-message CTA: This opens a deep link when you click anywhere on the message (text, image, or both).
- Click-on-link CTA: You can add additional, colored links at the bottom of your message to attract the user's attention.
- Copy to clipboard CTA: The user can copy text to their clipboard such as, copying discount codes to your products and applying them at the time of checkout.
- Open URL CTA: The user can open deep links for iOS or Android.
- Custom key-value pairs CTA: The key-value pairs send back custom data when a user clicks the App Inbox button. This data is not visible to the user. This feature is available for apps that use Clevertap Android SDK version 3.6.1 or above and iOS SDK version 3.7.1 or above.

Configuring CTAs
Message Tags
You can tag an inbox message with one or more comma-separated strings (Optional).
These tags help you identify the messages inside the user's device. Also, these tags help you classify your messages into different tabs in your app.

Define Message Tags
Using Message TagsMessage tags are an excellent way to engage your users contextually. For example, some of your app users might be interested in offers while others in news updates. You can have two separate tabs to categorize your inbox messages into those two buckets. Note that it is not compulsory to have tabs.
You can define the names of the inbox tabs during the configuration of App Inbox with your app. The same names should be entered as tags. In case you do not specify any tag, the message will go into the default bucket All.
Custom Key-Value Pairs
If you have a custom inbox and want to configure the message within CleverTap, you can define the parameters specific to your app and usage using these key-value pairs. For example, you can send an inbox campaign that offers a 20% discount to your users who interact with the campaign. Now, if the user taps on the notification, they are directed to the discounts page that offers a 20% discount. The following is an image that displays defining custom key-value pairs from the dashboard:
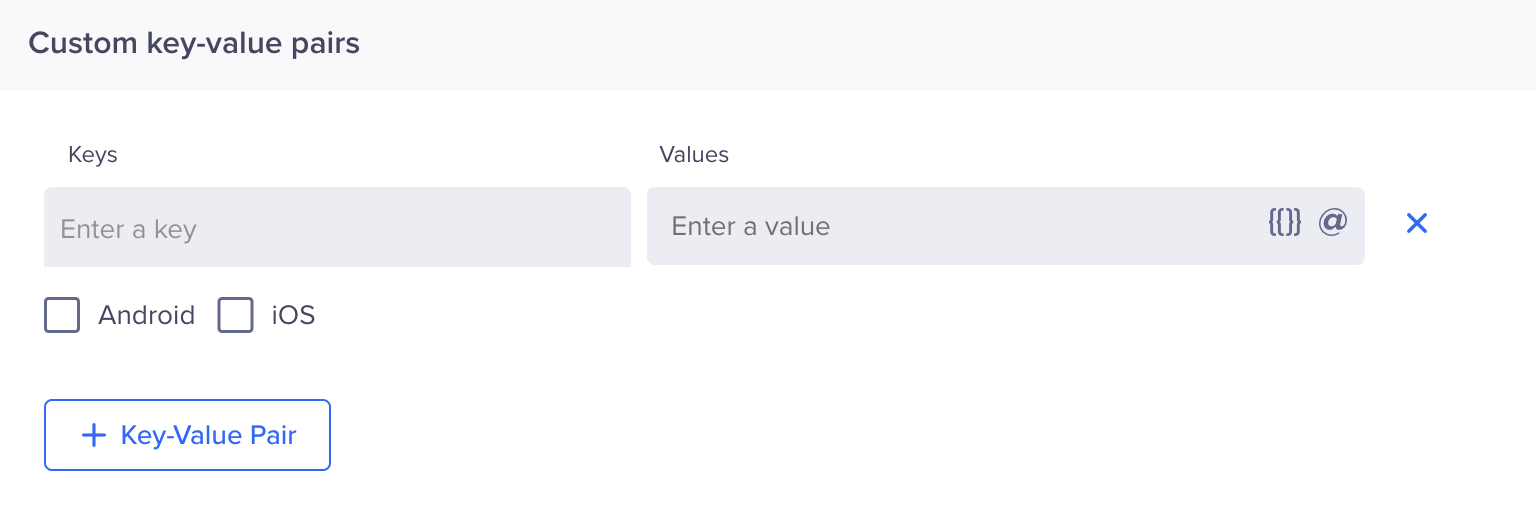
Define Custom Key-Value Pairs
SDK VersionTo access this feature, ensure that you upgrade to SDK version 5.2.0 or higher.
Time to Live (TTL)
App Inbox campaigns are by design persisted on the user device for a number of days.
- You can configure the number of days (or hours) to keep the message on the user's device by setting the time to live.

Define Message Time to Live
The TTL can range from 1 day to 60 days. The default value for TTL is 2 days. You can define the TTL for a maximum of 60 days. The message on the user's device stays there for the specified TTL after which it is automatically removed. You can also have Infinite TTL which means the message will never be deleted from the user's device.
Choosing the Right TTL
- You should choose a TTL that resonates with the purpose of your campaign. Some messages need to stay on the user's device for a longer period (coupon codes which are valid for a month) while some should last for a day or two (weekend discount offers).
- The TTL is considered based on campaign sent time.
How a Message is Accounted ForEach message stored on the CleverTap platform for App Inbox is accounted for as a user event.
Events via APIFor live action campaigns, messages do not get delivered to the App inbox if the qualifying event is sent via API. This only applies to standalone App Inbox campaigns and not Push + App inbox campaigns.
Supported Media Types
The supported media types include:
| Media Type | 16:9 Aspect Ratio | 1:1 Aspect Ratio | Max Size |
|---|---|---|---|
| Image (jpg, png, gif) | Yes | Yes | 500 KB |
| Video (mp4) | Yes | Yes | 50 MB |
| Audio (mp3) | N/A | N/A | 5 MB |
Video MessagesWhen adding video messages to In-App, ensure an audio track is always present. If required, insert a blank audio track to the video.
Preview & Test
Once you are all done setting up the content of your campaign in the What section, you have the option to send a test notification to any CleverTap user profile you have marked as a Test profile
Click the Preview & Test button from the message editor to test a message.
Message Types
You can create the following types of messages:
- Single Message
- A/B Test
- Split Delivery
- By User Property
Single Message
In this campaign, we send the same message to all users who qualify as your target audience. This message type is best for broadcast messages and for applications that do not vary campaign communication based on differences between language, geography, or any other user properties.
A/B Testing
A/B testing helps you understand what type of message copy works best to get clicks from users.
You can test up to three message variants on a test group, and the variant that gets the most clicks is declared the winning variant and is automatically sent to the rest of your target audience.
When creating multiple variants for a campaign, you can also auto-copy what is already present in a current variant.
Split Delivery
With split delivery, you can decide what percentage of your audience receives each message variant for the campaign duration. You can test up to three message variants.

Split Delivery in App Inbox
Split Delivery to Past Behavior Segments
For campaigns sent to Past Behavior Segments (grouping of users based on what they have done in the past), you have two options: launch the A/B test to a percentage of your target audience or send out an absolute number of messages. In either case, we deliver the variants equally to the test audience.
For example:
- If you are testing three messages (e.g., Variant A, Variant B, Variant C).
- Your campaign reach is 2,000,000 users.
- You choose a test population of 15% of campaign reach (300,000 users).
Then, we send:
- Variant A to 100,000 users.
- Variant B to 100,000 users.
- Variant C to 100,000 users.
After all 300,000 messages have been delivered, we calculate the winning message over this test group based on the number of click-throughs. We then automatically send the winning message to the remainder of your target audience which is 1,700,000 users in this example.
Note that for A/B testing, we ensure there is always an equal number of messages sent for each variant, so there is no bias introduced during the test phase and that the best-performing message is always declared the winner.
Split Delivery to Live User Segments
With campaigns sent to live user segments (triggered campaigns), messages are delivered immediately when a user’s activity matches the criteria you have selected. For example, you can send a message when the user has completed a booking or purchase. Since it is not possible to determine the reach of triggered campaigns upfront, you need to decide how many total messages to send for A/B testing before a winner is declared.
Triggered Campaign ExampleIf you select 500 users as your test audience, we will alternate delivery of Variant A and Variant B as users qualify for the campaign. After a total of messages are sent (Variant A – 250 and Variant B – 250), we then decide the winner based on the number of clicks and continue only with this winning message for the duration of the campaign.
Deciding on a test audience for A/B testing triggered campaigns requires some estimation. We recommend you check the total messages that were sent for similar triggered campaigns in the past to get a sense of how many users may qualify. If you select a test audience that is too small such as 25 users, you will get a statistically insignificant sample. If your test group size exceeds the total number of users who ultimately qualify for that campaign, then no winner will be declared and each message variant will be alternatively delivered for the duration of the campaign.
By User Property
If you would like to send different message variants to your target audience based on the user properties they possess, this campaign type is your best bet. A good example would be when you want to send a localized update to people based on their preferred language.
Similar to creating A/B test variants, you can use the + button to add multiple variants based on a user property value. You can send up to 50 message variants to different users based on a user property. In the example below, we have used the Customer Type user property so users with different customer type property values will receive corresponding copies of the campaign based on their different levels (Silver, Gold, or Platinum).
Define the Campaign Schedule
You can set up the When to schedule the campaign start and end using the options below:
Past behavior campaigns can be scheduled to run:
- On a specific date and time.
- On multiple specified dates and times.
- Recurring at a periodicity you set.
Live campaigns can be set up on a specific event:
- In response to a user event.
- User event/inaction combination (e.g., abandoned cart scenario).
- Based on a date event property value of an event (for example, a reminder for upcoming travel booking).
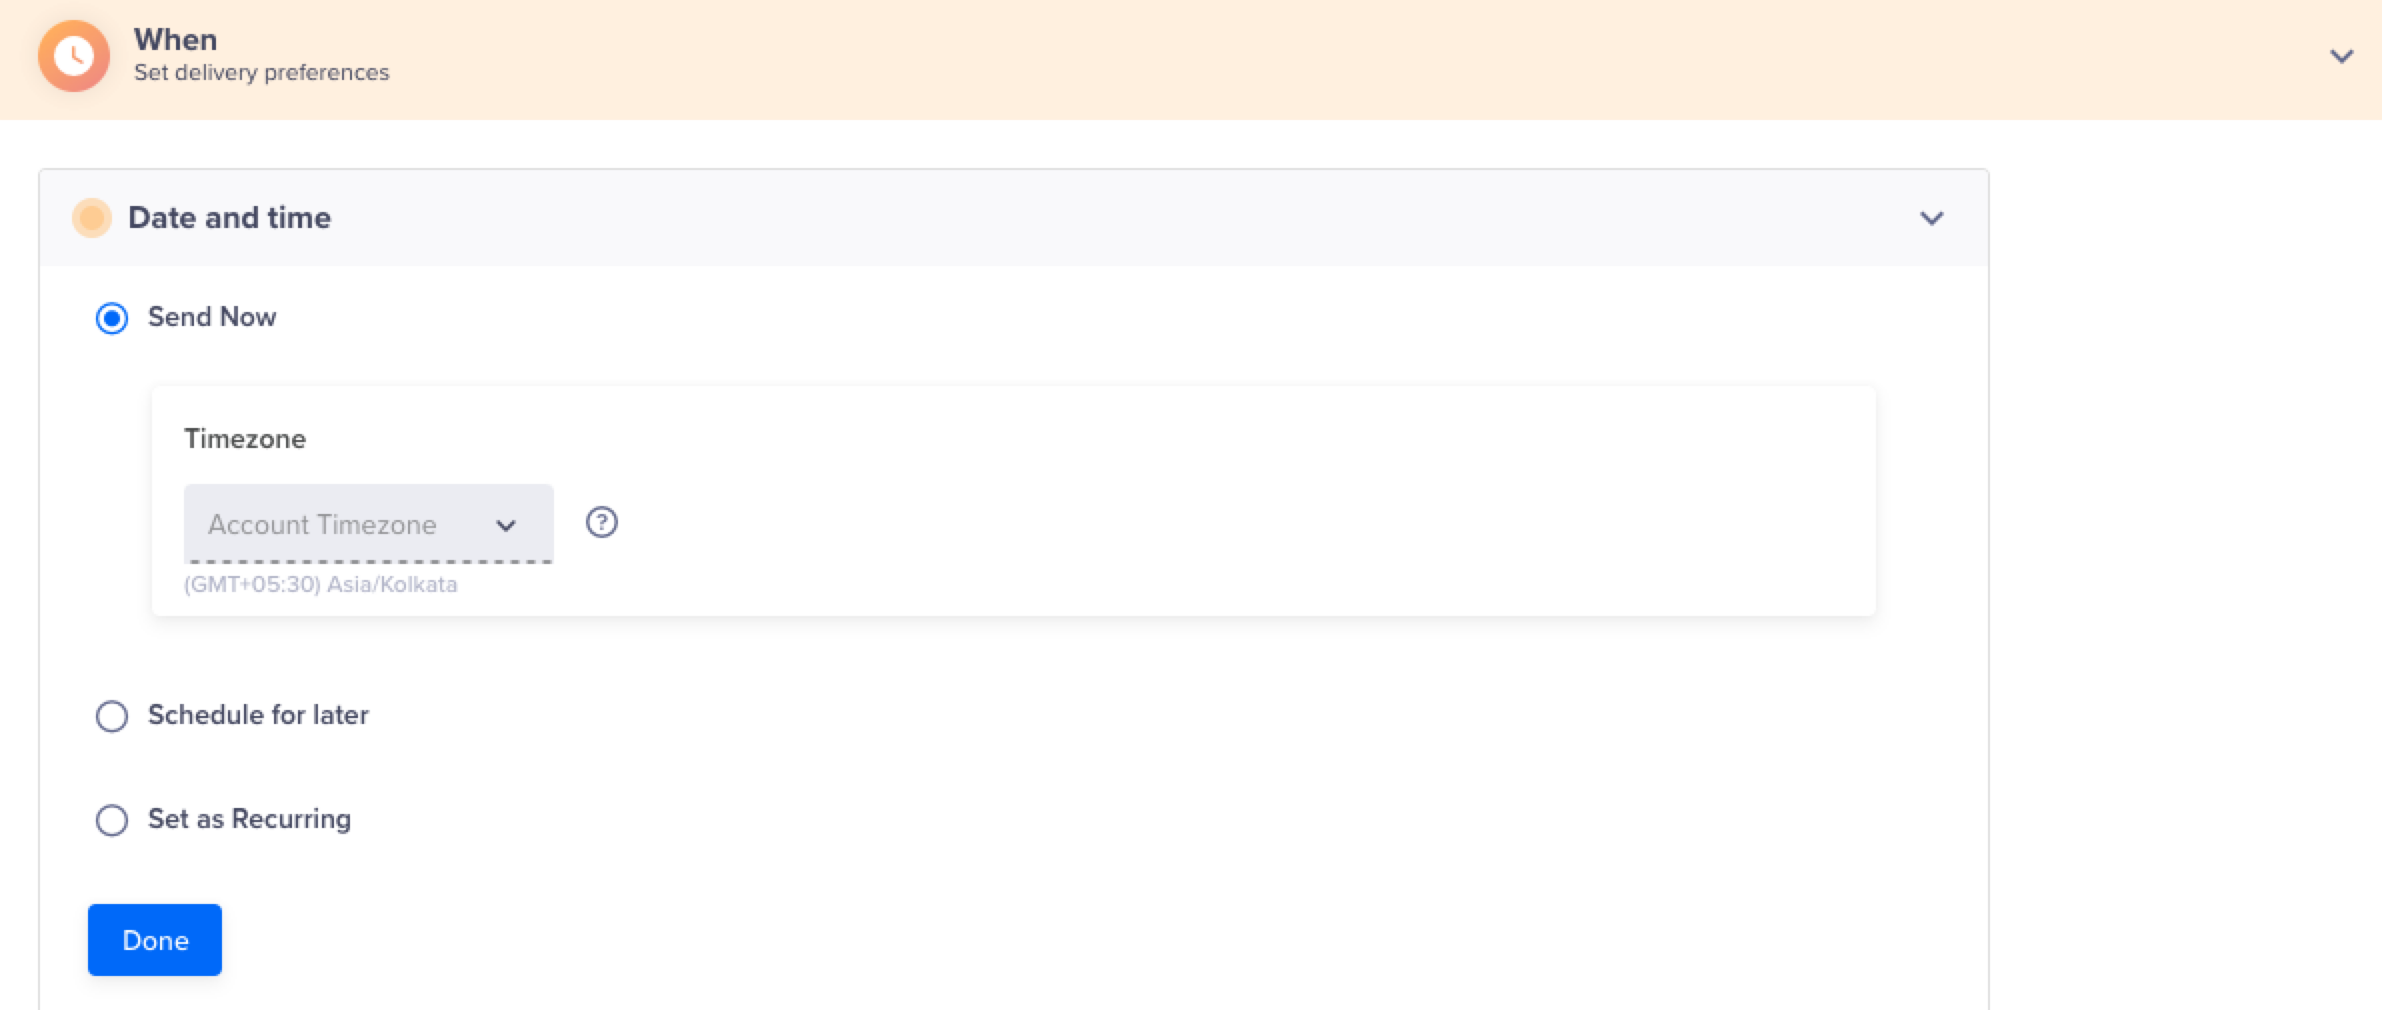
Define Campaign Schedule
Recurring DayIf you specify a recurring day for a campaign such as the 7th of each month, then the campaign will start for the specified day and ignore the creation date. This is a precaution to avoid sending a campaign unintentionally on a prior date.
Publish Campaign
After testing and once you are satisfied with the appearance of your campaign, finalize your campaign with the following steps:
- Click Continue to view your campaign summary. The overview page displays.
- View your campaign summary, then click Publish Campaign.

Publish App Inbox Campaign
Updated 6 months ago