CSV Upload
Understand how to import data to CleverTap dashboard using CSV upload feature.
With the CSV upload feature, you can create new user profiles in CleverTap in bulk by uploading a CSV file with a list of user profiles. You can also use this feature to add or update information for existing user profiles.
CSV Upload PermissionsAnyone with the required permissions to upload the CSV file can use this feature.
CSV Upload Video Tutorial
The following is a video tutorial that highlights the recent CSV Upload enhancements:
Upload User Profiles using a CSV File
To upload user profiles to the CleverTap dashboard using a CSV file:
Upload User Profiles
To upload user profiles:
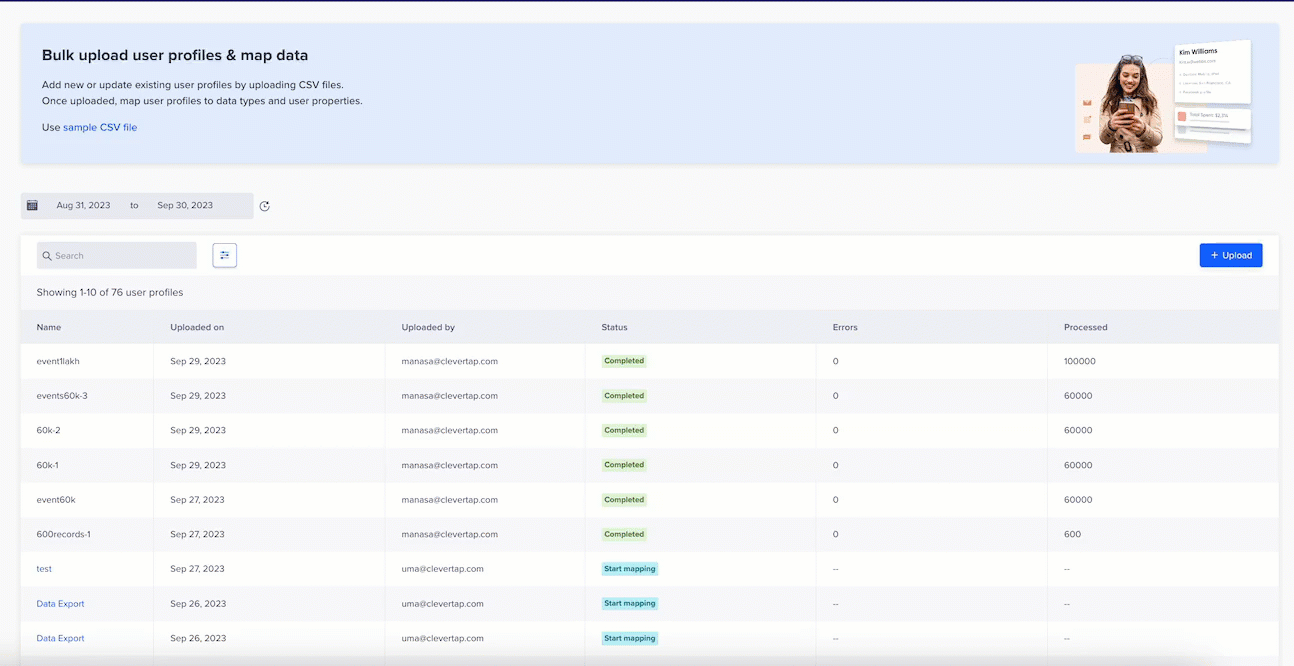
- Log in to your CleverTap account and click Settings > Engage > CSV Uploads.
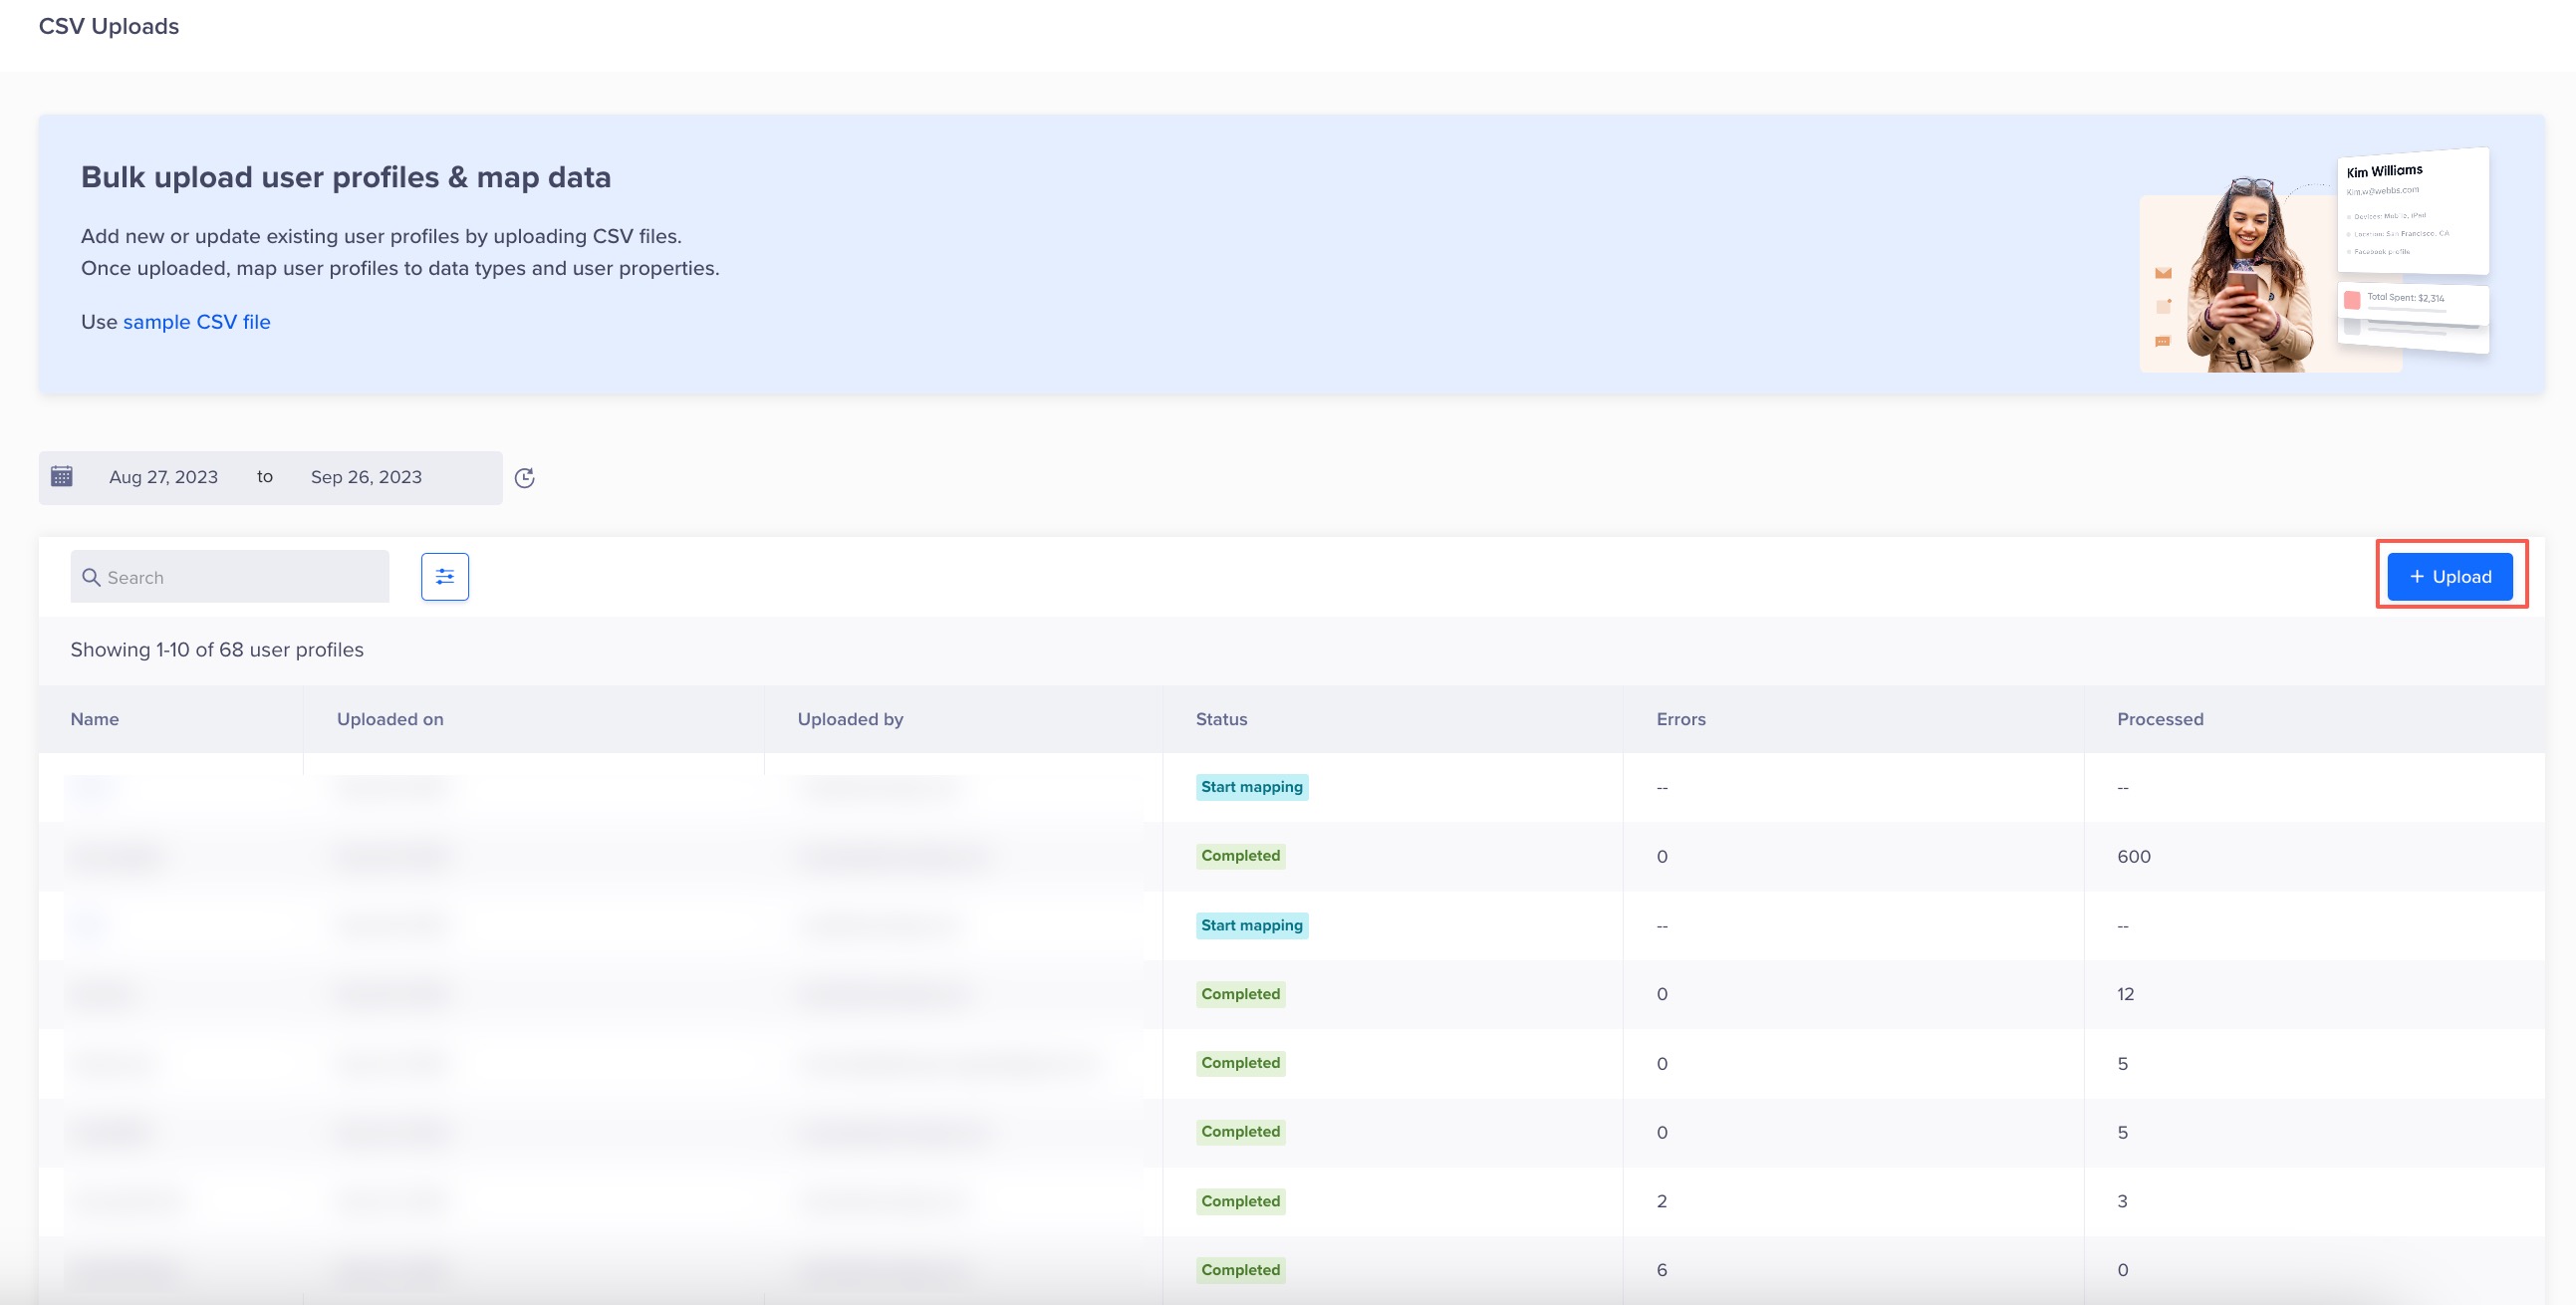
CSV Uploads Page
- Click + Upload. The Upload page appears.
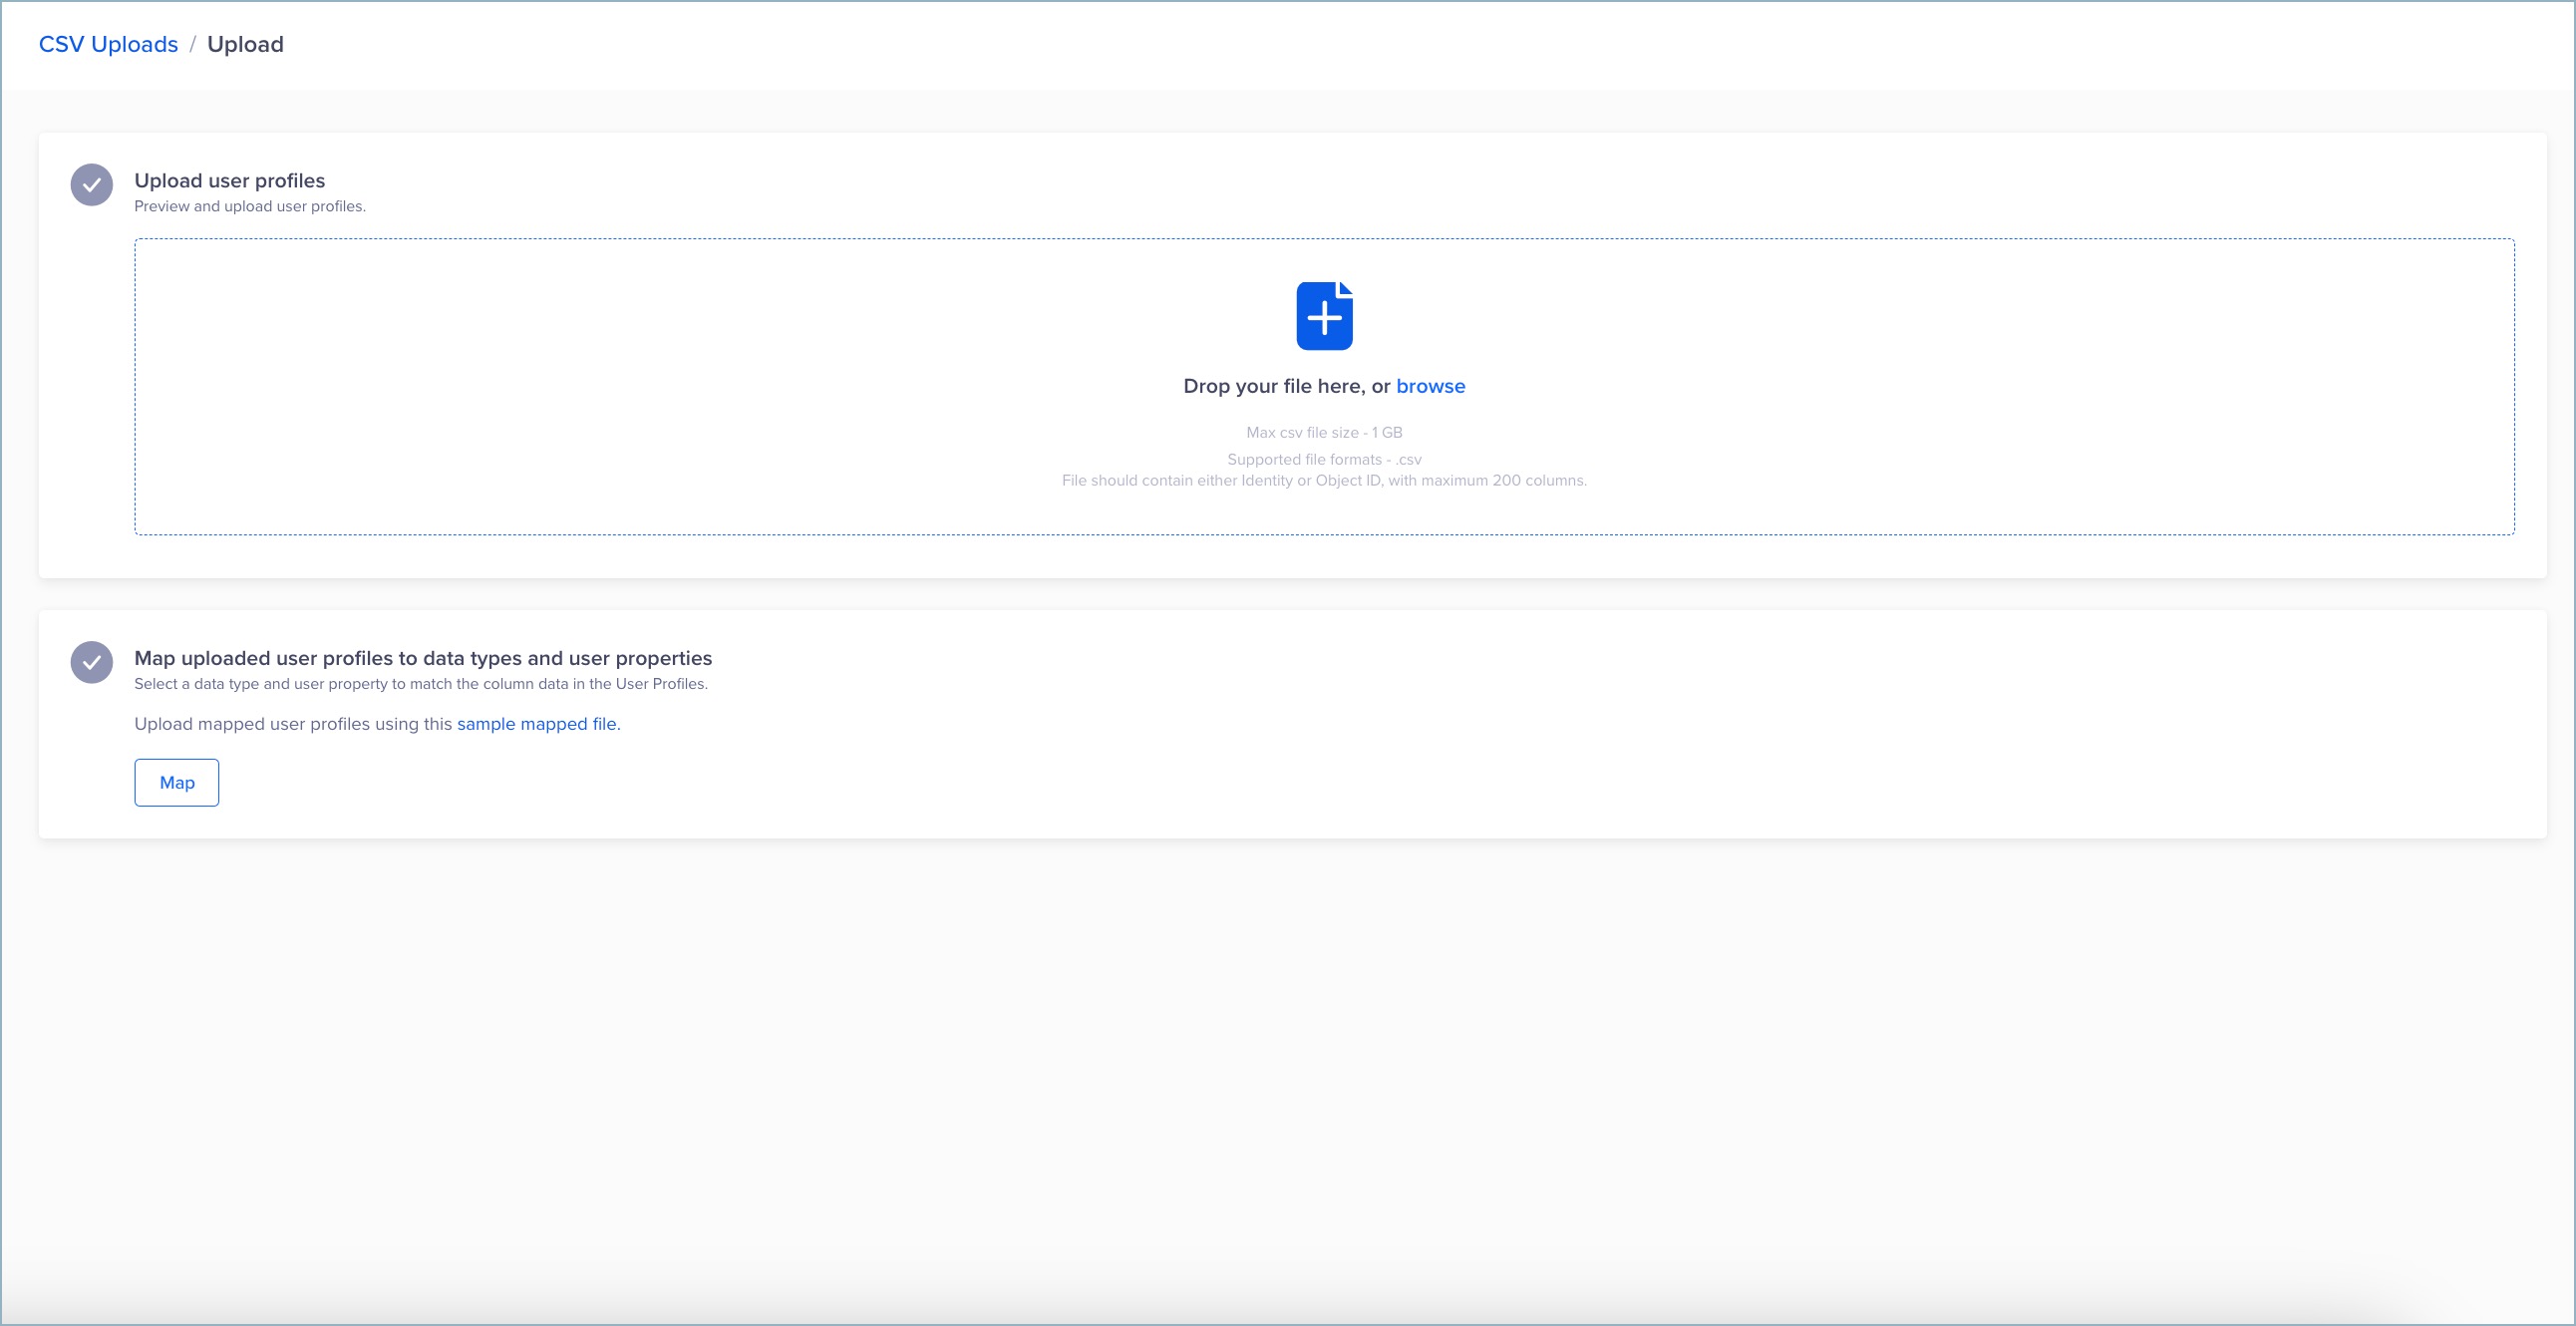
Upload User Profiles
- Under Upload user profiles, drag and drop or browse the CSV file. For more information on the CSV file format, refer to CSV File Format.
A preview of the uploaded user profiles appears on the right side.
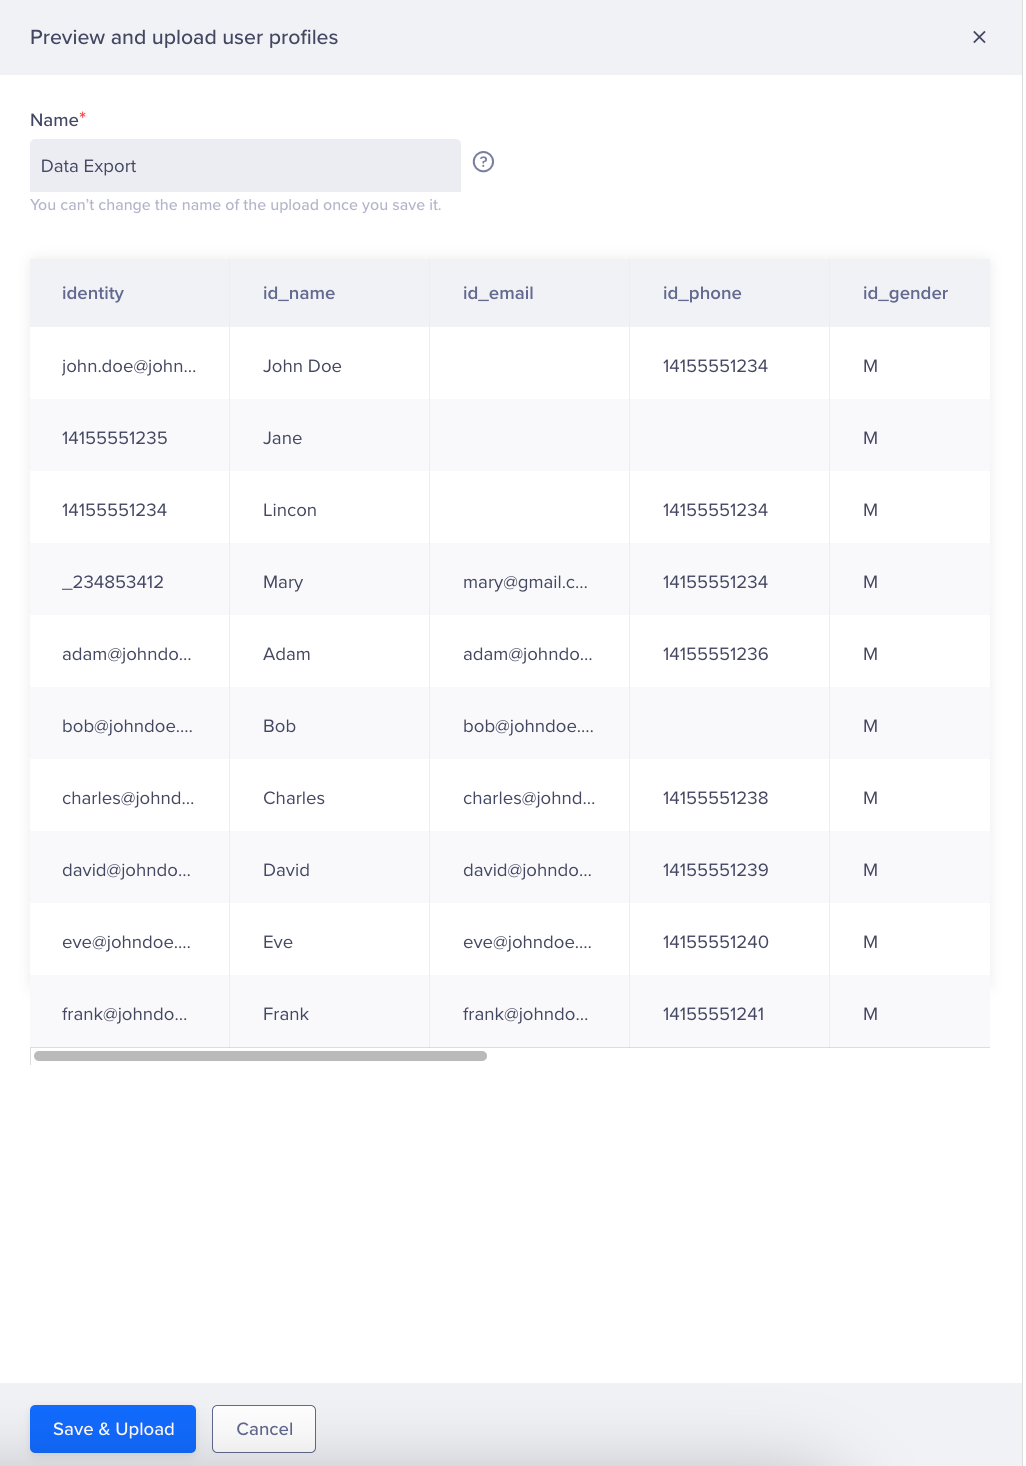
View a Preview of the Uploaded User Profiles
- Enter a unique file name on the main screen for easy identification and click Save & Upload.
The Data Export uploaded message appears. - (Optional) Click the Preview icon to view the uploaded user profiles.
Preview of the Uploaded User Profiles
Once you upload the CSV file, it is essential to map the uploaded user profiles with the appropriate data types and user properties.
Map Uploaded User Profiles
You must map the CSV column names with the corresponding date types and user properties in the CleverTap system.
By default, CleverTap tries to map your file data. However, you can map your file data to the respective data type and user property.
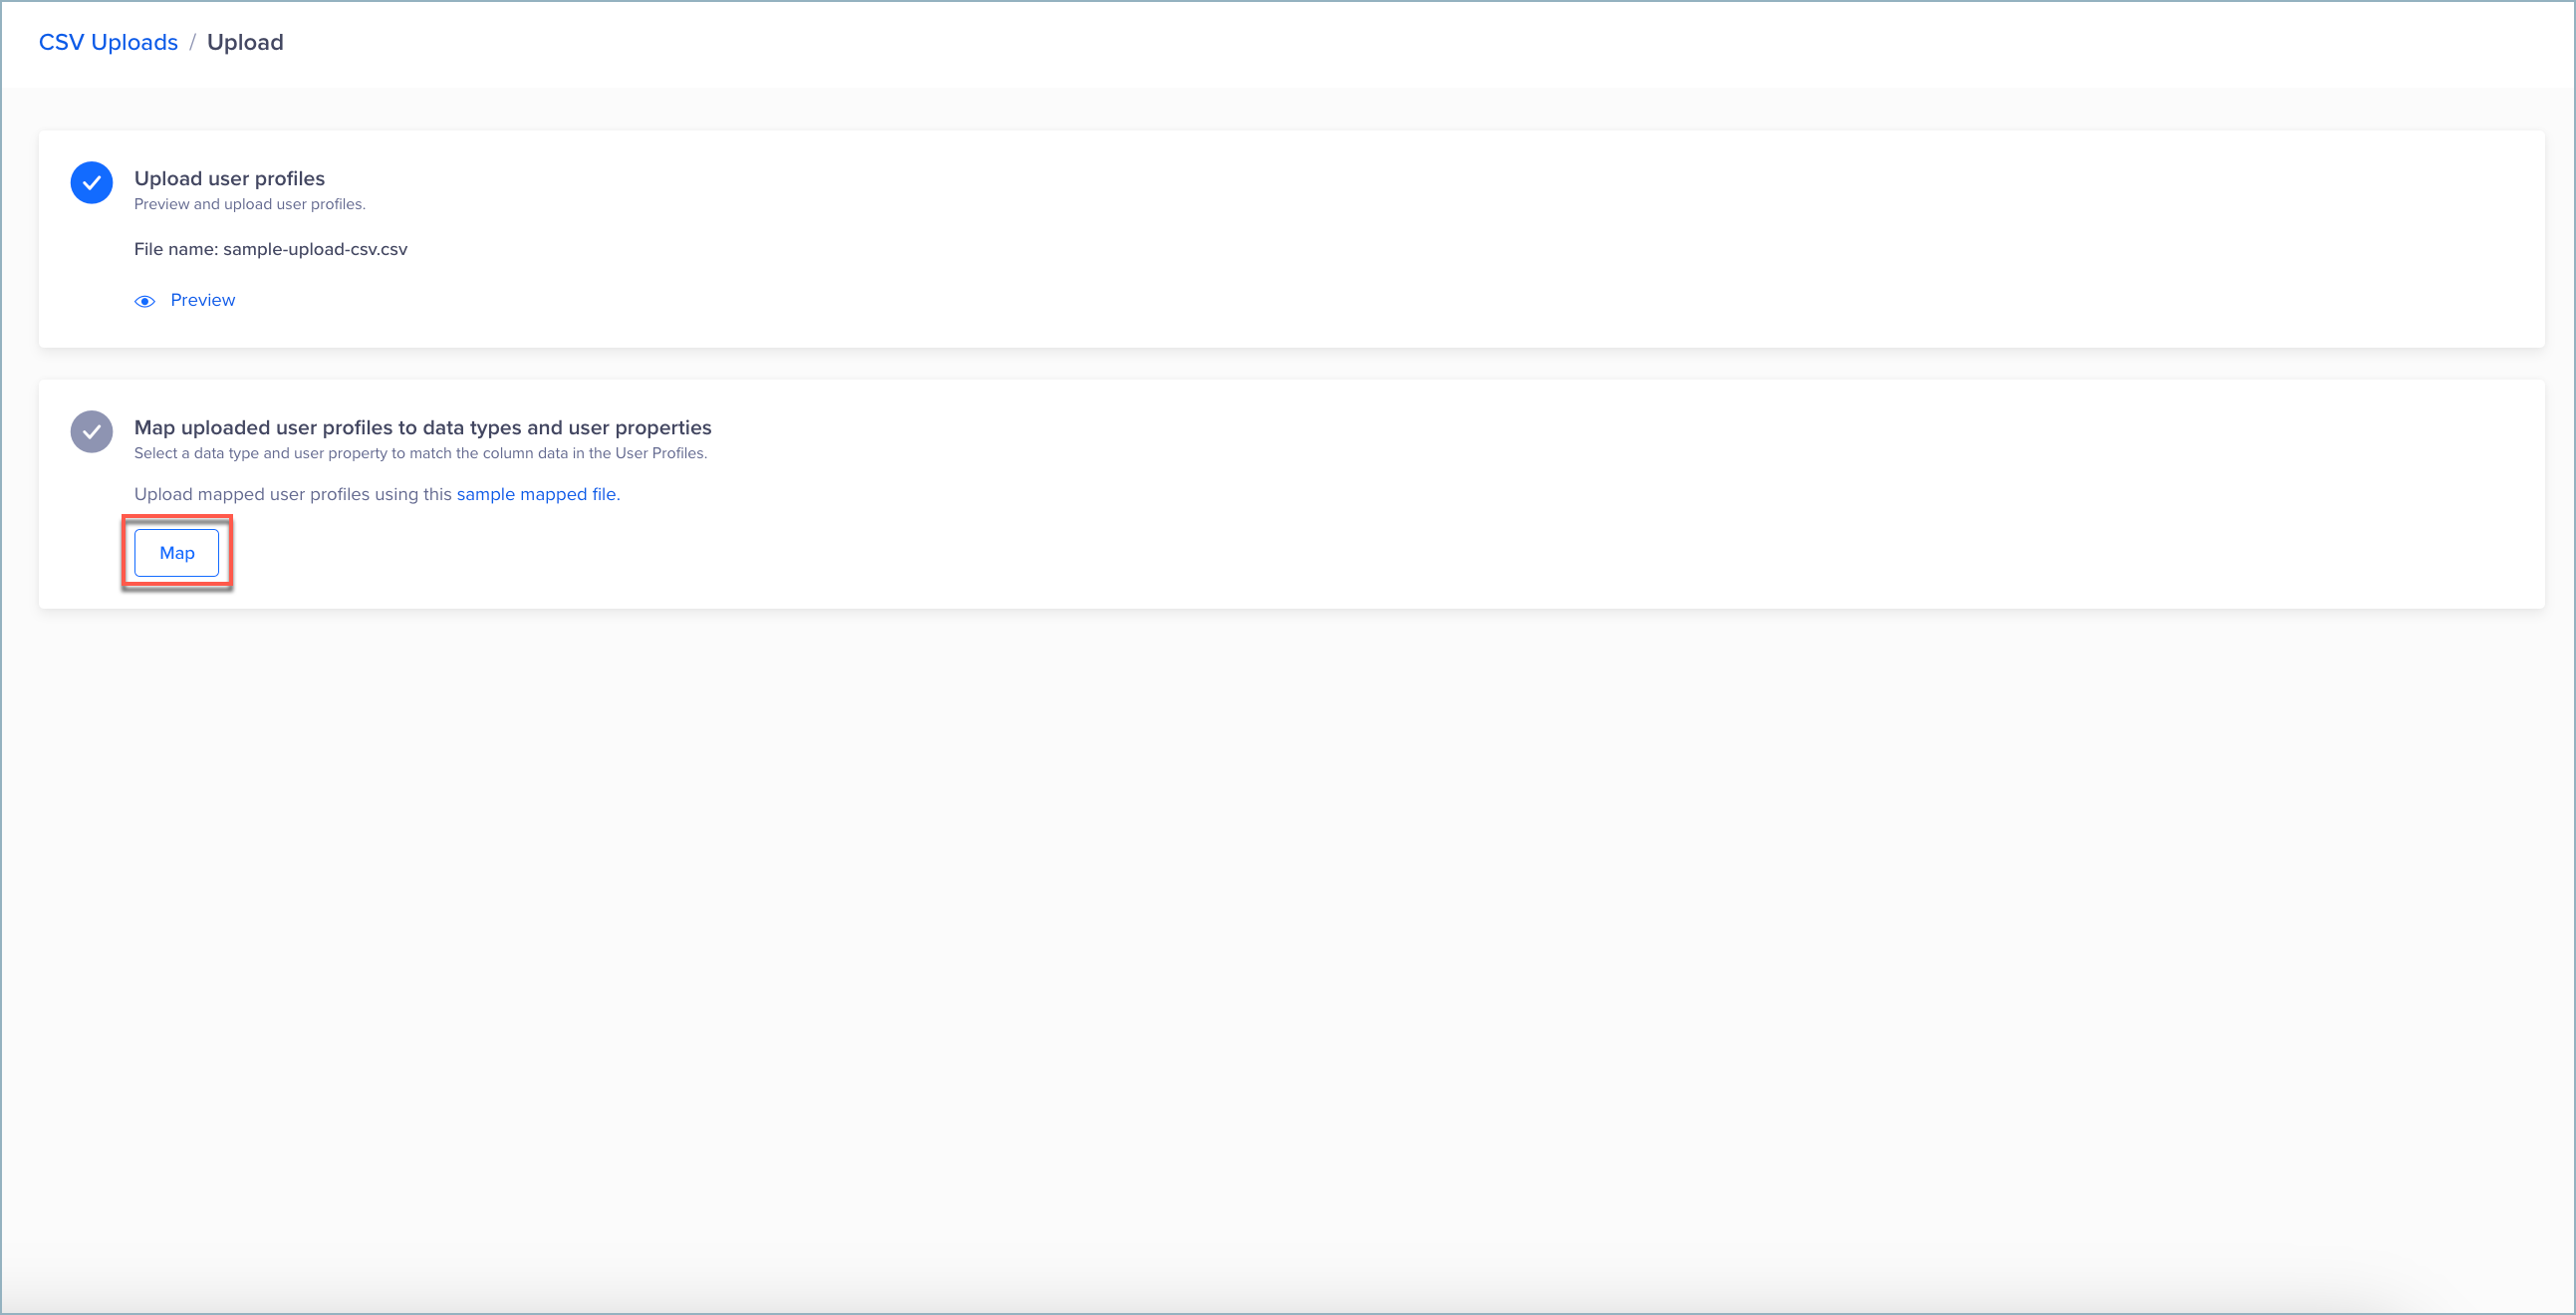
Map User Profiles
Click Map under the Upload user profiles page. It provides you with the following two methods to map the user profile with data type and user property:
Manually Map the File
To manually map the file:
- Select Manually map file.
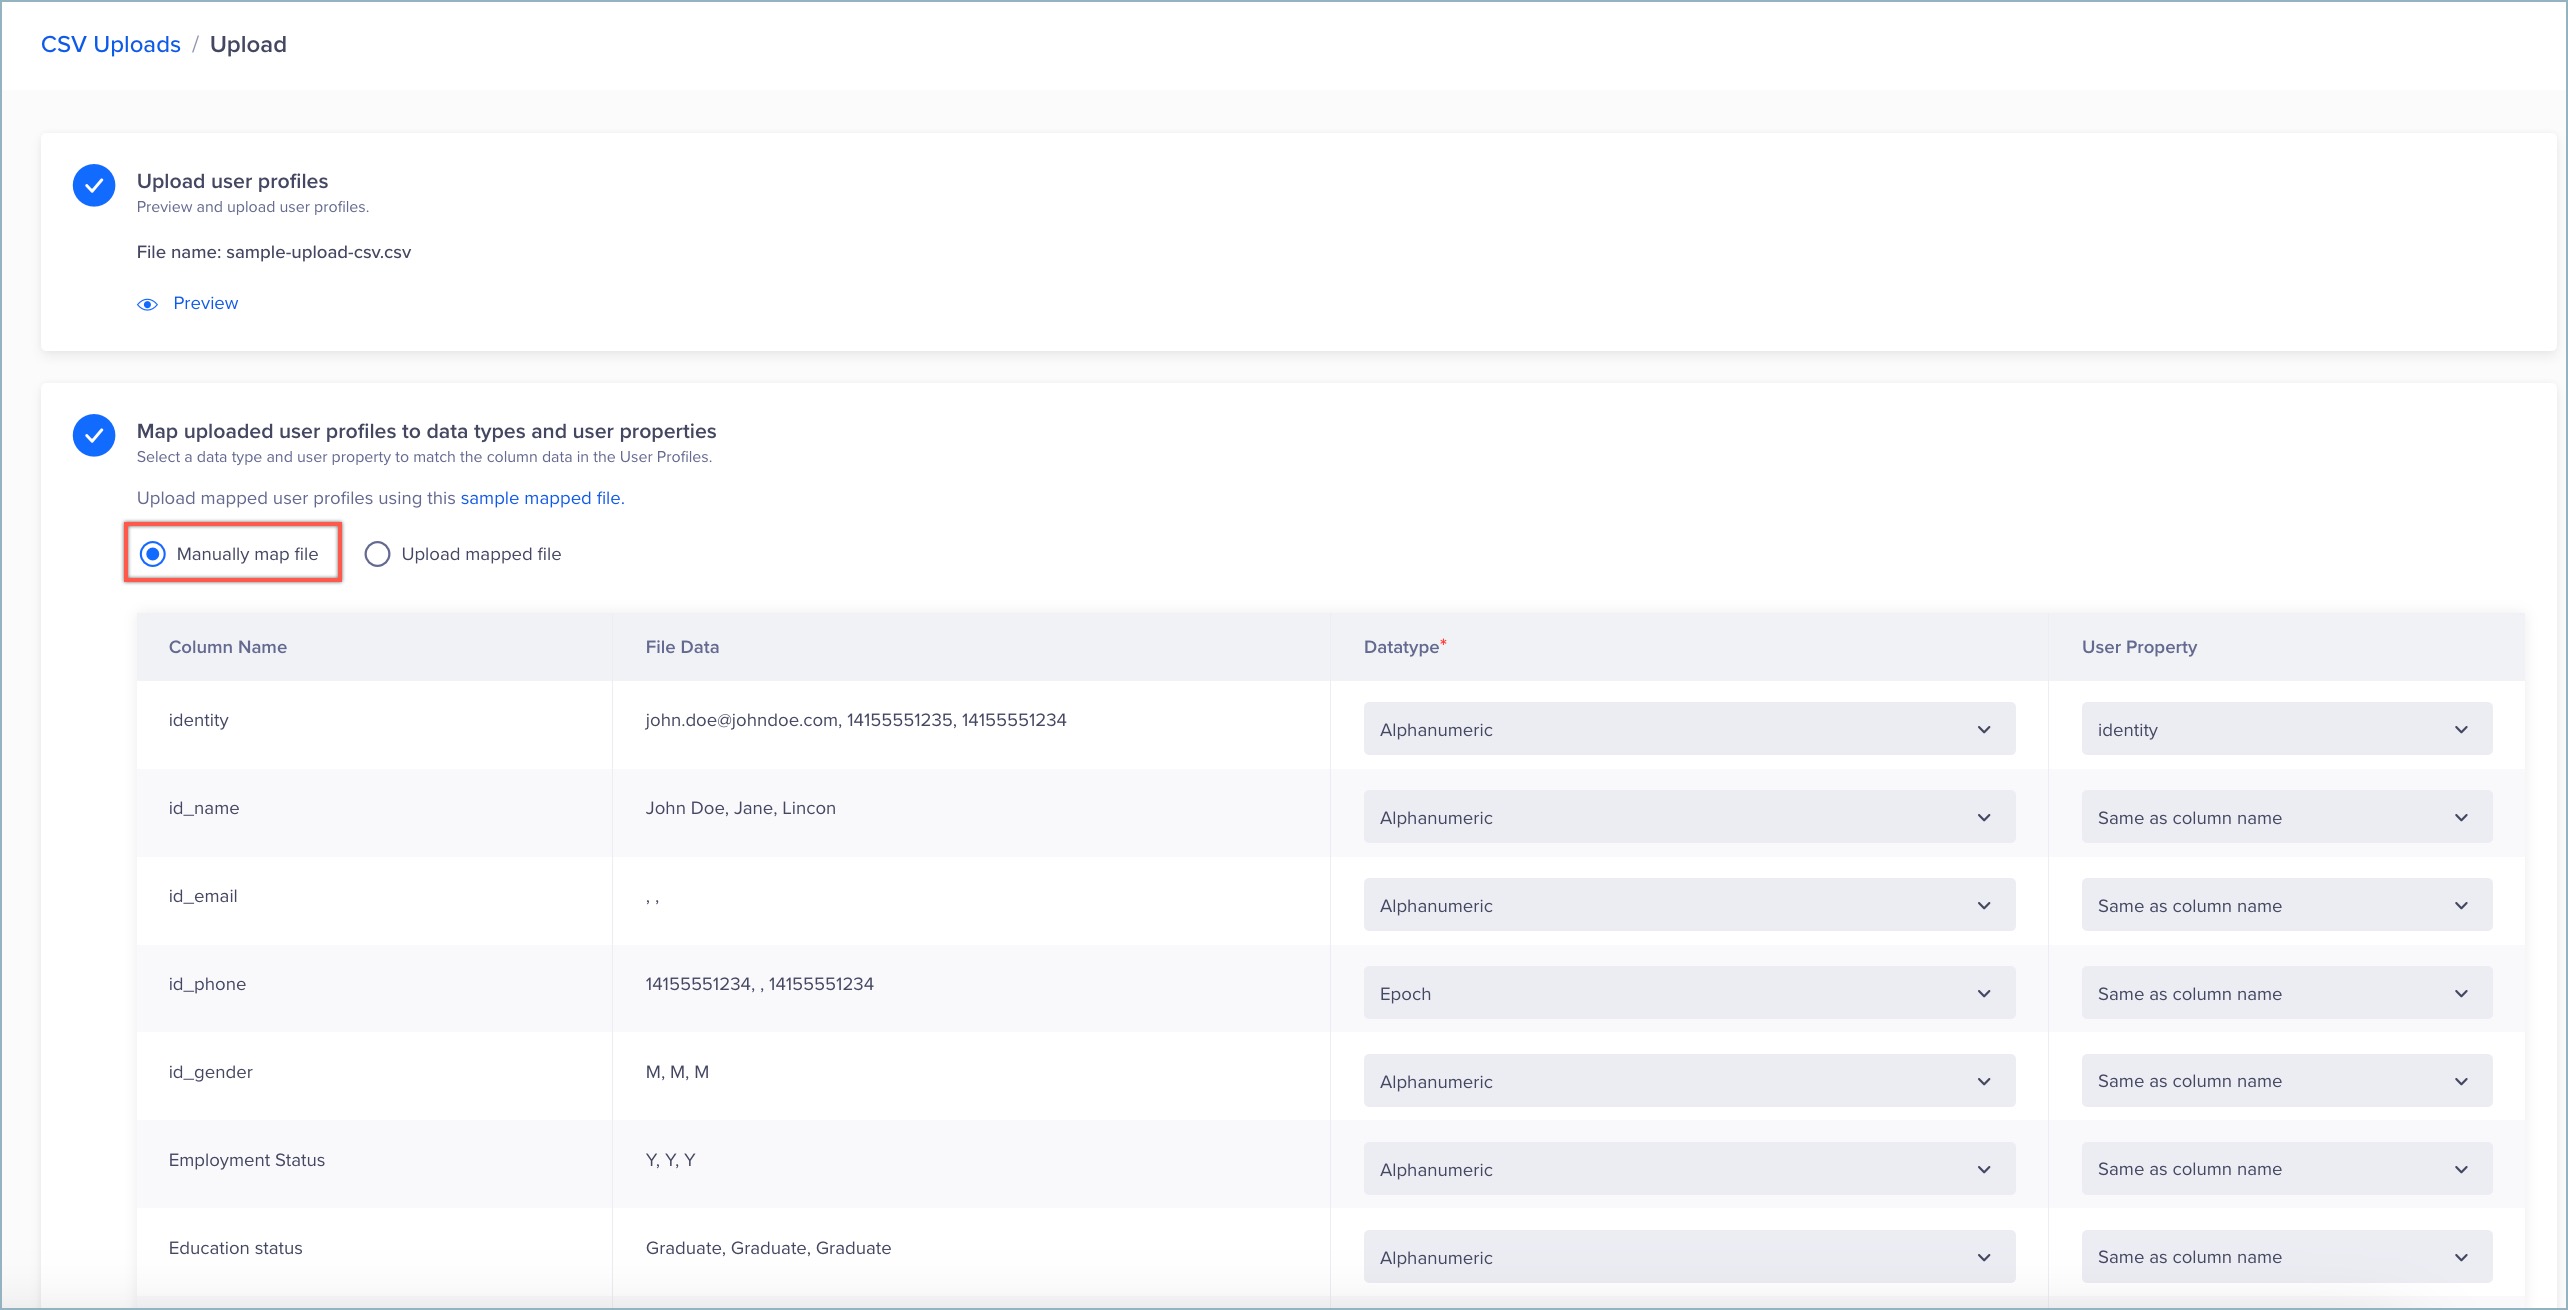
Manually Map User Profiles
- From the table below, select the appropriate data type and user properties for each column in the file:
- Data Types: Select a data type from the dropdown list for the user profile values. For instance, id_name has the value John Doe and is of the Alphanumeric data type.
- Alphanumeric: A string value consisting of letters and numerals for data such as Phone Number, customer_type, etc.
- Number: An integer value for data such as an Amount, Wallet Balance, etc.
- True or False: A boolean value. For example, True indicates if an email ID exists for users.
- Date Formats: A date value for data such as the Date of Birth of the user. For more information about date formats supported by CleverTap, refer to the Date Format section.
Guidelines for Mapping Data Types
- The data type for identity and objectID is always alphanumeric and cannot be changed.
- If the date format is $D_1695801332, then the data type must be alphanumeric.
- User Property: Select the corresponding CleverTap user property from the drop-down list. For example, id_email corresponds to Email in CleverTap.
Guidelines for Mapping User Properties
While mapping, if you do not find the relevant user property under the dropdown, select the Same as column name option. CleverTap will create a new user property for that specific column data.
- Data Types: Select a data type from the dropdown list for the user profile values. For instance, id_name has the value John Doe and is of the Alphanumeric data type.
Upload the Mapped File
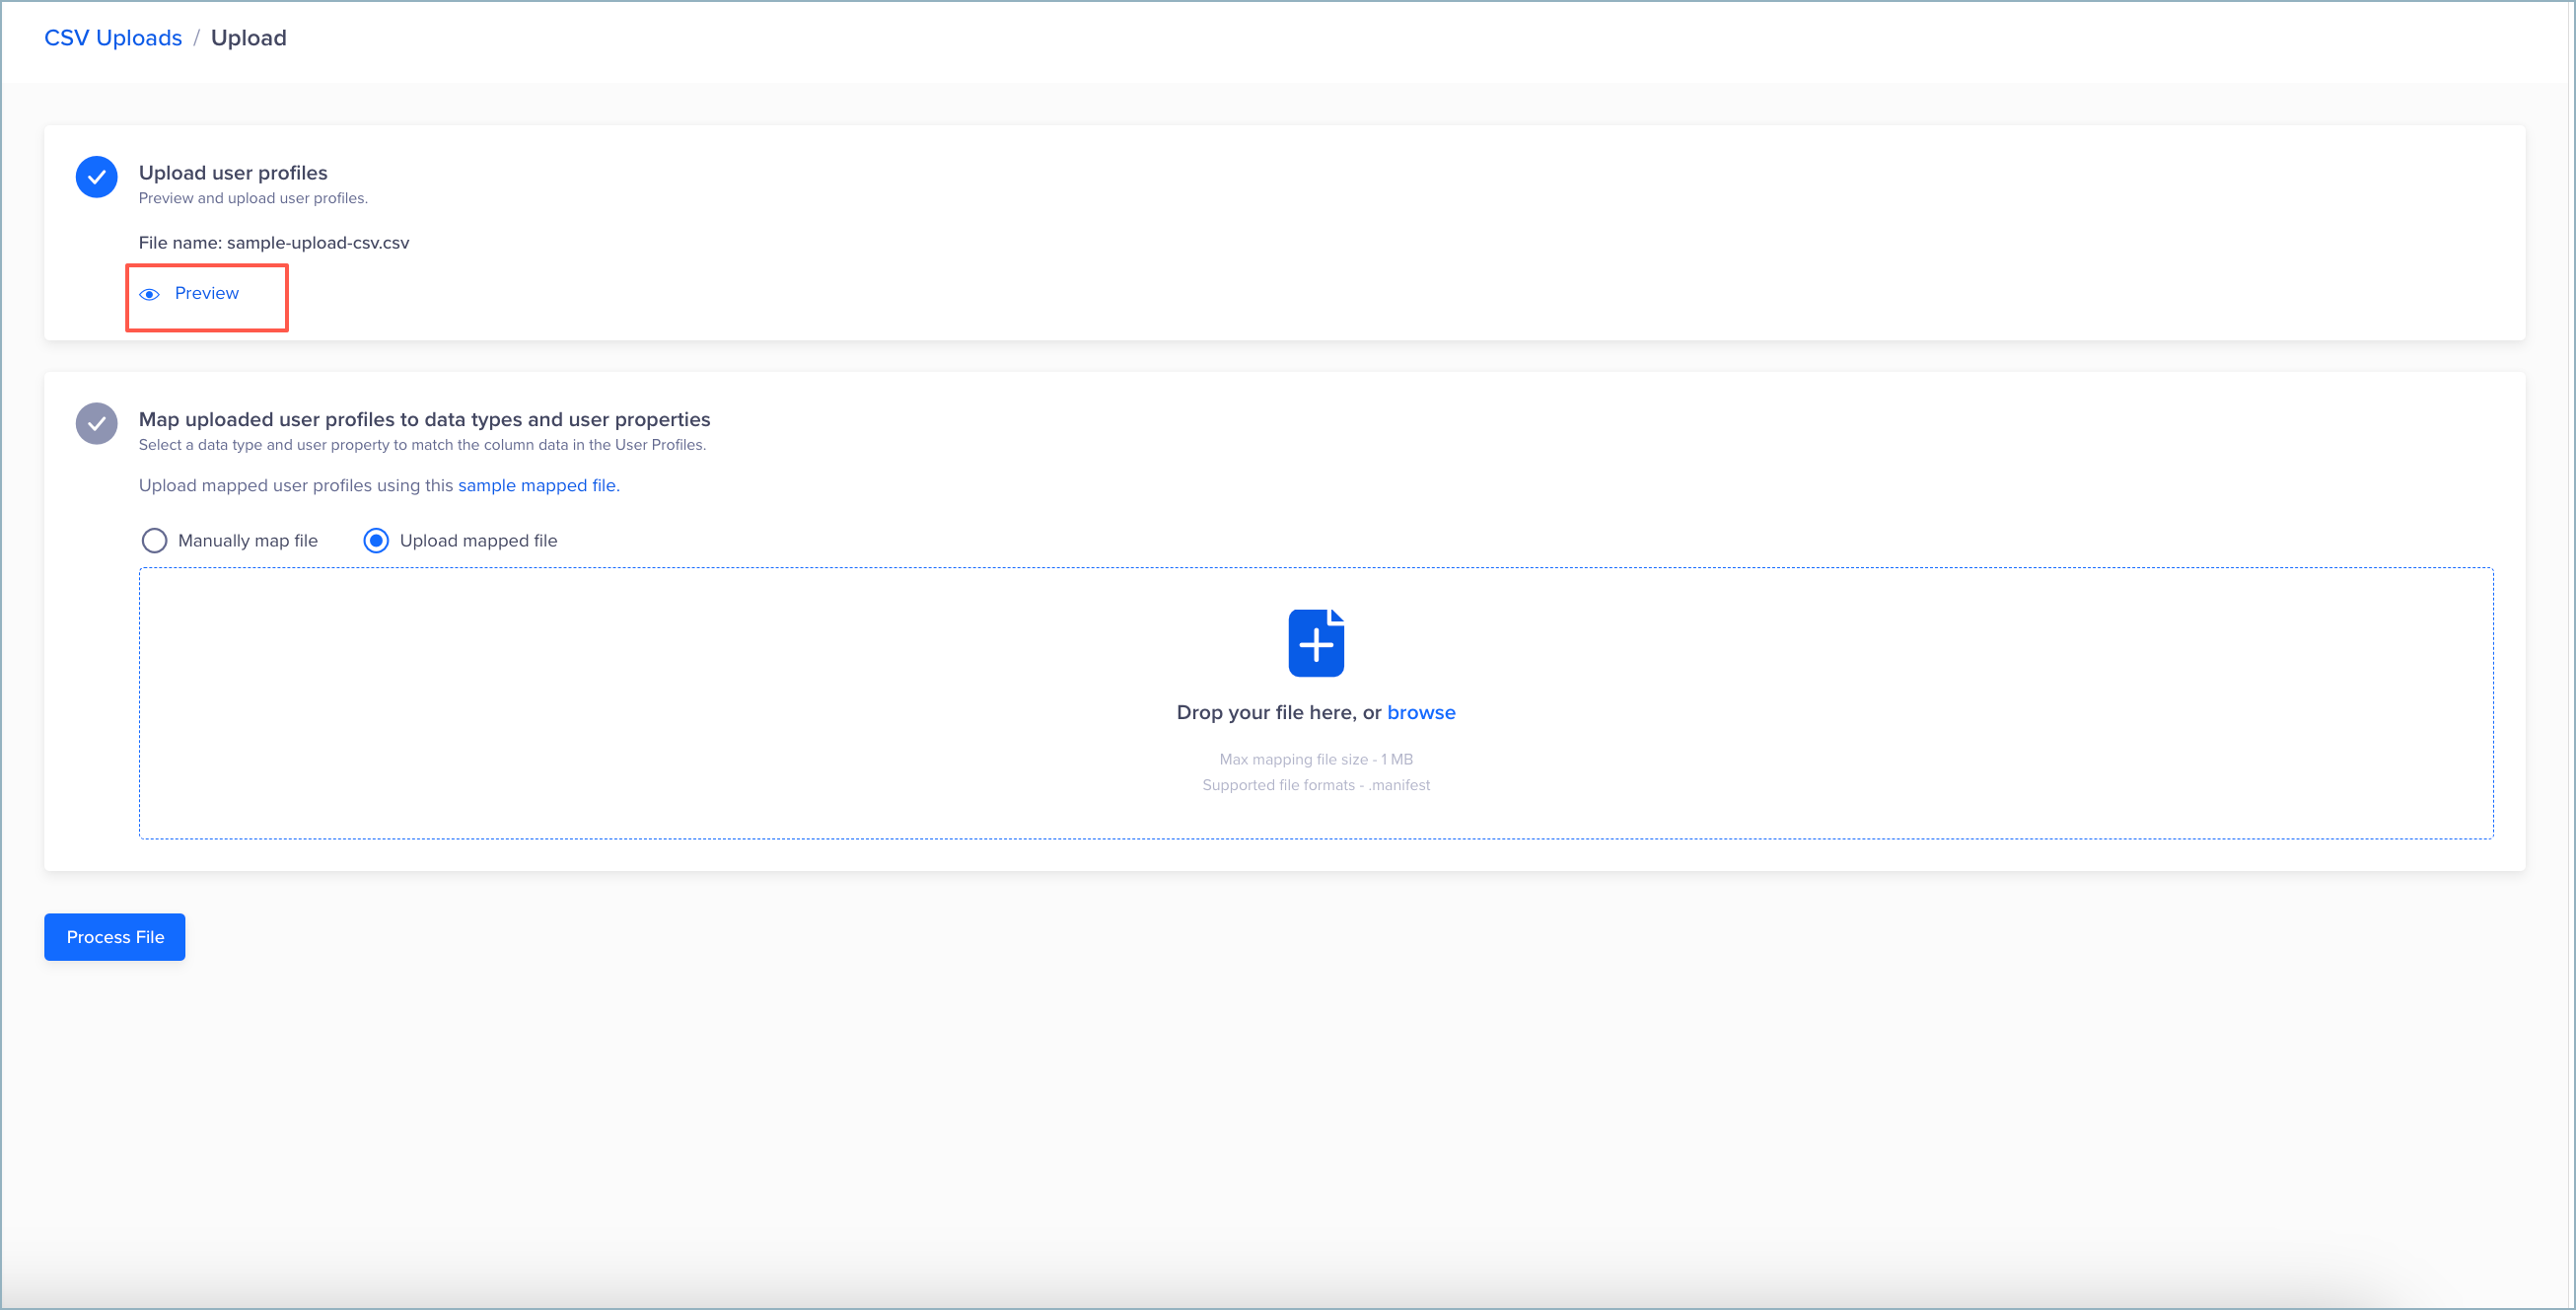
To upload a pre-mapped JSON manifest file:
- Select Upload mapped file.
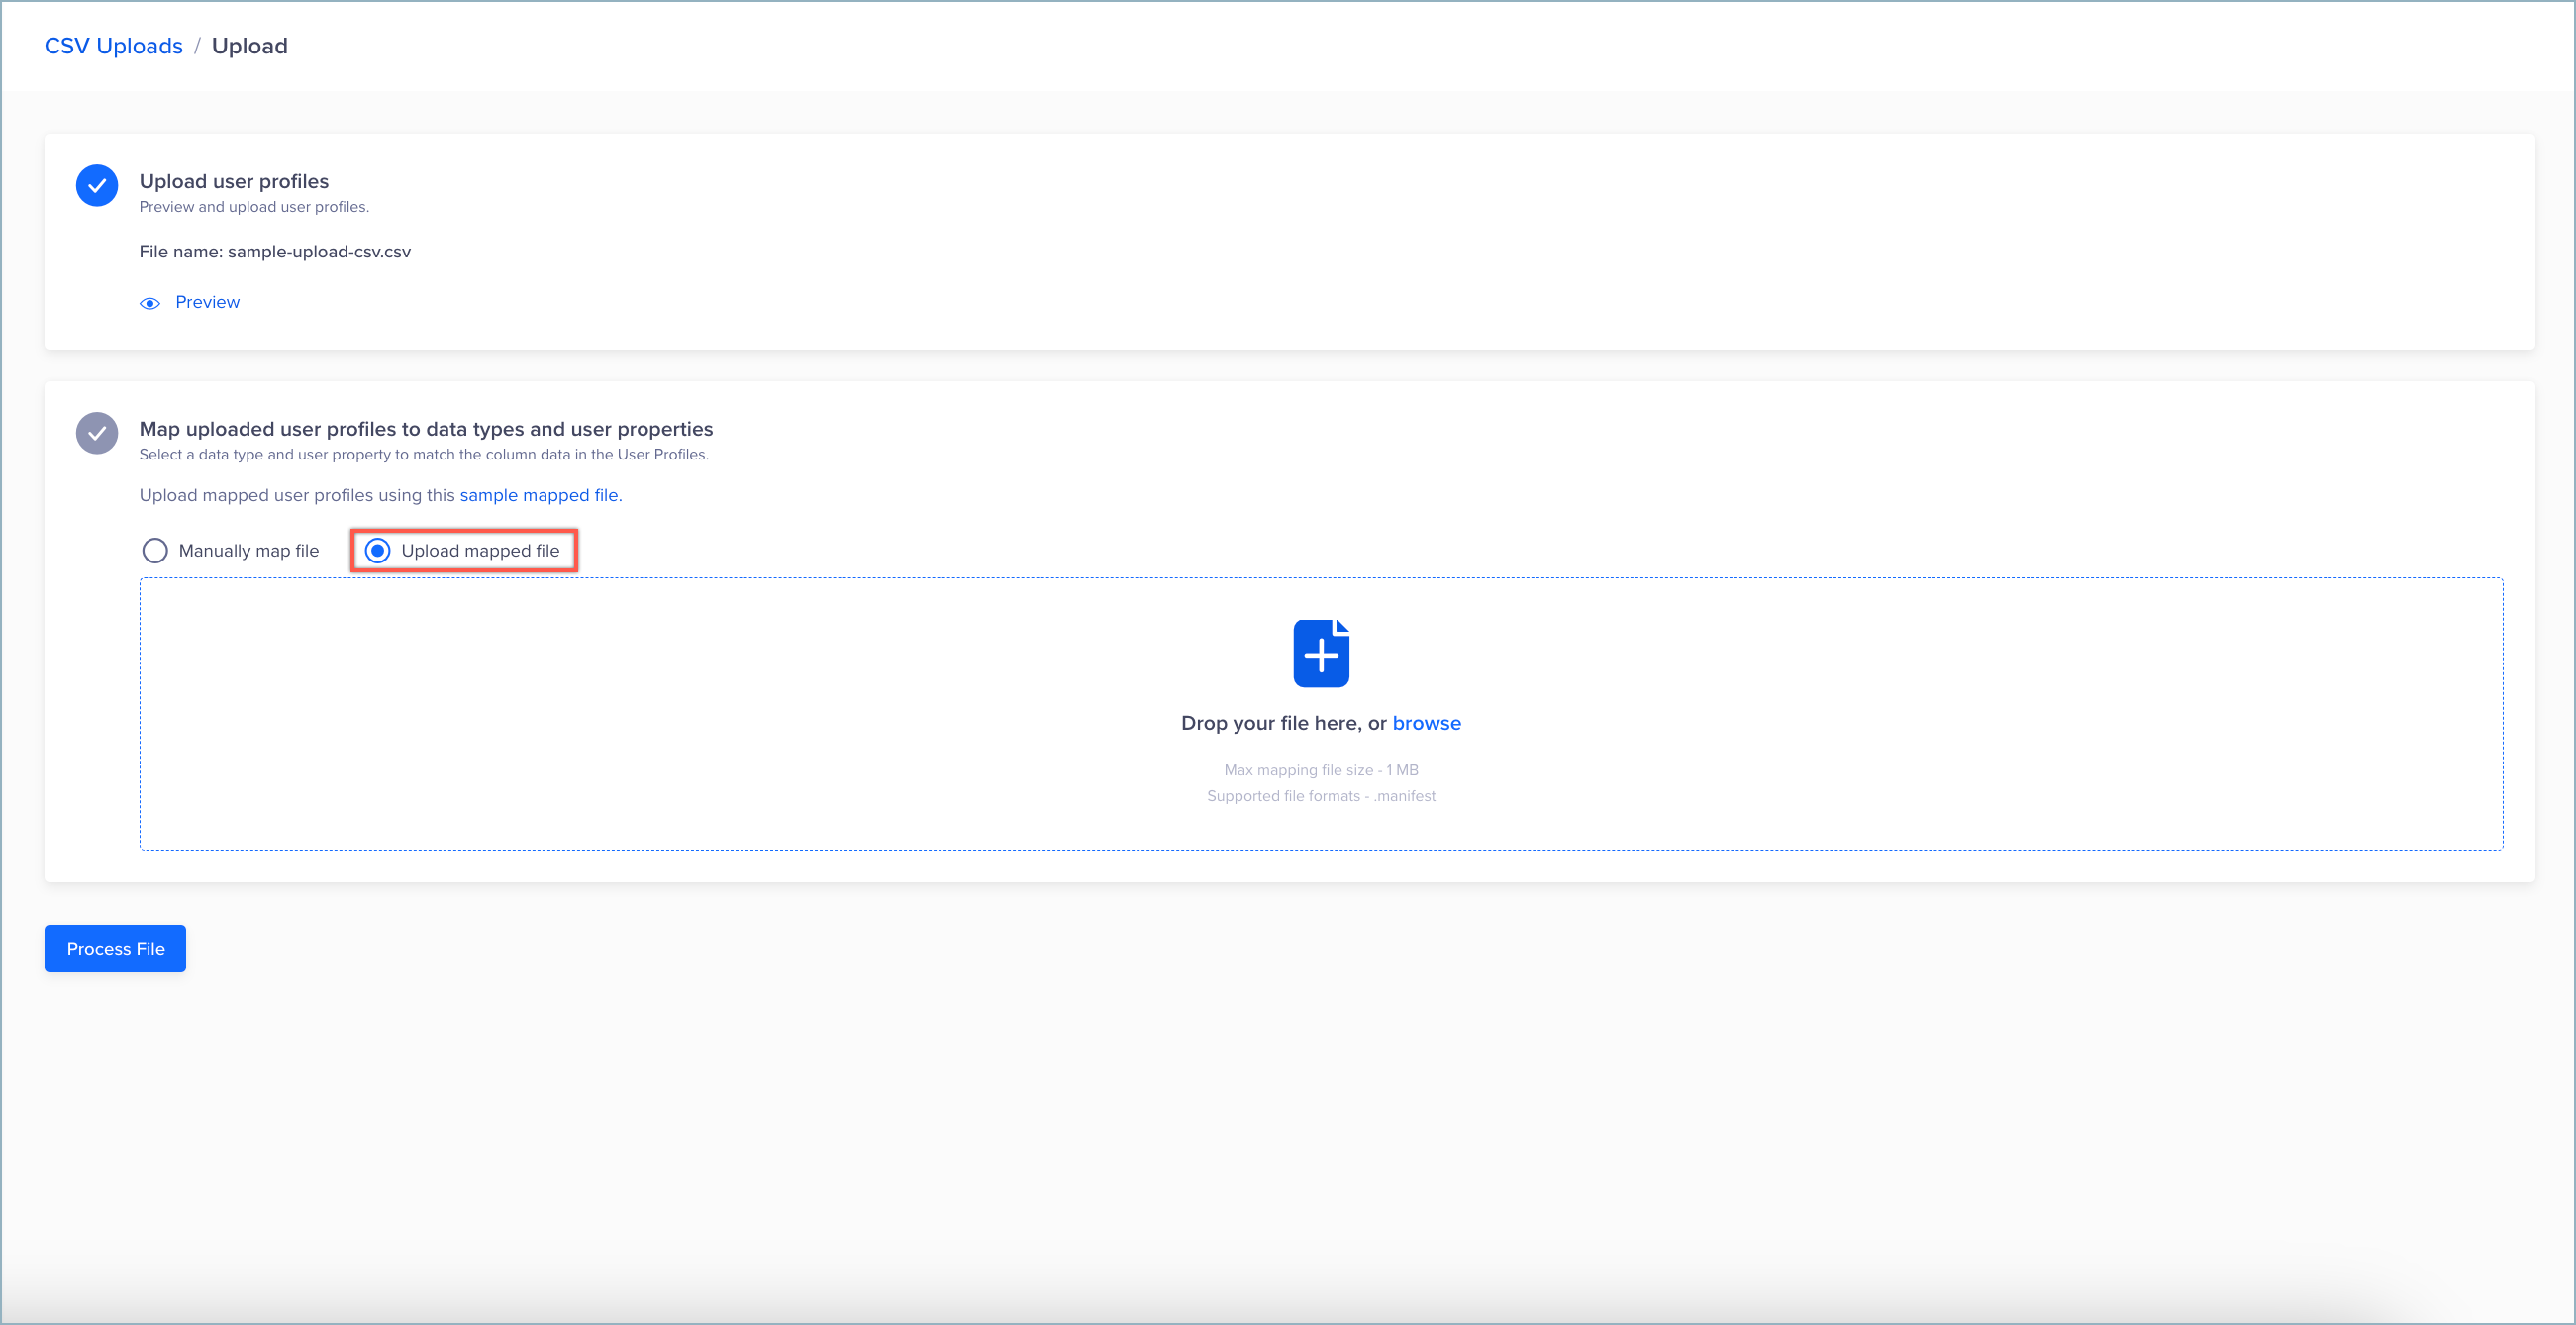
Upload Pre-Mapped User Profiles
- Drag and drop or browse the pre-mapped JSON manifest file.
The following is a sample JSON manifest file: - Click Preview to view the mapped file.
- Click Proces File.
Guidelines for Uploading Mapped FileJSON is a valid format.
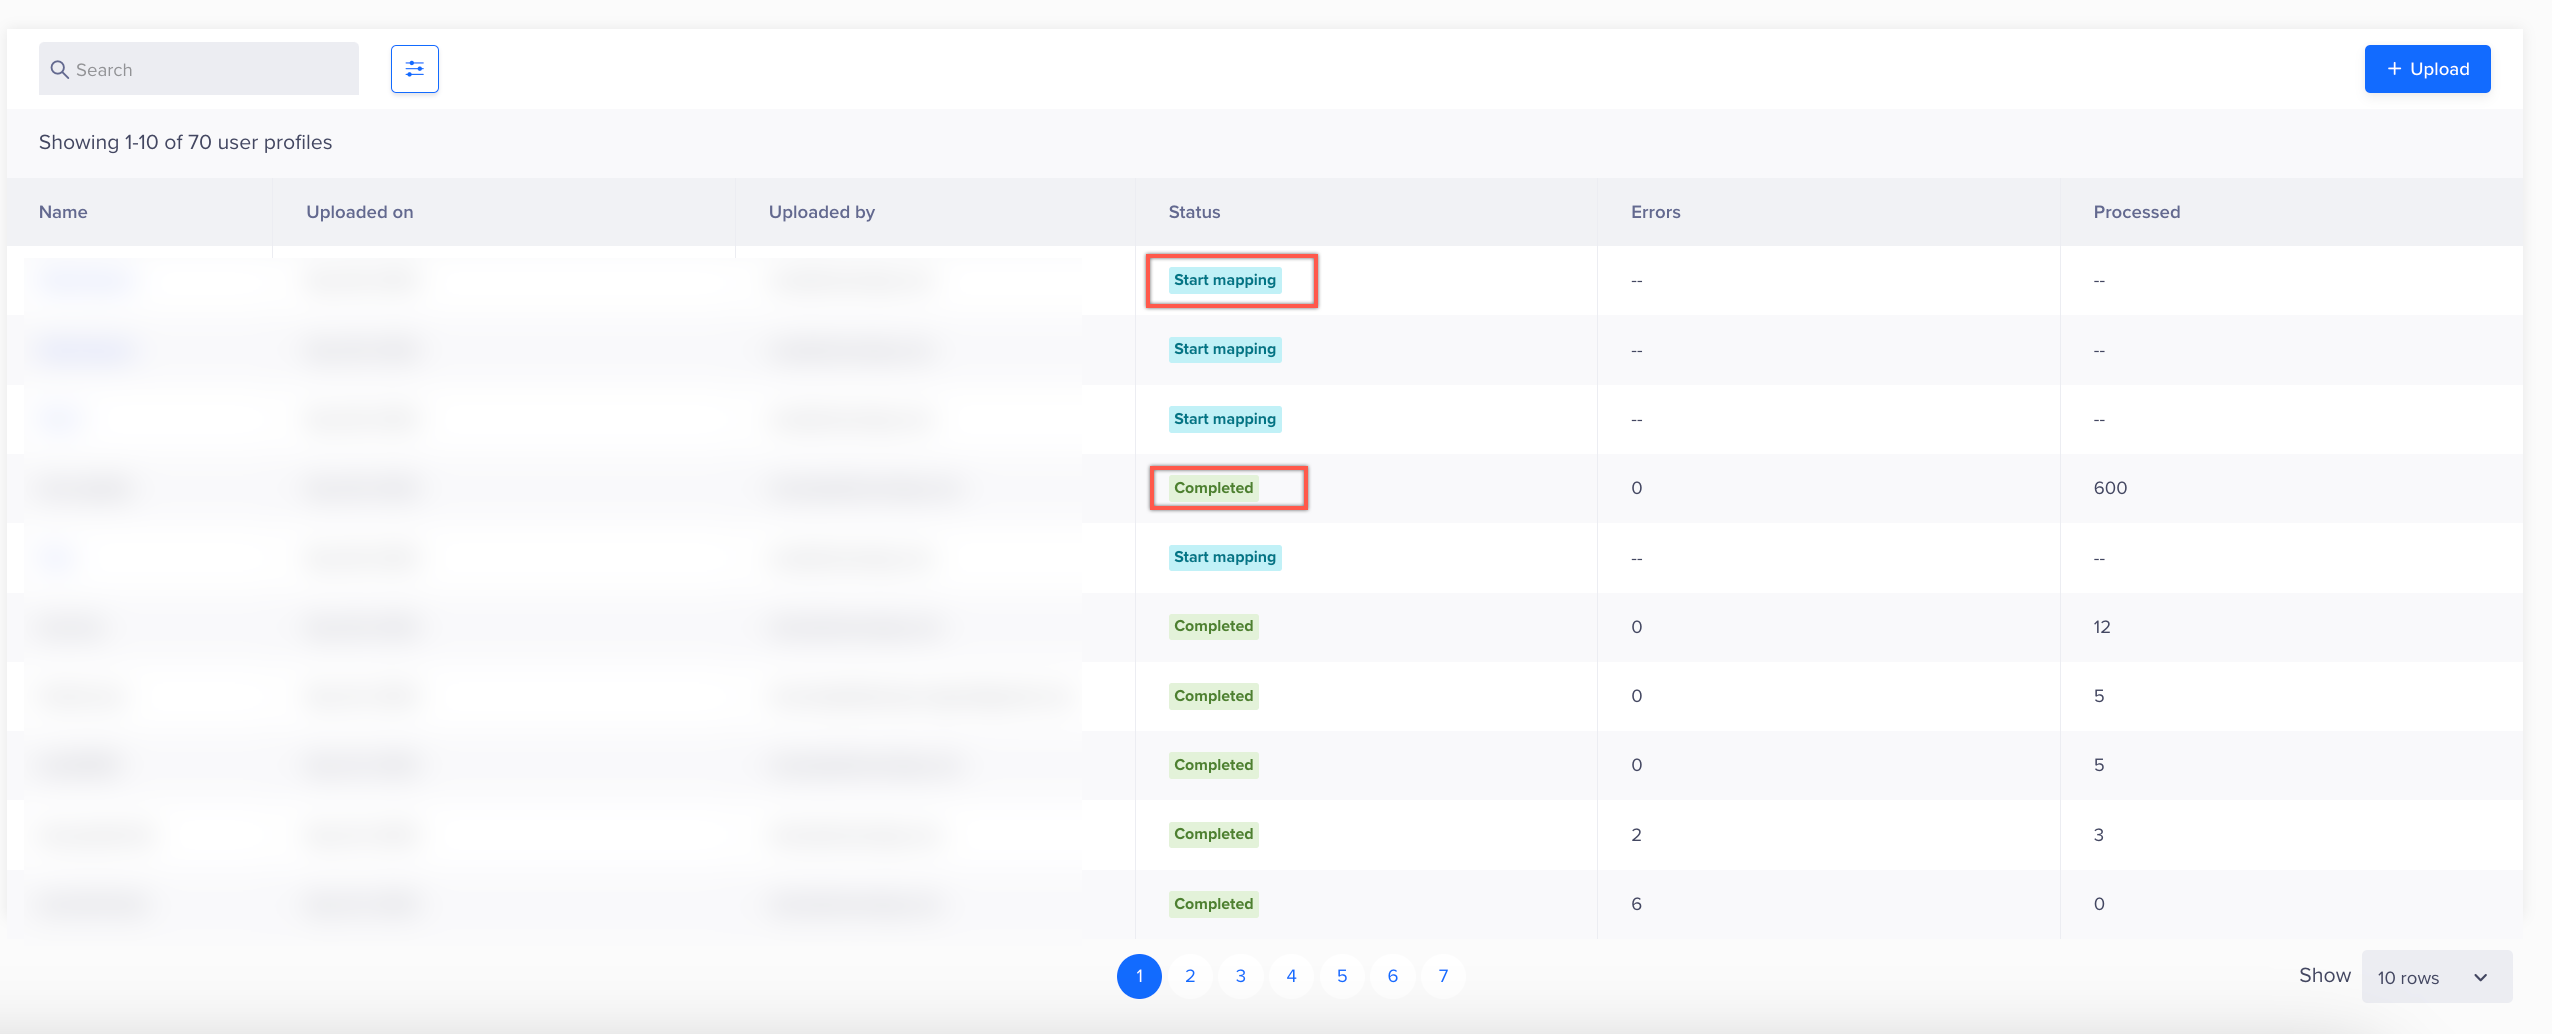
If you have not mapped the files, the status appears as Start mapping. Mapping is necessary to process the CSV upload. After the CSV file is processed, the status for that upload changes to Completed. For more information about the statuses, refer to the CSV Upload Details section.
Once the file has been successfully processed, you will receive an email notification with the processed data file and a detailed error report if any problems occur.
View the Status of the Newly-Uploaded File
Filter the Uploaded User Profiles
To filter the uploaded user profiles:
- Log in to your CleverTap account and click Settings > Engage > CSV Uploads.
- Click the
 icon.
icon.
The Filter Profile Uploads pane appears. - Select the required options from the Status drop-down list: Select All, Processing, Completed, Rejected, or Start mapping.
- Click Apply.
Filter Uploaded User Profiles by Status
- You can also filter the uploads using the date range option.

Filter Uploaded User Profiles by Date Range
Key Points to Remember
CSV Upload Details
- If a new user profile is uploaded, a new user profile is created on the account.
- If an existing user profile is uploaded, the old user profile is updated with new values.
- If a new user profile property is added, a property is created on the user profile.
- You can upload multiple CSV files simultaneously, even when existing files are currently being processed.
- The phone number must be in the format [country code][phone number] and is treated as an Alphanumeric. For example, +919869311111, where +91 is the country code for the India.
- After the upload is complete, the following information for the upload is displayed:
- Name: Displays the CSV import name.
- Uploaded on: Displays the date when the CSV file is uploaded.
- Uploaded by: Displays the email ID of the person who uploaded the file.
- Status: Displays the status of CSV File upload. The following are the possible upload statuses:
- Completed: Indicates that the CSV file has been successfully uploaded.
- Processing: Indicates that the CSV file is being processed.
- Rejected: Indicates that the CSV file was rejected due to multiple errors. Check your email to identify the error for rejection.
- Start mapping: Indicates that the mapping has not been done.
- Errors: Displays the count of rows that were not uploaded due to an error.
- Processed: Displays the count of records that were uploaded successfully.
CSV File Format
-
The following is an example of a CSV file format:
identity id_name id_email id_phone id_gender Employment Status Education status Wallet Balance DOB MSG-sms Payment Date 123456789 John Doe +919900000000 M TRUE Graduate 1 1487576752 FALSE 09/10/23 10:15:02 14155551235 Jane +919889000000 M FALSE Graduate 12 1487576752 FALSE 15/03/23 9:15:00 14155551234 Lincoln +919778000000 M 0 Graduate 34 1487576752 FALSE 09/01/22 13:08:00 _234853412 Mary [email protected] +919667000000 M 1 Graduate 255 1487576752 FALSE 09/10/23 10:15:00 [email protected] Bob [email protected] +919444000000 M 0 Graduate 45 1487576752 FALSE 08/01/21 10:15:00 [email protected] Adam [email protected] +919556000000 M 0 Graduate 24 1487576752 FALSE 09/06/20 10:15:00 -
The upload will not be allowed if the file is not a CSV file or does not comply with CSV standards.
-
identity is a mandatory column in the CSV file. However, if you want to make profile updates using the CleverTap ID, you can use the
objectIdin place of identity.
Note
- Ensure that the
identitykey is always in lower case.- You can upload CSV files up to 1 GB in size.
The following is the sample format for the CSV file using the objectId:

Sample CSV File using objectId
Date Format
-
CleverTap supports uploading date information in the following formats:
- dd/MM/yyyy HH:mm:ss
- MM/dd/yyyy HH:mm:ss
- yyyy/dd/MM HH:mm:ss
- yyyy/MM/dd HH:mm:ss
- dd MMM yyyy HH:mm:ss
- dd/MM/yyyy
- MM/dd/yyyy
- yyyy/dd/MM
- yyyy/MM/dd
- dd MMM yyyy
- Unix (EPOCH): A timestamp or a count of seconds. For example, 1695799434. It measures time by the number of seconds that have elapsed since 00:00:00 UTC on 1 January 1970. All other formats will be treated as a String.
-
Time defaults to 12:00:00 if hh:mm:ss is not added.
-
24-hour date format is supported.
NoteWe currently support uploading timestamps in 24-hour format and do not support AM/PM in timestamp. If the format is HH:mm:ss, use the 24-hour format (for example, 18:25:32). Do not use the 12-hour format (for example, 06:25:32 PM).
Operations for Profile Properties
You can use the following operations on user profile properties:
-
$add: You can add specific values for the multi-value profile properties. For example, you can add a particular item from the list of items that belong to a particular user profile.

Add a Value for User Property
-
$remove: You can remove specific values from the multi-value user property. For example, you can remove a particular item from the list of items that belong to a particular user.

Remove Value for User Property
-
$set - You can replace the current value with a new value. For example, you can replace the current value of a particular single-value or multi-value user property.

Set Value for User Property
-
$delete - You can remove the property entirely. For example, you can completely remove the property
MyStufffor user profile with identity1904and all the values in it.

Delete a User Property
FAQ
Q: What Happens if an Invalid Identity Value Is Set?
A: If you input an incorrect or invalid identity, it results in the below error, and the system flags the records in the file as error.
Error MessageIdentity value cannot be undefined or set at least one of identity / fbId / gpId / objectId under 1024 chars to identify the user.
Make sure not to use the following values as the identity:
- undefined
- null
- na
- n/a
- 0
- nil
- -1
- infinity
- -infinity
- inf
- -inf
- nan
- -nan
- empty
- xxxxxx
- none
Q. How to upload user user data via CSV?
A. Uploading your historical user data via CSV is quick and simple; however, note the following key pointers before uploading your user data via CSV:
- The identity field must be defined as identity with a lowercase i and not Identity.
- The identity field is a mandatory column.
- Check that your CSV complies with the CSV standards. Otherwise, the upload will be denied.
- You can download the sample CSV file for a quick check from the Settings section under CSV uploads.
Below is a sample CSV:
