Gupshup
Enable WhatsApp Messaging via Gupshup
Overview
CleverTap supports customers who send and receive WhatsApp messages using Gupshup as their provider. Once a provider is selected, the user must create a template before creating a WhatsApp campaign.
Select Gupshup Provider
Follow these steps to choose Gupshup as your messaging provider for WhatsApp.
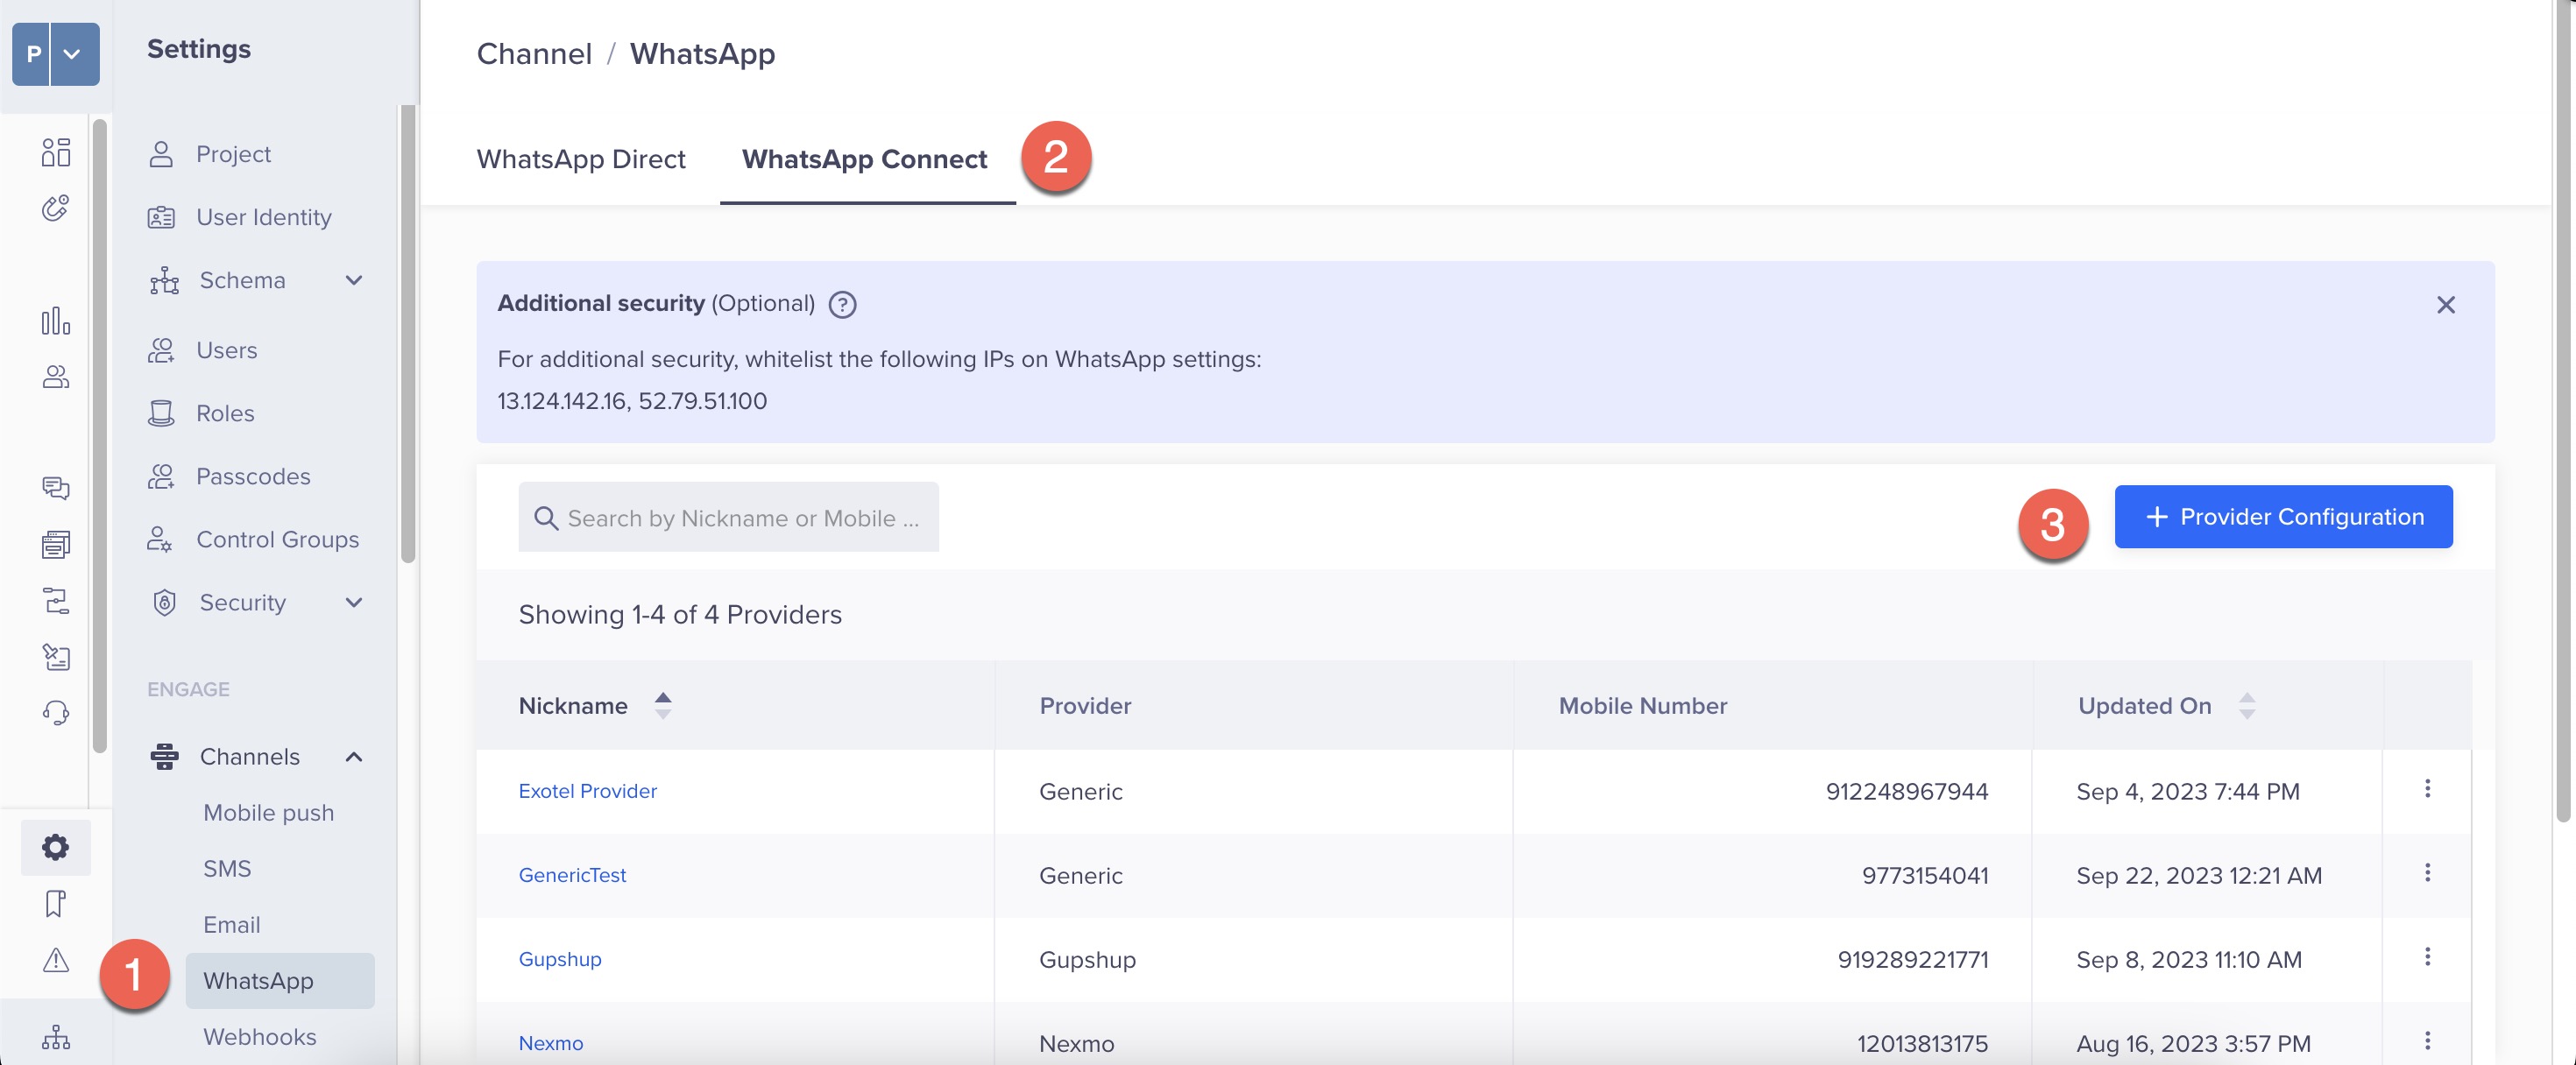
- Navigate to Settings and select Channels from the CleverTap dashboard.
- Select WhatsApp > WhatsApp Connect.

NoteOnly one WhatsApp Provider account is supported per CleverTap project.
- Click +Providers, and select Gupshup from the Provider list.

Provider Setup
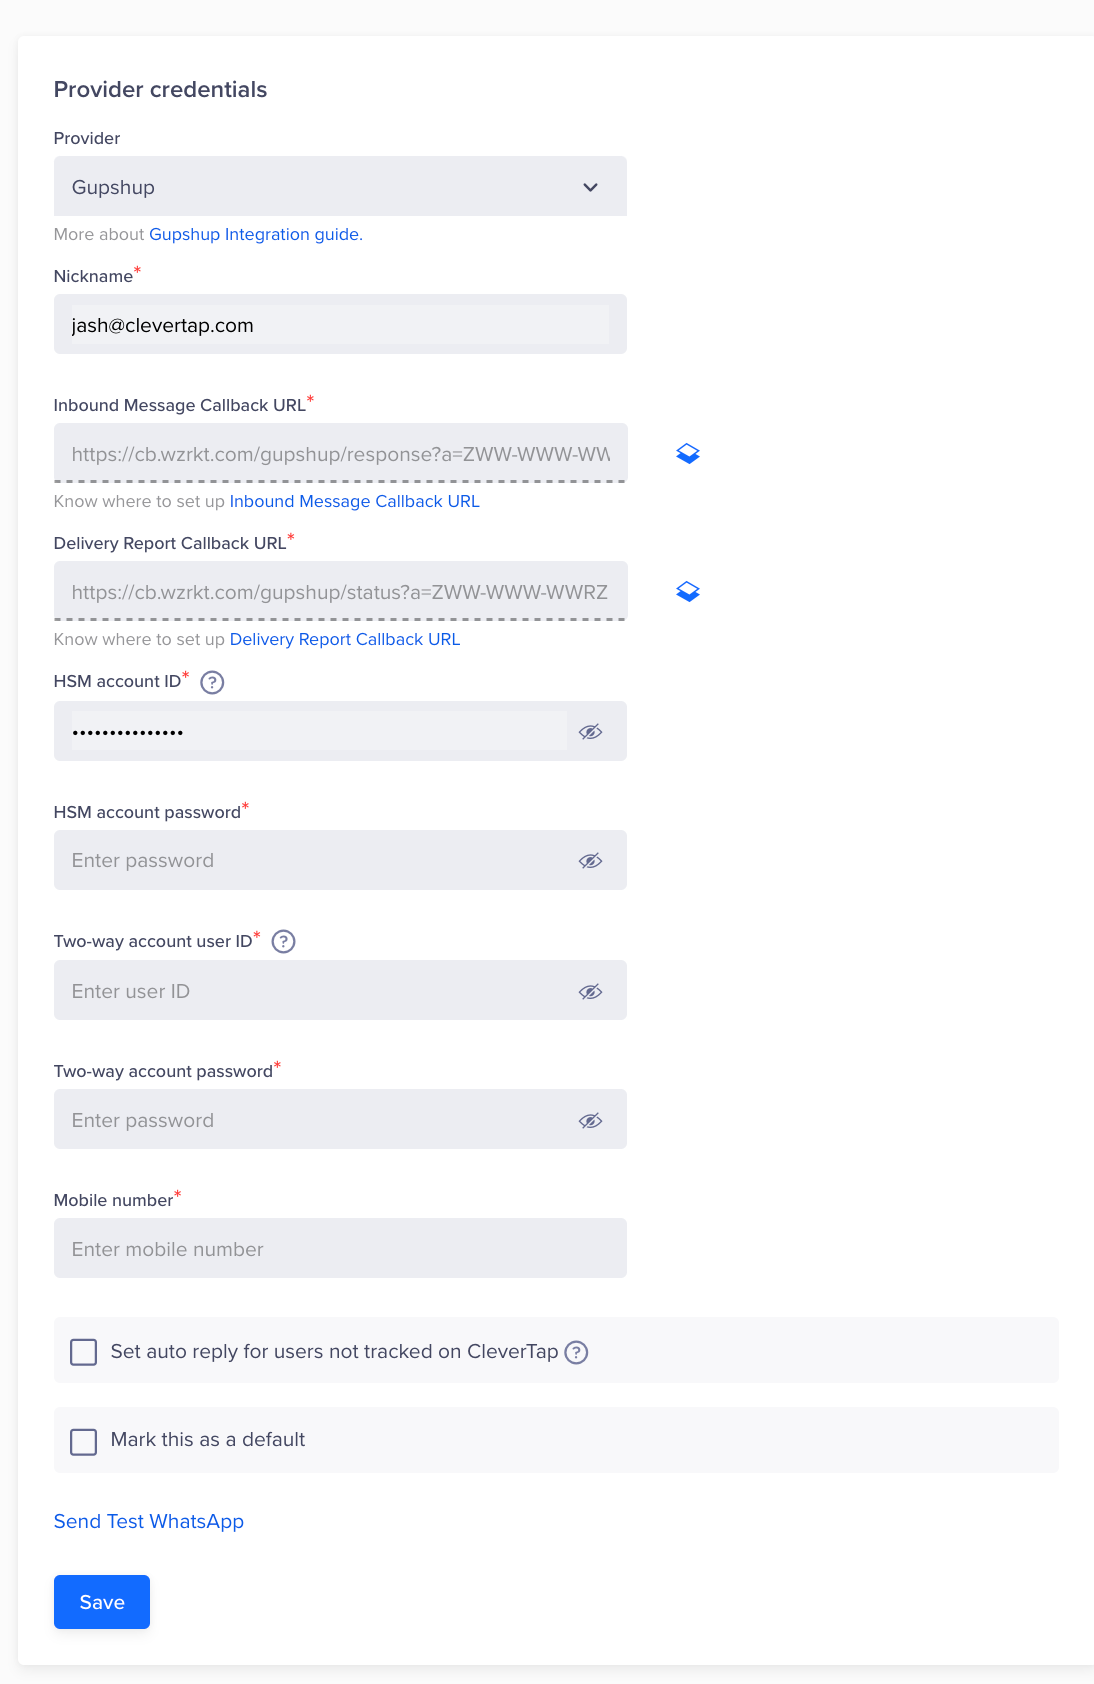
- Enter the following credentials:
- Nickname: Enter the nickname for this set of credentials.
- Inbound message callback URL: This is a non-editable field.
Note that Gupshup must use the following payload format to configure incoming message callbacks on their end.
CleverTap_Sandbox Incoming Hits - Calling URL :: POST :: https://cb.wzrkt.com/gupshup/response?a=YOUR_ACCOUNT_ID ==> {
  "waNumber": "91XXXXXXXXXX",
  "mobile": "91XXXXXXXXXX",
  "name": "John Doe",
  "text": "incoming text",
  "type": "text",
  "timestamp": "1658261071000"
}- Delivery reports callback URL: This is a non-editable field.
Delivery report, Generic, and Click tracking callback
- Gupshup must utilize the following payload format to configure the DLR callback on their end.
- Gupshup can opt for either the Generic callback payload format or Click Tracking callback payload format based on their requirements.
CleverTap supports click tracking integration with Gupshup. To enable the transmission of click data from Gupshup to CleverTap, please contact Gupshup Support to activate Click Tracking for your account. Once CleverTap receives a valid payload from Gupshup, a Notification Clicked event will be triggered in your CleverTap dashboard account.
2022-02-25 01:22:30 ################ KEYVALUE Forwarding: https://cb.wzrkt.com/gupshup/status?a=YOUR_ACCOUNT_ID => headers:  => body: [response:[{
  "srcAddr": "CLVTAP",
  "extra": "9|1658264893|20220720|9|0",
  "channel": "WHATSAPP",
  "externalId": "4687162516402008133-497817541934555810",
  "cause": "READ",
  "errorCode": "026",
  "destAddr": "+91XXXXXXXXXX",
  "eventType": "READ",
  "eventTs": 1658264959000
}]]
curl --location 'https://api.wzrkt.com/gupshup/status?a=YOUR_ACCOUNT_ID '
--header 'Content-Type: application/json'
--data '{
"deviceType": "Desktop",
"gsurl": "www.gsurl.com/abc2131",\\mandtory
"mobile": "91XXXXXXXXXX",
"clickTime": "2024-11-05 10:00:54",\\mandotry
"originalURL": "https://docs.clevertap.com/docs/getting-started", \\mandotory
"userId": "<example_user_id>",
"token": "********",
"msg_id_or_blank": "testMsgid",
"causeId": "5295633975448571957",
"internalId": "TextInternalID",
"carrier": "Reliance",
"browser": "Chrome",
"extra": "4930004|1731918555|20241118|4930004",\\mandatory
"device": "Linux+Desktop"
"userAgent":"Mozilla/5.0 (Windows NT 10.0; Win64; x64) AppleWebKit/537.36 (KHTML, like Gecko) Chrome/94.0.4606.81 Safari/537.36"
}'curl --location 'https://cb.wzrkt.com/gupshup/status?a=YOUR_ACCOUNT_ID'
--header 'Content-Type: application/json'
--data '{
"payloadVersion": 0.1,
"statuses": [
{
"msgId": "264780|1733353166|20241205|264780|0", \\mandatory
"status": "clicked", \\mandatory
"timestamp": 1733298876,
"url": "www.CleverTap.com", \\mandatory
"shortUrl": "https://bit.ly/3OjG22B", \\mandatory
"userAgent": "Mozilla/5.0 (Windows NT 10.0; Win64; x64) AppleWebKit/537.36 (KHTML, like Gecko) Chrome/94.0.4606.81 Safari/537.36"
}
]
}'- HSM account ID: Enter the HSM account user ID.
- HSM account password: Enter the HSM account password.
- Two-way account user ID: Enter the two-way account user ID.
- Two-way account password: Enter the two-way account password.
- Mobile Number: Enter either a Gupshup phone number or a shortcode. You can enter phone numbers or shortcodes under the Gupshup dashboard > Numbers > Your Numbers.
Non-Editable FieldsThe inbound message callback URL and delivery reports callback URL are non-editable fields. These values must be set up in your Gupshup account to allow CleverTap to receive inbound messages from end-users and delivery reports for messages sent through Gupshup.
Auto Reply CheckboxSelect the checkbox if you want to set auto-replies for users who are not tracked in CleverTap. If a message is received from a phone number for which a profile is not present with CleverTap, then this default message is sent to the user.
- Send a Test WhatsApp notification:

Send Test Message on WhatsApp
To ensure that the integration is successful:
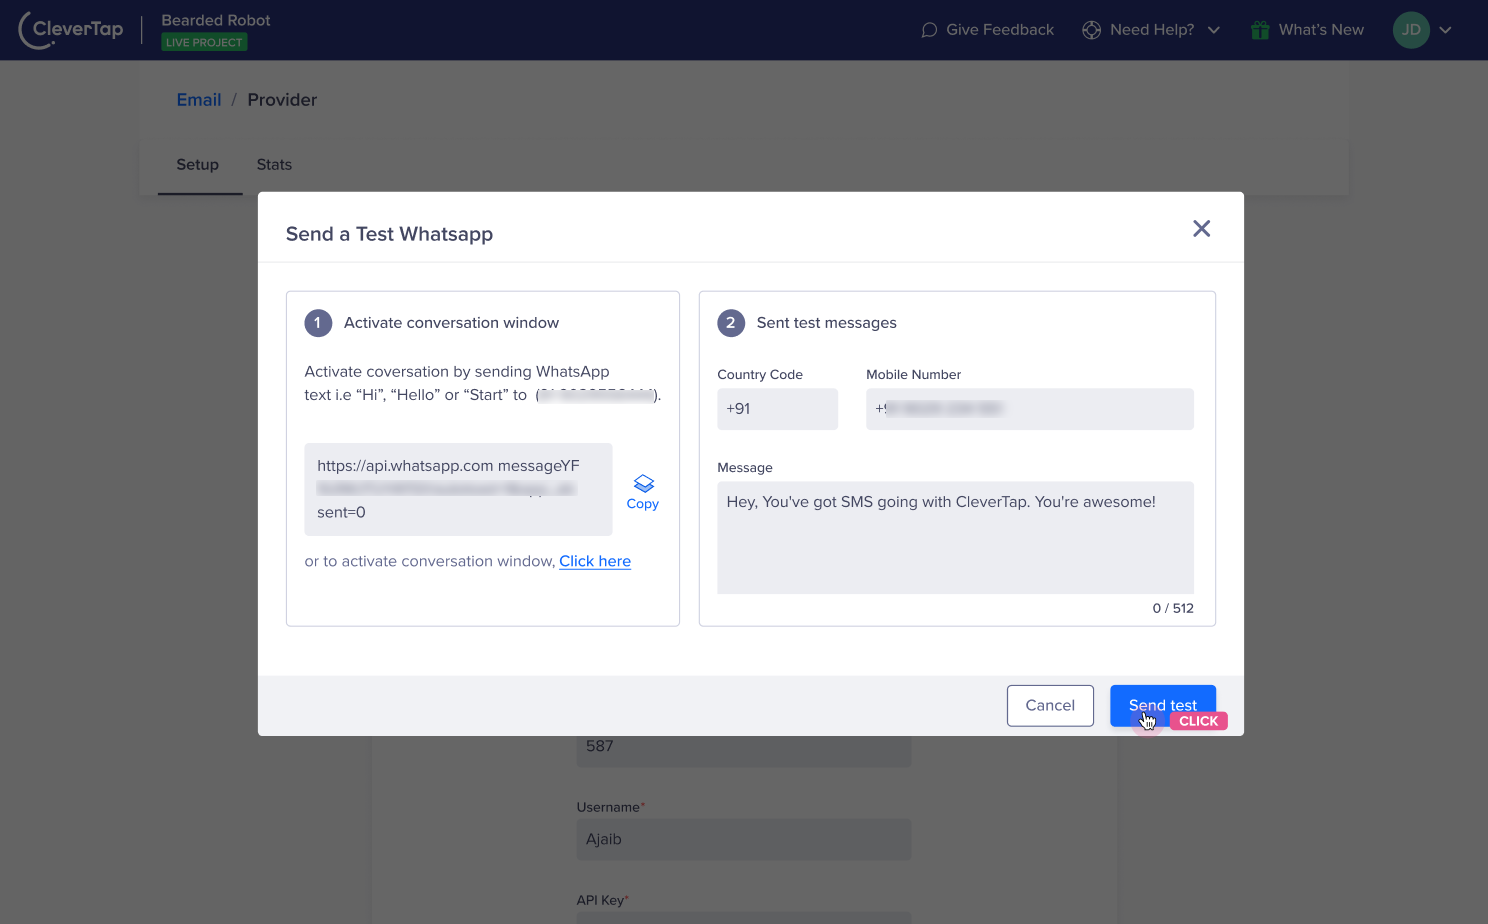
a. Click the Send Test WhatsApp hyperlink before creating WhatsApp campaigns and journeys. To begin with, activate the conversation window by following any one of the following methods:
i. Save the business contact and send a WhatsApp message to that number.
ii. Copy and share the link with the user to whom you want to send the test notification. Further, ask the user to click the link and send a WhatsApp message to initiate a conversation.
iii. If you want to send a test notification to yourself, you can click the link and initiate a WhatsApp conversation.
b. Enter the following details:
Country Code and Mobile Number: Enter the country code and mobile number of the user to whom you want to send the test message.
 Message: Here, you can enter the sample text message you want to send to the test user. Once you click on Send Test, the success or failure response displays on the dashboard. If the message is not delivered, you can copy the response payload and share it with the Gupshup team to debug the issue.
- Click Save.
Select Template
- Refer to this guide on how to create a WhatsApp template.
- The following are the template types for Gupshup on CleverTap:
Testing a Message Template
Refer to this document to understand how to test a template.
Create Campaign
To create a WhatsApp campaign using Gupshup as the provider, refer to Creating a WhatsApp Campaign for detailed instructions.
Troubleshooting
IP Whitelisting
Restricted IPs can cause errors during integration. Check that no IP restrictions are enabled on the Gupshup account. To check the IPs from the CleverTap dashboard, go to Settings > Channels > WhatsApp. The FCM credentials_section lists the IPs used to send WhatsApp requests. These IPs must be whitelisted on both the _one-way _and _two-way account IDs of Gupshup.

Restricted IPs
Updated about 2 months ago
