Zapier
Workflow Automation
Overview
Zapier, a workflow automation platform, automates repetitive work by connecting the applications with zero coding. The following are some of the scenarios where Zapier can prove to be a very useful platform:
- Add responses from the survey conducted to the CleverTap dashboard
- Update user profile information on the CleverTap dashboard
Zapier allows you to transfer information collected in one app (the trigger) to another application (the action). Such a trigger/action combo is called a Zap. With this integration, you can create Zaps to do the following:
Prerequisites for Integration
The following are the prerequisites for CleverTap-Zapier integration:
- A CleverTap Account Passcode
- An active Zapier account to create the CleverTap app
Create a Passcode on the CleverTap Dashboard
CleverTap uses a header-based authentication model to authenticate requests to the API. Every CleverTap API call must include Account ID and Passcode as the request headers. To create a passcode, refer to Create Account Passcode.
Create/Update User Information
To create/update the user information:
- Log in to the Zapier dashboard and click + Create Zap.
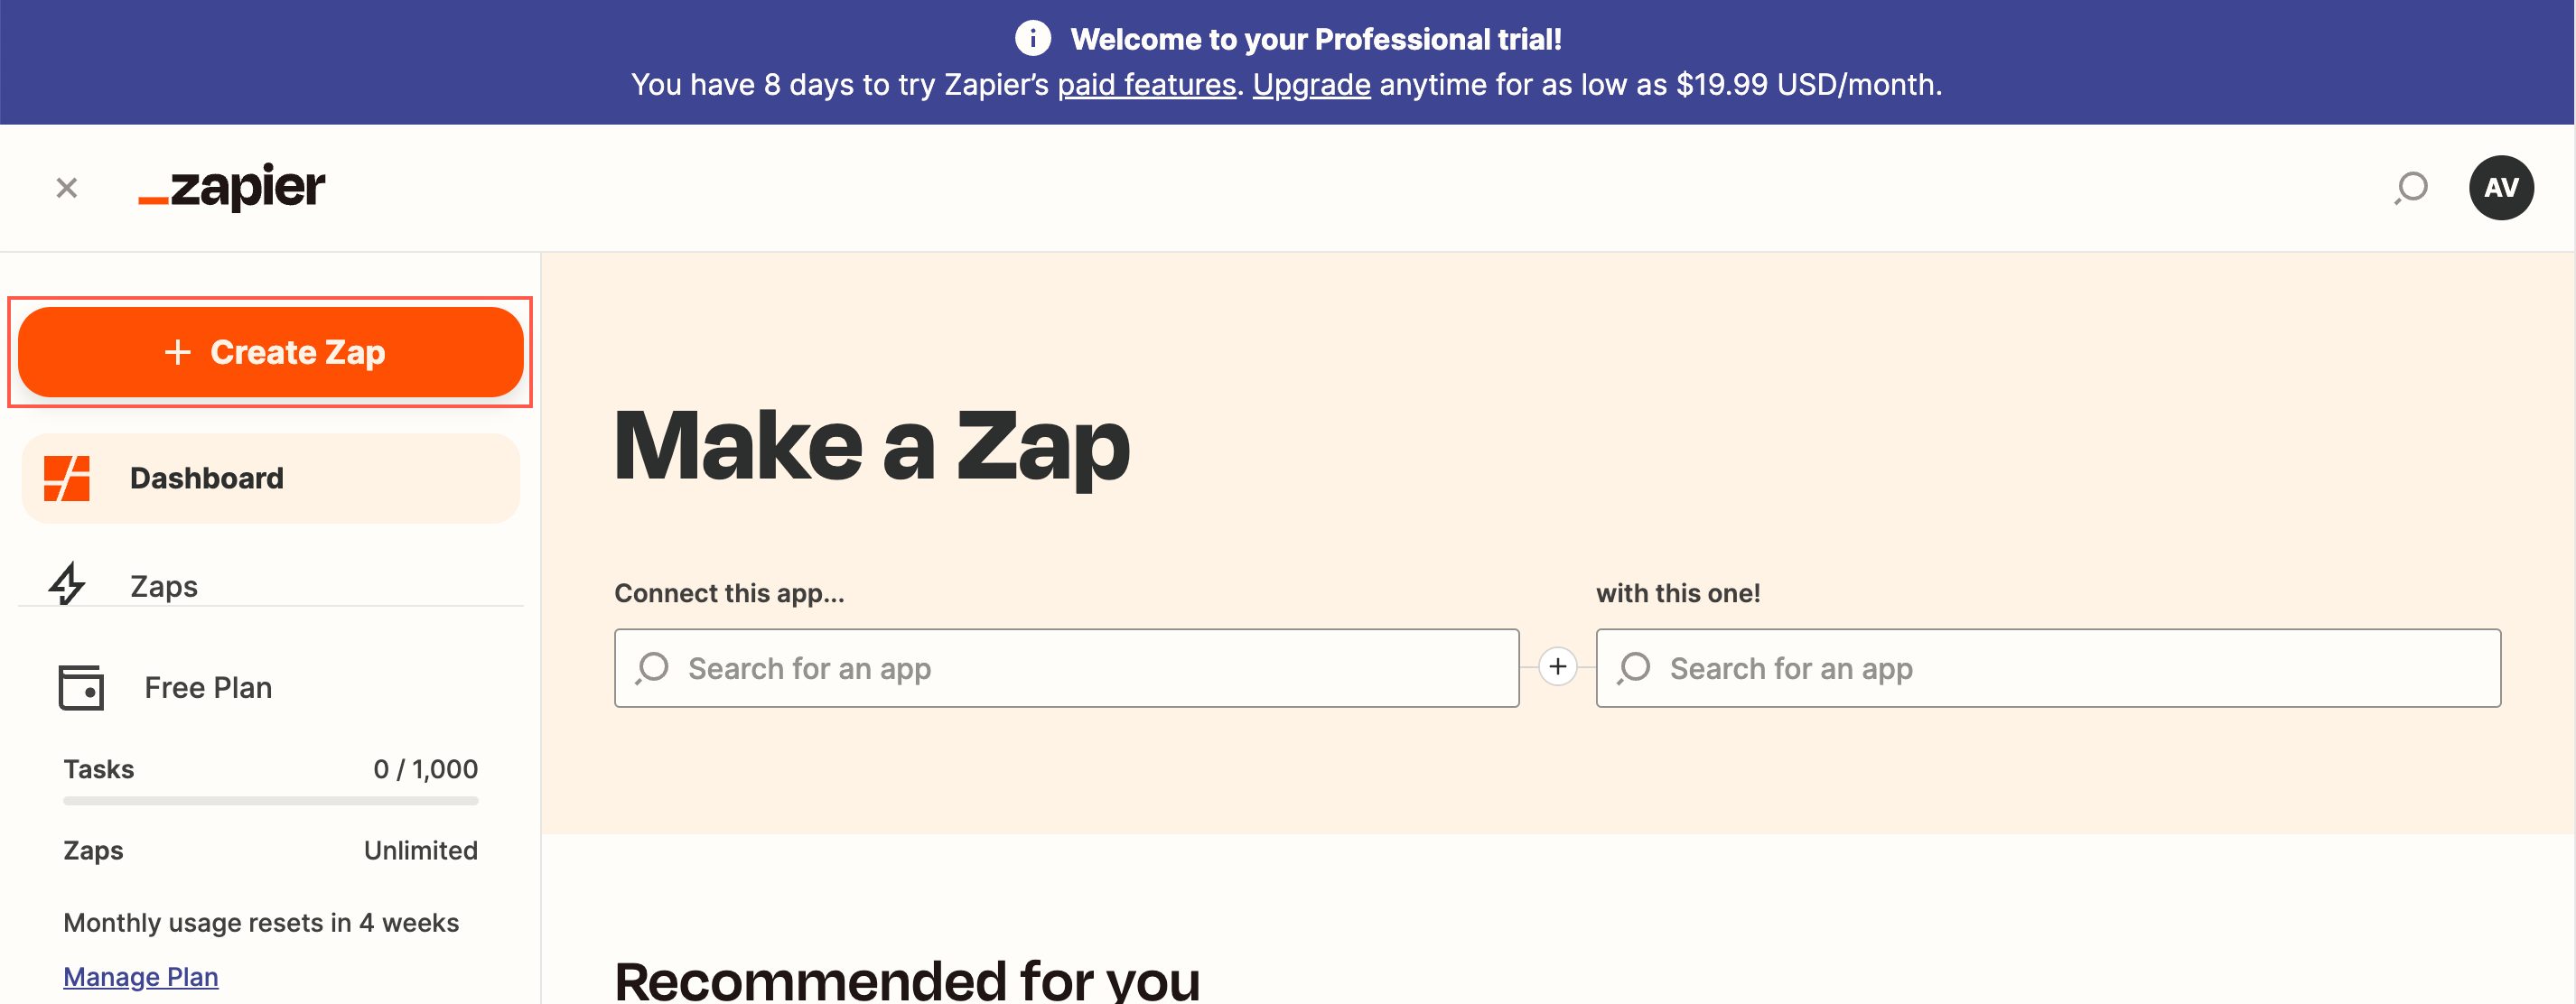
Create a Zap on Zapier Dashboard
Zapier can connect different applications. We will use Google Sheets for this example.
-
Set up a Trigger. For this example, perform the following steps:
a. Select Google Sheets from the App event section. This starts the Zap when a trigger event takes place in Google Sheets.
b. Select Event from the dropdown list. We will select New Spreadsheet Row for this example and click Continue.
d. Select the Google Sheets account from the dropdown list. You can also connect a new account if your account does not appear in the dropdown.
e. Click Continue.
f. Set up a trigger event. For this example, select the Google sheet for which you want to set up an event. Also, select the Worksheet from the Google sheet for which you want to set up a trigger and click Continue.
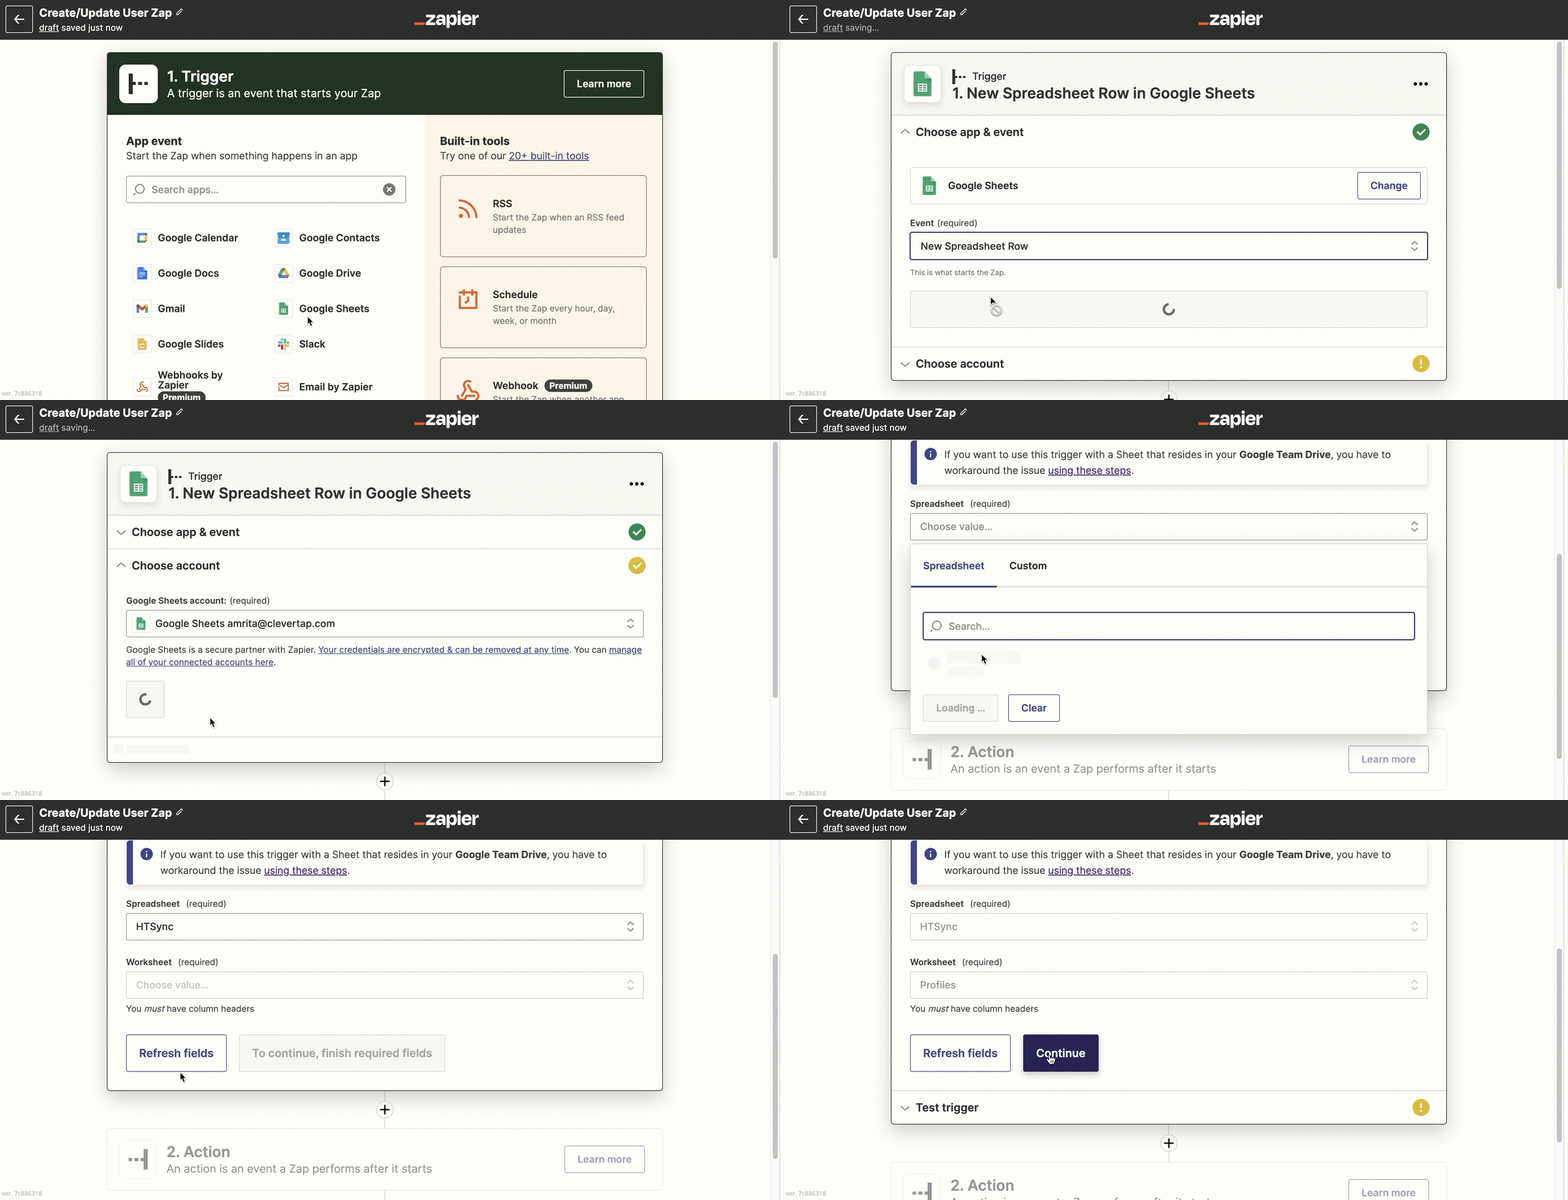
Set Up Trigger Event
-
Click Test Trigger. This ensures that the right account is connected and the trigger is set up correctly.
-
Click Continue.
-
Select theAction that the zap must perform after the trigger event occurs. For this example, perform the following steps:
a. Select CleverTap from the App event dropdown.
b. Select Create/Update User Profile from the Event dropdown. This implies that whenever a new row is added to the selected google sheet, a new user profile is created, or an existing user profile is updated with the new information.
c. Click Continue.
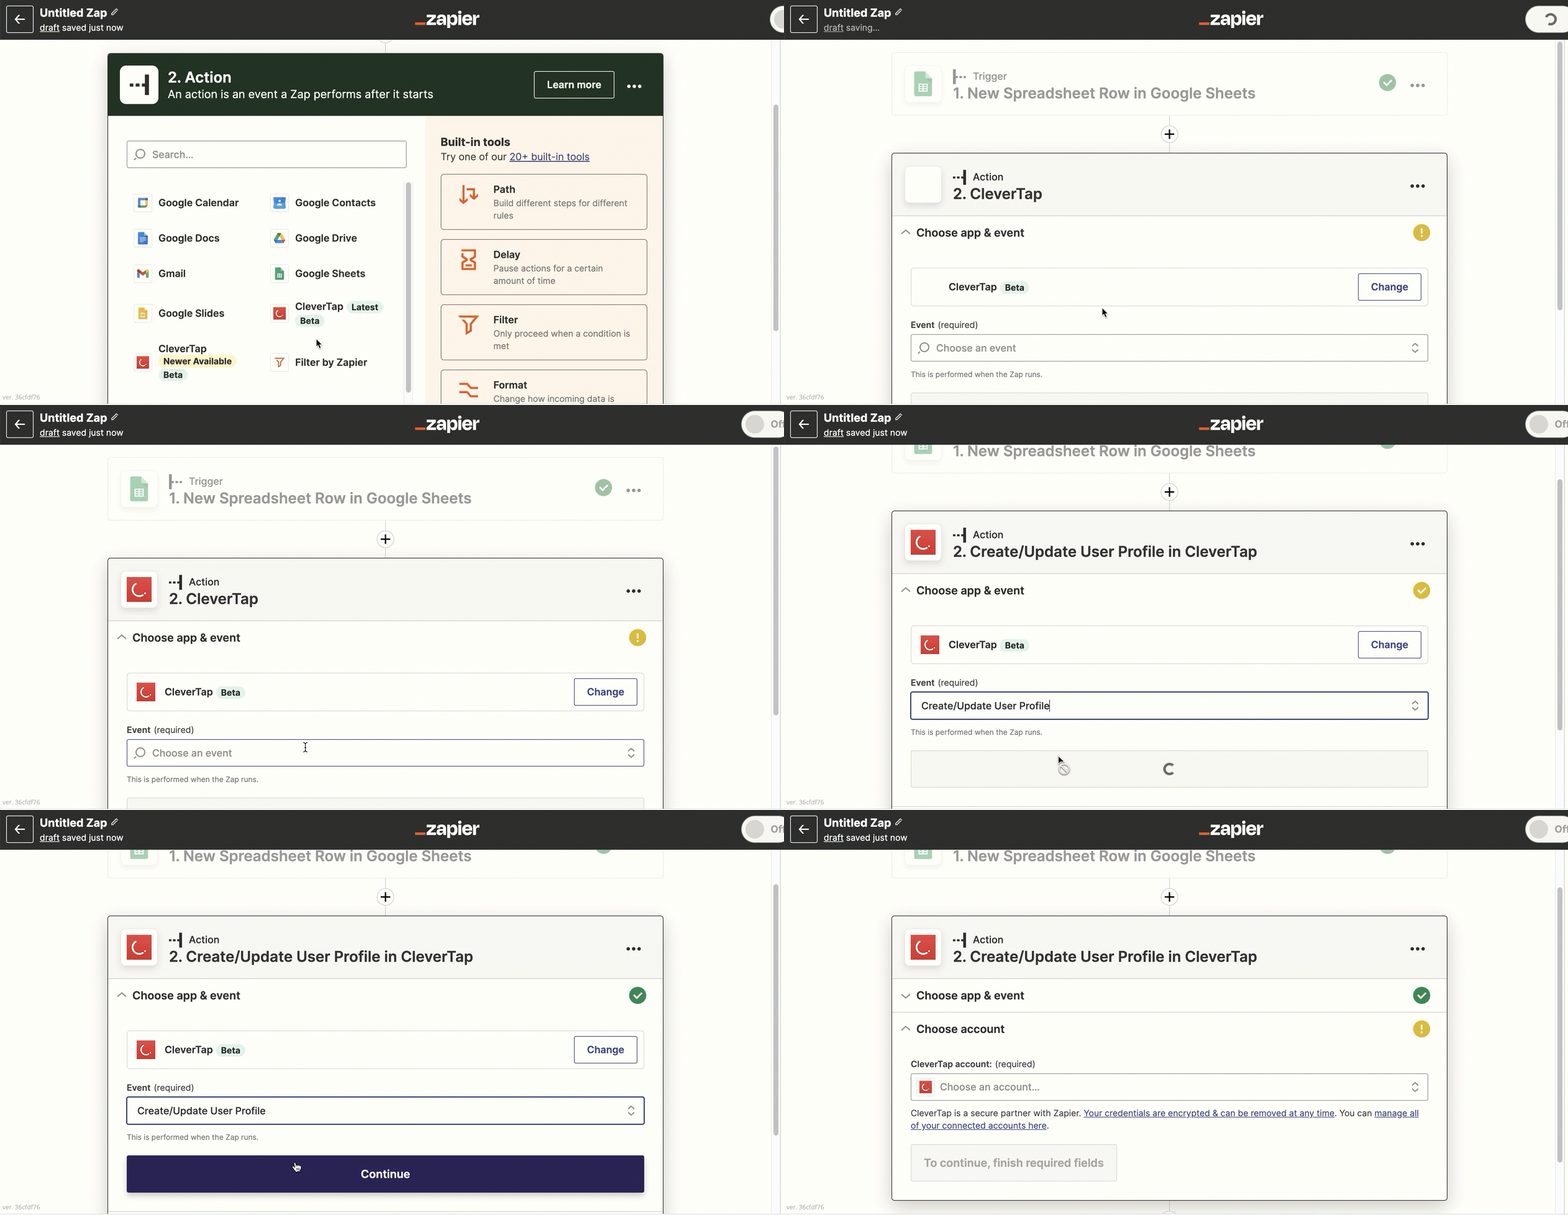
Select Action for Zap
d. Click Choose account and then click + Connect a new account. Connect an account | Zapier window opens. Enter all the required details for connecting the CleverTap account. Enter the same passcode that you obtained in the Create a Passcode on CleverTap Dashboard step.
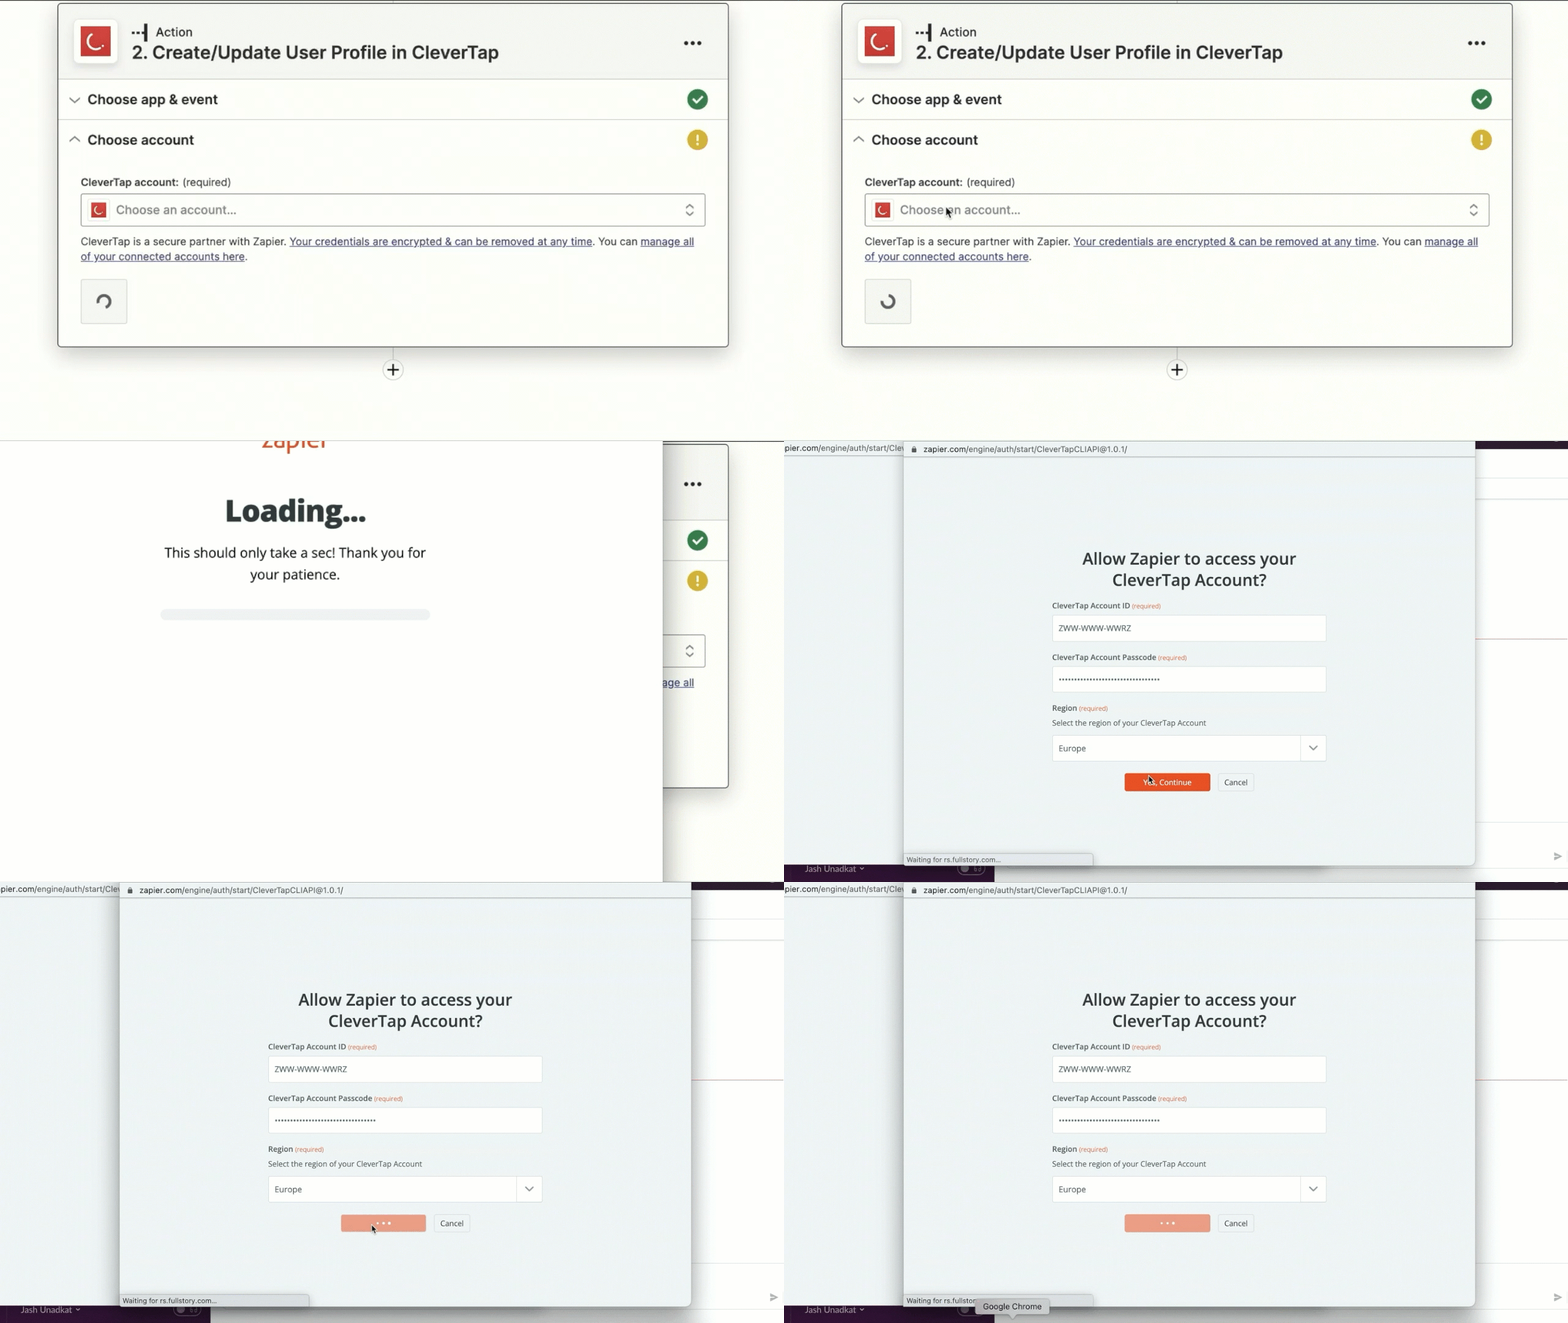
Select Account to Connect the Account
e. Click Continue after successfully connecting your account.
f. Set up an action as shown in the following figure and click Continue:
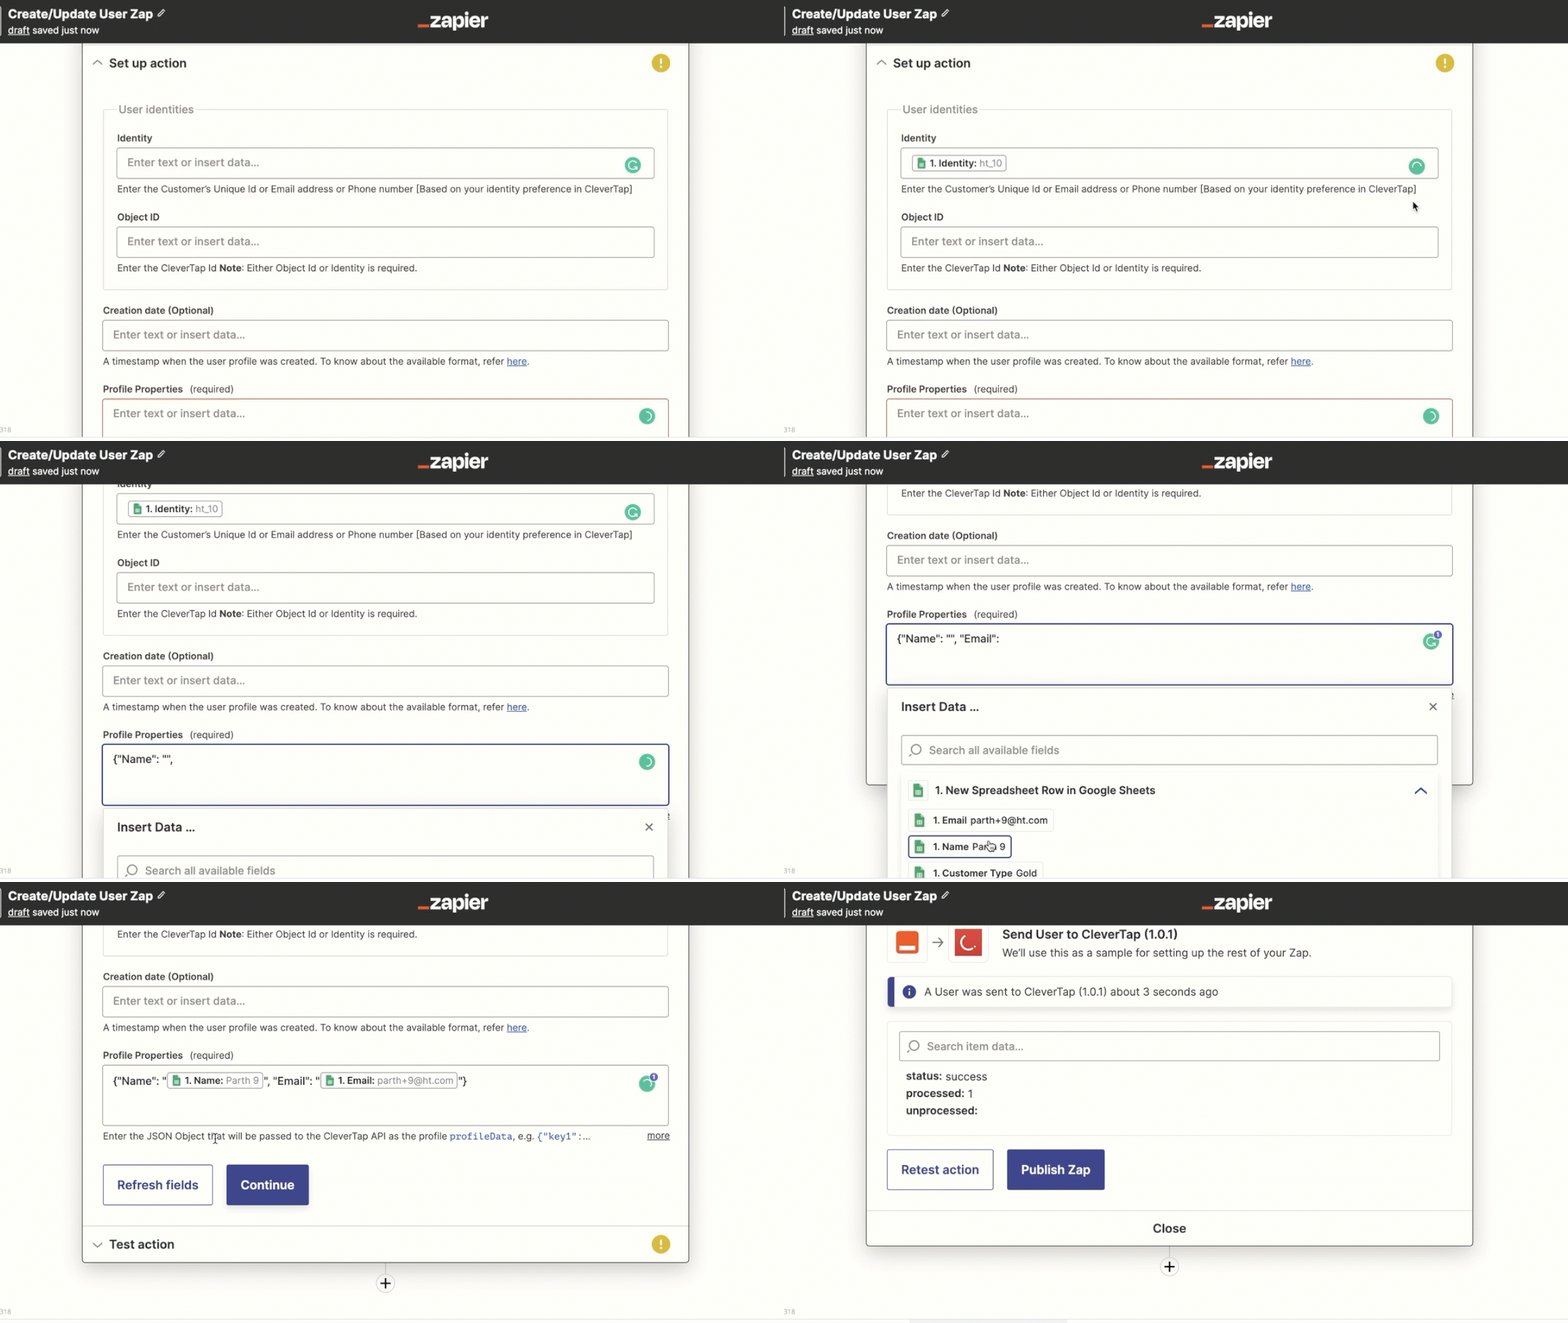
Set Up an Action
- Click Test action to test the zap.
- Click Publish Zap.
After publishing this zap, a new user is created, or an existing user is updated on the CleverTap dashboard every time a trigger occurs. CleverTap uses the Identity field to identify if it is a new user or an existing user.
Upload Event
To upload an event:
-
Log in to the Zapier dashboard and click + Create Zap. Zapier can connect different applications. We will use Google Sheets for this example.
-
Set up a Trigger. For this example, perform the following steps:
a. Select Google Sheets from the App event section. This starts the Zap when a trigger event takes place in Google Sheets.
b. Select Event from the dropdown list. We will select New Spreadsheet Row for this example.
c. Click Continue.
d. Select the Google Sheets account from the dropdown list. You can also connect a new account if your account does not appear in the dropdown.
e. Click Continue.
f. Set up a trigger event. For this example, select the google sheet for which you want to set up an event. Also, select the Worksheet from the google sheet for which you want to set up a trigger and click Continue.
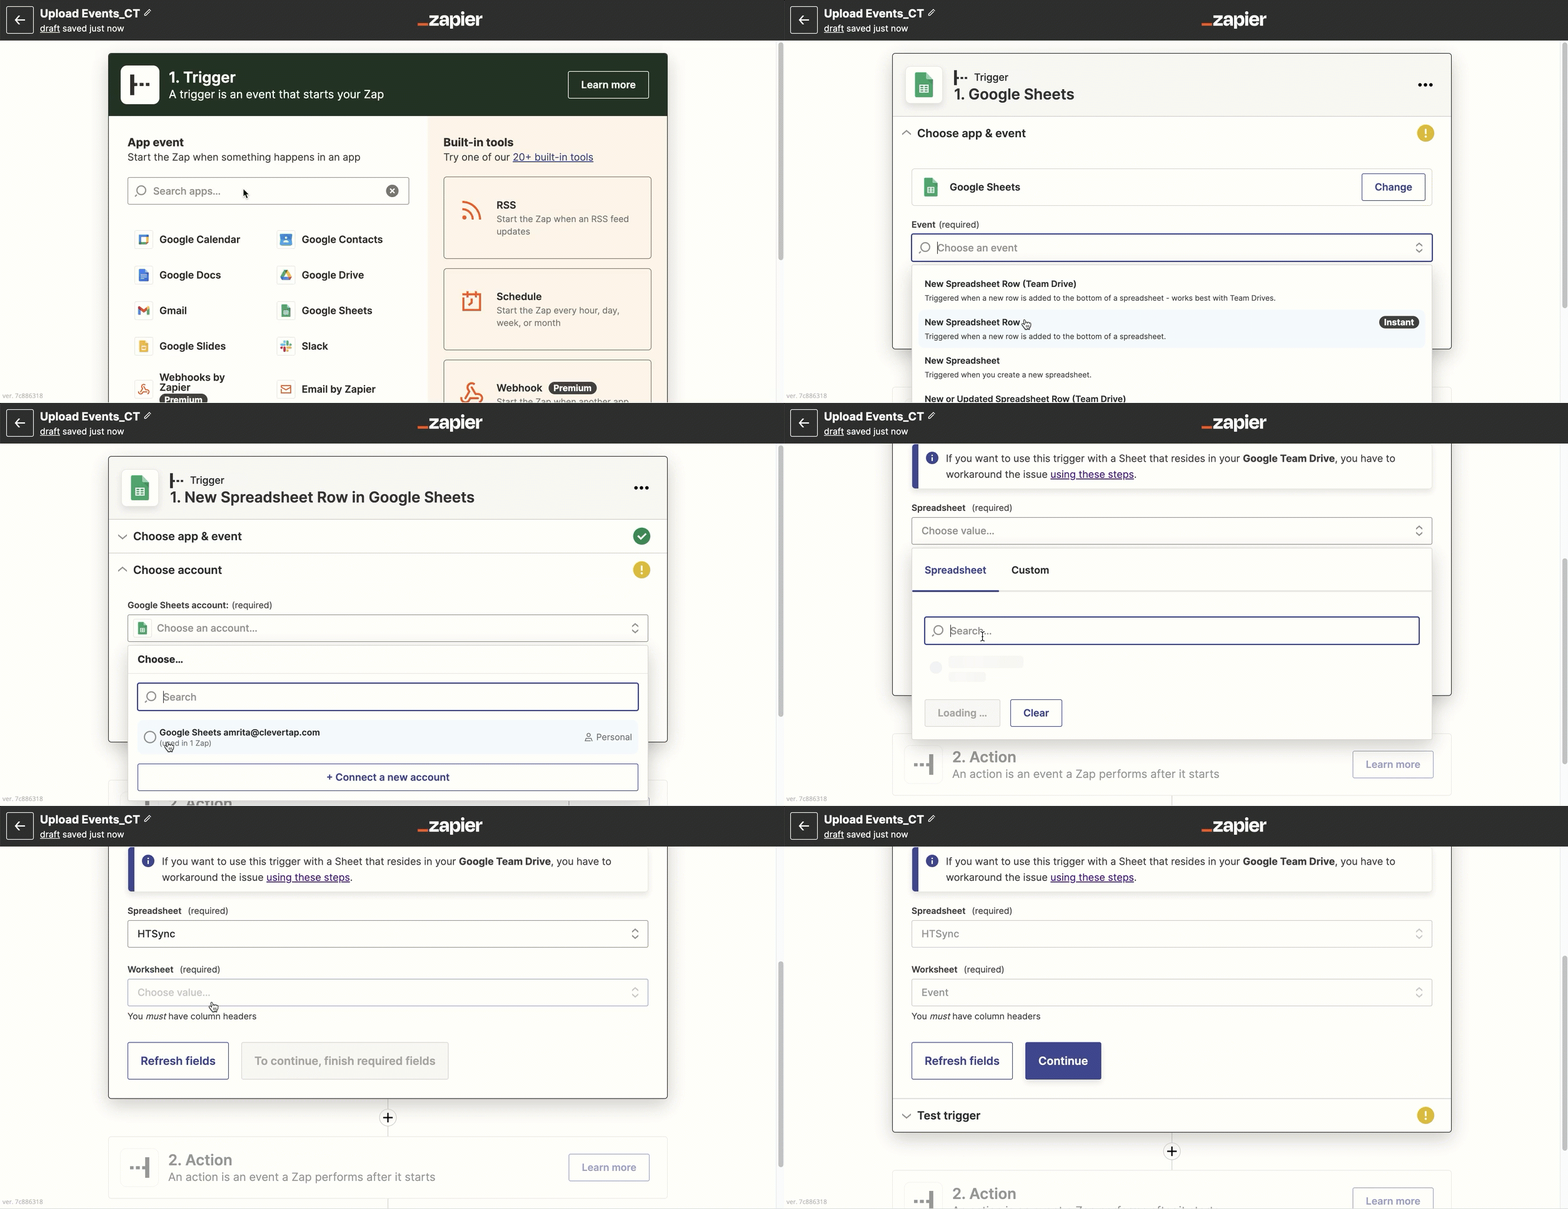
Set Up Trigger Event
-
Click Test Trigger. This ensures that the right account is connected and the trigger is set up correctly.
-
Click Continue.
-
Select theAction that the zap must perform after the trigger event occurs. For this example, perform the following steps:
a. Select CleverTap from the App event dropdown.
b. Select Upload Event from the Event dropdown. This implies that whenever a new row is added to the selected google sheet, a new user profile is created, or an existing user profile is updated with the new information.
c. Click Continue.
d. Click Choose account and then click + Connect a new account. Connect an account | Zapier window opens. Enter all the required details for connecting the CleverTap account. You can obtain this information by navigating to Settings > Project from the CleverTap dashboard. For more information about connecting the CleverTap account with Zapier, refer to the figure under Step 5d of Create/Update User Information.
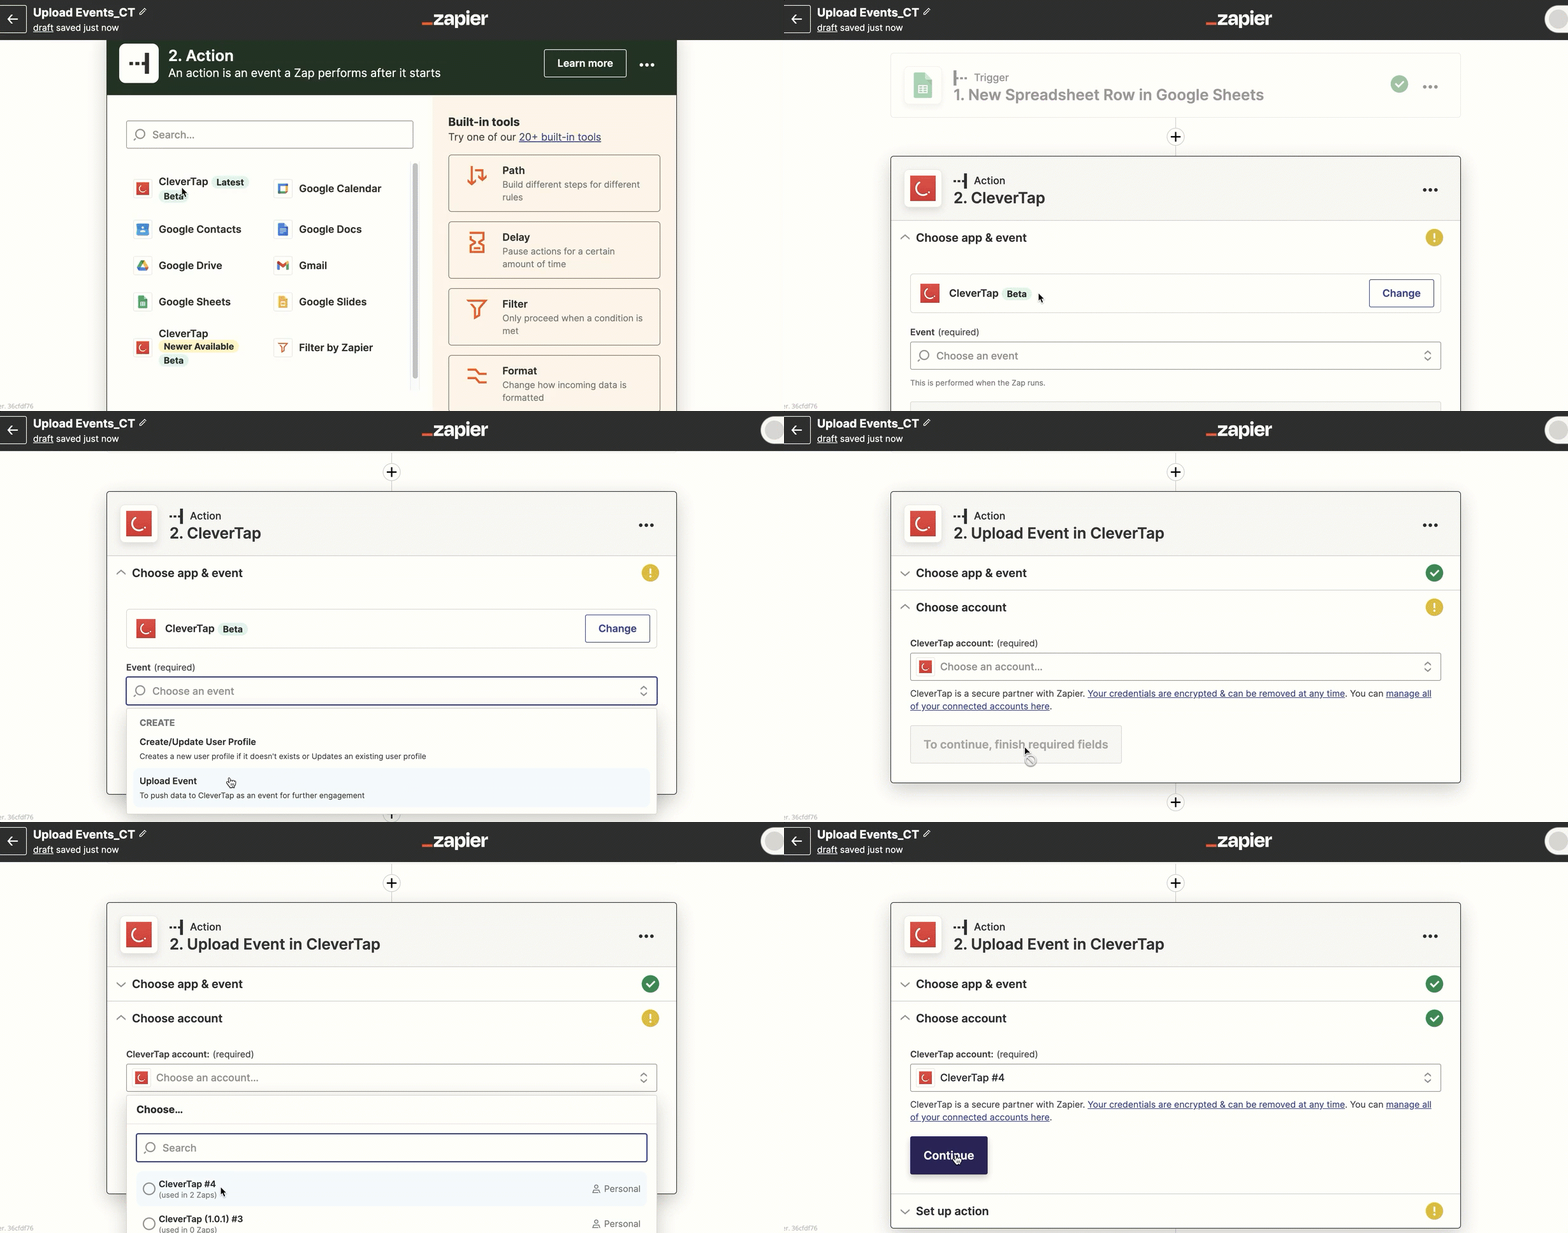
Select Account to Connect
e. Click Continue after successfully connecting your account.
f. Set up an action as shown in the following figure and click Continue:
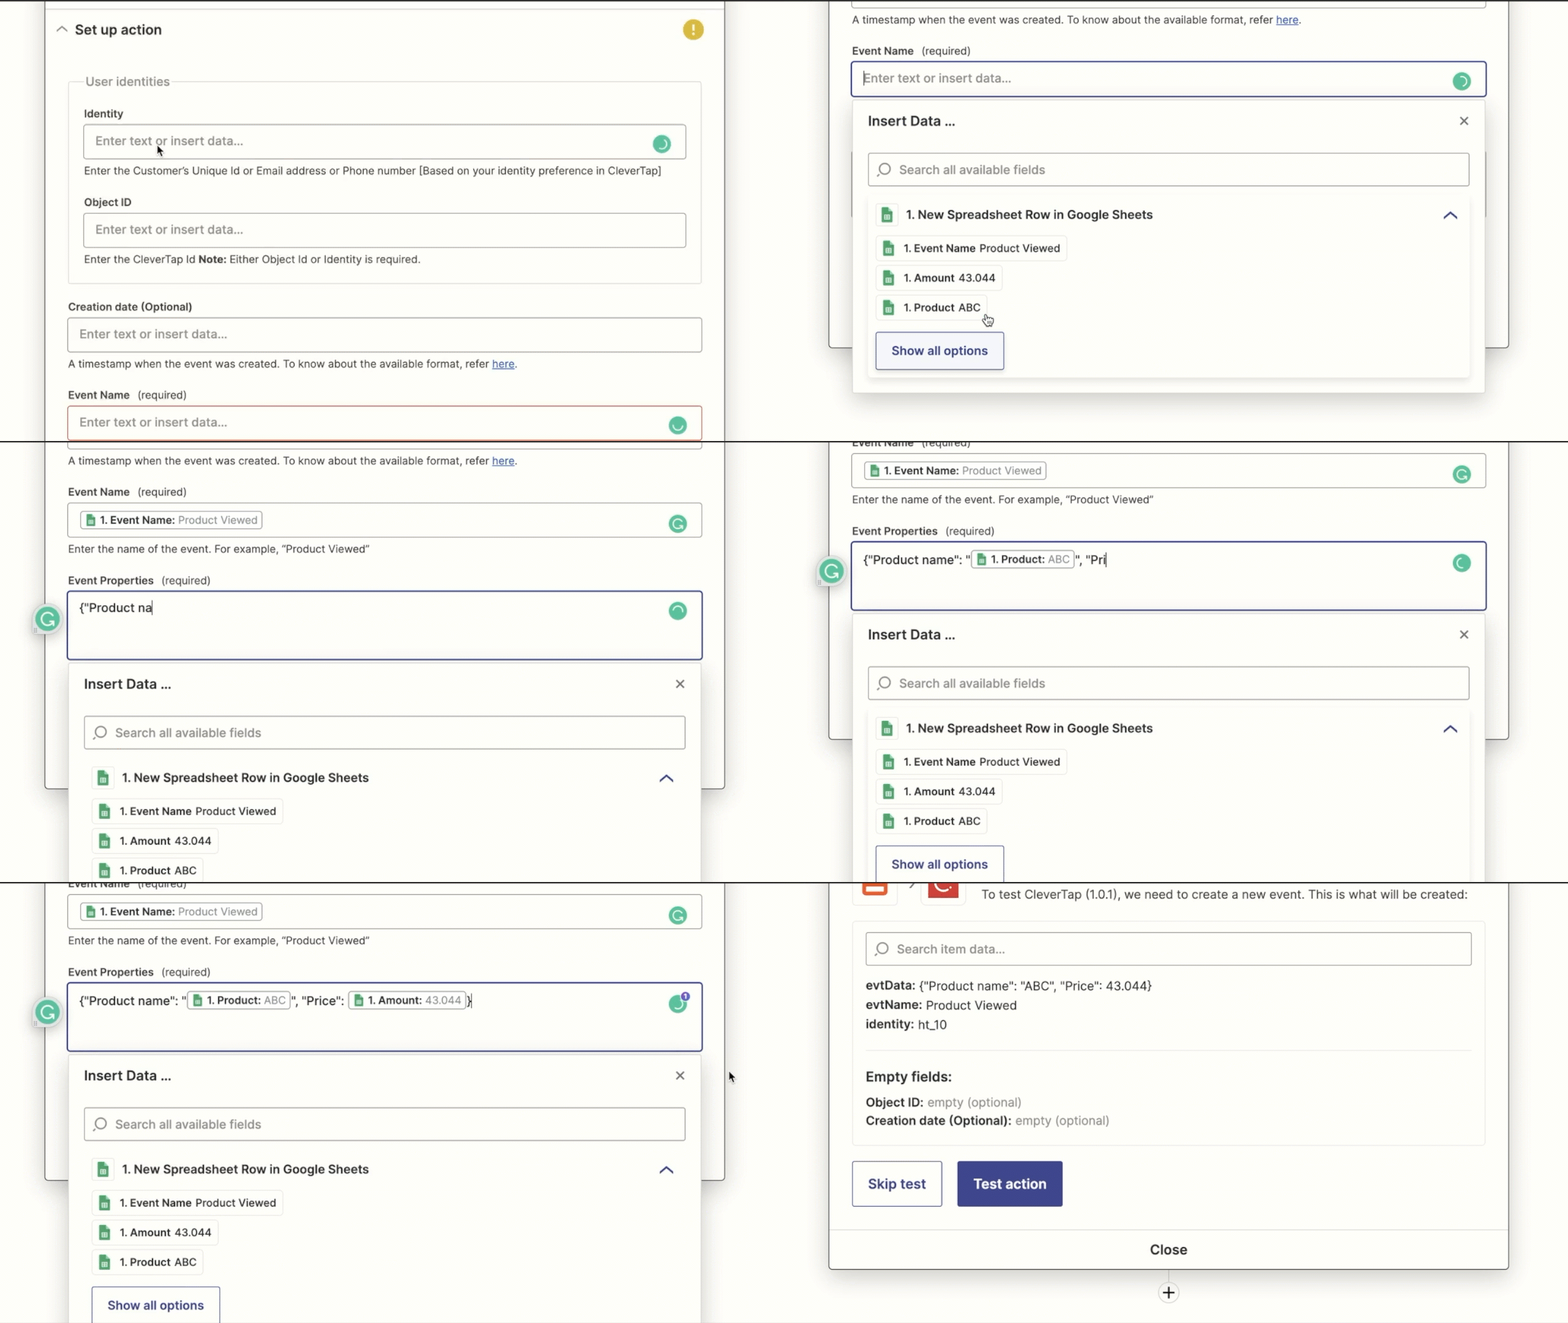
Set Up an Action
- Click Test action to test the zap.
- Click Publish Zap.
After publishing this zap, an event is uploaded to the CleverTap dashboard every time a trigger occurs. CleverTap uses the Identity field to identify if it is a new user or an existing user.
Supported Date-Time Formats
Supported date-time formats include:
- UNIX Epoch: Tracks time as a running total of seconds. For example, 1521611063.
- ISO 8601: It is in the format YYYY-MM-DDTHH:mm:ss. sssZ. For example, 2018-03-05T15:16:0Z.
- Short Date: It is in the format YYYY-MM-DD HH:mm:ss. For example, 2018-03-5 15:16:0.
- Long Date: It is in the format dddd, MMMM dd, yyyy HH:mm:ss. For example, March 05, 2018 15:16:0.
UTC/GMT Date-Time FormatThe timezone of the timestamp must be in UTC/GMT format. It can be obtained by adding Z at the end of the timestamp string. This is done so that the correct timezone (adjusted as per the local region) displays on the dashboard.
Updated about 2 months ago
