AWS S3
Data Warehousing and Analytics Platform
Overview
The data export feature enables you to bulk export your CleverTap event data to your AWS S3 bucket. You can use this for analysis in BI tools or storage in your data warehouse for analysis in the future.
Feature AvailabilityThis capability is a part of the Enterprise, Advanced, and Cutting Edge plan. To activate this for your account, contact your Account Manager.
Setup
The following are the two major steps involved in enabling this feature for your account:
- Create an AWS S3 Bucket.
- Configure Buckets details on the CleverTap Dashboard using one of the following methods:
Data ExportOnce you have set up both dashboards, you can configure export from the CleverTap dashboard. For more information, refer to the following:
- Data Exports for Legacy Profile and Event Export flow
- Profile Exports for Enhanced Profile Export flow
Create an AWS S3 Bucket
To create an AWS S3 bucket:
- Log in to your AWS account, then search for S3 in the AWS services box.
- Select S3 from the search results.
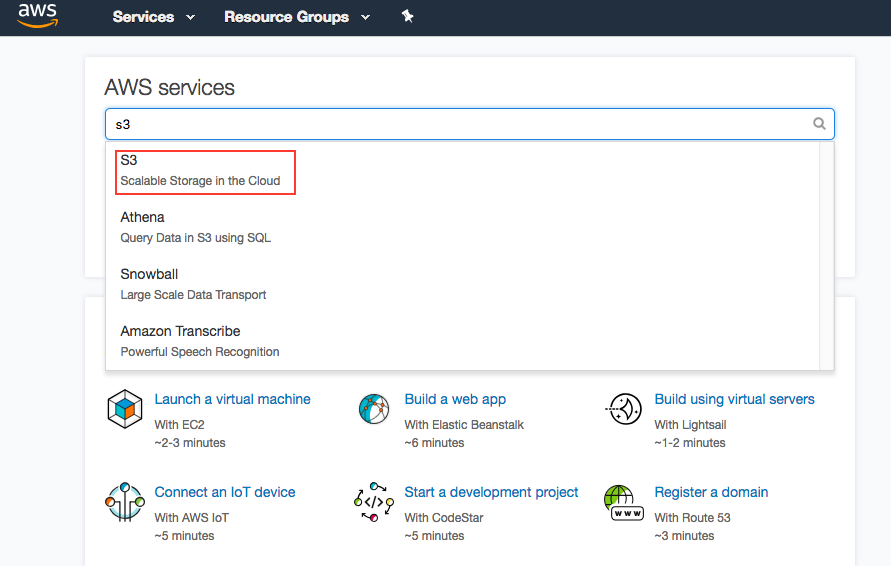
Select S3 from AWS Account
Upon clicking, the Bucket page is displayed.
- Click Create bucket. On clicking, the Create bucket page displays:
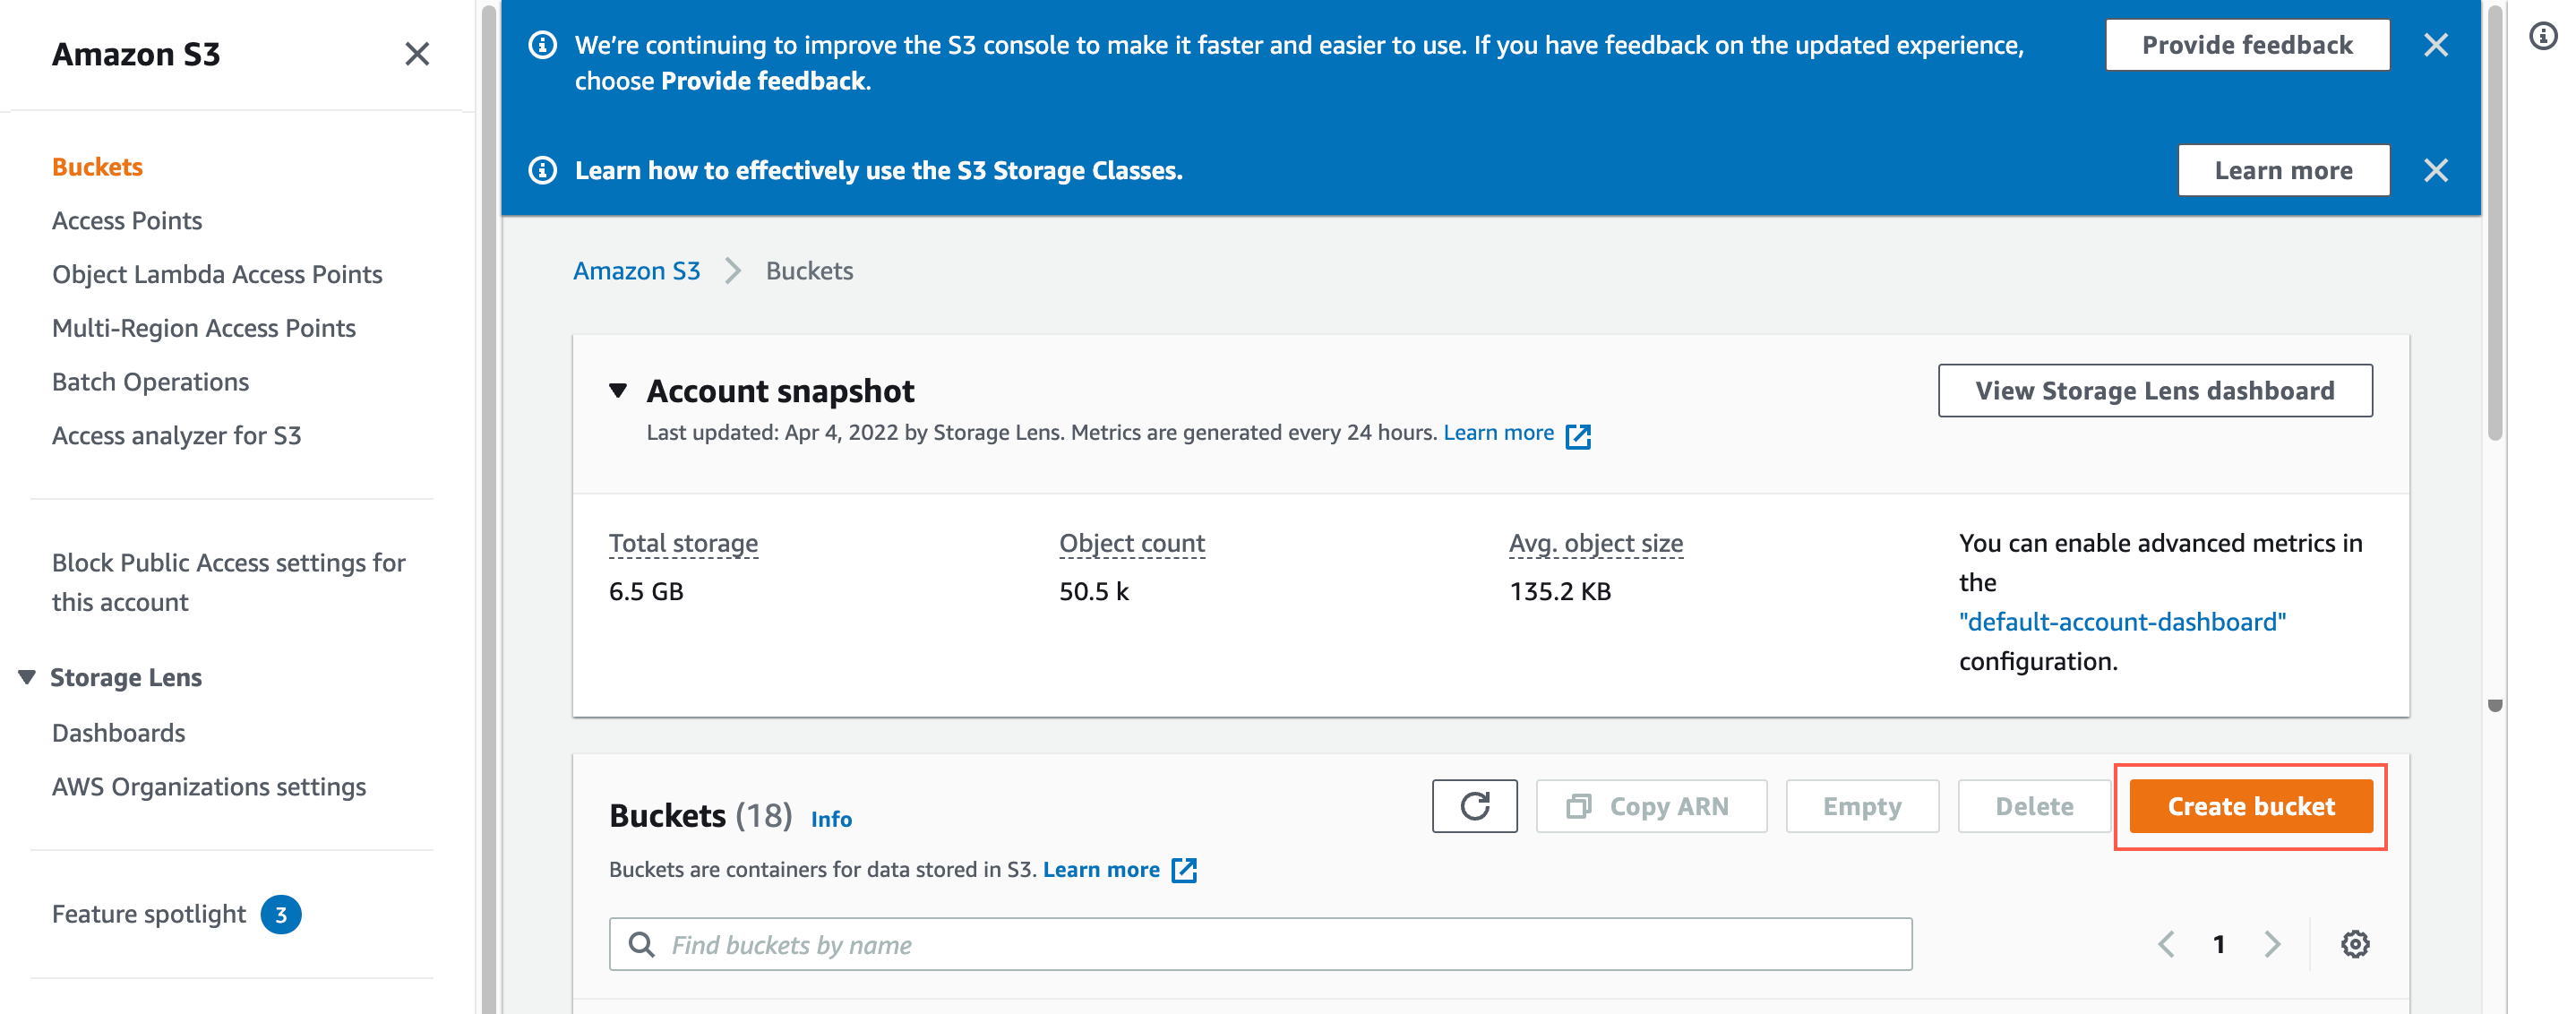
Click Create Bucket
- Enter a bucket name, region, logging, versioning, and encryption preferences.
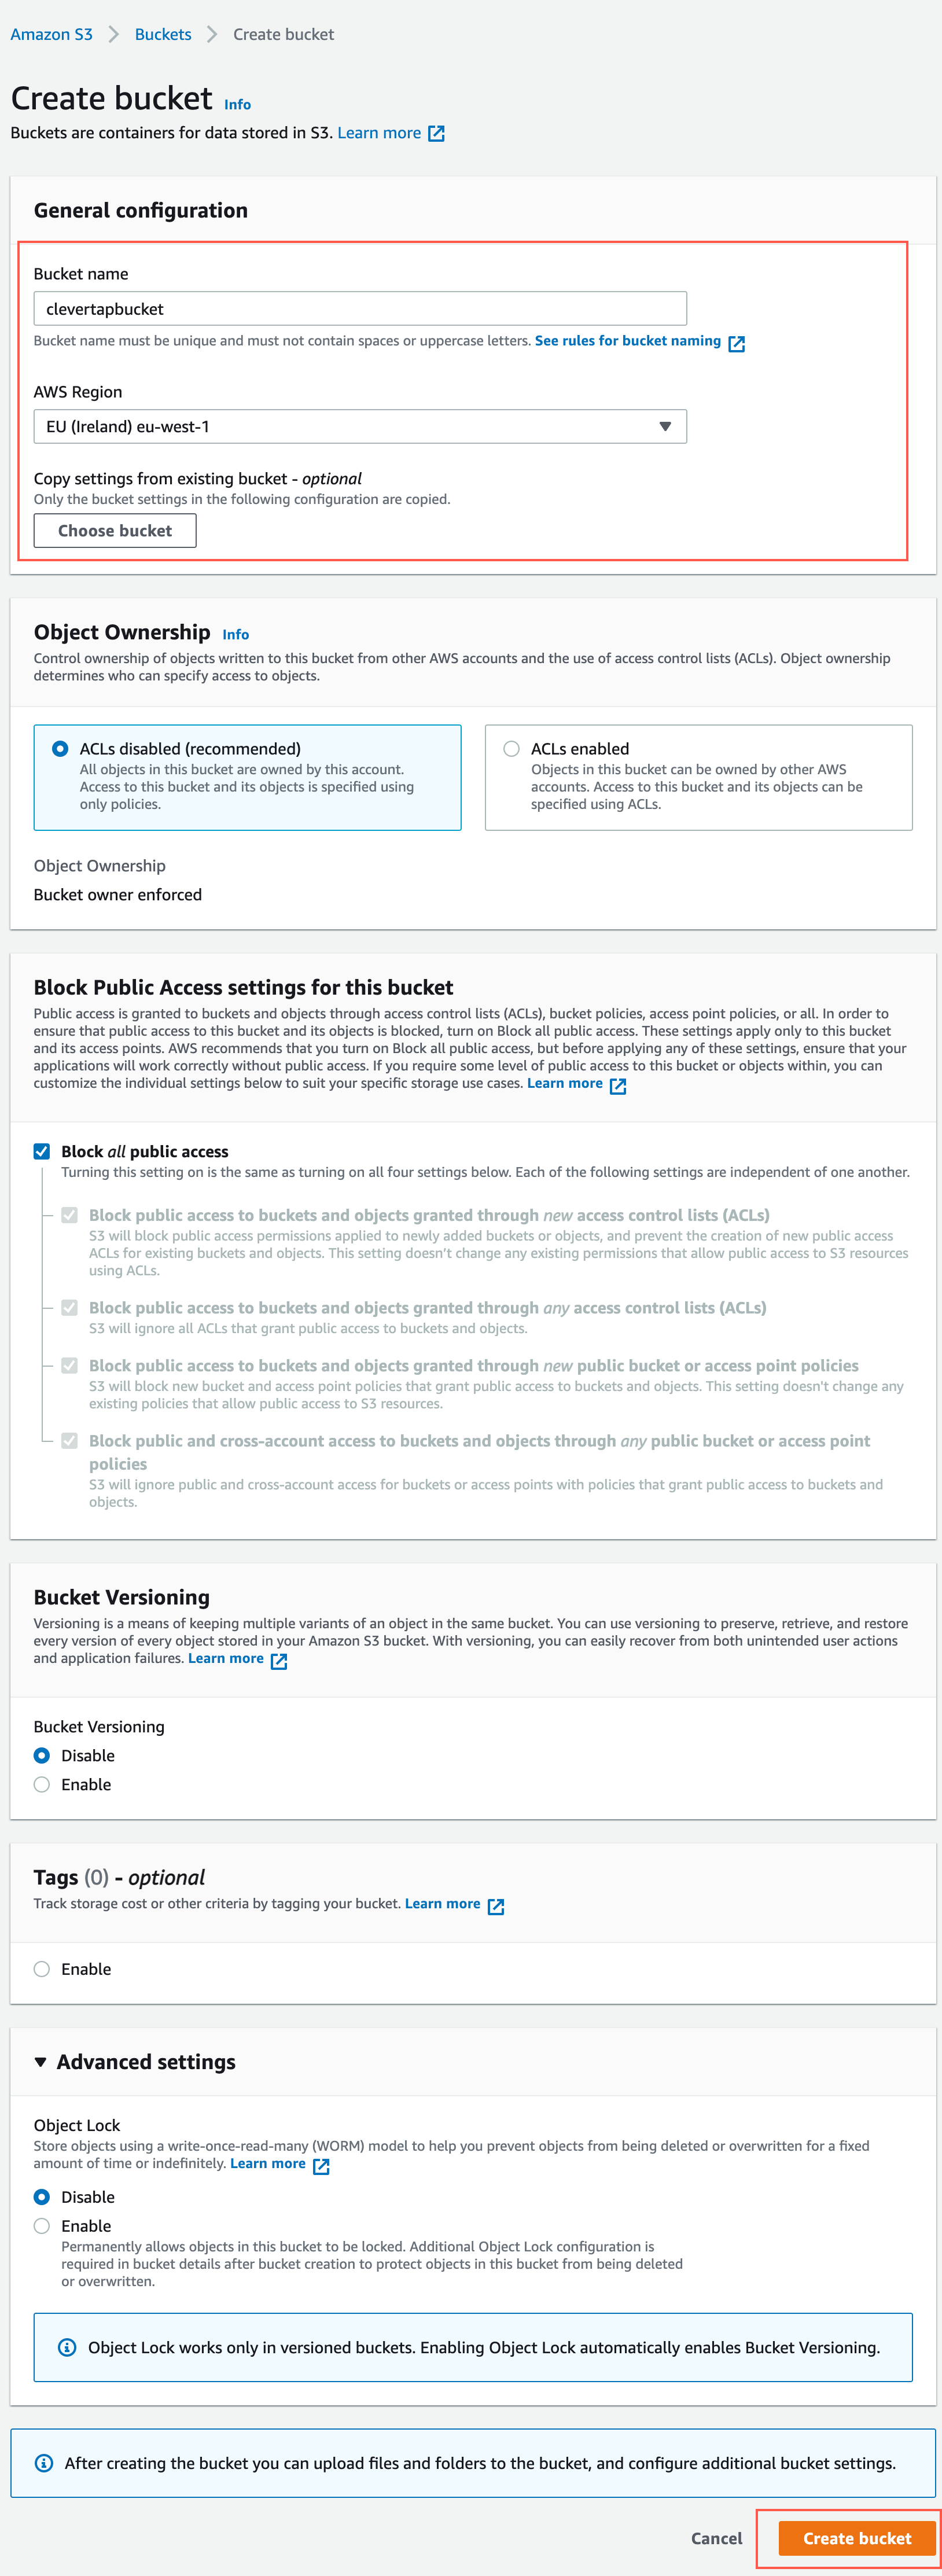
Configure S3 Bucket Settings and Click Create Bucket
Recommendation for SetupFor this integration, you need not modify the default settings; however, you must check your internal organization's policies to verify if you need to modify any of these settings.
Based on your CleverTap account settings, we host your data in Europe (EU), the United States (US), Singapore (SG), or India (IN). To identify the region of your account and the corresponding region that you must select when configuring the bucket settings, refer to the following table:
CleverTap Dashboard URL | Region | AWS S3 Bucket Region |
|---|---|---|
EU | EU (Ireland) eu-west-1 | |
India | Asia Pacific (Mumbai) ap-south-1 | |
US | US West (Oregon) us-west-2 | |
Singapore | Asia Pacific (Singapore) | |
Middle East (UAE) | Middle East (UAE) me-central-1 | |
Indonesia | Asia Pacific (Jakarta) ap-southeast-3 |
Set Up AWS Bucket RegionWhen setting up the AWS bucket region for your AWS account, ensure that the AWS bucket region matches your CleverTap account region. To identify the region of your CleverTap account, refer to the above table.
Also, you can set up the CleverTap account region only once during registration.
- Click Create bucket. On successful bucket creation, the following message displays in the snack bar at the top:
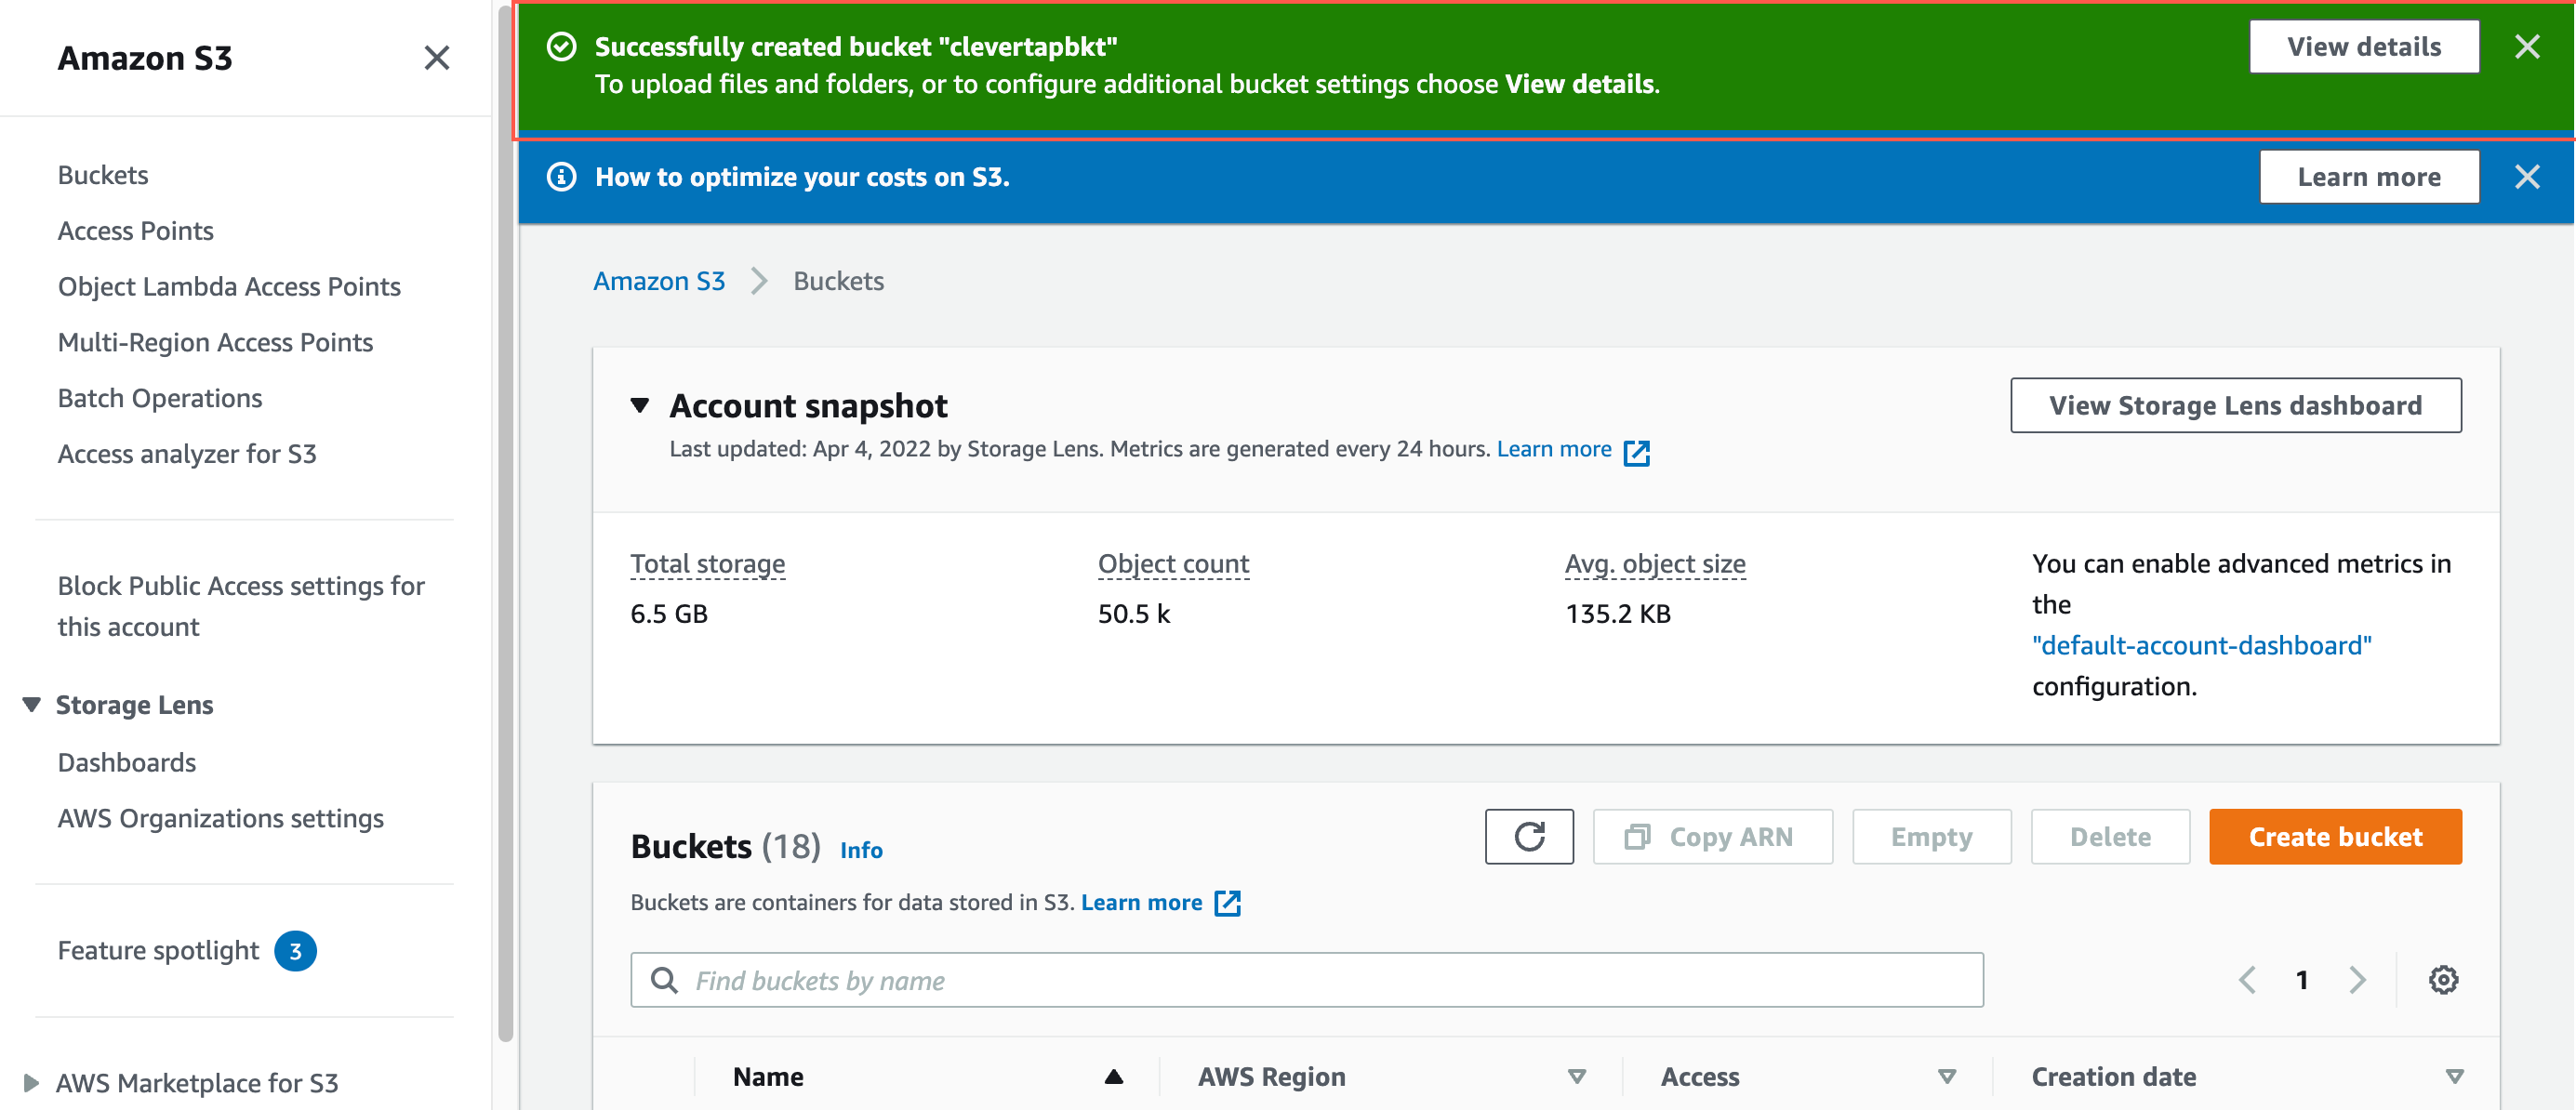
S3 Bucket Created Successfully
The bucket you just created now appears in your S3 console. We recommend you note down the name of your new bucket, as you will need it for the next step.
Configure S3 Bucket Details on CleverTap Dashboard
Using IAM Policy
The following are the two major steps to configure S3 bucket details on the CleverTap dashboard using IAM Policy
i. Copy IAM Policy from the CleverTap dashboard
ii. Add IAM Policy to S3 Bucket from AWS console
Copy IAM Policy from the CleverTap Dashboard
To copy the IAM policy from the CleverTap dashboard:
- Navigate to Settings > Partners and click View Details against Amazon S3. The Integrate analytics partner - Amazon S3 window displays on the right side of the screen.
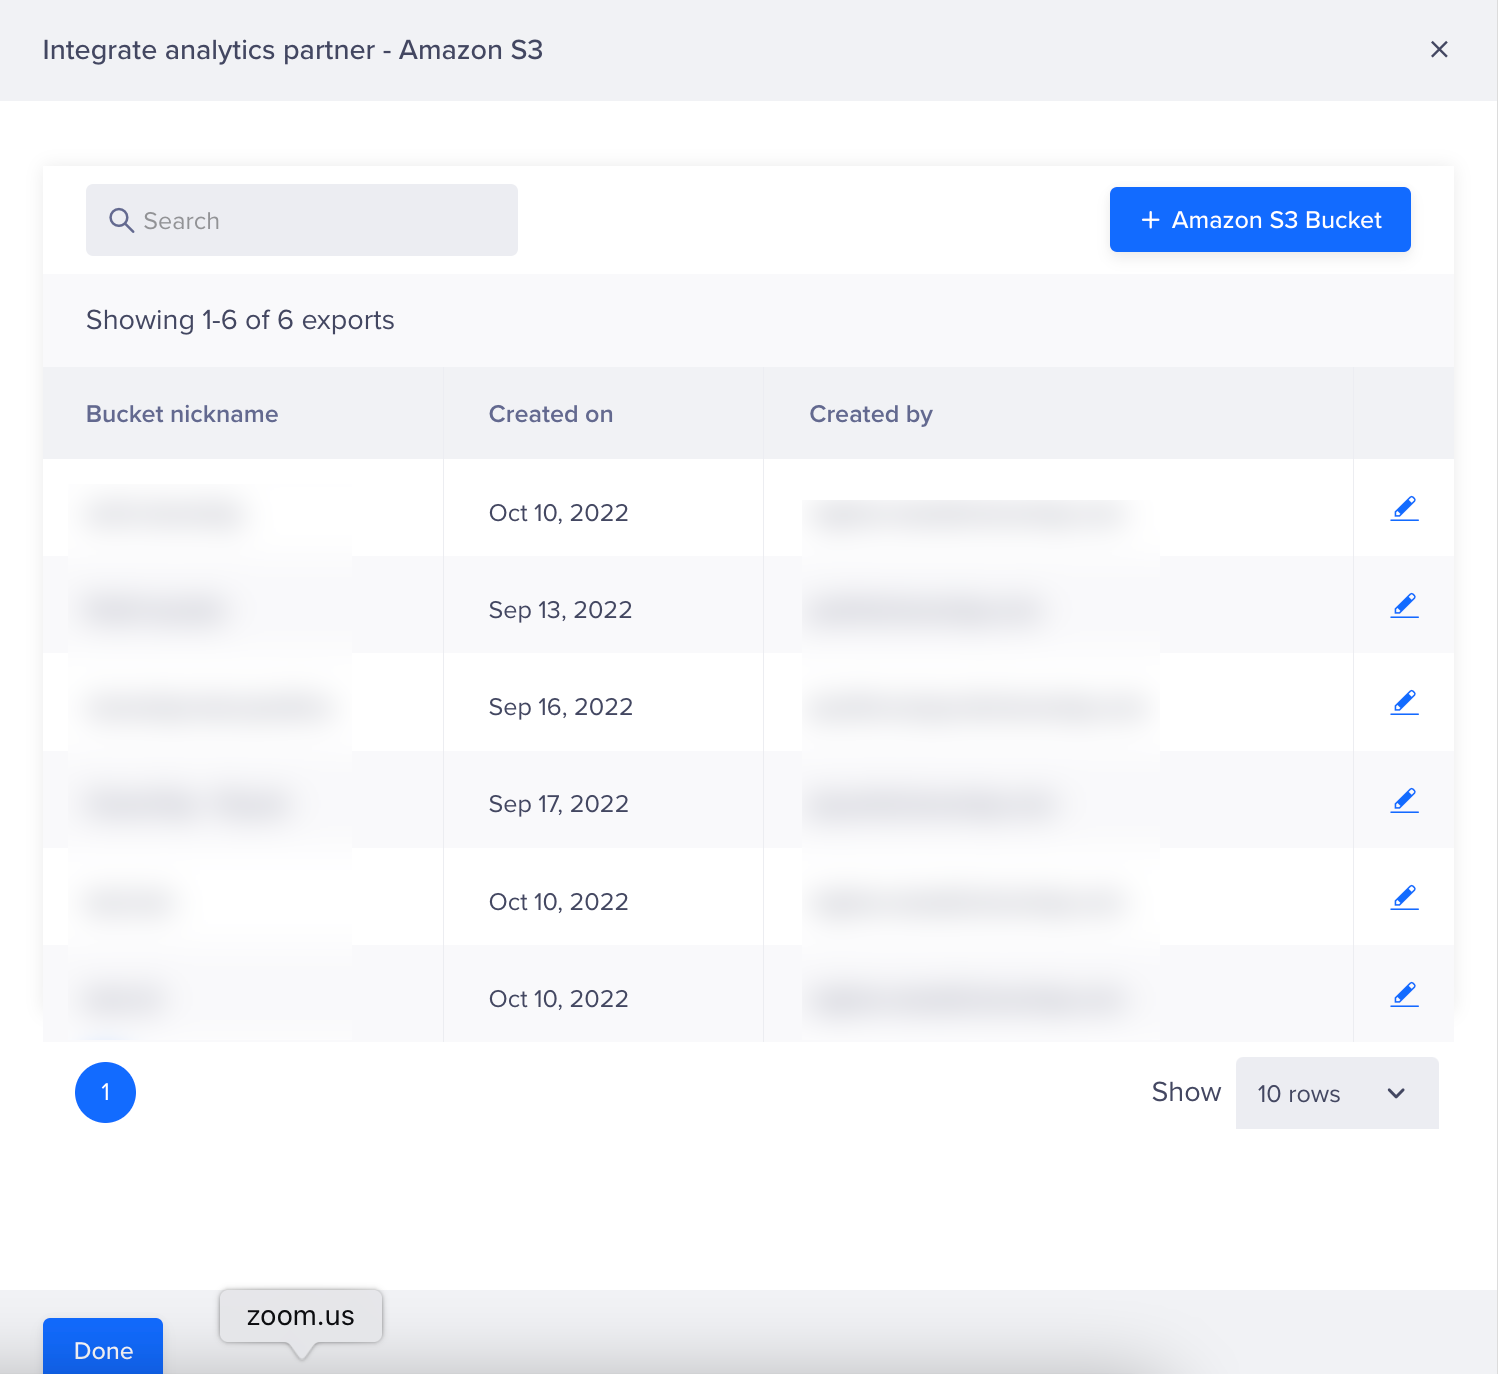
Click View Details against Amazon S3 from Partner Page
- Click + Amazon S3 Bucket to create a new bucket.
- Enter the Bucket name.
- Select IAM (Identity and Access Management) Policy option under Configure with section.
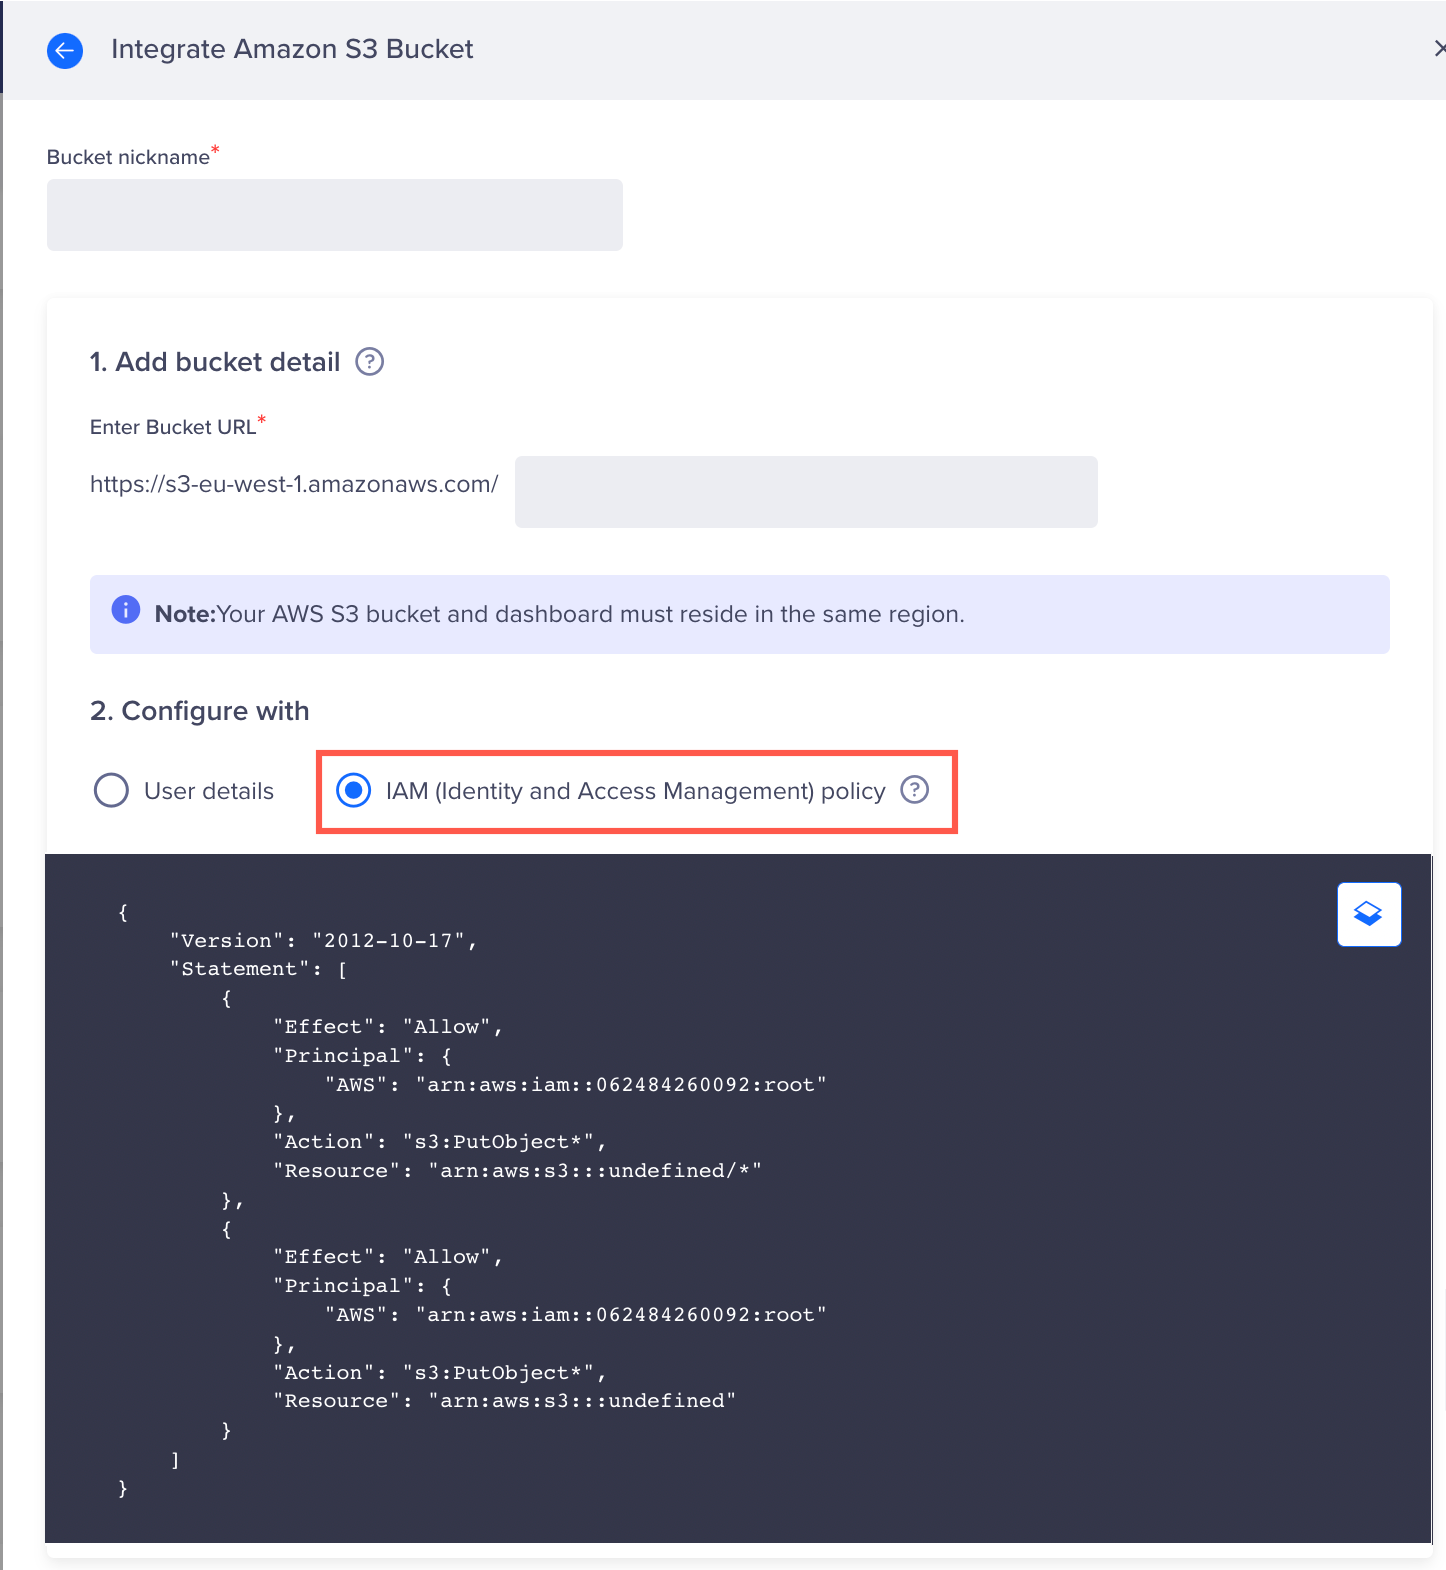
Configure S3 Bucket with IAM Policy
- Click the
 icon to copy the policy to the clipboard and keep this window open for saving these details later.
Add IAM Policy to S3 Bucket on AWS Console
To add IAM policy to the S3 bucket:
- Select the bucket from the Bucket page of the AWS console.
- Select the Permissions tab.
- Click Edit under the Bucket policy section and enter the policy that you copied in Step 4 of Copy IAM Policy from the CleverTap dashboard:
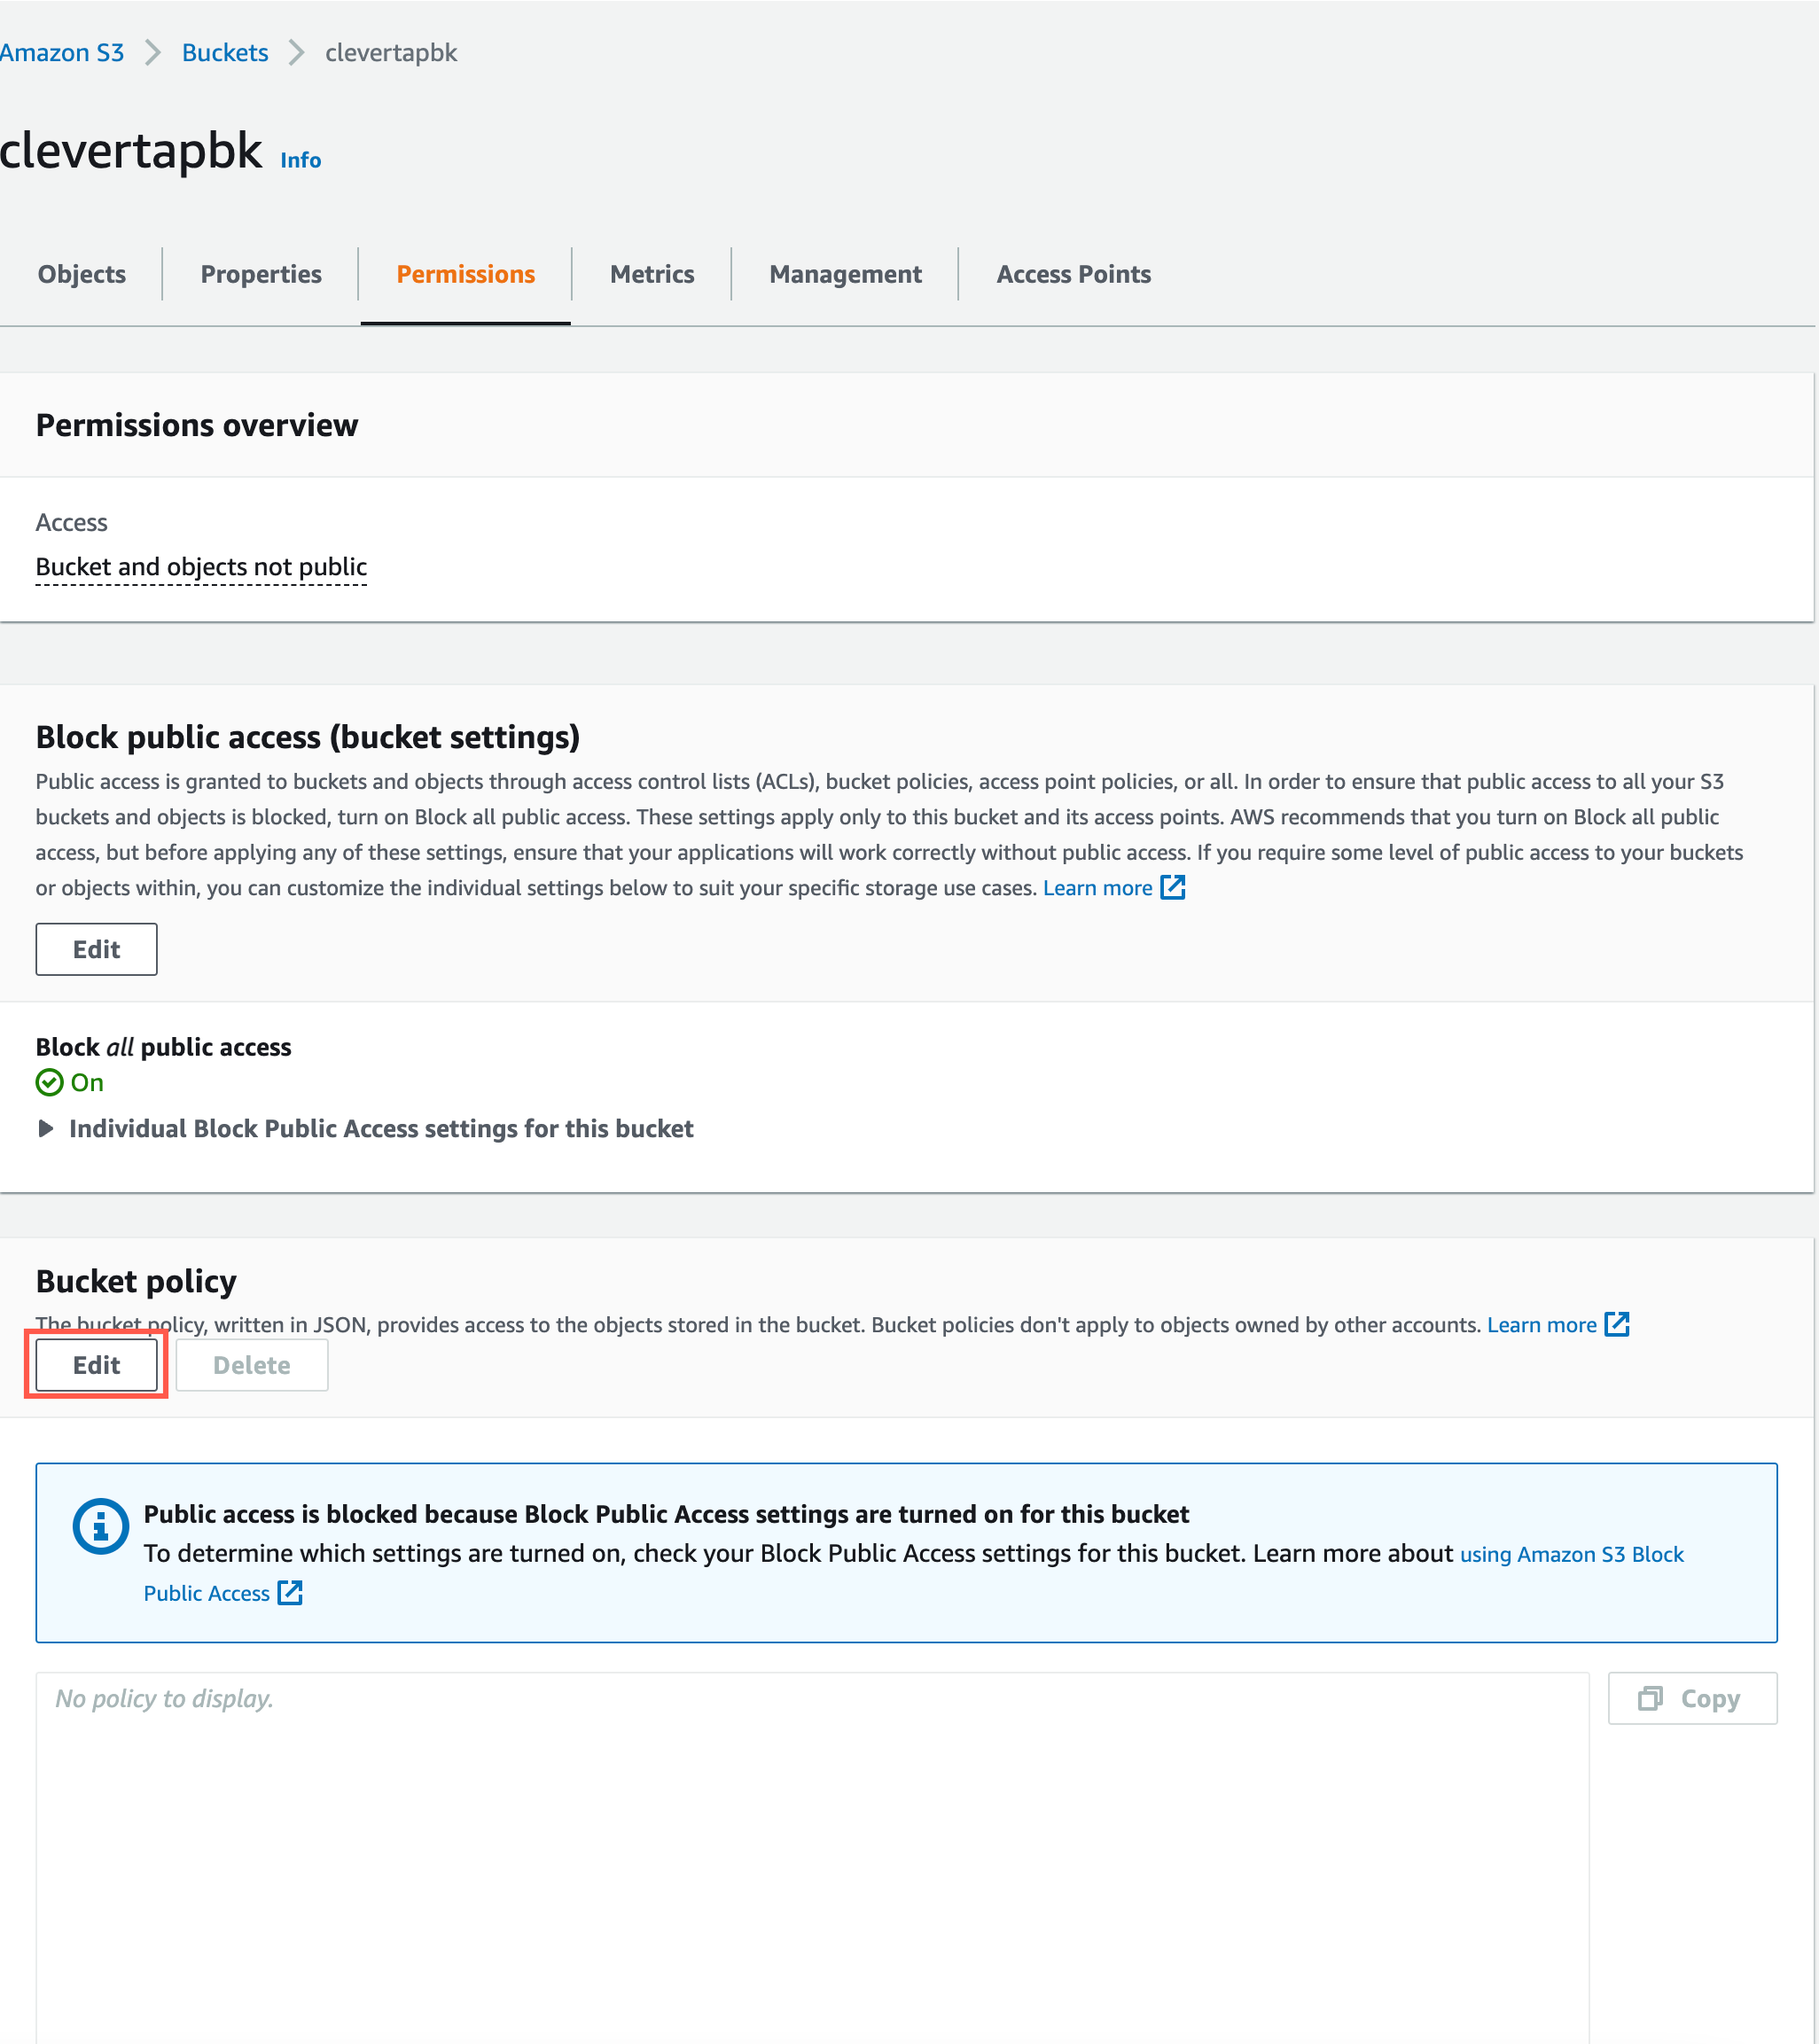
Edit S3 Bucket Policy
{
    "Version": "2012-10-17",
    "Statement": [
        {
            "Effect": "Allow",
            "Principal": {
                "AWS": "arn:aws:iam::062484260092:root"
            },
            "Action": "s3:PutObject*",
            "Resource": "arn:aws:s3:::bucket-name/*"
        },
        {
            "Effect": "Allow",
            "Principal": {
                "AWS": "arn:aws:iam::062484260092:root"
            },
            "Action": "s3:PutObject*",
            "Resource": "arn:aws:s3:::bucket-name"
        }
    ]
}
IMPORTANTEnsure that you replace all the occurrences of
bucket-namein the above JSON payload with your actual bucket name.
- Click Save Changes to save the policy.
- Go back to the same window opened in Step 4 of Copy IAM Policy From CleverTap Dashboard and click Save Credentials.
The Amazon S3 bucket is now configured on both the AWS S3 console and the CleverTap dashboard.
Using Access Key
The following are the two major steps to configure S3 bucket details on the CleverTap dashboard using Access Key:
i. Create an API Key for Your S3 Bucket.
ii. Add Your S3 Bucket Details to CleverTap.
Create an API Key for Your S3 Bucket
This section demonstrates the creation of an AWS API key with write access to the bucket we created in the above step. CleverTap uses this API key to export data to your S3 bucket.
- Click on your account name on the top right of the AWS console.
- Select Security credentials.
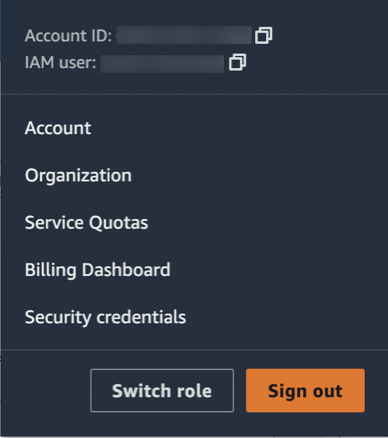
Select Security credentials
- Select Users from the left navigation and click Add user.
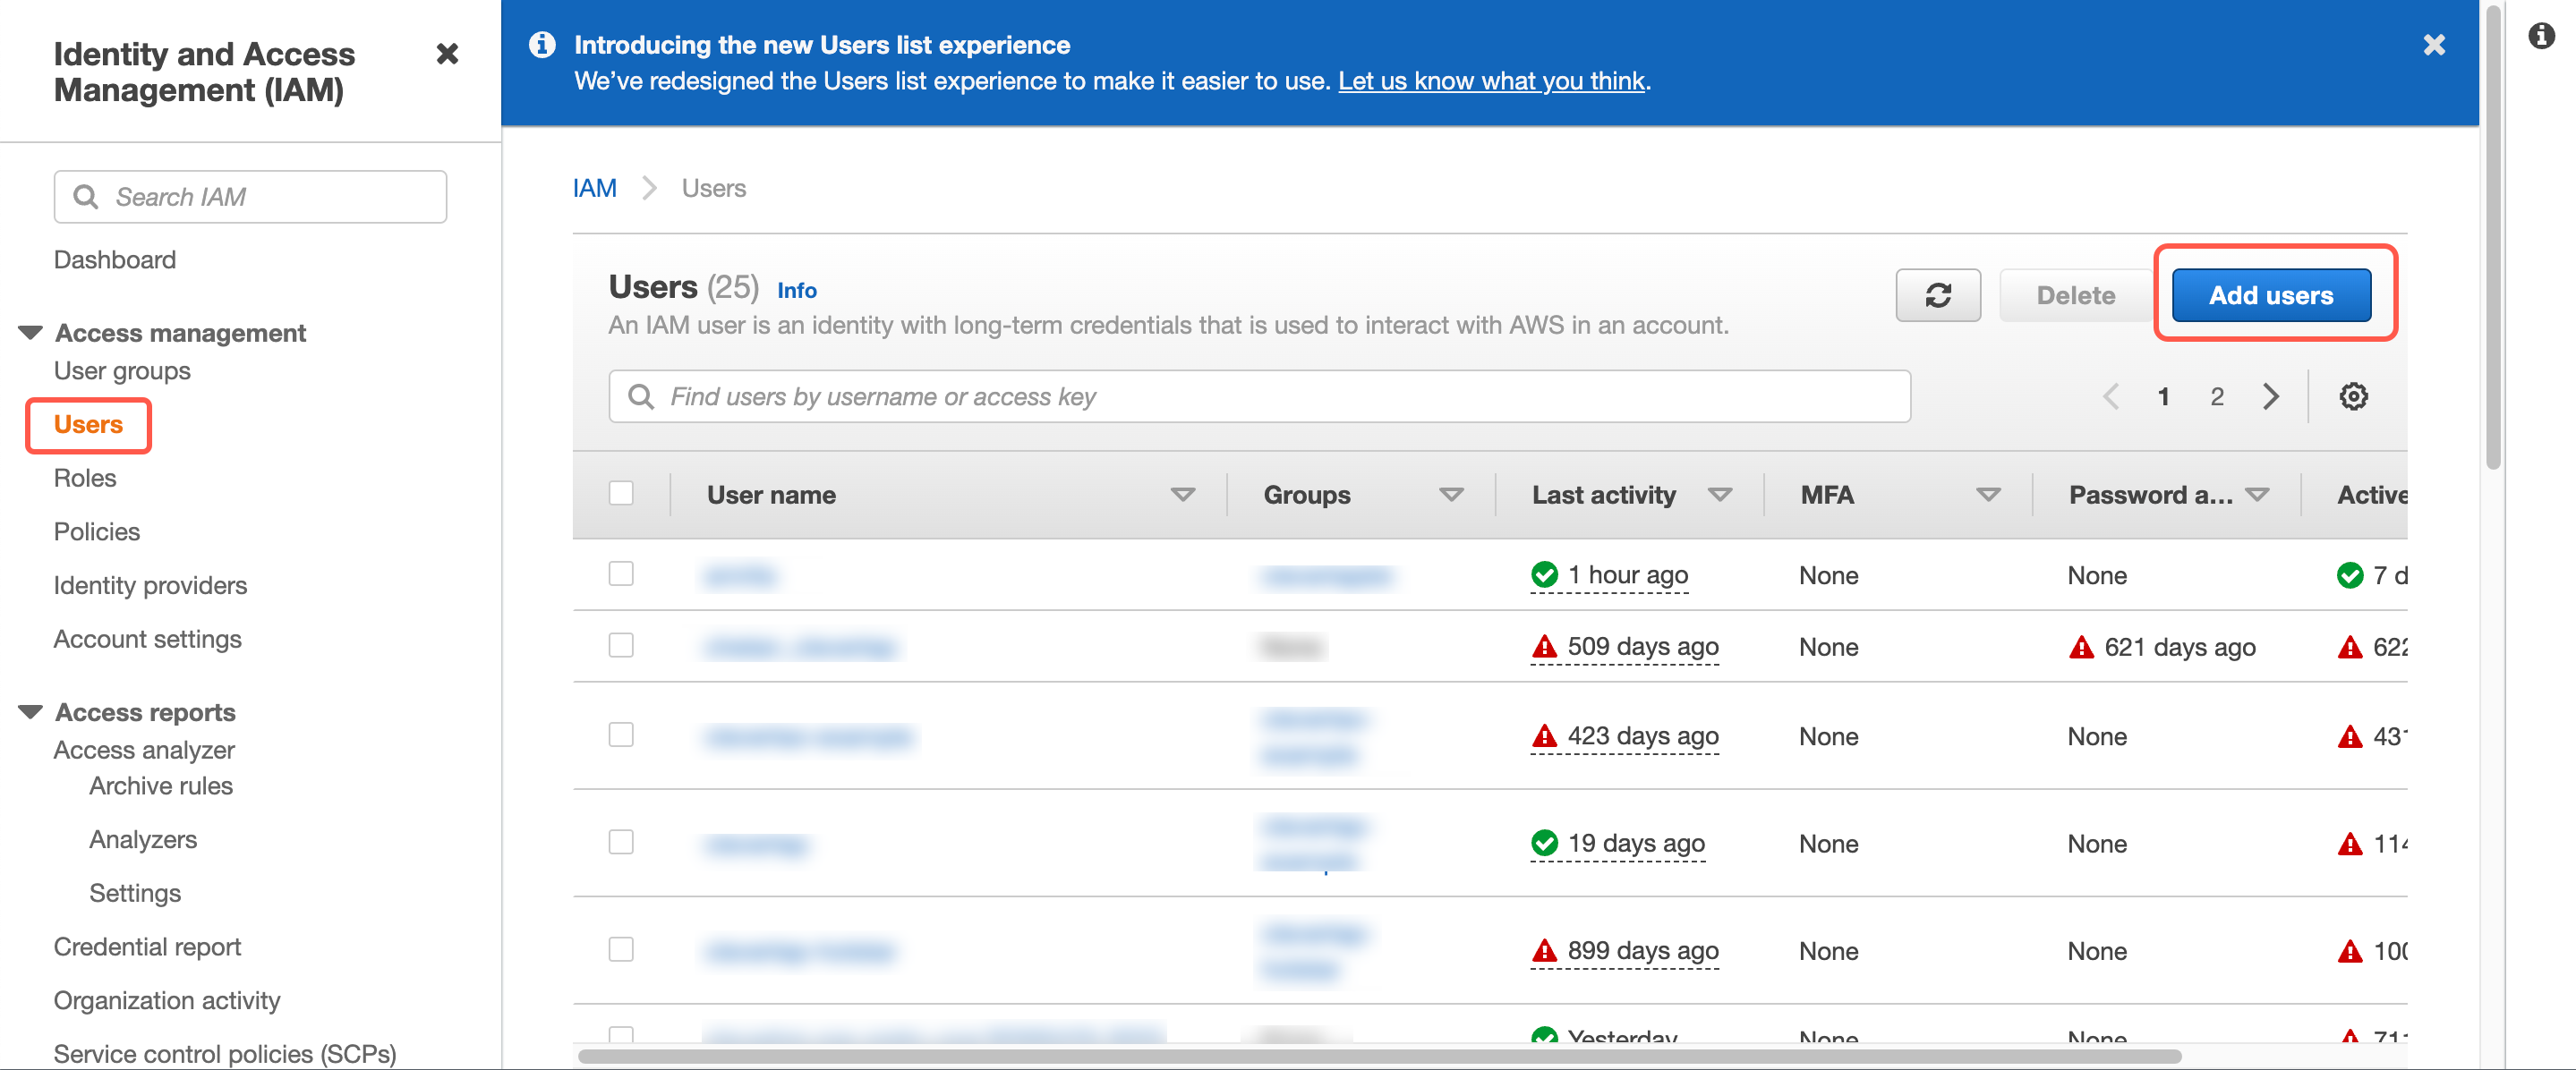
Add Users
On clicking, the Add user page displays.
- Enter the User name and select the Programmatic access checkbox.
- Click Next:Permissions.
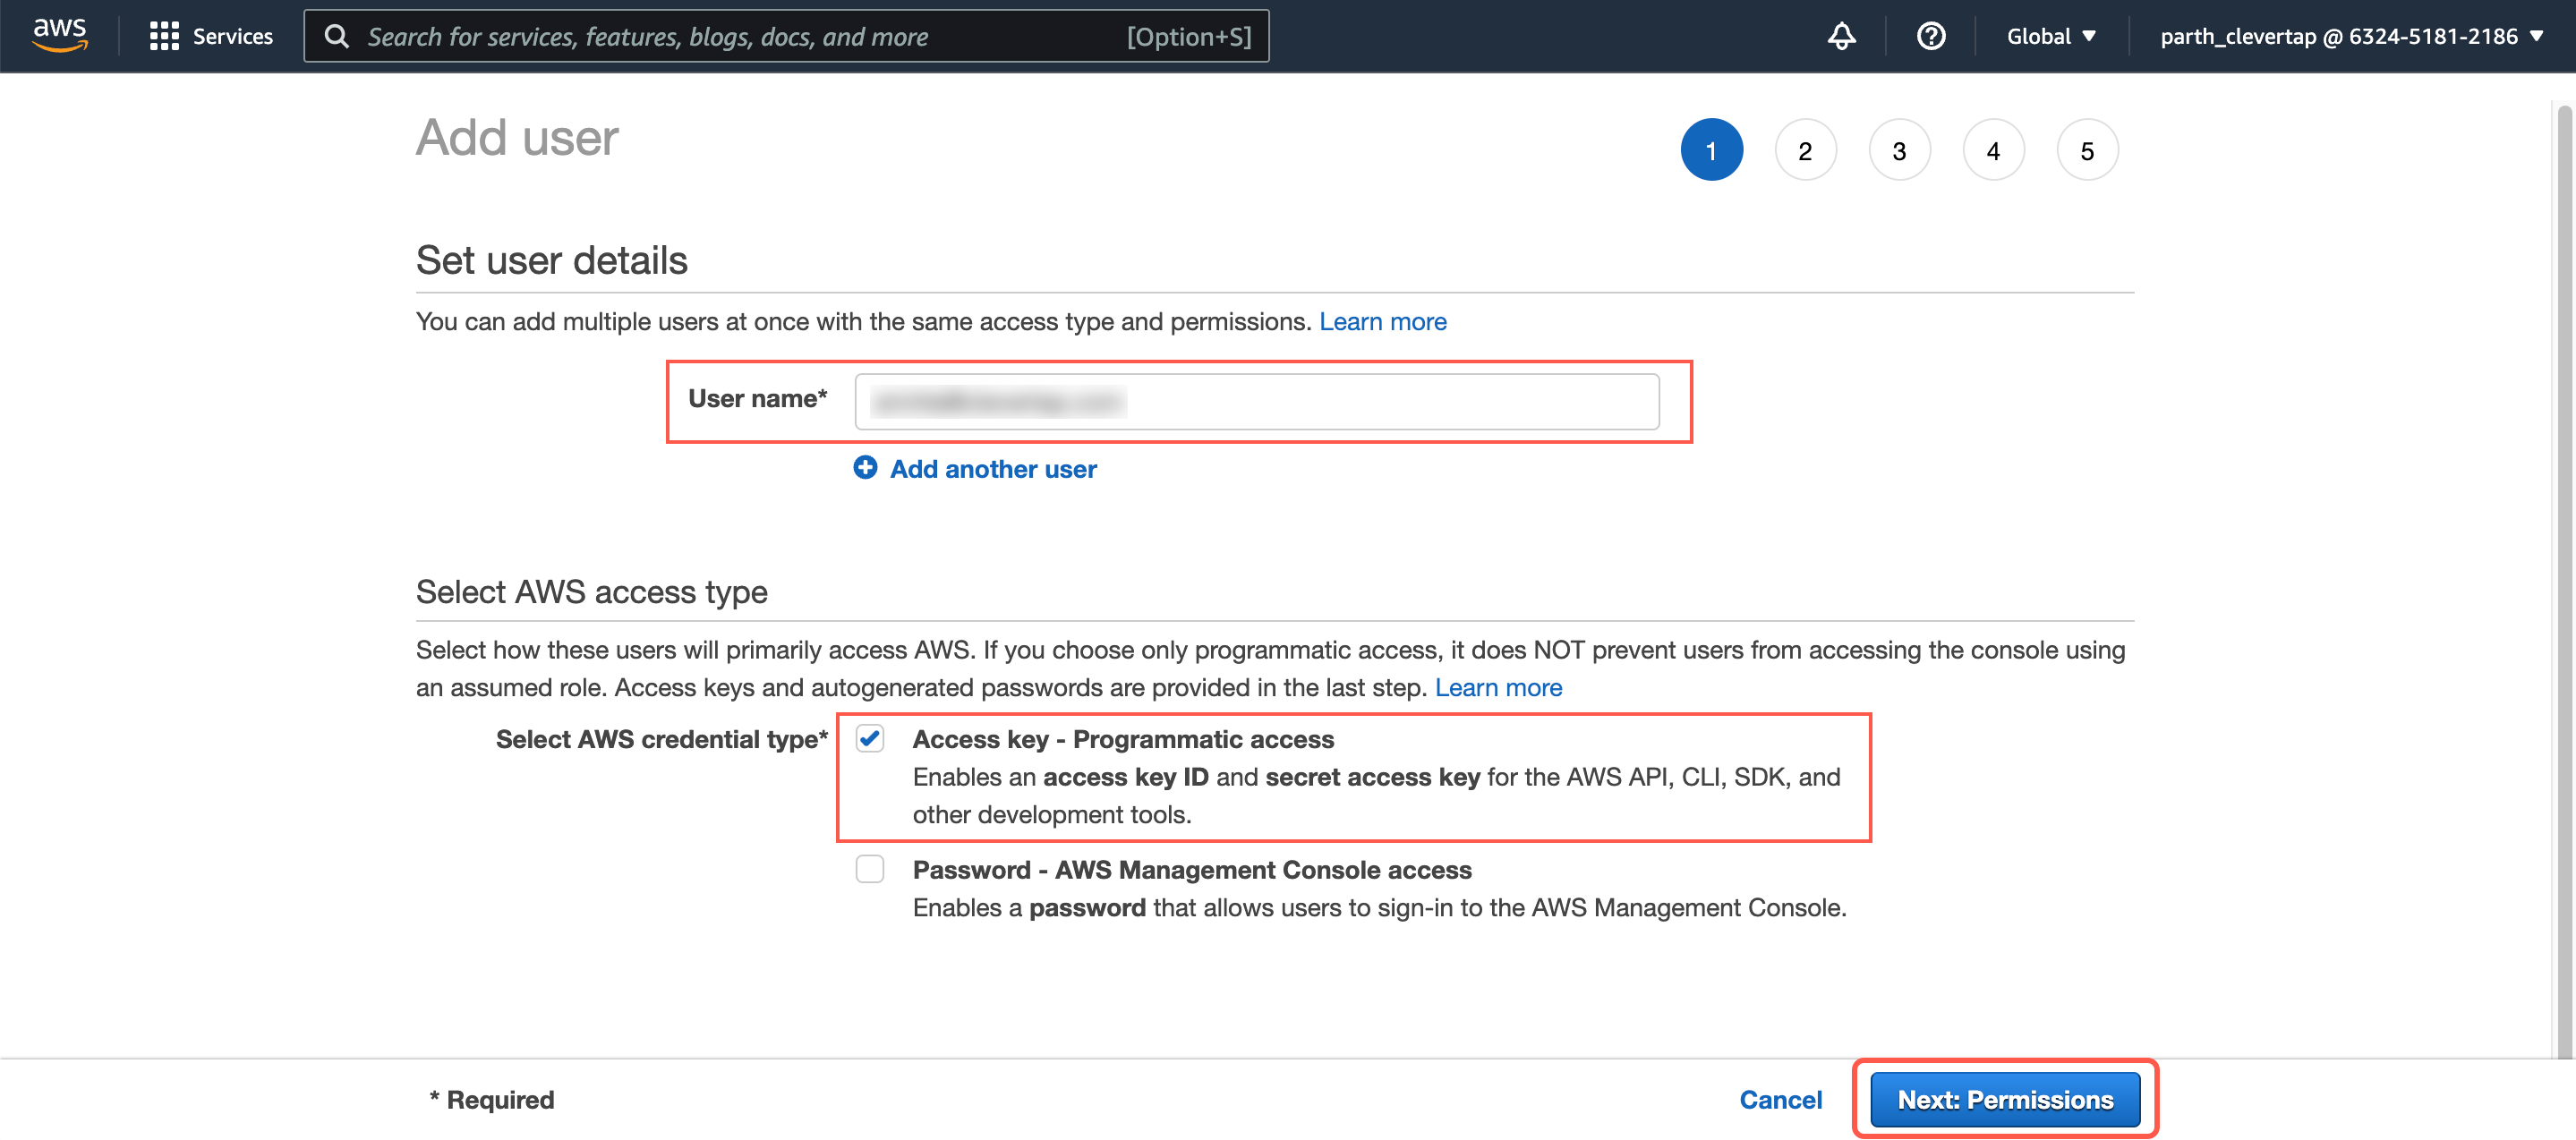
Select AWS Access Type and Click Next: Permissions
On clicking, Set permissions page displays.
- Click Create group under Add user to group tab.
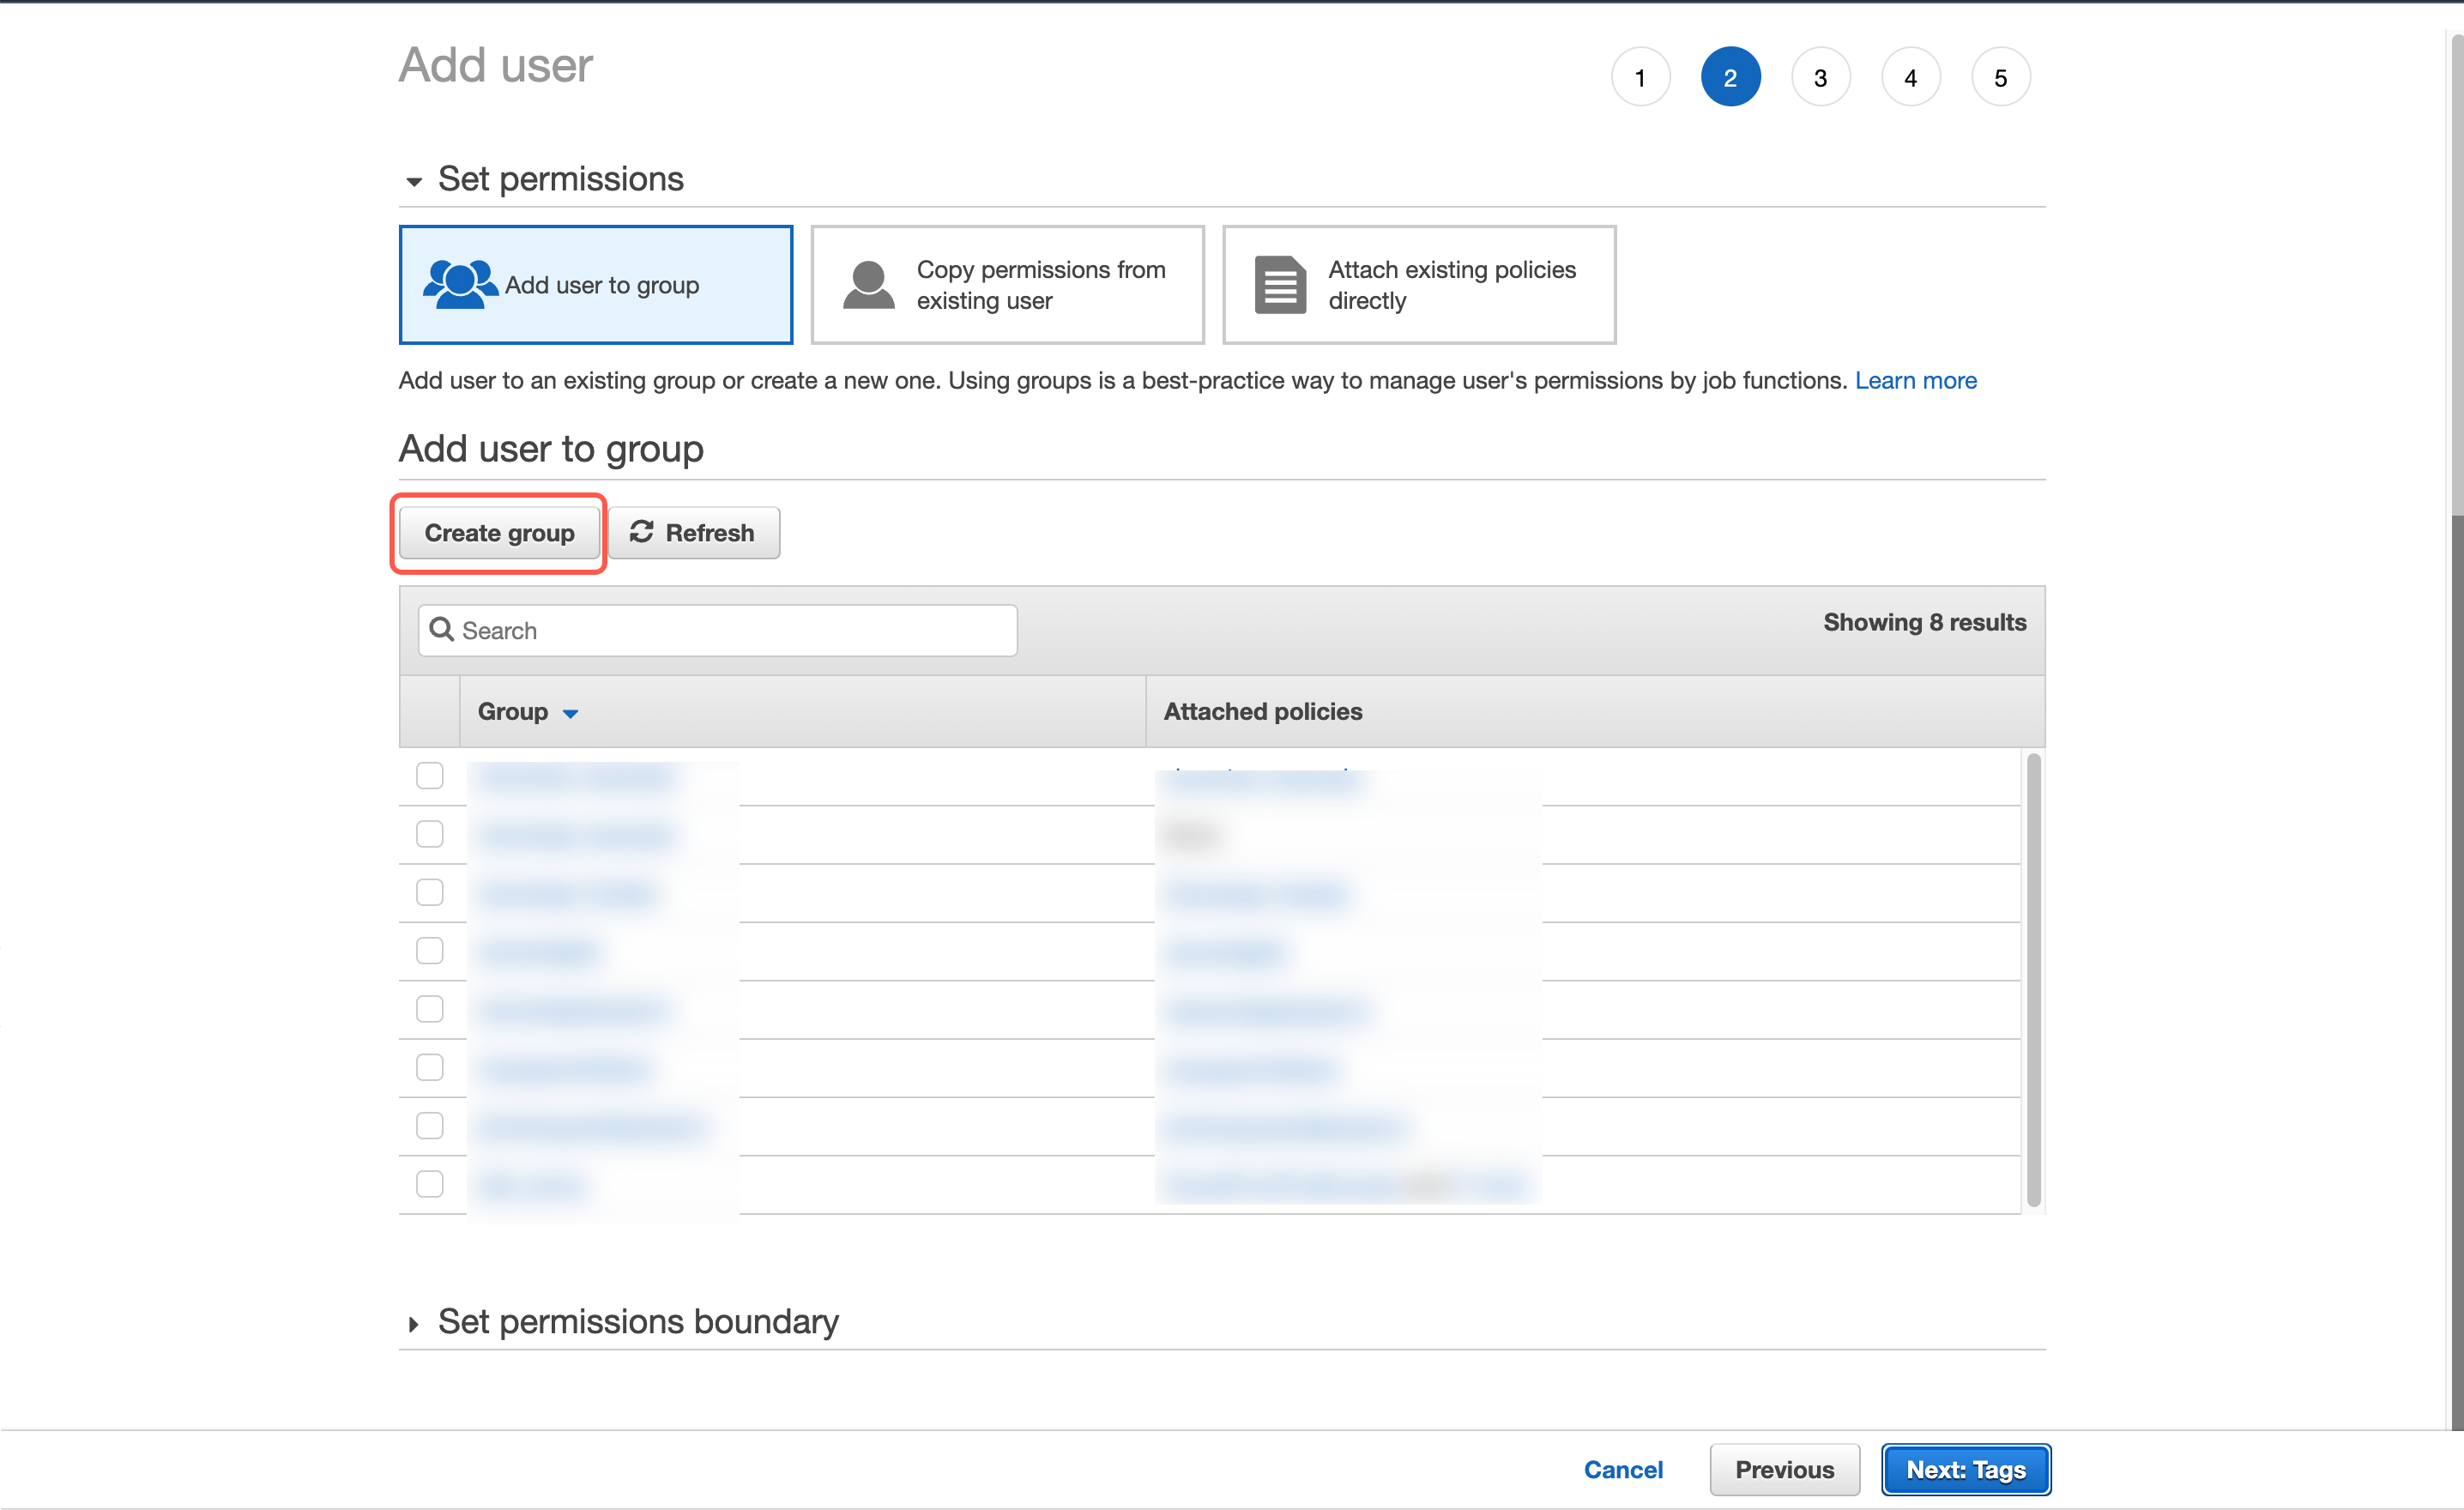
Add User to Group
On clicking, Create group page displays.
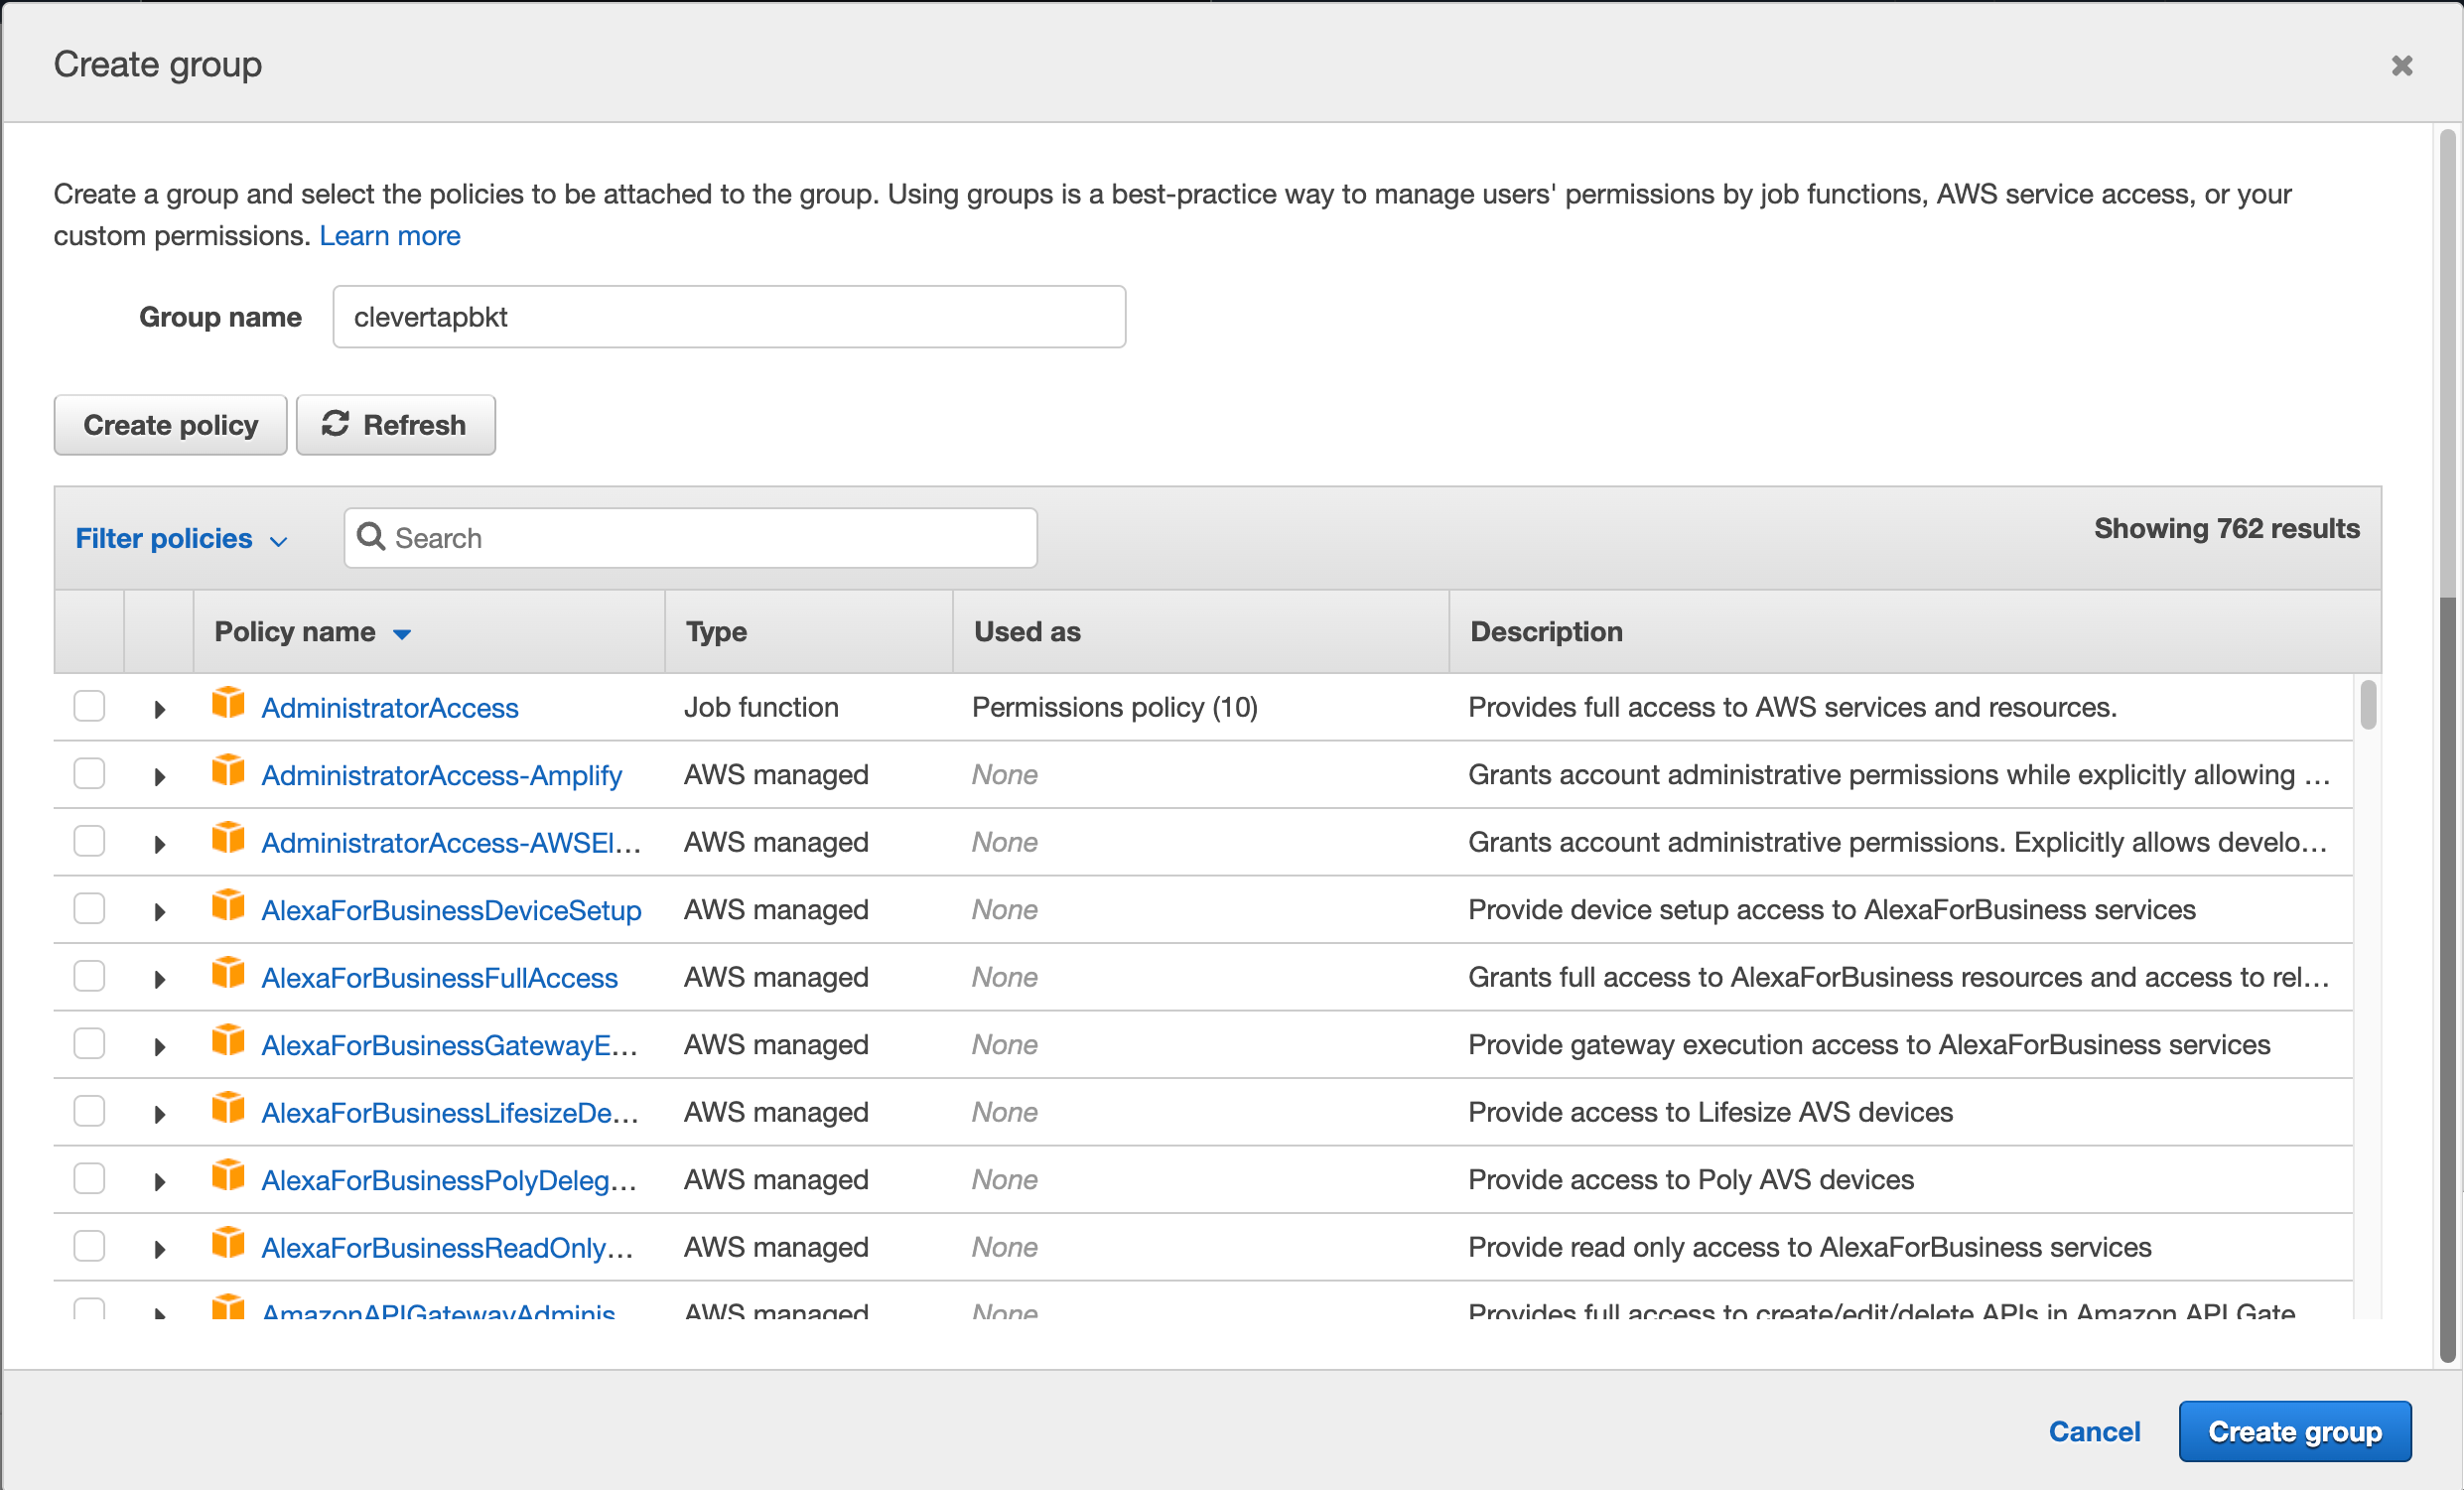
Assign Policy to Group
- Click Create policy. On clicking, Create policy page opens in a new tab.
- Select the JSON tab and then paste the JSON code given below in the box.
- Replace
clevertap-examplein the JSON code with the name of the S3 bucket you created in the above step.
The permissions defined in this policy allow CleverTap to get information about your bucket and upload files to it.
AWS API Access PoliciesIP Whitelisting is not supported with S3 exports. For more information about AWS API access policies, refer to this post from the AWS blog.
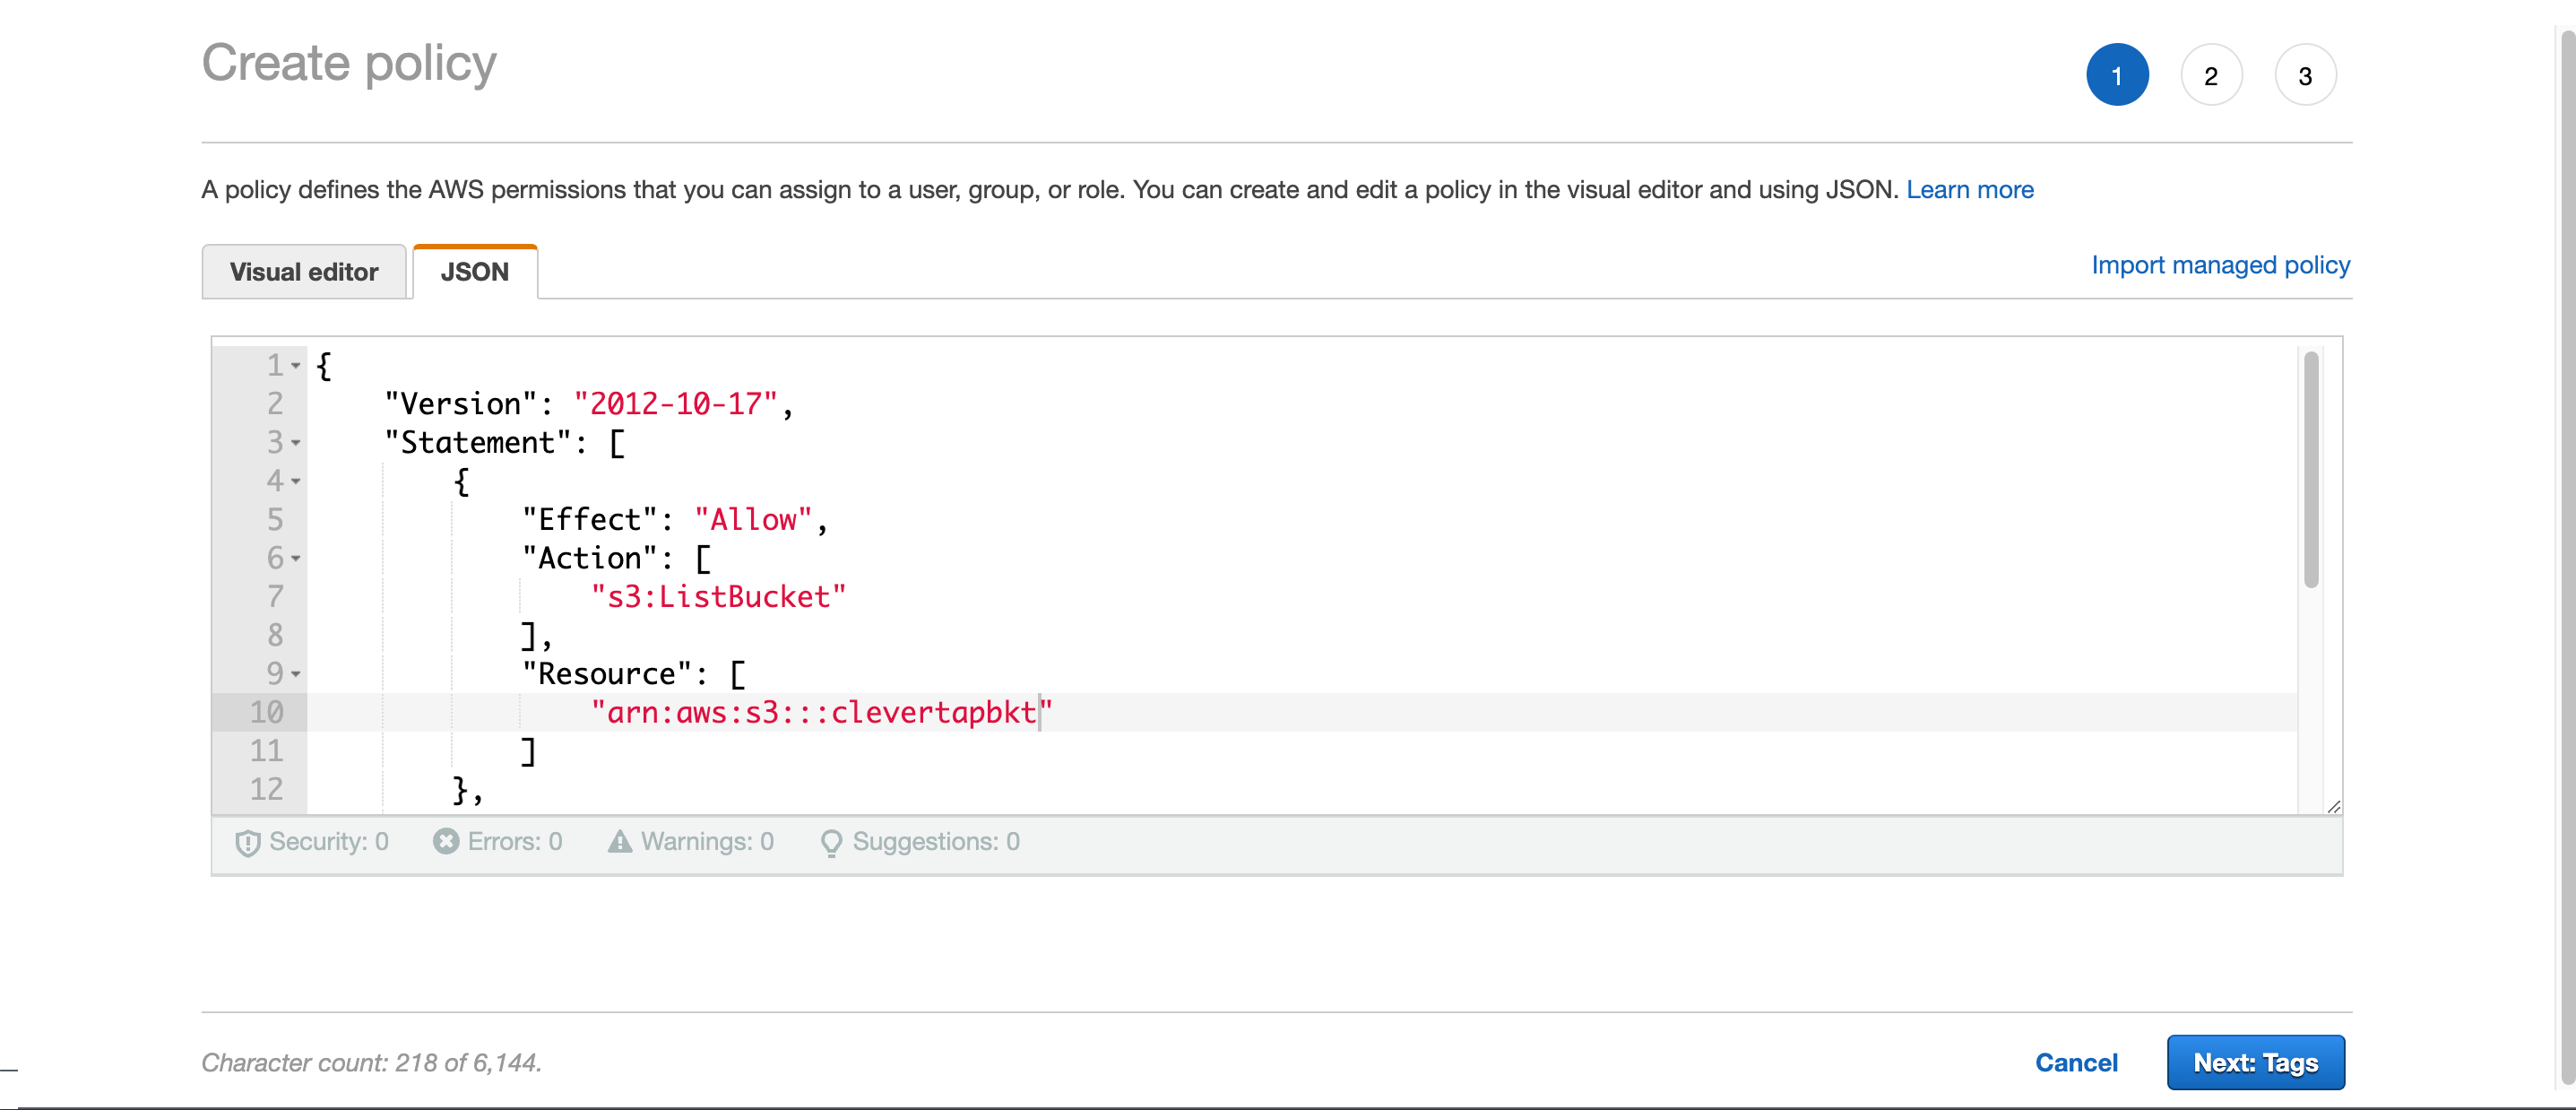
Bucket Policy in JSON Format
{
    "Version": "2012-10-17",
    "Statement": [
        {
            "Effect": "Allow",
            "Action": [
                "s3:ListBucket"
            ],
            "Resource": [
                "arn:aws:s3:::clevertap-example"
            ]
        },
        {
            "Effect": "Allow",
            "Action": [
                "s3:PutObject"
            ],
            "Resource": [
                "arn:aws:s3:::clevertap-example/*"
            ]
        }
    ]
}- Click Next: Tags and then click Next: Review. On clicking, the Create policy page opens.
- Enter the policy Name and click Create policy.
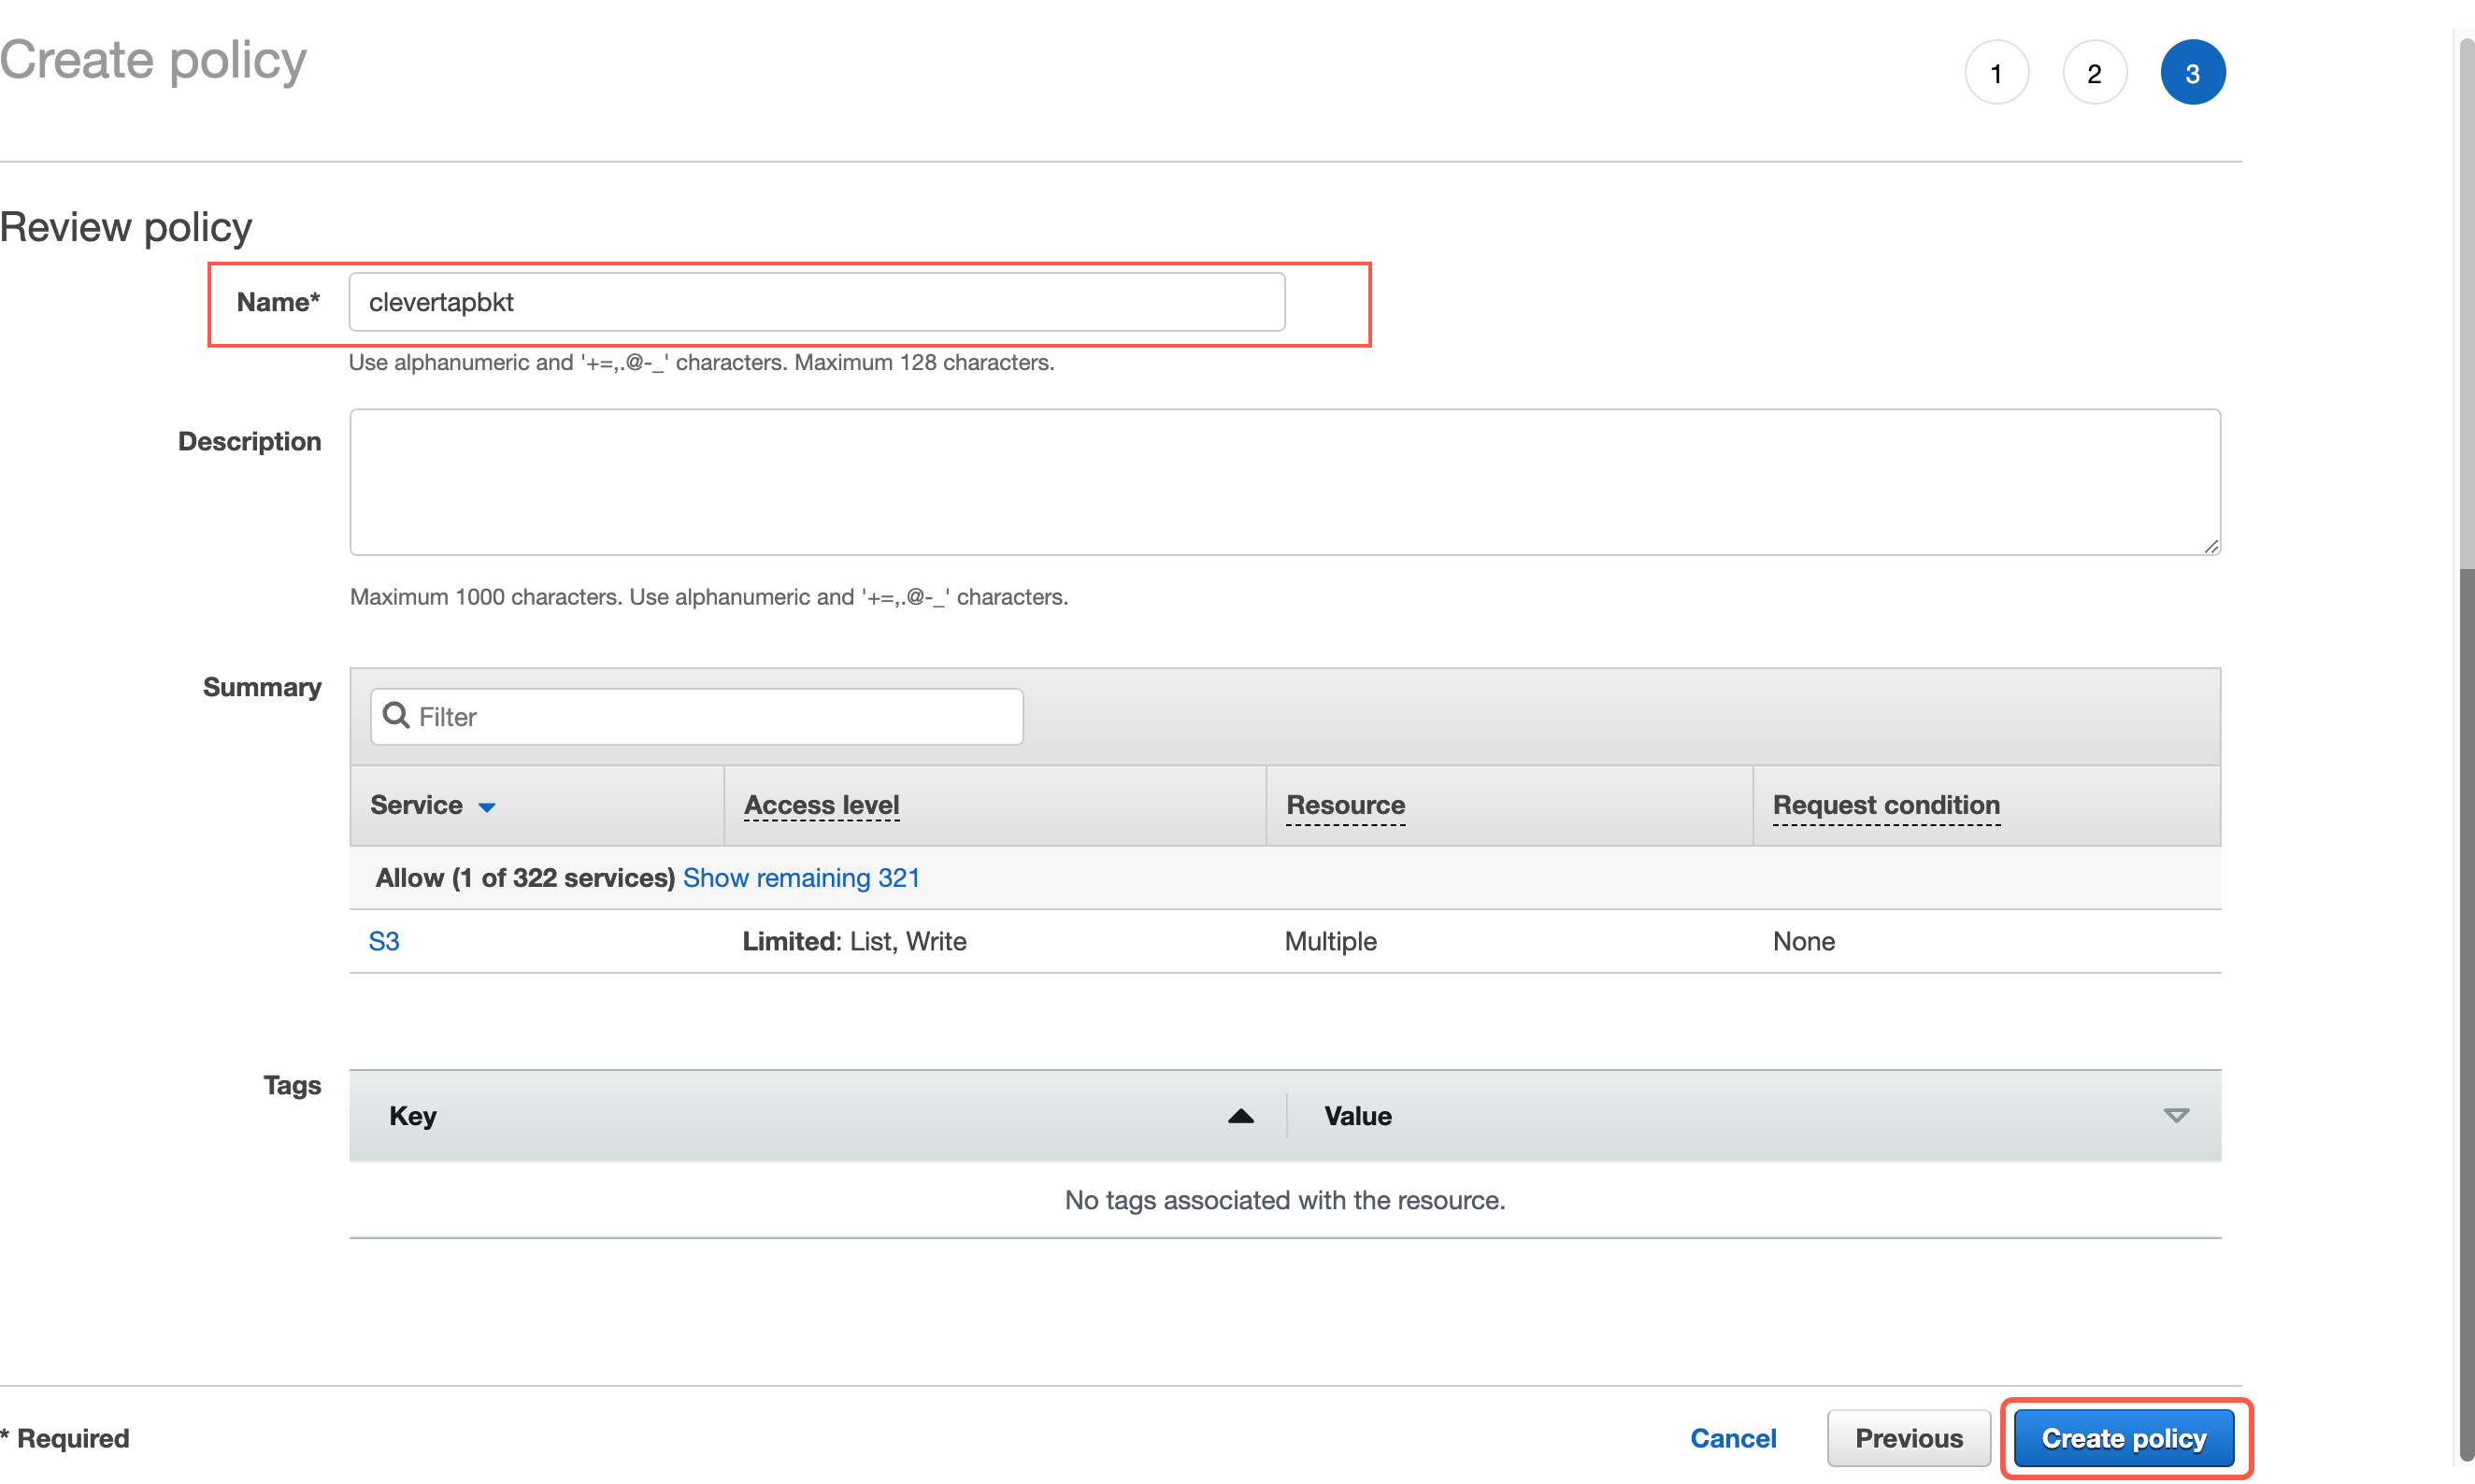
Enter Policy Name and Click Create policy
On successful policy creation, the following message displays in the snack bar at the top:
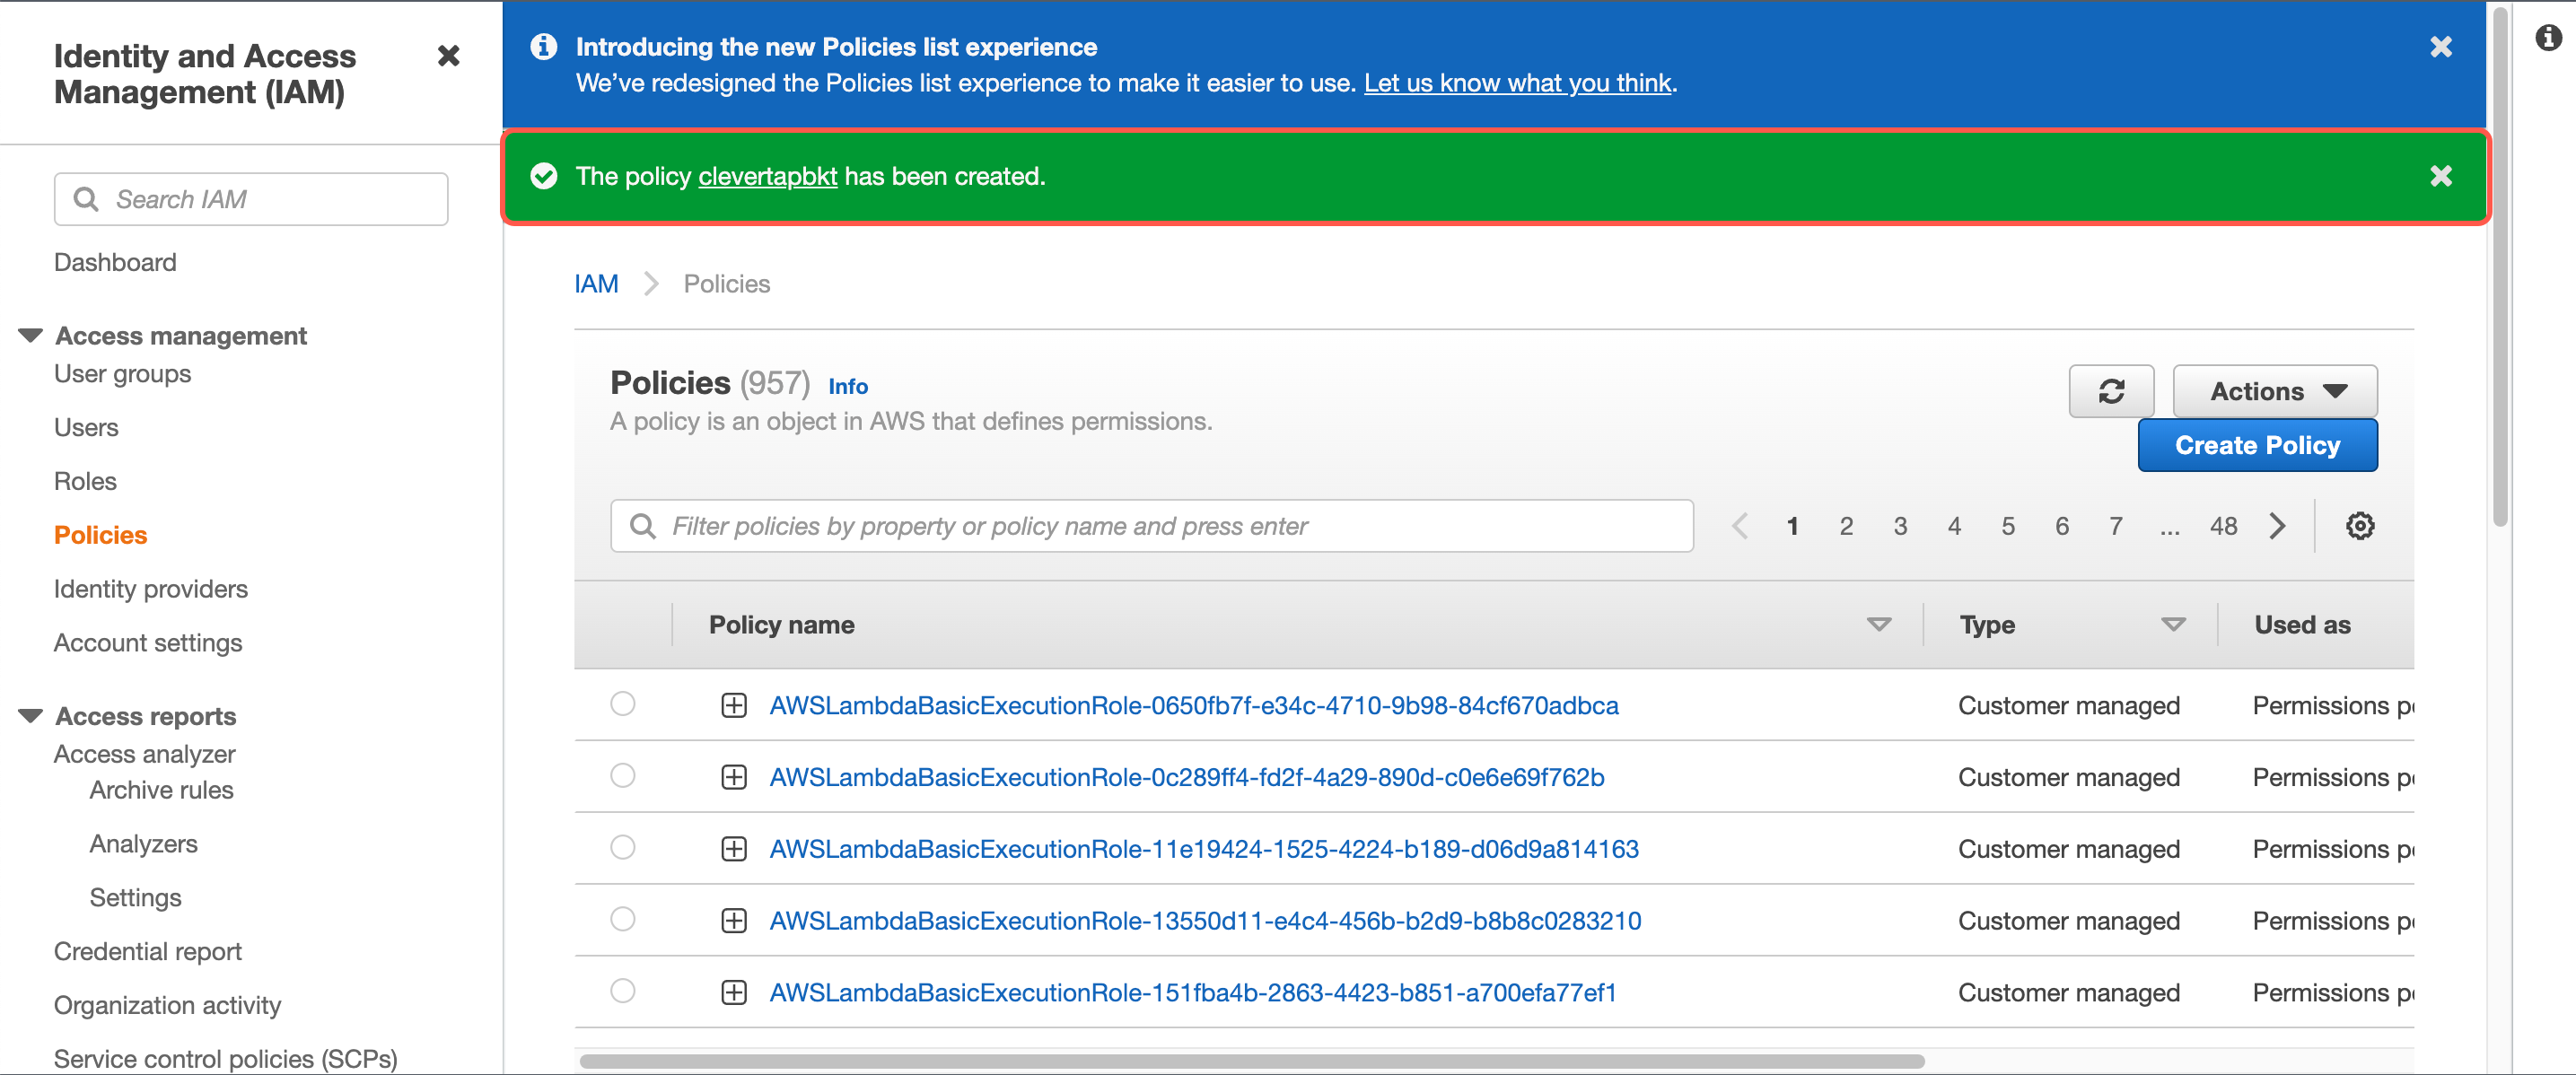
Bucket Policy Created Successfully
- Go back to the Create group page (opened in Step 6), search for the policy you just created, and assign it to the new group by selecting the checkbox.
- Click Create group. On clicking, the Add user page displays.
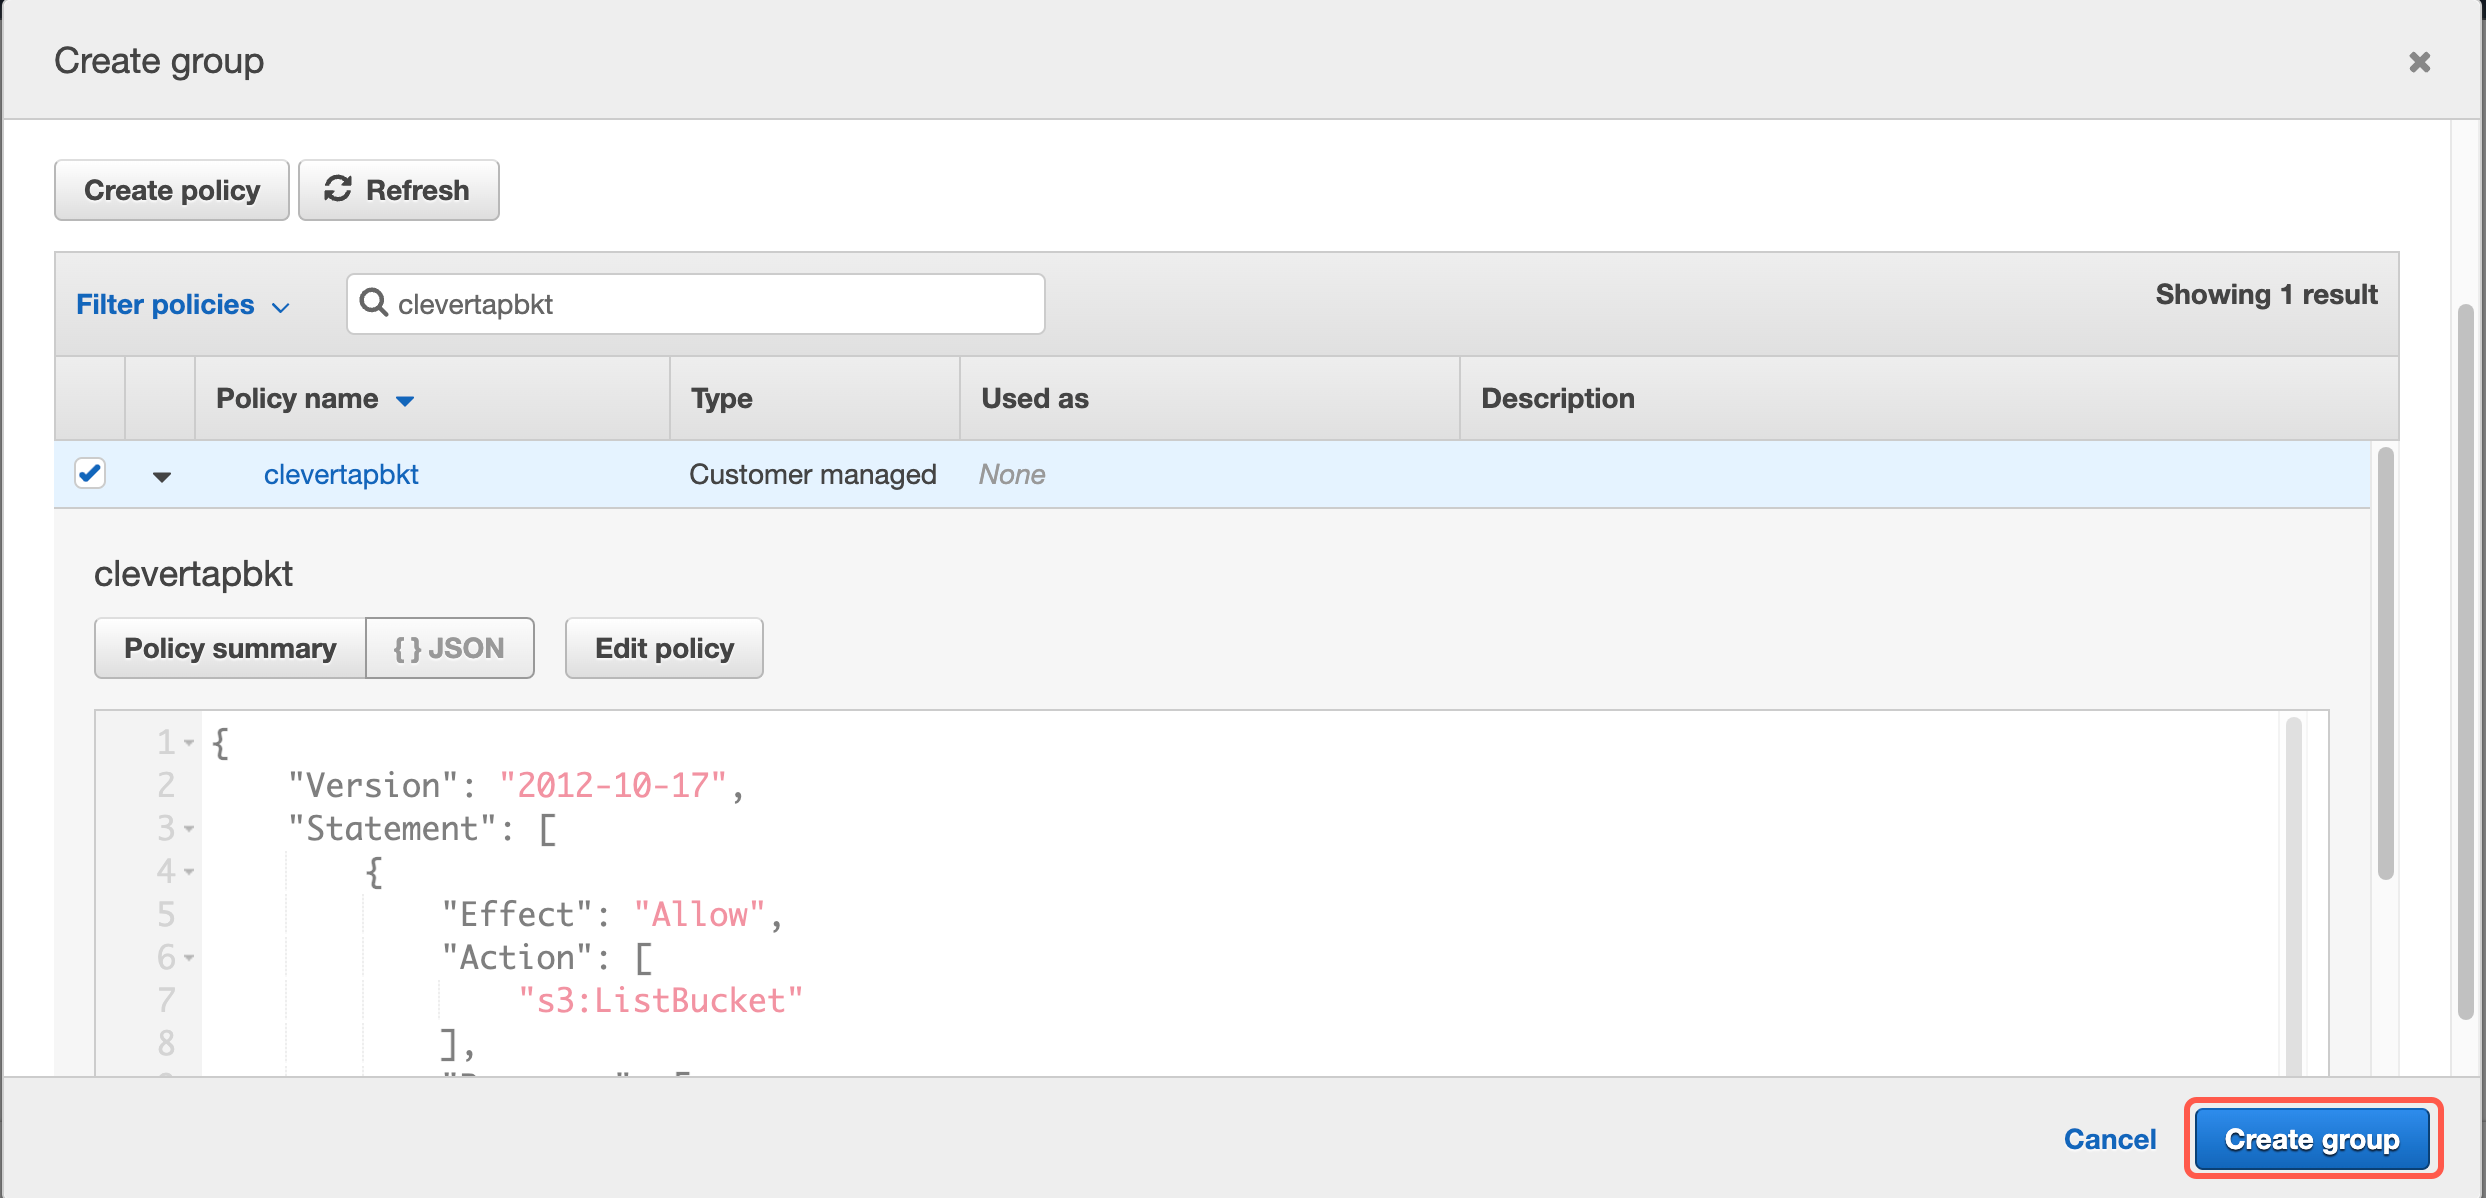
Select Policy and Click Create Group
- Click Next: Tags and then click Next: Review.
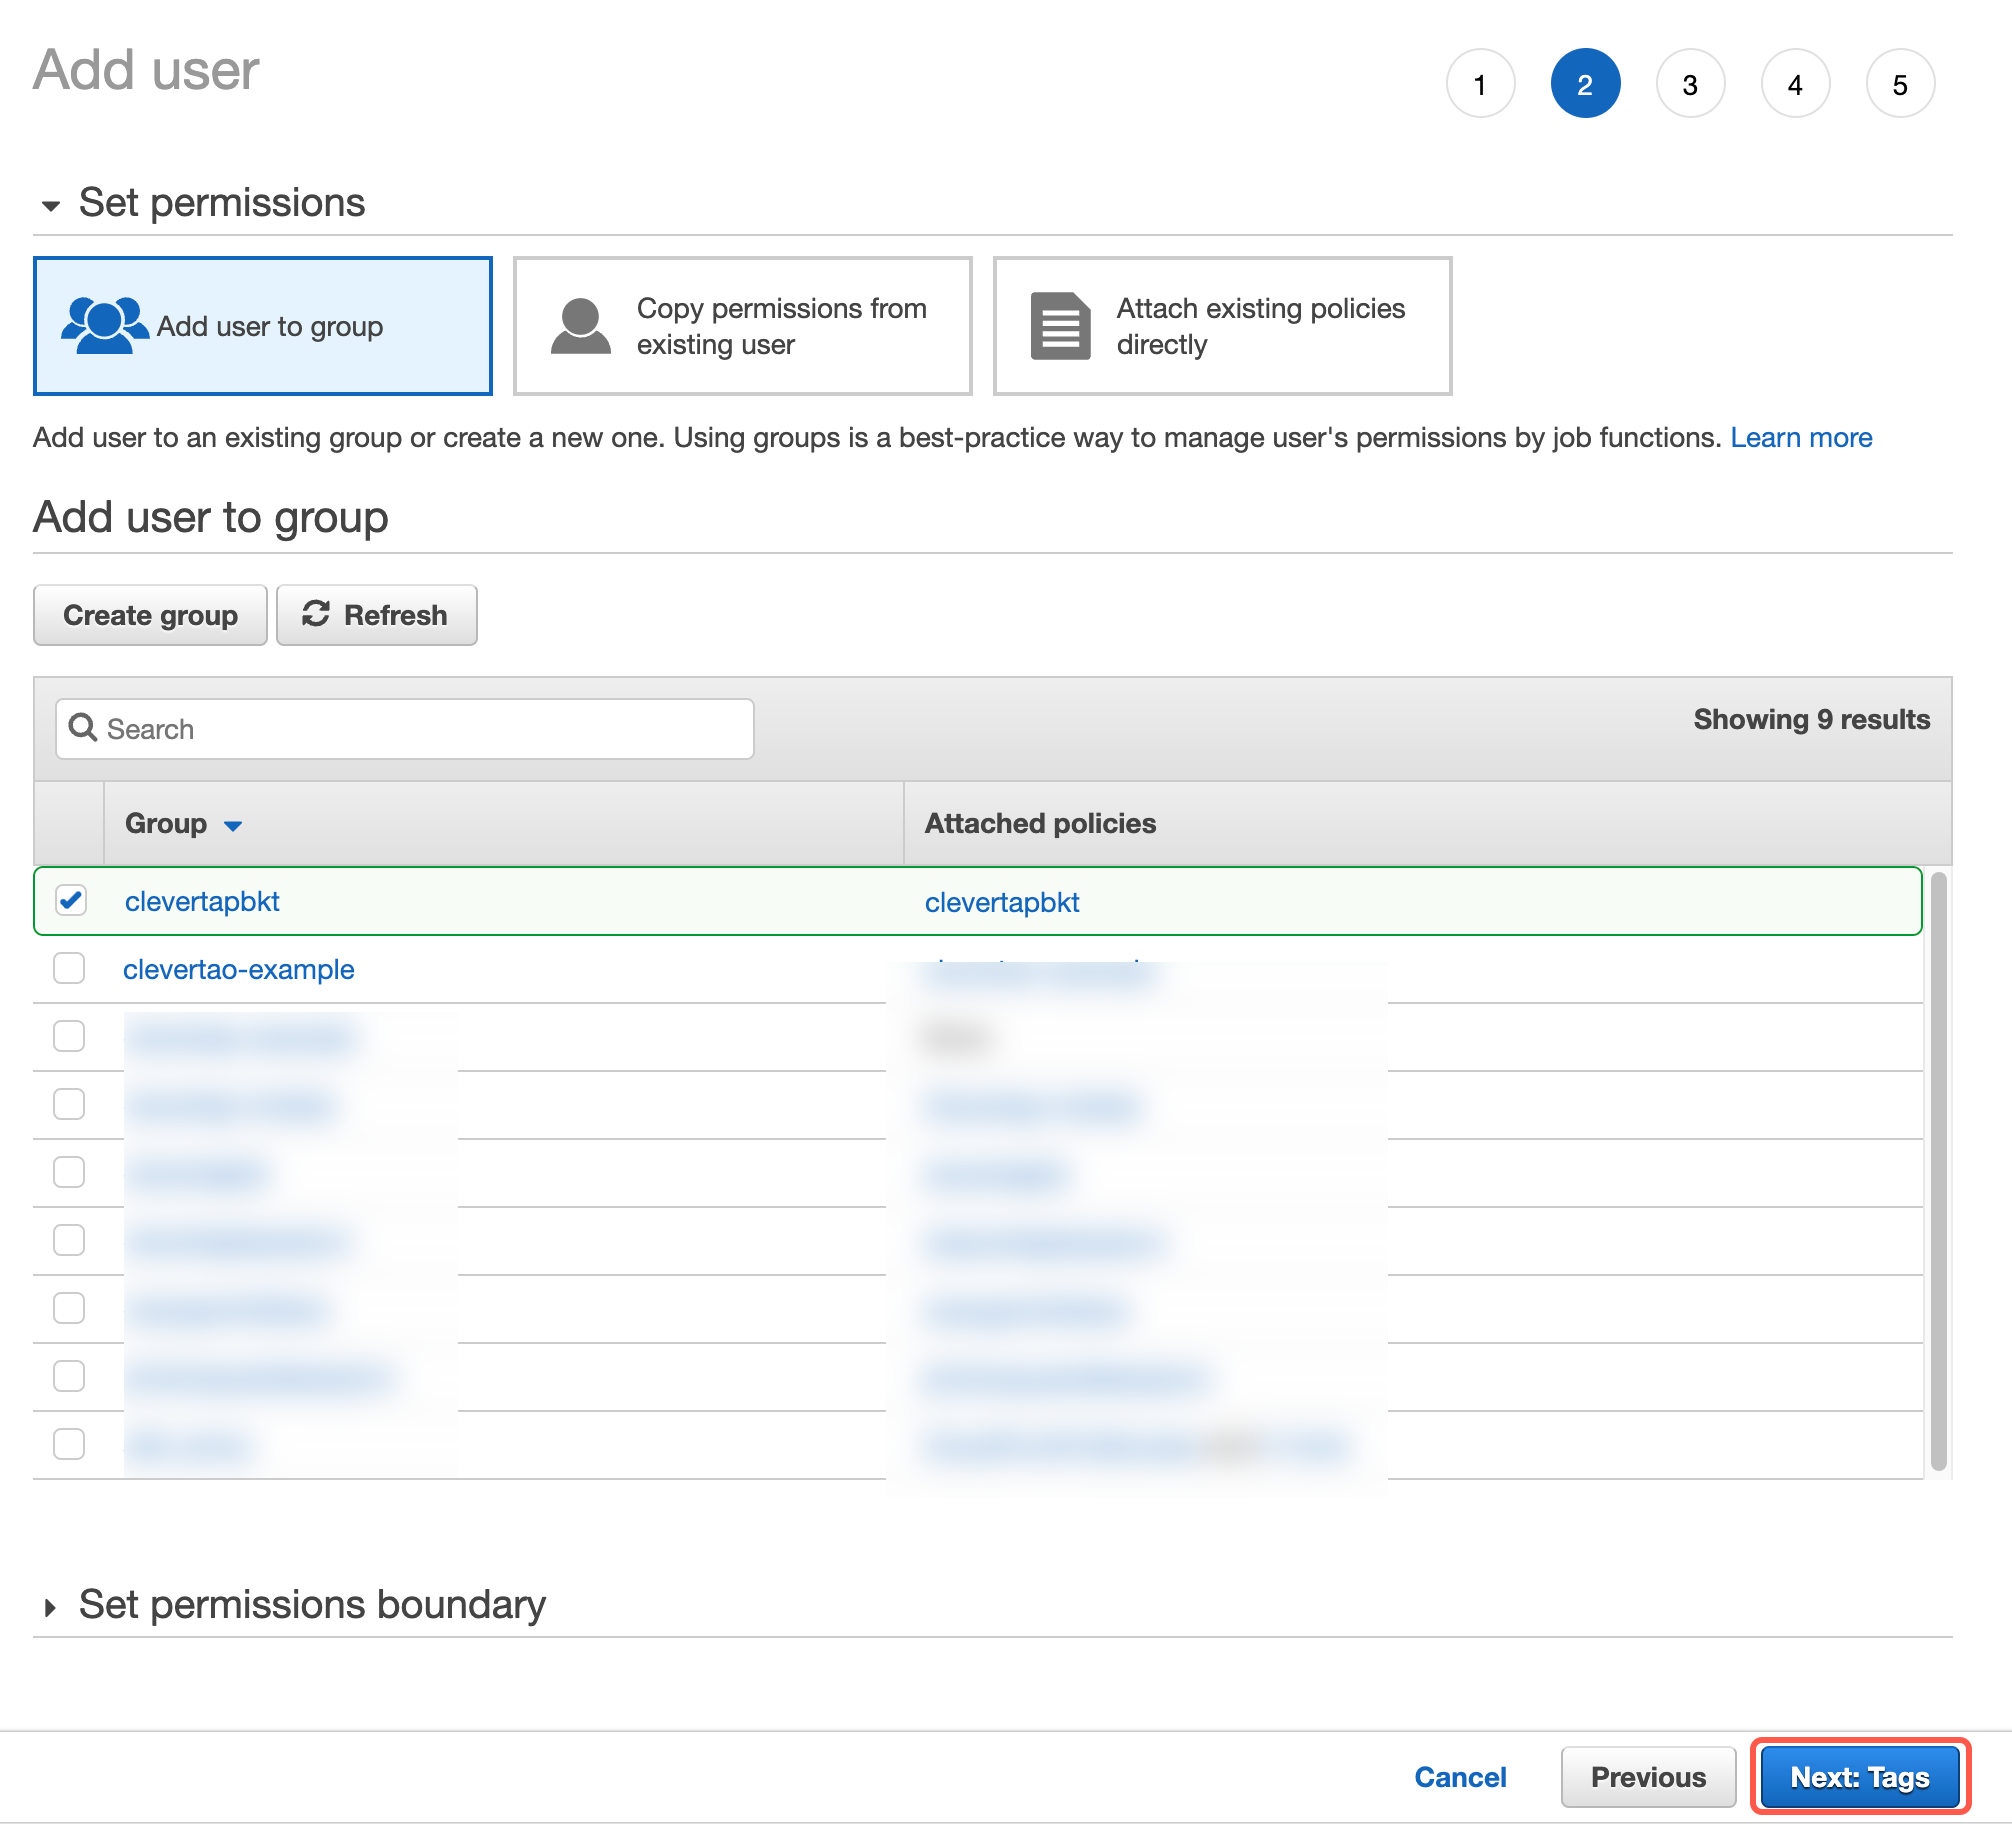
Click Next: Tags
- Click Create user.
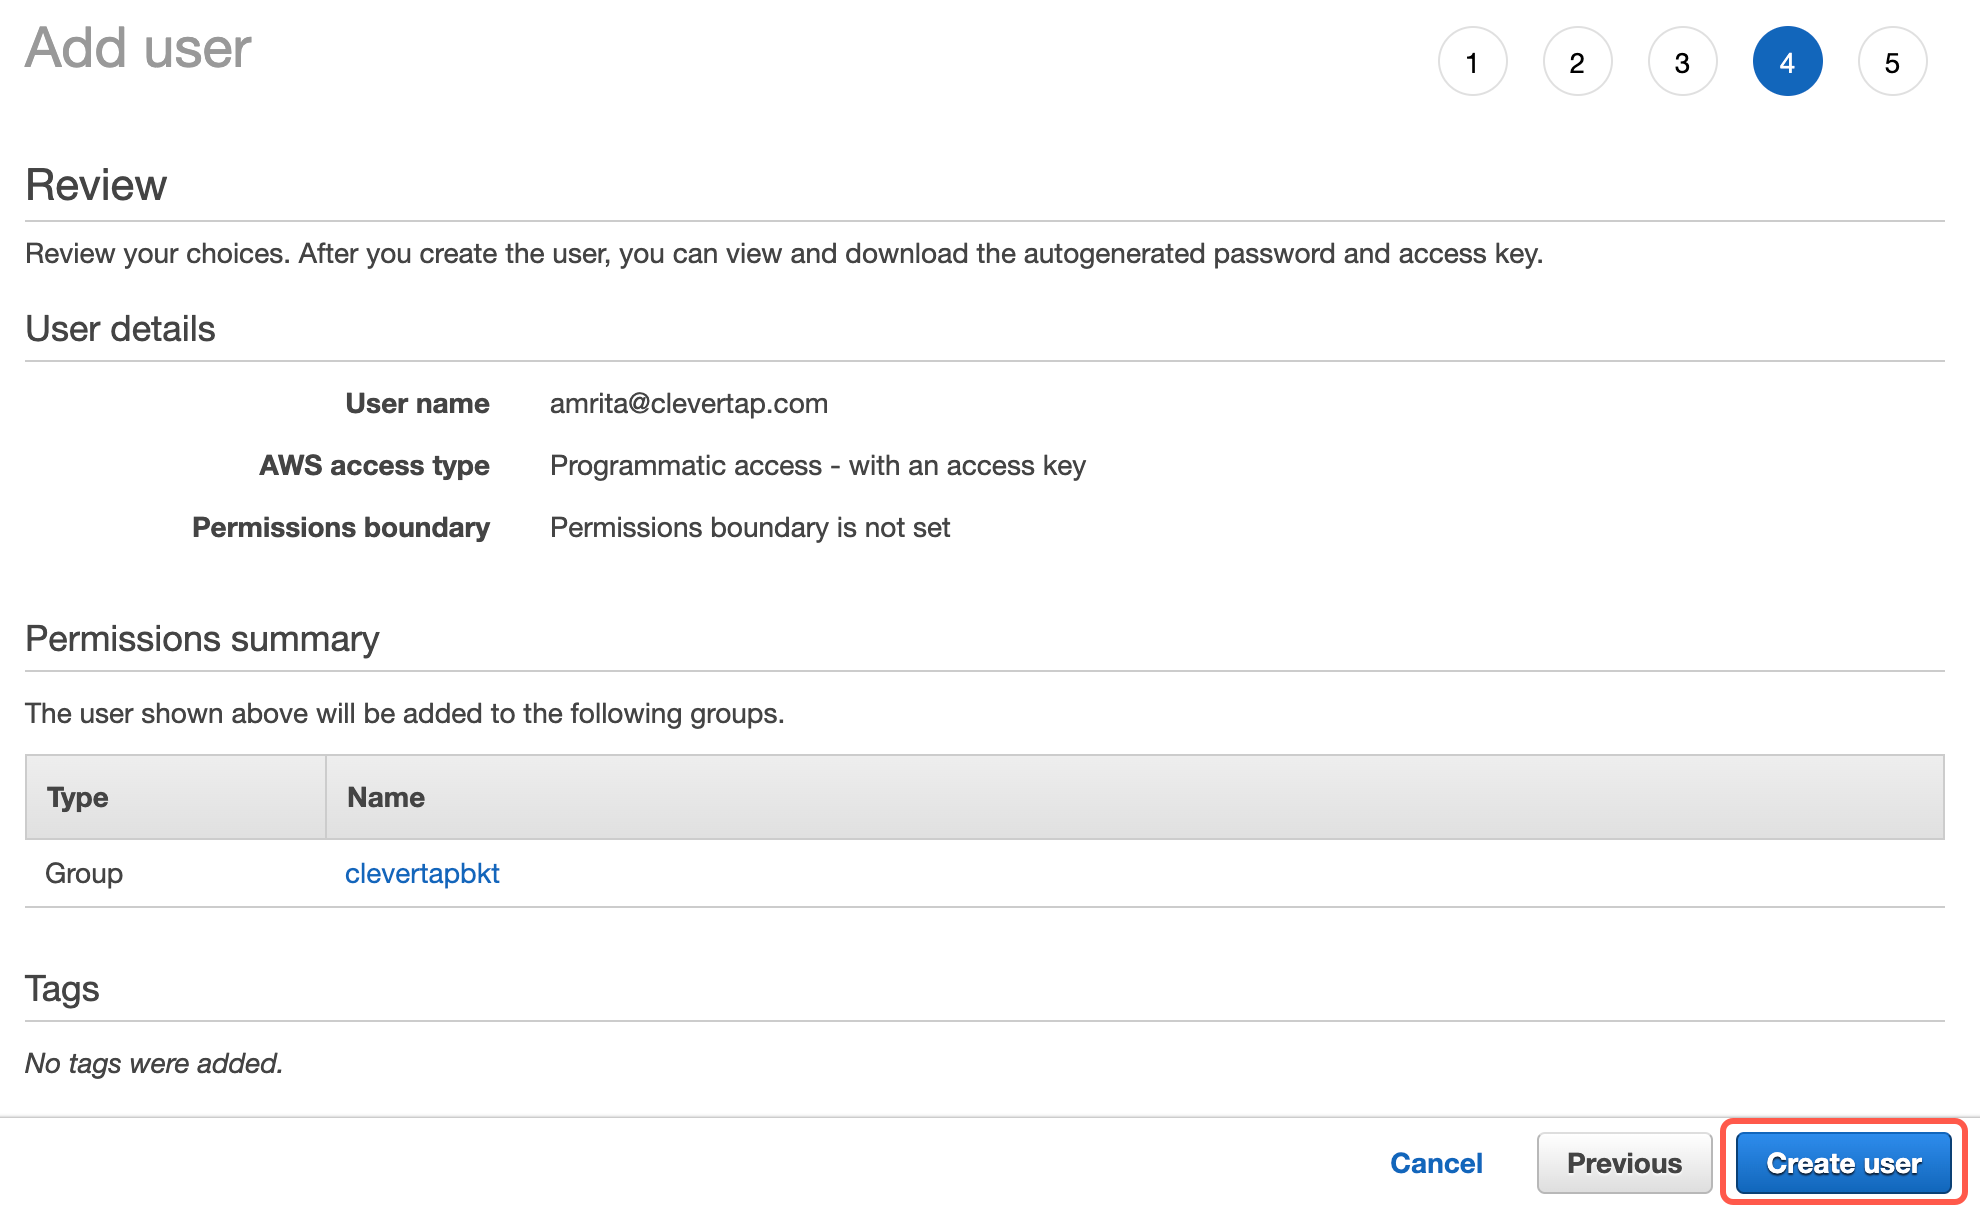
Click Create user
On successful user creation, the following page displays. You will see your Access key ID and the Secret access key.
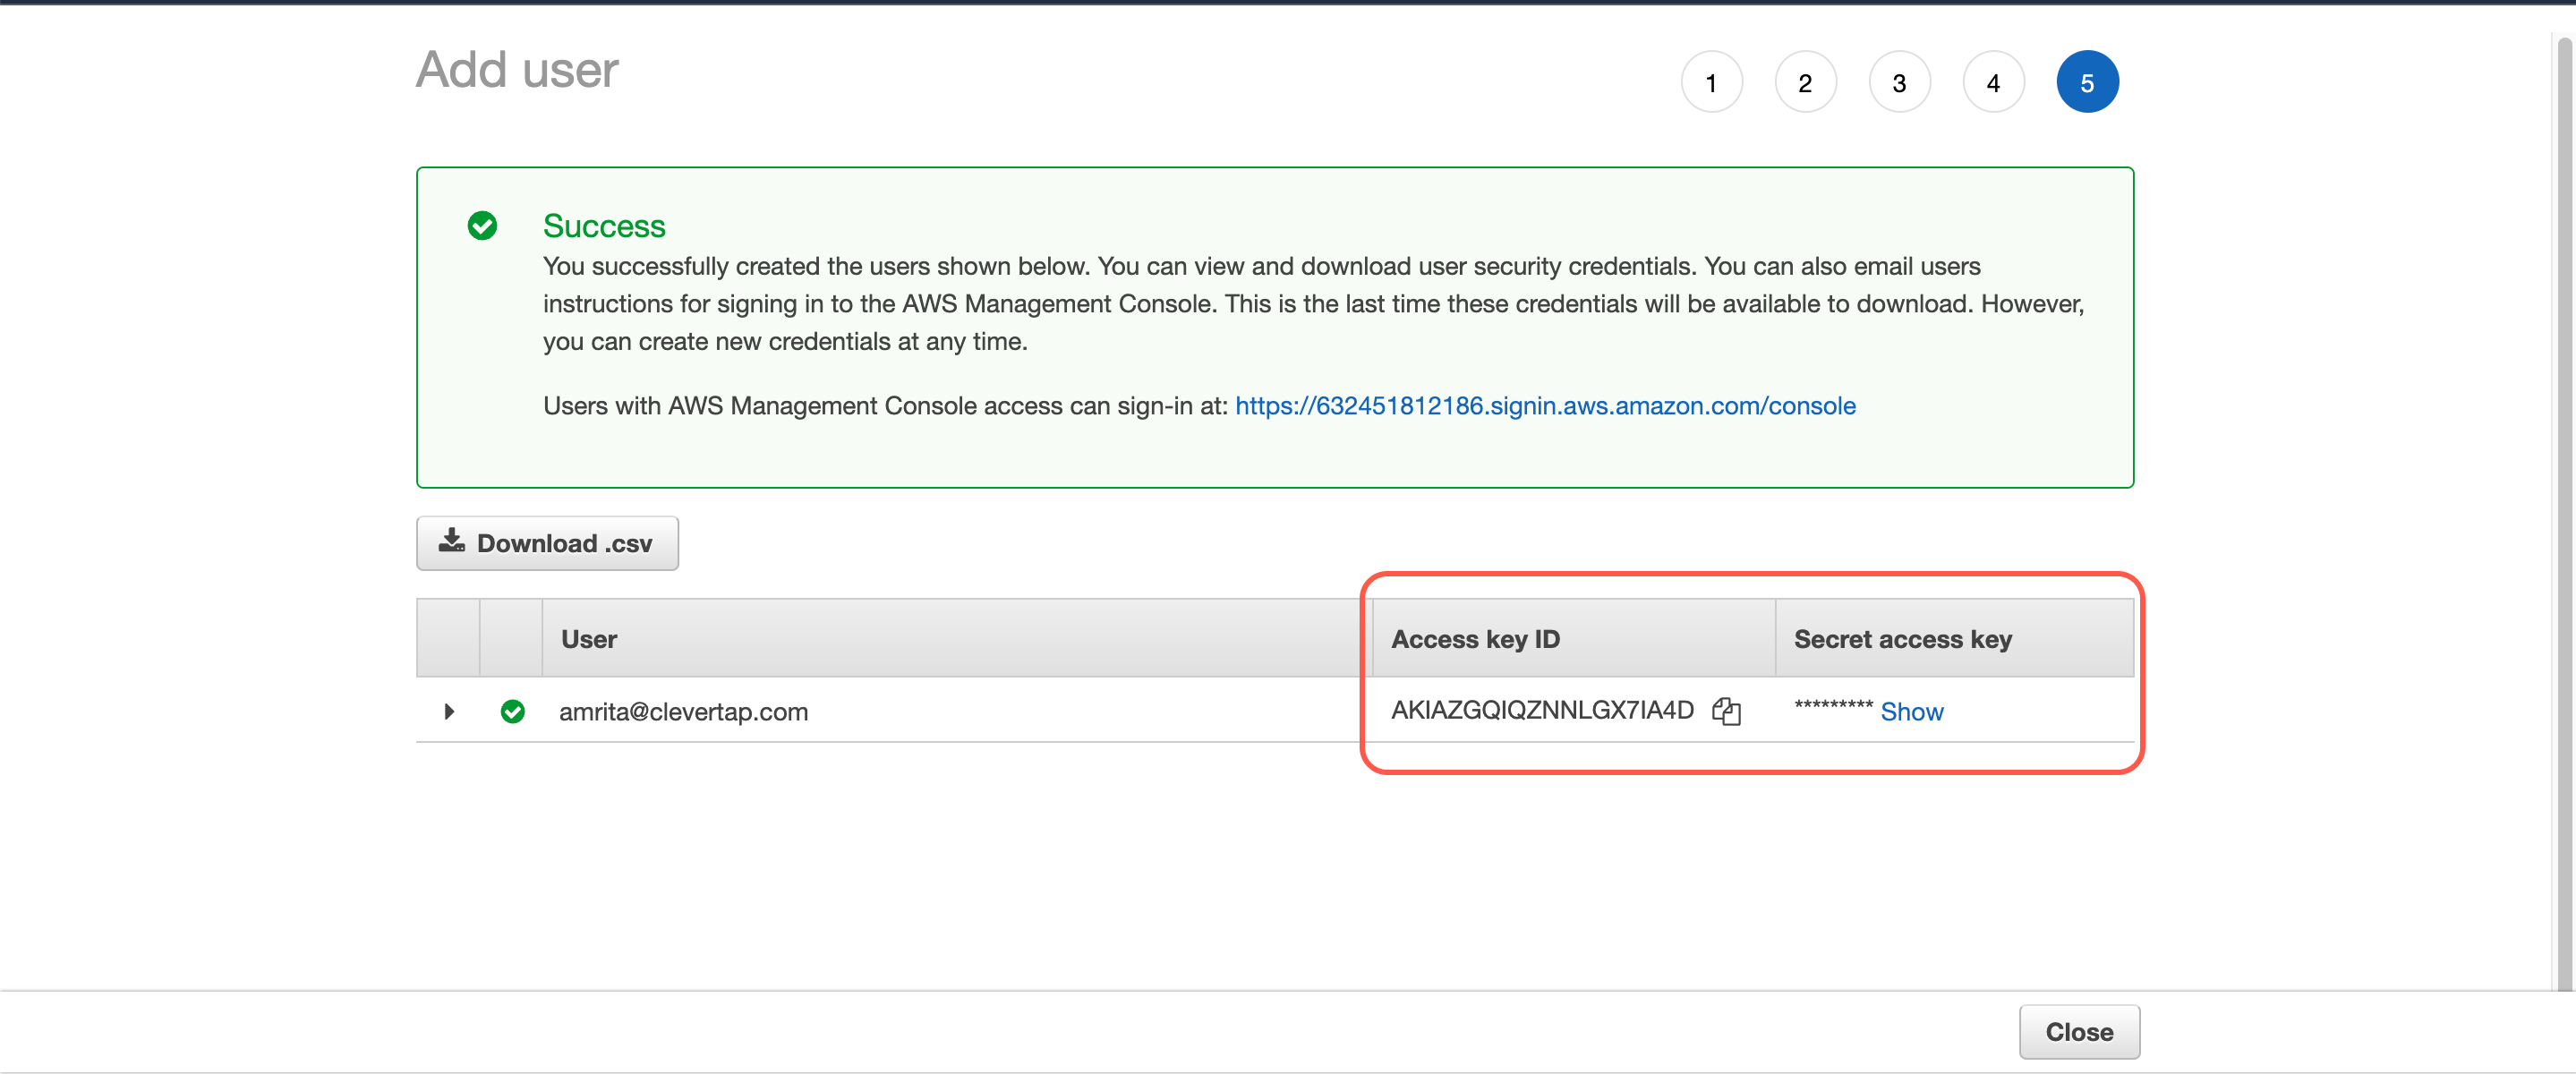
Copy or Download User Security Credentials
These credentials allow CleverTap to upload files to your S3 bucket. We recommend you note down these values as you will require them for the next step. Otherwise, you can also click Download .csv to save these details for future use.
Add Your S3 Bucket Details to CleverTap
To add your S3 bucket details to Clevertap, perform the following steps:
- Go to Settings > Partners and click View Details against Amazon S3. The Integrate analytics partner - Amazon S3 window displays on the right side of the screen.
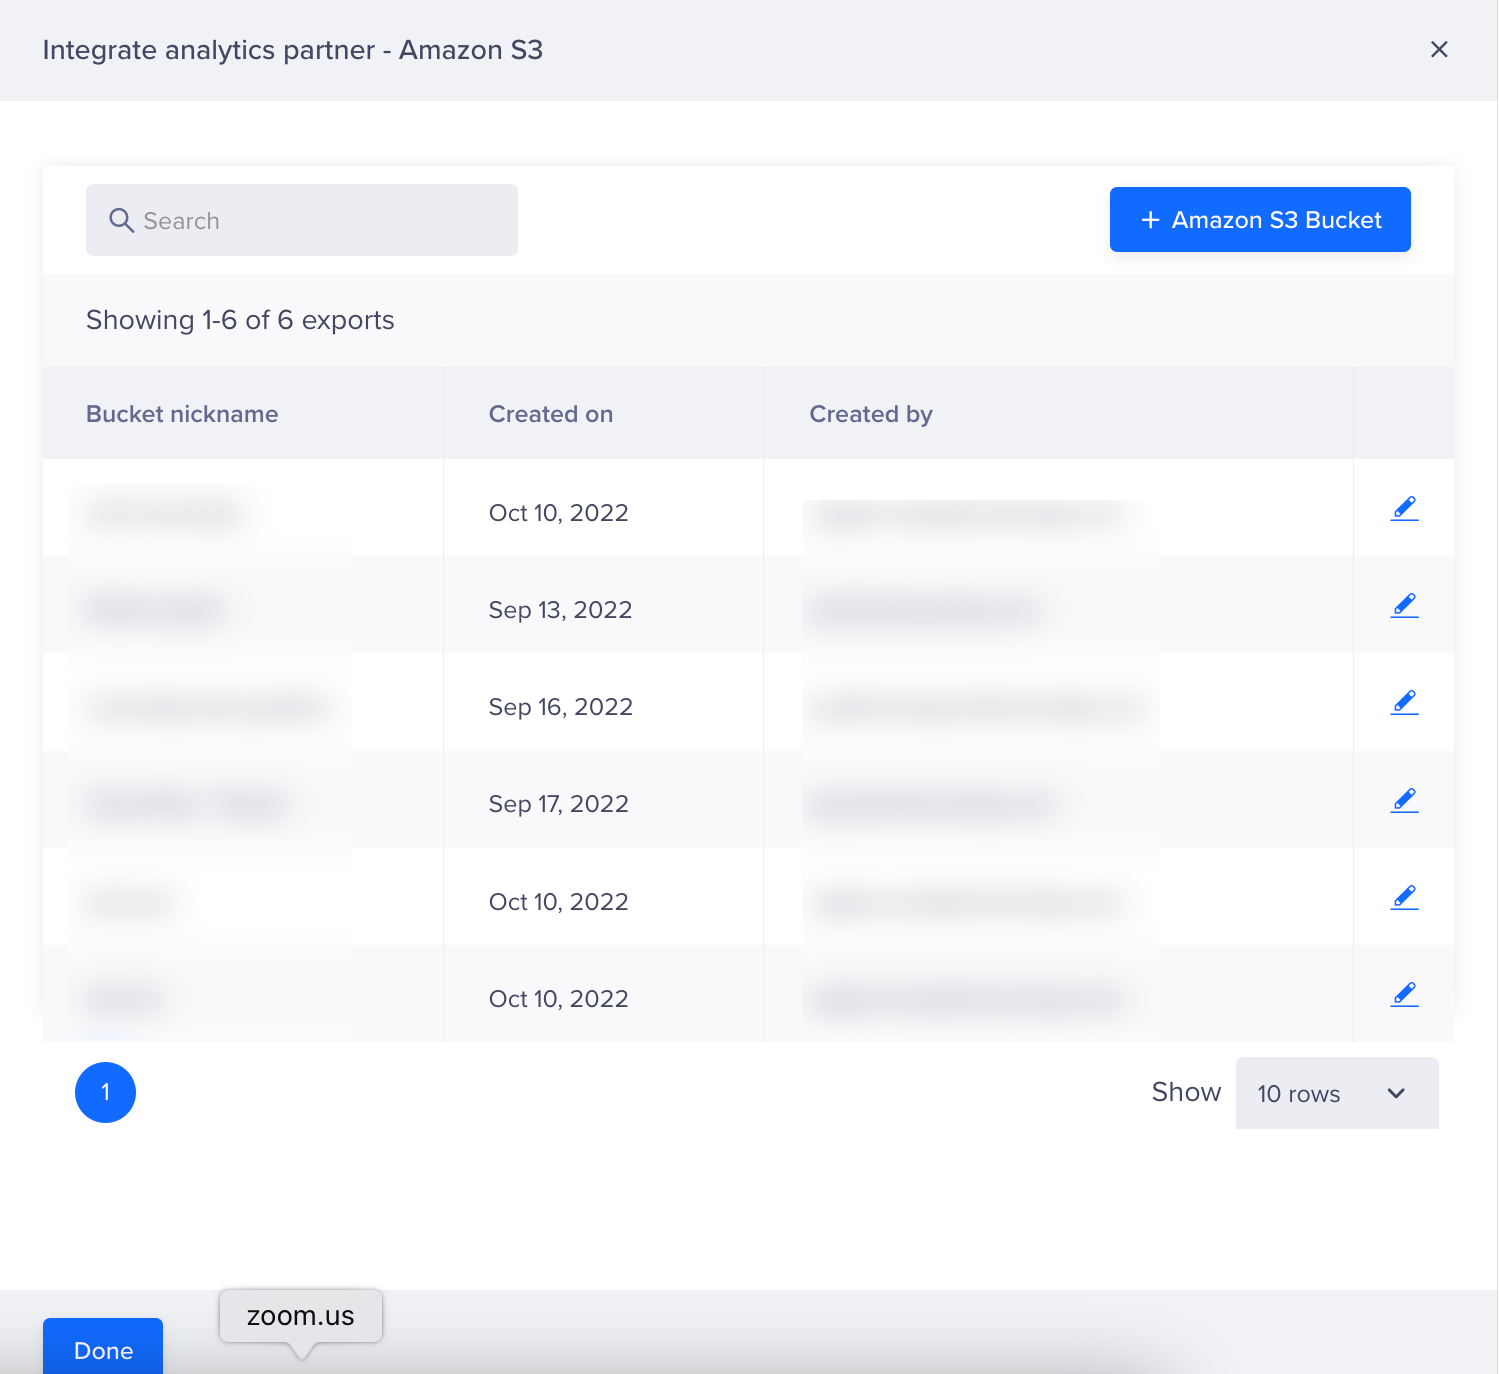
Click View Details against Amazon S3 from Partners Page
- Click + Amazon S3 Bucket to create a new bucket. The Integrate Amazon S3 Bucket window opens on the right side of the screen.
- Enter the Bucket nickname and Bucket URL.
- Select the User details option under Configure with section.
- Enter your Access key ID and the Secret access key obtained earlier and click Save Credentials.
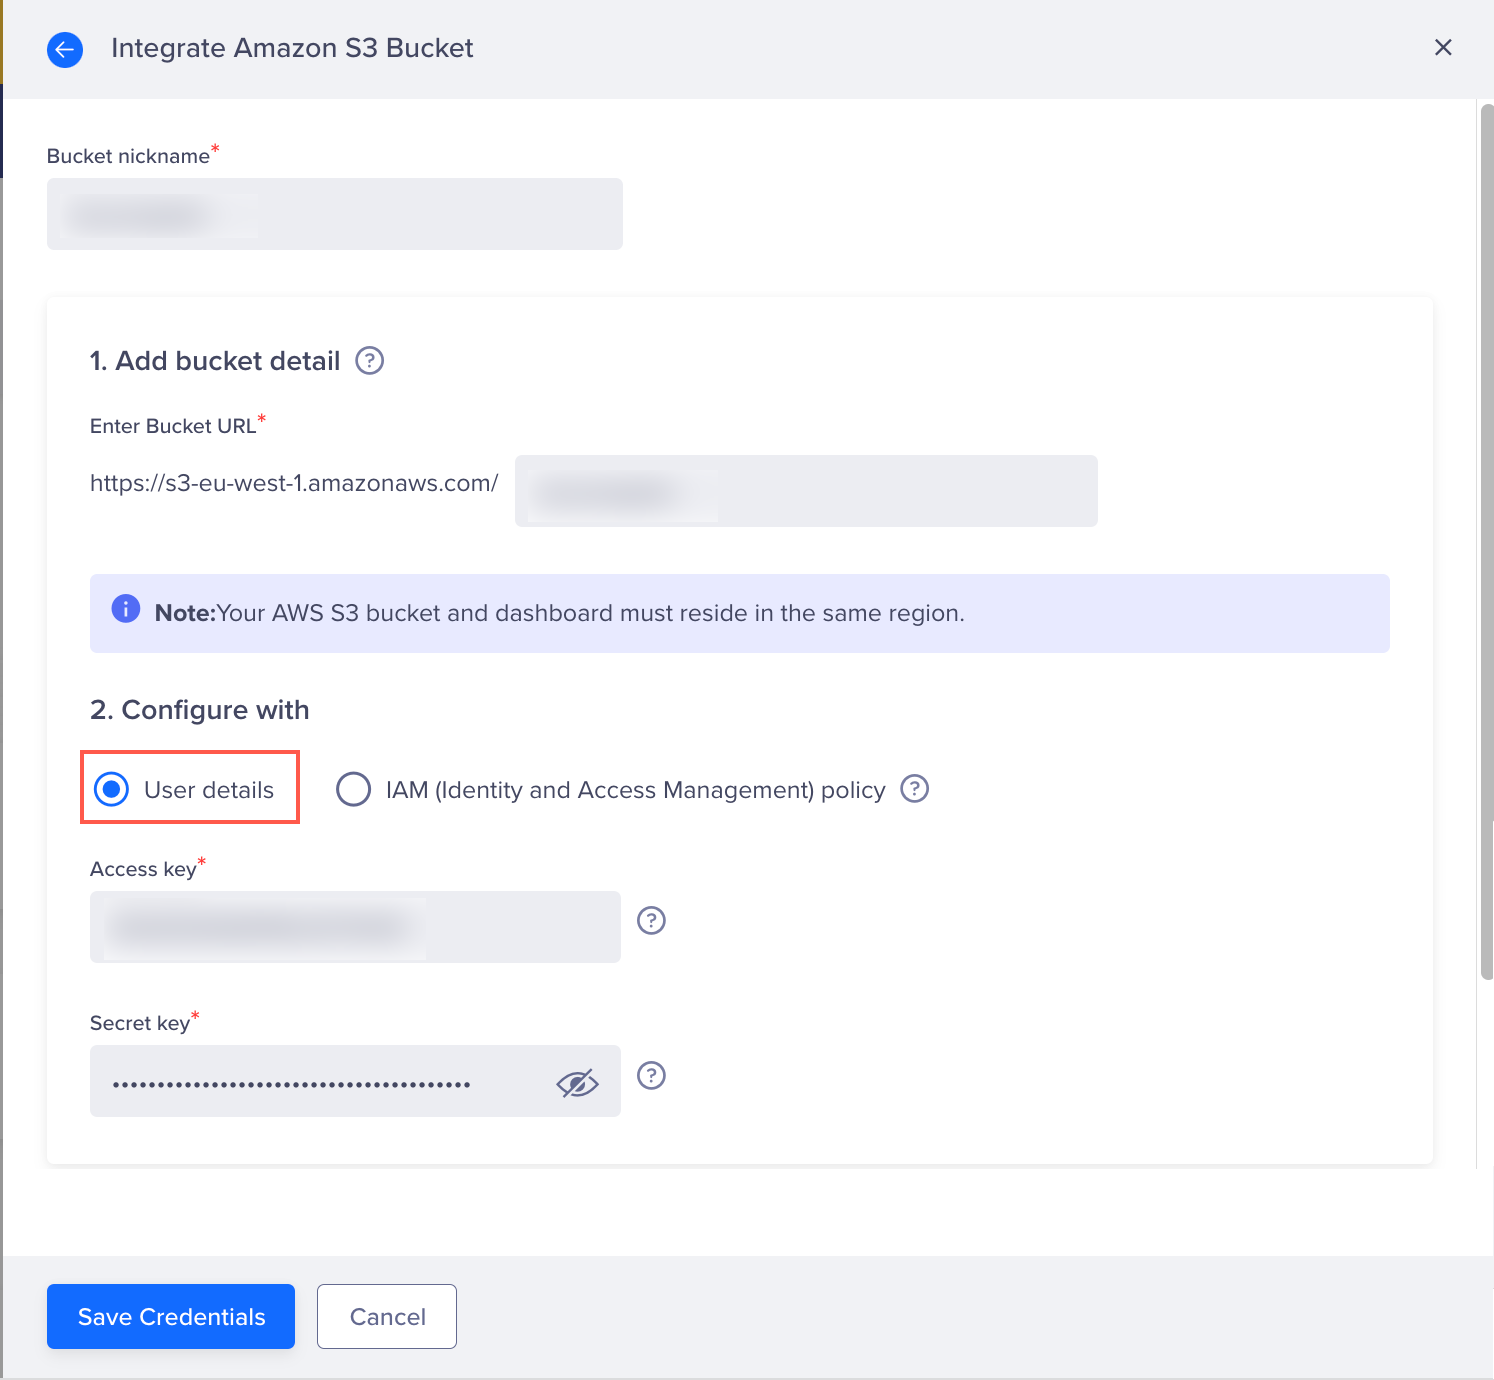
Enter User Security Credentials and Click Save Credentials
FAQs
What permission is required for CleverTap to export data to your AWS S3 bucket?
A. CleverTap needs write permission to be able to export data to your AWS S3 bucket, as shown in the following figure:
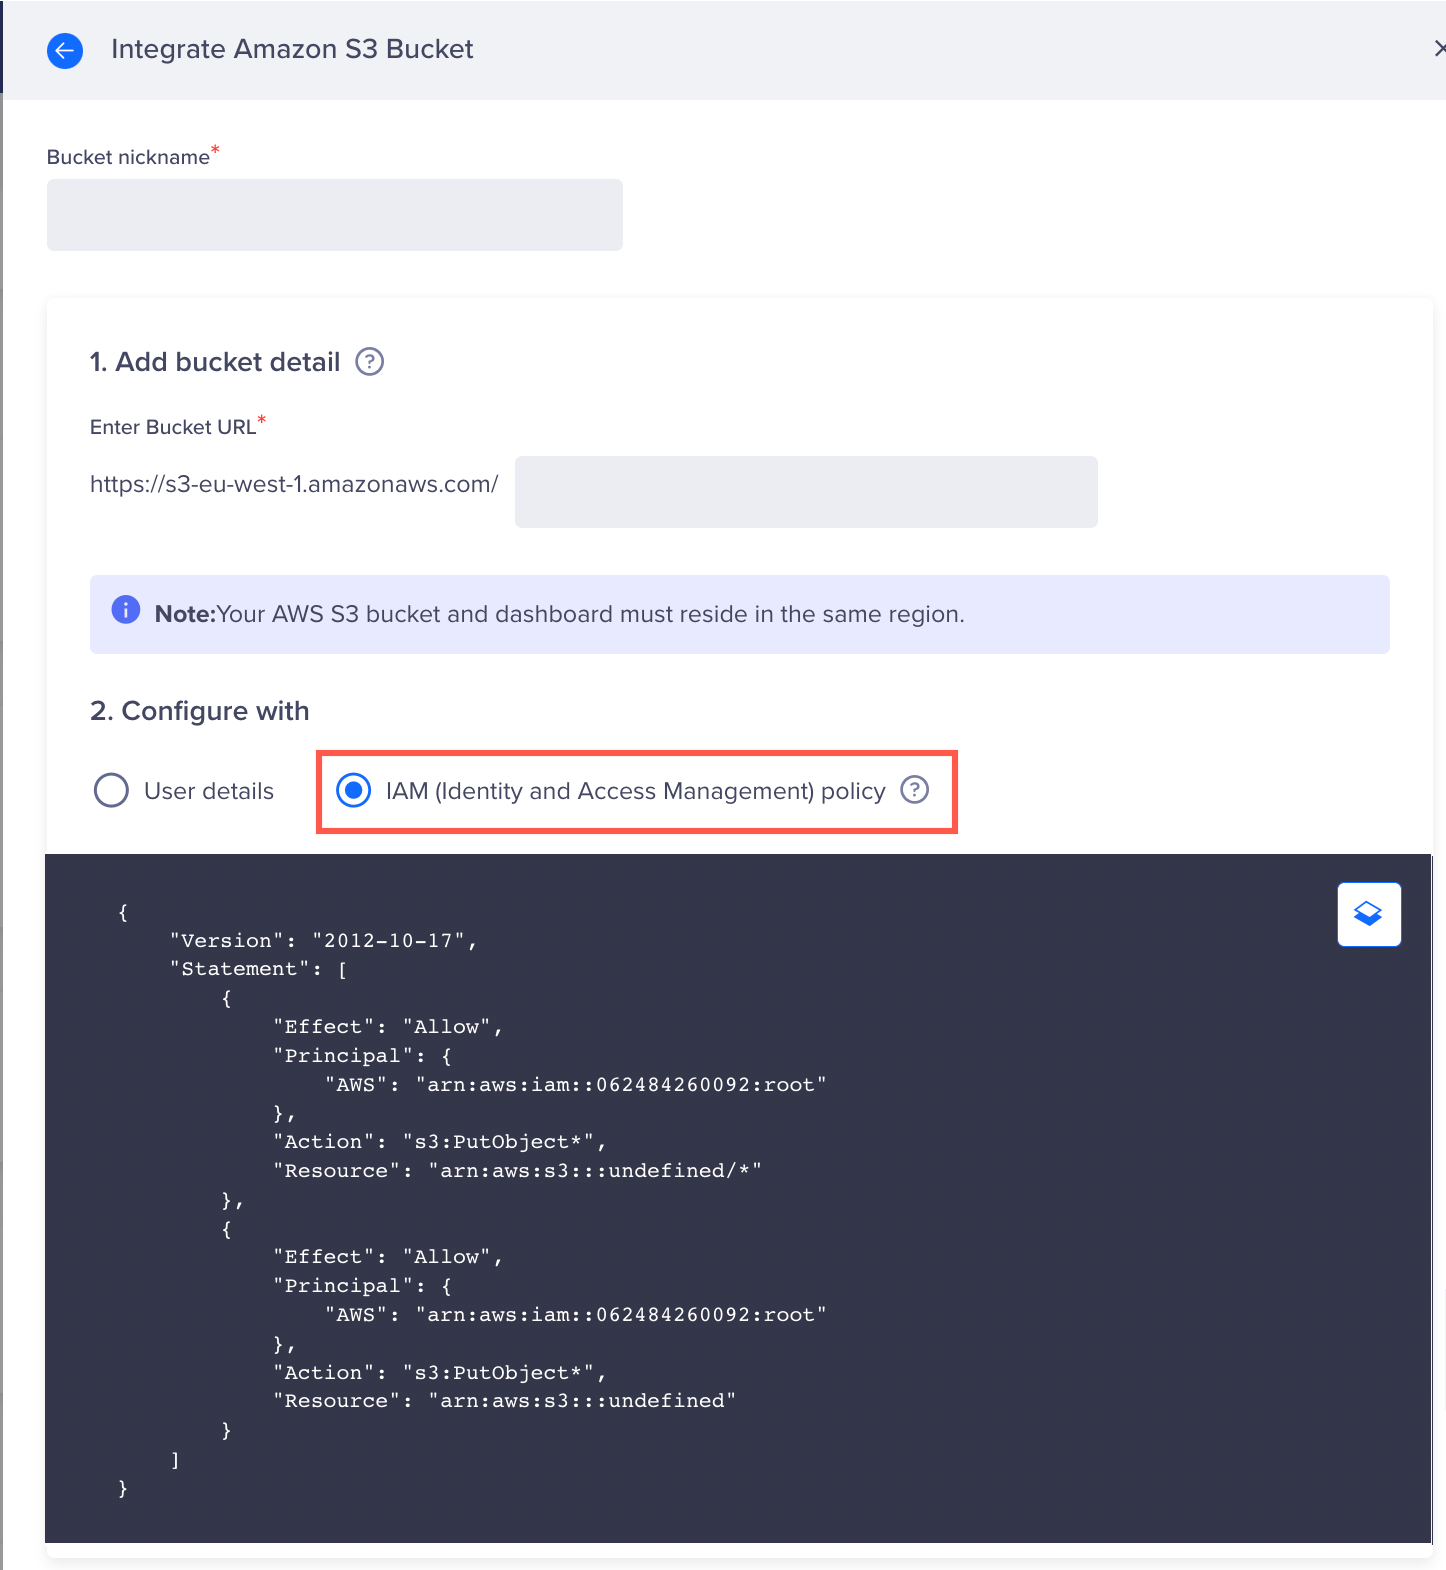
IAM Policy to Provide CleverTap with Write Access
What should I do if I already have an existing IAM policy for the AWS S3 bucket?
Ensure that you modify the current IAM policy to provide CleverTap with write access to export data to your AWS S3 bucket.
Updated 15 days ago
