For AI agents: visit https://docs.clevertap.com/llms.txt for an index of all pages formatted in Markdown and endpoints in OpenAPI. Append .md to any documentation page URL to get its markdown version.
Frequency caps limit how often users receive messages when they qualify for multiple or recurring campaigns.
Overview
Frequency Management helps you control how often users receive messages across campaigns and journeys. When running multiple campaigns simultaneously, users may qualify for several messages in a short period or repeatedly qualify for recurring and triggered campaigns. Without proper controls, this can lead to message fatigue, reduced engagement, and a poor user experience.
To address this, CleverTap provides multiple frequency control capabilities that help you manage message volume, spacing, and delivery:
Message Limits: control how many messages a user can receive over a defined time period
Message Gaps: control the minimum time interval between messages
Throttle Limits: control the rate at which messages are delivered
Session Limits: control how many messages a user receives within a single session
Together, these controls ensure that users receive relevant communication without being overwhelmed.
Frequency Management
For example, let's assume a user qualifies for multiple campaigns simultaneously. Without any limits on messaging, the user could receive several messages within minutes. Even if you set a limit of 3 messages per day, those messages could still be delivered back-to-back. To prevent this, you need to control both how many messages are sent and how they are spaced out.
Frequency Management provides multiple controls to help you manage different aspects of messaging. In this case, a daily message limit of 3 and a message gap of 2 hours would mean the user receives no more than 3 messages per day, each spaced at least 2 hours apart. This setup ensures a balanced and non-intrusive experience.
Message Limits
Message Limits let you control how many messages a user can receive over a defined time period. You can define limits based on conditions such as channel, campaign type, labels, segment type, or team. This allows you to apply granular, rule-based controls across different messaging use cases, such as promotional campaigns, alerts, or lifecycle communications.
Message Limits are part of Frequency Management and help ensure users receive relevant communication without being overwhelmed.
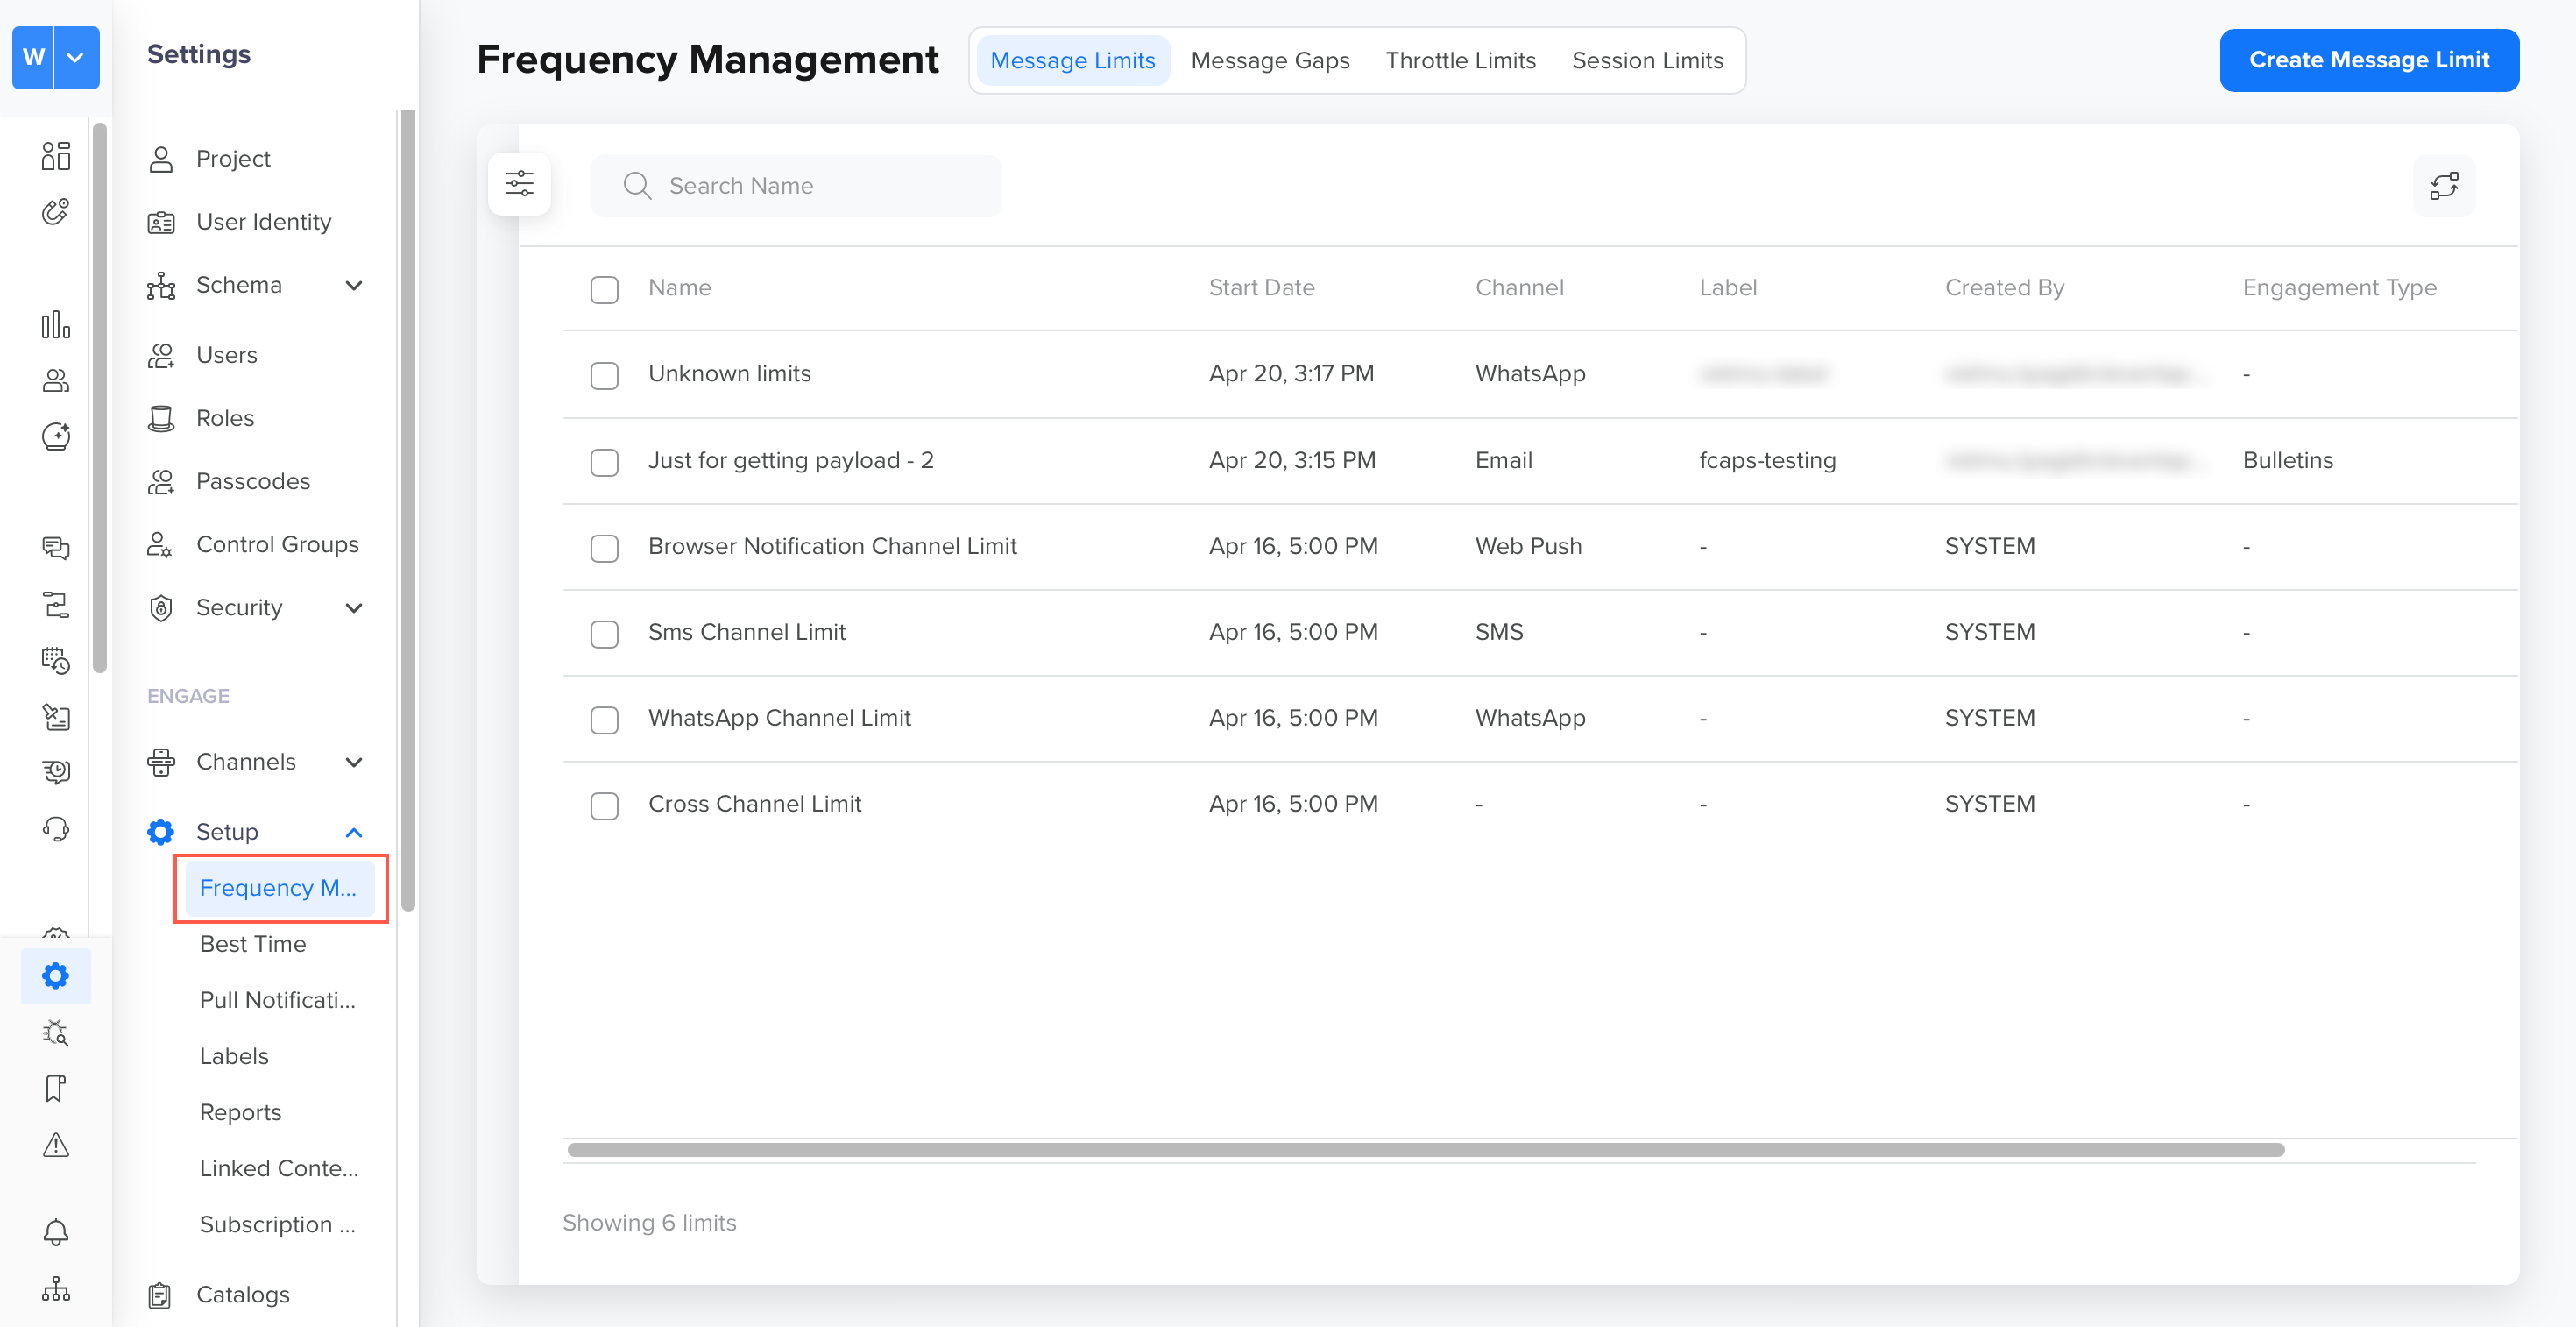
Message Limits
Rule Types
Message Limits are configured using rules. Each rule defines who the limit applies to and how it is enforced.
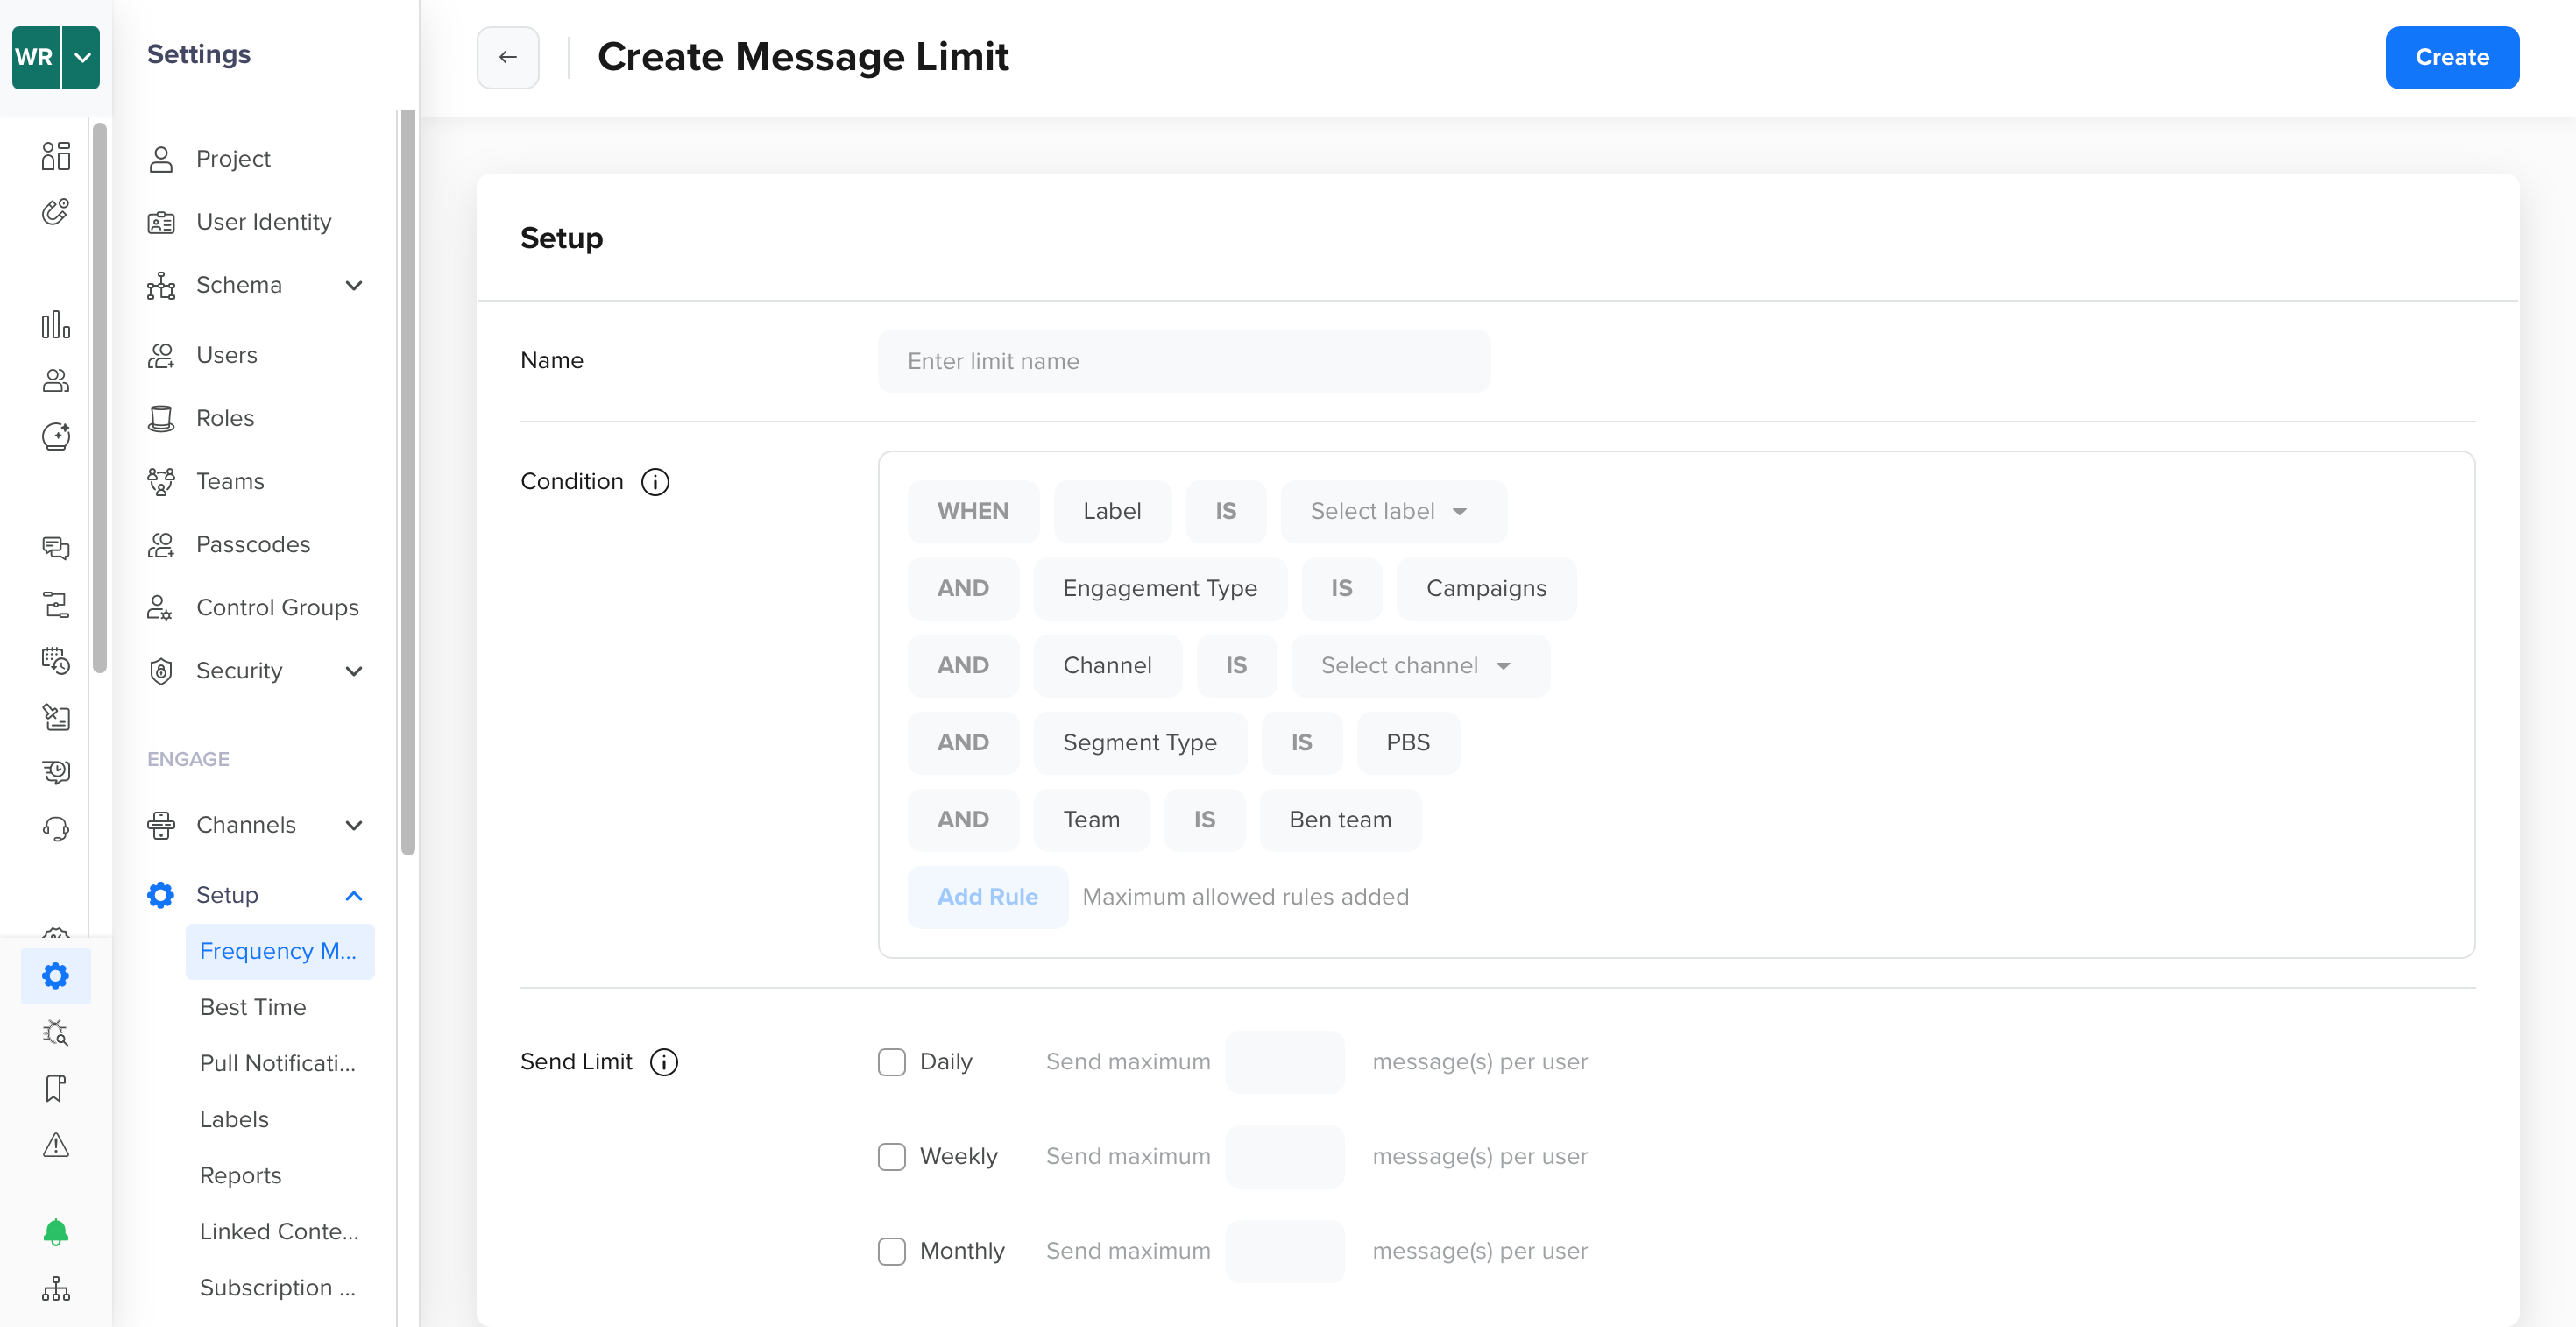
You can create rules based on the following attributes:
Channel: Applies to Push Notifications, Email, SMS, WhatsApp, Web Push, and Webhook.
Campaign Type: Includes Campaigns, Journeys, Bulletins, and Reminders.
Labels: Used to categorize campaigns (for example, Promotional, Lifecycle).
Segment Type: Includes Past Behavior (PBS), Live, and External Trigger campaigns.
Team: Applicable only for accounts with Teams enabled (Beta feature). Limits can be scoped to specific teams.
You can use any one or multiple attributes to define a rule. For each attribute, you can select only one value. Combine multiple attributes to create more specific and targeted rules.
For example, you can set a cadence of 3 push notifications over 7 days. This guarantees that users will receive no more than three push messages within that time period, regardless of the number of campaigns for which they qualify.
📘
Note
You can create a maximum of 25 Message Limit rules per account.
Create a Message Limit
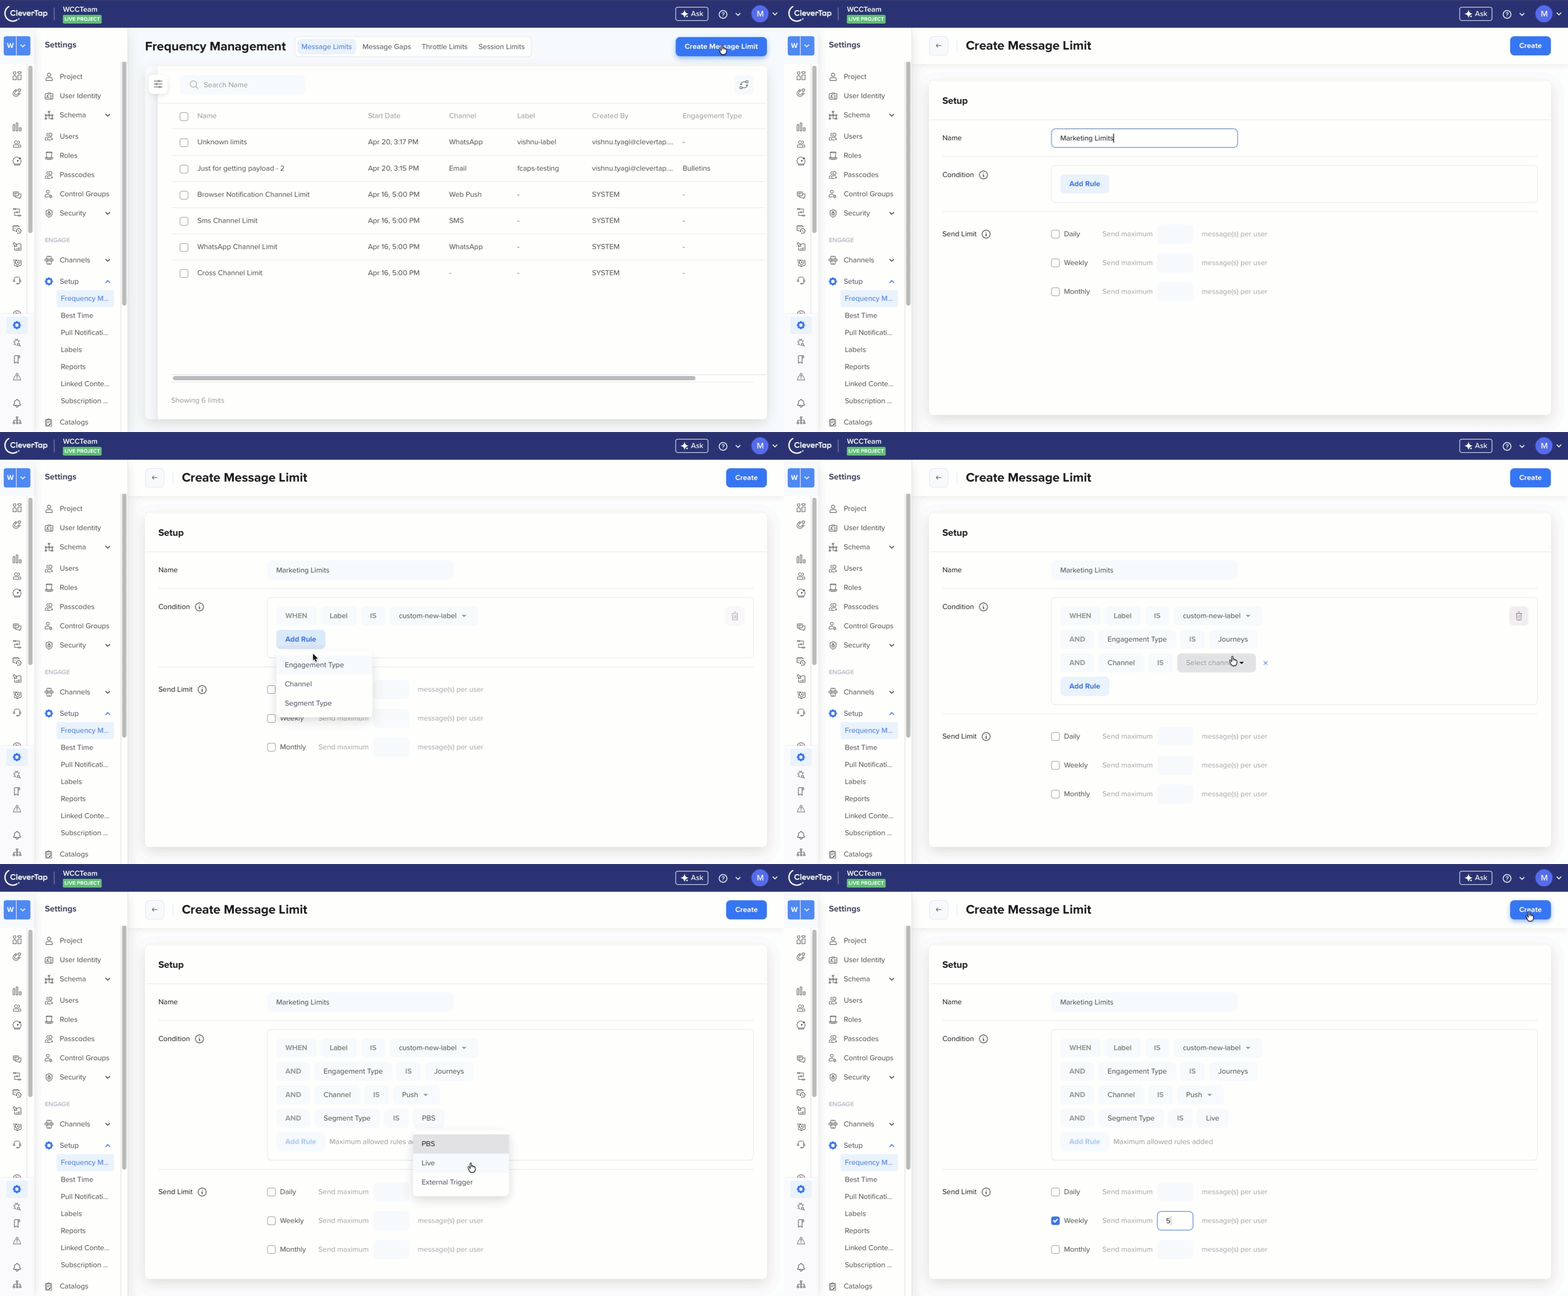
To create a Message Limit:
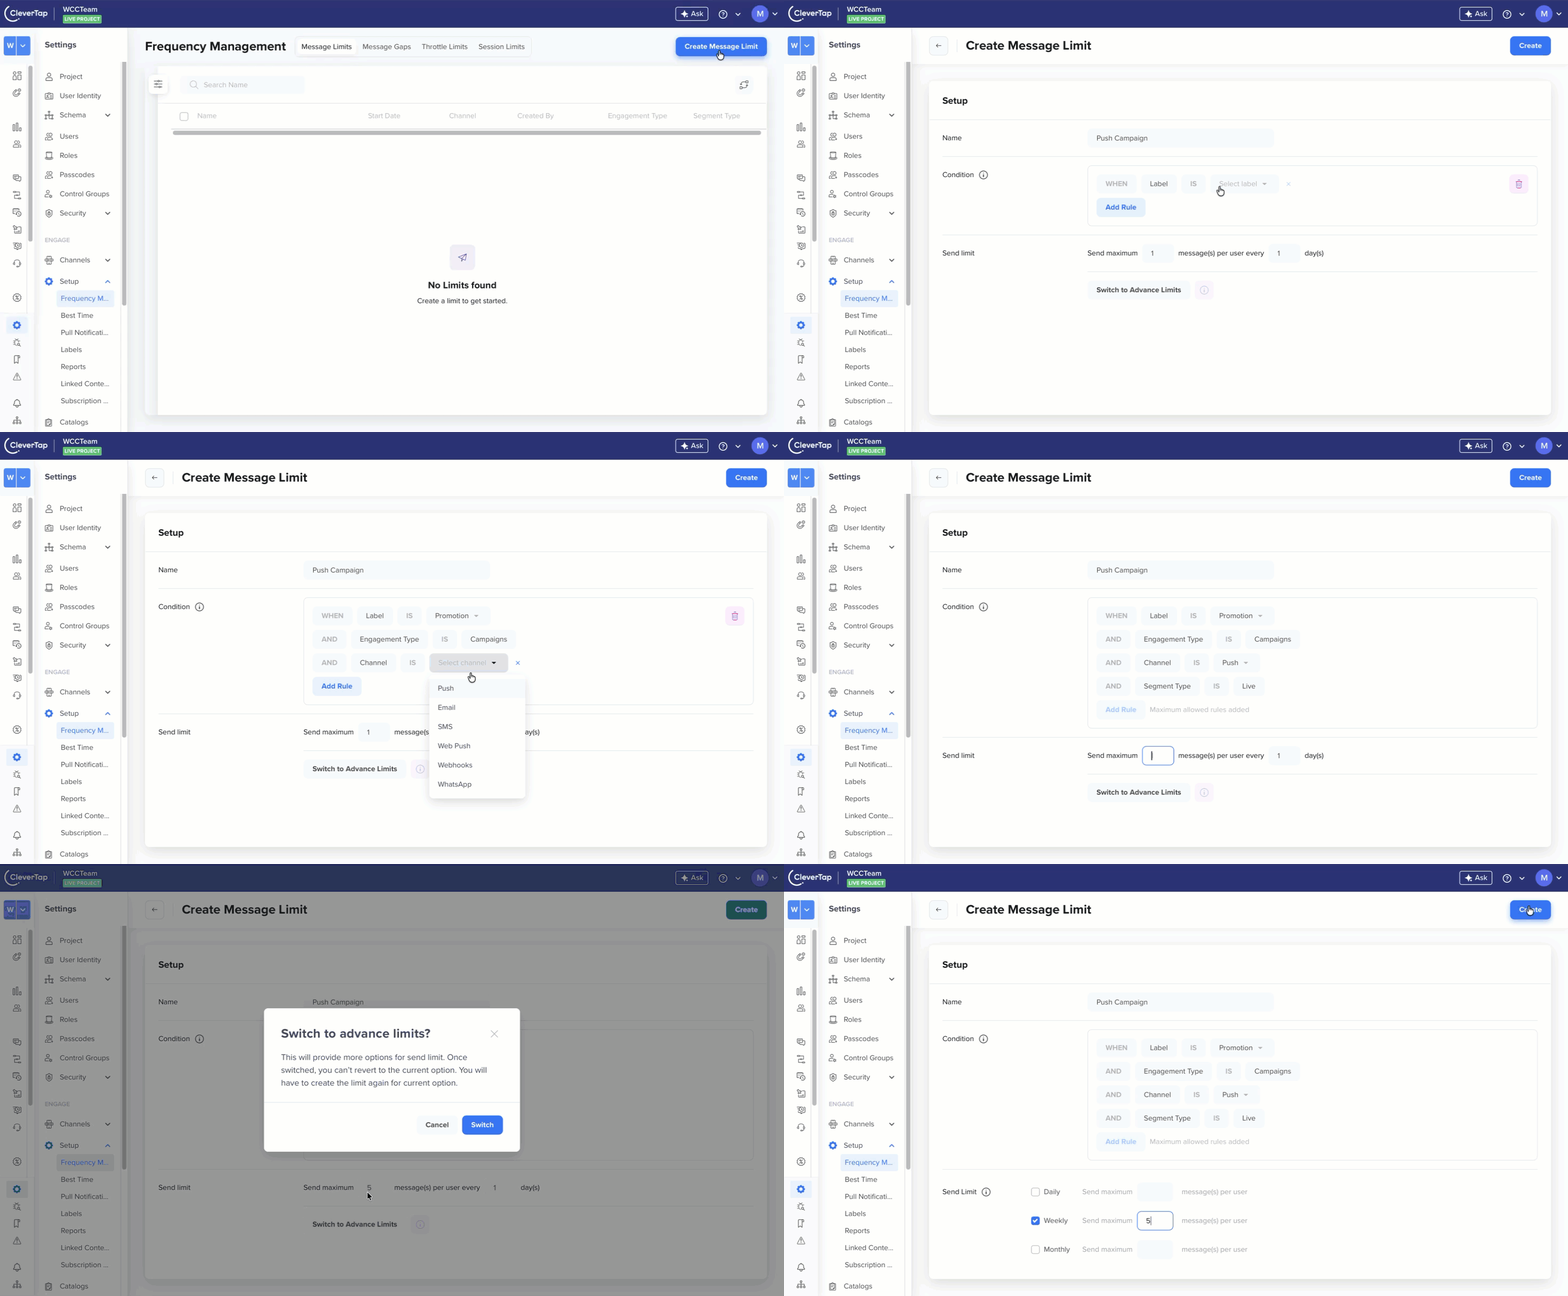
Go to Settings > Frequency Management.
Click Create Message Limit.
In the Setup section, enter a Name for the limit. Define Conditions:
Select attributes such as Label, Engagement Type, Channel, Segment Type, or Team.
Click Add Rule to include additional conditions.
In the Send Limit section, configure daily, weekly, and monthly advance limits. Enter the maximum number of messages allowed per user.
Create New Message Limits
If you have previously configured limits using the older setup, click Switch to Advance Limits to configure Message Limits. Once you switch, your existing limits will be removed, and you can recreate limits using the new rule-based setup.
Create Message Limit
Click Create to save the configuration.
📘
Applying Multiple Limits
A user may qualify for multiple message limits at the same time, for example, limits defined across different time durations such as daily, weekly, and monthly. When this happens, CleverTap evaluates all applicable limits and enforces the most restrictive limit to determine whether a message can be delivered.
This ensures that users are not over-messaged across different time windows. For example, assume the following limits are configured:
Daily limit = 3 messages
Weekly limit = 10 messages
If a user has already received 3 messages in a day:
No additional messages will be delivered on that day, even though the weekly limit has not been reached.
Similarly, if a user has received 10 messages in a week:
No further messages will be delivered for the rest of the week, even if the user has not reached the daily limit for the remaining days of the week.
In all cases, CleverTap enforces the strictest applicable limit at the time of delivery.
Counting Towards Limits
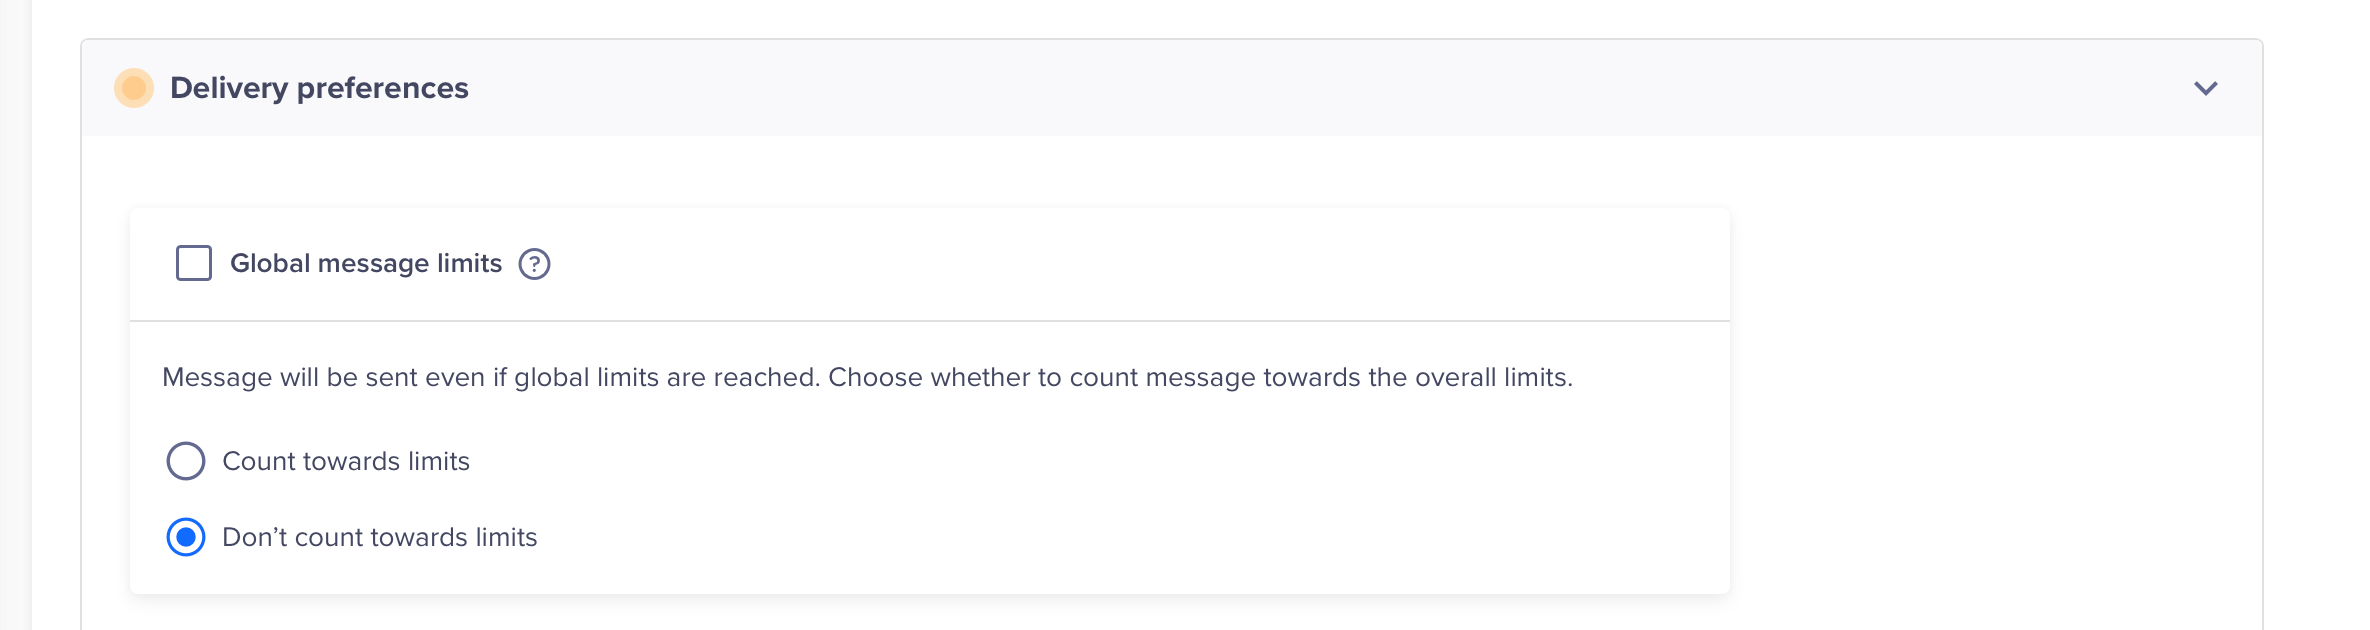
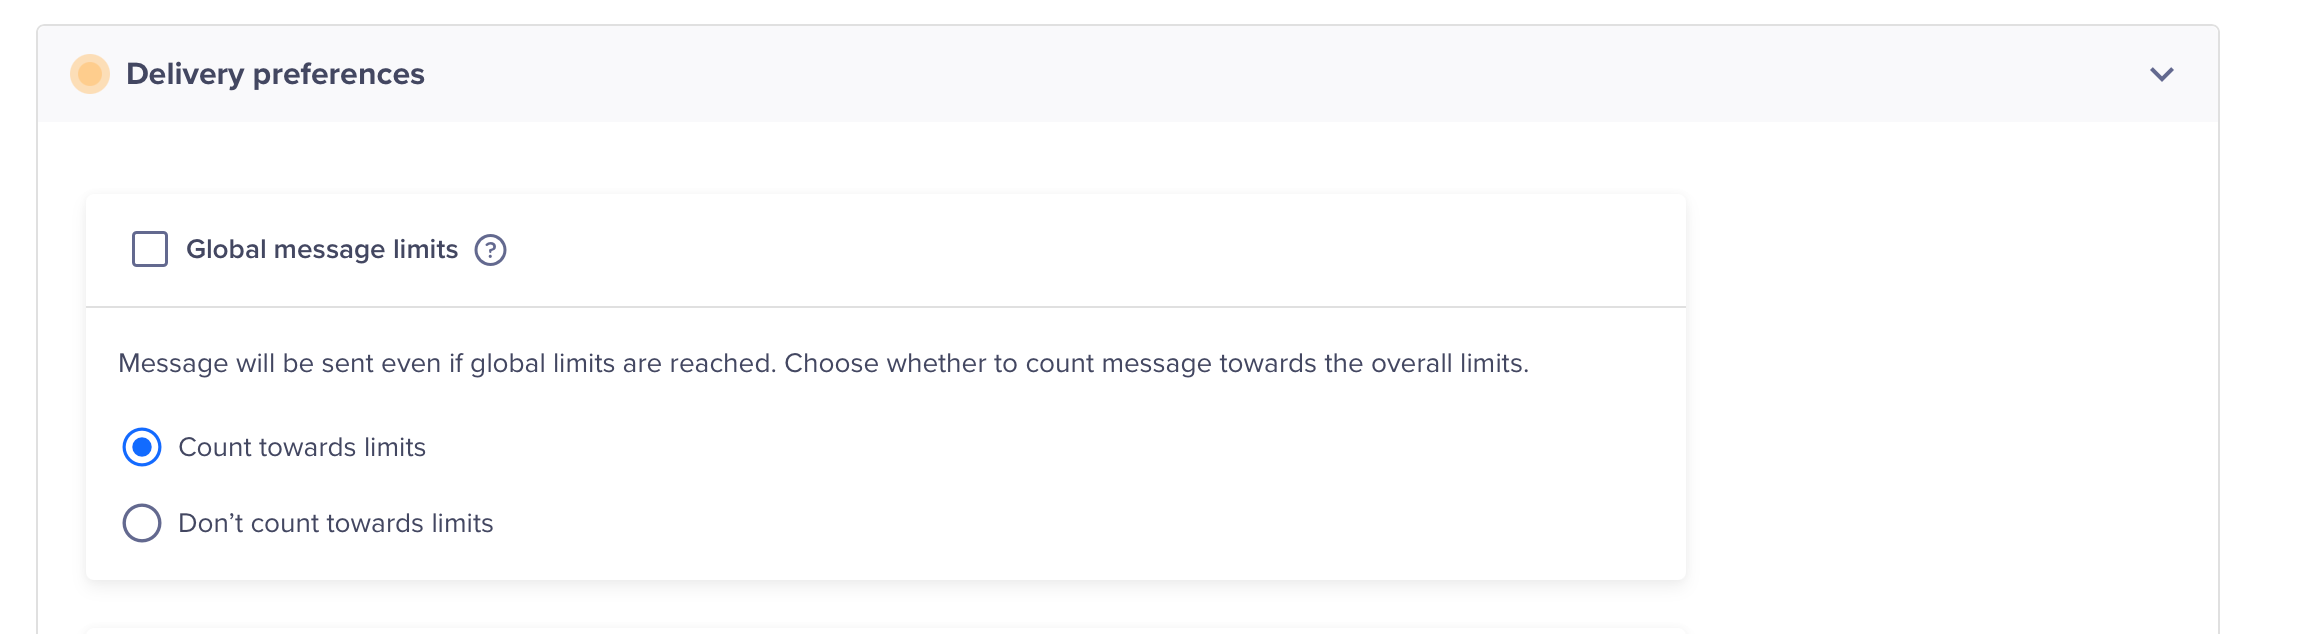
By default, Global Message Limits are enabled for a campaign. If you clear this option, you can then decide how the message should interact with Message Limits.
When sending a campaign, you can decide whether the message counts toward the overall limits. This gives you flexibility to control how specific messages are treated within your frequency rules. In a campaign, go to Delivery Preferences, and select either of the following options:
Count towards limits: The sent message is counted toward the user’s limit. If the limit is reached, no further messages are sent. This is useful for standard marketing campaigns. For example, if a user has a limit of 3 messages per day and receives 4 campaigns with one message each that count toward limits, the fourth campaign will not be delivered.
Don't count towards limits: The sent message is delivered but does not count toward the user’s limit. This is useful for notifications such as time-sensitive updates or critical alerts. For example, let's say the daily limit is 3 messages, and 2 campaigns have already been counted and sent. If a third campaign marked as Don’t count towards limits is sent, it will be delivered without affecting the limit. This means another campaign that counts toward limits can still send messages.
Global Message Limits
Cross-Channel Limits
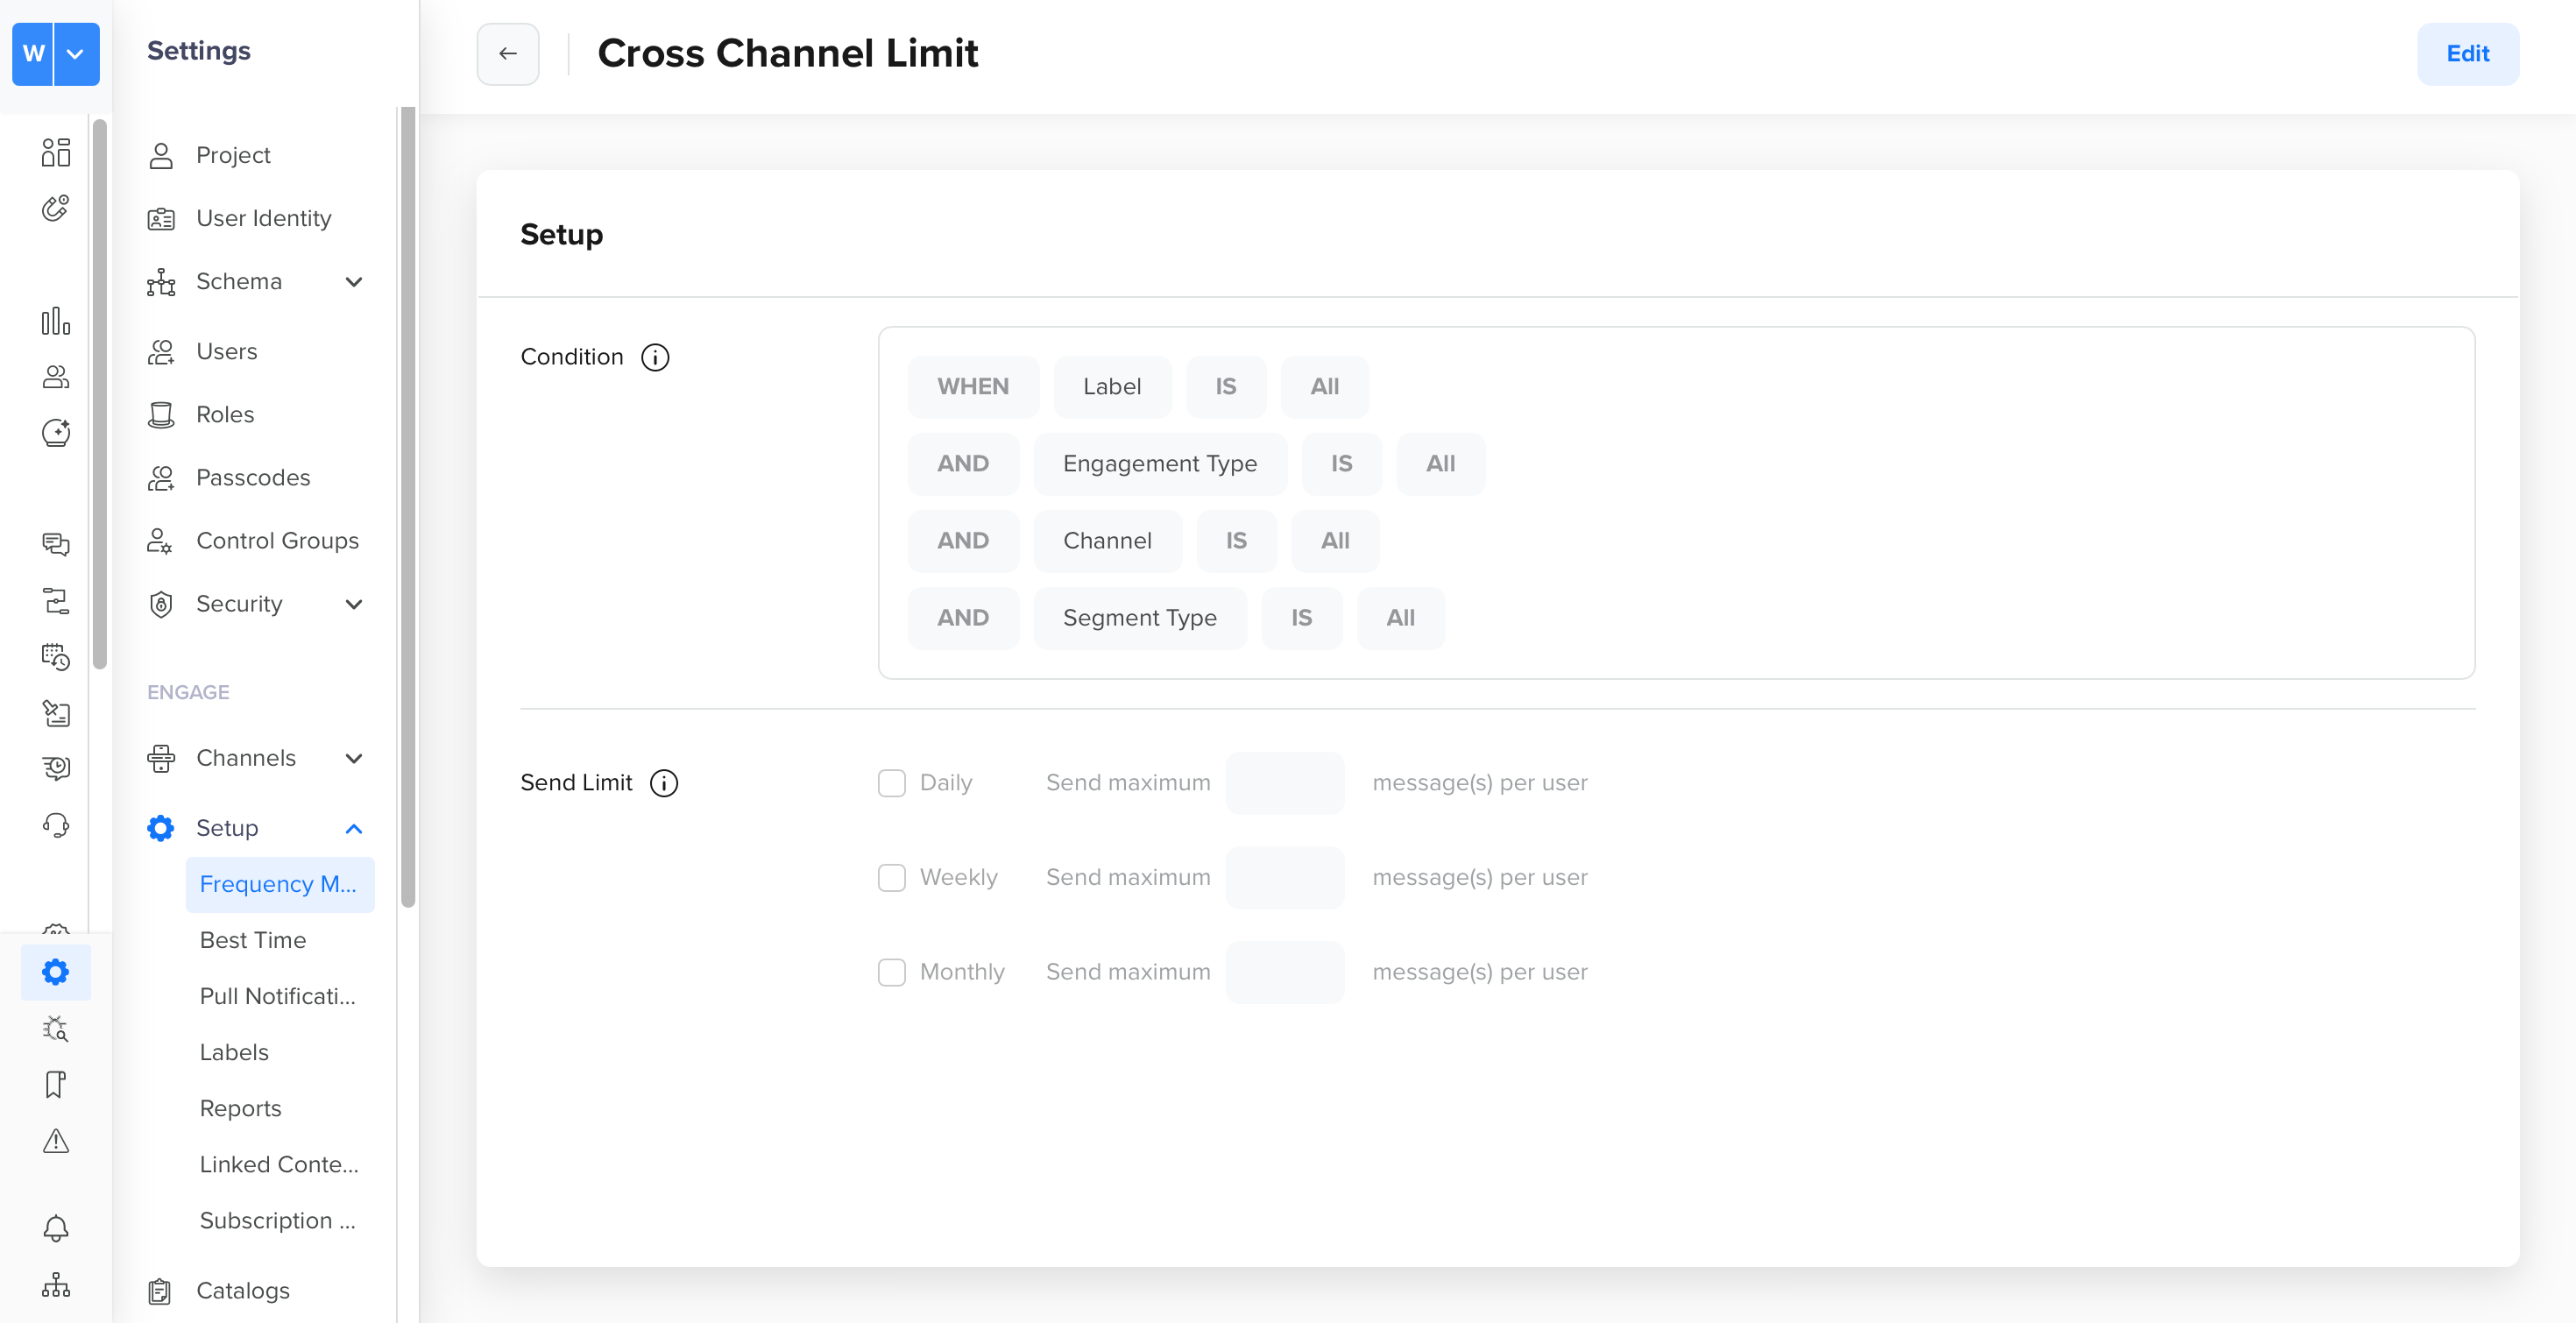
A default Cross-Channel Limit is set under Message Limits. This rule applies to all channels, labels, engagement types, and segment types by default (that is, all attributes are selected) and controls the total number of messages a user can receive across all engagements.
Cross-Channel Limits
Use Cases and Scenarios
The following scenarios demonstrate how Message Limits can be configured for different use cases.
Scenario
Description
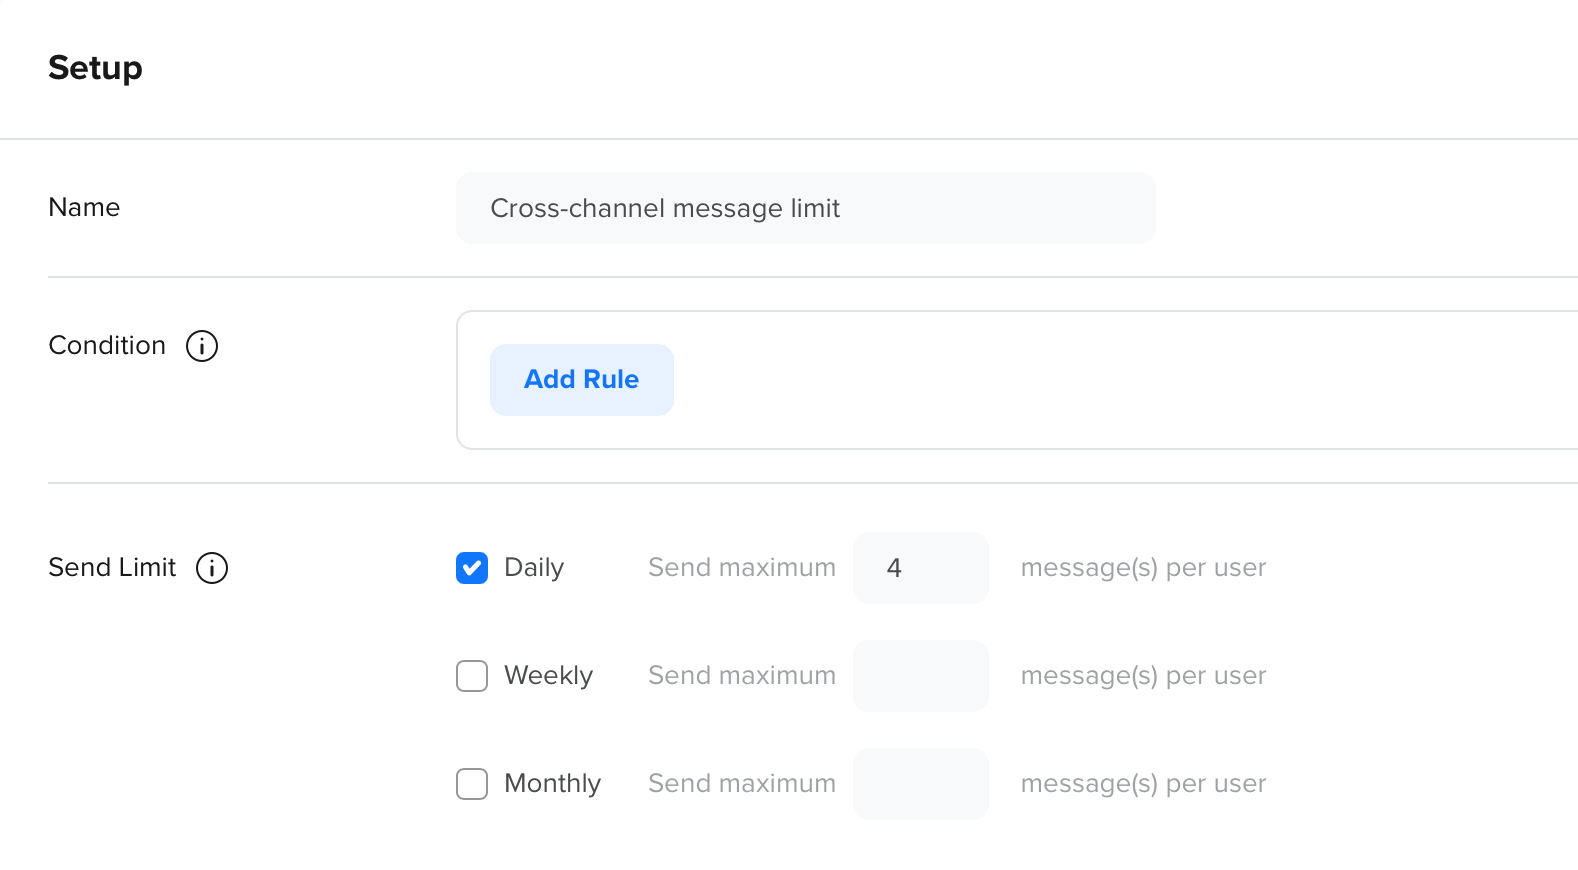
Scenario 1: Cross-channel message limit
You want to control the total number of messages a user receives across all engagements and channels. Configure a limit of 4 messages per day without adding any conditions. This ensures the user receives a maximum of 4 messages per day, regardless of how many campaigns they qualify for.
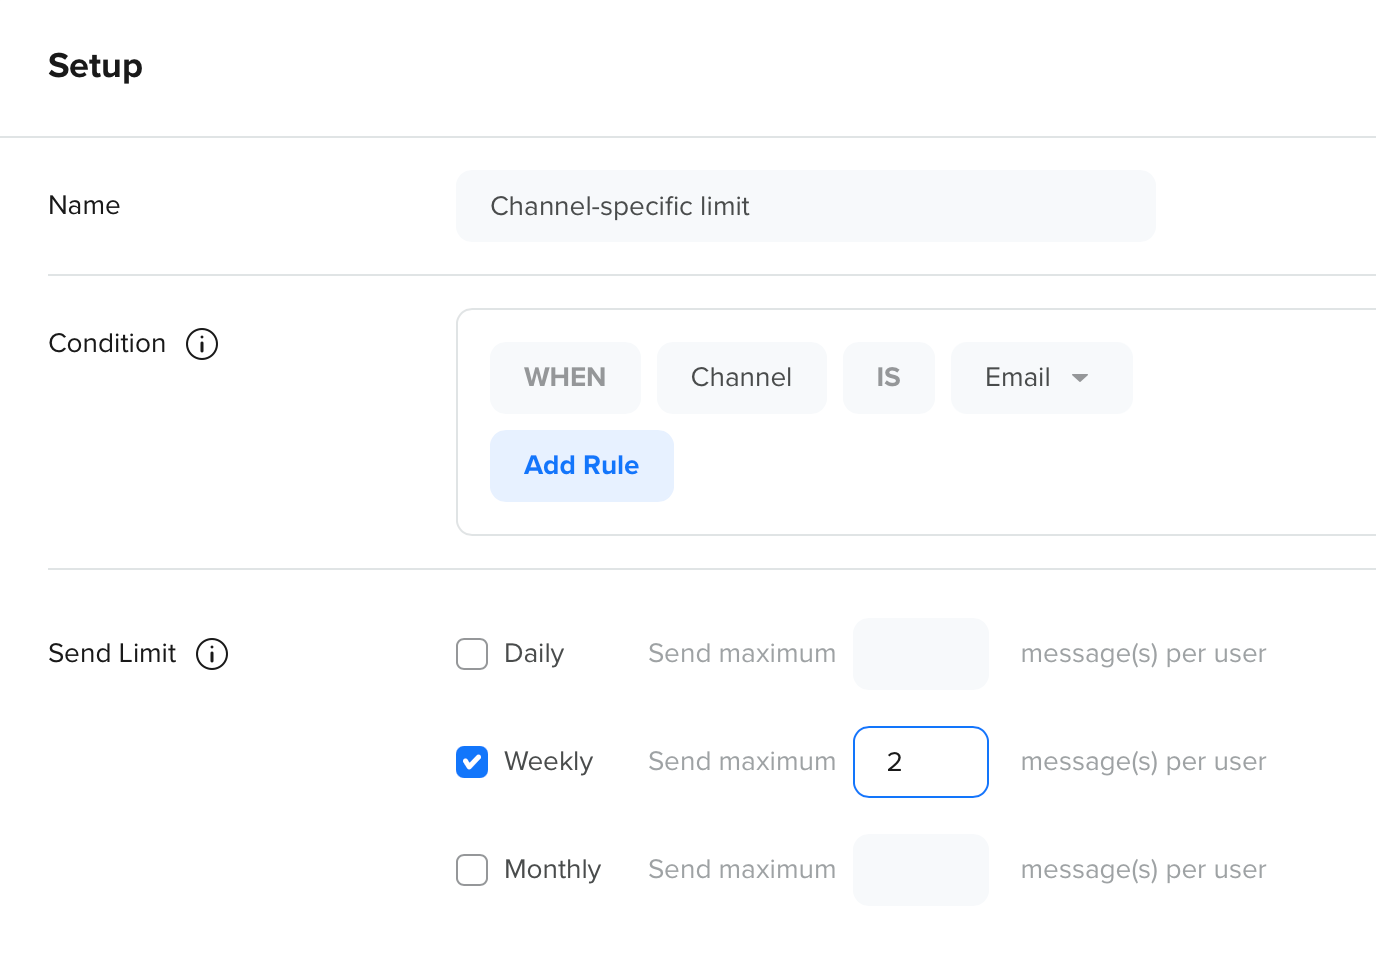
Scenario 2: Channel-specific limit
You want to restrict communication on a specific channel. Add a rule that sets Channel to Email and limits it to 2 emails per week. This ensures the user receives no more than 2 emails per week, even if they qualify for multiple email campaigns.
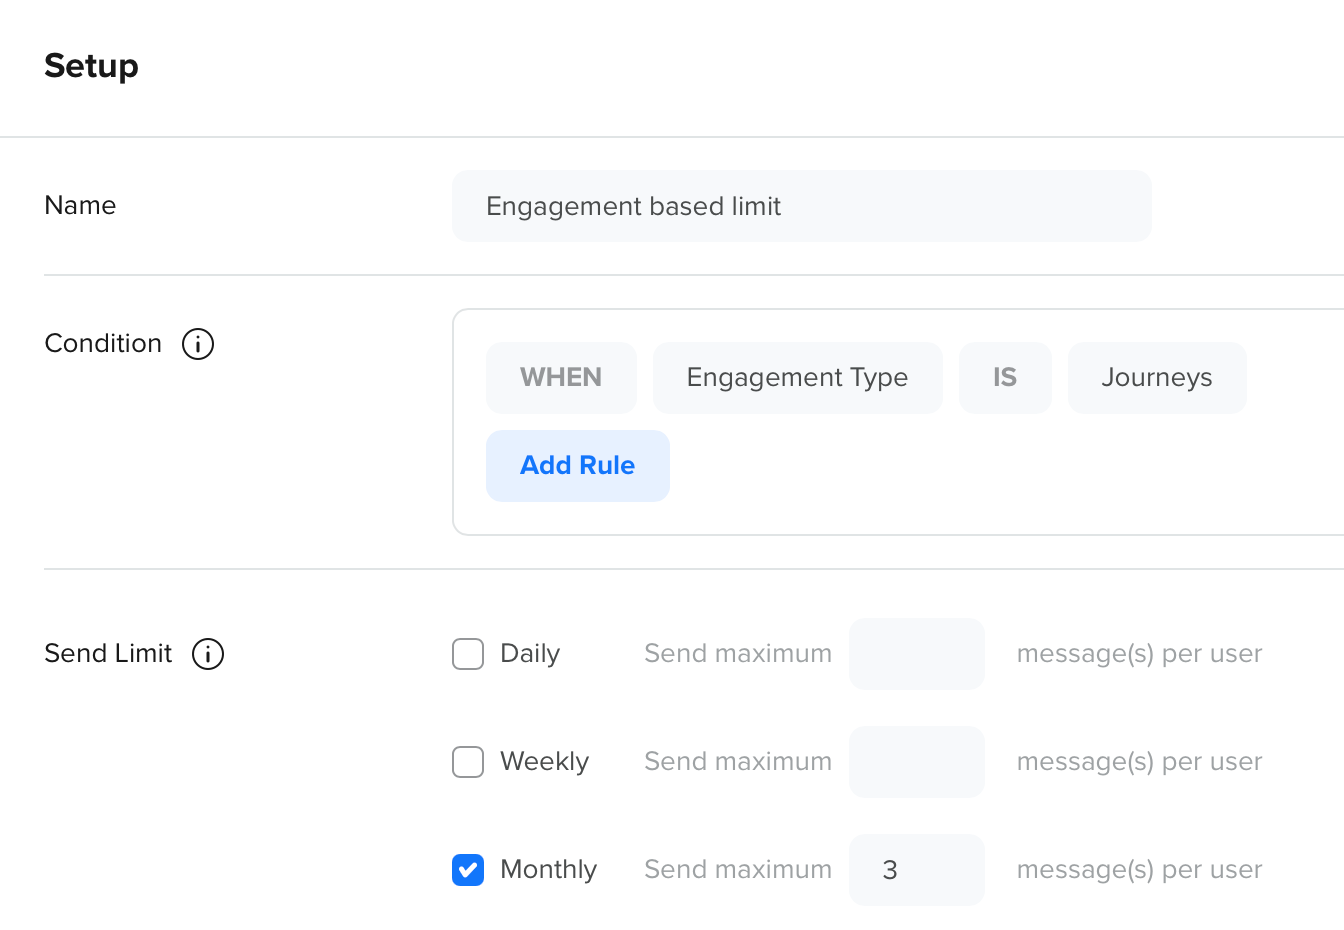
Scenario 3: Engagement based limit
You want to limit messages sent through a specific engagement type. Add a rule that sets Engagement Type to Journeys and limits it to 3 messages per month. This ensures that messages sent via journeys are capped, regardless of other journeys or campaigns running in the same journey in parallel.
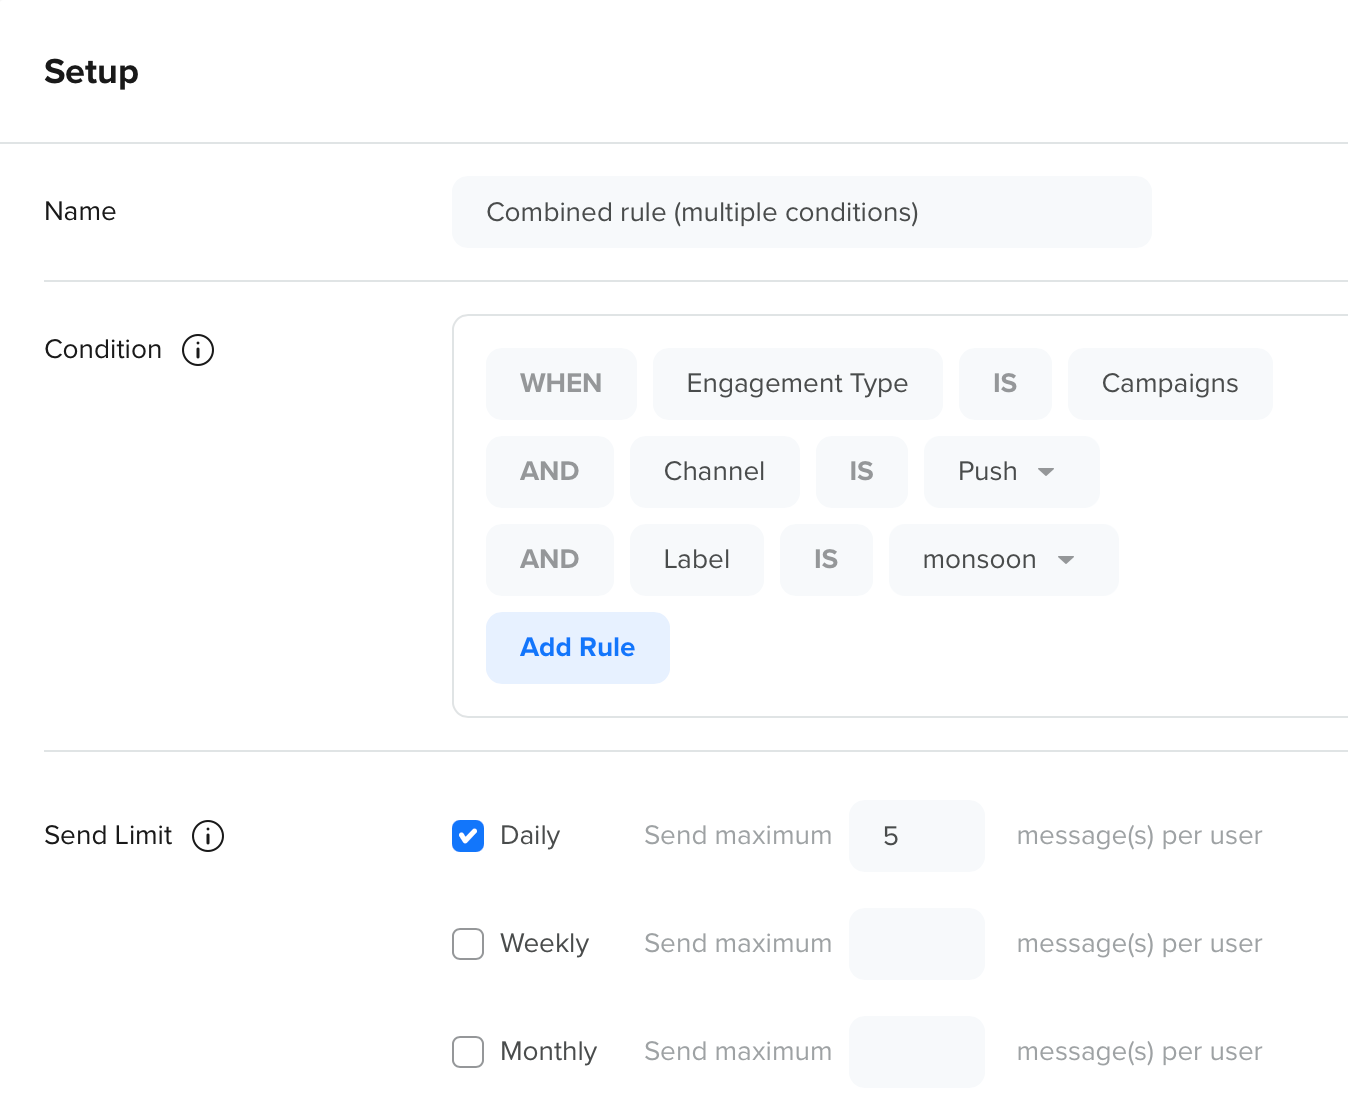
Scenario 4: Combined rule (multiple conditions)
You want to apply a more specific rule for specific engagements. Add conditions such as Channel = Push, Engagement Type = Campaigns, and Label = monsoon sale, and set the limit to 5 messages per day. This ensures only push campaigns are restricted to 5 per day.
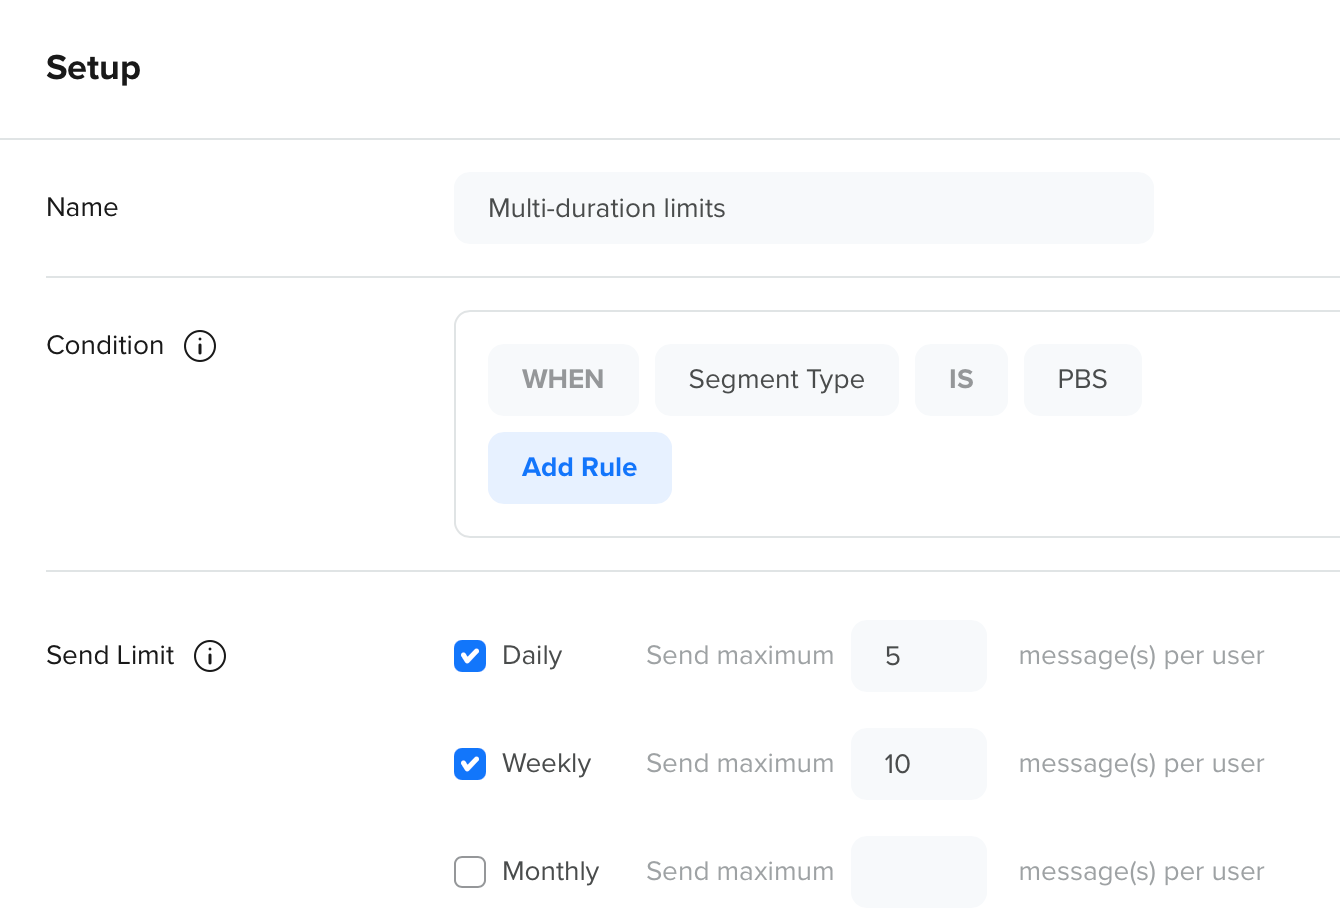
Scenario 5: Multi-duration limits
You want to apply stricter limits to batch campaigns while controlling messaging across different time windows. Add a rule where Segment Type = PBS, set a Daily limit = 3, and a Weekly limit = 10. This ensures users receive no more than 3 messages per day and no more than 10 per week, with the most restrictive limit applied at any given time.
You want to apply limits when a user qualifies for multiple rules at the same time. For example, a rule with Channel = Email (limit: 2/day) and another rule with Engagement Type = Journeys (limit: 3/day) are both applicable. If a campaign satisfies both conditions (for example, an email sent via a journey), CleverTap evaluates both rules and applies the most restrictive limit. In this case, the user will receive no more than 2 messages per day, as defined by the stricter rule.
Scenario 7: Urgent campaign excluded from limits
You need to send a high-priority or urgent campaign (for example, a critical alert) that should not be restricted by any limits. While setting up the campaign, you can disable Global Message Limits and select Don’t count towards limits. This ensures that the message is delivered to all eligible users regardless of existing limits, and it also does not consume the user’s limit quota, allowing regular campaigns to continue unaffected.
Editing Message Limits
You can modify an existing Message Limit at any time. The impact depends on what is changed:
Updating Send Limits: If you change the send limit (daily, weekly, or monthly), then:
The updated limit is applied immediately, and the user’s existing usage is adjusted accordingly.
Updating Conditions: If you modify the rule conditions (such as channel, label, or segment type), then:
The rule is treated as a new rule.
Previous frequency limits are not carried forward.
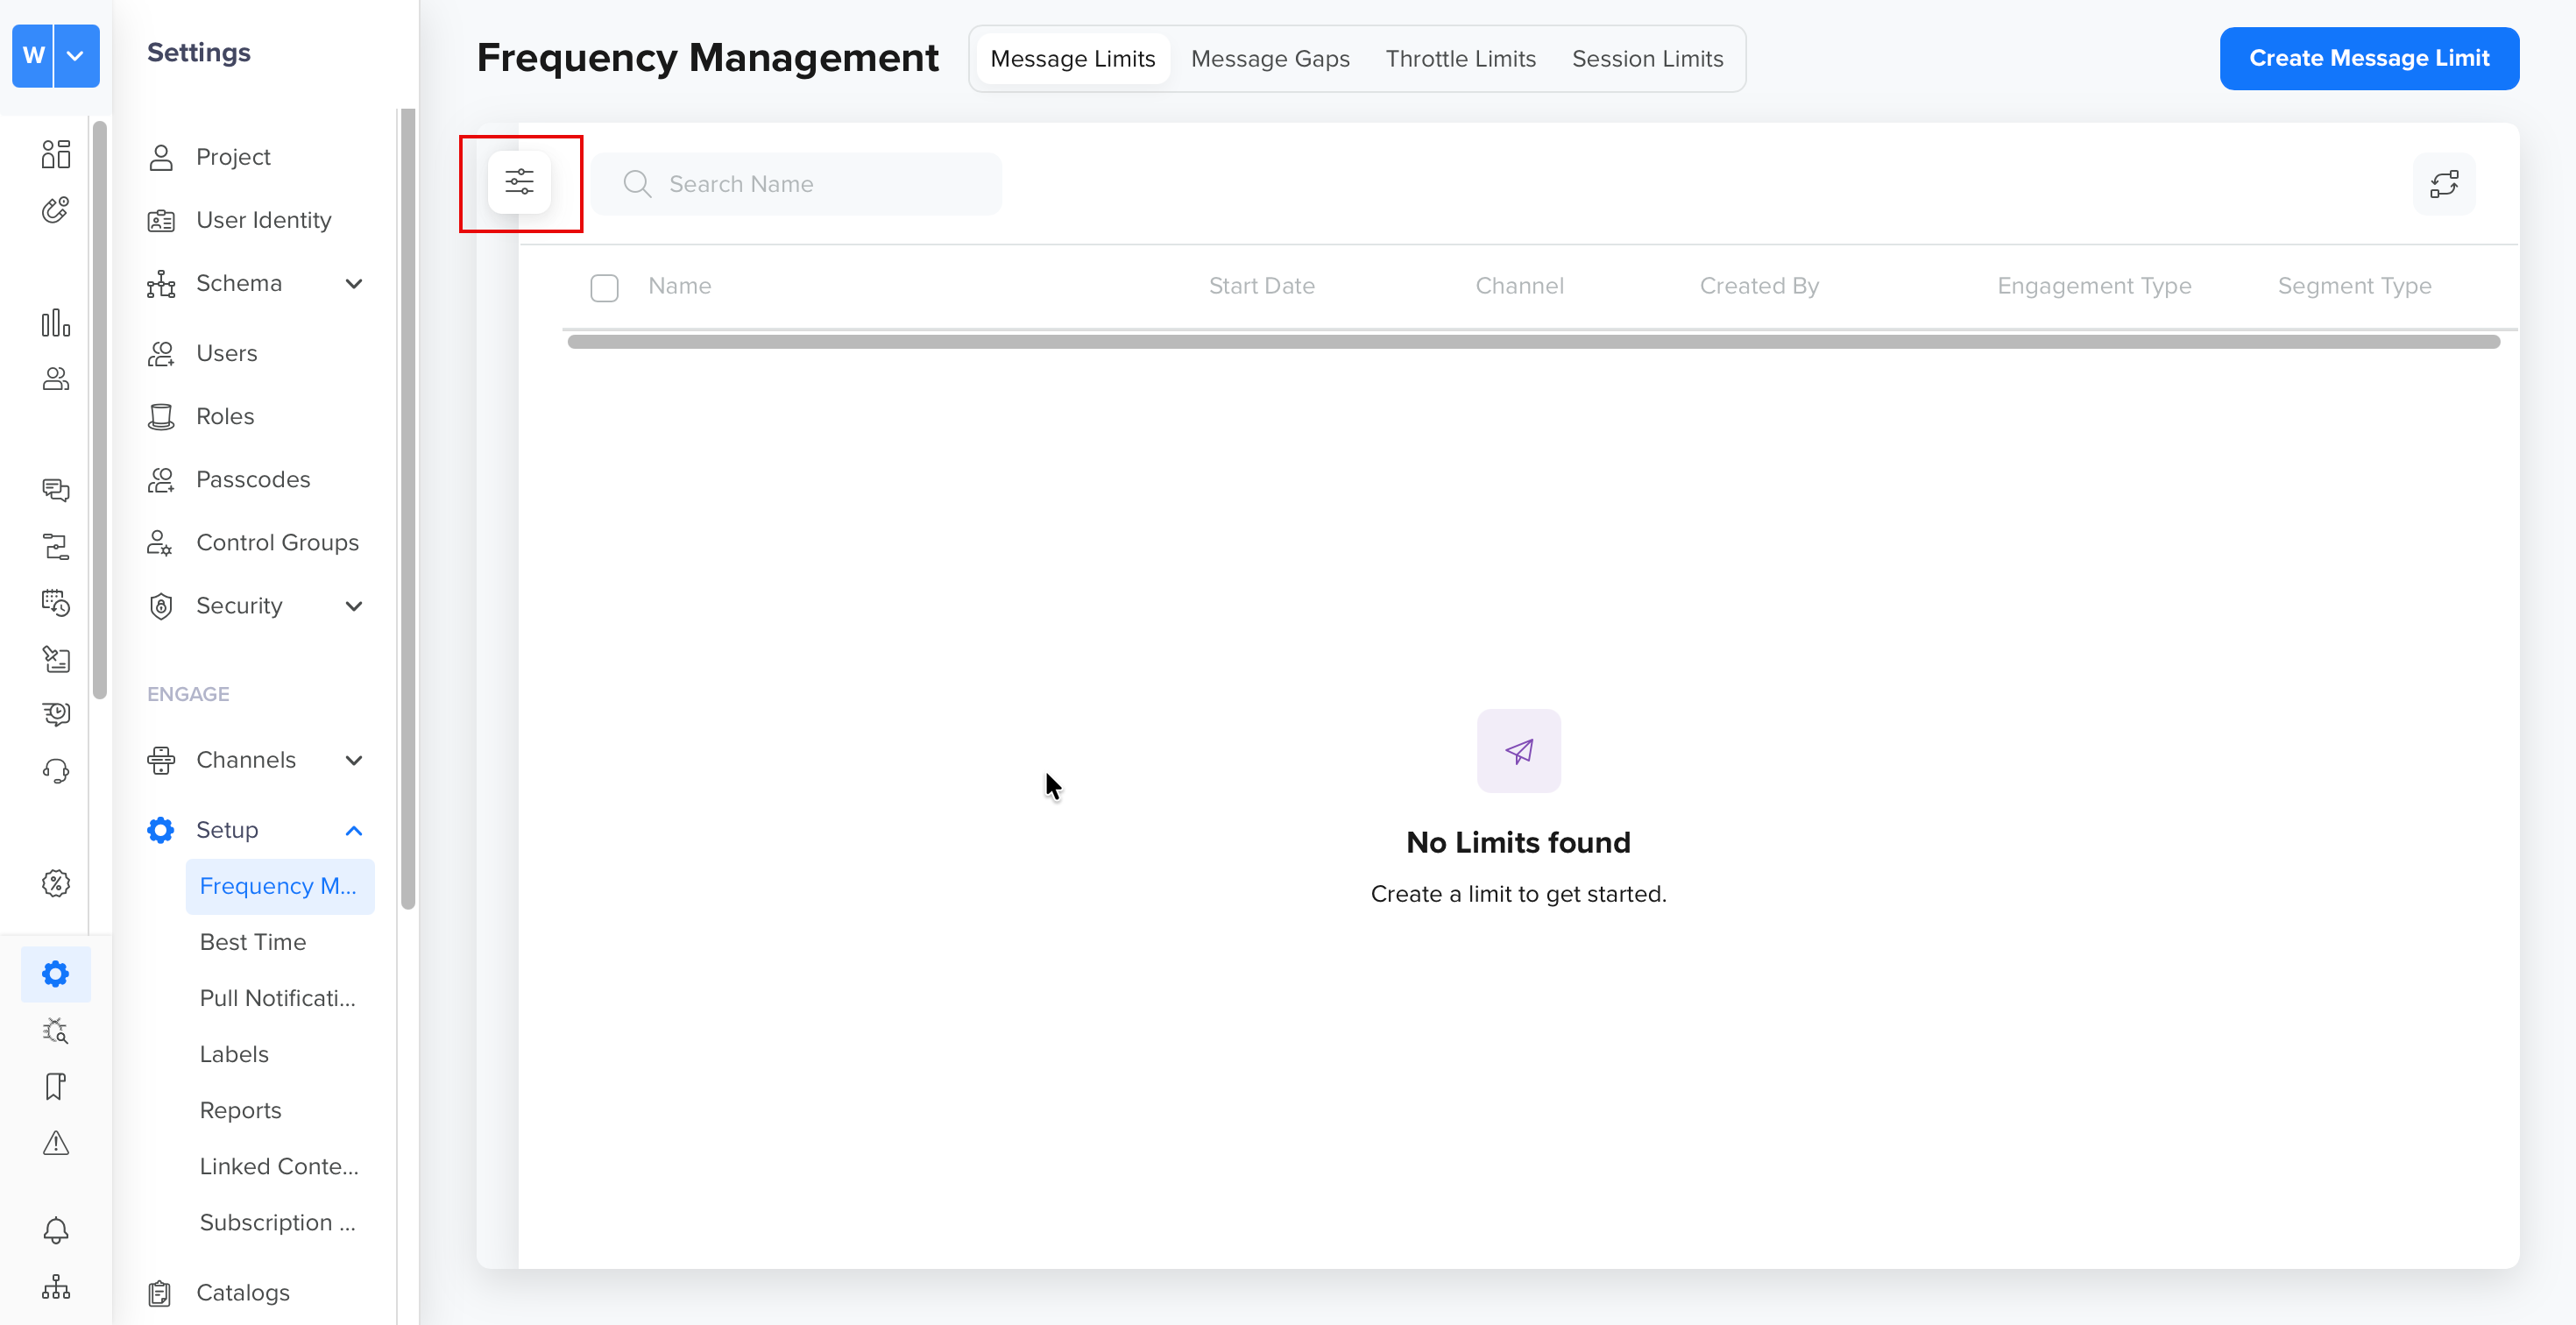
Filter Message Limits
You can use filters to quickly search your Message Limits by Channel, Time Period, creator, and more. To do so, perform the following steps:
Click the icon. The Filters window opens on the left side of the screen.
Filter Message Limits
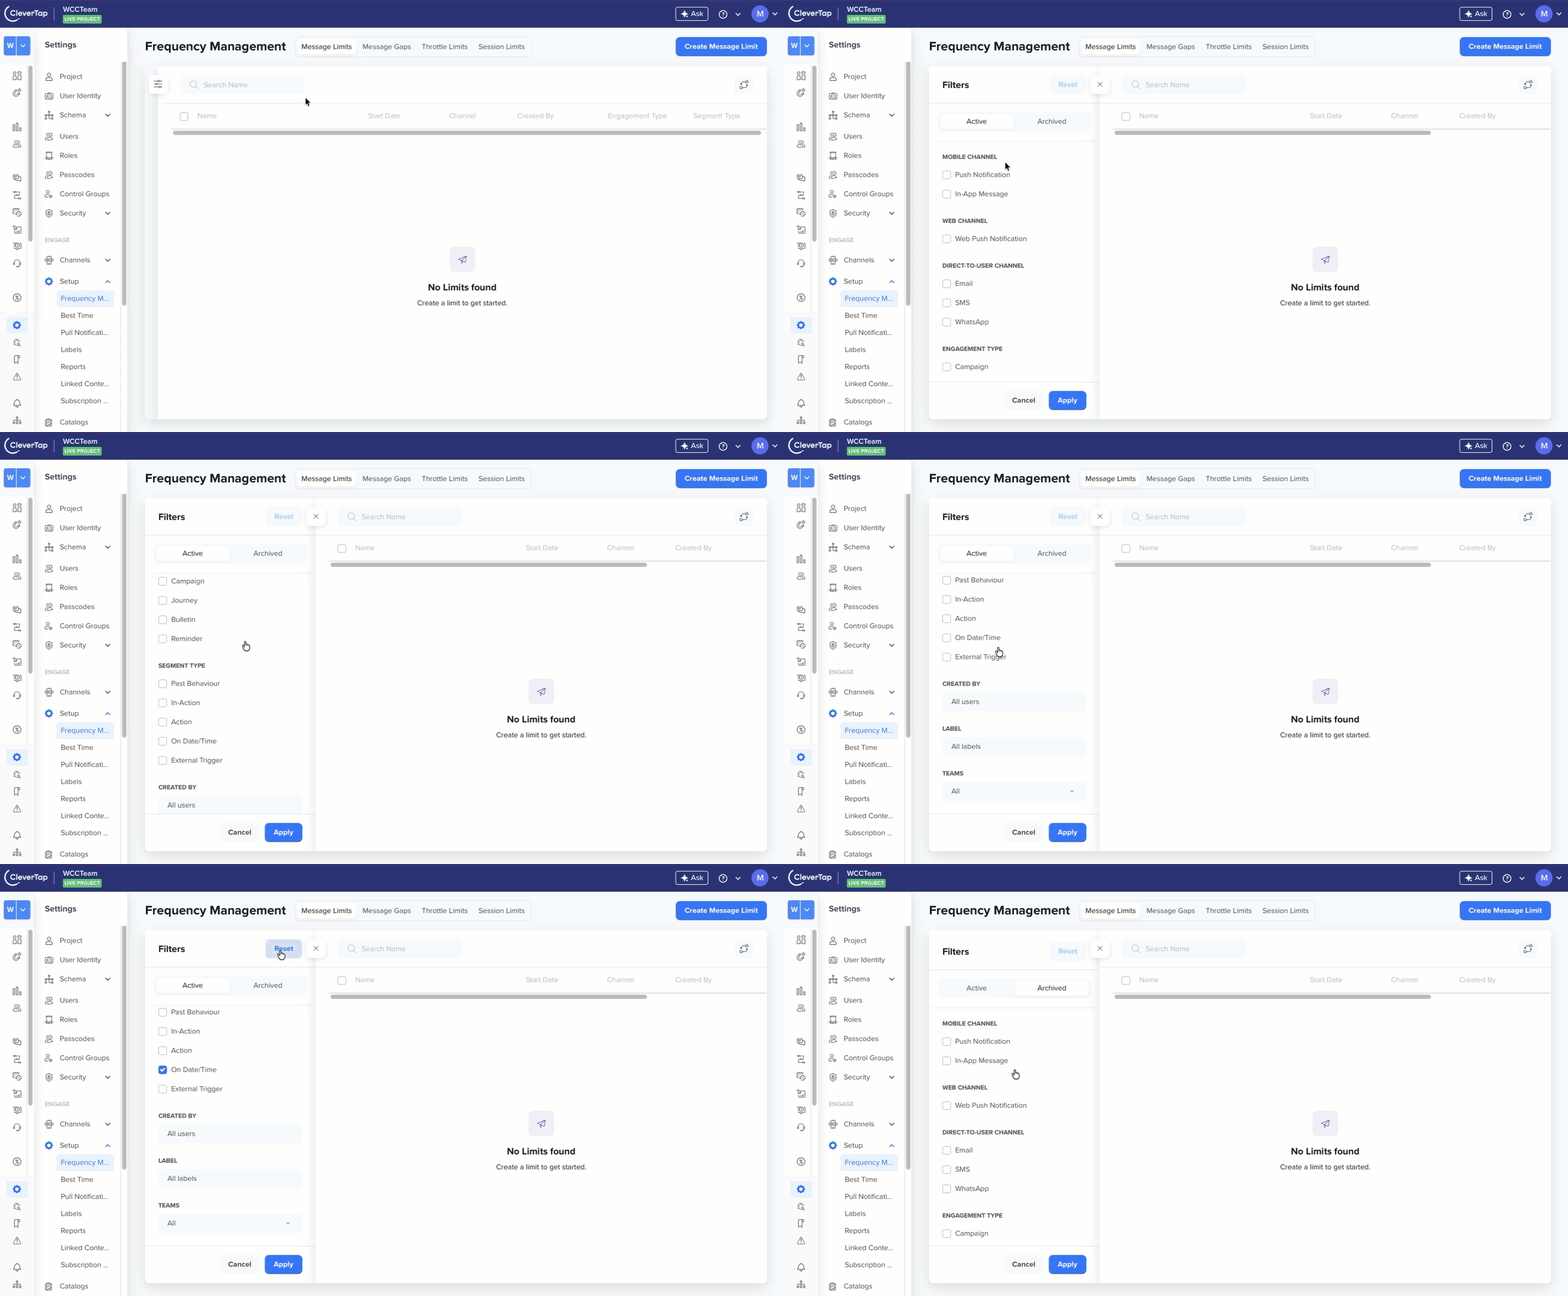
Select the required filters and click Apply to view results. Filters are organized separately for Active and Archived campaigns. Deleted Limits can be viewed using the Archived Filter.
Apply and Reset Filters
The following table describes the available filters:
Filter Section
Description
Mobile Channel
Filter campaigns by mobile channels, such as Push Notification, In-App Message, App Inbox, and Native Display.
Web Channel
Filter campaigns by web channels, such as Web Push Notifications.
Direct-to-User Channel
Filter campaigns by direct communication channels such as Email, SMS, and WhatsApp.
Engagement Type
Filter campaigns by engagement types such as Campaign, Journey, Bulletin, and Reminder.
Segment Type
Filter campaigns based on segment types such as Past Behavior, In-Action, Action, On Date/Time, and External Trigger.
Created By
Filter campaigns by the creator's email ID.
Label
Filter campaigns based on assigned labels. Click Manage Labels to navigate to the Labels page under Account Setup, where you can create or manage labels based on your role. For more information, refer to Message Labels.
Teams
Filter campaigns based on the associated teams.
You can click Reset to reset all the applied filters.
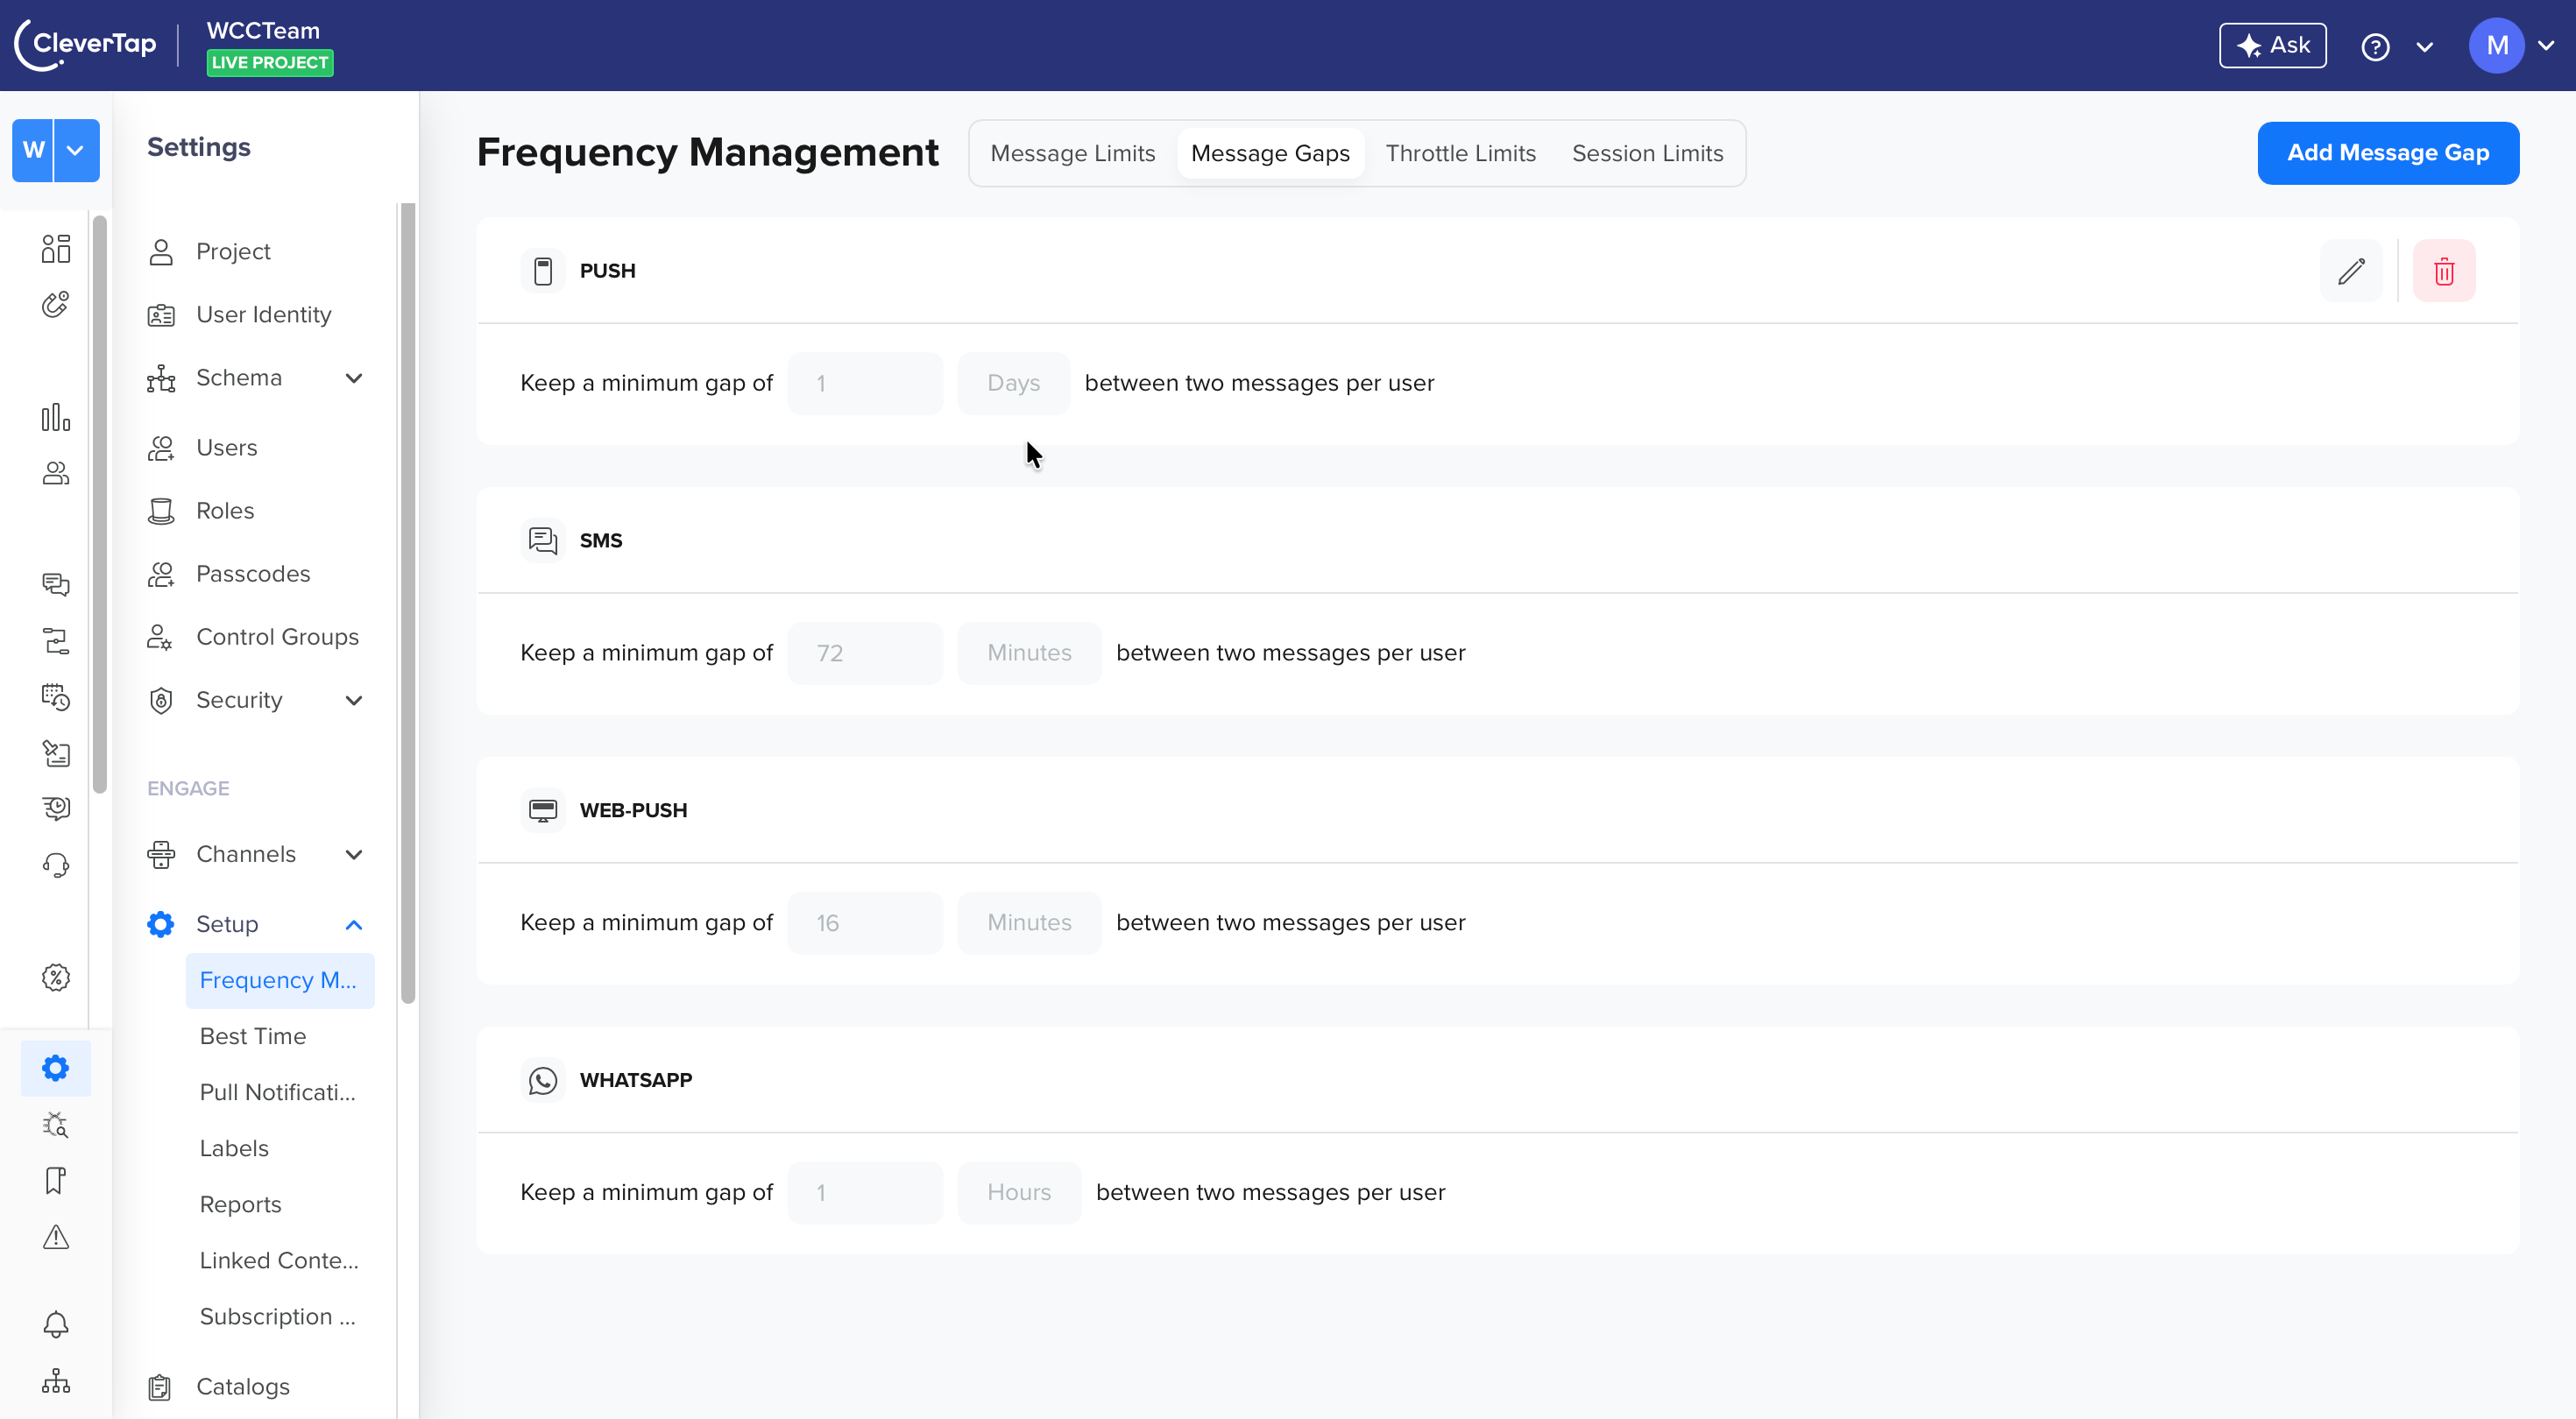
Message Gaps
Message Gaps let you control the minimum time interval between messages sent to a user across campaigns and journeys. This ensures that users do not receive multiple messages in quick succession, even if they qualify for multiple campaigns simultaneously. For example:
If the Message Gap is set to 4 hours, and a user receives a message at 10:00 AM
The next message can only be delivered after 2:00 PM
If a user qualifies for multiple messages within the gap window:
Only the first message is delivered
Subsequent messages are skipped until the gap is satisfied
Supported Range
You can configure message gaps within the following range:
Minimum: 15 minutes
Maximum: 7 days
Supported Channels
You can configure message gaps for the following channels: Push Notifications, Email, SMS, WhatsApp, and Web Push.
Message Gaps
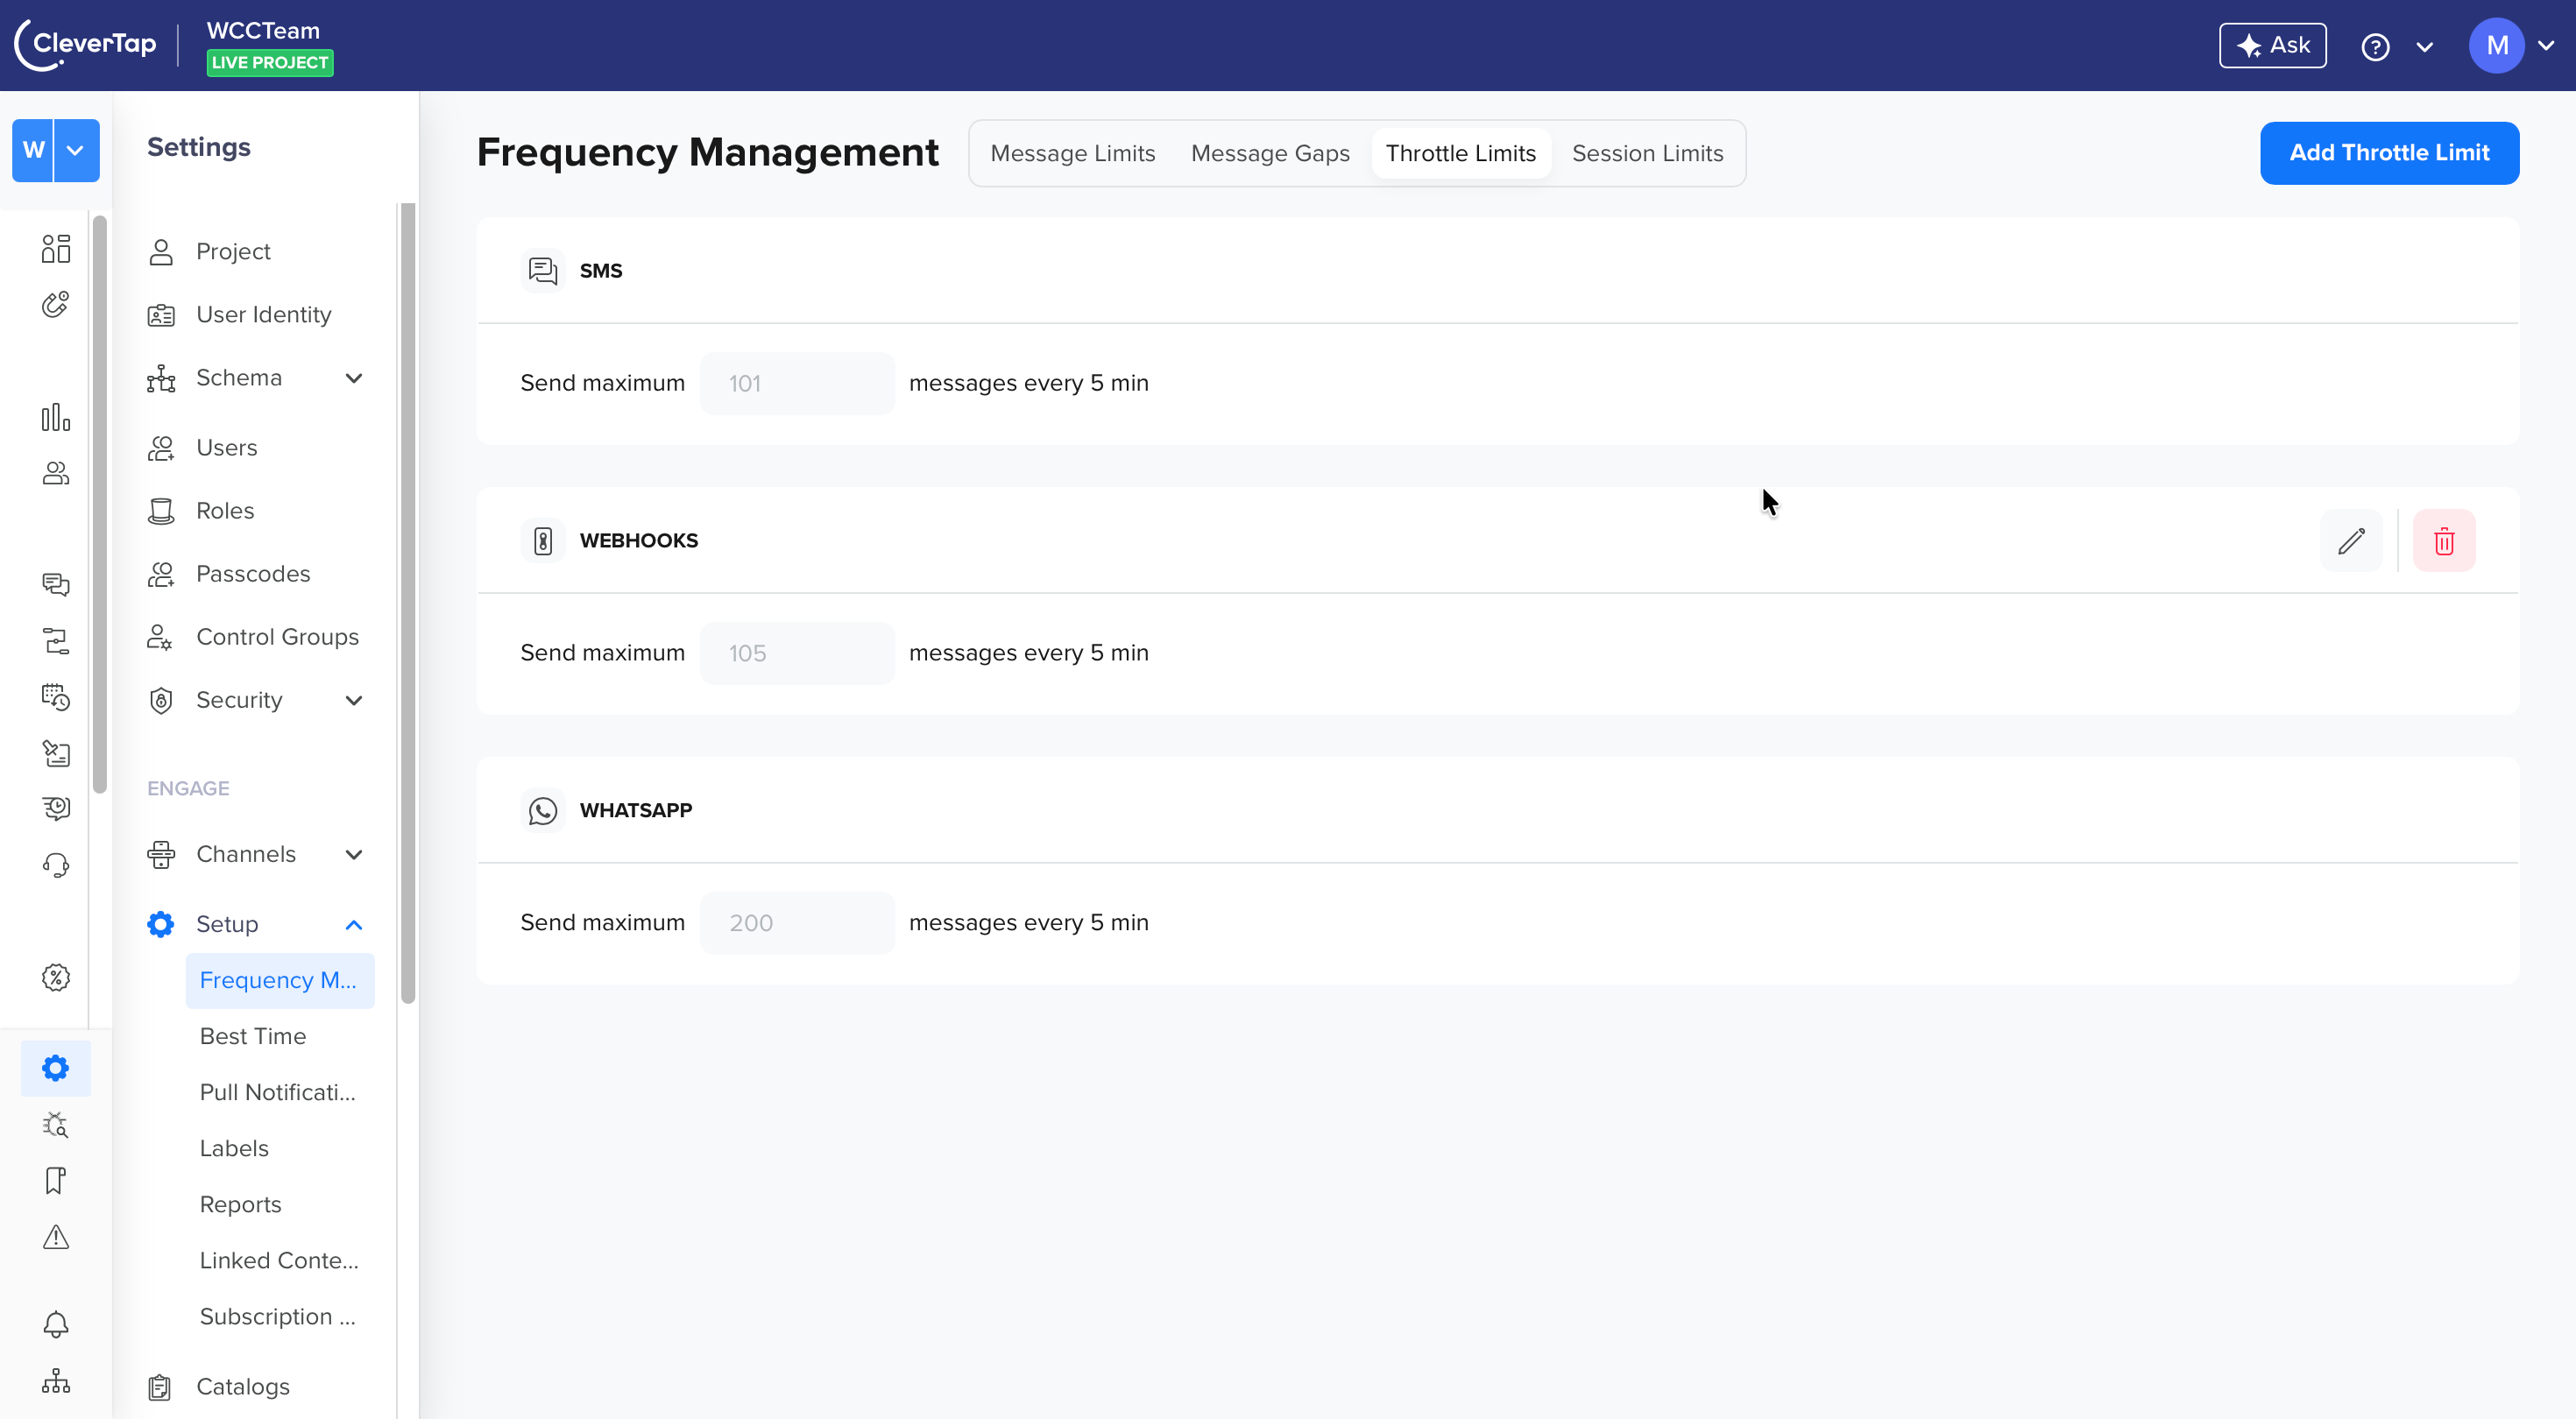
Throttle Limits
Throttle is a feature that lets you control the rate at which notifications are sent to end users. Instead of sending messages to all users at once, throttling spreads delivery over a period of time. This helps avoid sending a large number of notifications simultaneously. By controlling notification delivery, throttling indirectly reduces sudden spikes in user activity on your platform (for example, during events like limited stock sales). This ensures a smoother user experience and helps maintain system performance.
Finding the optimal throttling rate is crucial in ensuring the effectiveness of your engagements. A high throttling rate can overload your platform, while a low rate can cause engagements to run longer than expected, affecting the relevance of your messages to end users. Therefore, it is important to strike a balance by setting a reasonable throttling rate that aligns with your engagement reach and frequency, ensuring your messaging stays relevant without overloading your platform.
📘
Throttle Limit Recommendations
Check that you always set throttle limit to more than 100 messages when setting the Ad Hoc limit.
Always check that your throttle limit is set high enough to prevent messages from running for multiple days, as they will stop delivering after the third day. This ensures that the relevance of messages is maintained.
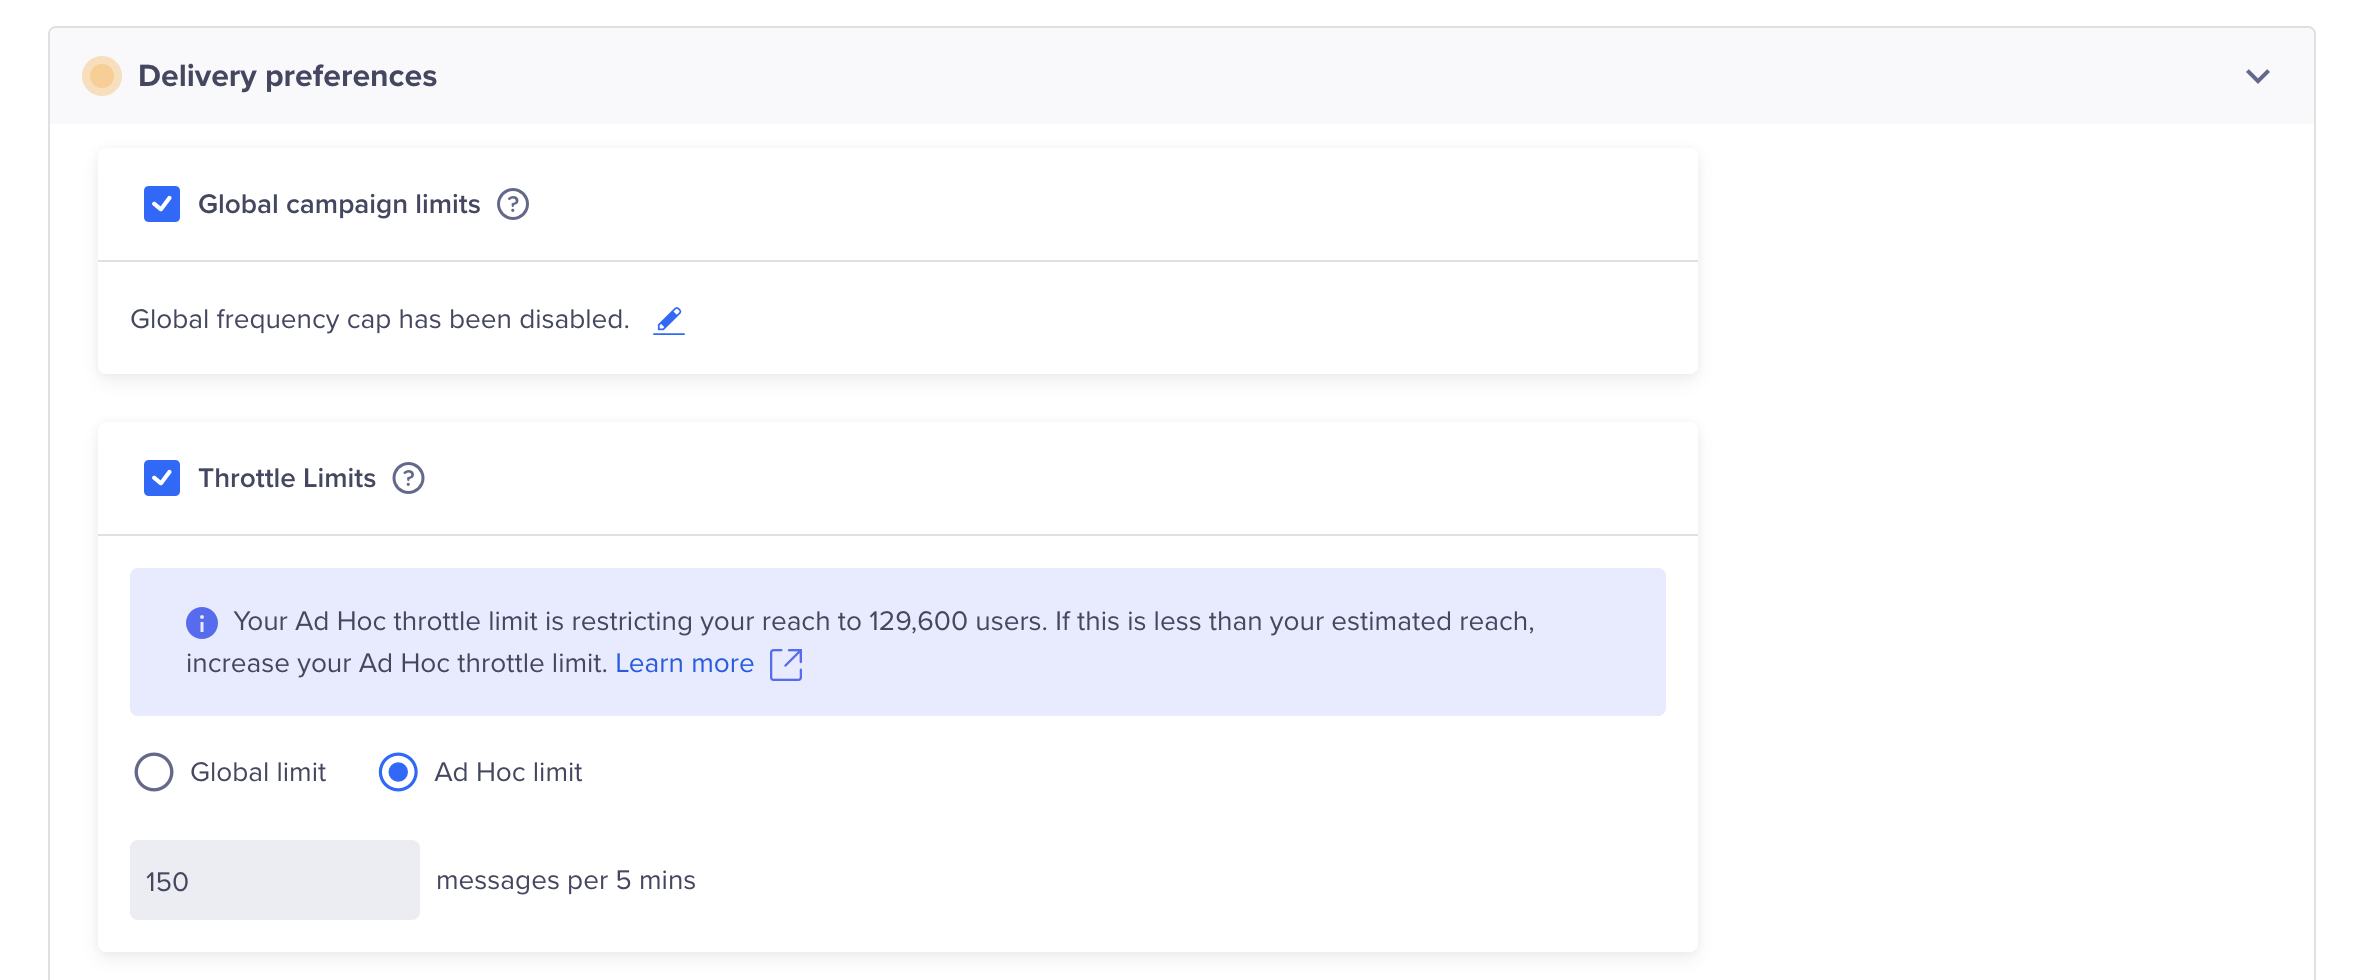
The restricted reach of your messages is displayed in a banner below the Global throttle limits. Check that the restricted reach is higher than your expected reach to ensure that all users receive the messages.
Types of Throttle
There are two types of throttle:
Global Limit: Select this option to apply global throttle settings to control the overall rate of message delivery. This setting ensures a consistent throttling rate across all campaigns or engagement nodes in journeys.
Ad hoc Limit: Select this option if you want to override the global throttle limits for specific campaigns or engagement nodes in journeys. This option provides more granular control over message delivery rates tailored to individual requirements.
Global Limit
The Global Limit is a default throttle setting that applies to all campaigns. This limit is set globally and can be configured from the Settings section.
Throttle Limits
This is now the global limit for all your campaigns. You can check this limit from the Campaigns by navigating to Delivery preferences under the When section.
Global Limits
📘
Note
If Global Throttle Limits (GTL) are not set in global settings, you can still configure them for a specific campaign or journey.
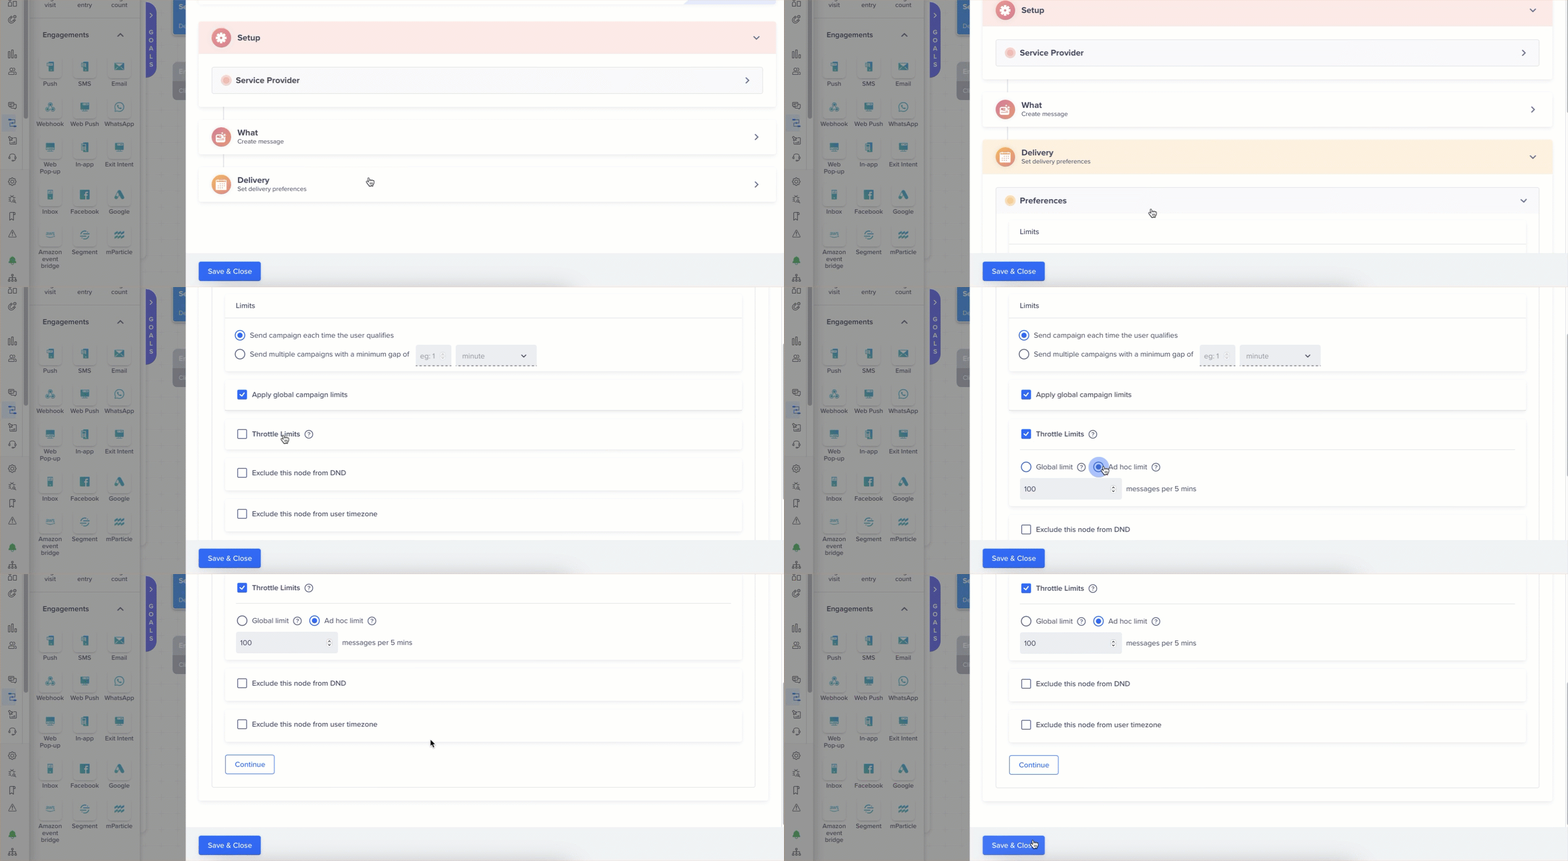
For a Campaign, navigate to the When section > Delivery Preferences > Ad Hoc limit.
For a Journey, select the specific Engagement node in the Journey setup > When section > Delivery Preferences > Ad Hoc limit.
The GTL checkbox is always enabled in Campaigns, similar to Journeys, allowing users to set ad hoc limits even if GTL is not configured in global settings.
Delivery Preferences
Ad hoc Limit
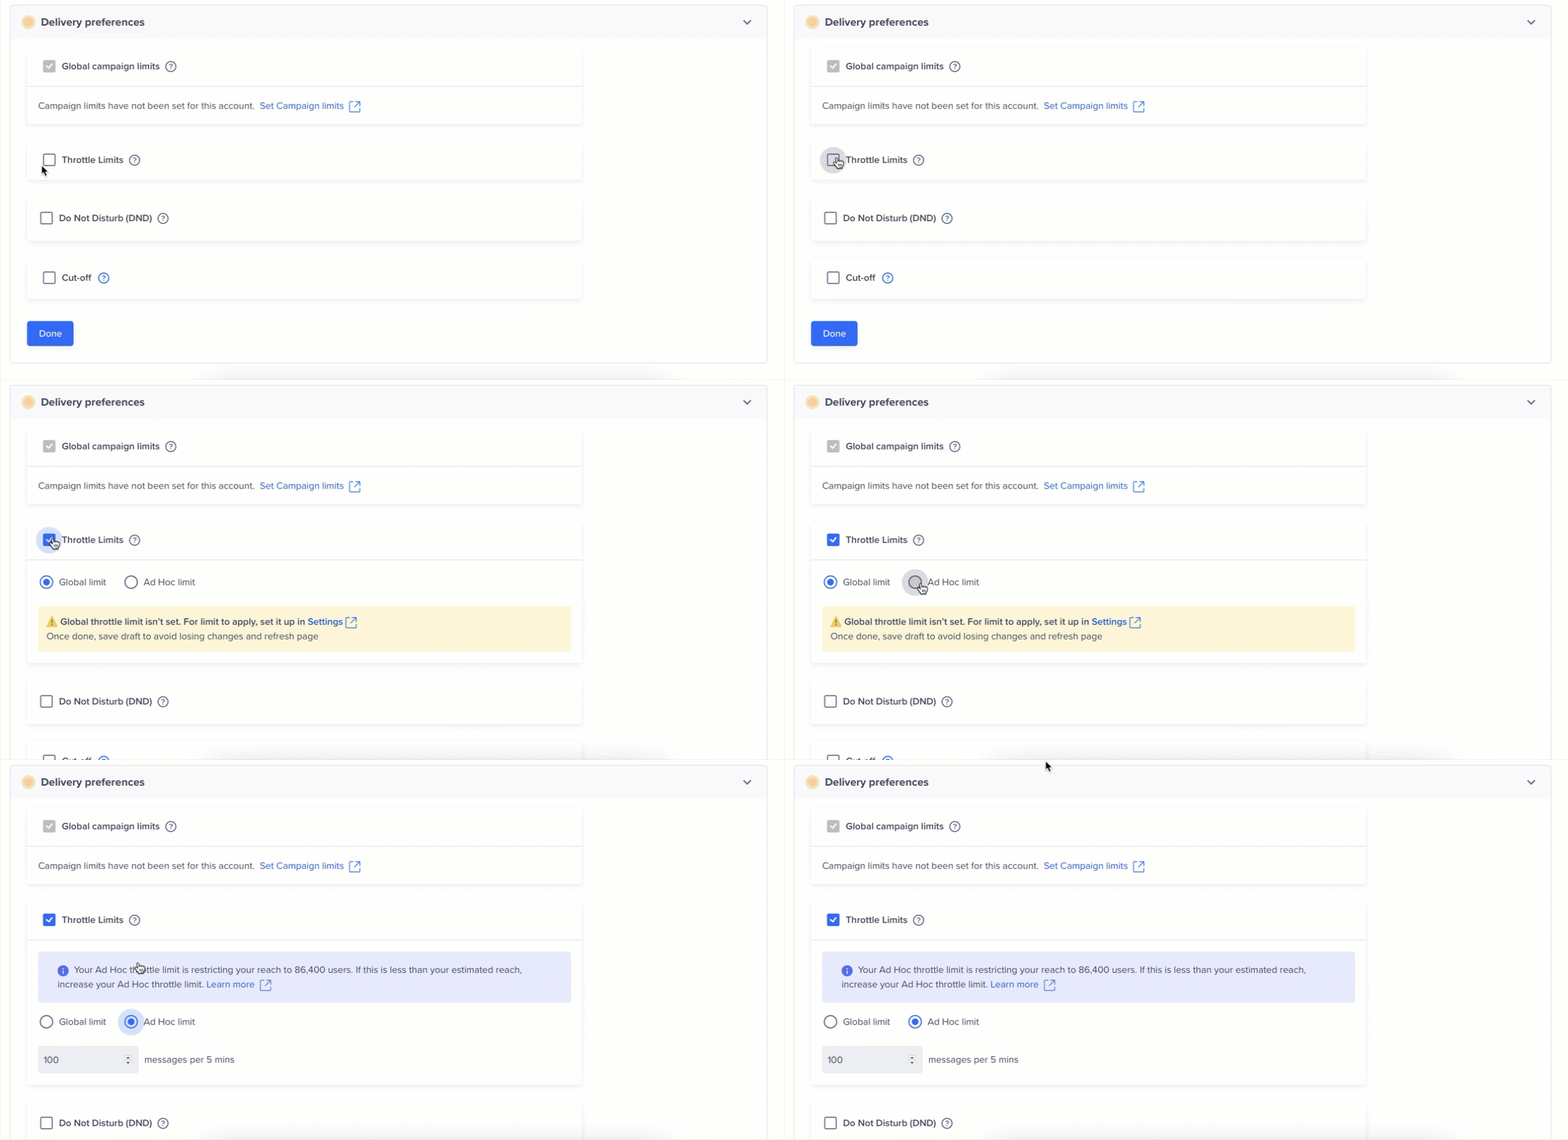
The Ad hoc Limit lets you set a custom throttle limit for a specific campaign, overriding the Global Throttle settings for that specific campaign. This is useful when you want to apply a different throttle limit for a particular campaign without changing the global settings.
Go to the When section > Delivery preferences. The Delivery preferences section displays the Global Limit and the Ad Hoc Limit.
Select Ad Hoc Limit to change throttle the message from the current campaign.
Enter the value and click Done.
Set Adhoc Limit
The Ad Hoc limit applies only to the current campaign or an engagement node in journeys.
Throttling in Journeys
For Journeys, throttle limits for the engagement nodes are the same as the Campaign throttle limits for Push notifications, SMS, Email, Webhooks, and WhatsApp.
Set Up Throttle Limits from Journeys
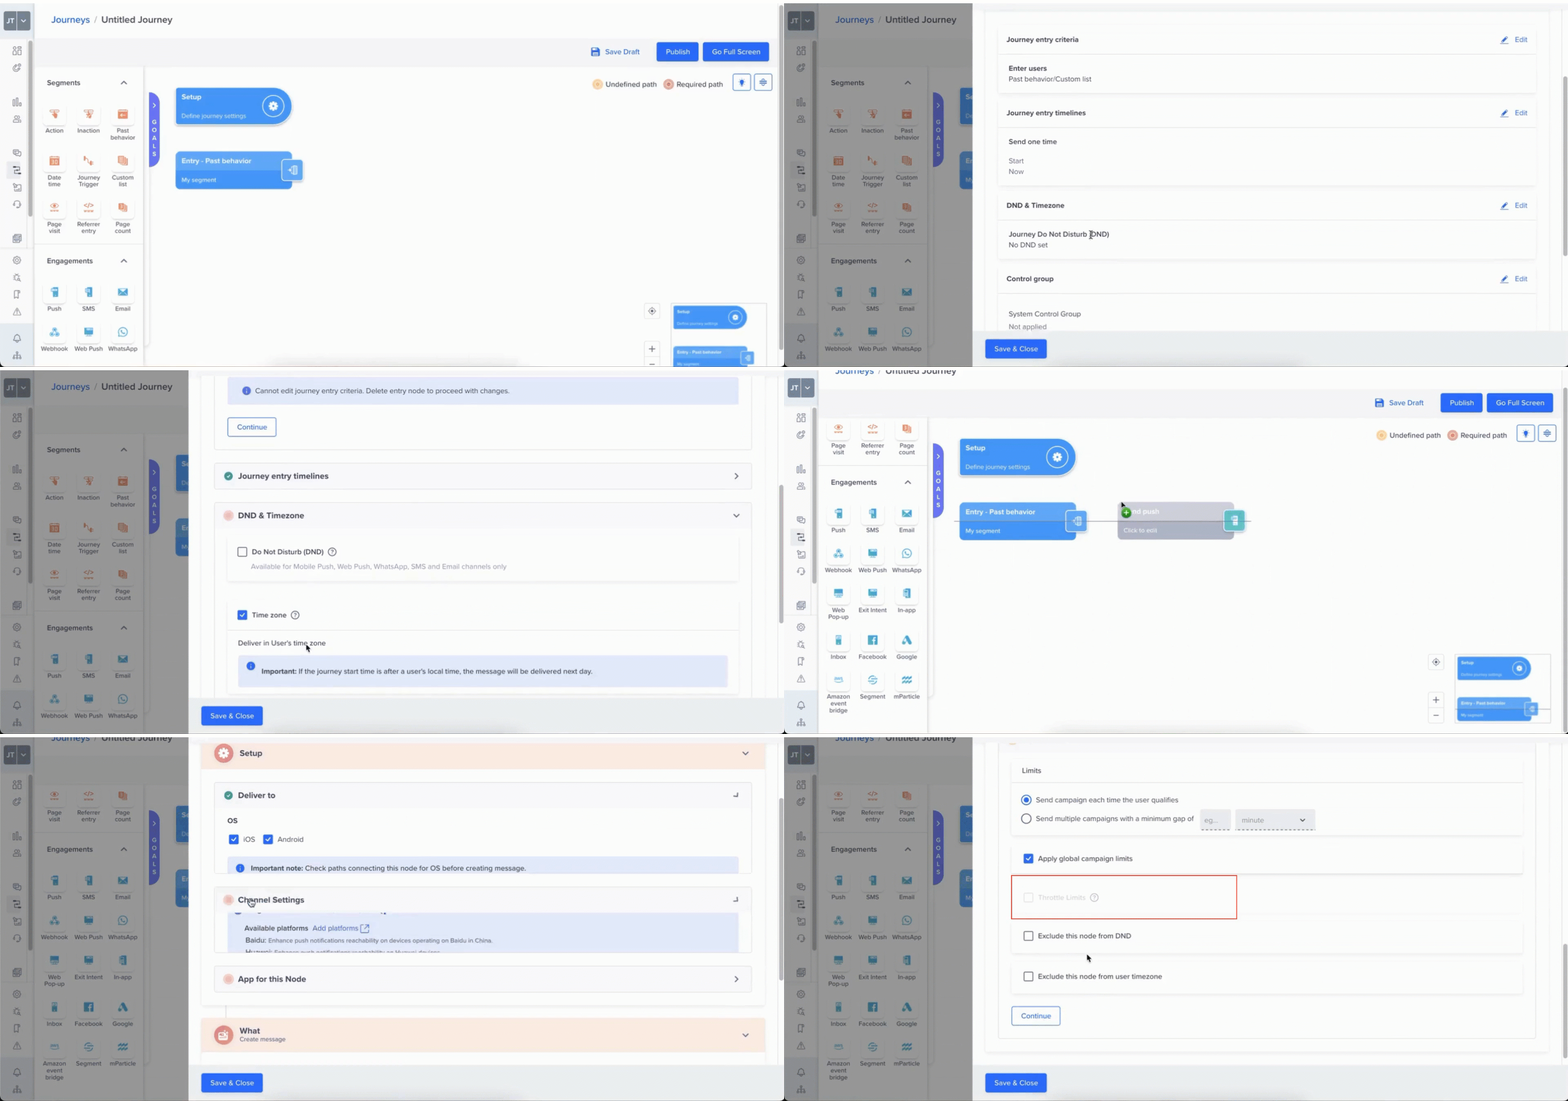
Depending on the time settings within a Journey, throttling may be allowed or disallowed:
Timezone: The Account Timezone setting provides a centralized way to manage and schedule campaigns, ensuring consistency in timing and reporting across the entire user base. User Timezone settings are designed to send messages at the timezone the user was last active. Applying throttling in this context could cause delays in message delivery, disrupting optimal engagement times and reducing the overall effectiveness of the communication. To avoid this, throttling is allowed only when the messages are scheduled based on the Account Timezone. If you still schedule messages based on the User Timezone, a popup notifies you that throttling will be disabled for campaign limits. Throttling is permitted when you schedule messages based on the User Timezone only if you select the Exclude the node from user timezone option.
Throttling Permitted When Scheduling Campaigns Based on Account Timezone
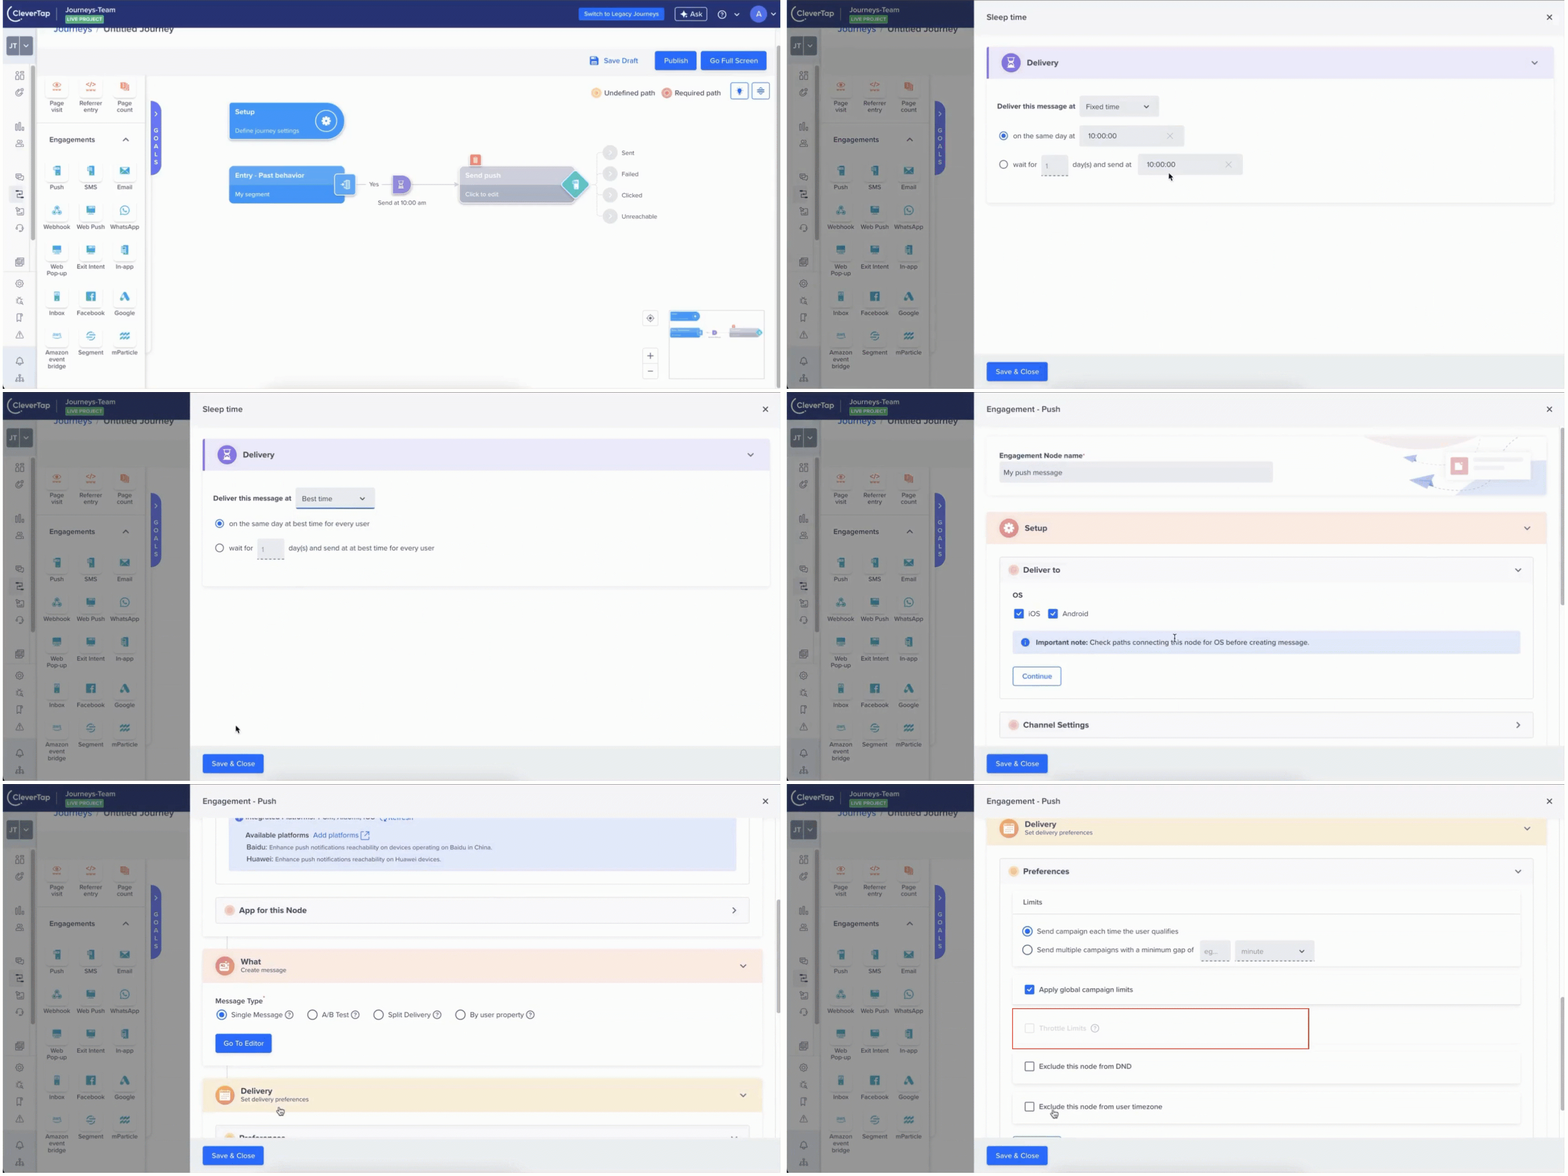
Best Time Campaigns: The Best Time setting optimizes message delivery by sending messages at times when users are most likely to engage, based on their individual behavior and activity patterns.
Throttling is not permitted in this context because it could delay message delivery, disrupt the optimized timing, and reduce the overall effectiveness of the campaign. Additionally, throttling would undermine the personalized nature of Best Time messaging by introducing delivery inconsistencies, potentially diminishing the user experience. To ensure messages are delivered at the optimal time, CleverTap disables throttling for campaigns that use Best Time, helping maximize engagement success.
Past Behavior Segment (PBS) Node followed by Engagement Node: When a PBS node is followed by an engagement node, throttling is allowed on the engagement node. This setup supports controlling message delivery while targeting users based on their past behavior.
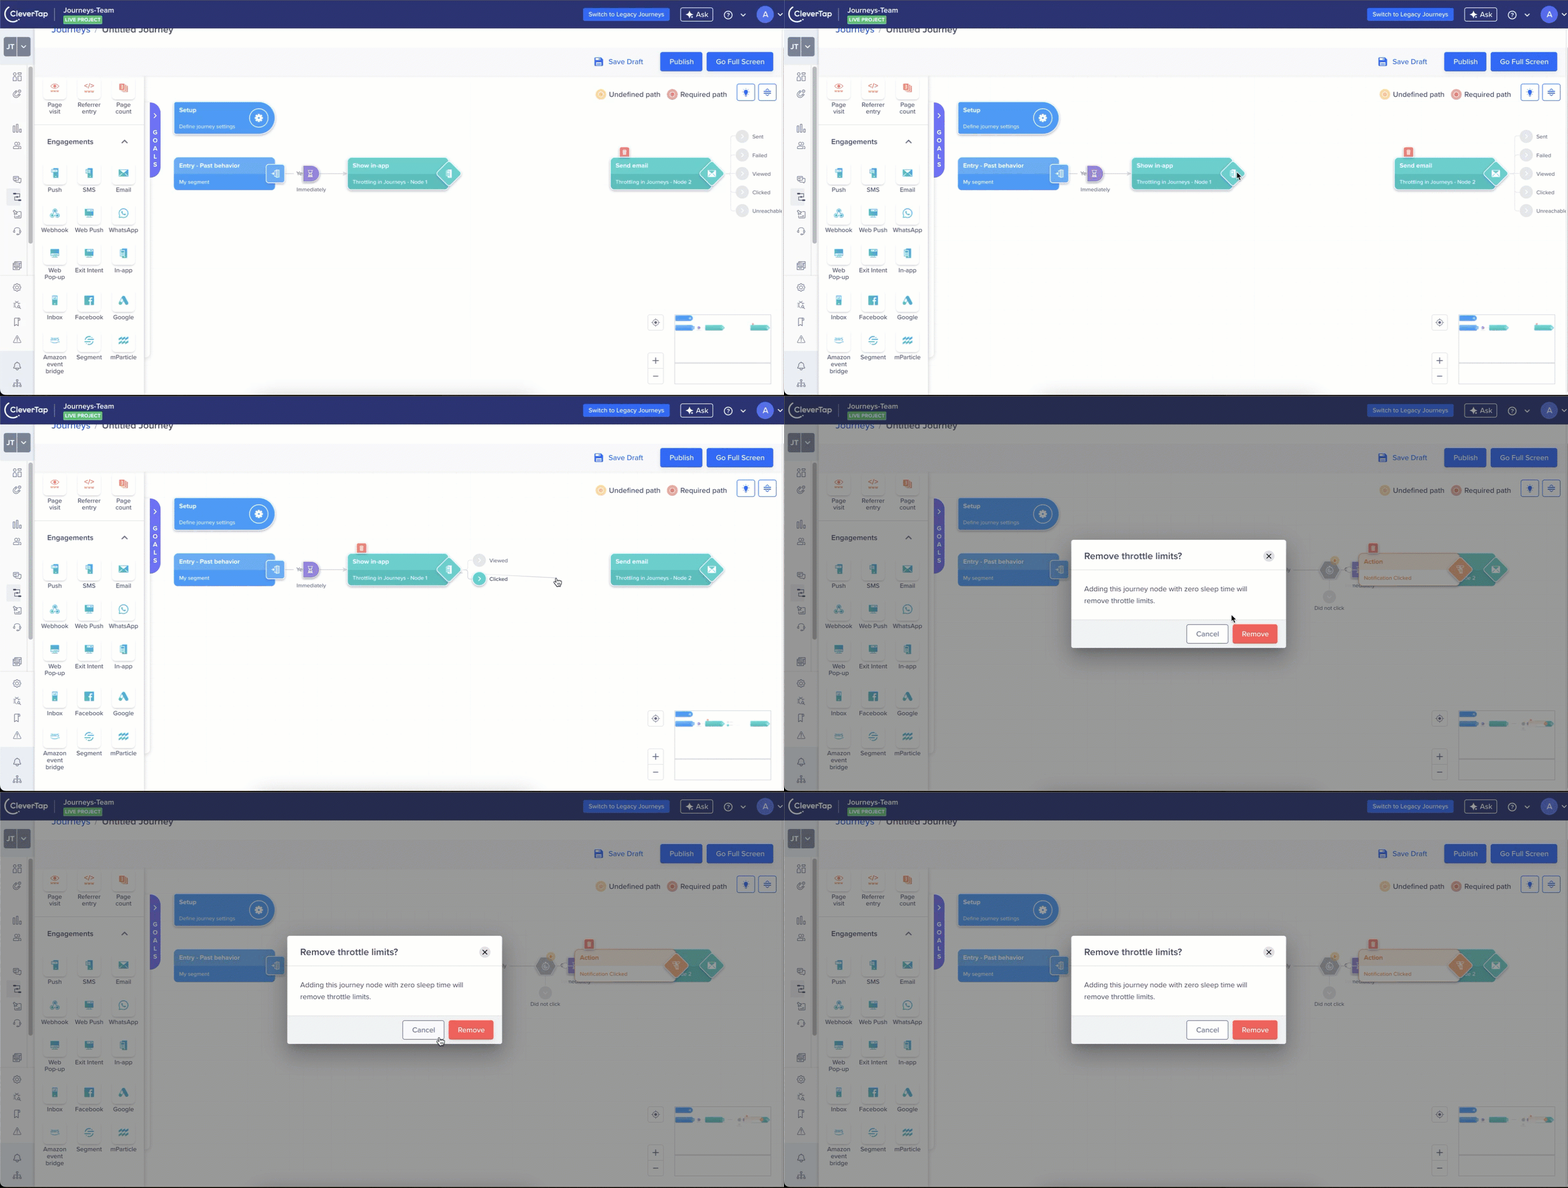
Segment Action Node with Zero Sleep Time: When a segment action node with zero sleep time is added before an engagement node, CleverTap automatically removes throttling for the following engagement node. Zero sleep time indicates that users must proceed immediately from the segment action to the next step without delay. In this scenario, throttling, which controls message delivery rates by spreading them out over time, conflicts with the intent of instant progression. By disabling throttling, CleverTap ensures that messages are delivered in real time, preserving their relevance and impact.
Additionally, when this configuration is applied, the system prompts for user confirmation, ensuring you are aware that the following engagement node will no longer be subject to throttling limits.
Segment Action Node with Zero Sleep Time
However, if you set a sleep time of more than 24 hours, throttle limits will apply for the engagement node that follows the segment action node.
Segment Action Node with Sleep Time Greater Than One Day
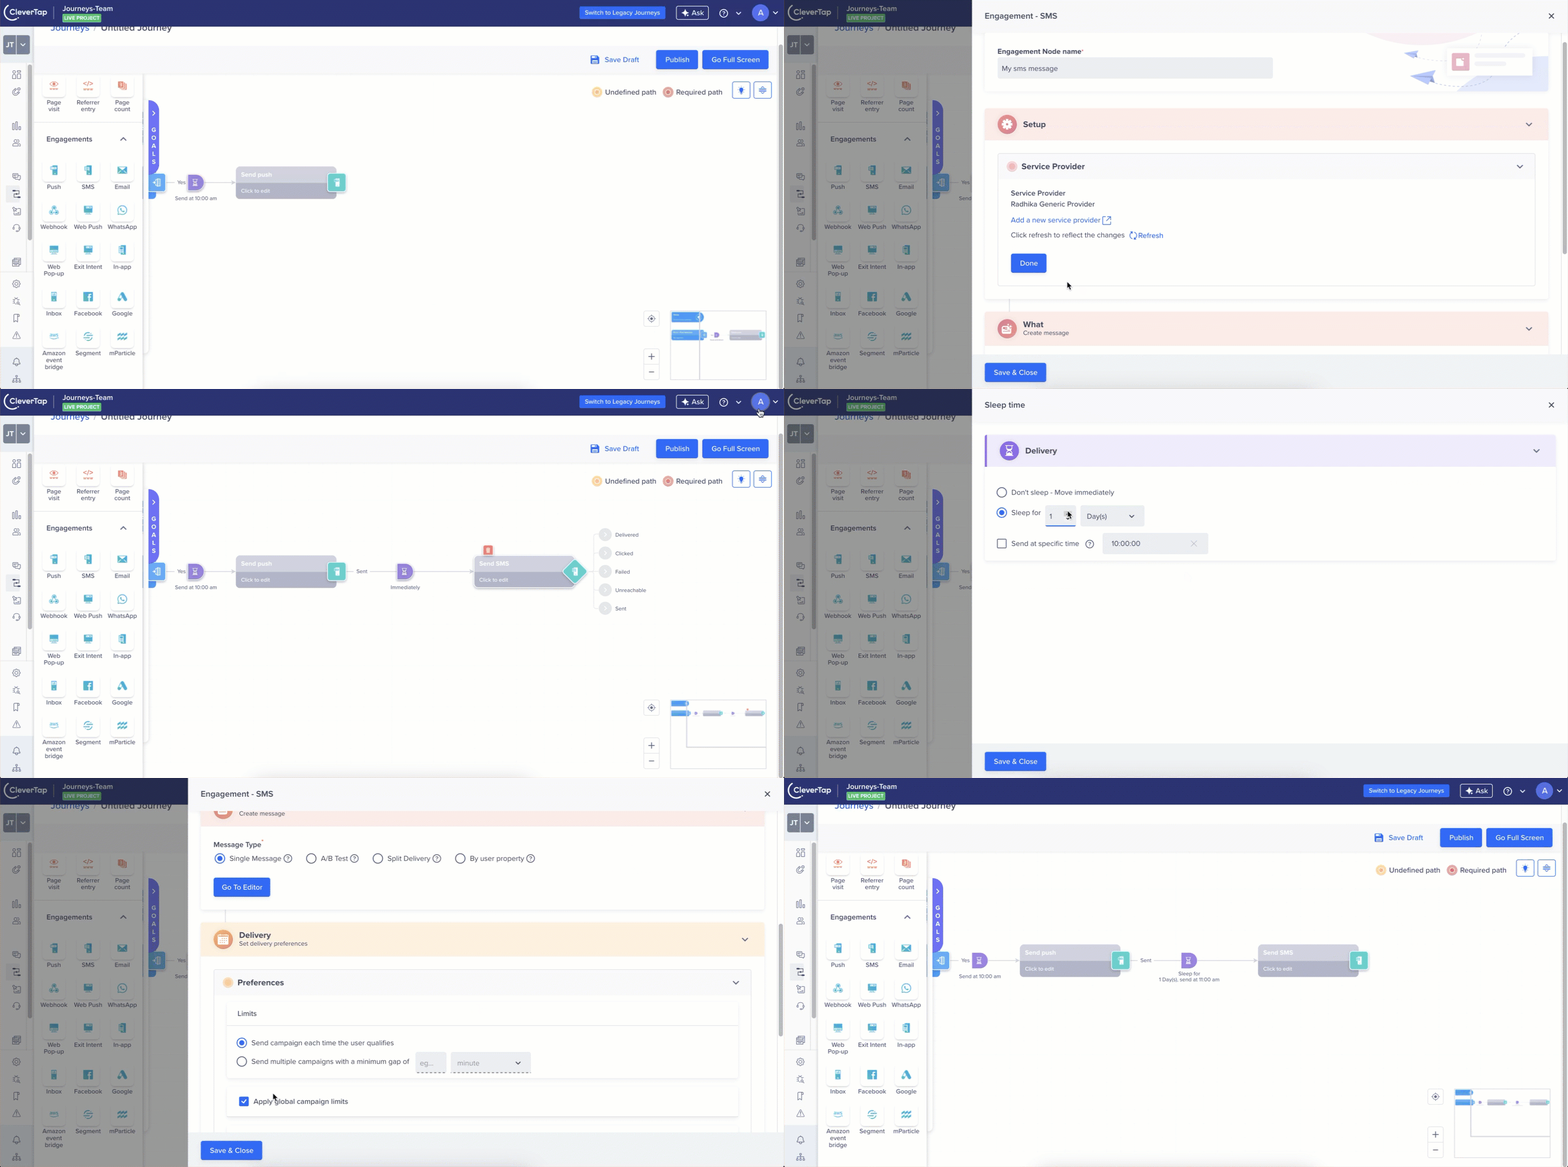
Segment Action Node with Sleep Time without Send at Specific Time: When a sleep time is added after a node without enabling Send at specific time, CleverTap carries forward the throttle configuration from the previous engagement node. For example, if there is a 1-day sleep time after a throttled engagement node, CleverTap ensures that the subsequent engagement is sent exactly 1 day after the previous engagement was delivered to each user. Allowing throttle configuration in the second engagement node, in this case, would introduce additional delays, as both nodes would apply throttling sequentially. This could lead to unintended gaps in message delivery, extending the overall time it takes users to progress through the journey.
Segment Action Node with Sleep Time with Send at Specific Time: When a sleep time is added with Send at specific time enabled, CleverTap allows throttle configuration for the subsequent engagement node. Consider a scenario with a 1-day sleep time set to trigger at 10:00 AM and a throttle applied in the previous node. If a user received the first engagement at 10:00 AM on March 11, they would reach the next node at 10:00 AM on March 12. Users who received the first message later in the day on March 11 would then receive the next message at 10:00 AM on March 13, and so on. Since delivery is already scheduled to a fixed time, additional throttling can be configured safely, helping control volume without causing excessive delays.
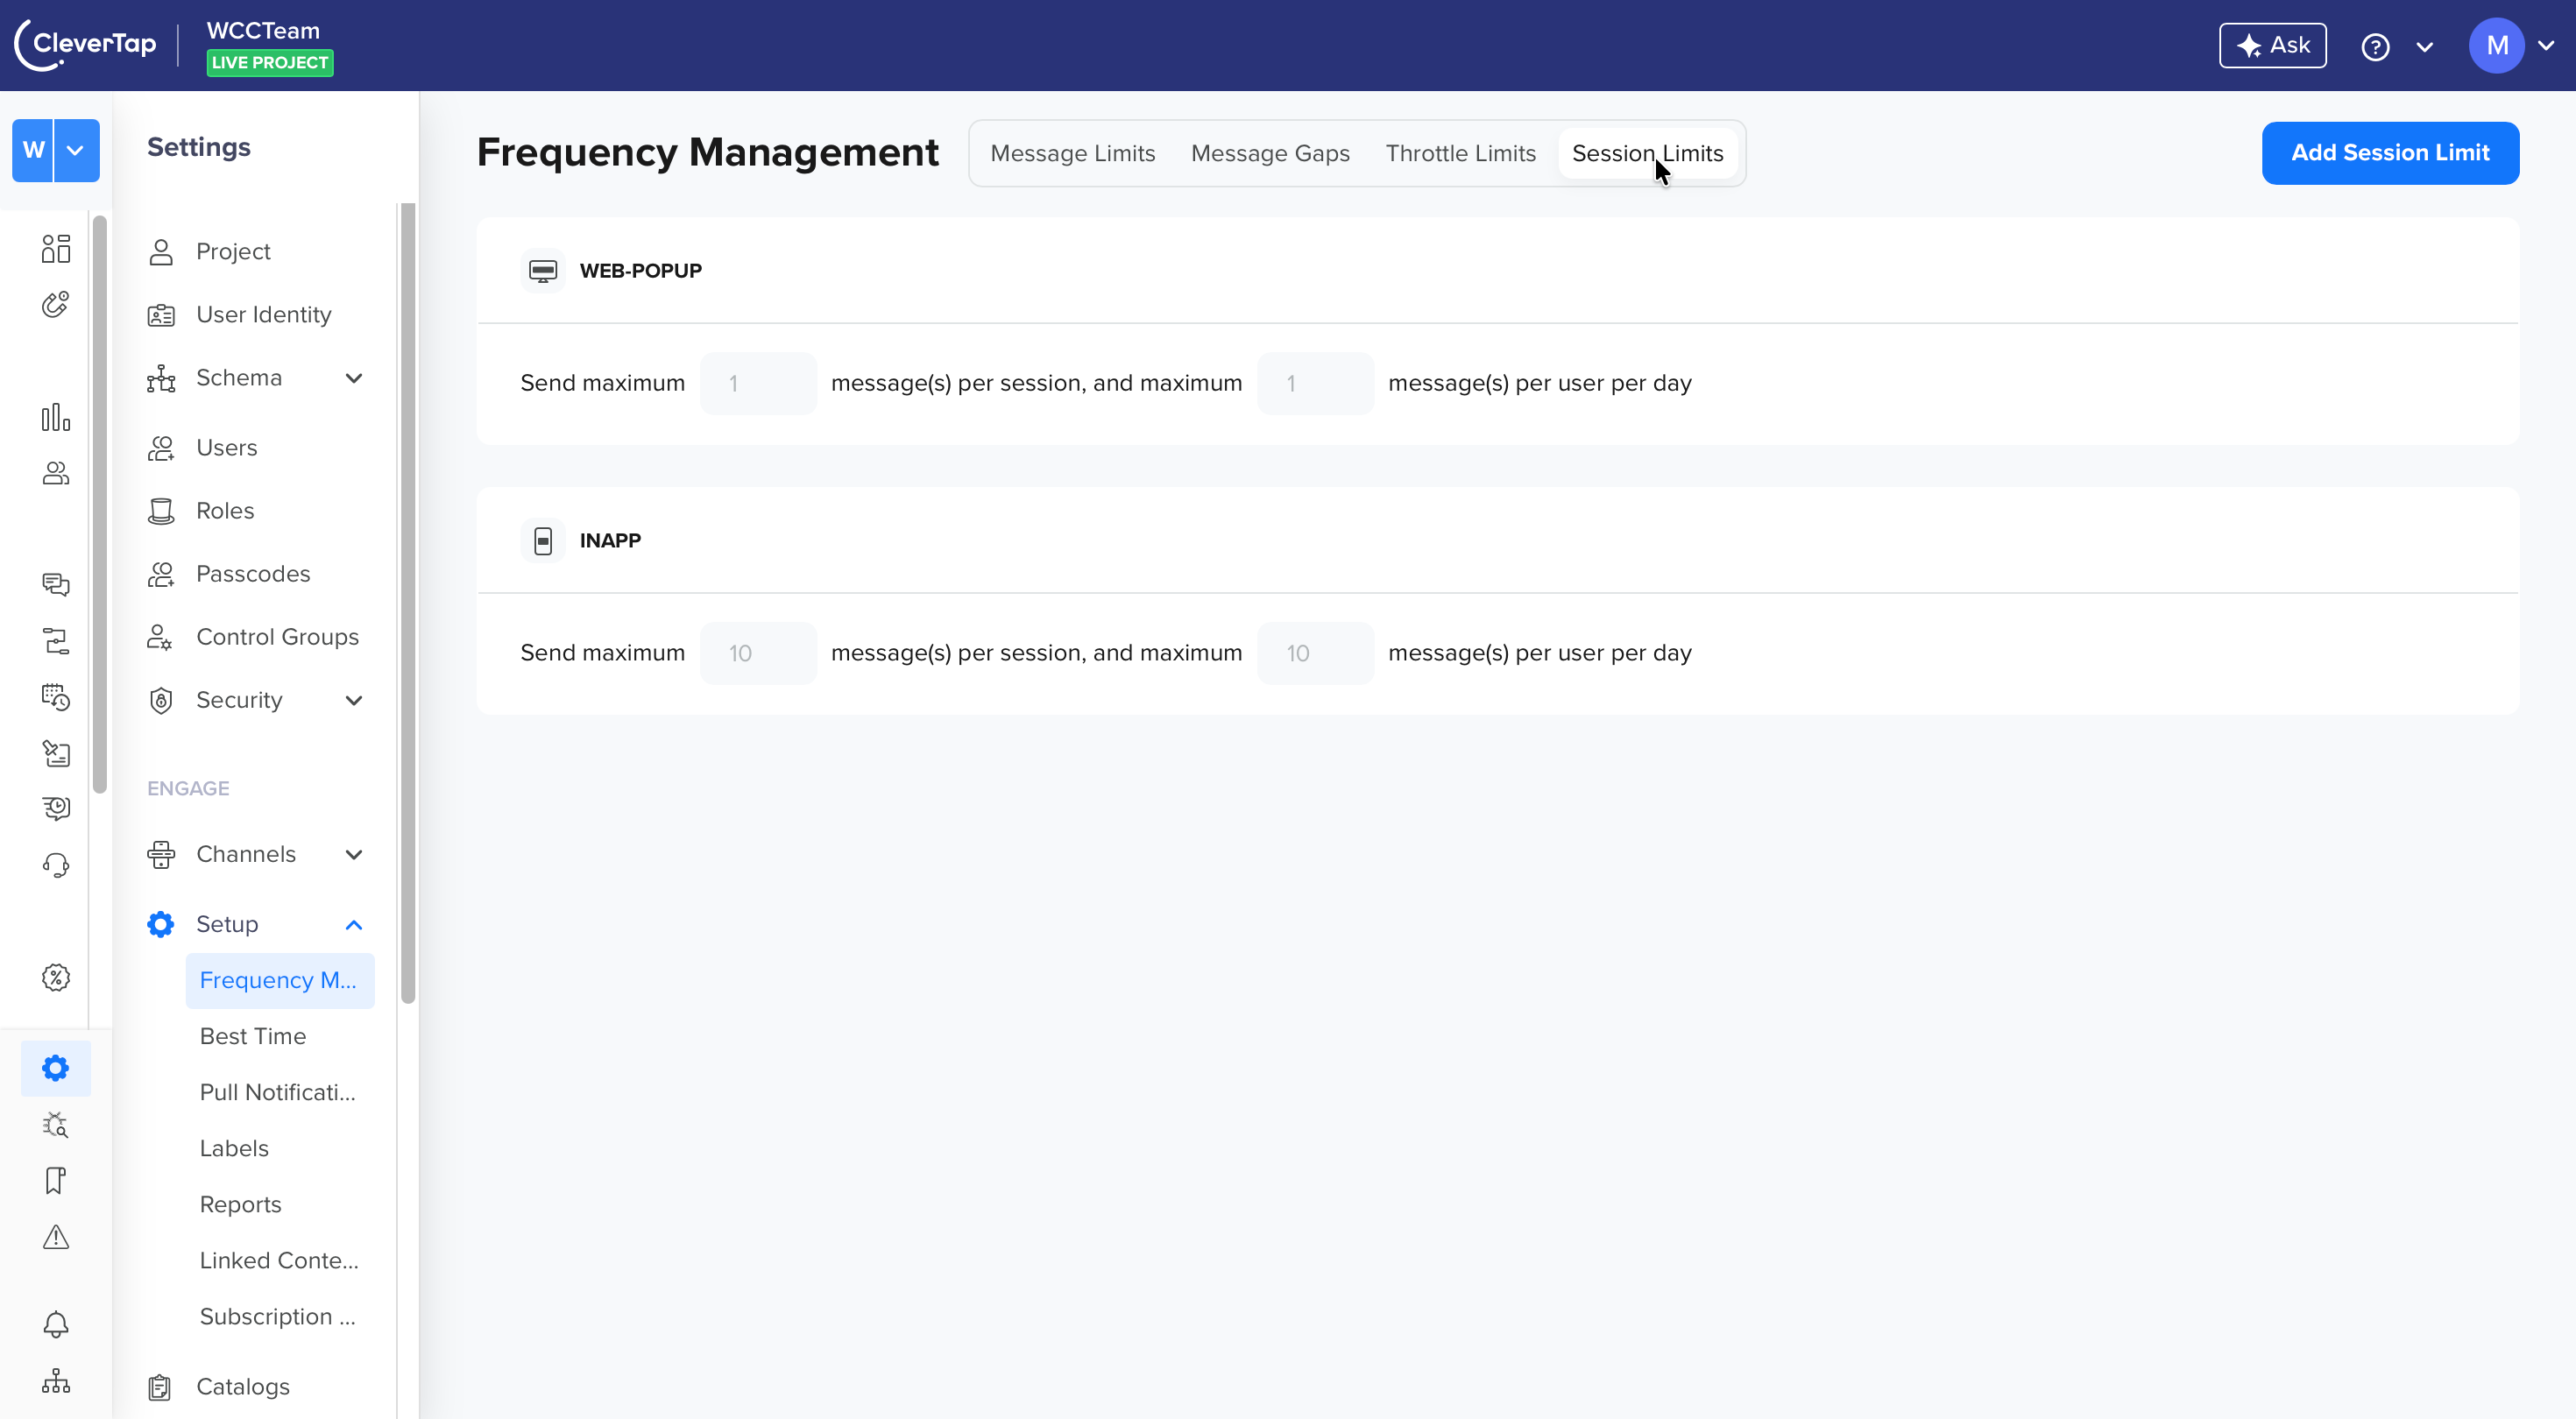
Session Limits
Session Limits let you control how many messages a user can receive within a single session, per day. A session refers to a period of continuous user activity in your app. A new session typically starts when a user opens the app and becomes active, or the app is brought to the foreground after being inactive for a defined period.
Session Limits prevent users from being overwhelmed with multiple messages during an active session with your app, enhancing the in-app user experience. They are supported for In-App Messages, Web Inbox, and Web Popup channels.
For example, if you set a session limit of 2 messages per session per day, a user who opens your app will receive at most two messages during that session, even if the user is qualified for multiple campaigns. If the user closes the app and returns later, starting a new session, they can again receive up to 2 messages (subject to daily limits).
📘
Note
Session Limits operate independently of Advanced Frequency Limits and campaign-level caps.
To configure Session Limits:
Go to Settings > Frequency Management.
Navigate to the Session Limits tab.
Click Add Session Limits.
Enter the maximum number of messages allowed per user, per session, per day.
Click Save.
Session Limits
FAQs
What happens when a frequency cap applies to a user?
In such cases, CleverTap does not deliver the associated message. The dropped messages are accounted for in the campaign report error table.
What happens when I edit an existing Message Limit?
If you update the send limits (daily/weekly/monthly), the new limits are applied immediately and existing usage is adjusted accordingly.
If you update the rule conditions (such as channel, label, or segment type), the rule is treated as a new rule and previous usage is not carried forward.
What happens when multiple message limits apply to the same user?
If multiple limits apply, CleverTap evaluates all applicable rules and enforces the most restrictive limit. For example, if:
Global limit = 10 messages/day
Promotional limit = 3 messages/day
The user will receive a maximum of 3 promotional messages per day, even though the global limit allows more.
What happens when both Message Limits and Message Gaps are configured?
Both controls are evaluated independently. Message Limits control how many messages can be sent. Message Gaps (dwell time) control when the next message can be sent. A message is delivered only if:
The user is within the allowed limit, and
The required time gap since the last message has passed.
How does the User DND Set error occur?
The User DND Set error occurs when you qualify users for a campaign despite unsubscribing on the target device. This error indicates that these users have been routed to the error bucket.
Is there a limit to the number of Message Limit rules I can create?
Yes, you can create a maximum of 25 Message Limit rules per account.
What is the Frequency Caps Exceed error?
This feature limits the total number of messages that can be scheduled per day for a user, taking into account all active devices and across different communication channels.
Navigate to Settings > Engage > Setup > Frequency Management to cap the frequency for various channels.
From the Frequency Management page, you can define the number of messages you want to send to each user in X number of days.
You can also specify the following:
Message Gap is the gap you want to keep between messages.
Throttle controls the flow of your messages.
For more information on Message Gaps, refer to Message Gaps.
For more information on throttling, refer to Throttle.
Now, when you create a campaign, and you want to disable the Global frequency limit, clear the Global Campaign Limit option under the Who section. The Global Campaign Limit is enabled by default.
Do Message Limits apply across both campaigns and journeys?
Yes, Message Limits are applied across all campaigns and journey nodes, unless explicitly bypassed.
What happens if a user qualifies for multiple campaigns at the same time?
If multiple campaigns are triggered simultaneously, Message Limits ensure the user's notifications does not exceed allowed volume, while Message Gaps ensure messages are spaced out. Only the messages that satisfy both conditions are delivered.

 icon. The Filters window opens on the left side of the screen.