Create Message
Learn how to create an Email campaign using the CleverTap dashboard.
Create a New Campaign
Create a campaign to deliver your message.
To create a new campaign:
- From the dashboard, select Campaigns.
- Click + Campaign.
- From the Messaging Channels list, select the messaging channel.

Select Messaging Channel
The Campaign page displays.
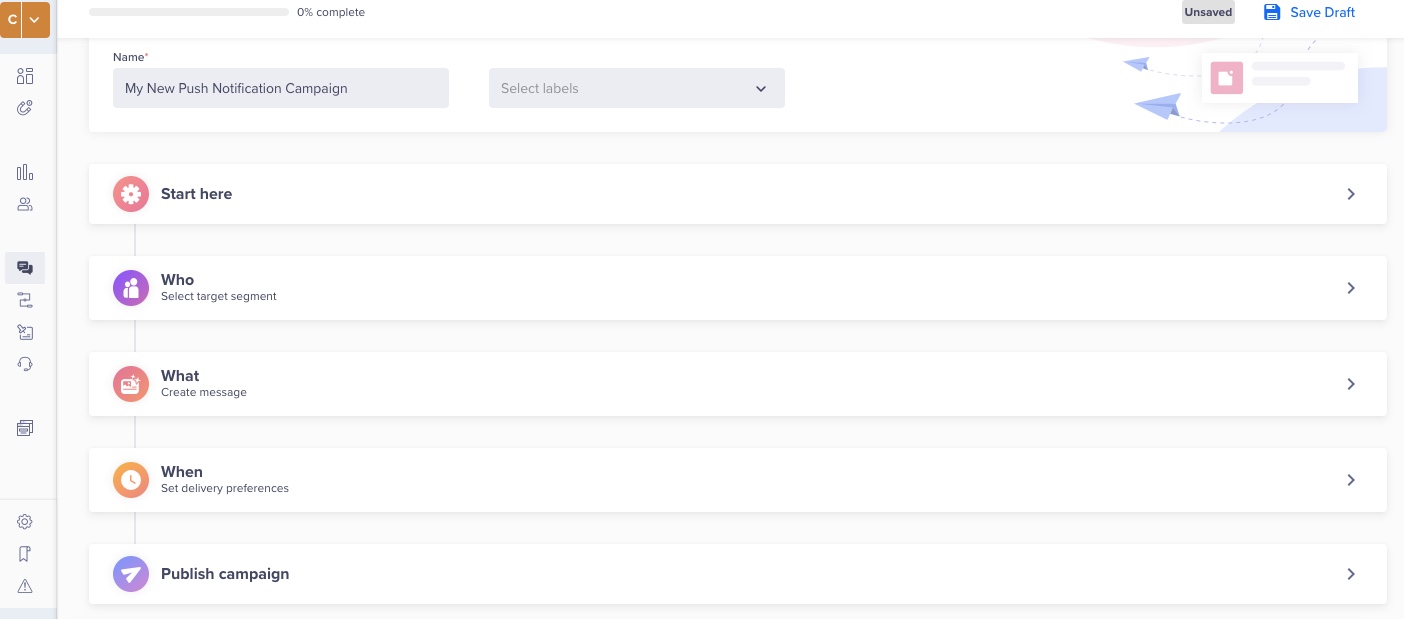
Create Campaign
Define all the sections and publish the campaign.
Start Campaign Setup
The Start here section displays the setup information.
This section has the following parts:
- Qualification criteria: Deliver the notification by Past behavior/Custom list, Live behavior, or External trigger. For more information about segmenting users, refer to Segments.
- Email Service Provider: Select a provider.
- Set a Goal: You can track your campaign conversion by setting up a goal. Setting a goal allows you to measure your campaign effectively against what you want to achieve in the campaign. This selection is optional.
The campaign goal can be as generic or as specific as you want. It can answer questions from How many users were influenced for purchasing an X amount? to How many first-time visitors purchased red shoes worth a minimum of X amount and blue jackets worth a minimum of Y amount? ".
Define the conversion period by selecting the Conversion Time. You can define your conversion goal further by filtering an event by event properties. For more information on event properties, see Events.
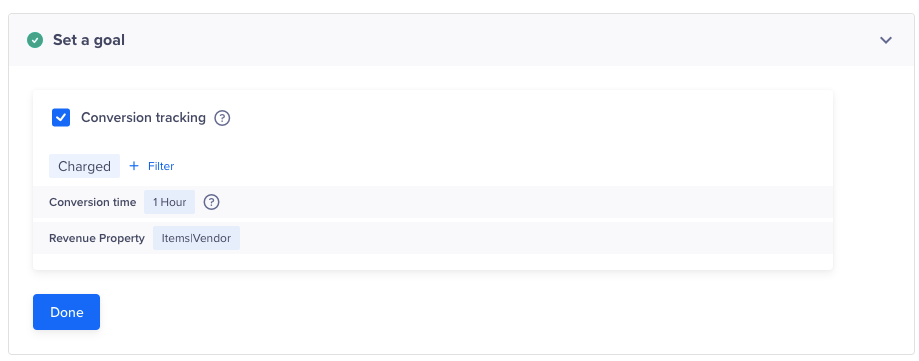
Set a Goal
Define the Audience
You must indicate the target audience for your campaign. You can specify your target audience from the Target segment section. Here, you can create a new segment or use a previously saved user segment from the segment list.
For Past Behavior segments, you also calculate the estimated reach.
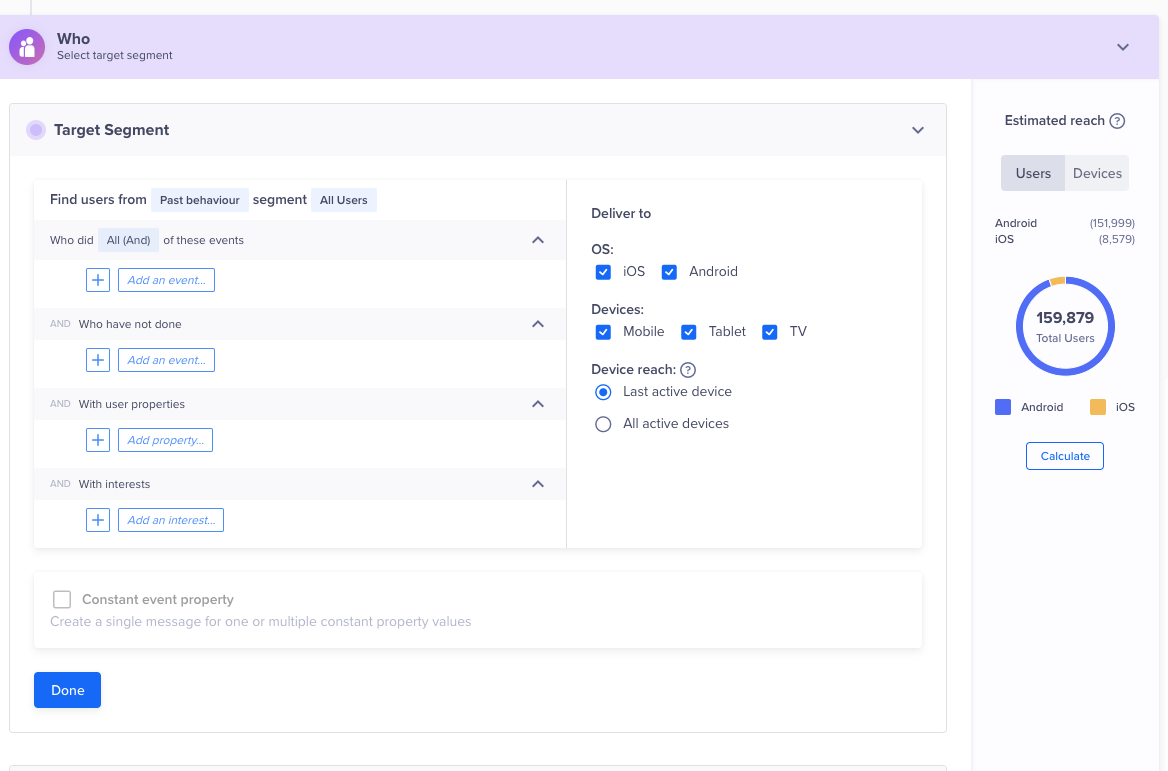
Define - Who
Segment
If you want to create an ad-hoc segment, you can select a type of segment on which to base your campaign. You can create the target based on past user behavior and user properties or live (ongoing) user behavior. The latter is helpful to send out real-time, triggered campaigns.
Delay > 24 HoursWe recommend creating a Past Behavior campaign for all campaigns where the delay is greater than 24 hours for a live inaction campaign.
For instance, you can create a live Inaction within time campaign that targets users as soon as they add a product to their cart but do not finish transacting within 10 minutes; that is the golden window within which most users transact on iOS and Android app platforms.
On this basis, you would then set up the Who by sending this campaign to all users who qualify or limit the users who qualify under Estimated reach.
Deliver Action Based Messages
You can trigger a message based on an action. Users receive messages when they perform an action in the app instead of waiting for the next app launch. It makes the messages more contextual and increases conversion. Campaigns with delays and app inbox coupled with a push message do not trigger instant messages.
Deliver Messages based on Past Behavior (PBS)
You can also target users based on their past user behavior. For past behavior campaigns, you also have the option to calculate estimated reach. The estimated reach shows the number of users that qualify for the campaign criteria and the number of reachable users via mobile push.
Filter by User Properties
Using the With user properties filter in the Who section, you can segment your campaign to only reach users who meet specific criteria.
For example, you can send a push notification to English-speaking female users who live in the United States.
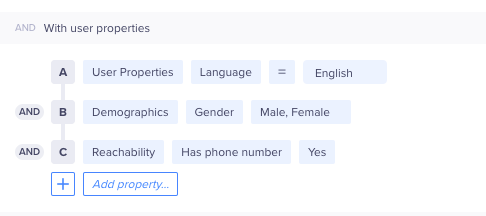
Filter by User Properties
To know more about what segments can be used, see Segments.
Constant event property (Optional)
You can also hold a property constant across the selected events. For more information, see Constant Event Property.
Control Group
You can define a control group to compare and measure the results of your campaign. For more information on control groups, see Control Groups.
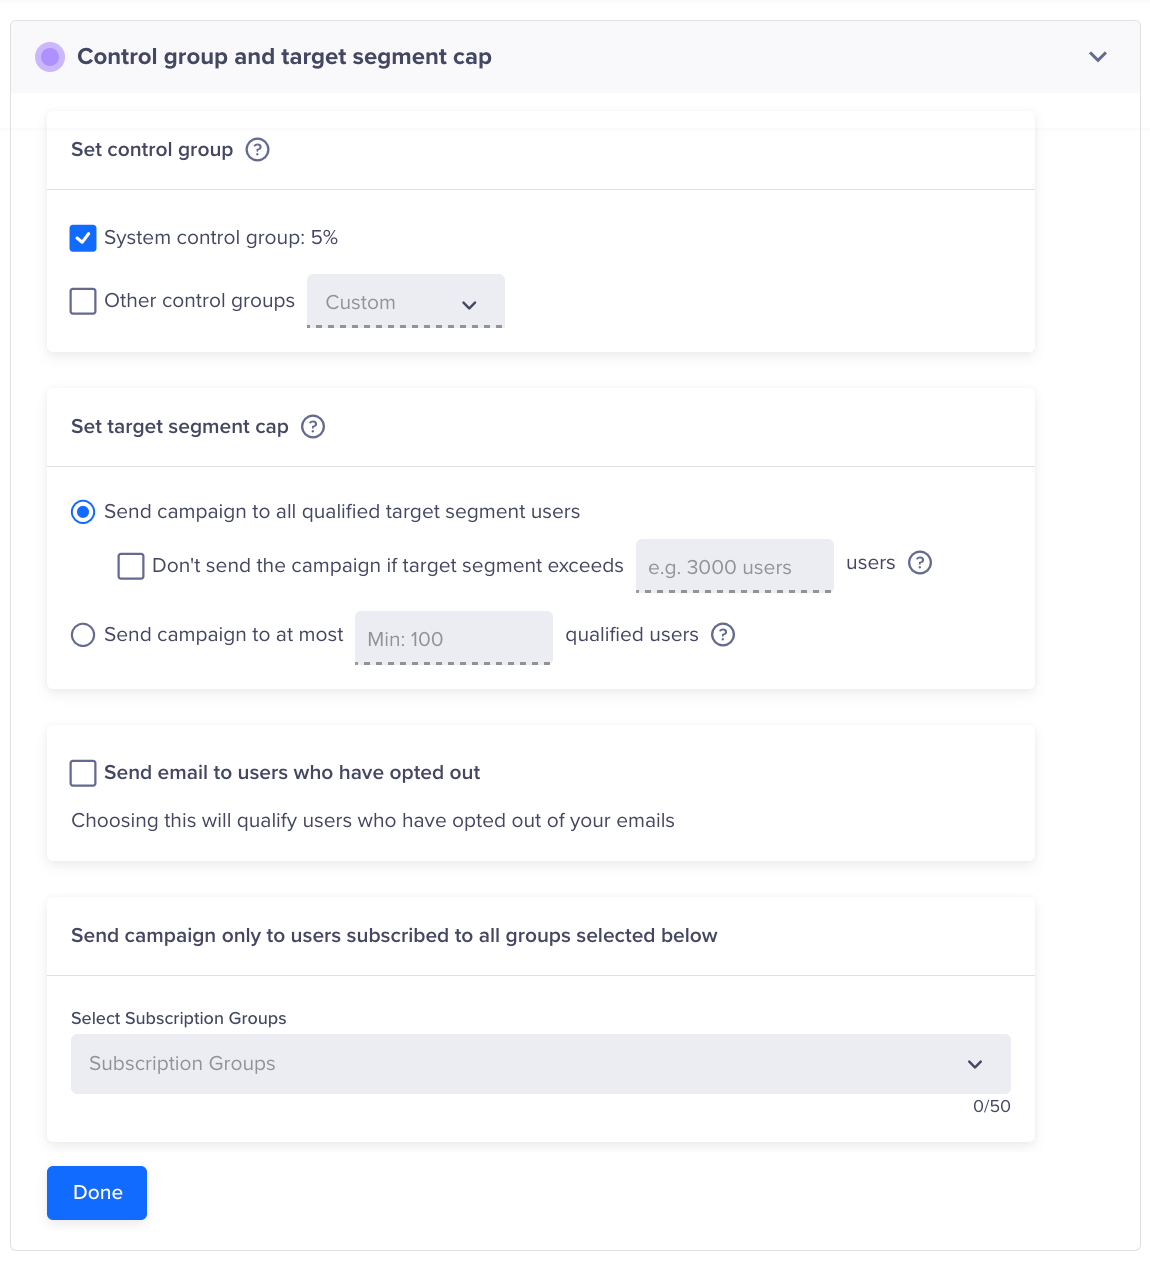
Control Group
Targeting Cap
You can limit the number of users receiving the message.
A relevant use case is a limited offer where you want to distribute a fixed number of coupon codes. If the total reach for your campaign exceeds the number of coupon codes you can distribute, then you can limit the number of users who will receive the message to precisely the number of coupons you want to distribute.
Campaign LimitEnsure that you set up a limit of 100 or more, regardless of the qualified user segment size. If the limit specified is less than 100, an error occurs.

Target Cap
This section explains the campaign creation flow when you are determining who to send your message to. Under the Estimated Reach section, select the option to limit the delivery of the messages to a specified number.
The campaign limits can also be configured using the following options:
- All target segment users: Select this option to send the campaign to all the target segment users. You can also prevent sending out unwanted campaigns by Don't send the campaign if target segment exceeds checkbox and entering the value for the number of users. When selecting this option, a campaign does not run if the number of qualified users exceeds the safety limit. The campaign creator receives an email alert for further action.
- Only: Select this option to limit the number of users for each run of a campaign.
For triggered campaigns based on live user segments, the users receive a message as they qualify until the total quantity specified has been delivered, after which the campaign ends. For campaigns based on Past Behavior Segments, we randomly select the users who receive the message.
Override Communication Preferences for Email
You must use this option only when you want to send critical emails of a non-promotional nature, such as privacy policy updates, legal/regulatory information, and downtime/outage-related updates to customers. To do so, select Send email to users who have opted out of your emails to send the emails to all qualified users, including those who have opted out (i.e., unsubscribed from email campaigns).

Override Communication Preferences for Emails
Once you select this option, you are prompted to confirm that this email is in compliance with spam regulations.
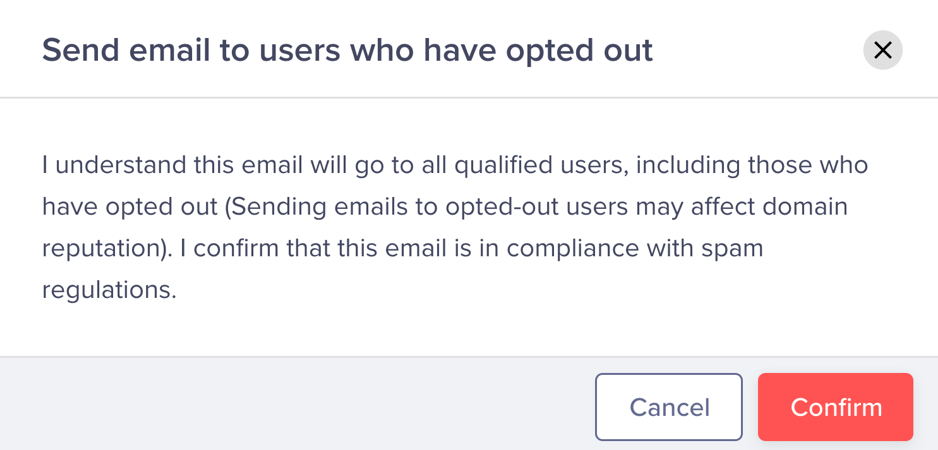
Compliance Confirmation Prompt
As you cannot unsubscribe from this type of email, it is advisable to refrain from including unsubscribe links in these emails. If you still choose to use the unsubscribe links, clicking on the link results in the user being unsubscribed only from promotional emails. If the user is marked unsubscribed at the Email Service Provider's end, this email would still not be delivered to the end user. Therefore, this feature is most effective when using CleverTap’s Handling Unsubscribes method instead of adding ESP-specific unsubscribe links to your emails.
WarningTo avoid spamming the recipient's inbox and potentially harming your domain reputation, exercise utmost caution when enabling this option for your email campaign. It is important to note that any legal issues resulting from the violation of relevant anti-spamming laws will not be the responsibility of CleverTap.
Exclude Unsubscribe groups
Select the subscription groups to exclude from your campaign. For more information, refer to unsubscribe subscription groups in campaigns
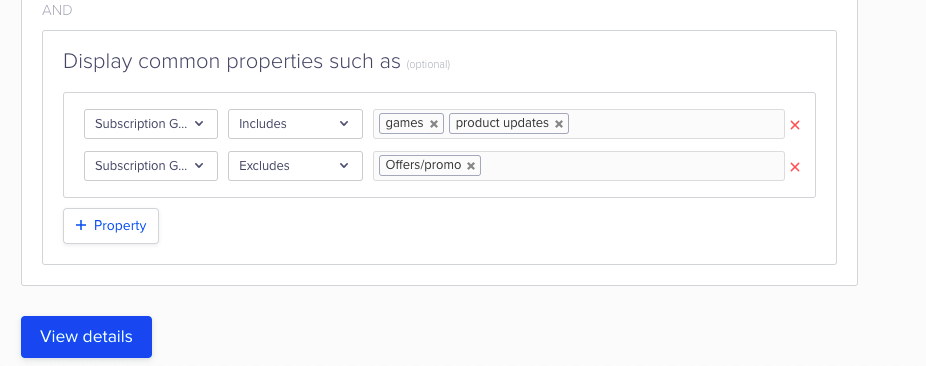
Select Subscription Groups
Include Selected Subscription Groups
Subscription groups allow users to select the content they want to receive, reducing unsubscription rates and fostering strong brand-user relationships. This approach enhances user satisfaction and builds a more personalized connection with your audience.
Select the groups you want to include in your campaign from the Select Subscription Groups list. This allows you to target users who have subscribed to all the groups you selected for the campaign.

Select Subscription Groups
Define the Message Content
Now, you can set up the What which is the email campaign content where you have four different options. Click Go To Editor to create your message.

Select Message Type
Email Editor
Select the templates and create a message. You can also get inbox previews and spam reports for your email message before you send out the campaign. For more information on the Email editor, see Email Editor.
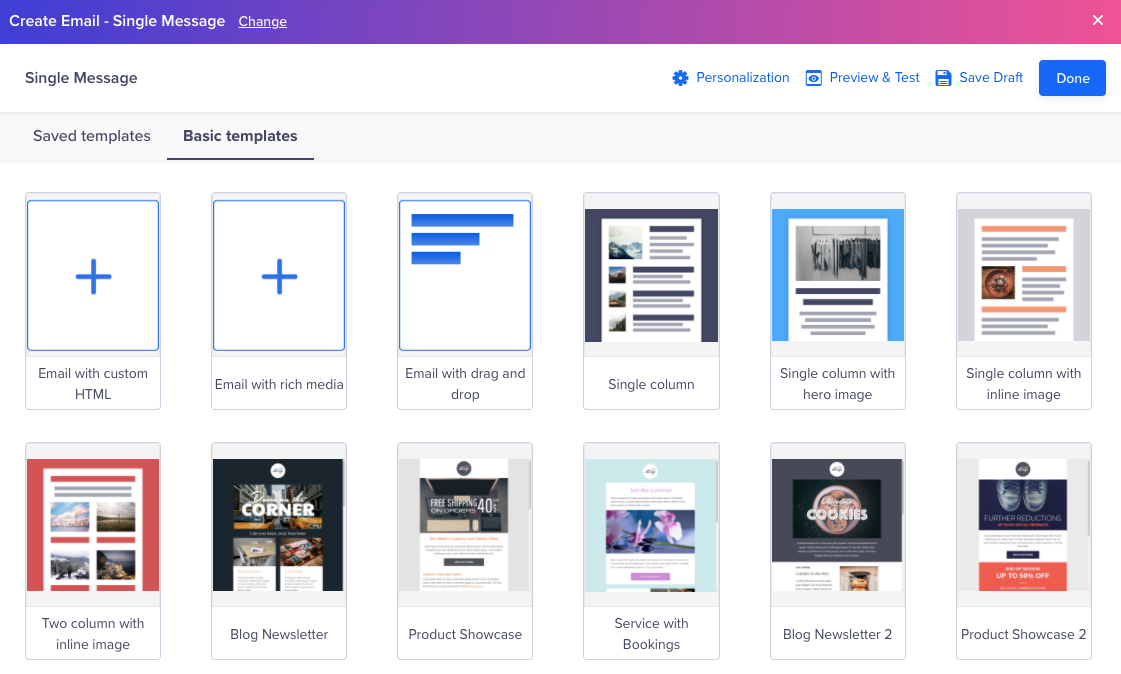
Select Email Editor
Sender Details
After setting up the content of your campaign in the What section, you can configure how your email appears to recipients. This helps ensure that the email adheres to best practices for deliverability and compliance. All the fields under this section can be personalized (see the following image).
Private BetaYou can now add From and Reply To fields in emails for the following providers: Sendgrid, Amazon SES, and Generic SMTP setup. This feature is released in Private Beta.
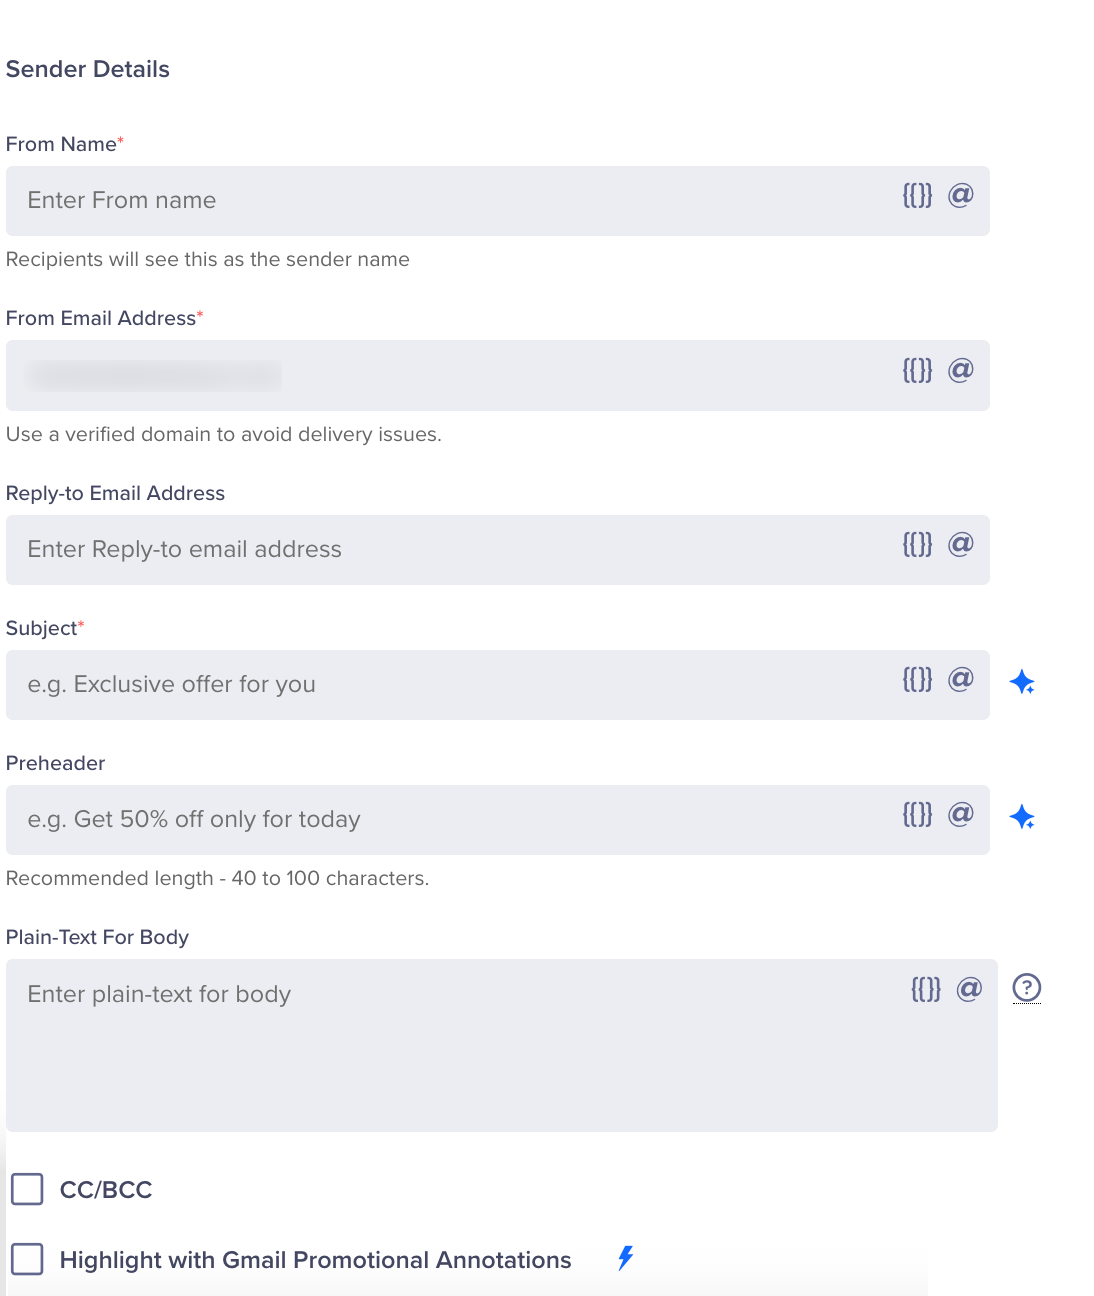
Sender Details
The Sender Details section encompasses the following:
- From: This is a mandatory field. This name is displayed as the sender of the email. It is important as it helps recipients recognize the sender, thereby increasing the likelihood of them opening the email. You can use the personalized value for this field when sending test campaigns, but only if the Send Test Personalization feature is enabled for your account.
- From Email Address: This is a mandatory field. This field specifies the email address from which the campaign is sent to the recipient. A default email address that has been added during the setup under From Address field under the Settings > Email > Providers > Setup page will be pre-populated in this field. You can use the personalized value for this field when sending test campaigns, but only if the Send Test Personalization feature is enabled for your account.
- Reply-to Email Address: This is a mandatory field. This field determines the email address where replies will be directed, ensuring that responses from recipients are sent to the appropriate point of contact. A default email address that has been added during the setup under Reply-to-Address field under the Settings > Email > Providers > Setup page will be pre-populated in this field. You can use the personalized value for this field when sending test campaigns, but only if the Send Test Personalization feature is enabled for your account.
- Subject: This is a mandatory field. It is crucial for grabbing the recipient's attention and giving them a reason to open the email.
- Preheader: This is the short summary text that follows the subject line when the email is viewed in the inbox. It provides additional context and can encourage recipients to open the email. For example, if you are running a campaign for the Black Friday Sale, you can define this text as Get 50% OFF only for today.
- Plain-Text For Body: This text displays in the campaign body if the recipient's inbox provider does not support HTML or formatted text. It can only contain plain text and cannot include images, styled content, or hyperlinks.
- CC/BCC: This field allows you to send a copy of your email campaigns to additional recipients directly from the CleverTap dashboard. For more information, refer to the CC/BCC section.
- Highlight with Gmail Promotional Annotations: This field enables you to highlight your email on the Gmail Promotions tab. Your email can include additional information, such as promotion codes, a featured image, and deal expiration dates. For more information, refer to Gmail Promotional Annotations.
CC/BCC
Private BetaThis feature is released in Private Beta. You can now add CC/BCC recipients in emails for the following providers: Sendgrid, Amazon SES, and Generic SMTP setup
This feature allows users to send a copy of their email campaigns to additional recipients directly from the CleverTap dashboard. Using this feature, brands can ensure that key stakeholders receive necessary email communications simultaneously, facilitating better tracking, compliance, and customer relationship management. Here are some of the use cases:
- E-commerce, Travel, and Hotel brands often need to send email campaigns to their customers and sellers while keeping the respective account managers informed. In this case, the marketers can use the CC feature to copy account managers on all relevant communications, ensuring they stay updated and can provide timely support.
- In the case of the Real estate industry, the realtors can use the CC feature to copy agents or brokers when sending emails to high-intent users to ensure these agents can track and nurture those prospects toward making a purchase.
- FinTech companies can use the BCC feature to discretely send emails to their legal team, ensuring that all communications comply with legal standards without the primary recipient's awareness.
You can add up to a total of 20 CC and BCC recipients to your campaign.
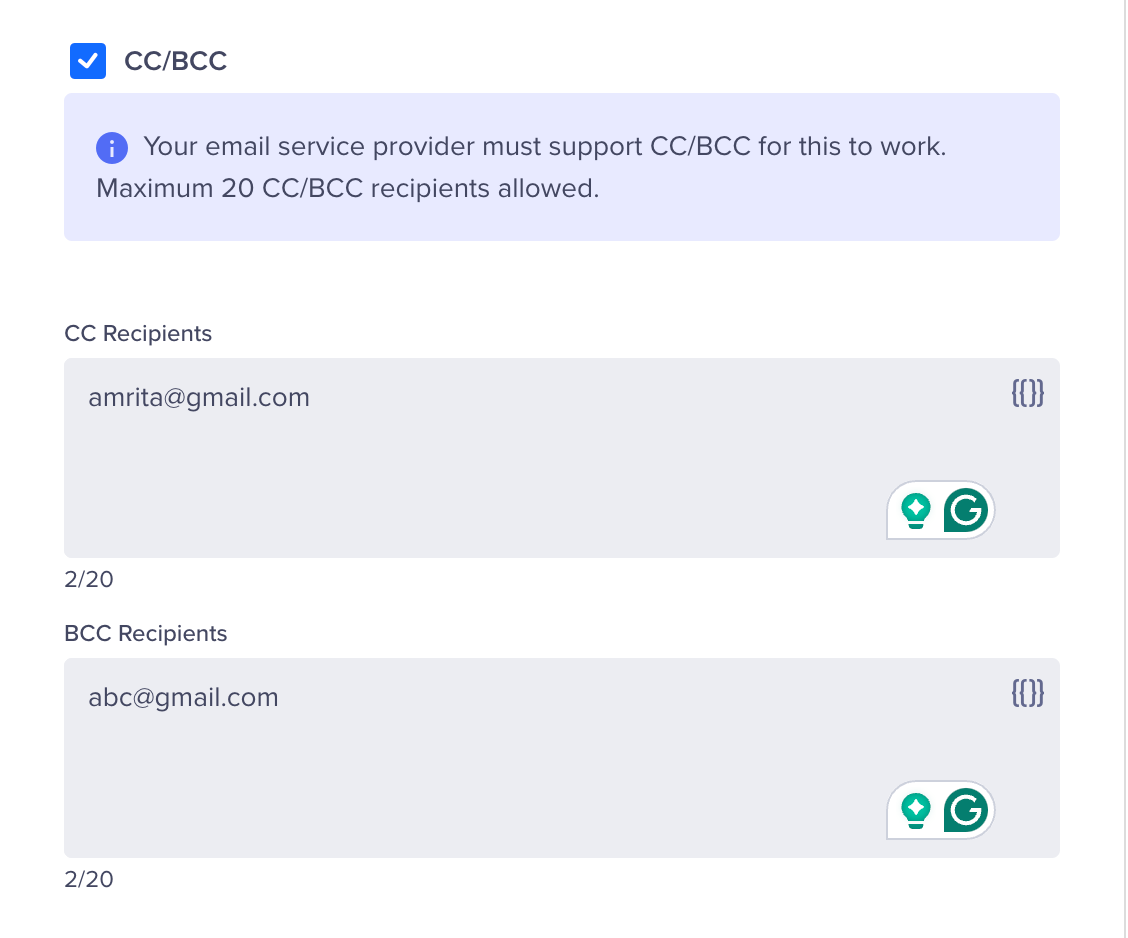
Adding CC/BCC Recipients to Email Campaigns
Key Points to Remember
- In the case of Generic SMTP, ensure that your email service provider supports the CC/BCC feature to use it on CleverTap.
- Using CC/BCC in emails lead to increased email consumption because the copy of each mail sent to the recipient is also sent to the CC and/or BCC recipients, resulting in greater email traffic.
Preview & Test
After setting up the content of your campaign in the What section, you have the option to send a test email notification to any CleverTap user profile you have marked as a Test profile.
Click the Preview & Test button from the message editor to test a message.
You can also check view Inbox Previews and Spam Report.
Message Types
You can create the following types of messages:
- Single Message
- A/B Test
- Split Delivery
- By User Property
Single Message
In this campaign, we send the same message to all users who qualify as your target audience. This message type is best for broadcast messages and for applications that do not vary campaign communication based on differences between properties such as language, geography, or any other user properties.
A/B Testing
A/B testing helps you understand what type of message copy works best to get clicks from users.
You can test up to three message variants on a test group and the variant that gets the most views is declared the winning variant and is automatically sent to the rest of your target audience.
When you create multiple variants for a campaign, you can also auto-copy what is already present in a current variant.
Split Delivery
With split delivery, you can decide what percentage of your audience receives each message variant for the duration of the campaign.
Split Delivery to Past Behavior Segments
For campaigns sent to Past Behavior Segments (grouping of users based on what they have done in the past), you have two options: launch the A/B test to a percentage of your target audience or send out an absolute number of messages. In either case, we deliver the variants equally to the test audience.
For example:
- If you are testing three messages (e.g., Variant A, Variant B, Variant C).
- Your campaign reach is 2,000,000 users.
- You choose a test population of 15% of campaign reach (300,000 users).
Then, we send:
- Variant A to 100,000 users.
- Variant B to 100,000 users.
- Variant C to 100,000 users.
After all 300,000 messages have been delivered, we calculate the winning message over this test group based on the number of views. We then automatically send the winning message to the remainder of your target audience, which is 1,700,000 users in this example.
Note that for A/B testing, we ensure there is always an equal number of messages sent for each variant, so there is no bias introduced during the test phase and that the best-performing message is always declared the winner.
Split Delivery to Live User Segments
With campaigns sent to live user segments (triggered campaigns), messages are delivered immediately when a user’s activity matches the criteria you have selected. For example, you can send a message when the user has completed a booking or purchase. Since it is not possible to determine the reach of triggered campaigns upfront, you need to decide how many total messages to send for A/B testing before a winner is declared.
Triggered Campaign ExampleIf you select 500 users as your test audience, we will alternate delivery of Variant A and Variant B as users qualify for the campaign. After a total of messages are sent (Variant A – 250 and Variant B – 250), we then decide the winner based on the number of views and continue only with this winning message for the duration of the campaign.
Deciding on a test audience for A/B testing triggered campaigns requires some estimation. We recommend you check the total messages that were sent for similar triggered campaigns in the past to get a sense of how many users may qualify. If you select a test audience that is too small such as 25 users, you will get a statistically insignificant sample. If your test group size exceeds the total number of users who ultimately qualify for that campaign, then no winner will be declared and each message variant will be alternatively delivered for the duration of the campaign.
By User Property
If you would like to send different message variants to your target audience based on the user properties they possess, this campaign type is your best bet. A good example would be when you want to send a localized update to people based on their preferred language.
Similar to creating A/B test variants, you can use the + button to add multiple variants based on a user property value. In the example below, we have used the Customer Type user property so users with different customer type property values will receive corresponding copies of the campaign based on their different levels (Silver, Gold, or Platinum).
Define the Campaign Schedule
You can set up the When to schedule the campaign start and end using the options below:
Past behavior campaigns can be scheduled to run:
- On a specific date and time.
- On multiple specified dates and times.
- Recurring at a periodicity you set.
Live campaigns can be set up on a specific event:
- In response to a user event.
- User event/inaction combination (e.g., abandoned cart scenario).
- Based on a date event property value of an event (for example, a reminder for upcoming travel booking).
Delivery preferences
Global campaign limits are limits you can apply to determine how many messages each app user receives per day. If you want to override these settings for an important campaign, you can click on the Don’t apply global campaign limits to this campaign checkbox.
You can also Do Not Disturb (DND) hours during which notifications from this push campaign are prevented from going out, either by discarding them or delaying delivery after DND hours are complete, such as 9 PM to 9 AM.
Since past behavior campaigns can have scheduled times, you have the option to stop a campaign delivery after a certain cut-off time, or even deliver at the specified time in the user’s timezone. For more information, refer to Notification delivery options.
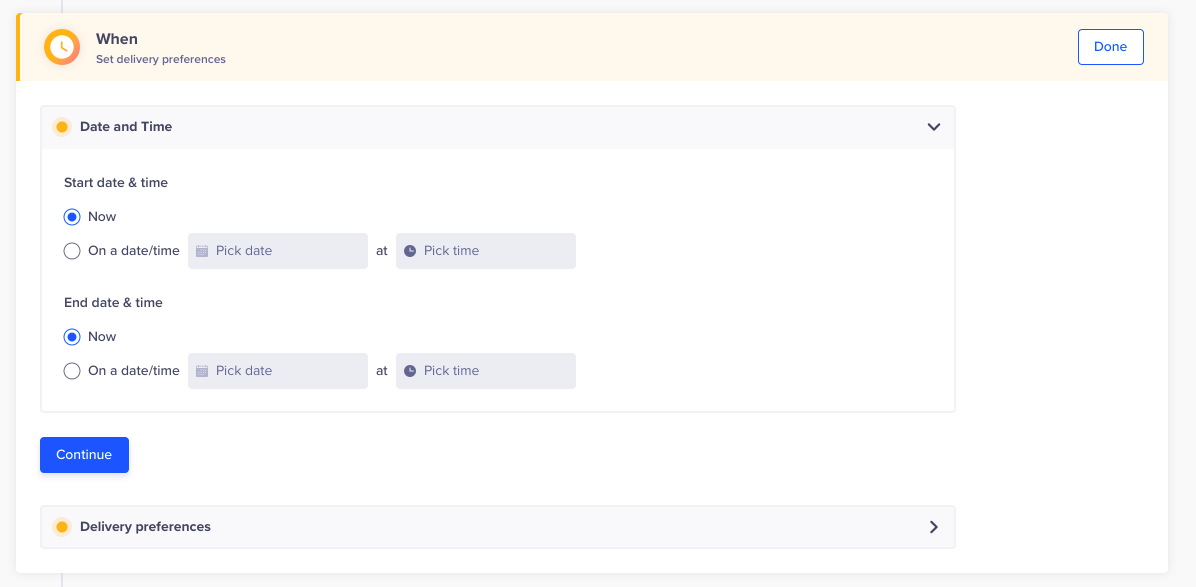
Define - When
Recurring DayIf you specify a recurring day for a campaign such as the 7th of each month, then the campaign will start for the specified day and ignore the creation date. This is a precaution to avoid sending a campaign unintentionally on a prior date.
Publish Campaign
After testing and once you are satisfied with the appearance of your campaign, finalize your campaign with the following steps:
- Click Continue to view your campaign summary. The overview page displays.
- View your campaign summary, then click Publish Campaign.

Publish Campaign
Updated 26 days ago
