As part of our continued commitment to account security and effective collaboration, CleverTap provides Role-Based Access Control (RBAC) to help administrators manage user access across the dashboard.
RBAC enables you to assign role-specific permissions, ensuring that each team member, agency partner, or regional stakeholder has access only to the features and data relevant to their responsibilities. With granular access controls, organizations can manage campaigns, data visibility, and account settings securely and efficiently.
Assign Roles
The admin must invite new users to assign roles and can also reassign existing users' roles. For more information about inviting users to the dashboard, refer to Manage Users.
Components of Access
The following table outlines the available components and their respective subcomponents that can be permissioned when setting up or modifying a role. There are two types of roles: System and Custom. System roles are pre-defined and cannot be changed. For custom roles, an Admin role can configure or assign access to these roles.
• Campaigns: Campaigns, Clever Campaigns • Journeys • Recommendation • Catalogs • Global Campaign Limit (GCL): Define the maximum number of campaigns that can run concurrently • Global Throttle Limit (GTL): Control the number of messages sent per user per day
Real Impact
• Control Groups: Custom Control Group, System Control Group • Real Impact Dashboard
Settings
• Billing: Billing, app usage, plans, invoices • Account Settings: Role-Based Access Control, add new app, change account, timezone, privacy settings, uninstall • User Settings: Invite user, revoke access, account settings • Event and User Properties • CSV Uploads: Profile uploads and external user list • My Profile and Password • Exports: Events and profile exports to Amazon S3 • Downloads: Download profiles • Email Reports: Campaign and Journey reports • Campaign Integration and Settings: Push, Email, SMS, Web Push, Facebook, Google Ads • Campaign Settings: Campaign limits, Best Time settings
Types of Roles
Roles in CleverTap can be broadly categorized as System Roles and Custom Roles. The following sections discuss each of these roles in detail.
System Roles in CleverTap
CleverTap provides four standard system roles. These roles are predefined and cannot be cloned, deleted, or edited.
Role
Description
Key Permissions
Admin
Full and unlimited access to the account.
Assign users to any role (Admin, Creator, Member, or Custom) - Revoke user access - Create, stop, and archive campaigns - Approve/reject campaigns from Creators - View analytics - Download user profiles and reports - Add/update billing details - Modify event and profile schema - Manage security settings (IP Whitelisting, 2FA, Campaign Approval Workflow)
Creator
Create and manage all types of engagement (campaigns, journeys, product experiences).
Create, stop, and delete engagements - View analytics - Download reports -Cannot revoke user access or view billing details.
Member
Read-only access to view analytics and reports.
View campaign performance - Access dashboards and reports
Approver
Approve campaigns created by users in the Creator role.
Assign users to Creator, Member, or Custom Roles - Create, stop, and archive campaigns - Approve/reject campaigns from Creators - View analytics - Download user profiles and reports
Custom Roles in CleverTap allow administrators to define and assign precise access controls based on specific business needs. You can configure permissions at a granular level—across components, engagement features, and data access—ensuring that each user has access only to what’s relevant to their role. Custom Roles are of two types:
Basic Custom Role: Allows you to provide access to dashboard components and engagement permissions.
Advanced Custom Role: Allows you to define data access at a granular level, as well as dashboard components and engagement permissions.
Define Access for Custom Roles
Once a custom role is created, administrators can configure specific permissions for components, engagement features, and data access to ensure each user has appropriate and secure access based on their responsibilities.
Define Access for Basic Custom Roles
Basic Custom Roles refer to user-defined roles that are not tied to advanced data segmentation or user property filters. These roles allow you to control access at the component level—such as Boards, Campaigns, or Analytics—based on standard read/write permissions.
Administrators can assign a Basic Custom Role when inviting new users or by cloning and modifying an existing role.
To define a Basic Custom Role, configure the following:
Access Level :
Read Access: Grants view-only access to the selected component. Users can see the data (such as campaign statistics) but cannot make changes or download content.
Write Access: Grants full access to create, edit, and manage the selected component, including modifying configurations such as throttle limits.
Component: Choose the feature or module (such as Campaigns or Journeys) to which the user should have access.
Engagement Permissions: Use this setting to control which roles can engage with users through specific channels and apply global campaign or throttle limits as required.
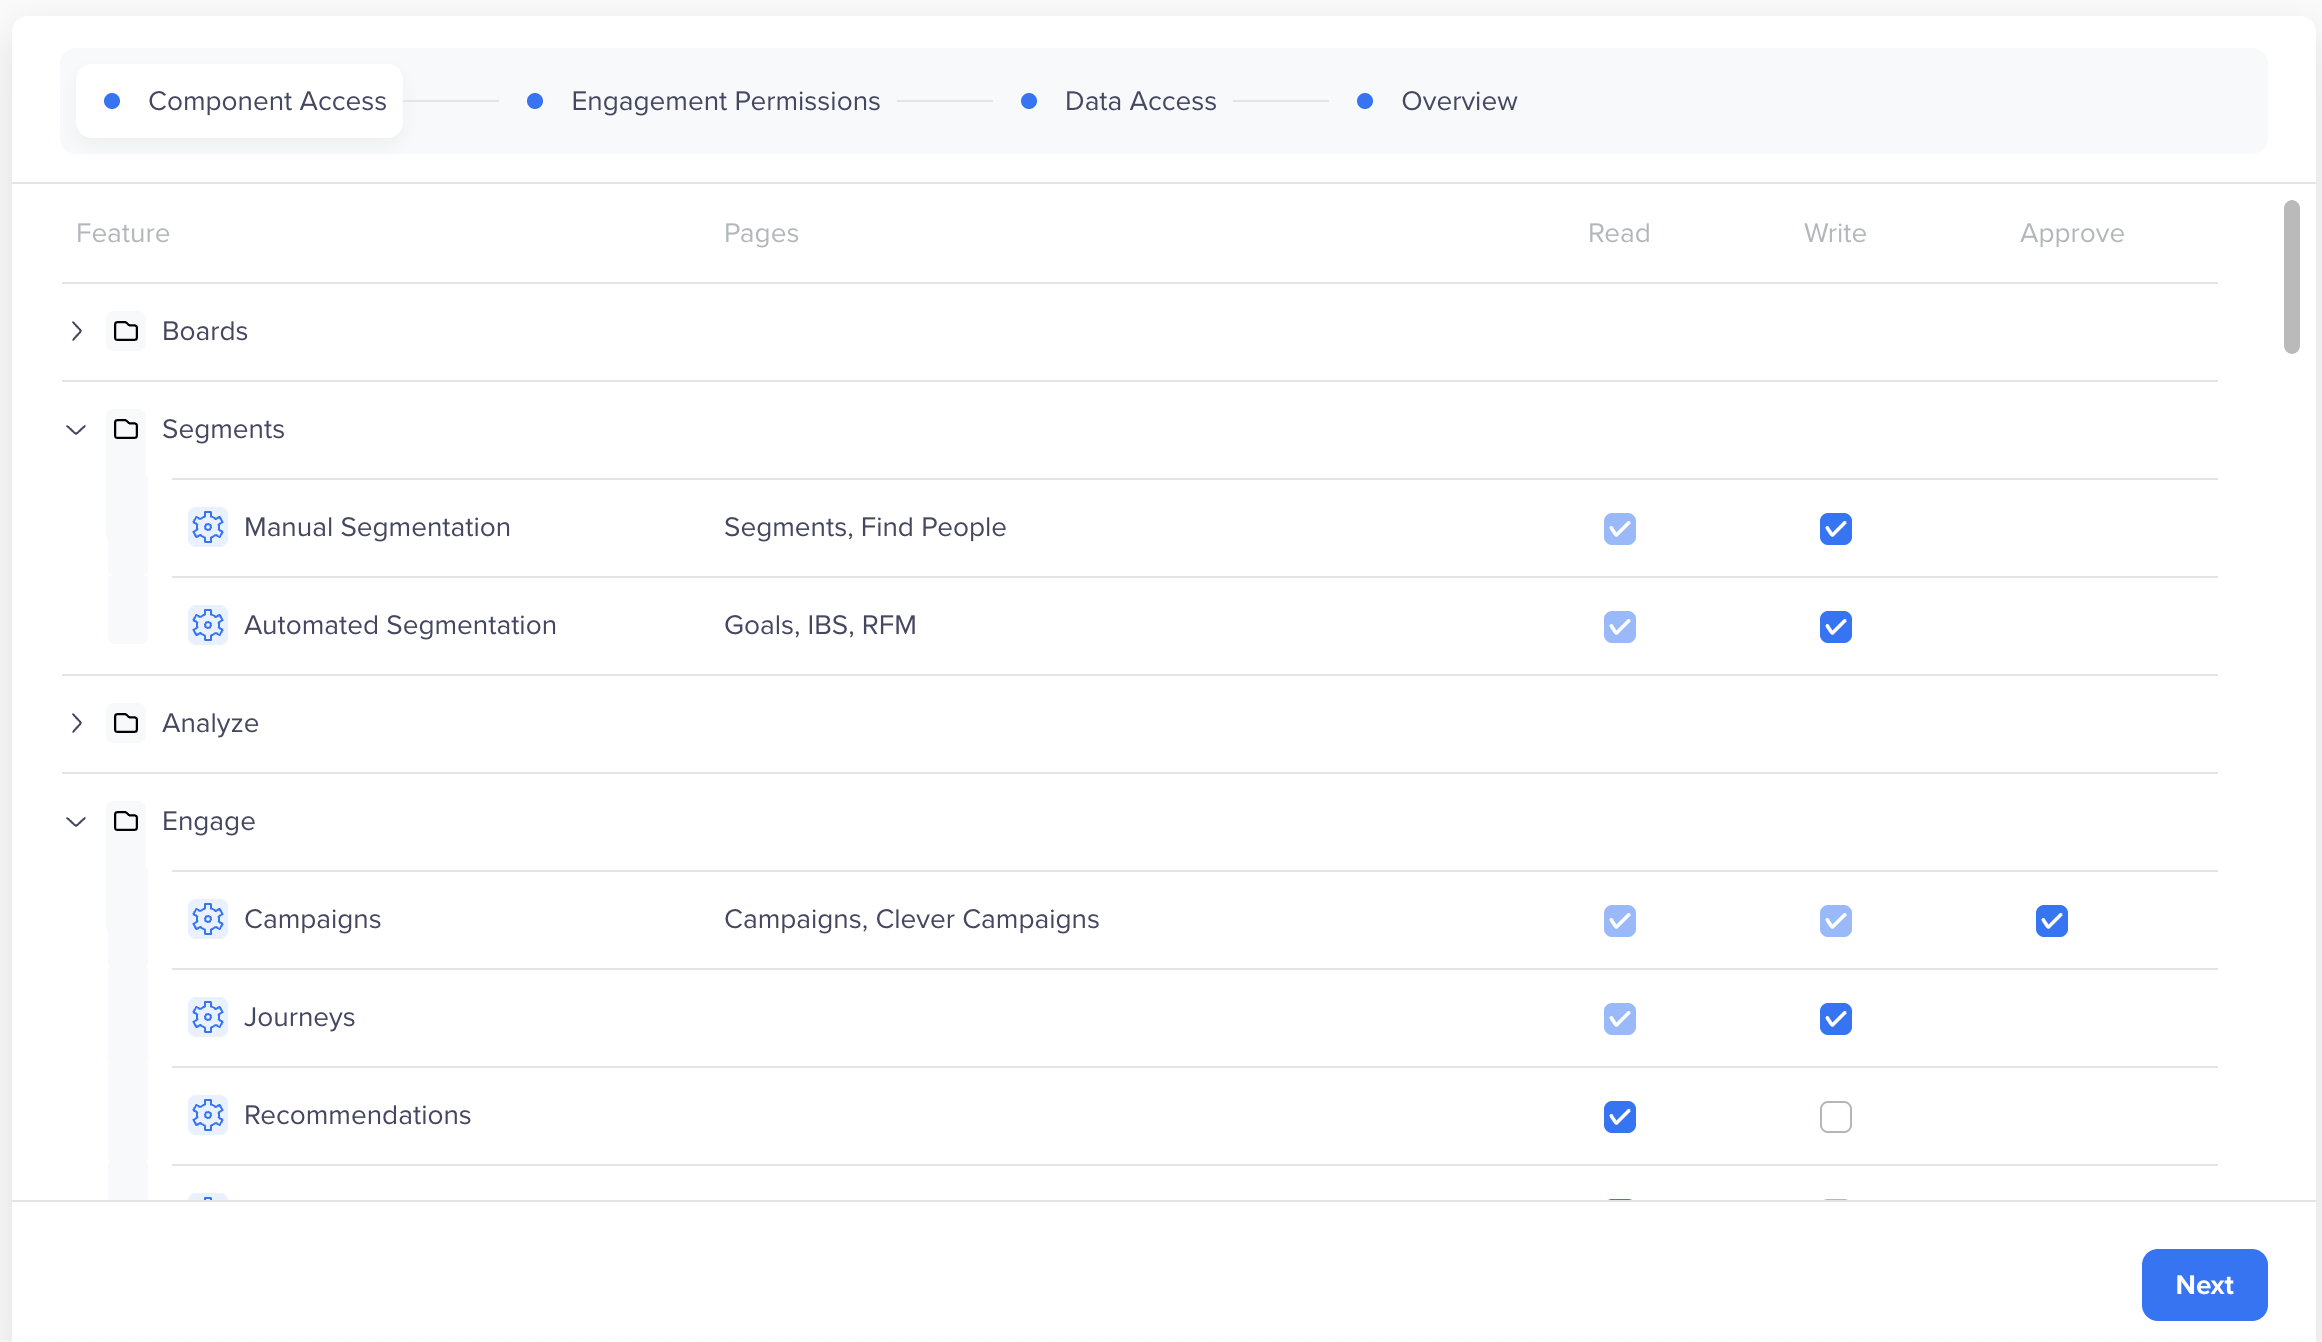
Component Access
You can assign granular permissions to the users for each component. Define which components are available to the user role. You can specify whether the users must have complete or restricted access to Campaigns and Journeys limits. For more information, refer to Components of Access.
Provide Component Access
📘
Template Locking
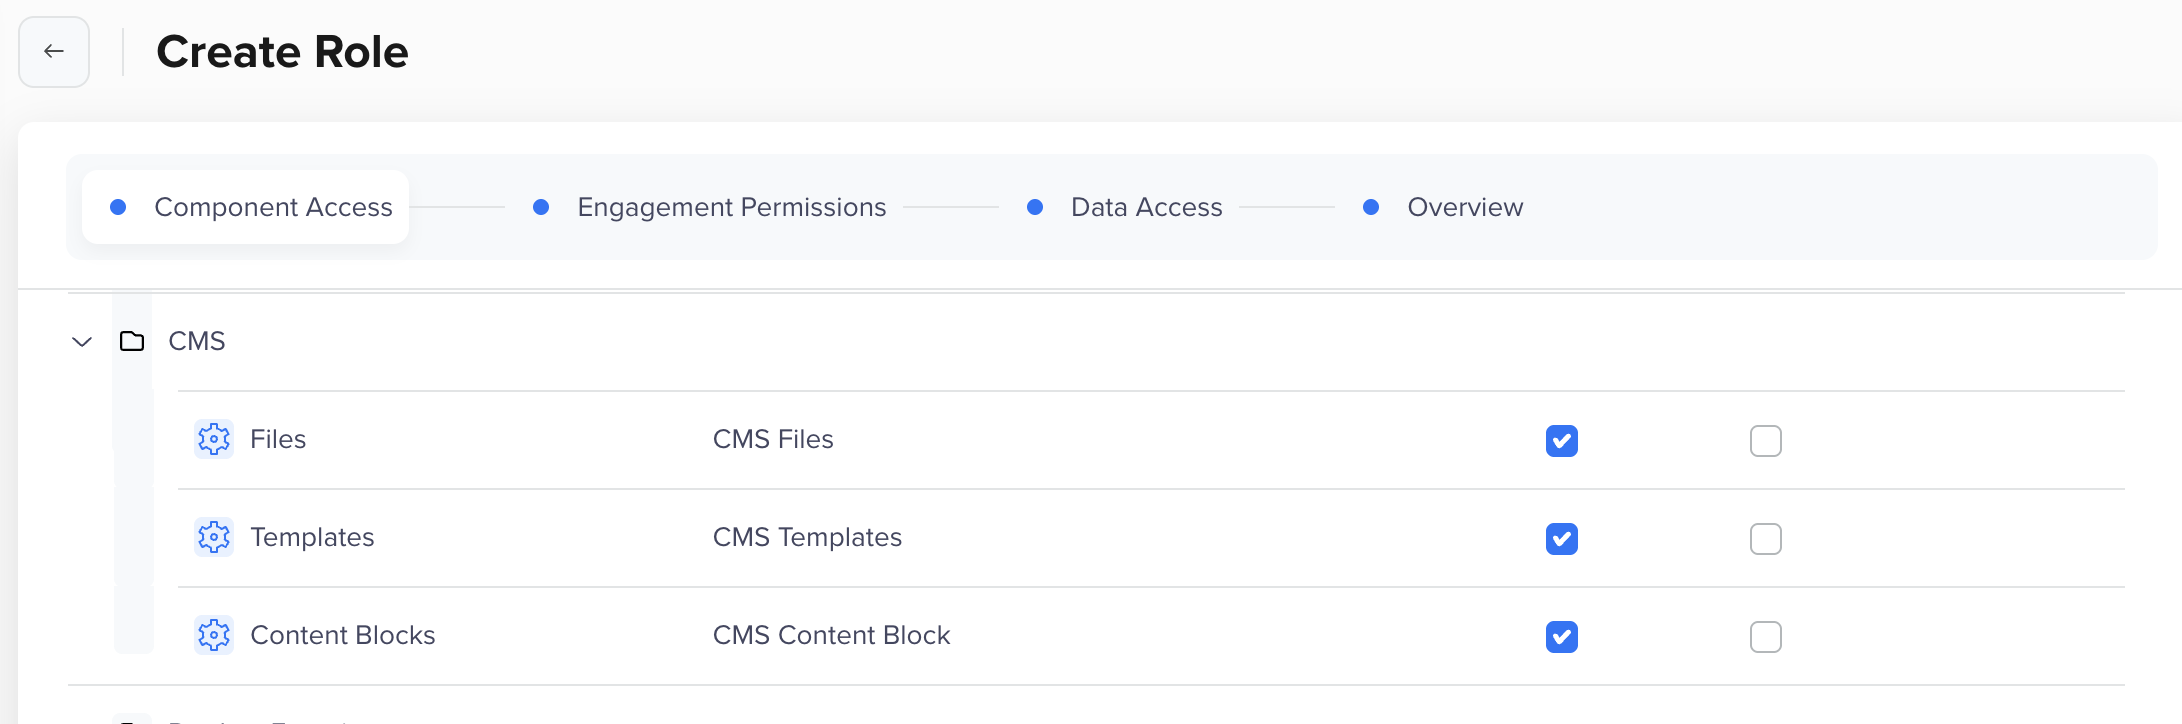
RBAC governs read, create, update, and delete permissions for email templates in both Campaigns and CMS.
The Component Access step in role creation allows admins to configure these permissions.
As shown in the following image, you can selectively disable write access for templates, files, and content blocks. This will lock templates from being edited by users with restricted roles.
CMS Access
📘
Note
Currently, this feature is released in Private Beta. If you want access to this feature, contact your Account Manager.
The following table outlines what users can do with email templates in Campaigns and CMS, based on their access level.
Access Level
Campaigns
CMS
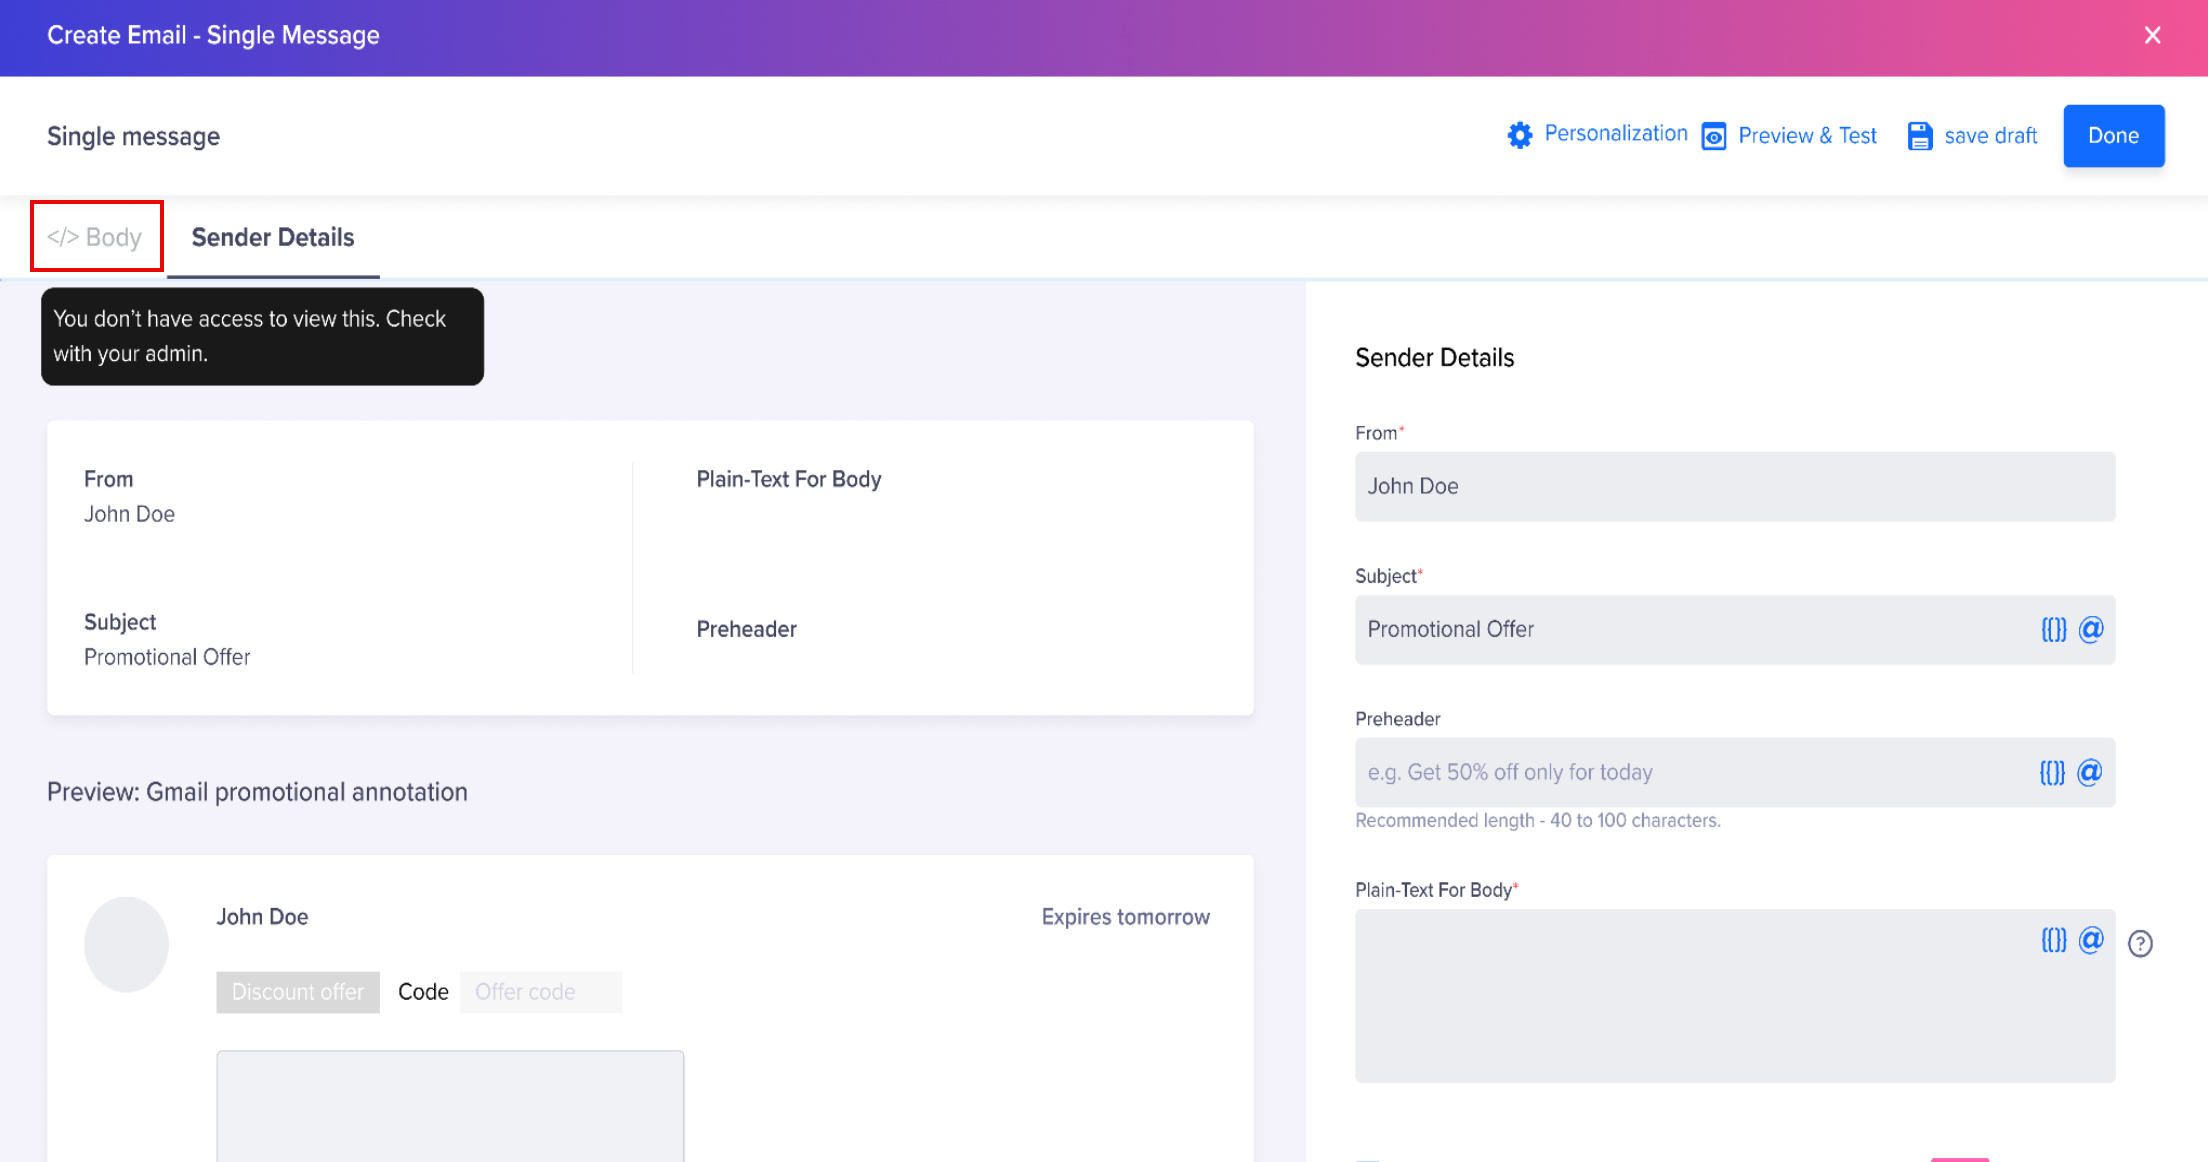
Read-only with template lock
Users can preview, test, and send emails using templates, but cannot modify the template content, including the email body. Sender details can be edited.
Users can view existing templates.
Read+Write
Users can edit templates only if an admin has explicitly granted them edit permissions.
Users can create and edit templates.
Default Behavior for Read-only
Templates are locked for editing. Only preview, test, and send actions are allowed.
Read-only view of templates unless write access is granted.
The following image illustrates how users with limited permissions experience template editing restrictions, where the Body tab is locked.
Edit Lock for Email Body
This restriction ensures that only authorized users can modify the template body, preserving content integrity and reducing the risk of accidental changes.
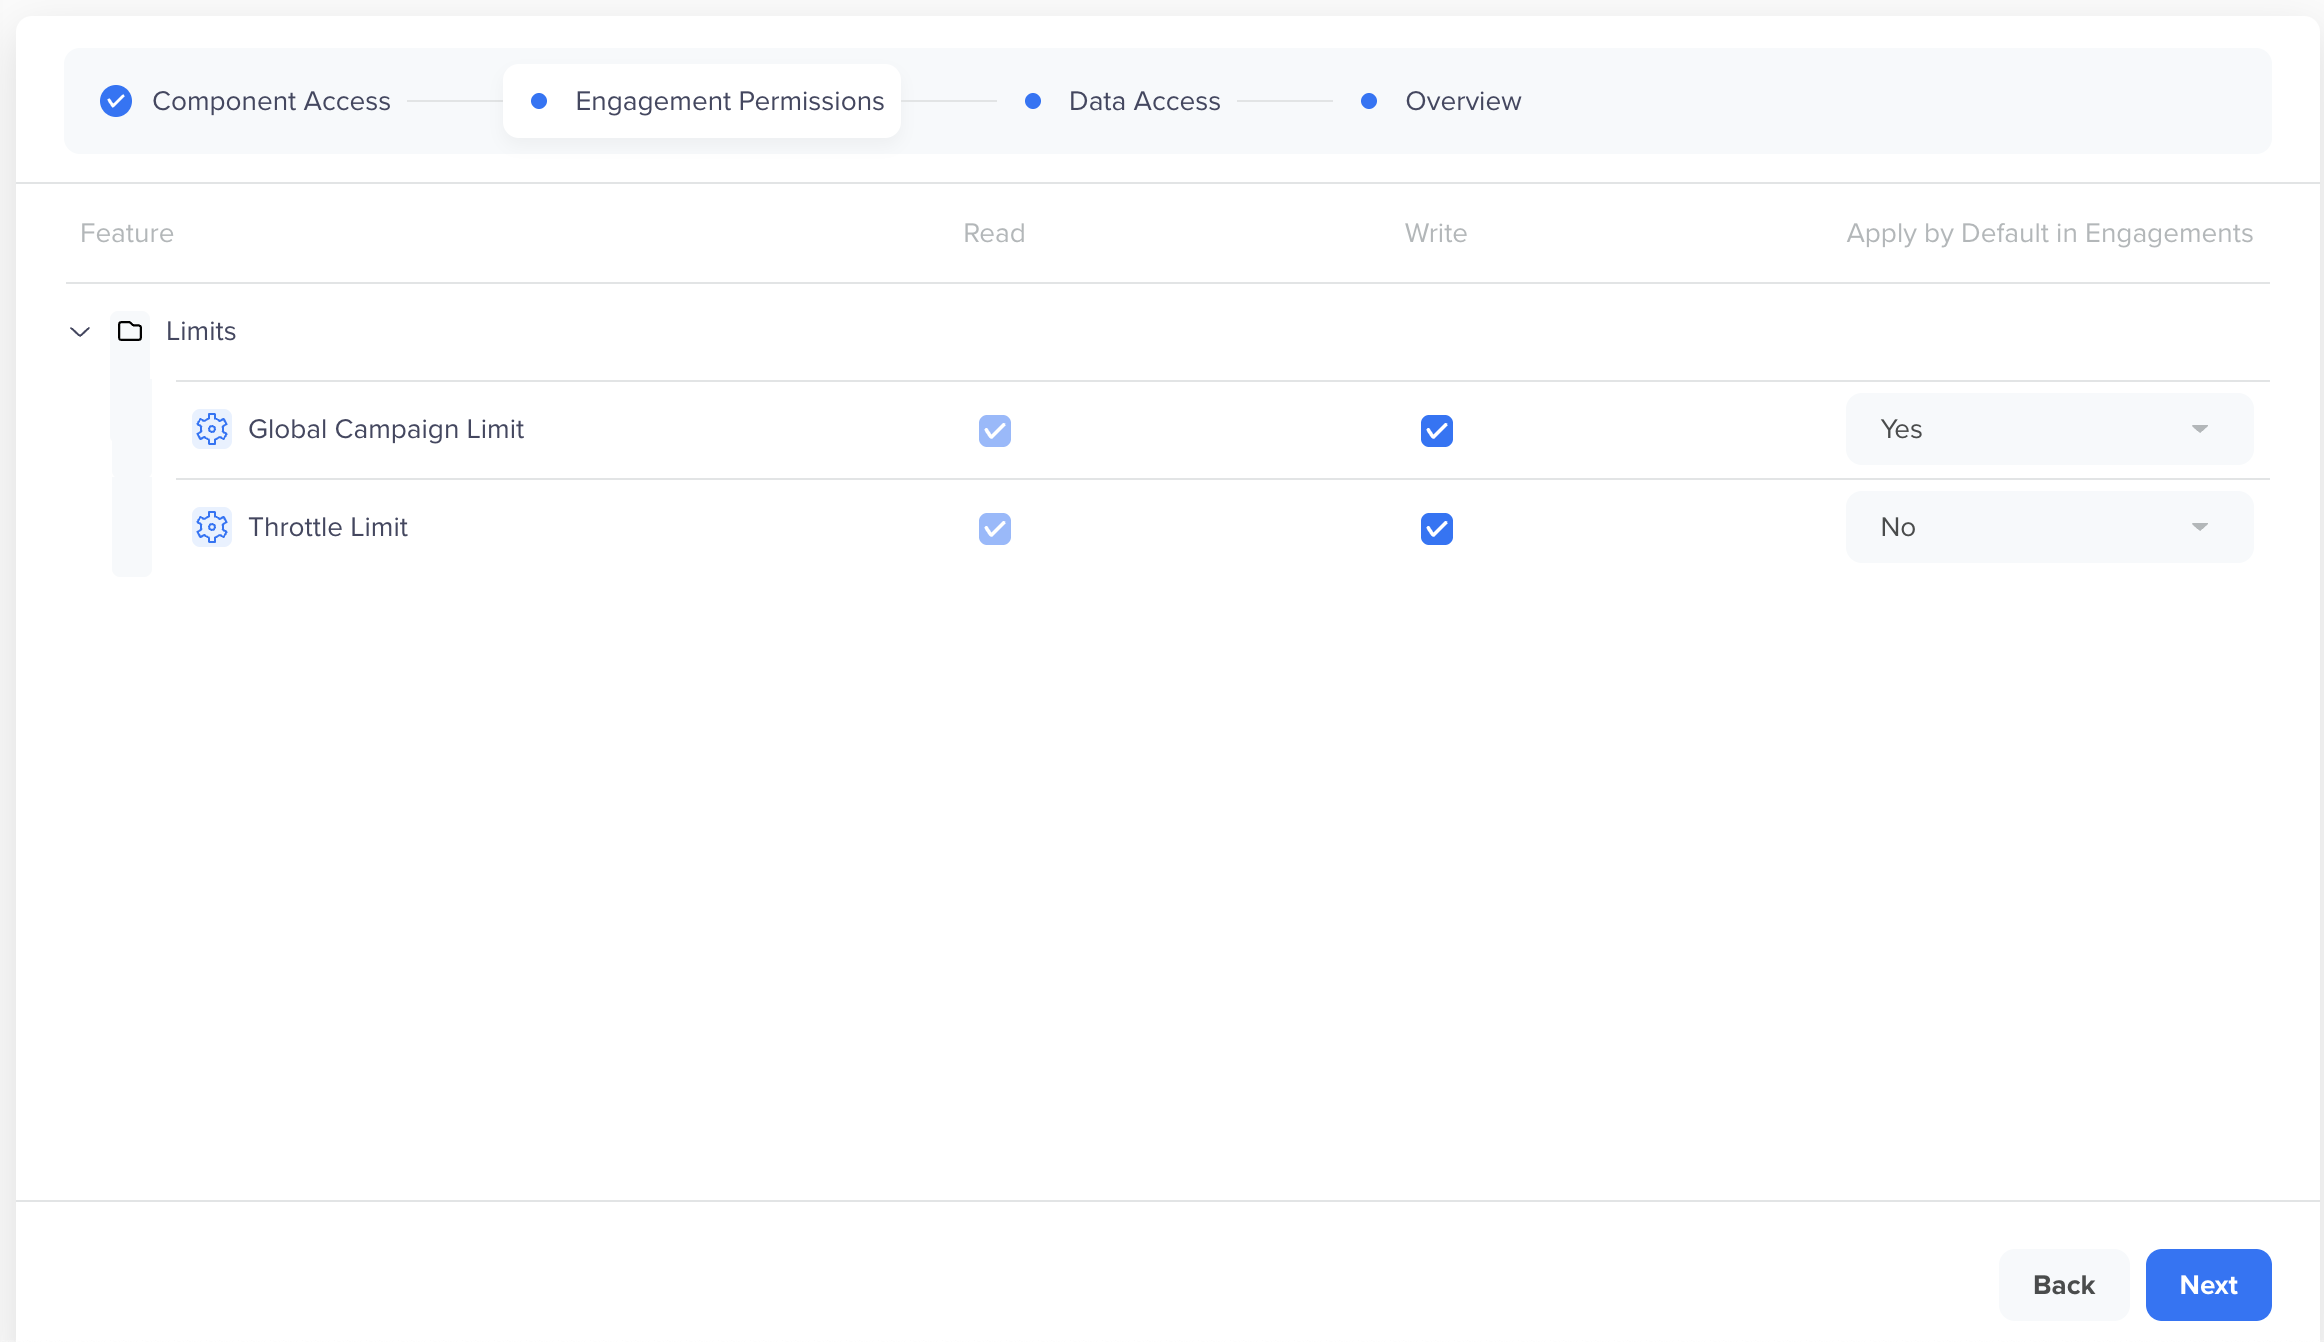
Engagement Permissions
This tab is visible only to users with Write access to engagement components, such as Campaigns and Journeys.
Engagement Permissions
The following table explains the Global Campaign and Throttle Limit for user roles when creating or editing an engagement, that is, Campaigns or Journeys:
Read
Write
Apply by Default in Engagements
User Access Provided
Yes
Yes
Yes
The limit is applied by default. Users can choose to enable or disable it based on the use case. For example, a team member sending both transactional and promotional messages can choose to apply limits only to promotional campaigns.
Yes
No
Yes
The limit is applied by default for this role. Users can view the specified limit but cannot modify it. For example, a marketer sending regular promotional messages can see the applied limits but cannot adjust them—ensuring adherence to predefined sending limits.
Yes
Yes
No
The limit is not applied by default. Users can choose to apply the limit if needed. For example, a team member who mainly sends transactional messages but occasionally runs promotional campaigns can enable limits when required.
Yes
No
No
No limits are applied. Users can view the limit but cannot change it. For example, a team member responsible for transactional messages does not have limits enforced to ensure critical communication is always sent.
You can view the impact of assigned permissions when creating campaigns or journeys. For more information, refer to Global Campaign and Throttle Limits.
Define Access for Advanced Custom Roles
Custom roles can be mapped to user groups for advanced role-based access control. You can give various users access to different datasets and restrict access to the data you do not want them to view on the CleverTap dashboard. Administrators can also restrict data access to new custom roles based on selected user properties, such as geographies. Users assigned to these roles are limited to only read/modify the data available to the particular role.
For example, you can grant access to the role US Campaign Manager, which has write access to campaigns for only users in the United States. This role cannot create campaigns for users in other geographies.
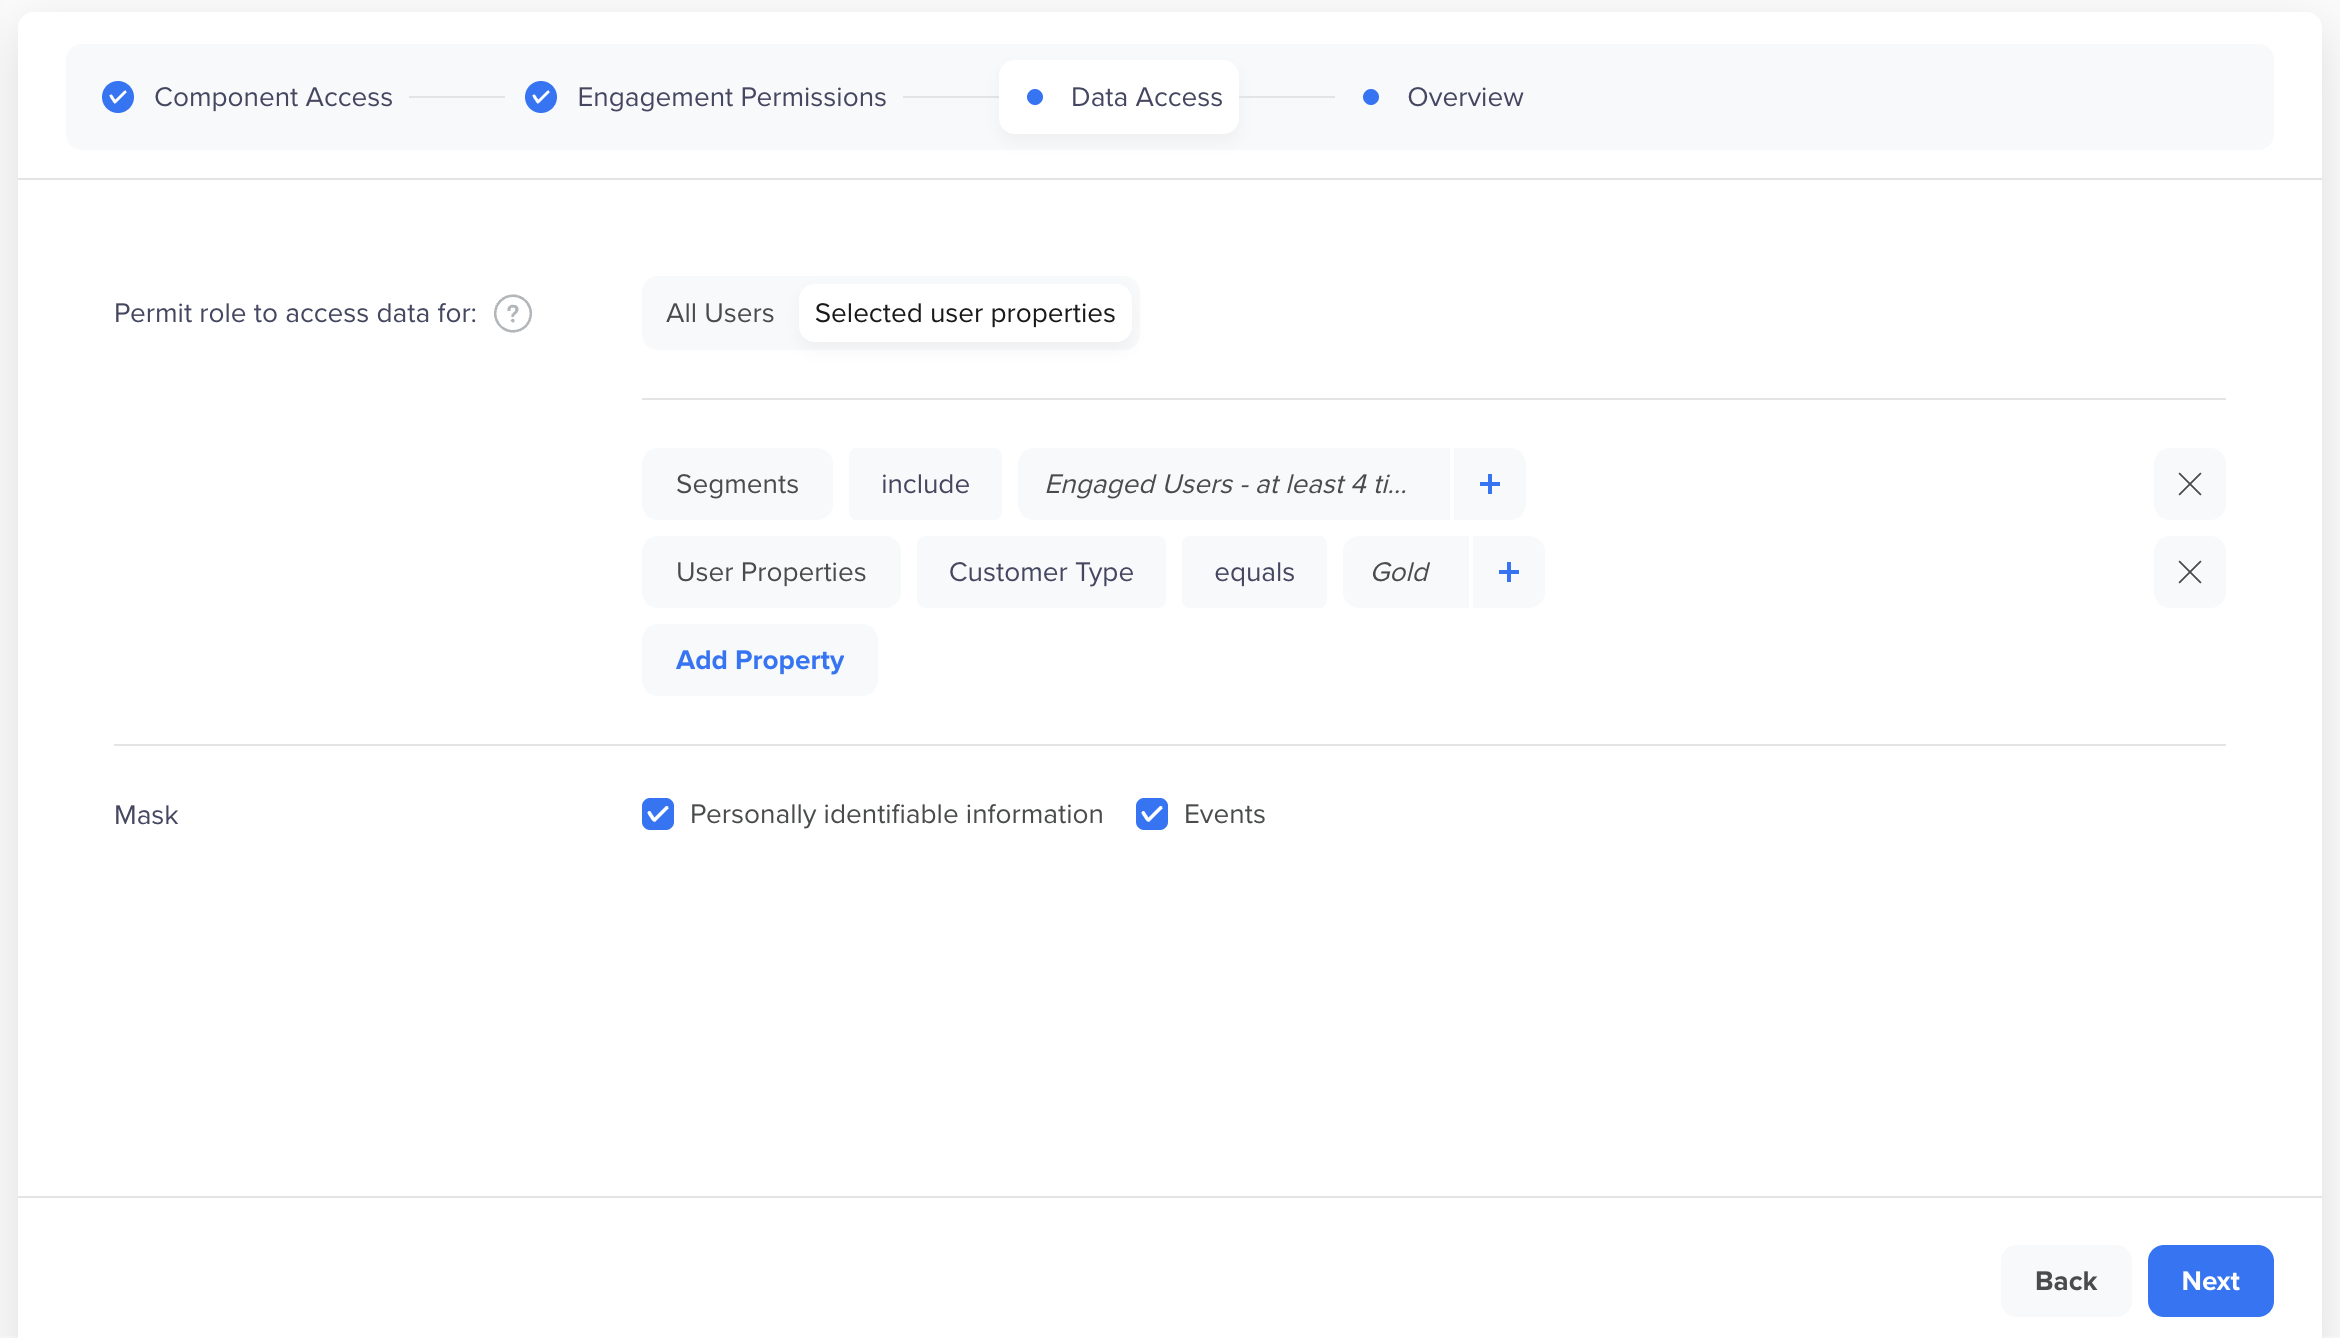
Data Access and Segment Restrictions
The Advanced Custom Roles allow configuring Data Access permissions. In addition to the Components Access and Engagement Permissions tab, the Data Access tab allows you to define which users a role can view and interact with on the CleverTap dashboard.
You can choose to grant access to all users or apply filters using user properties or predefined segments to restrict access.
This functionality helps enforce role-based data visibility, which is particularly useful for distributed teams, regional ownership, and compliance-driven environments.
Example 1: Regional Access by User Property
A regional marketing manager for France is assigned a role with a user property filter where Country = France. Even when viewing "All Users" reports, the manager will only see data related to users in France. Information from other regions remains inaccessible.
Example 2: Segment-Based Access
A custom role is restricted to:
Users in the segment Engaged Users – at least 4 times
Users with the Customer Type = Gold
This ensures that the user can only access data for a specified user base—even when broad filters such as “All Users” are selected.
Map User Properties and Events
📘
Note
When you restrict access using a user property or segment, the limitation applies globally—even if the role attempts to view All Users.
You cannot assign more than one segment role per user.
Masking Personally Identifiable Information and Events
This option allows you to mask personal information such as Email, Phone number, Location, Gender, User properties, other sensitive data, and the event activity of a user profile for the specific user role.
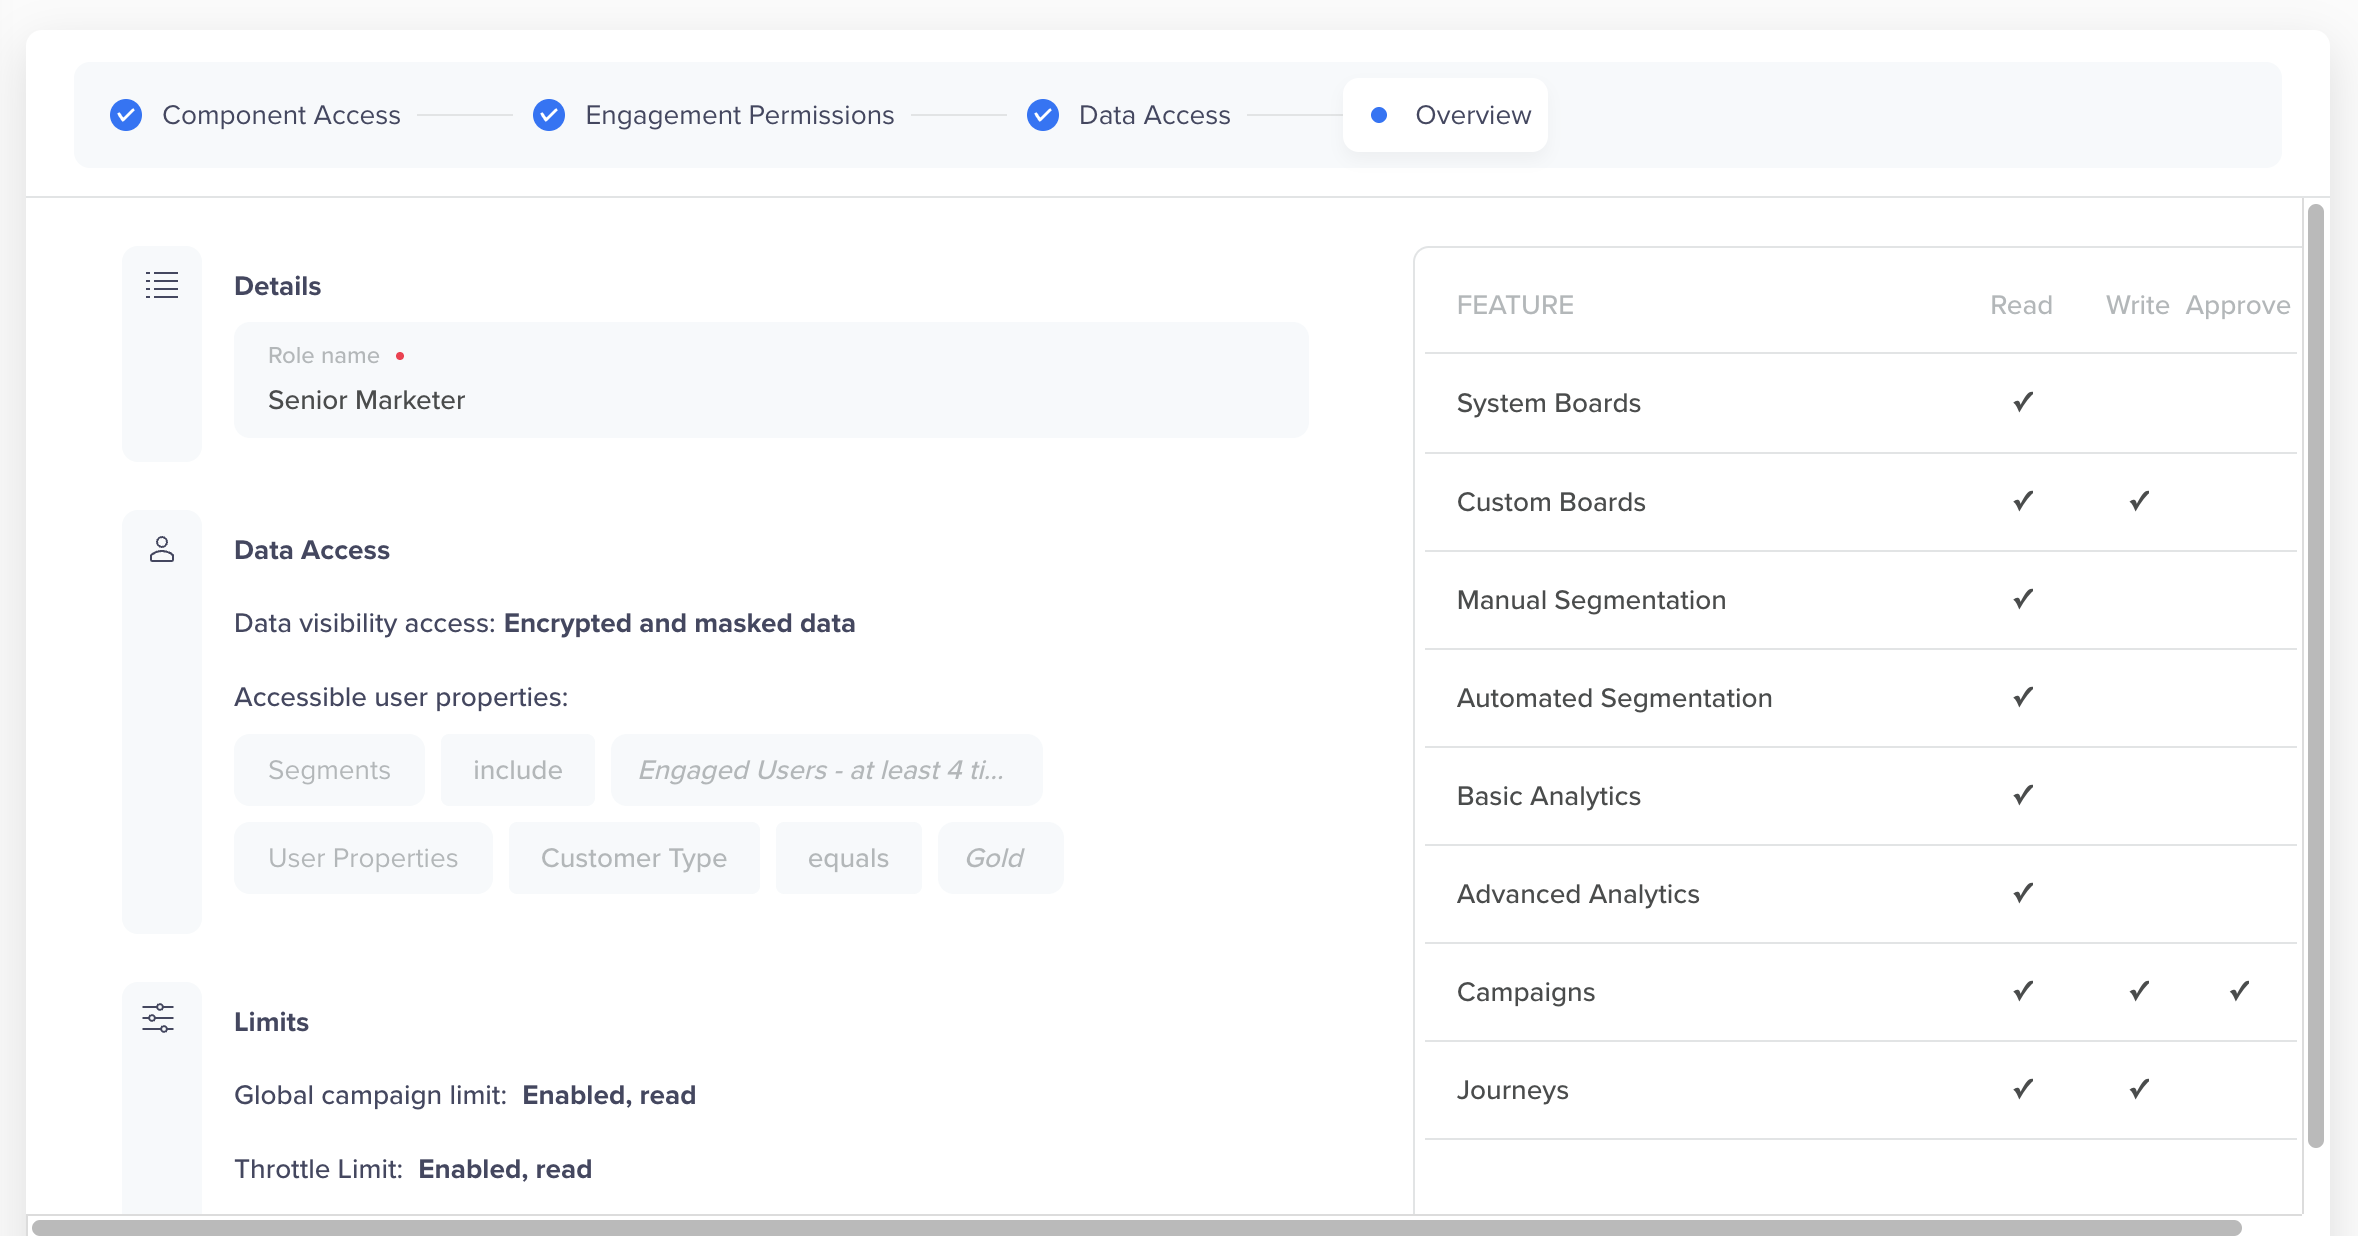
Access Overview
The Overview tab provides a summary of the role configuration, including role name, assigned permissions, data access settings, and engagement limits. This view allows administrators to quickly review and validate all access controls before finalizing the custom role.
Role Overview
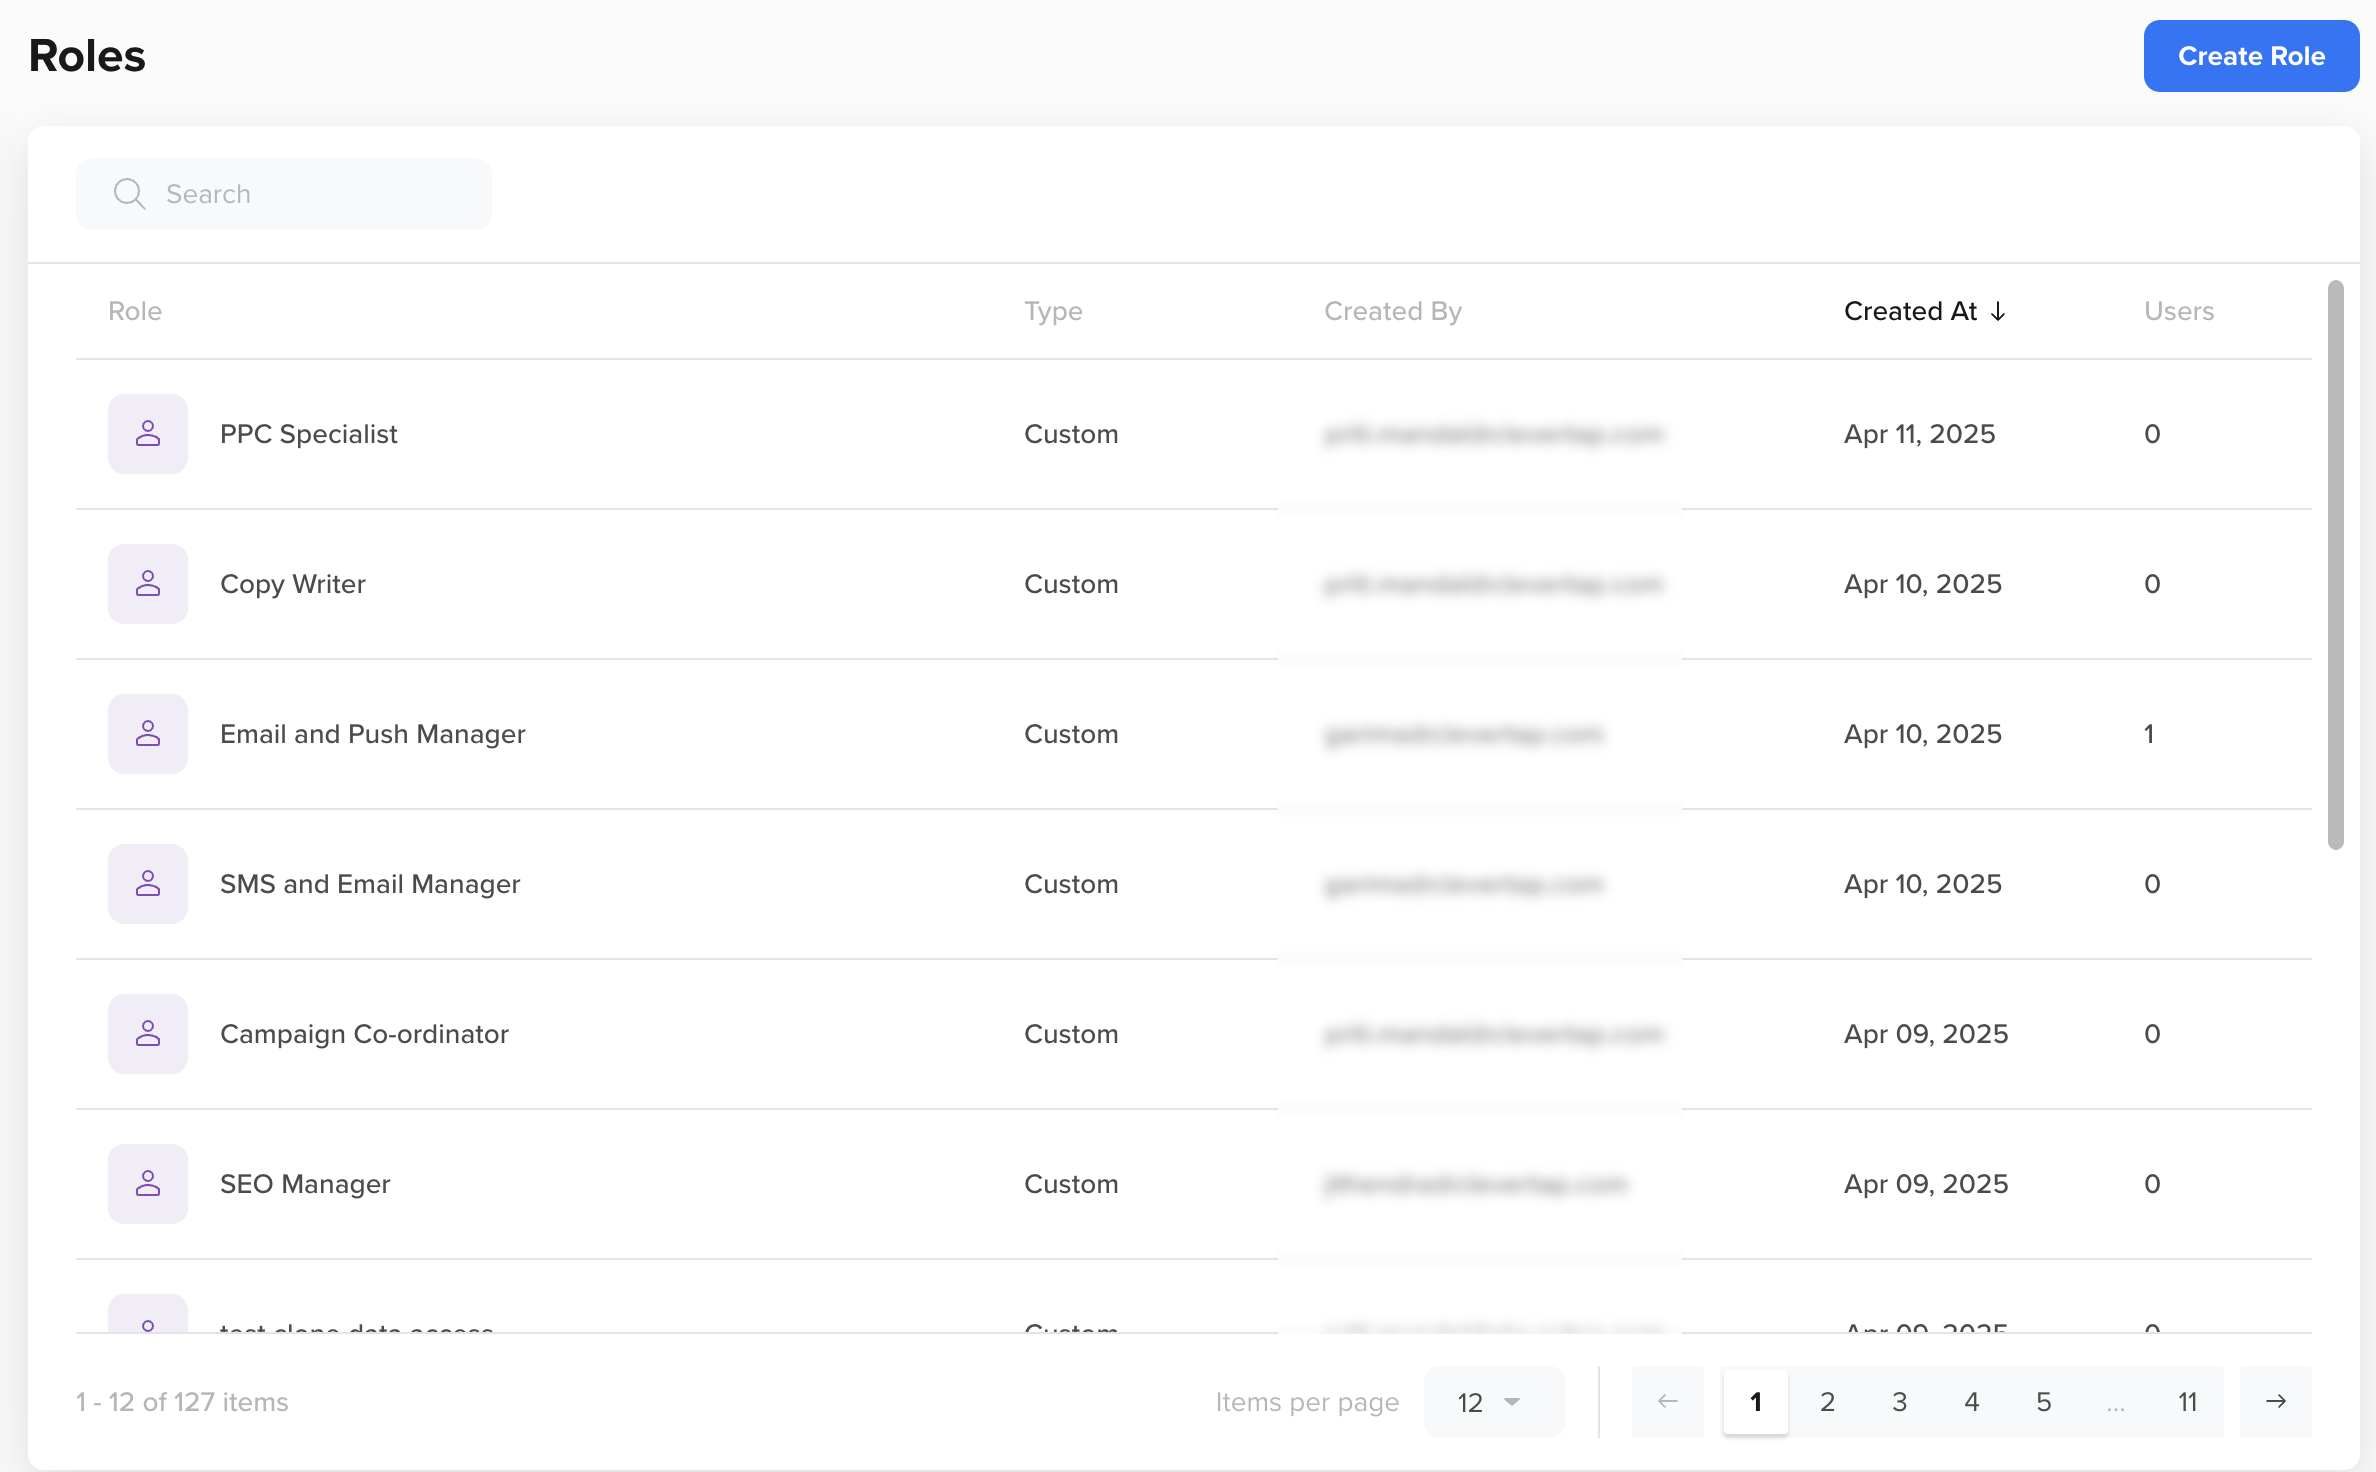
Create Custom Roles
To create a custom role, perform the following steps:
Navigate to Settings > Roles from the dashboard.
Click Create Role.
Create a New Role
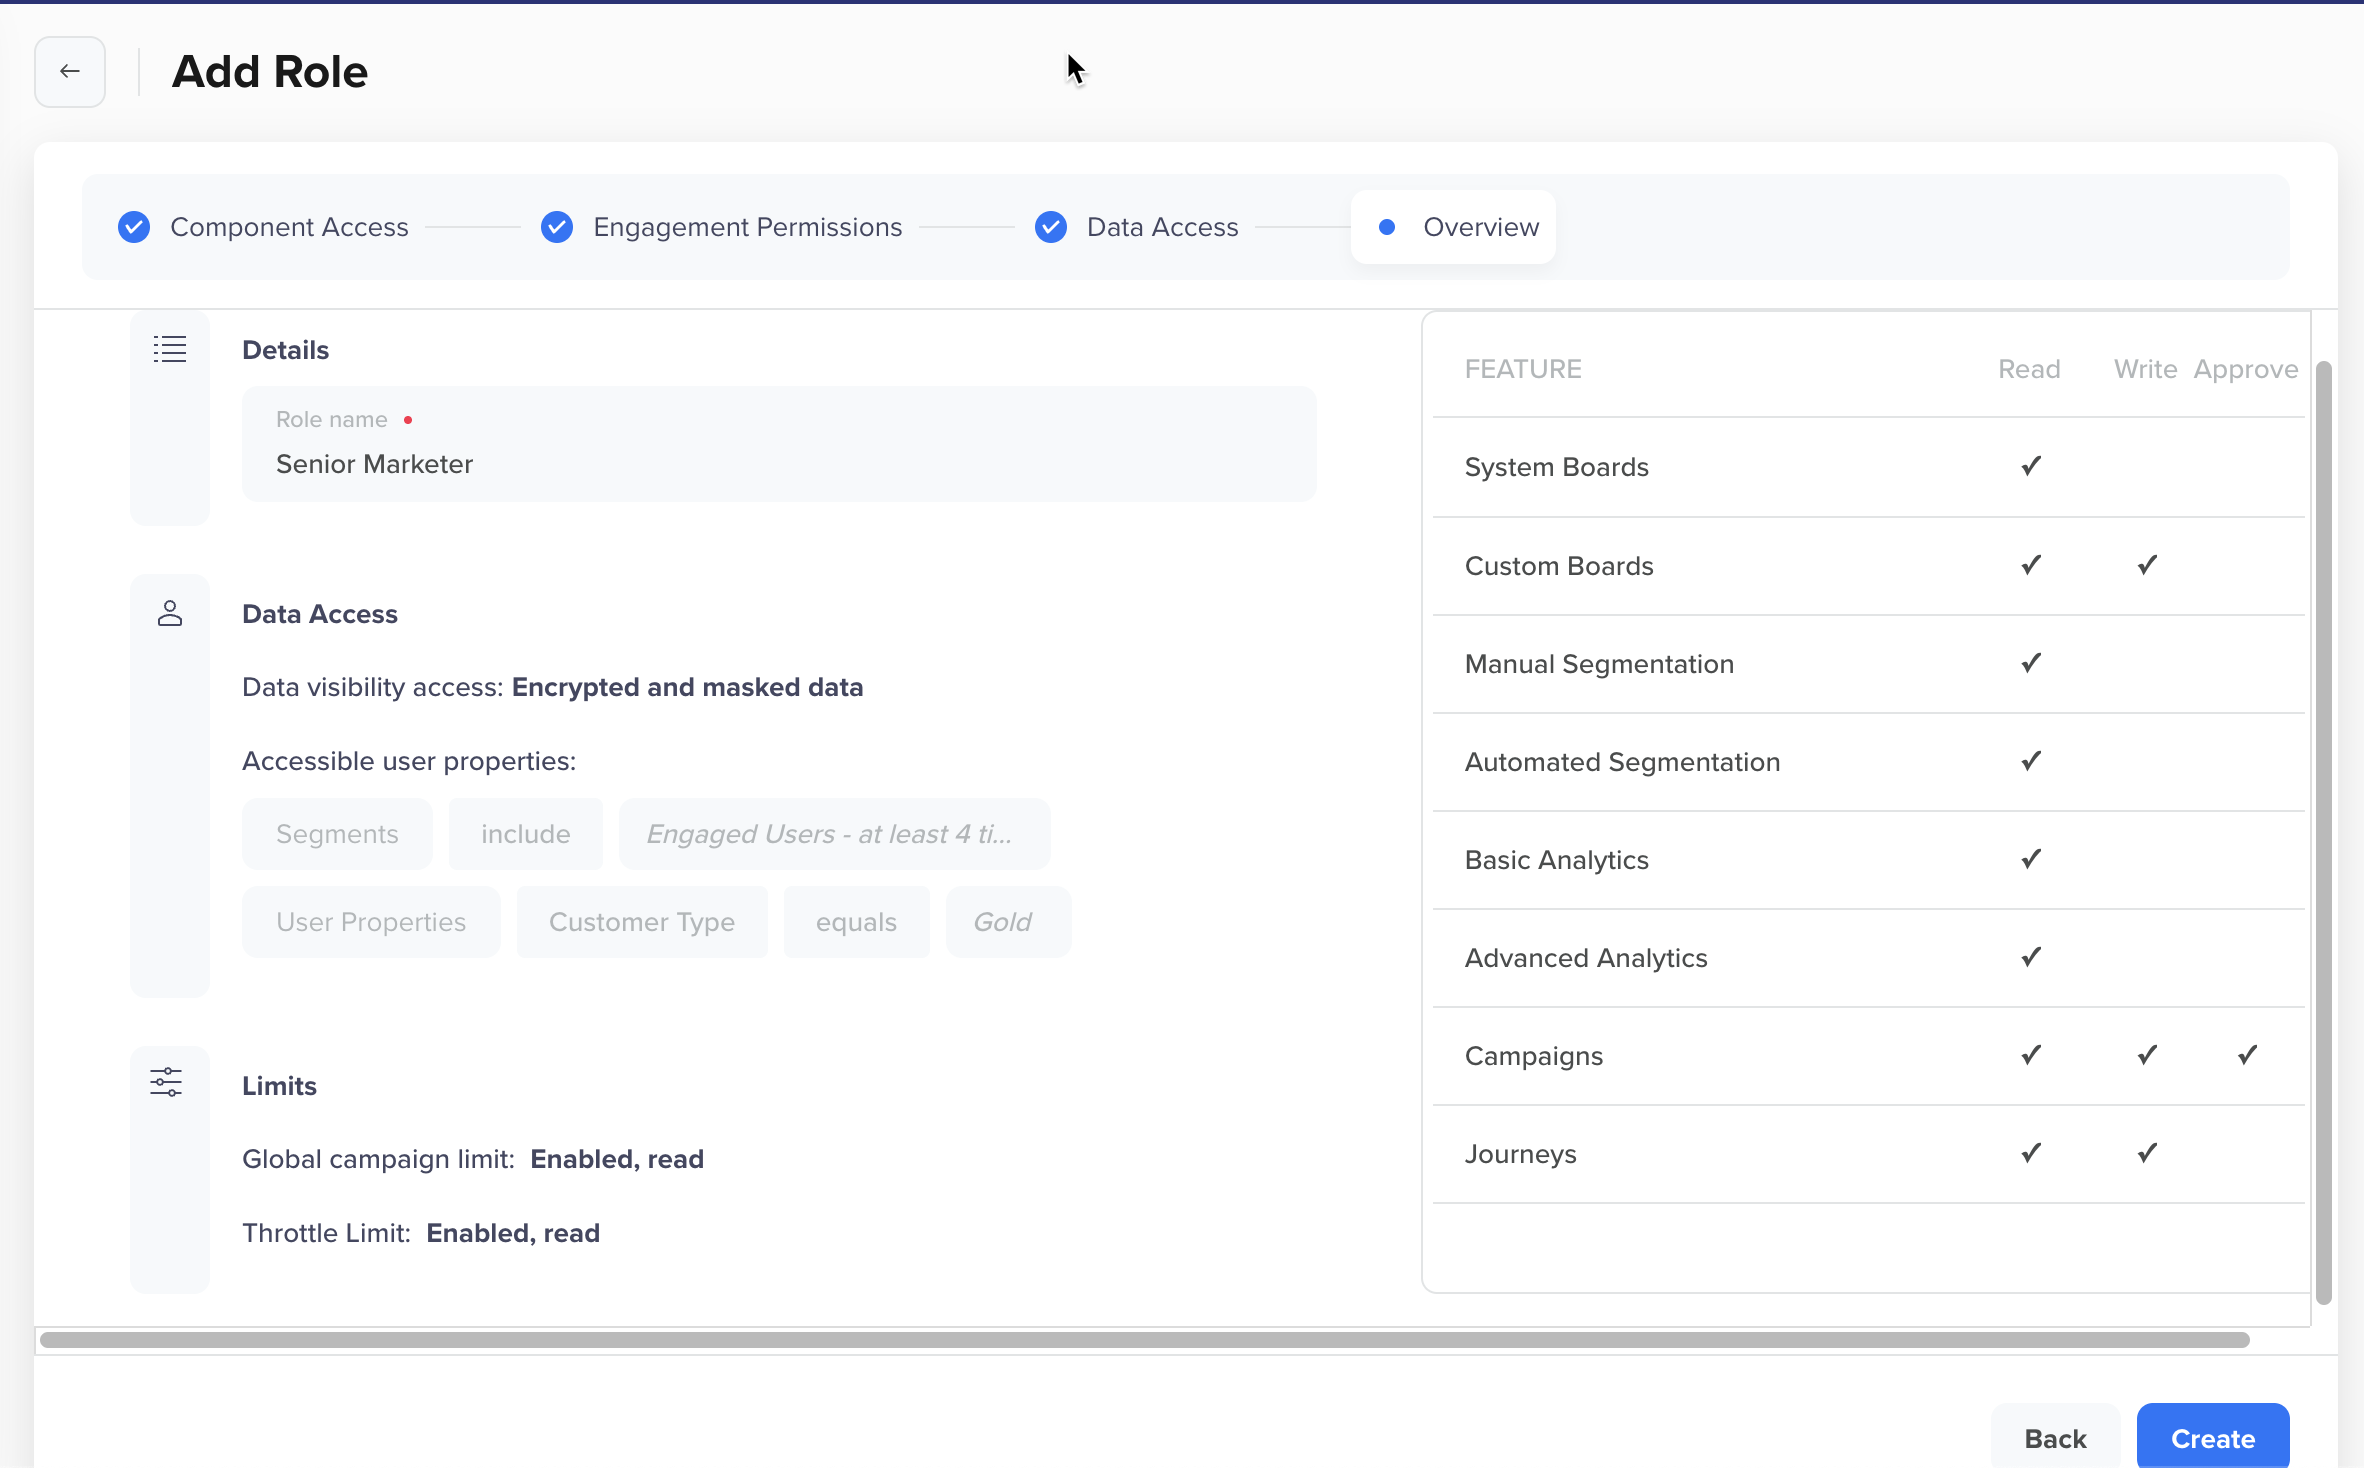
The Create Role page appears. Select the required permissions for each tab and click Next when done.
In the final step, specify the name and click Create to add the new role. The Overview tab displays permissions assigned to the new role.
Role Overview
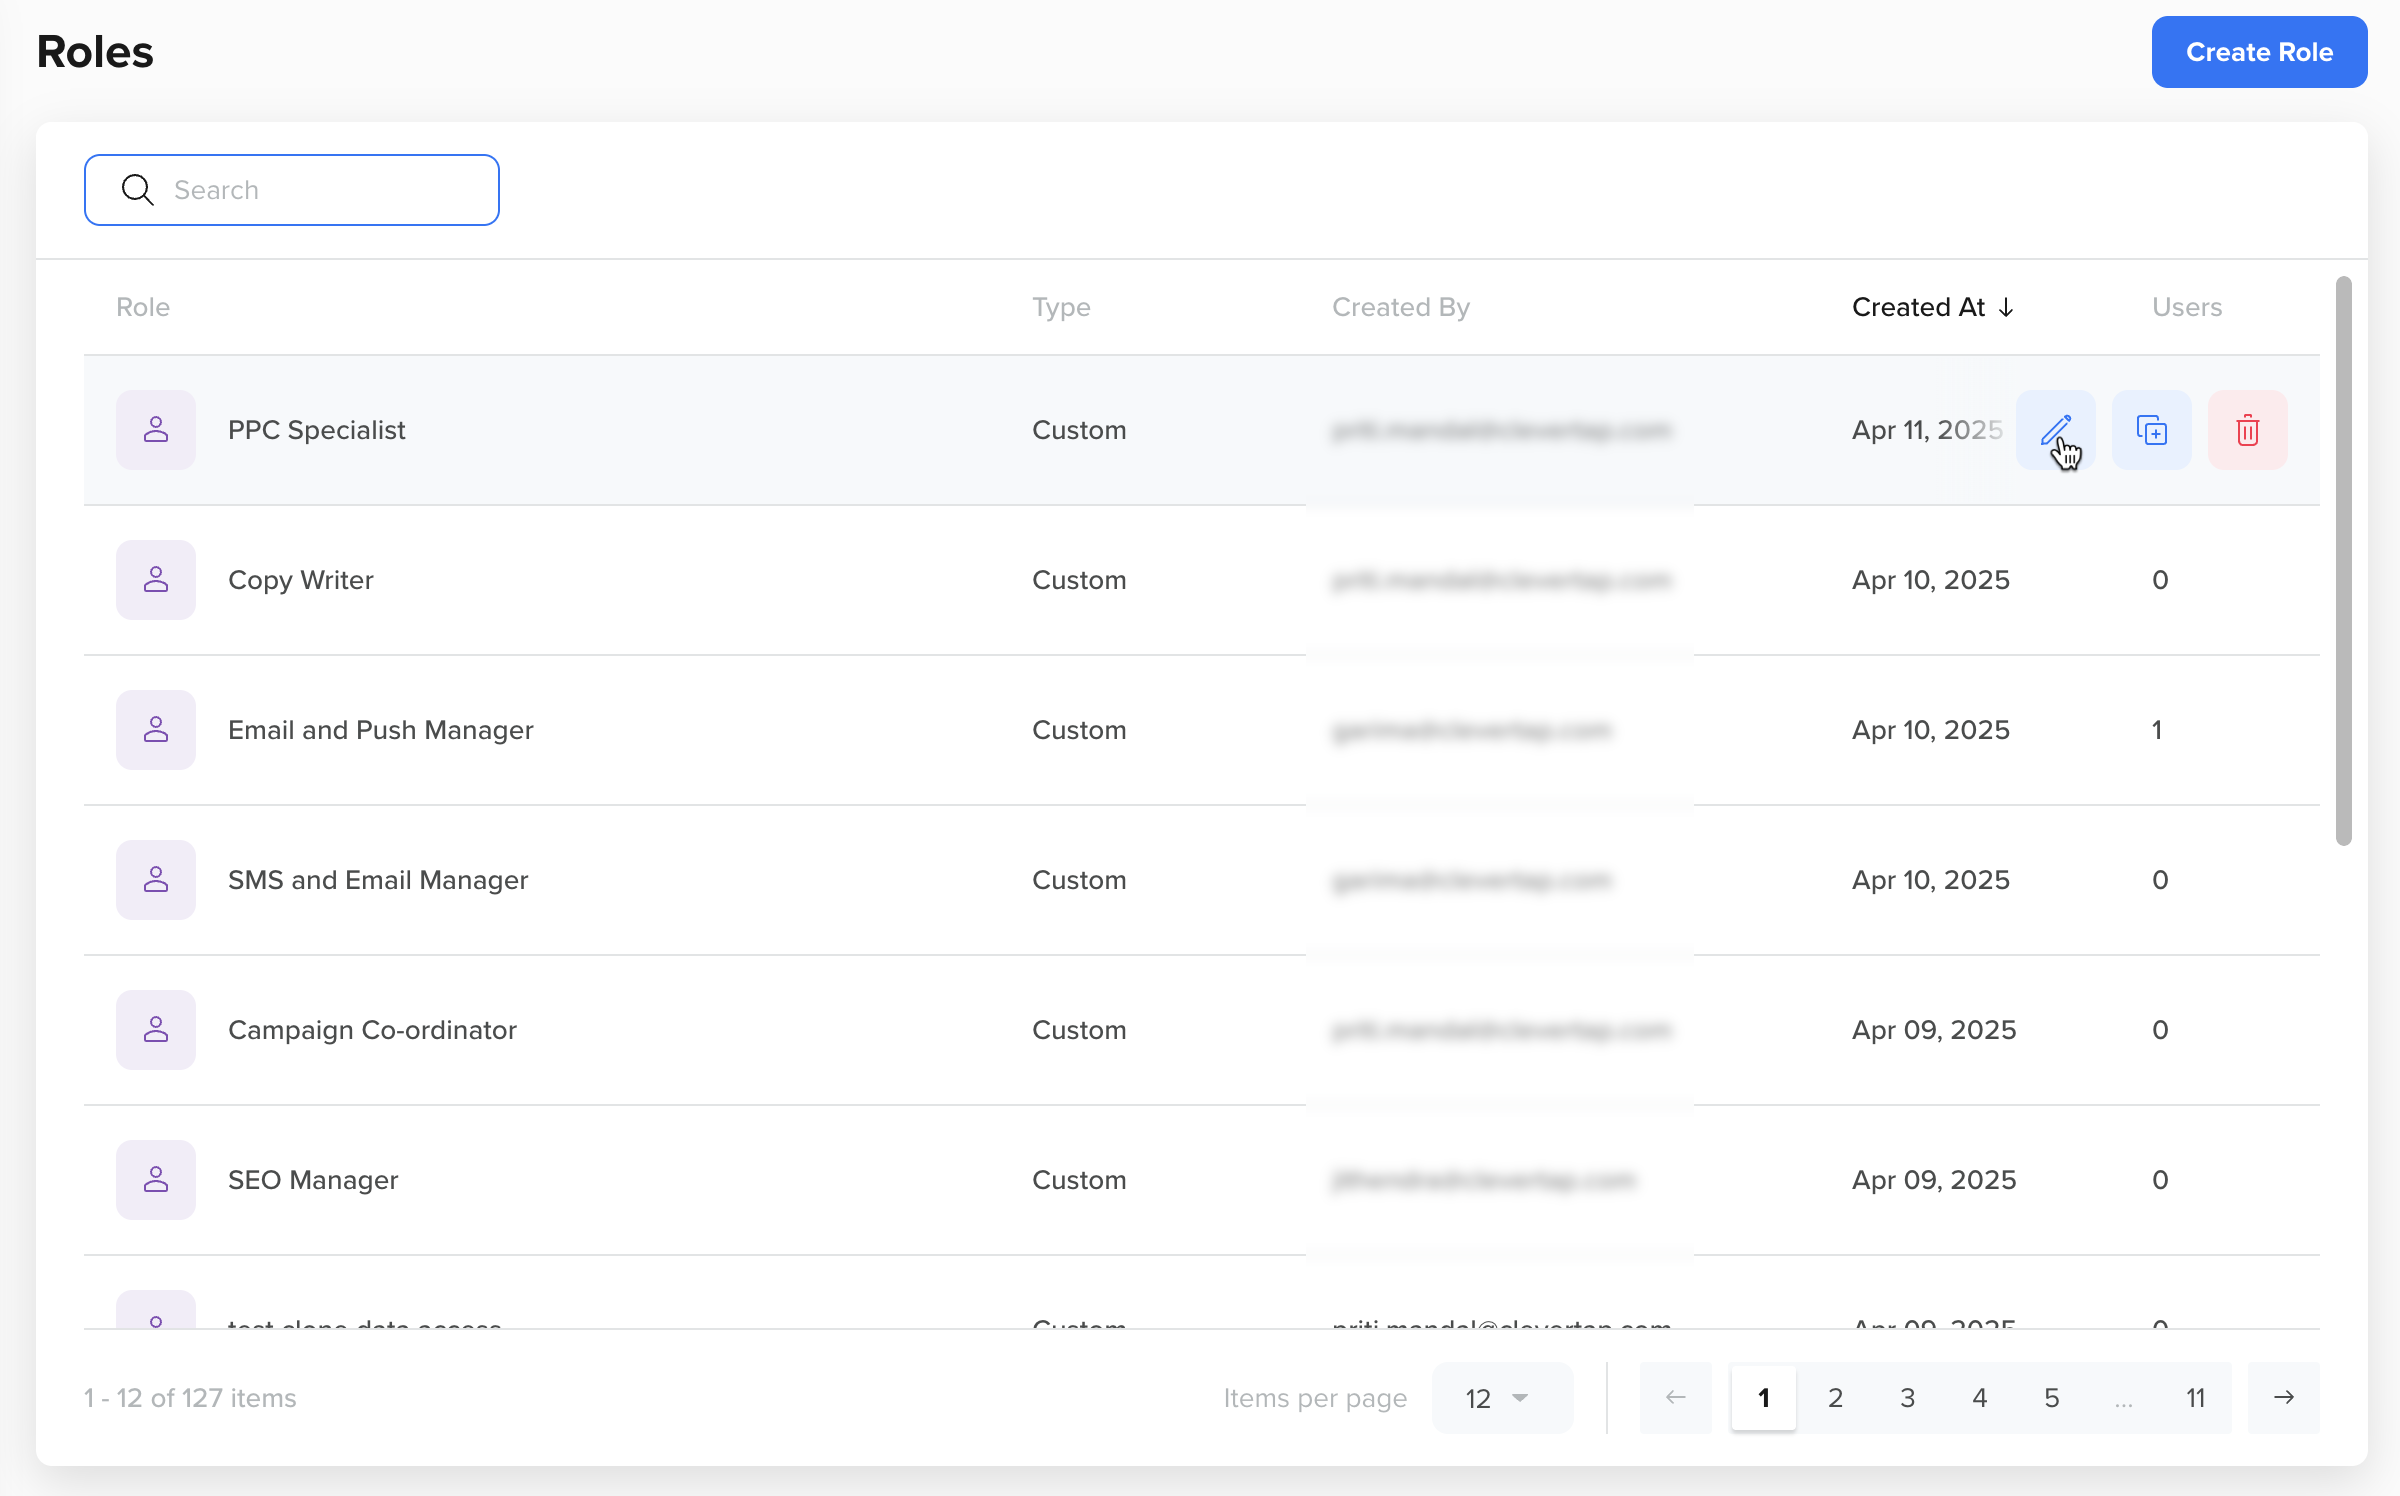
Manage Custom Roles
You can edit, clone, or delete custom roles. To edit, clone, or delete a role, hover over the role and select the corresponding icon.
Role Operations
Handle Access Conflicts
Permissions and access can be set while creating a custom role. The following order of preference applies.
A user can only be assigned system role(s) and custom role(s).
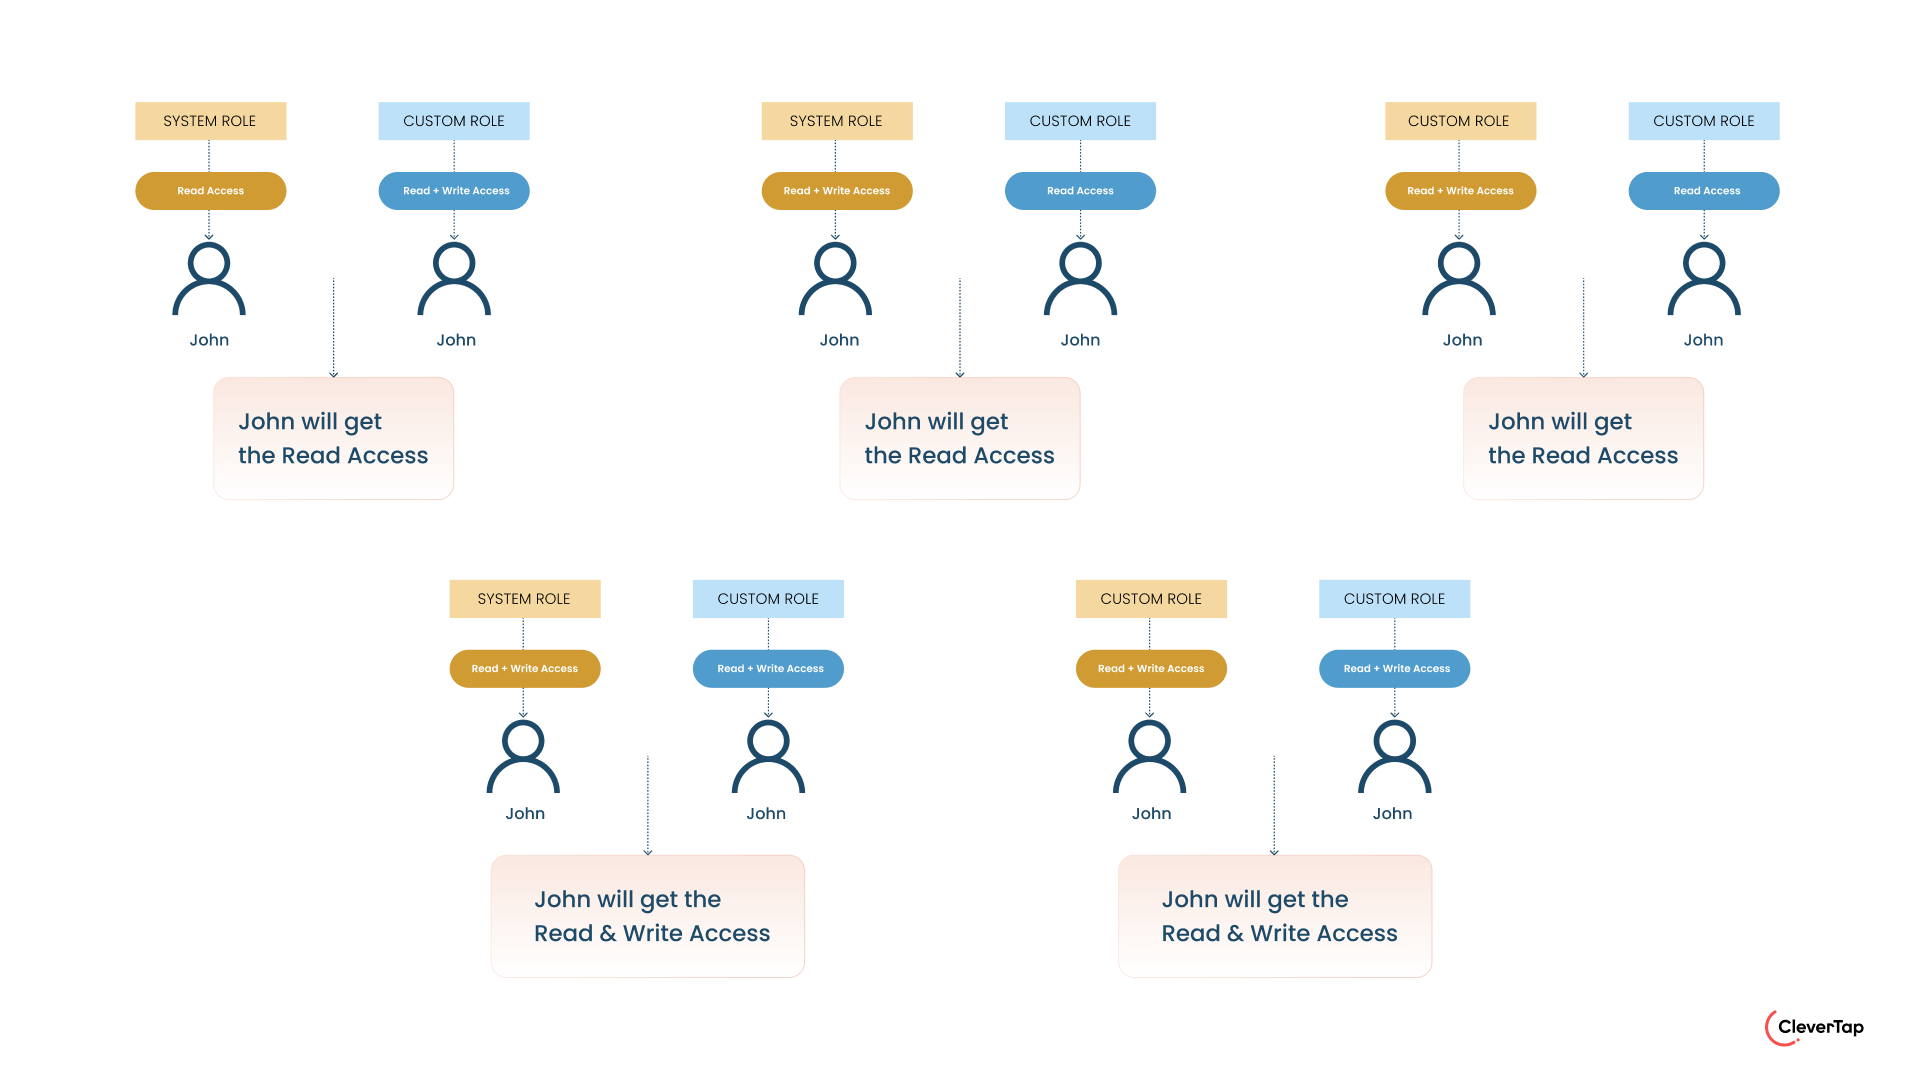
Permission Conflict on System Roles: When a user is assigned multiple system roles, there is a permission conflict, and the role with the higher access level is enabled. For example, if a user is assigned both Admin and Creator roles, Admin access is enabled. Thus, a user cannot have multiple system roles enabled simultaneously.
Component Conflict on System Role and Custom Role: When a user is assigned a system role and a custom role, there can be situations where one role has access to a component, and another role does not allow access to the same component. In this case, the permissions will be a union. For example, a user has two roles: “Creator” and “Custom B.” Role Creator has write access to Campaigns while role Custom B does not have access to Campaigns. In this scenario, write access is granted.
Component Conflict on Custom Roles: When a user is assigned multiple custom roles, there can be situations where one role has access to a component, and another role does not allow access to the same component. In this case, the permissions are restricted to the intersection of the roles. For example, a user has two roles: “Custom A” and “Custom B.” Role Custom A has write access to Campaigns while role Custom B does not have access to Campaigns. In this scenario, the user will not have write access to the Campaigns.
Permission Conflict For Custom Roles
Enforcement Across Campaign Actions
Users can view all channels while creating or managing campaigns. but can only take action (create, edit, clone, stop, archive, label, or publish) on campaigns for channels where they have write access. Restricted channels are visible but disabled. RBAC is enforced across all entry points (for example, Listings, Segments, Analytics, or URL access).
Bulk actions (like stop, archive, or label) fail entirely if any selected campaign is unauthorized.
Cloning is only allowed if the user has write access to all channels used in the original campaign.
Push + App Inbox: If the user does not have write access for App Inbox, the option to send it with Push is disabled.
Direct URL access is validated against RBAC before allowing publish or edit.
Campaigns created via API are not restricted by RBAC settings.
General Rules of Access
These rules define how CleverTap applies access controls across system and custom roles. Understanding these guidelines helps ensure roles are assigned appropriately and that permissions are enforced consistently across the platform.
Any role with write access automatically includes read access.
A user can have only one system role at a time.
A user can be assigned multiple custom roles, with one important exception: If a custom role includes data access restrictions based on user properties (such as geography or customer tier), the user can only be assigned one such role.
For example, if one custom role is restricted to users in the U.S. and another to users in India, the user can be assigned only one of these roles. This ensures that data access remains isolated to a single segment and prevents overlapping access.
Users can hold one system role and multiple custom roles (excluding filtered roles).
FAQs
Do RBAC settings apply to campaigns created via API?
No, RBAC restrictions for campaigns do not apply to API-created campaigns.
What happens if a user has multiple roles with conflicting channel access?
If one role grants write access and another does not, the most restrictive permission is applied.
For example, if Role A grants write access and Role B is read-only, the user will only have read-only access.
Will users with restricted channel access still be able to view campaigns and journey setups?
Yes. All users have read or view-only access to all campaign channels by default. This helps them view multi-channel setups (such as in journeys) even if they can’t edit them. However, they cannot create, edit, clone, or publish campaigns for channels where write access is restricted.
Can users with restricted channel access create campaigns or journeys from Analytics or Segments?
No. If a user does not have write access to Campaigns and Journeys, CleverTap blocks them from creating campaigns directly from the Analytics or Segments sections.
An error message is shown when the user tries to initiate the action.