Shopify
Learn how to integrate your Shopify store with CleverTap.
Overview
CleverTap plugin provides an easy way to integrate your Shopify stores within minutes without any code. All you need is a CleverTap account and you can have a seamless flow of events and user data from your Shopify store. You can also send personalized messages to your users through channels such as Web Push notifications, Web Pop-up, Web Exit Intent, and Web Native Display.
Video Tutorial - Integrating Shopify Store with CleverTap
Integrate Shopify
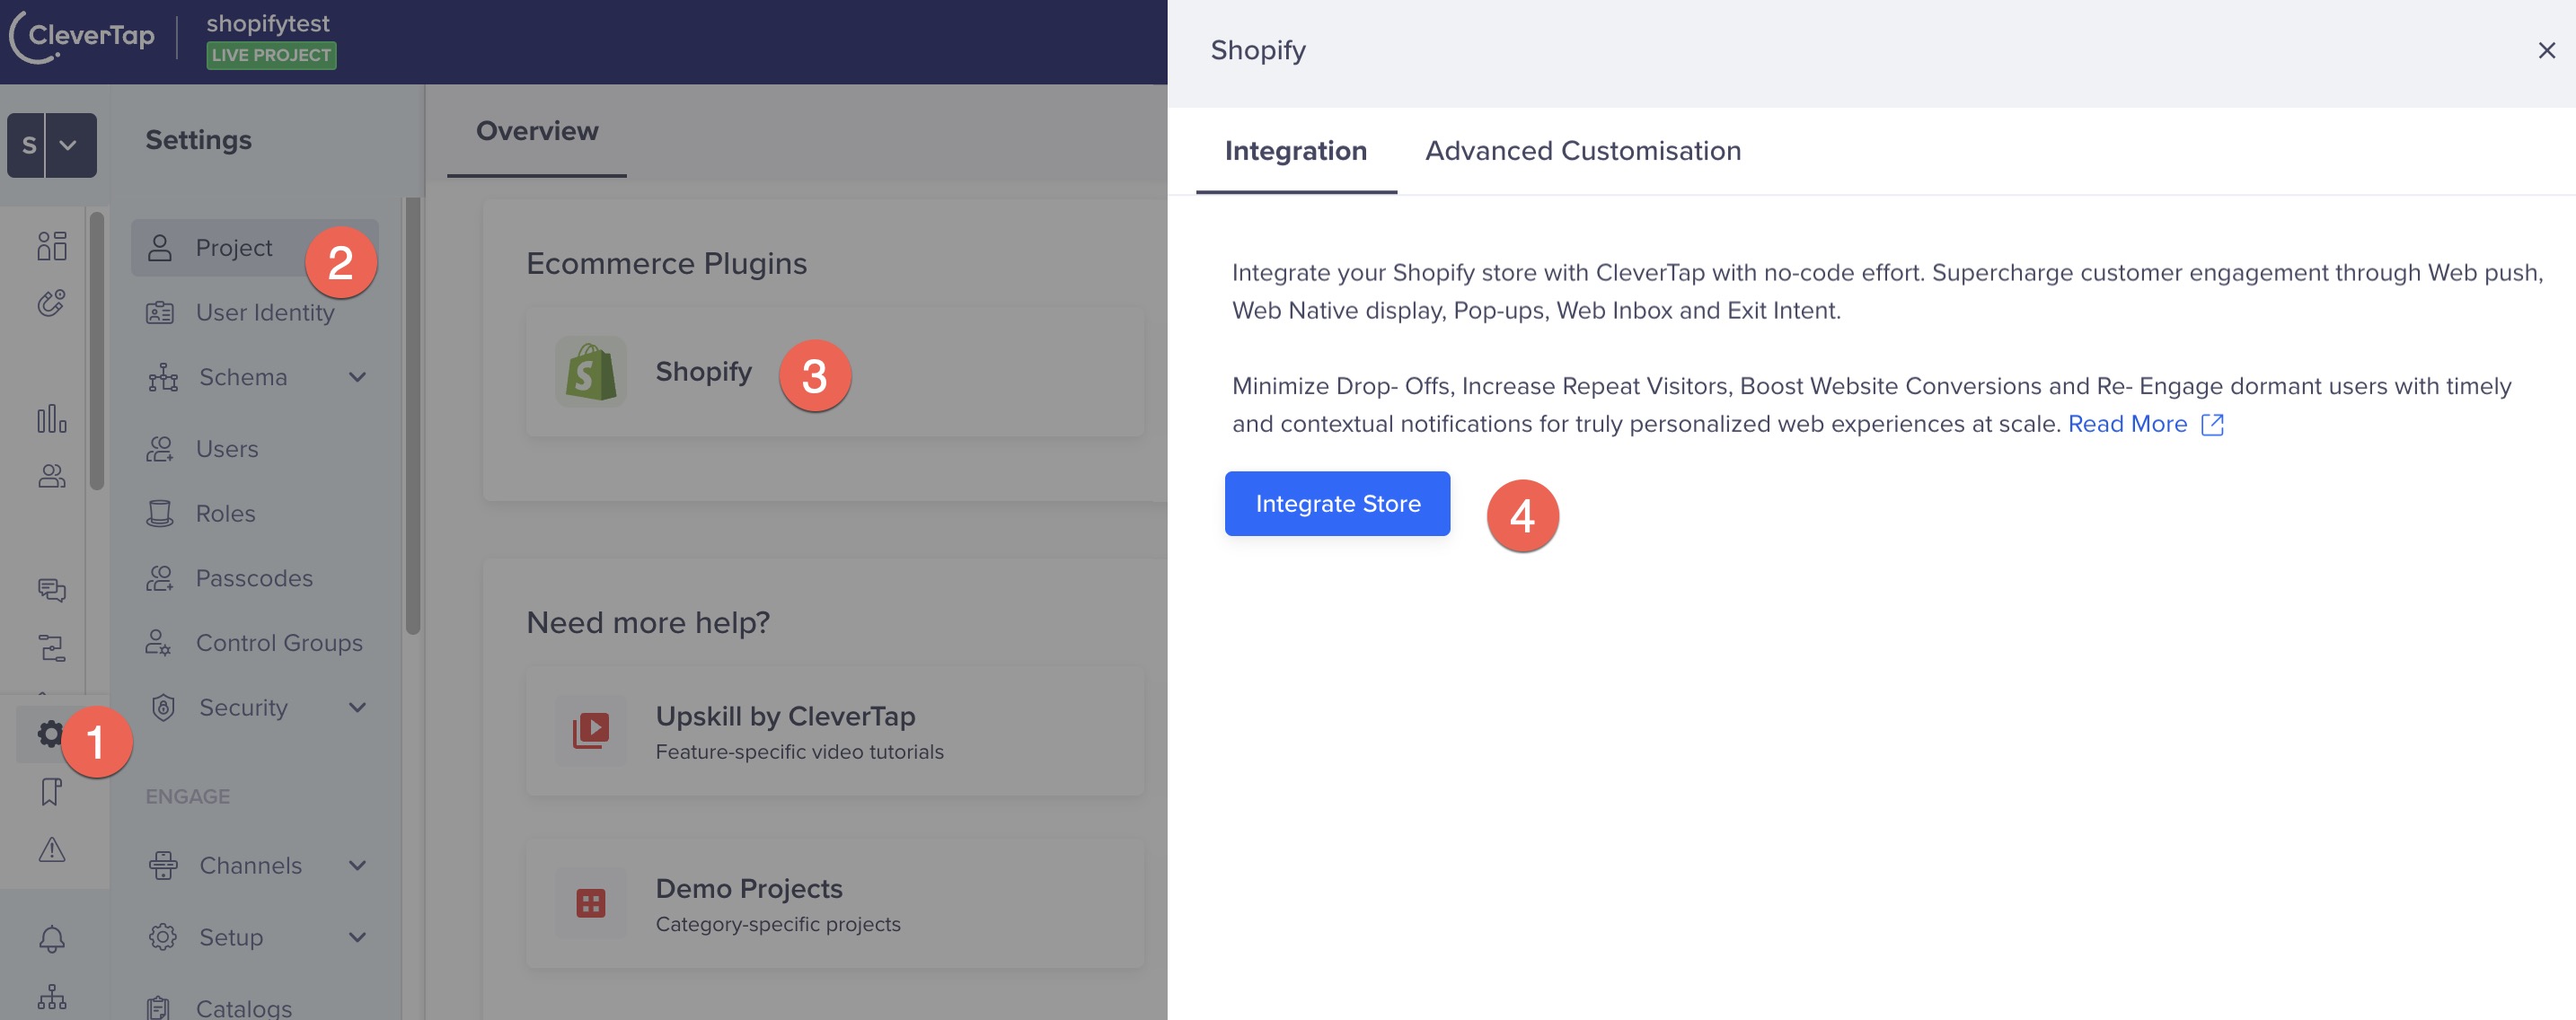
You can install the CleverTap App from the Shopify App Store. Login to the CleverTap dashboard and follow the steps to complete the integration:
Follow the steps to locate the Shopify plugin on the CleverTap dashboard:
- Login to your CleverTap account.
- Open Settings > Project > Shopify.
 Locate the Shopify Plugin
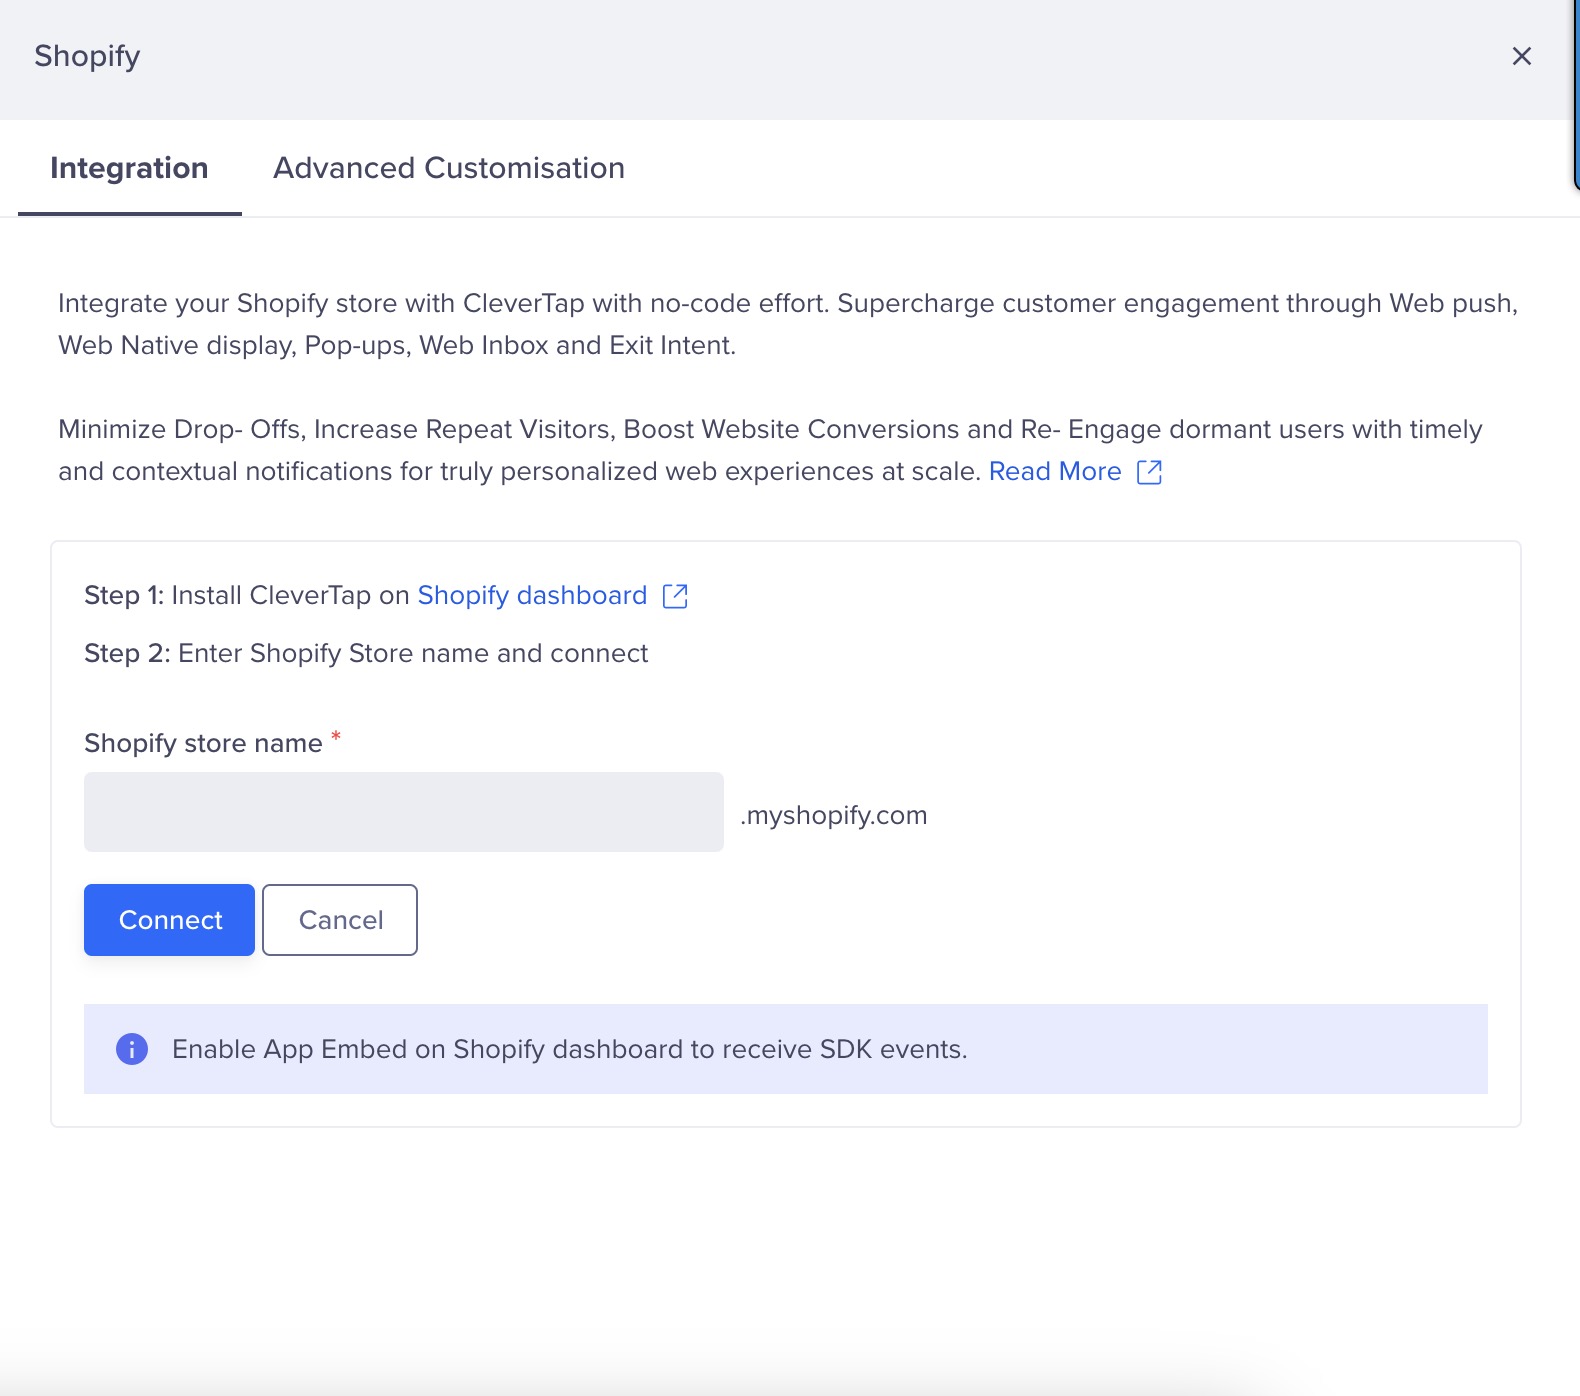
- The Shopify window displays. Click Integrate Store button to start the integration.
The integration includes the following steps:
Install and Connect App
If you have already installed the app from the Shopify App Store, App Installed is displayed next to your store name. However, if you are installing the app for the first time, you can install it from the Shopify dashboard.
Follow the steps below to install the CleverTap app:
- Click the Install CleverTap on Shopify dashboard link.
 Install from CleverTap
- The link opens the Shopify App Store page. Check that you are logged in to the store and click Install.
 Install CleverTap App
- You can now connect your store from the CleverTap dashboard and click Continue.
 Enter Shopify Store Name
- Enter your credentials if you are not logged in to your Shopify store and continue the process.
Your store is now connected to your CleverTap account.
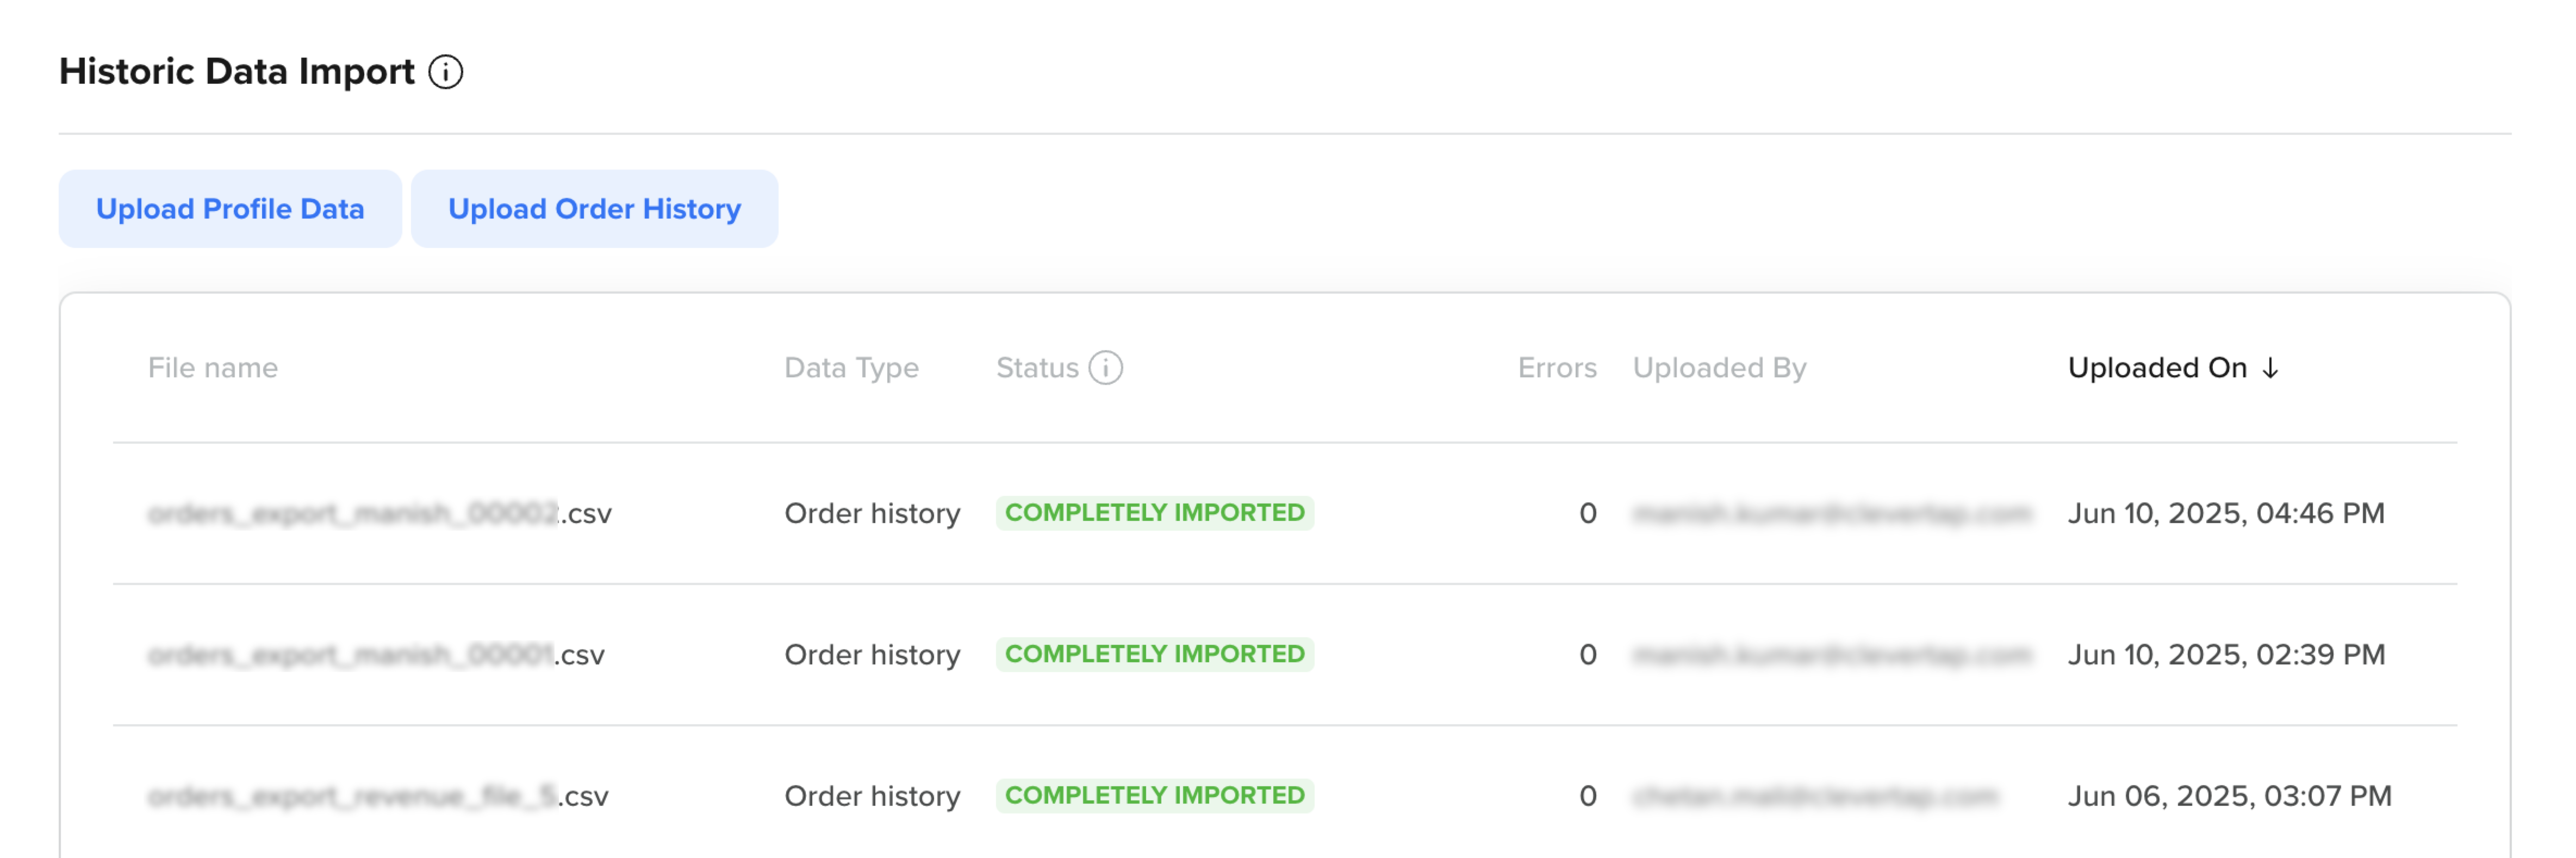
Import Existing Shopify Data into CleverTap
CleverTap's Historical Data Import feature helps synchronize existing Shopify user and transaction data by allowing you to upload all your historical data directly to CleverTap.
 Historical Data Import
You can upload the following types of data:
- Profile Data: Includes user information such as name, email, phone number, and so on. This is mapped as Profile Properties on the CleverTap dashboard. Refer to the sample profile data file.
- Purchase Data: Includes transaction data such as order data. This is mapped as Charged Event on the CleverTap dashboard. Refer to the sample purchase data file.
To upload your Shopify website data on CleverTap, follow the steps below:
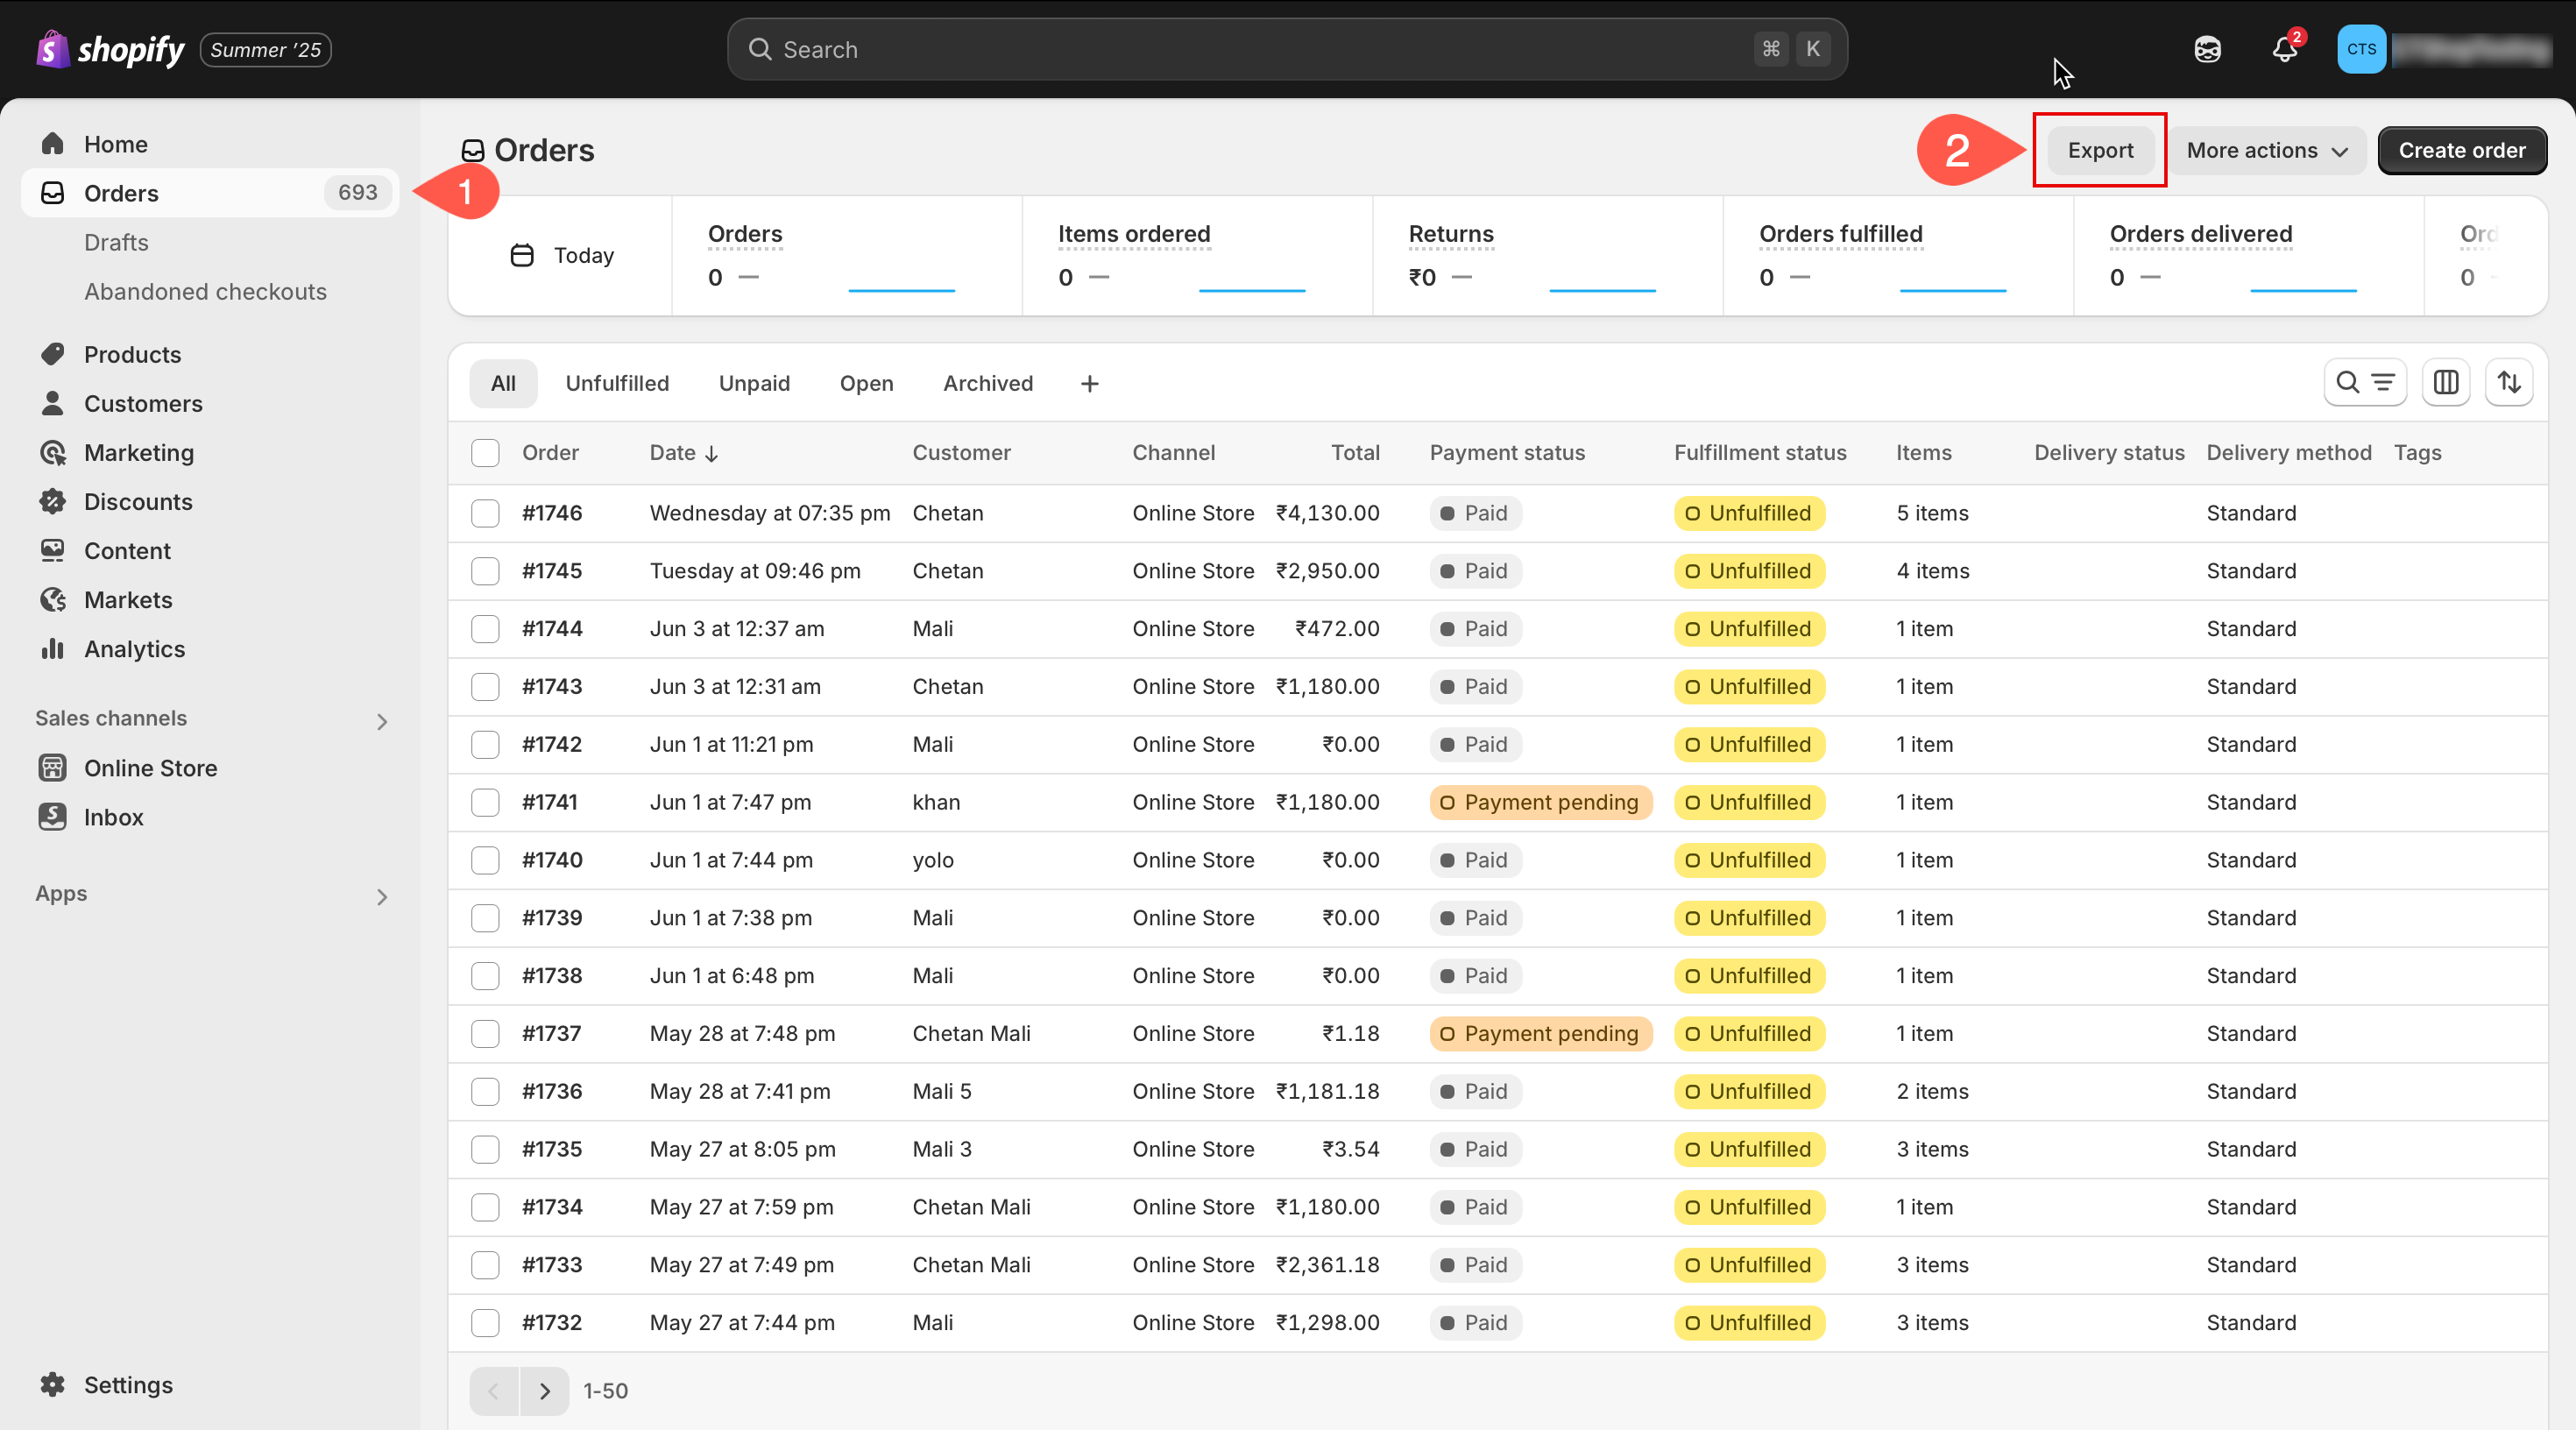
- Download a CSV file from your Shopify dashboard. This file can either be a Profile CSV with user data or a Charged Event CSV with transaction data.
 Shopify Dashboard
- To upload the CSV file to CleverTap, go to Settings > Project and click Shopify.
- Select the upload option: Profiles or Charged Events. The system starts processing the uploaded file immediately.
 Historical Data Import
- Track the status of your upload at any time. Statuses include:
- Pending: The file has been received and is waiting to be processed.
- Processing: The system is validating and ingesting the data.
- Importing: The data is actively being ingested and merged into your CleverTap project.
- Merged: All rows are processed and added to your CleverTap project.
- Merged with Errors: The file is processed and merged, but some rows contain issues. You can check the error details, fix the data, and re-upload the CSV.
- Failed: The upload has failed due to formatting or validation issues.
- Paused: Processing has been paused manually, or there may be a system interruption.
- After processing, you will receive an email with a CSV file attached only for rows that encountered errors. This file includes an additional column indicating the reason for failure. In case of errors, fix the failed rows and re-upload only the affected rows. Multiple uploads are supported if required. Once your data is merged, you can create campaigns, run analytics, and fully utilize the CleverTap platform. Profiles and events can be found in your CleverTap dashboard for further engagement.
Note
- Events containing any error columns will be silently ignored and dropped.
- Ensure every user record has at least one valid identity field. The value must be under 1024 characters. If this condition is not met, the following error will occur:
Identity value cannot be null or set at least one of identity / fbId / gpId / objectId under 1024 chars to identify the user.- The maximum file size for historical backfill uploads is 5 GB.
- The following four columns are mandatory for a Charged file upload:
- Name
- Id
- Phone
- Profile and Purchase data must be uploaded as two separate files.
- If your mobile number is used as an identity, always search it in the CSV using the full international format. For example:
+91XXXXXXXXXX.
Advanced Customization
After your store is connected and installed, you can start customizing it per your requirements. You can configure the web push for your store and also customize the event data received from your Shopify store.
Configure Web Push
You can send personalized communication to your users through Web Push notifications. However, you must enable them first from the CleverTap dashboard.
Check that Web Push is configured for your store. If not configured, you must configure the Web Push from the CleverTap dashboard.
After the Web Push is configured, enable the notification prompts. Click Web Push configuration and toggle ON Send notification permission prompt to enable CleverTap Web Push notifications.
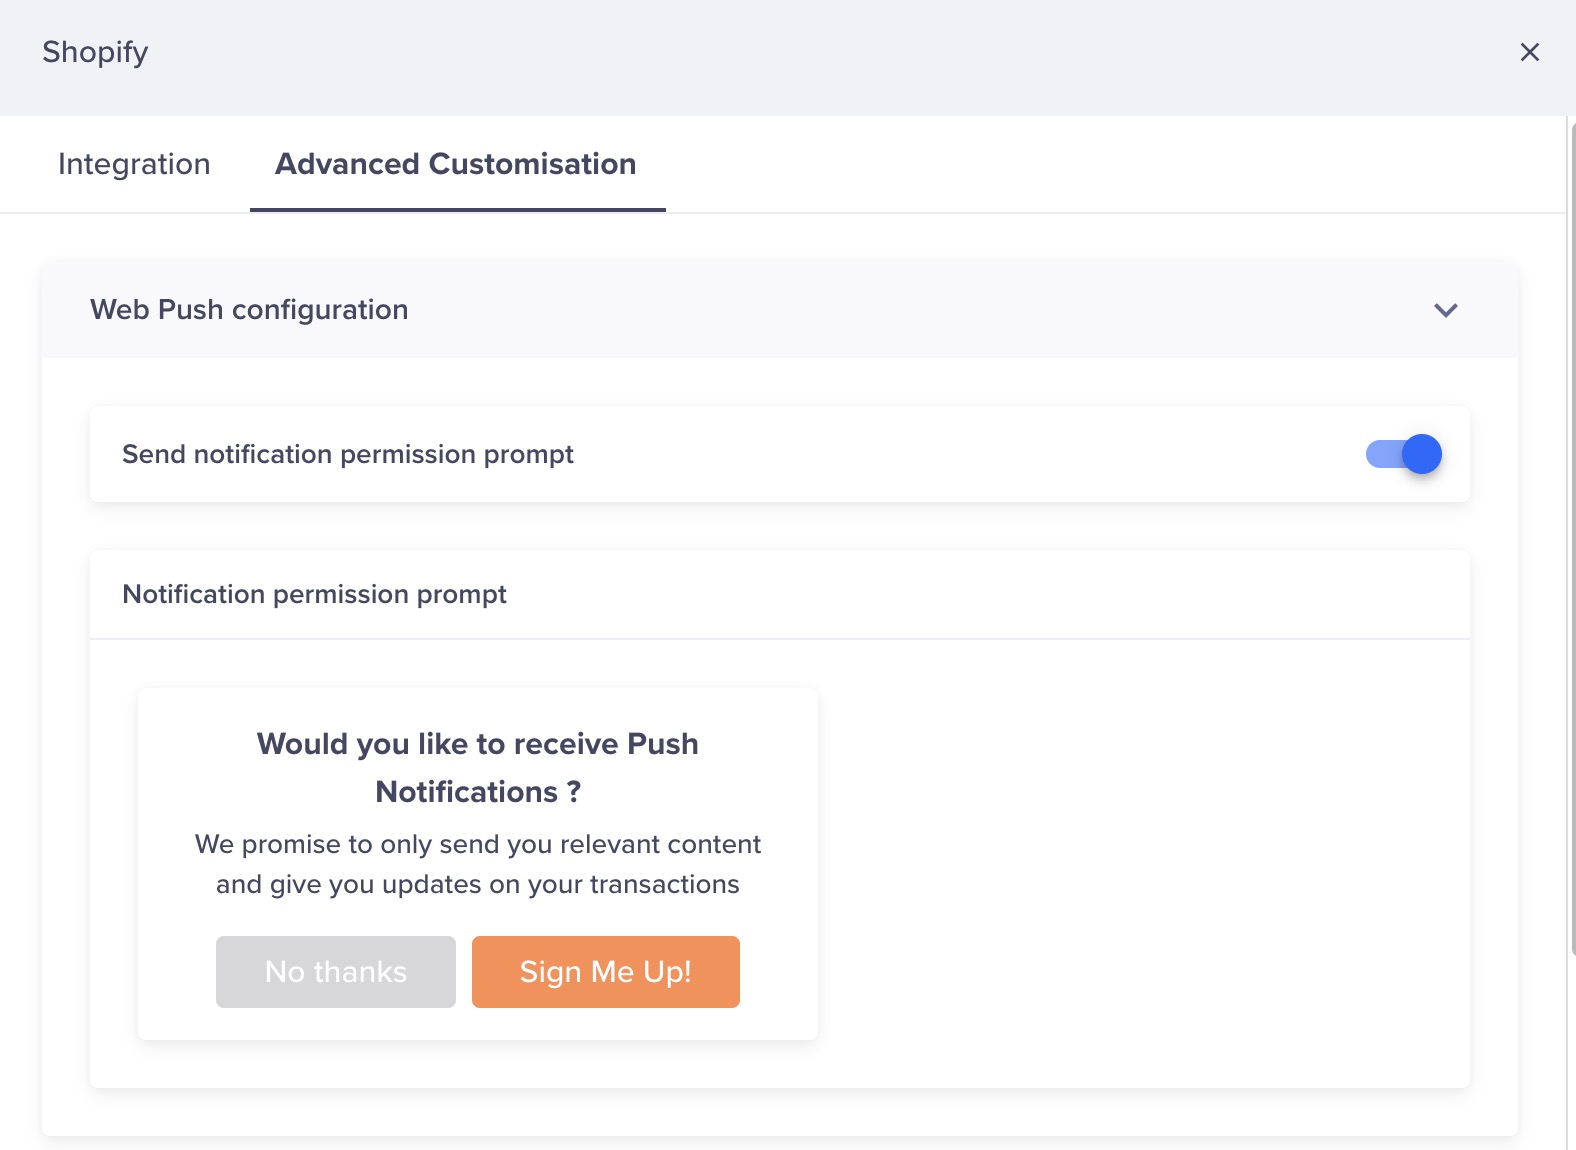 Enable Web Push
Customize Event Data
Event data customization includes event and profile data. You can choose to receive only the required data and opt out of receiving any data that is not required.
Profile Properties
CleverTap allows you to select only the required Profile properties. To select the Profile properties, follow the steps listed below:
- Go to Settings > Project > Shopify > Advanced Customization > Event Data Customization.
- Click Edit.
- Click the Profile properties list and select the required properties.
- Click Apply.
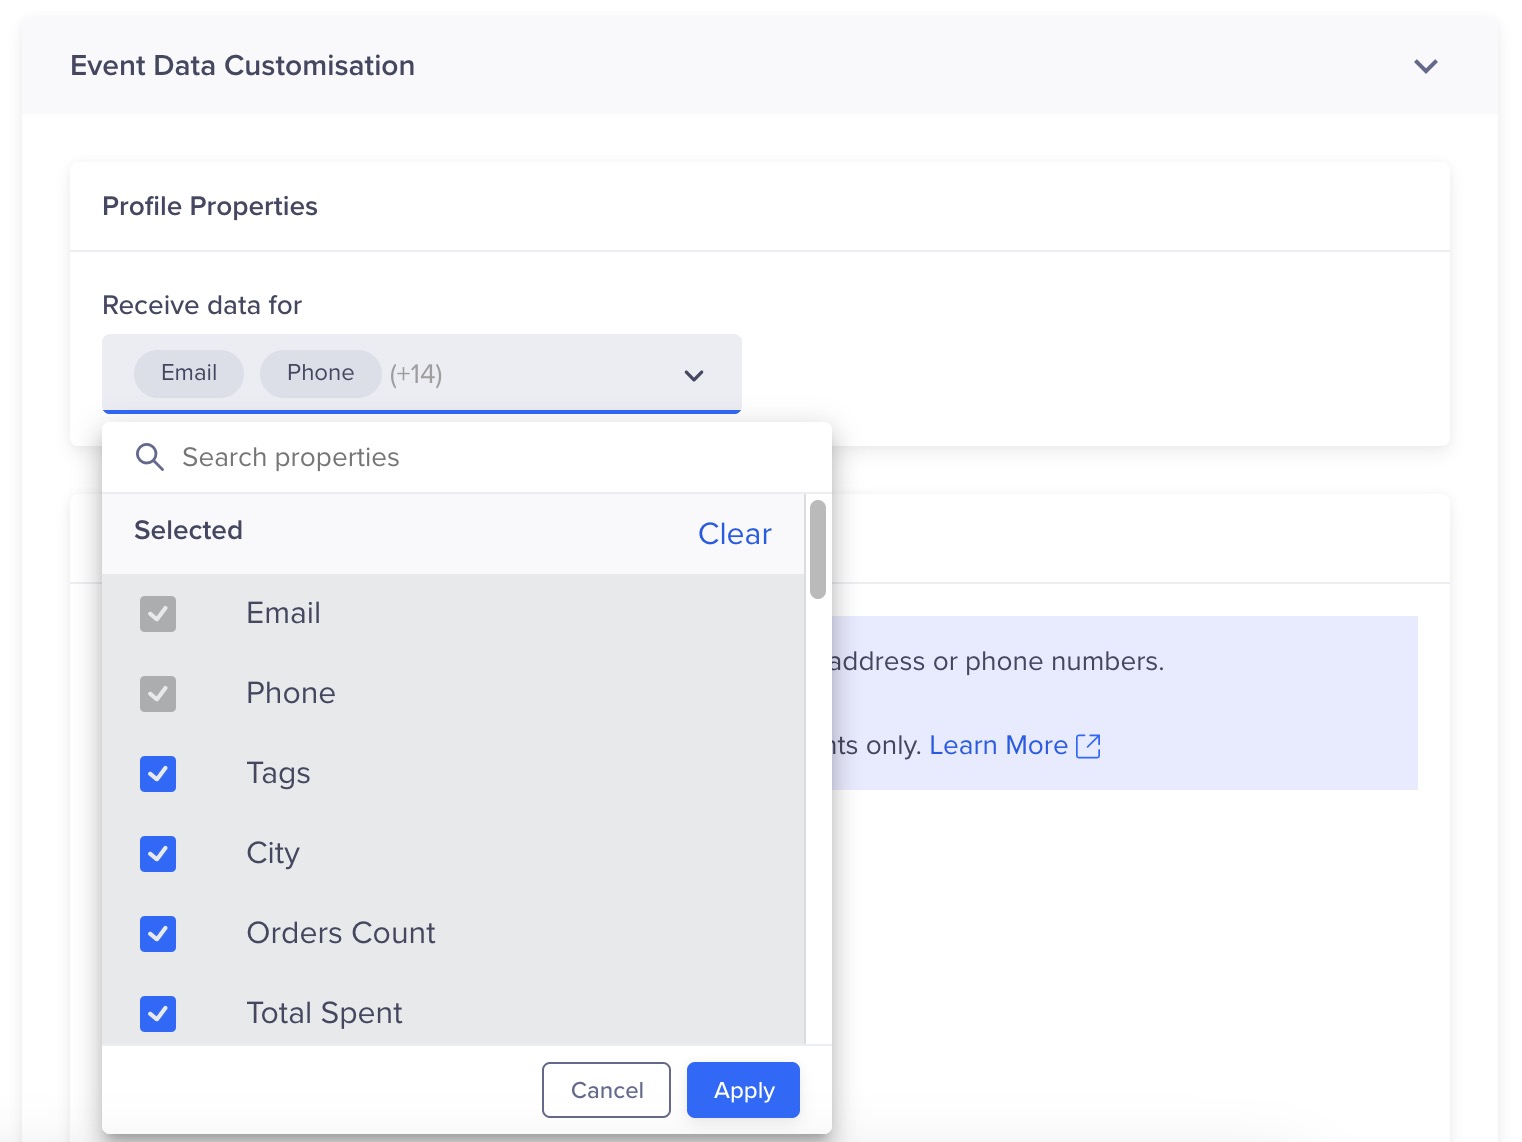 Select the Required Profile Properties
The following table displays all the user properties supported by the Shopify plugin:
| User Property | Property Description |
|---|---|
| The customer's email address. For example, [email protected]. | |
| Phone | The customer's mobile number. For example, 97650000. |
| Tags | The list of tags associated with the customer. For example, Gold customer. |
| City | The customer's city. For example, Mumbai. |
| Orders Count | The total number of orders from a customer. |
| Total Spent | Total amount spent on all orders. For example, 5400. |
| Shopify ID | The Shopify ID of the customer. For example, 29873645910. |
| First Name | The customer's first name. |
| LastName | The customer's first name. |
| Last Order ID | The order ID of the last order placed by the customer. |
| Has Account | This property returns the value as true if the email associated with the customer is linked to a customer account. The property returns the value as false if the email is not linked to the customer account. |
| Tax Exempt | Whether or not the customer is exempt from taxes. |
| Email Marketing Consent | Records the consent status of the customer for receiving marketing communication through Email. |
| SMS Marketing Consent | Records the consent status of the customer for receiving marketing communication through SMS. |
| Note | A note left by the customer to the merchant, either in their cart or during checkout. |
| Currency | The currency of purchase. |
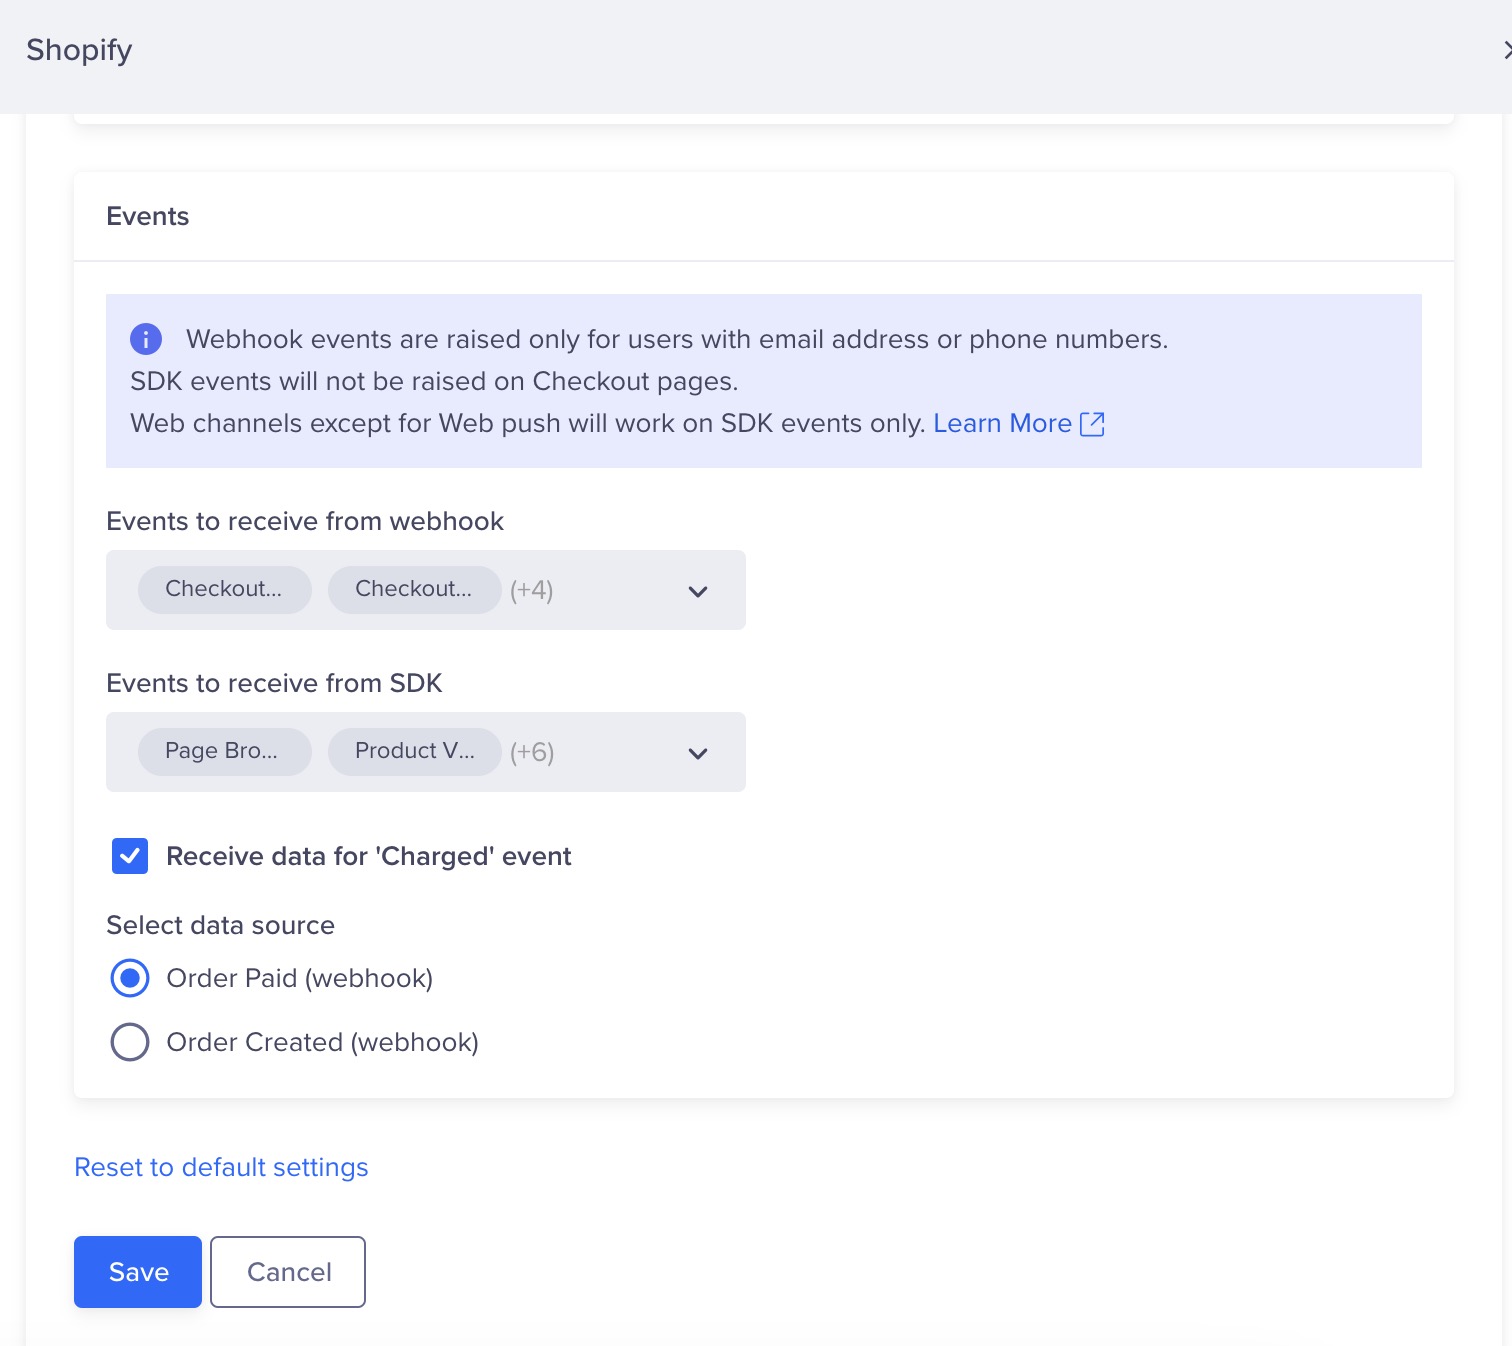
Events
CleverTap receives events from the following two sources:
- Shopify Webhook : After you integrate your store, CleverTap subscribes to the selected Webhook events for your Shopify store.
- Web SDK :These are the supported events that CleverTap Web SDK captures from your Shopify store.
Select the events you want to receive from the Shopify Webhook and the Web SDK.
 Receive Events from CleverTap SDK and Shopify Webhook
You can also select to Receive data for Charged event or opt-out. Select either of the following events that you want CleverTap to record as a Charged event:
- Order Paid : This event is passed to CleverTap by the Shopify webhook when an order is paid.
- Order Created : This event is passed to CleverTap by the Shopify webhook when an order is created.
Web SDK Supported Events
The following table displays all the events supported by the CleverTap Web SDK:
Event Name | Description | Properties |
|---|---|---|
Page Browse | This event is recorded when the user visits a page |
|
Product Viewed | When the user views a product |
|
Searched Product | When a product is searched |
|
Added To Cart | When a product is added to cart |
|
Removed from Cart | When a product is removed from cart |
|
Customer Registered | When a customer registers on the Shopify store |
|
Customer Logged In | When a customer logs in to the Shopify store. |
|
Customer Logged Out | When a customer logs out of the Shopify store. | None. |
NoteThe Charged and Checkout events are received through Shopify Webhooks. Therefore, these events are be received at CleverTap only for the users who have logged in.
Webhook Supported Events
The following events are supported via the Shopify Webhook:
Sr. No | Events | Event Properties | ||||||||||||||||||||||||||||||||||||||||||||||||||||||||||||||||||||||||||||||||||||||||||||||||||||||||
|---|---|---|---|---|---|---|---|---|---|---|---|---|---|---|---|---|---|---|---|---|---|---|---|---|---|---|---|---|---|---|---|---|---|---|---|---|---|---|---|---|---|---|---|---|---|---|---|---|---|---|---|---|---|---|---|---|---|---|---|---|---|---|---|---|---|---|---|---|---|---|---|---|---|---|---|---|---|---|---|---|---|---|---|---|---|---|---|---|---|---|---|---|---|---|---|---|---|---|---|---|---|---|---|---|---|---|
1 | Customer Created Customer Update |
| ||||||||||||||||||||||||||||||||||||||||||||||||||||||||||||||||||||||||||||||||||||||||||||||||||||||||
2 | Checkout Create Checkout Updated
Draft Order Updated |
| ||||||||||||||||||||||||||||||||||||||||||||||||||||||||||||||||||||||||||||||||||||||||||||||||||||||||
3 | Fulfillment Created Fulfillment Updated |
| ||||||||||||||||||||||||||||||||||||||||||||||||||||||||||||||||||||||||||||||||||||||||||||||||||||||||
4 | Order Created Order Updated Order Cancelled Order Fulfilled Order Partially Fulfilled |
| ||||||||||||||||||||||||||||||||||||||||||||||||||||||||||||||||||||||||||||||||||||||||||||||||||||||||
5 | Order Paid |
|
NoteAll the above-listed Webhook events will only be captured for logged-in users.
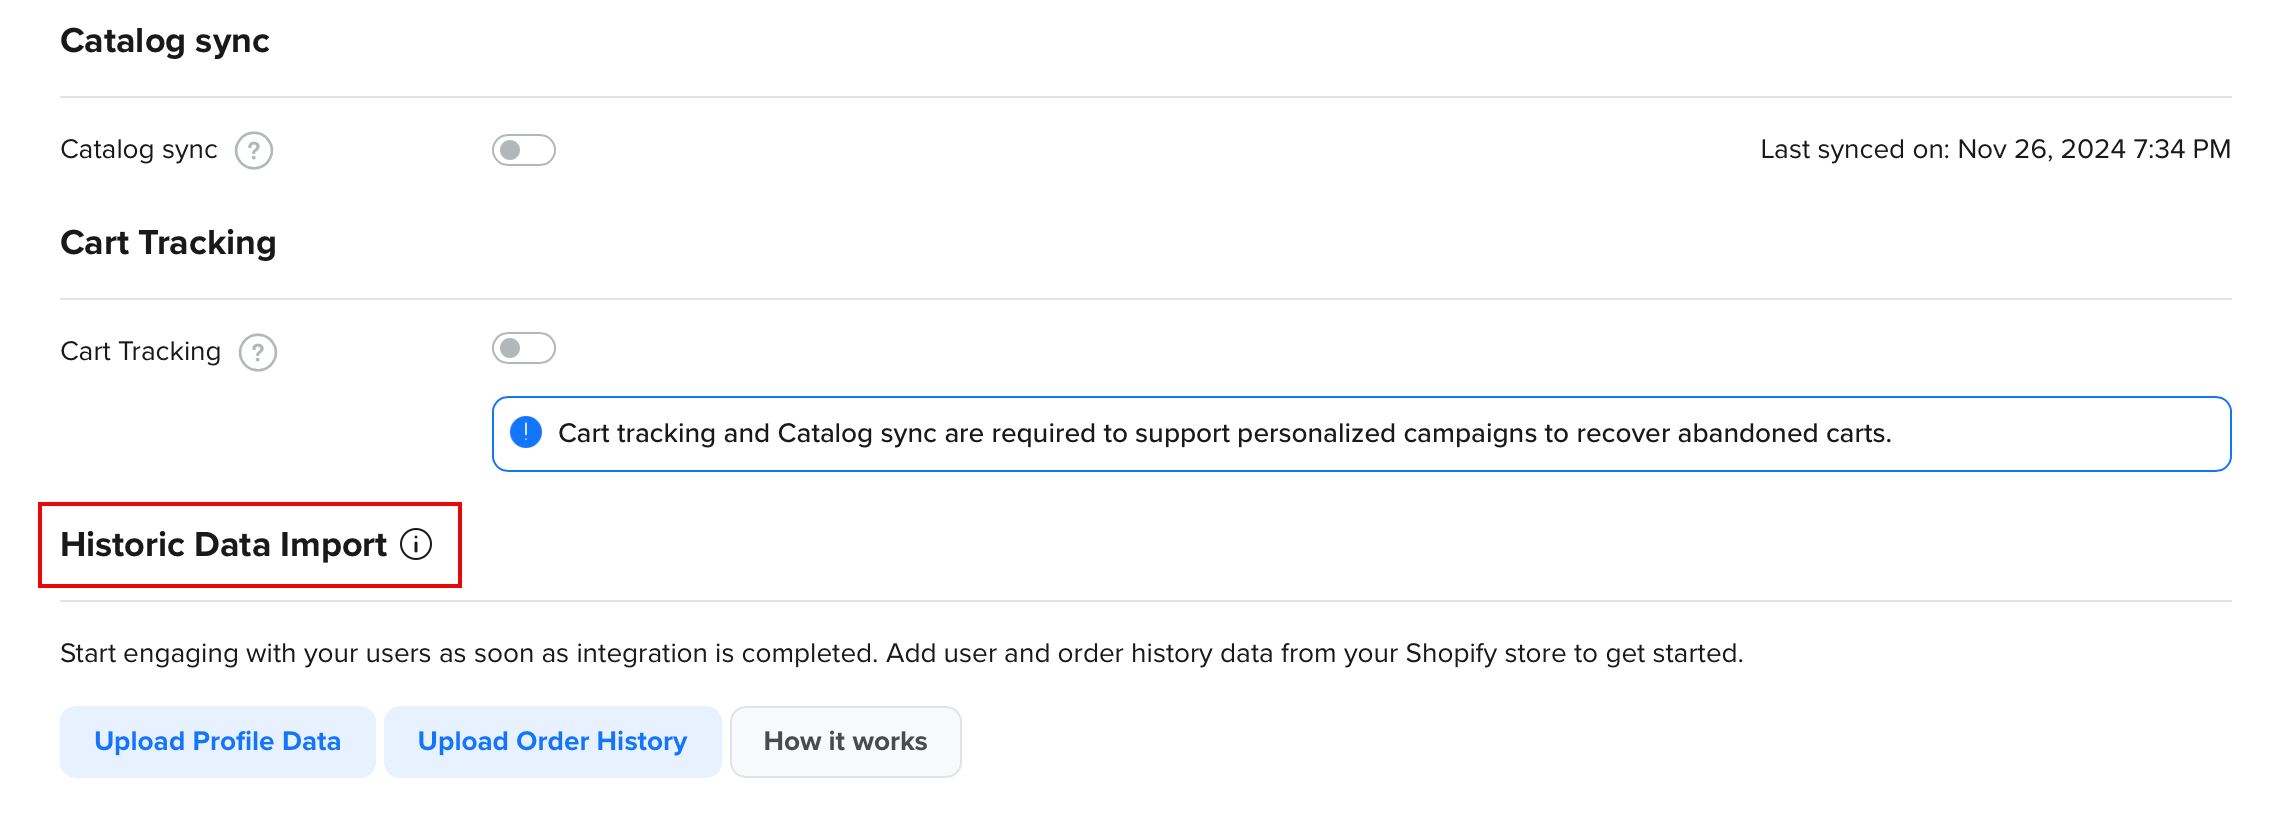
Catalog Sync
The Catalog Sync feature simplifies catalog management by automating product data sync between customers' Shopify and CleverTap accounts. This integration ensures up-to-date catalogs are readily available for personalization across marketing channels like Email and WhatsApp, eliminating manual uploads.
To do this, enable the Catalog Sync option in the Advanced Customization section of the Shopify Integration page.
 Catalog Sync Feature for Shopify
To enable Catalog Sync in your dashboard:
- Go to the Shopify Integration page within CleverTap.
- Click the Advanced Customization section.
- Toggle on the Catalog Sync feature.
Enable App Embed Status
The App Embed status displays as Enabled if enabled already.
The App Embed status informs you if it is active. By default, app embed blocks are deactivated after an app is installed. However, if the App Embed status is Disabled , merchants must activate app embed blocks in the theme editor, from their Shopify theme settings. Refer to this detailed document on App embeds to learn more.
To enable CleverTap-Shopify App Embed on your Shopify store:
- Navigate to your Shopify store's theme settings page using the following URL:
https://<Your-Shopify-store-name>.myshopify.com/admin/themes/current/editor?context=apps&activateAppId=2566991a-cd89-49d8-997d-74717582b9ed/app-embed. - Toggle ON the Clevertap-Shopify App embed and click Save at the top right corner.
 Toggle ON CleverTap-Shopify
To check if the CleverTap-Shopify App embed is enabled:
- Navigate to your Shopify store, right-click and, select Inspect.
- Navigate to Sources tab and select Page.
- Search for the clevertap-shopify.js file in the extensions folder under cdn.Shopify.com. Refer to the following image:
 Verify if CleverTap-Shopify App Embed is Enabled
Cart Abandonment Use Case
Cart personalization allows businesses to send dynamic cart abandonment emails displaying all the products users have left in their cart without making a purchase. Events such as Add to Cart store the most recent product added to the cart. This limitation prevents a real-time view of all the products in the cart, making it difficult to run campaigns that fully reflect the user’s cart activity.
CleverTap uses a combination of User Properties and Catalog Personalization to achieve the card abandonment use case:
- User Properties: Stores variant IDs in an array format when users add items to their cart. These properties update dynamically when items are added or removed during checkout.
- Catalogs: These contain additional product details, such as product name, image URL, and price, and are synced in the CleverTap dashboard using the Shopify Catalog Sync feature.
This approach enables businesses to create dynamic campaigns that accurately reflect the state of the user’s cart. By combining user properties with catalogs and advanced personalization techniques like liquid tags, CleverTap enhances the effectiveness of cart abandonment campaigns, delivering an effortless shopping experience.
NoteCart Personalization works only if the Added to Cart, Charged, and Removed from Cart events are sourced through the CleverTap Shopify plugin. Custom implementations of these events are not supported.
Live Action Email Campaign
Learn how to create personalized cart abandonment emails using CleverTap's Live Action Email campaigns.
Scenario
A user visits an e-commerce store and adds multiple items to their shopping cart. However, the user leaves the website without making a purchase.
Objective
Using Cart Personalization, you can:
- Encourage users to complete their purchases by sending tailored, timely reminders via Email.
- Recover potential lost revenue.
- Provide a personalized and seamless shopping experience for the users.
Steps to Implement Cart Abandonment Campaigns
To set up an Email campaign, follow these steps on the CleverTap Dashboard:
-
Toggle theCatalog Sync feature: Toggle the Catalog Sync feature to automatically sync product data between customers' Shopify and CleverTap accounts.
-
Toggle theCart Tracking feature:
This feature ensures that the variant IDs from the users' cart are stored in their CleverTap profile. For example, when a user adds a product to their cart, the variant ID will be saved as a user property in an array format in the user's profile, under the shopify_cart_ids. Similarly, when a user removes a product from the cart, the variant ID will be removed automatically. To enable Cart Tracking in your dashboard:- Go to the Shopify Integration page within CleverTap.
- Click the Advanced Customization section.
- Toggle on the Cart Tracking feature.
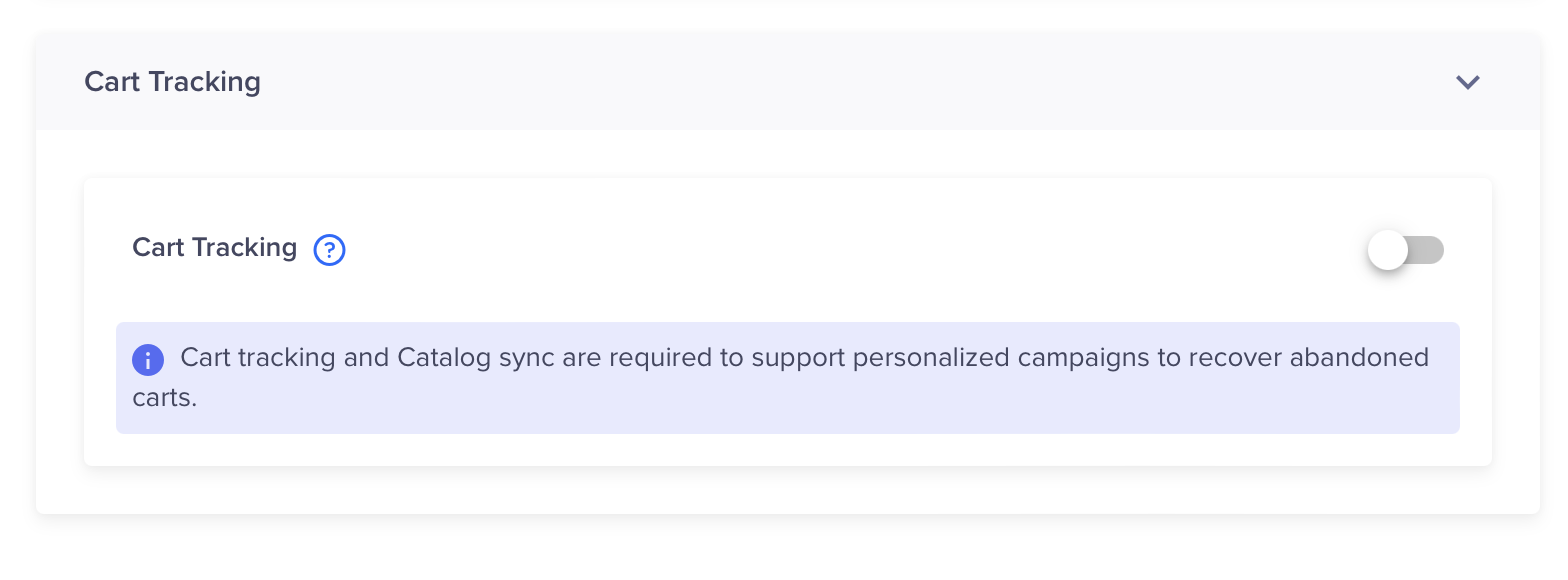 Cart Sync Toggle
- Create the Campaign:
Define the campaign as an inaction campaign targeting users who added products to the cart but did not complete a checkout action within 15 minutes.
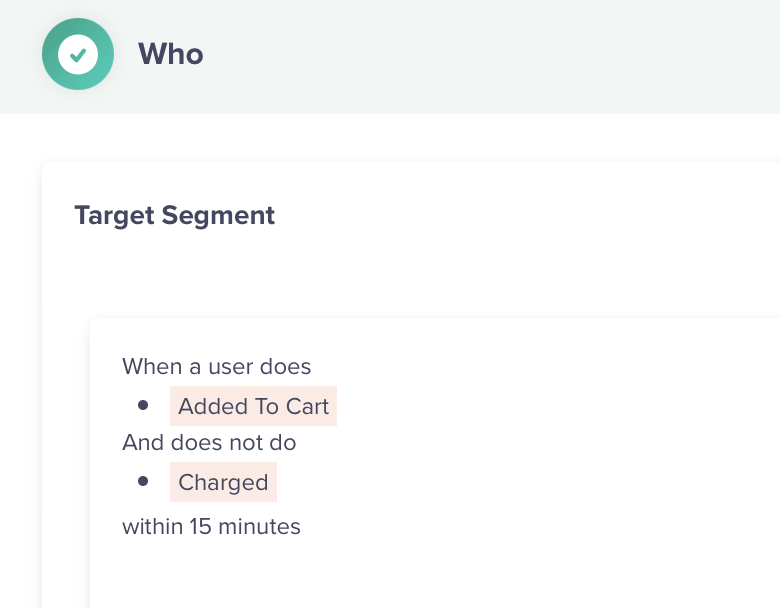 Inaction Campaign
For more information, refer to Create an Email Campaign.
- Mapping the campaign with Catalog:
- Go to What section of the campaign editor and click on Personalization.
- From the Catalog tab, select shopify-catalog.
- Select the shopify_cart_ids user property and map it to the Identity column in the catalog.
 Mapping the Catalog
- Set UpPersonalization with Liquid Tags:
- In the What section of the email body editor, drag a Text field into the email body.
- Click on More and select the Customize with Liquid tags option.
- Use Liquid Tags to dynamically fetch the product details (name, image, price, etc.) from the catalog's CSV file.
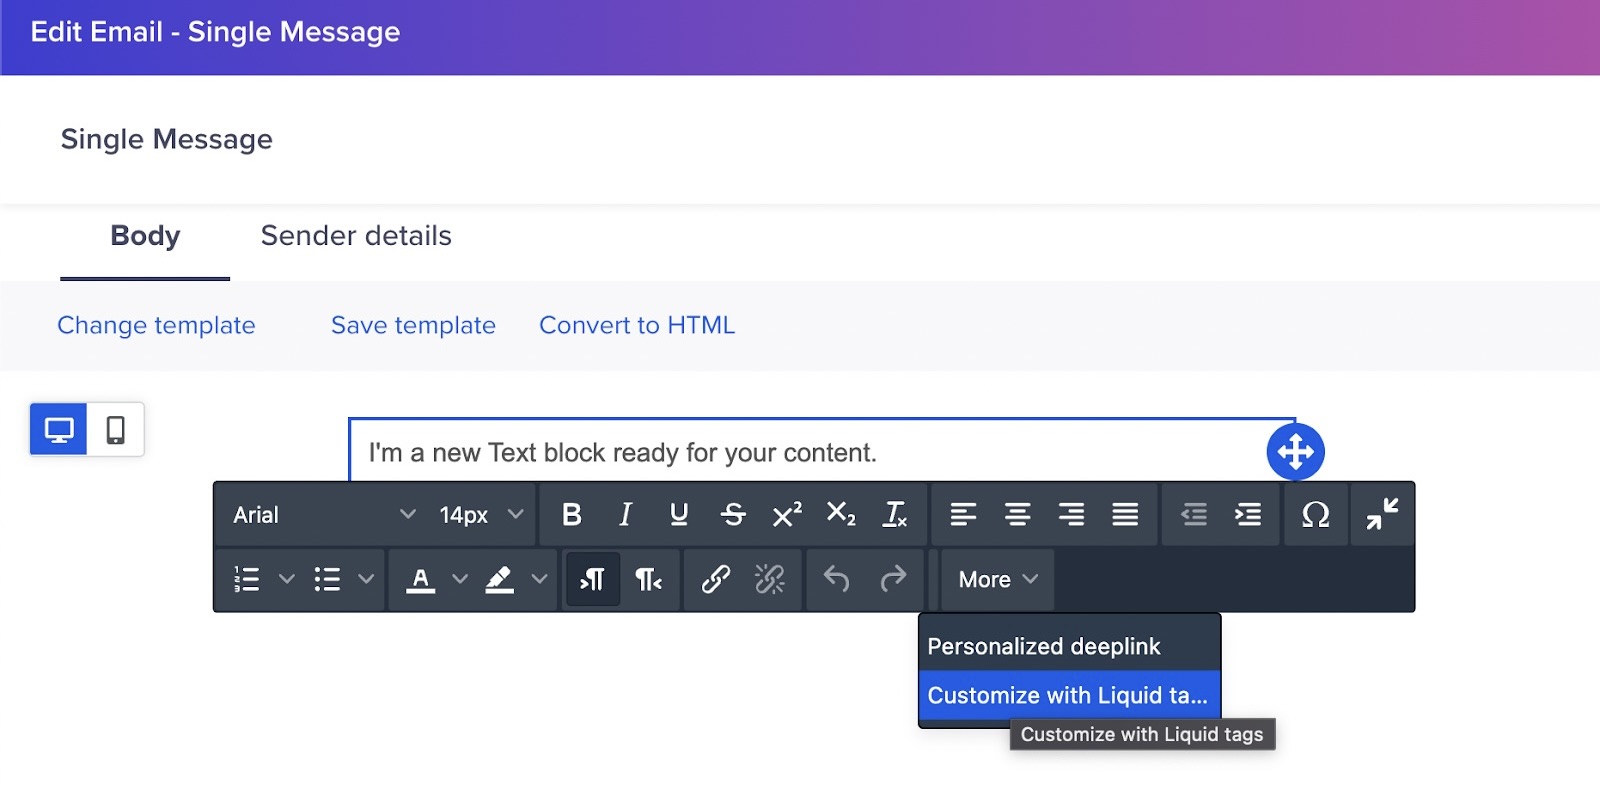 Liquid Tags
For example, you can use HTML tags to create a table and For loop in Liquid tags to traverse the Catalog. The For loop will run until it covers all the Variant IDs in the Profile property.
Key ConsiderationsIf a user empties the cart without performing the Charged event, the
For loopin the liquid tags will not run. Consequently, the Email will be delivered without product data, as the user remains eligible for the campaign despite having no variant IDs. Therefore, ensure that the email templates are designed to handle scenarios where the product table does not render, maintaining a professional appearance.
- Apply Frequency Caps:
To prevent multiple emails on every Add to Cart event trigger for a single user, apply a frequency cap within the campaign to send only one email per cart addition.
- Test the Email to ensure correctness:
You can test the campaign to ensure personalized rendering of product details from the products left in your cart.
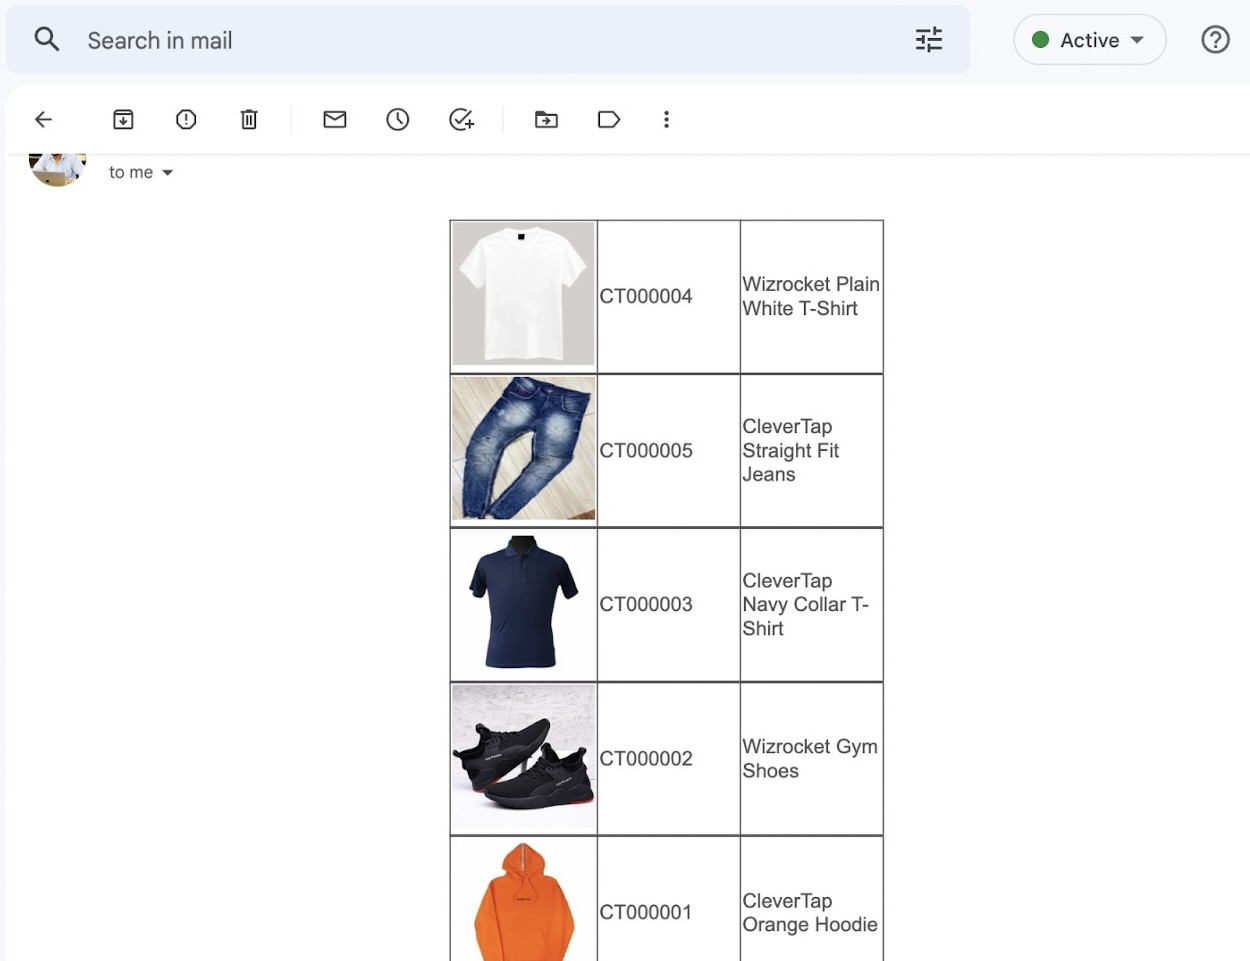 Final View of the Email
CleverTap's cart abandonment campaigns allow businesses to recover revenue by re-engaging users with personalized messages, thus driving conversions.
Create Web Campaigns
The CleverTap Shopify plugin provides support for web channels such as Web Push , Web Pop-up , and Web Exit Intent without the need for any manual code integration.
To create a Web campaign:
- From the dashboard, navigate to Campaigns.
- Click + Campaign.
- Create a Web Push , Web Pop-up , or Web Exit Intent campaign to engage your users.
FAQs
Does my current billing plan include integration with the Shopify plugin?
Yes. This Shopify plugin is available for all CleverTap billing plans.
I have a Shopify web store and a mobile app. How do I target users who have performed an event on my Shopify store?
To target the users who have performed the event on your store:
- Select the event (for example, added to cart) in the CleverTap segment builder.
- Filter by event property CT Source equal to Shopify.

Filtering Shopify Users from Find People Page
I see a warning Shopify installation seems to have a few missing files displayed at the end of the Project page. How do I resolve this warning?
CleverTap recommends reinstalling the plugin by clicking Reinstall.
Will this plugin work for Shopify Plus customers?
Yes. This Plugin works for Shopify Plus customers too.
Updated 4 months ago