Segments
Understand what are CleverTap Segments and how it works.
Overview
A segment in CleverTap is a group of users that share the same characteristics such as actions performed, actions not performed, or user profile properties based on the defined criteria. For example, a segment can be users who launched the app for the first time in the past 30 days. A more complex segment could be users who live in New York, were acquired via a Facebook campaign in April, transacted three or more times in May and June, and have not transacted in the past two weeks.
The Segments page lets you create segments, perform different operations on the segments, and view segment trends over time to understand how a segment behaves in response to your marketing initiatives. The entire CleverTap dashboard can be filtered by any segment you create, including any of our analytics features.
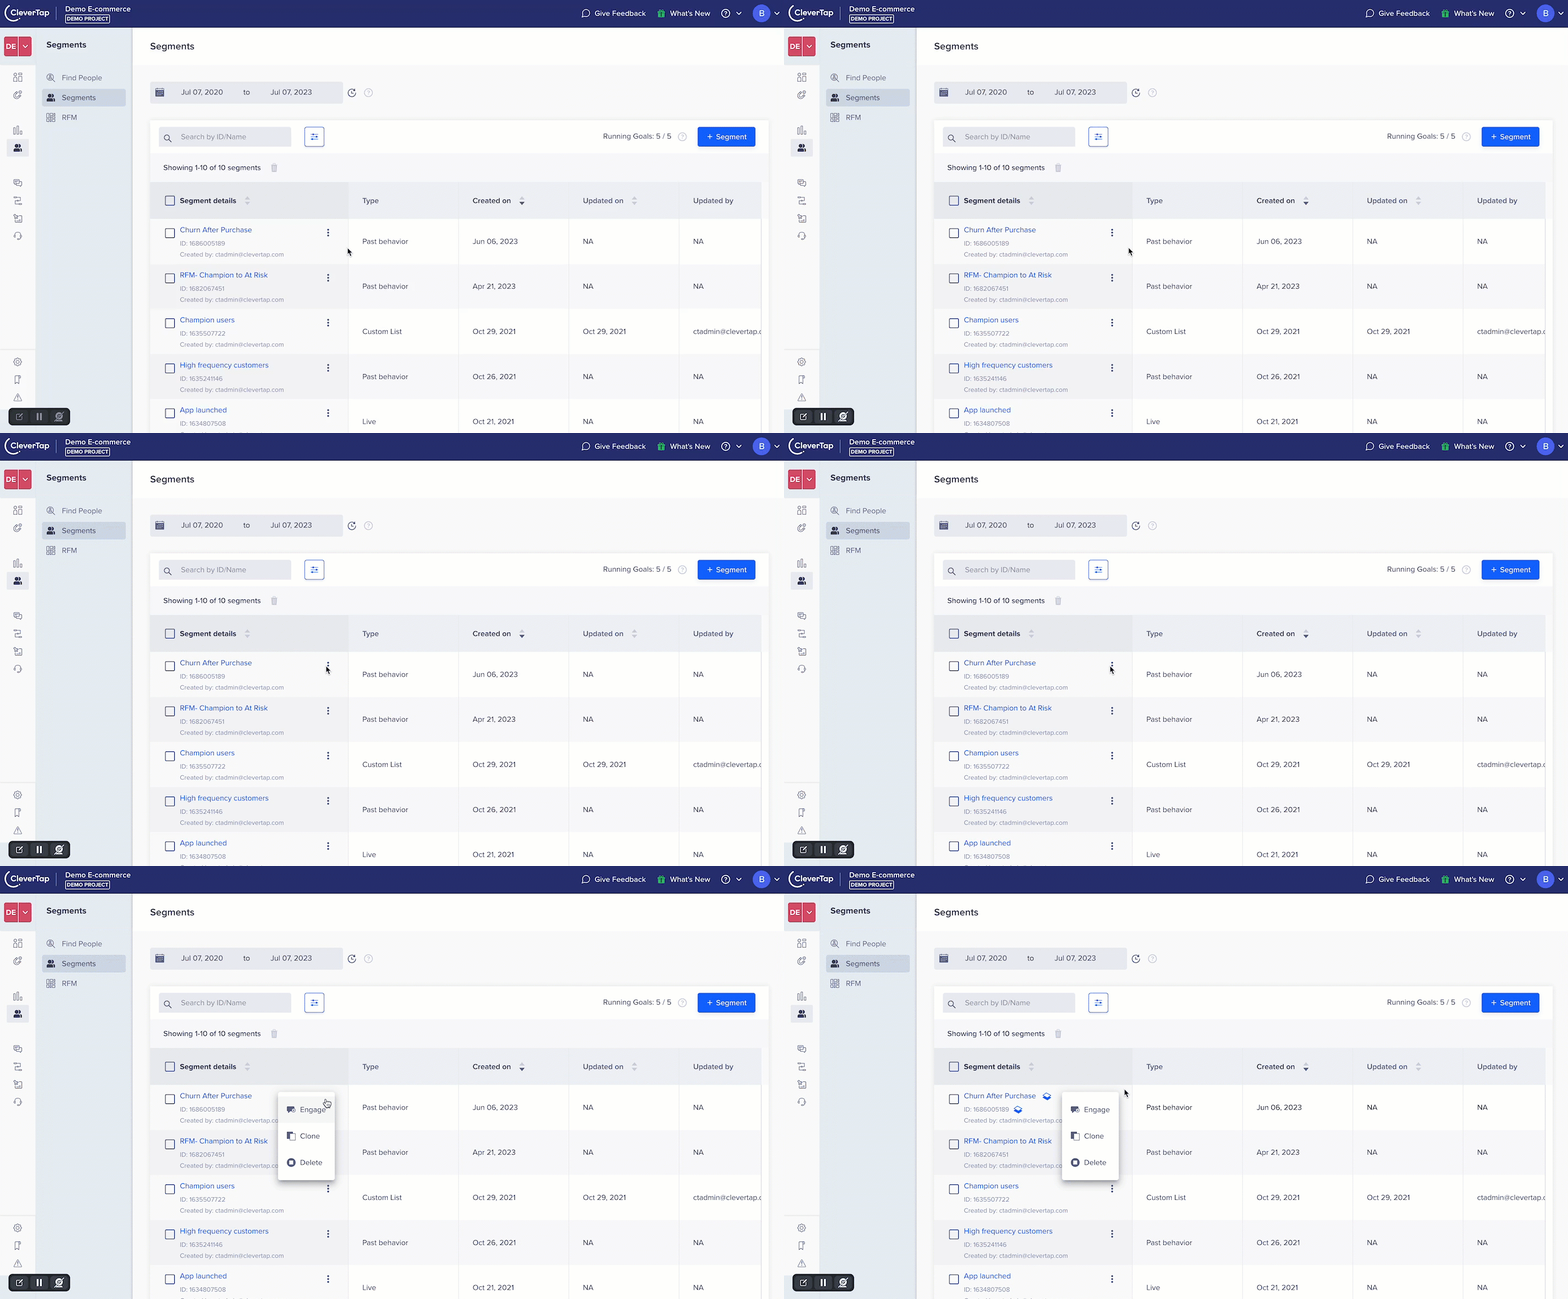
View List of Created Segments
Field | Description |
|---|---|
Segment details | Displays the details like segment name, ID, and email ID of the user who created the segment. |
Type | Displays the type of segment. The following are the options available: |
Created on | Displays the date on which the segment was created. |
Updated on | Displays the date on which the segment was last updated. |
Updated by | Displays the email ID of the user who last updated the segment. |
Goals | Displays the number of goals that are running on the segment. |
IBS Goals | Displays the number of goals running with Intent-Based Segment. |
Engagement |
|
Dependent Segments |
|
System User Segments
Before creating any segment on the CleverTap dashboard, there are default system segments already present on the dashboard. The following are the system-defined user segments that are available for your use:
- All Users: This user segment contains all the users added to your project.
- Test Users: The Test User segment is a default user segment in CleverTap that businesses can use to test their campaigns, journeys, and product experiences before sending them to actual users. This segment allows businesses to experiment with new features, messaging, and campaigns in a safe and controlled environment. Using Test Users helps businesses measure the effectiveness of their ideas before rolling them out to a larger audience. Test Users can be manually created from the CleverTap dashboard or imported through a CSV file and segmented based on various criteria. For more information, refer to Mark a User Profile as a Test Profile.
Types of Segments
There are three types of segments in CleverTap, which are explained in the following sections:
Past Behavior Segments
Past behavior segments include users grouped by their actions in the past. You can group users based on a single activity or do complex combinations of actions, inactions, and user properties.
For example, you can create a segment of users from California, who are females, launched the application in the last 30 days, and have not purchased anything from the app.
Past behavior segments can be based on:
- Actions: Add users to a segment if they have performed an event. For example, users who added a product to the cart in the past 30 days.
- Inaction: Add users to a segment if they have performed an event but did not perform another event within a certain time. For example, users who added a product to the cart but did not purchase in the last 30 days.
- Actions with user properties: Add users to a segment if they did or did not perform an event and have a common user property. For example, platinum-level users who added a product to the cart but did not purchase in the last 30 days.
Live User Segments
While past behavior segments let you evaluate users based on historic criteria, live user segments let you track what is happening in your app right now. When you define a set of behaviors of interest, CleverTap monitors for these behaviors as they happen in your app and immediately adds a user to a segment the moment their behavior matches your action criteria. You can create live user segments for the following:
- Single action: Add users to a segment as soon as they perform an event. For example, users who booked a movie ticket from your app.
- Inaction within time: Add users to a segment when they perform a particular event but did not perform another event within a certain time. For example, users who have added a product to the cart but did not purchase it within 10 minutes of adding the product to the cart.
- On a date/time: Add users to a segment based on date and time property value. For example, users who have an appointment five days from the current date.
- Page visit: Add users to a segment as soon as they visit a specific URL on your website. For example, users who have visited the Resources page of your website.
- Referrer entry: Add users to a segment based on a referring website or campaign. For example, users who have visited your website via a specific external referrer URL.
- Page count: Add users to a segment based on the number of pages visited by them. For example, users who have visited five web pages on your website.
Custom List Segments
A custom list segment is a list of users from any source, including third-party tools or internal databases. You can deliver personalized messages to these users based on their past or real-time behavior in the app. For more information, refer to Custom List Segment.
Create Segments
The steps vary based on the type of segment you want to create.
Create Past Behavior Segments
In this example, we can create an action-based segment where users will qualify if they have applied for a payment offer at least one time in the past 30 days.
To create a past behavior segment, perform the following steps:
- Navigate to Segments > Segments from the dashboard.
- Click +Segment.
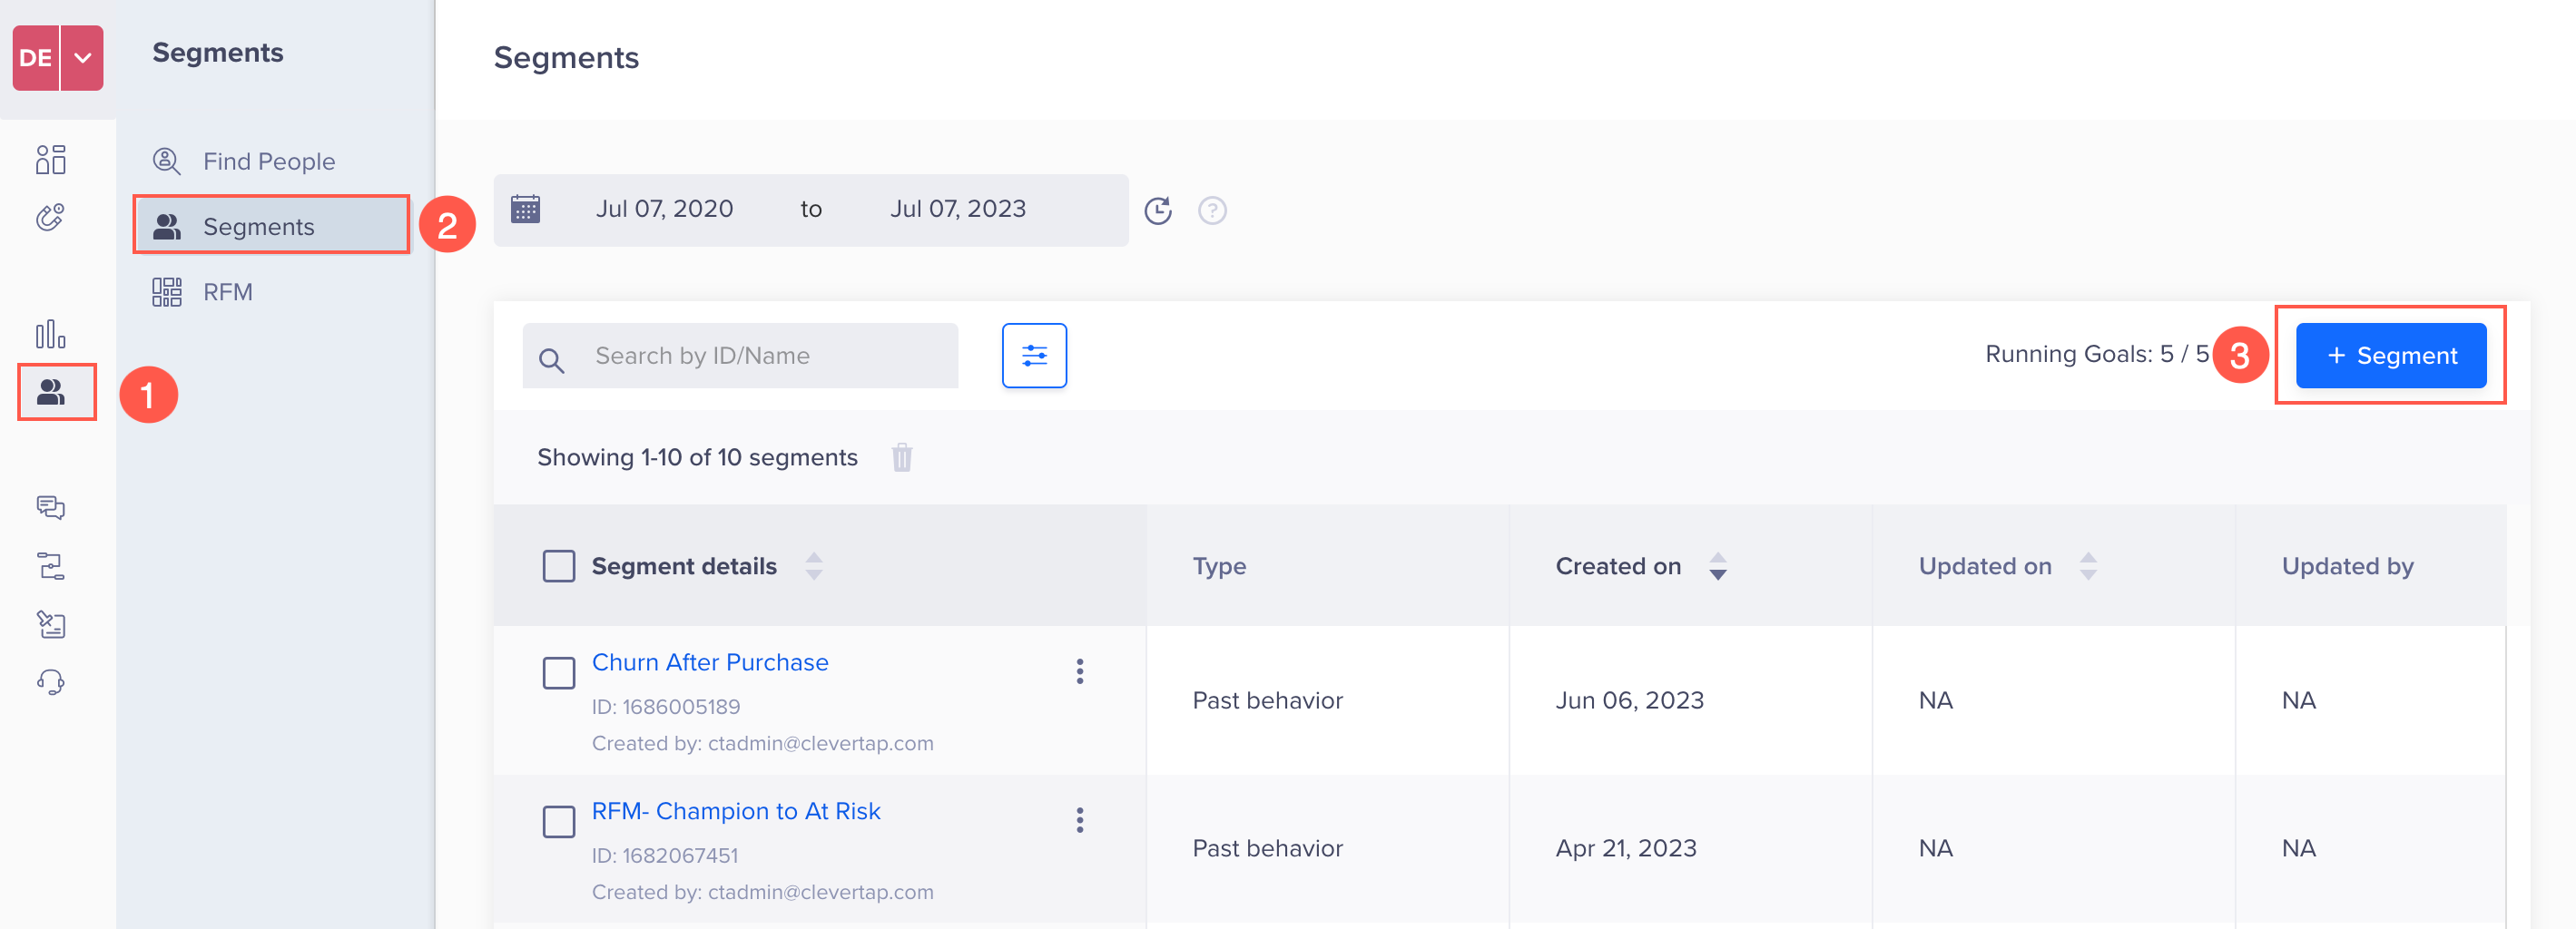
Create a New Segment
- Select the box Actions underneath Past behavior segments from the main segment creation page.
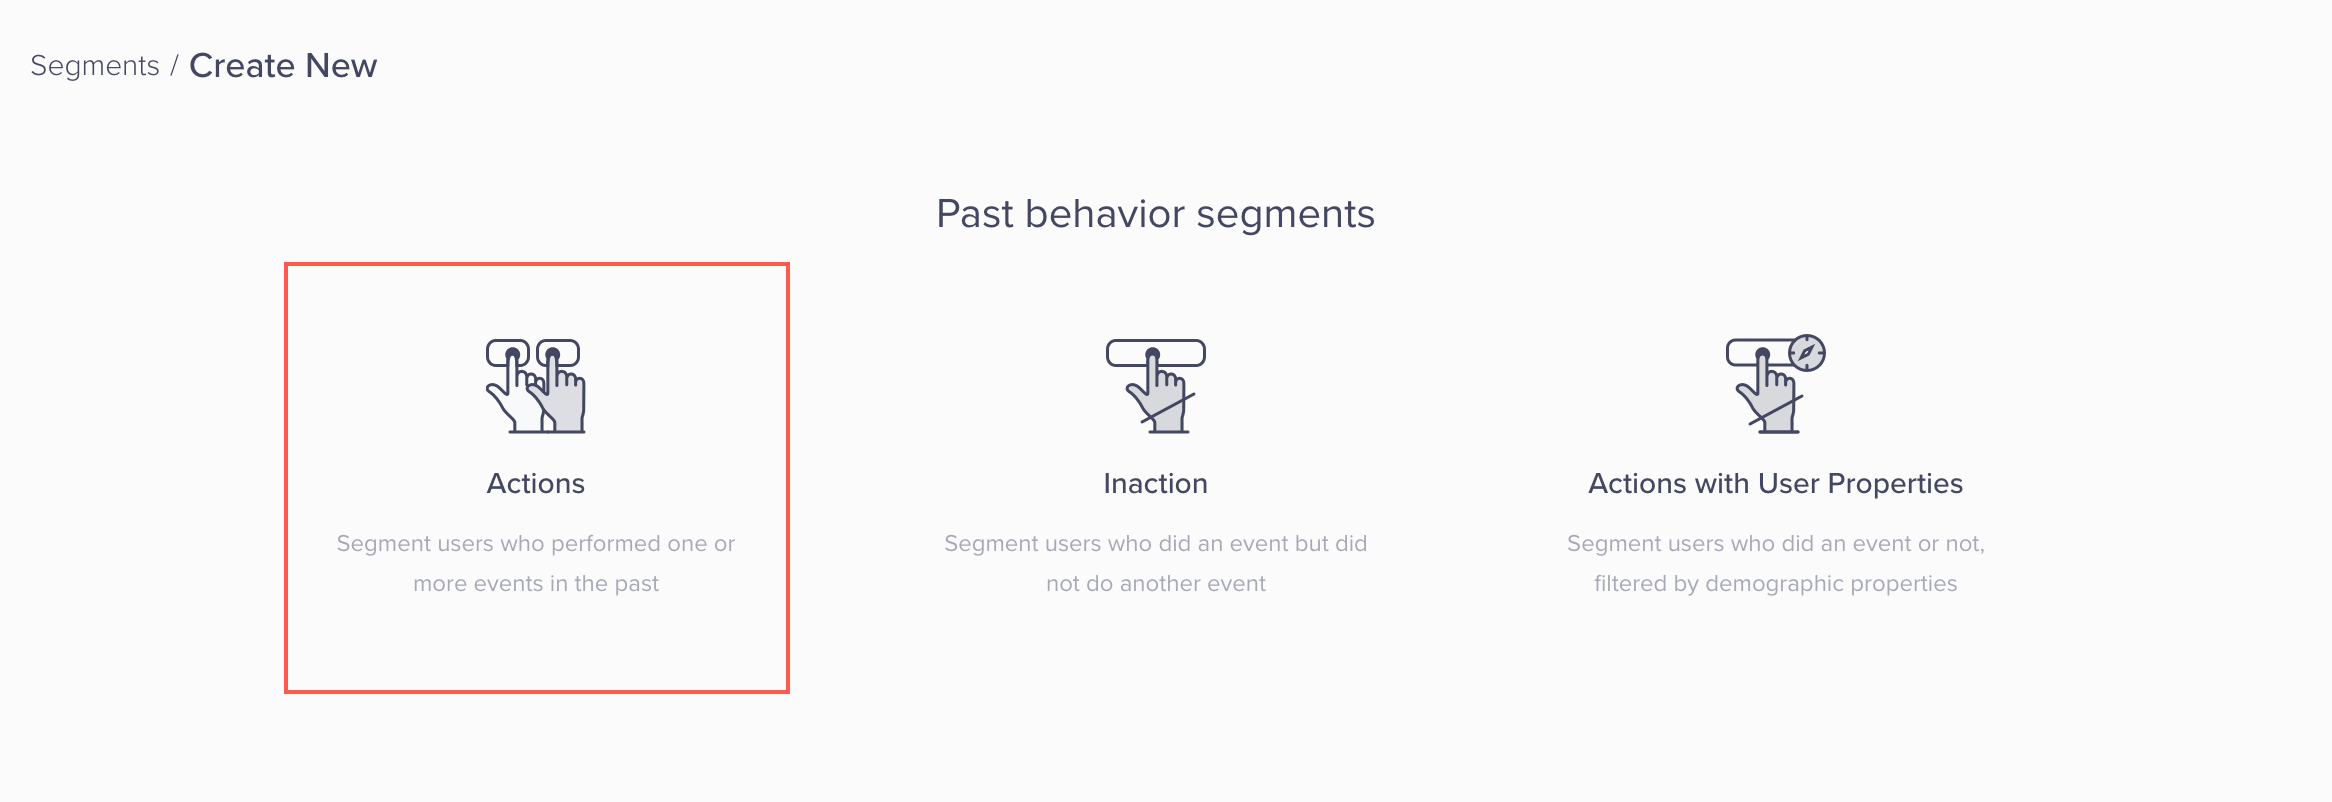
Past Behavior Segments
- Define the segment rule as shown below on the segment query page.
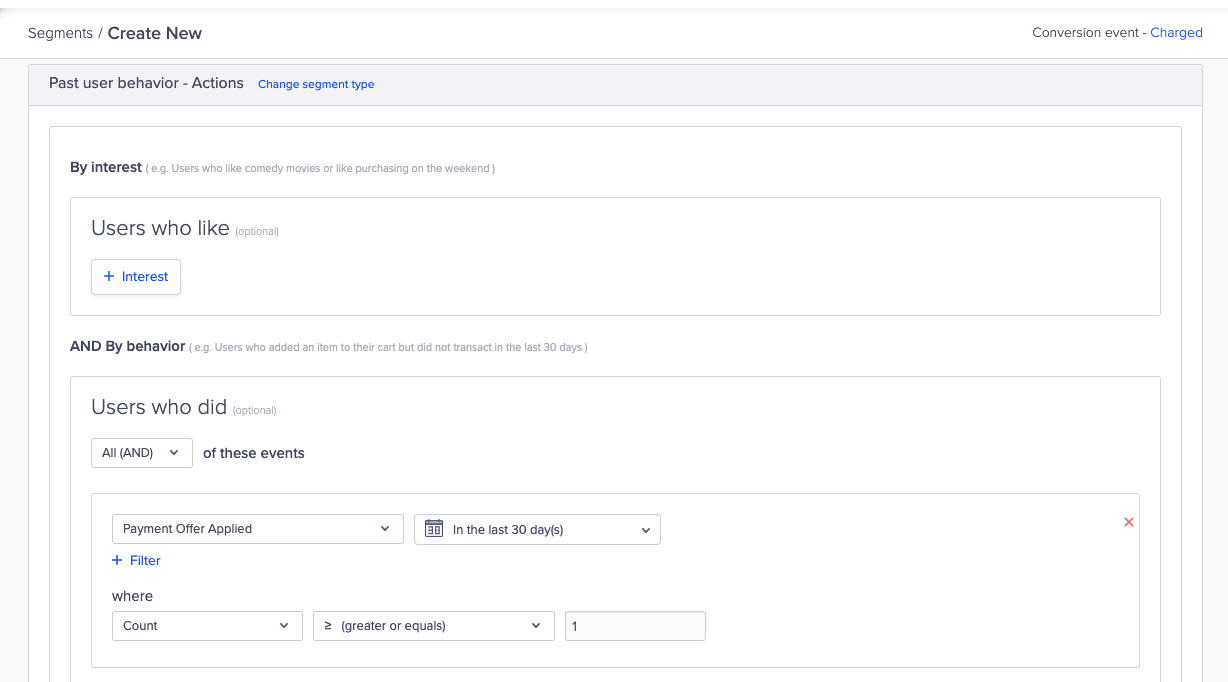
Create a Past Behavior Segment
- Click Save segment and name the segment.
You can now view your new segment on the Segment List page.
Create Live User Segments
In this example, we can create an Inaction within time segment for which users will qualify in real-time as soon as they add a product to their cart but do not purchase the product within 10 minutes.
Golden Window for Mobile TransactionsThe golden window within which most users transact on our iOS and Android app platforms is within 10 minutes.
To create a live segment with CleverTap, perform the following steps:
- From the dashboard, navigate to Segments > Segments.
- Click + Segment.
- Under Live user segments, select the Inaction within time box.
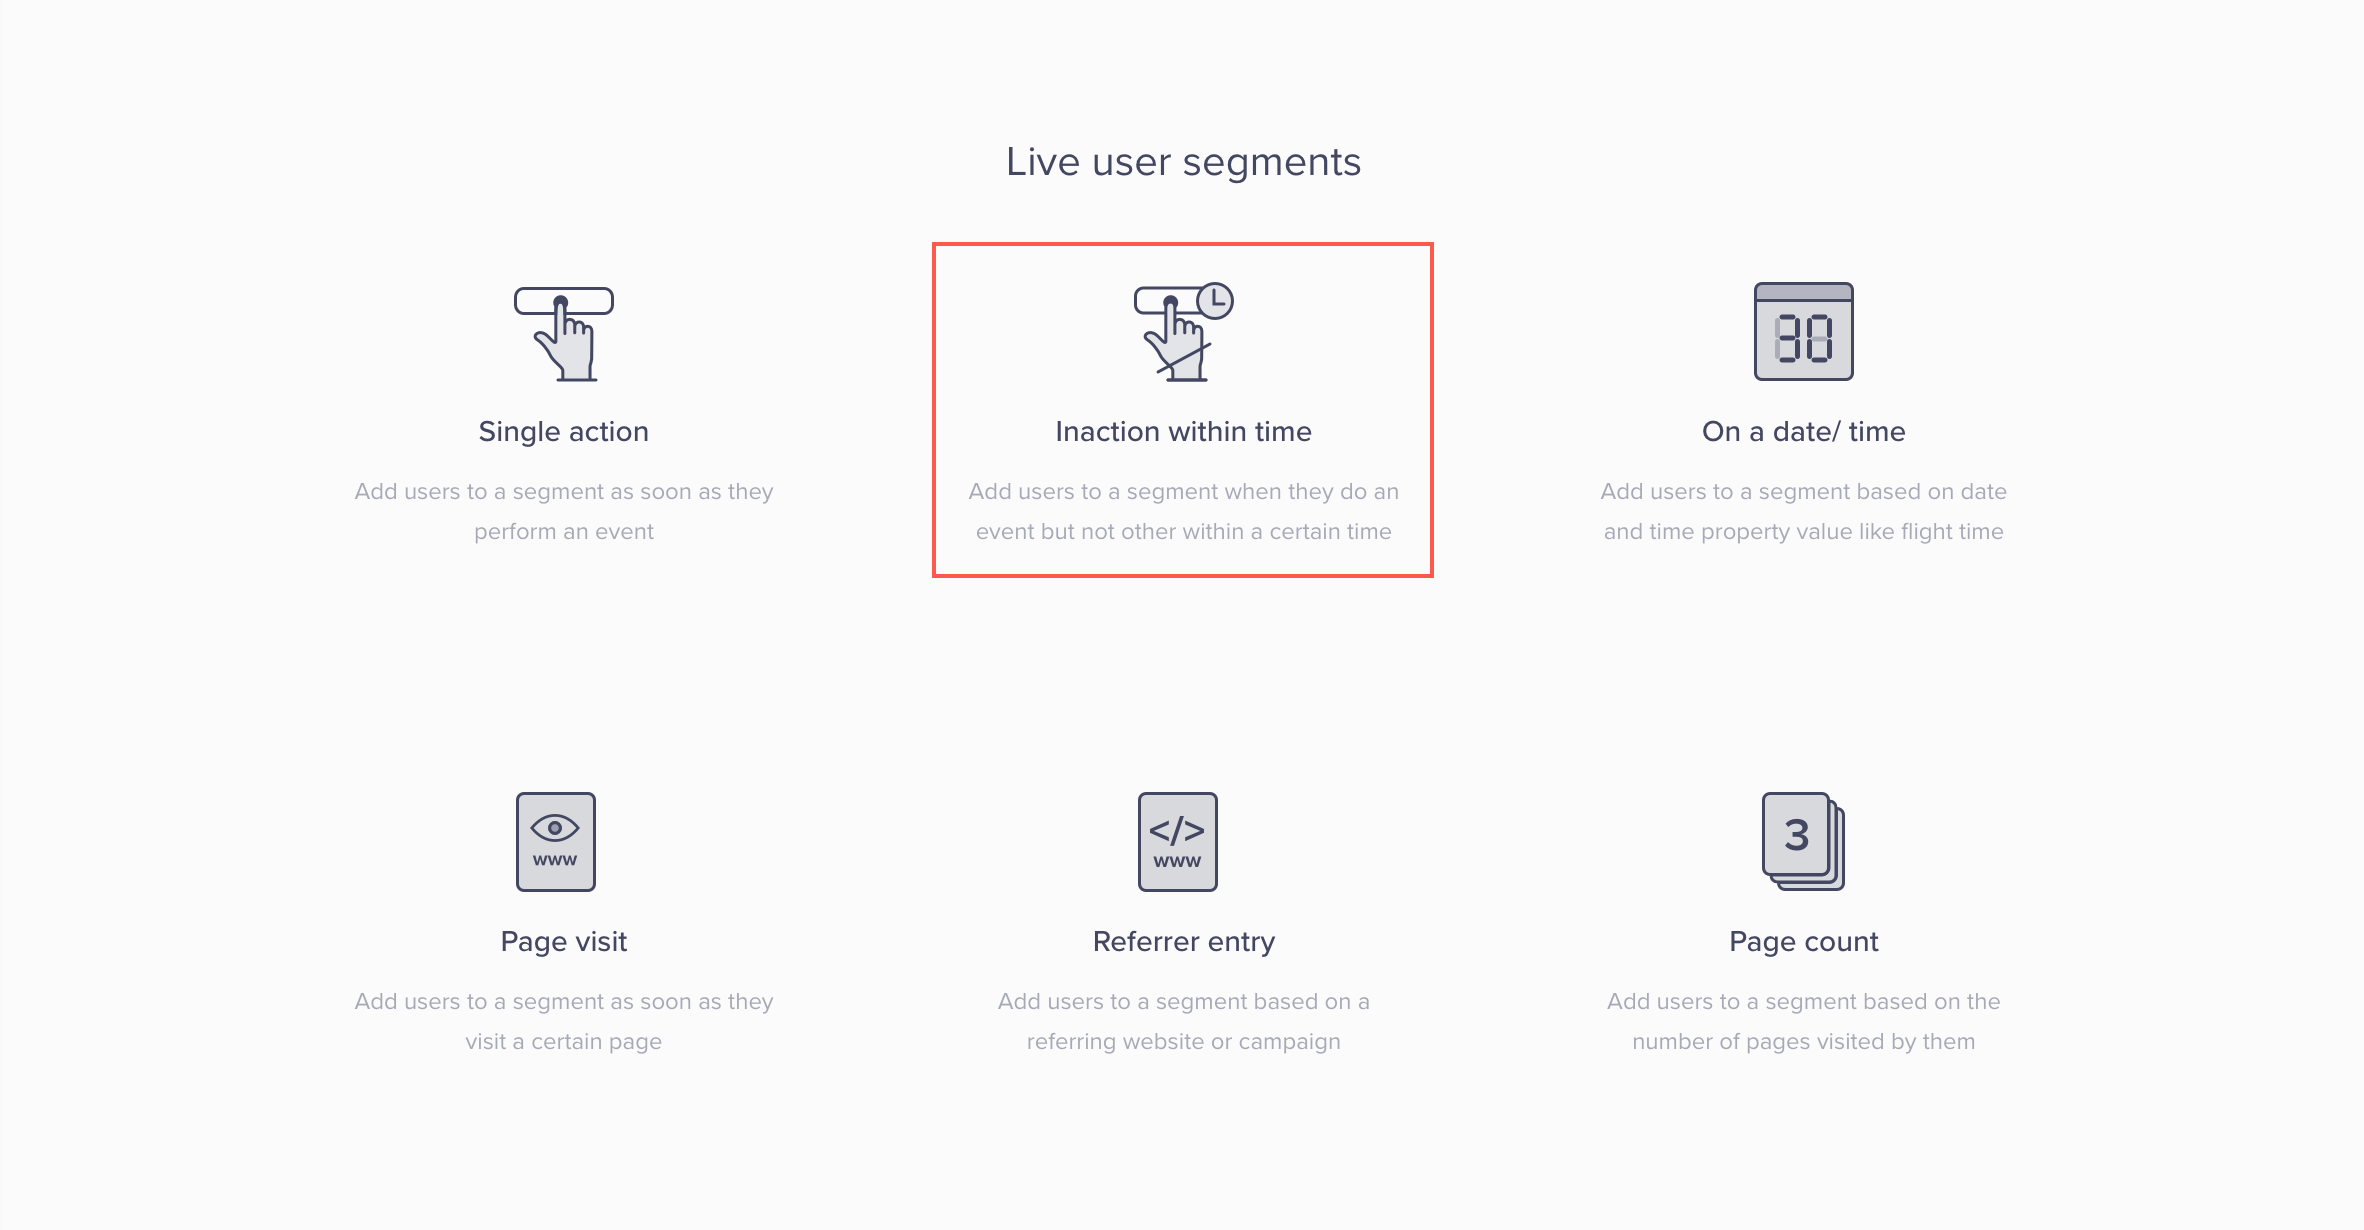
Live User Segments
- Select the appropriate properties for your live user segment.
You may choose to select the Filter on past user behavior and common properties checkbox to apply past action, inaction, or common user property filters.
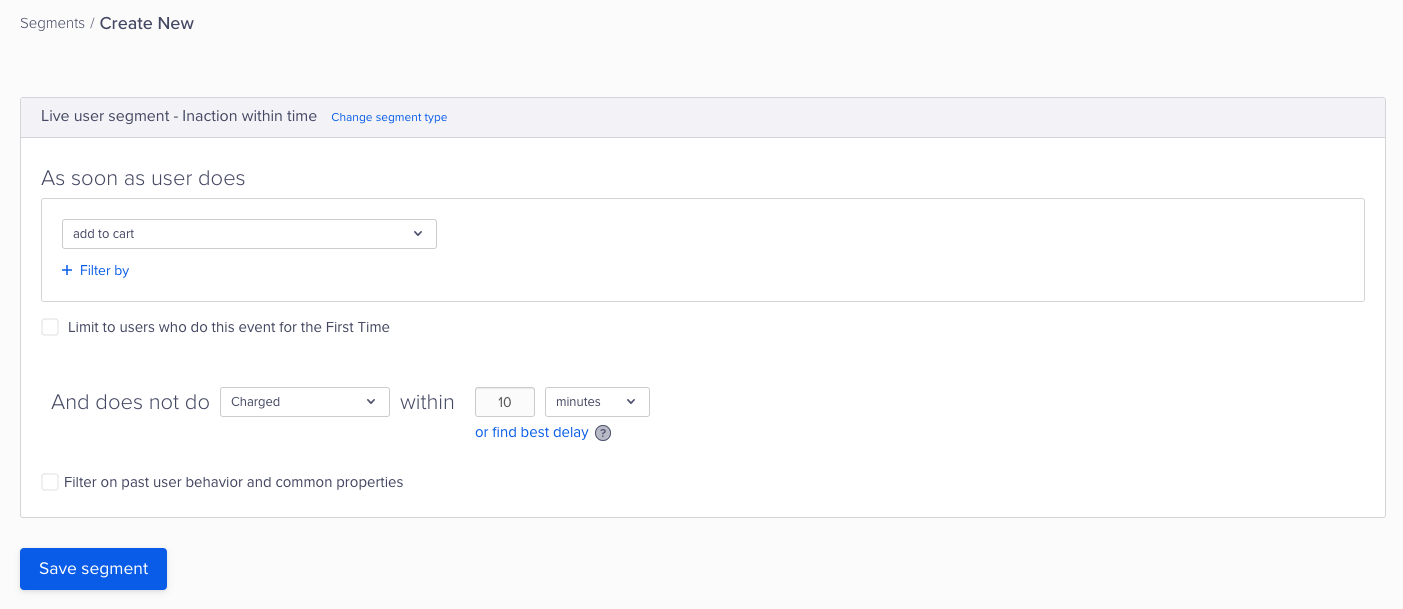
Create a Live User Segment
- Click Save segment and name the segment.
Segment Naming Best PracticesConvey the core meaning of the segment while keeping the name brief.
You can now see your new segment in the main section as Added to cart but no charge within 10 minutes.
View Segment Details
To view segment details, navigate to Segments > Segments, search for the segment you are looking for and then click on it. On clicking, segment details are displayed. At the top of the page, you can click View segment definition to understand more about the underlying query.
Past Behavior Segment Details
The top portion of the past behavior user segment report consists of a way to first view the segment definition to understand its underlying query. There are graphs on the left-hand side showing the plot of the number of users who qualified for the segment going forward from the first complete day post-segment creation. The list on the right-hand side shows the sample list of users who qualified for the segment on this day.
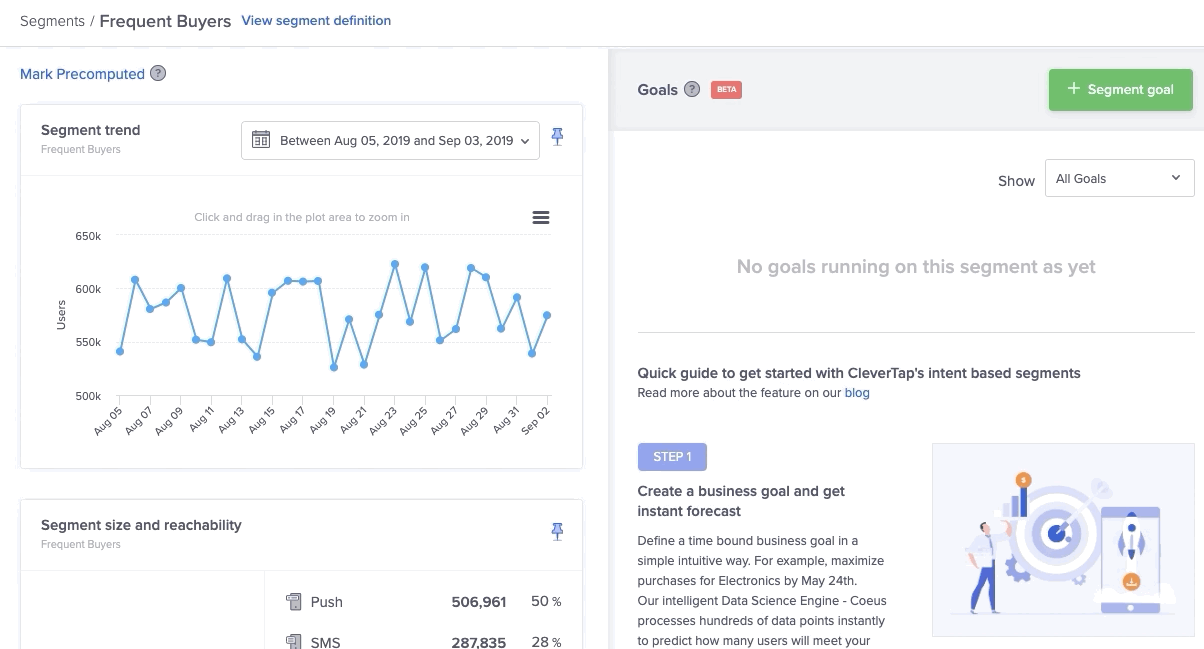
Segment Trend
The past behavior segment statistics are computed daily. However, when these segments are used in campaigns, the users who qualify for these segments are computed in real time. This ensures that users meeting the segment criteria during campaign execution reflect the most recent user activity data.
The lower portion of the past behavior segment report consists of reachability percentages for these users within each messaging channel. The lower-most part of the report shows you how to do more with this segment by either filtering relevant analytics dashboard views by this particular user segment or reaching out to this segment via relevant messaging channels.
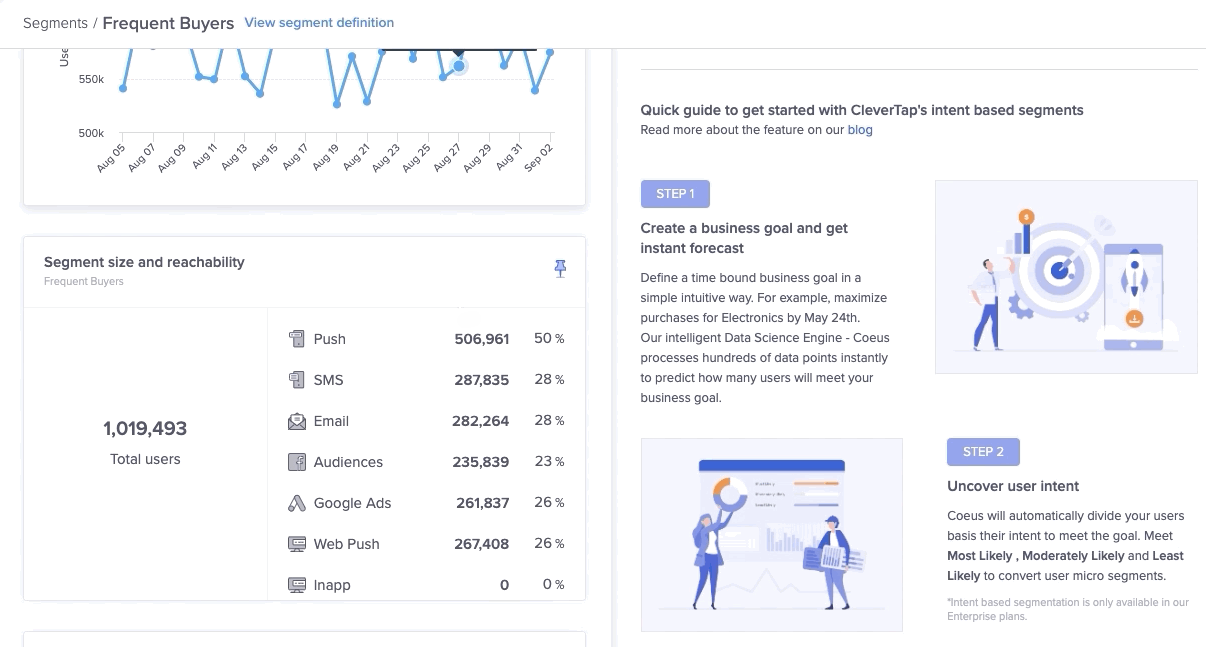
Segment Size and Reachability
Live User Segment Details
To view a live user segment report, perform the following steps:
- From the dashboard, navigate to Segments > Segments.
- Search for the segment you are looking for, then click on it.
At the top of the report, you can click View segment definition to understand more about the underlying query.
The two graphs describe the following:
- The left-hand side shows the plot of the number of users who qualified for the segment going forward from the first complete day after creating the segment.
- The right-hand side shows the real-time rate at which users are qualifying for the segment vs. all user activity on your app/website.
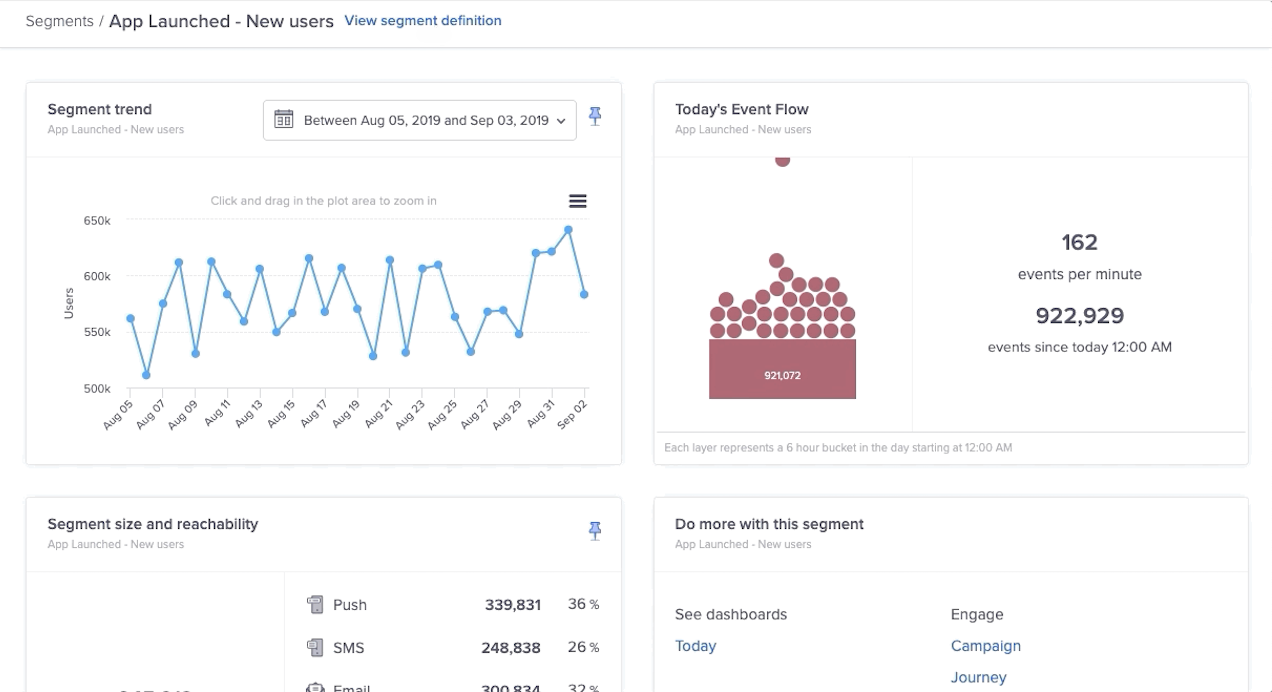
Segment Reports
- The lower portion of the live user segment report consists of a list of sample users trickling into your segment in real time on the right-hand side. It also shows the reachability percentages for these users within each messaging channel on the left-hand side.
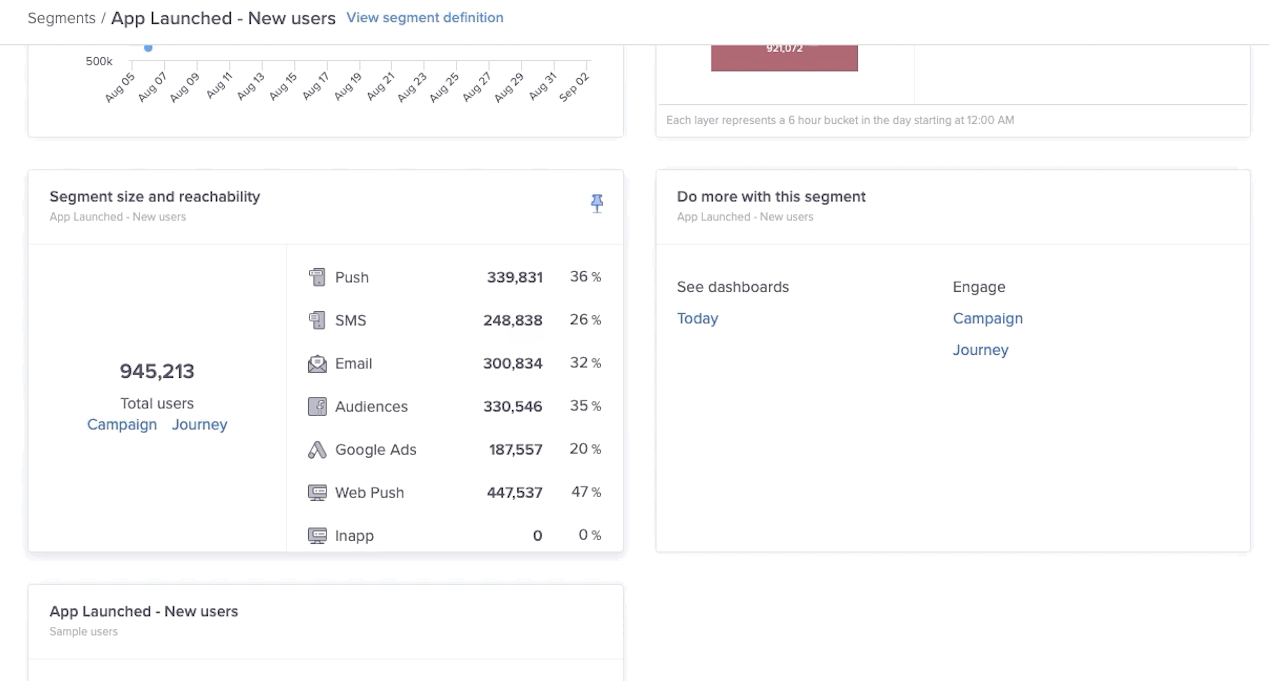
Segment Size and Reachability
- The lower-most part of the report shows how to do more with this segment by either filtering relevant analytics dashboard views by this particular user segment or reaching out to this segment via relevant messaging channels.
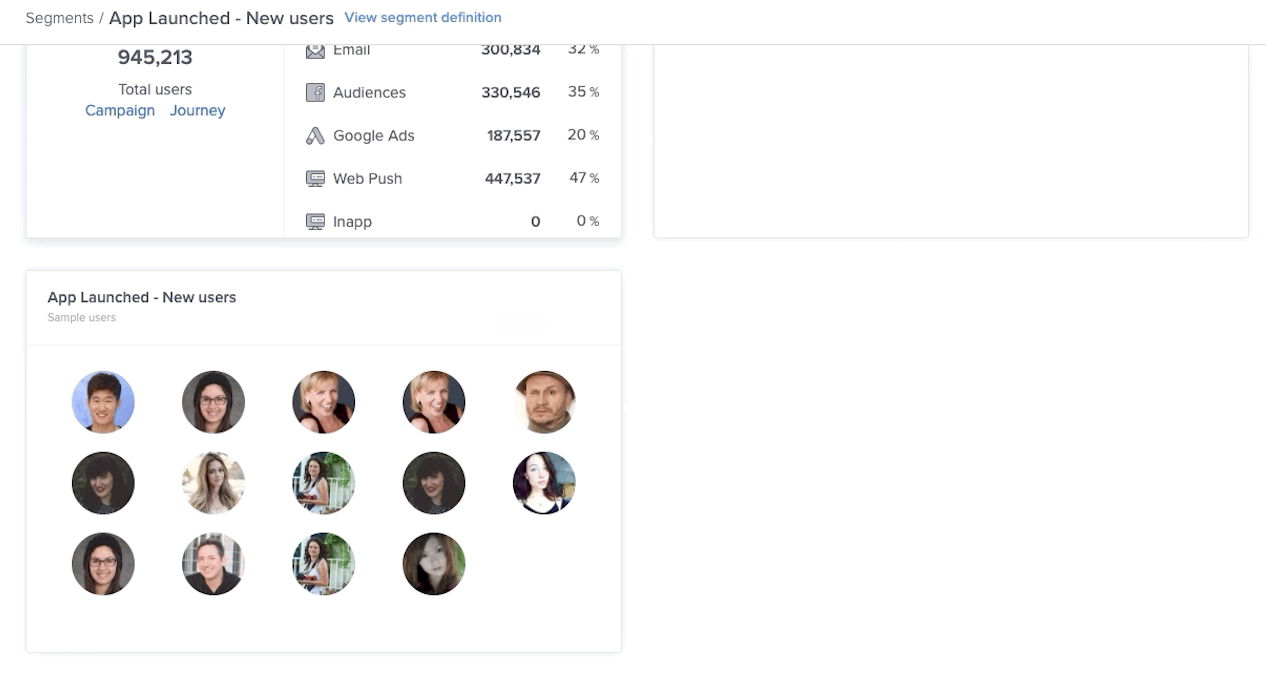
Sample Users
Export Users in a Segment
CleverTap allows you to export the users from any segment in the CSV format. To do so:
- From the Segments page, select the segment from which you may want to export the users. You can also filter out the segments using the Type and Goals filters. The page opens where all the segment details are displayed.
- Scroll down and navigate to the Sample users section and click Download.
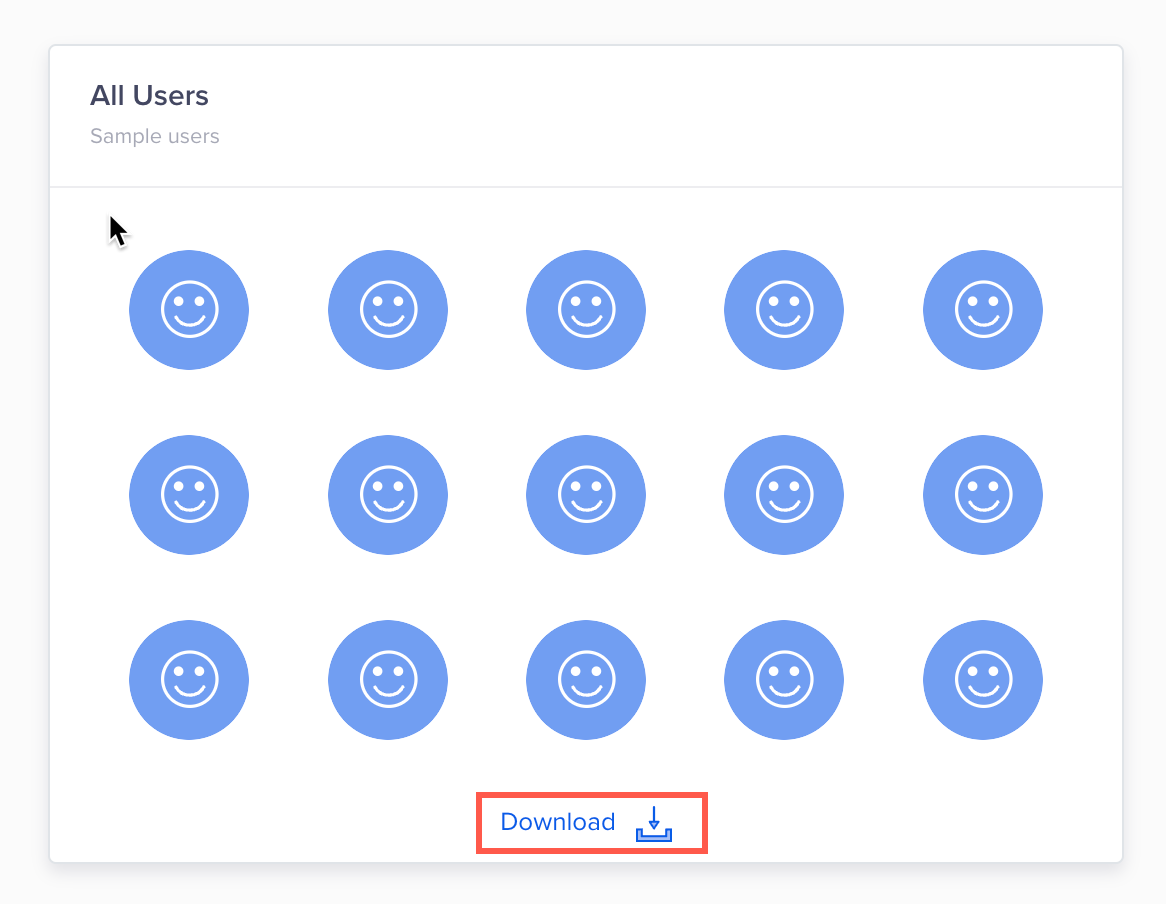
Download Sample Users
- Select the fields you want to export and click Proceed.
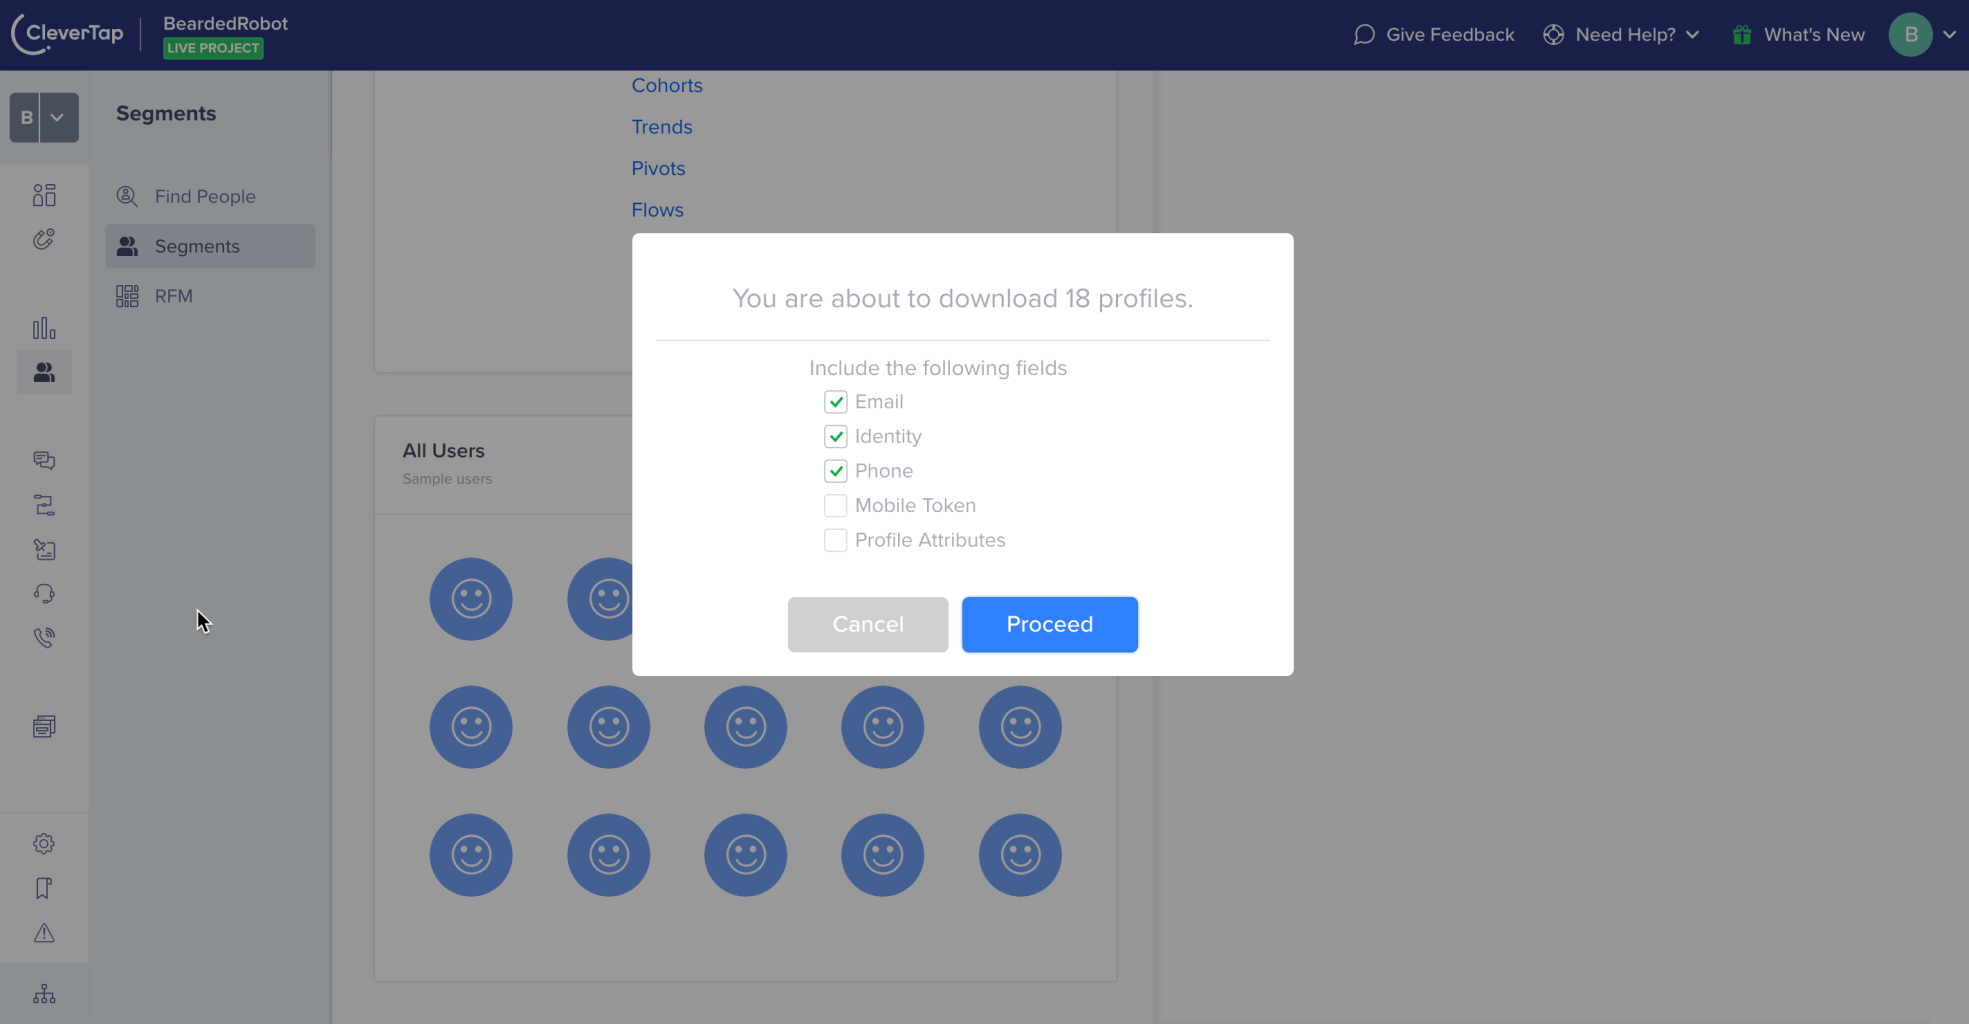
Select the User Details
Mismatch in Segment Size and Number of Users Exported to CSV FileThe number of users displayed under the Segment size and reachability section may vary from the number of users exported to the CSV file. This variation is due to the inclusion of blacklisted users under the Segment size and reachability section.
View Analytics Filtered by Segment
Under the Do more with this segment section, you have the option to view an analytics report. This is for the chosen segment alone and not your entire user base.
Real-time dashboard views such as the Today dashboard only enable filtering by live user segments. Analytics based on past behavior such as mobile app, revenue, funnels, cohorts, trends, and events will only enable filtering their stats by past behavior segments.
Create Campaigns for a Chosen Segment
Under the Do more with this segment section, under Engage, you have the option to create a campaign to message a specific segment.
This immediately takes you to the messaging channel with your segment criteria pre-populated in the target.
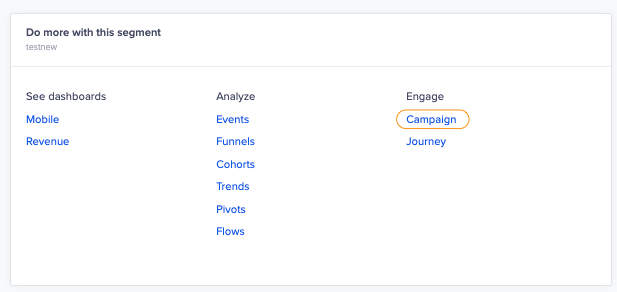
Create a Campaign from the Segment
Include and Exclude Segments
You can simplify complex queries by including or excluding the existing user segments. Create segments with complex conditions once and then reuse them in different scenarios.
You can create powerful segmentation that is valid for a variety of scenarios.
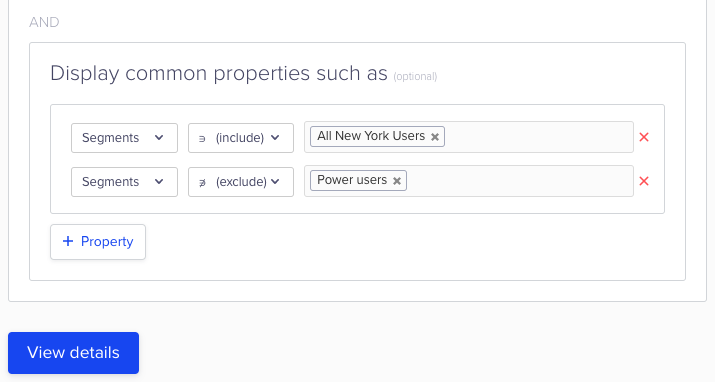
Include and Exclude Segments
Exclude Segments
There may be instances when you want to exclude some users based on specific criteria.
For example, you want to offer discounts to all the users who have expressed interest by adding the product to the cart in the past 30 days; however, you want to save your engagement dollars by excluding the power users.
The parameters for these power users can be the following:
- Users who have charged three times in the past three months, and
- Users who have launched the app 15 times in the past month, and
- Users who rated a product 10 times in the past year
Now, you can create a segment with these criteria called Power Users and use it every time rather than creating a complex query each time. You can save all these parameters in a segment called Power Users and exclude them from the discount message.
The following is a campaign query for an e-commerce app that excludes the Power Users segment.
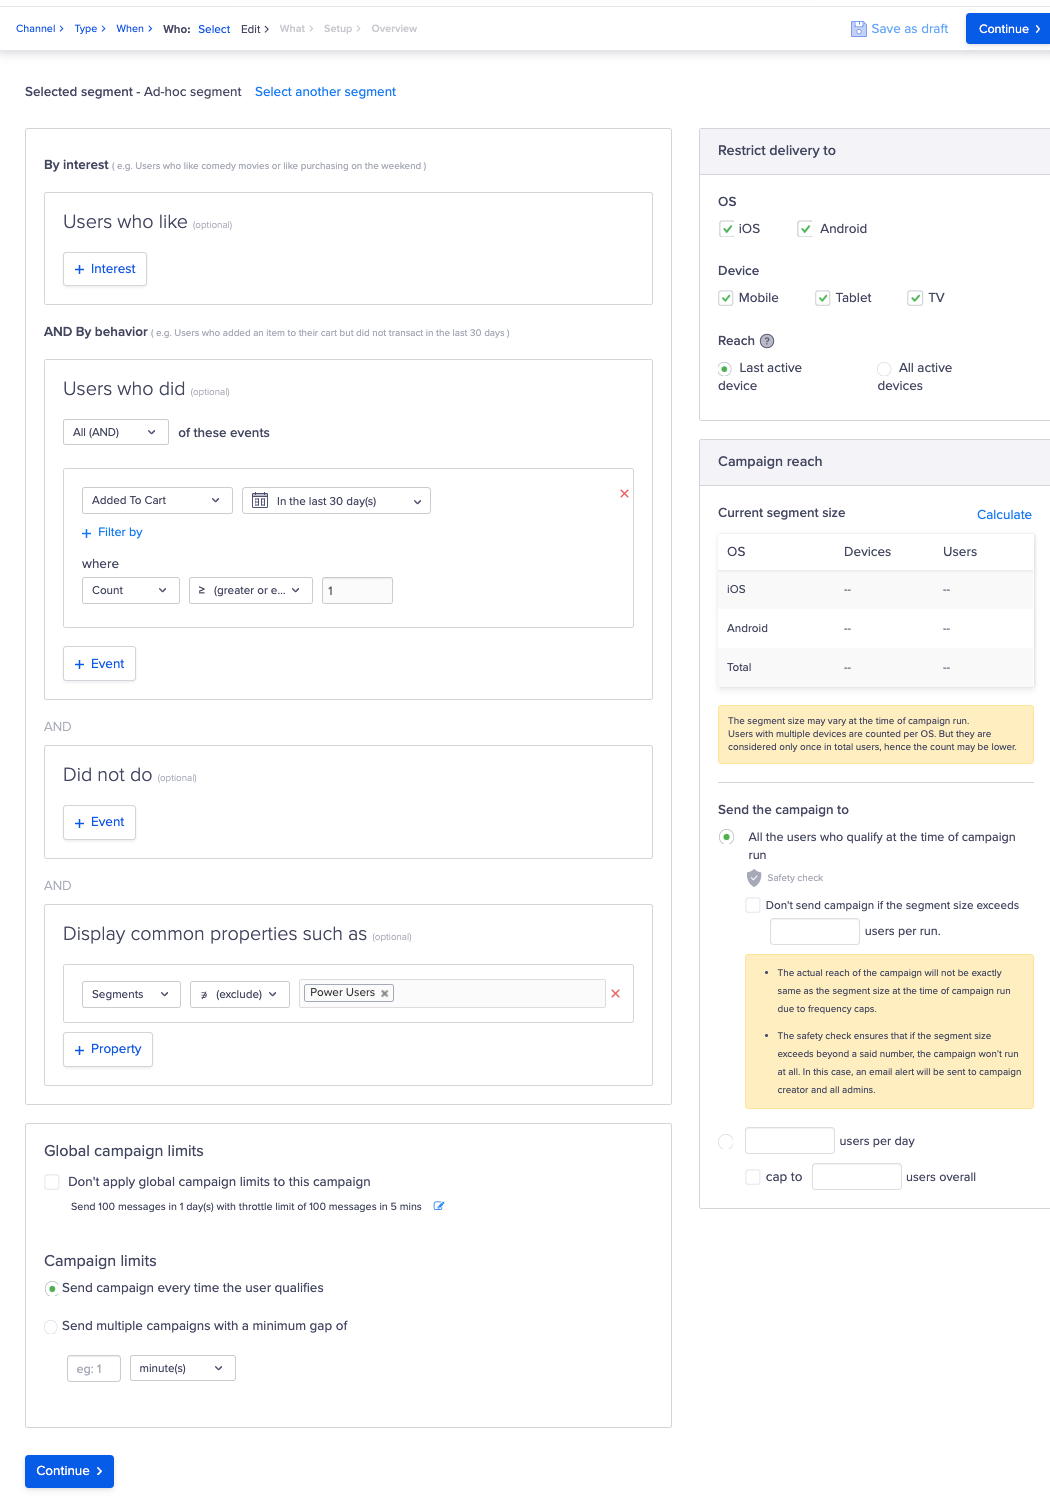
Exclude Segments
Include Segments
There may be instances when you want to include some users based on specific criteria.
Consider the example of a ride-hailing app. You want to nudge your users to enroll for a monthly pass as soon as they open the app. The parameters for these users can be the following:
- The users must be power users, and
- The users have booked more than five rides in a month, and
- They belong to select cities in the country
Now, you can create a segment with these criteria called Power Users and using it repeatedly rather than creating a complex query each time.
The following is a campaign query for a ride-hailing app that includes the Power Users segment.
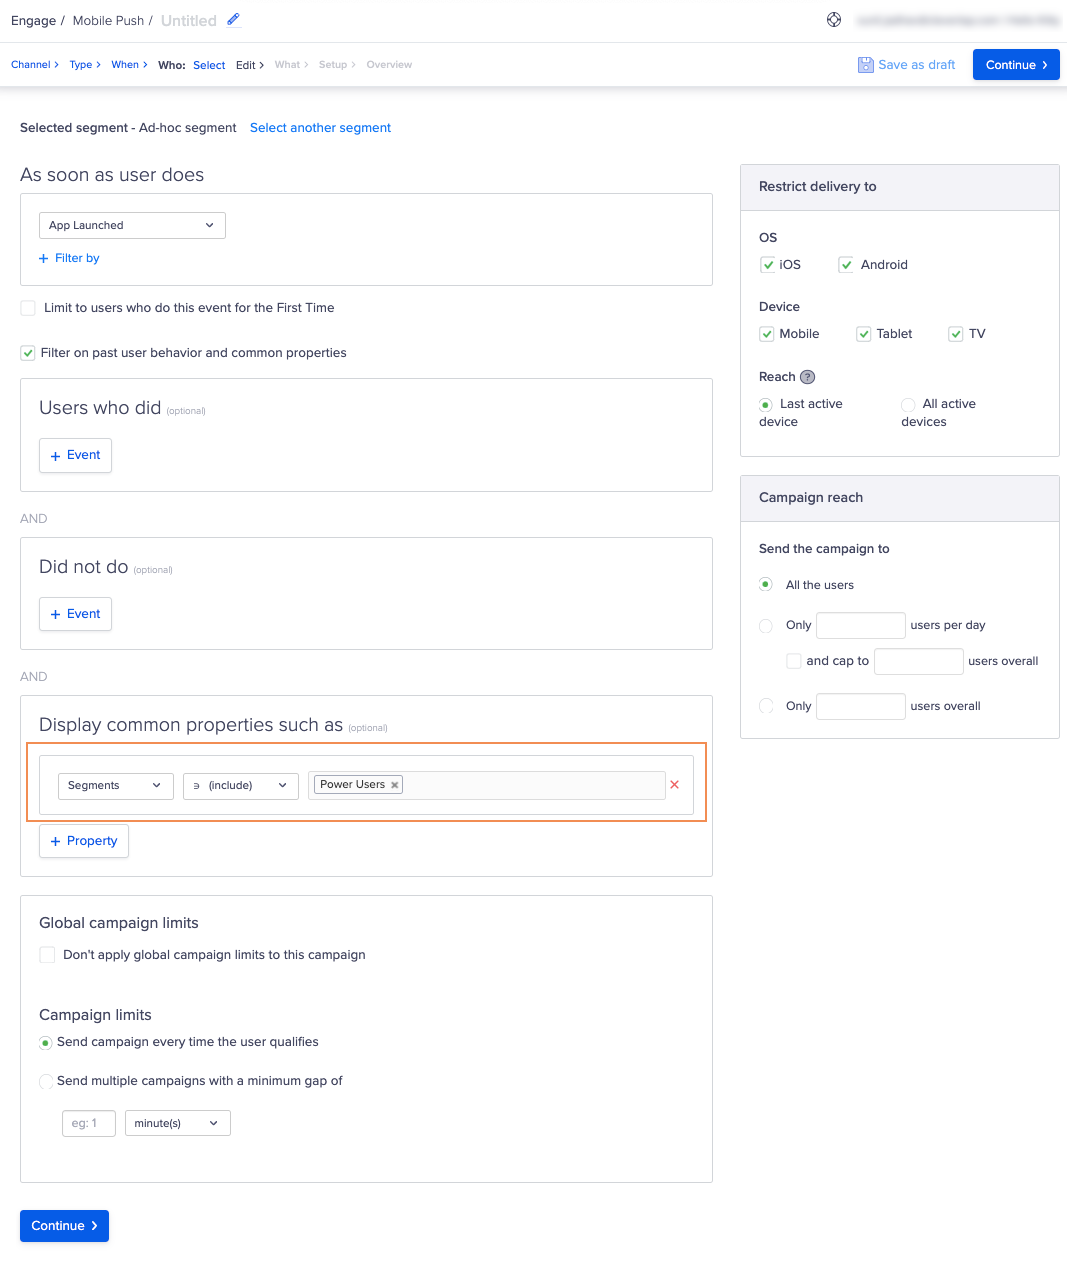
Include Segment
Include and Exclude Segments
- You can include and exclude segments in the same query. It is considered as an AND condition between the Included and the Excluded segments.
- The include and exclude segments are currently unavailable for bulletins and A/B Testing.
- The segments available for including or excluding users can only be of the type PBS segment.
Additional AND By Behavior Filters
AND By behavior filters provide customers the ability to segment users based on the count, average, or total sum of a property value.
Count
The count filter allows customers to filter users by event count. The query finds all users who performed a Charged event greater than 5 times in the past 30 days.

Count Filter
Average of Property Filter
The Average of property filter allows customers to filter users by the average of a chosen event property. The query finds all users who performed a Charged event such that the average Revenue event property per event is greater than $10.
The Average of property filter allows averaging the value of the selected event property. For example, you can find out the average revenue earned from all users who performed purchases worth $10 or less. Let us assume that 5 users charged for each for $3, $5, $7, $2, and $8. The average value of all the purchases lower than $10 is ($ 3+ 5 +7+2+8)/5 events = 25/5= $5 per event.
Let us assume that the value for 2 charged events is missing. The charged event values received are $3, $5, and $7. The value of the missing events will be considered as 0. The average of property is now ($3 + 5 +7 +0 +0)/5 events = 15/5 =$3 per event.
If you want to exclude all the events that do not have event properties, you can select the property that exists a condition in the Filter by section.

Average of Property Filter
Total Sum of Property
The Total sum of property filter allows customers to filter users by the sum of a chosen event property. The query finds all users who performed a Charged event such that the Revenue event property is greater than $10.

Total Sum of Property Filter
Include Users Who Did Not Do the EventIf the query is to find people who performed the charged event fewer than five times, by default, the users who have not performed the charged event are not included in the result set. Only the users who did the charged event but did it fewer than five times are included; however, if the checkbox for Include users who didn’t do the event is selected, those users are also included in the result set. The same is true for sum and average.
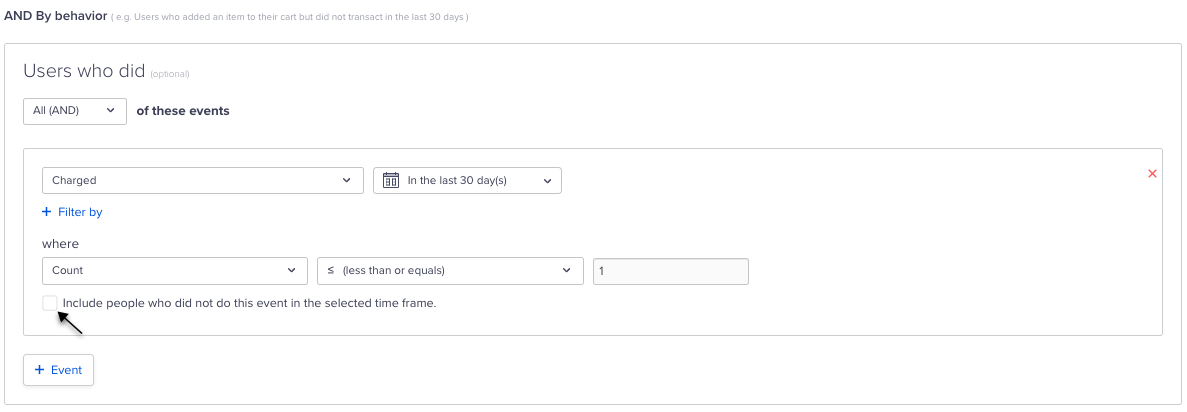
Include Users Who Did Not Do an Event
Segment Operations
You can perform different actions on the segments from the Segments page. Each of them is explained in the sections to follow
Search Segment
You can search segments by their Name or ID from the Segments page.
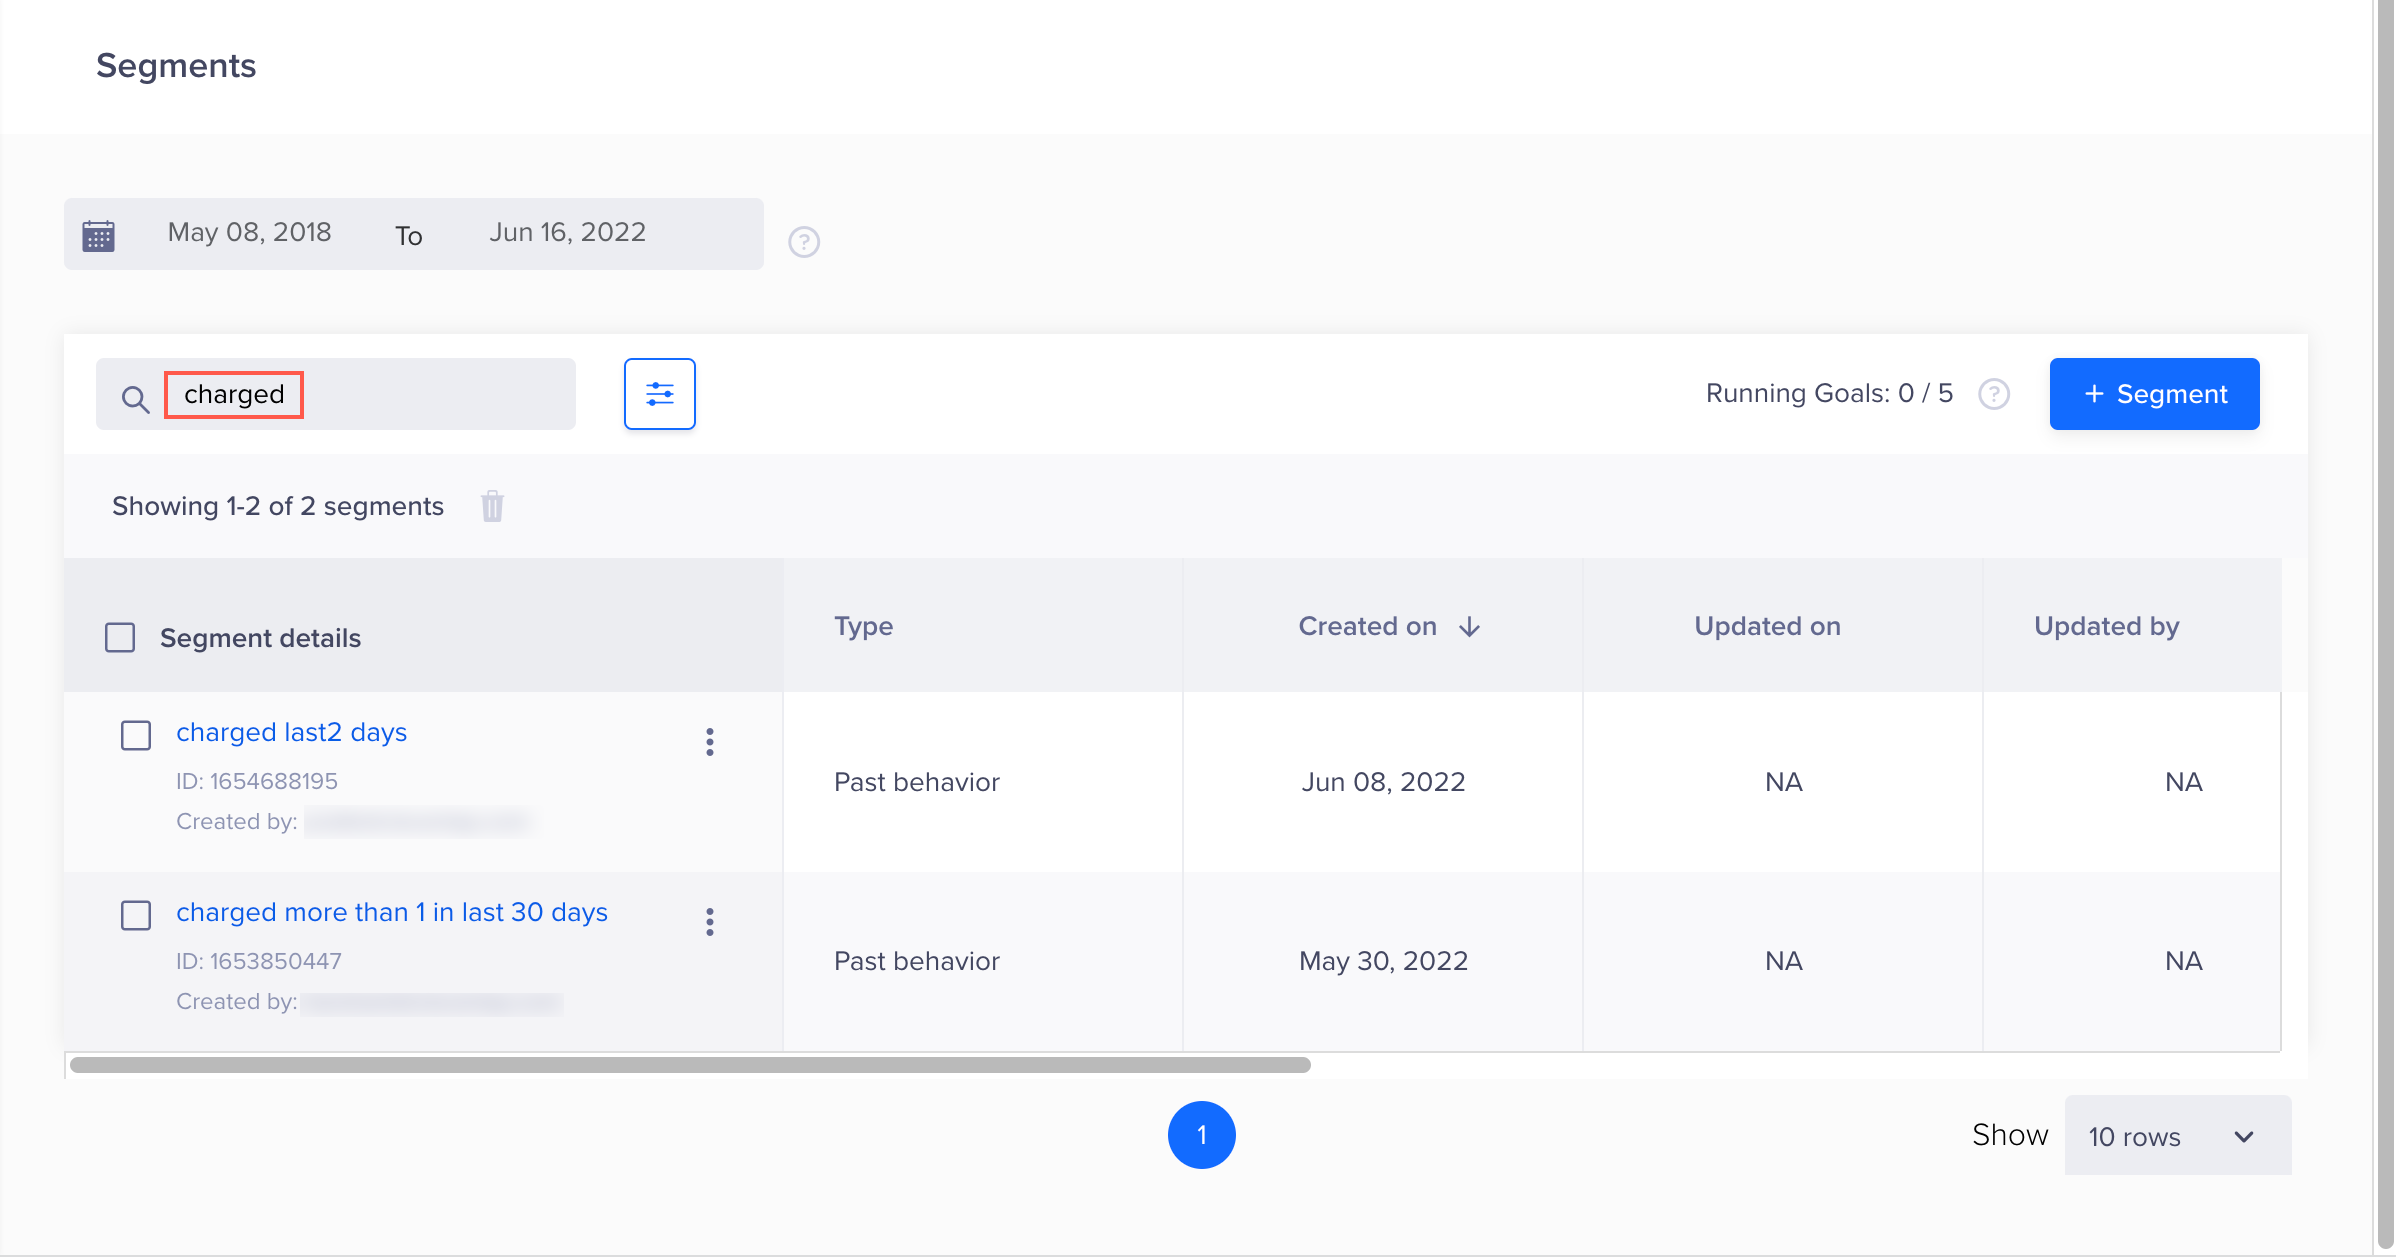
Search a Segment
Copy Segment Name and ID
To copy segment name and ID:
- From Segments page, hover on the name or ID of the required segment.
- Click the
 icon against the respective segment.
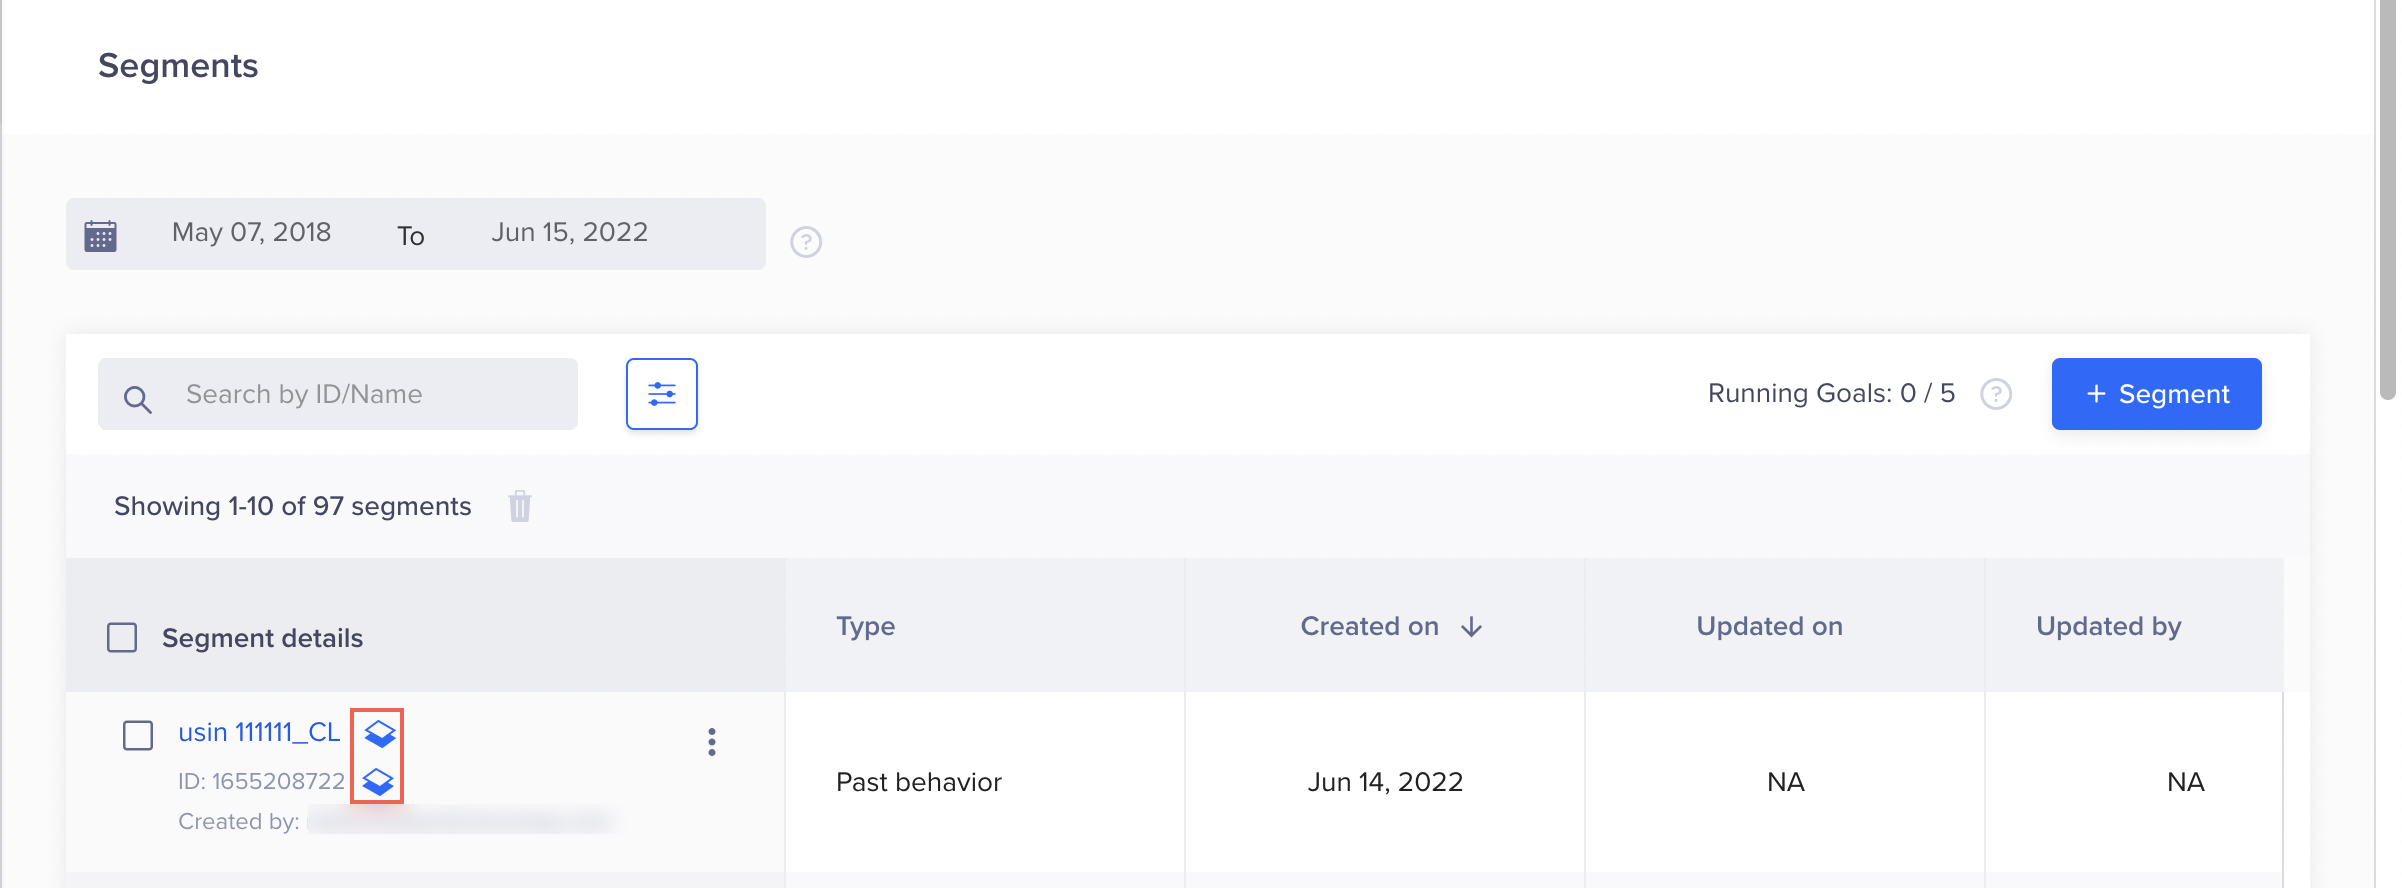
Copy a Segment Name and ID
Engage with Segment
To engage with a segment directly from the Segments page:
- Click
 icon displayed against the segment name under the Segment details column and click Engage.
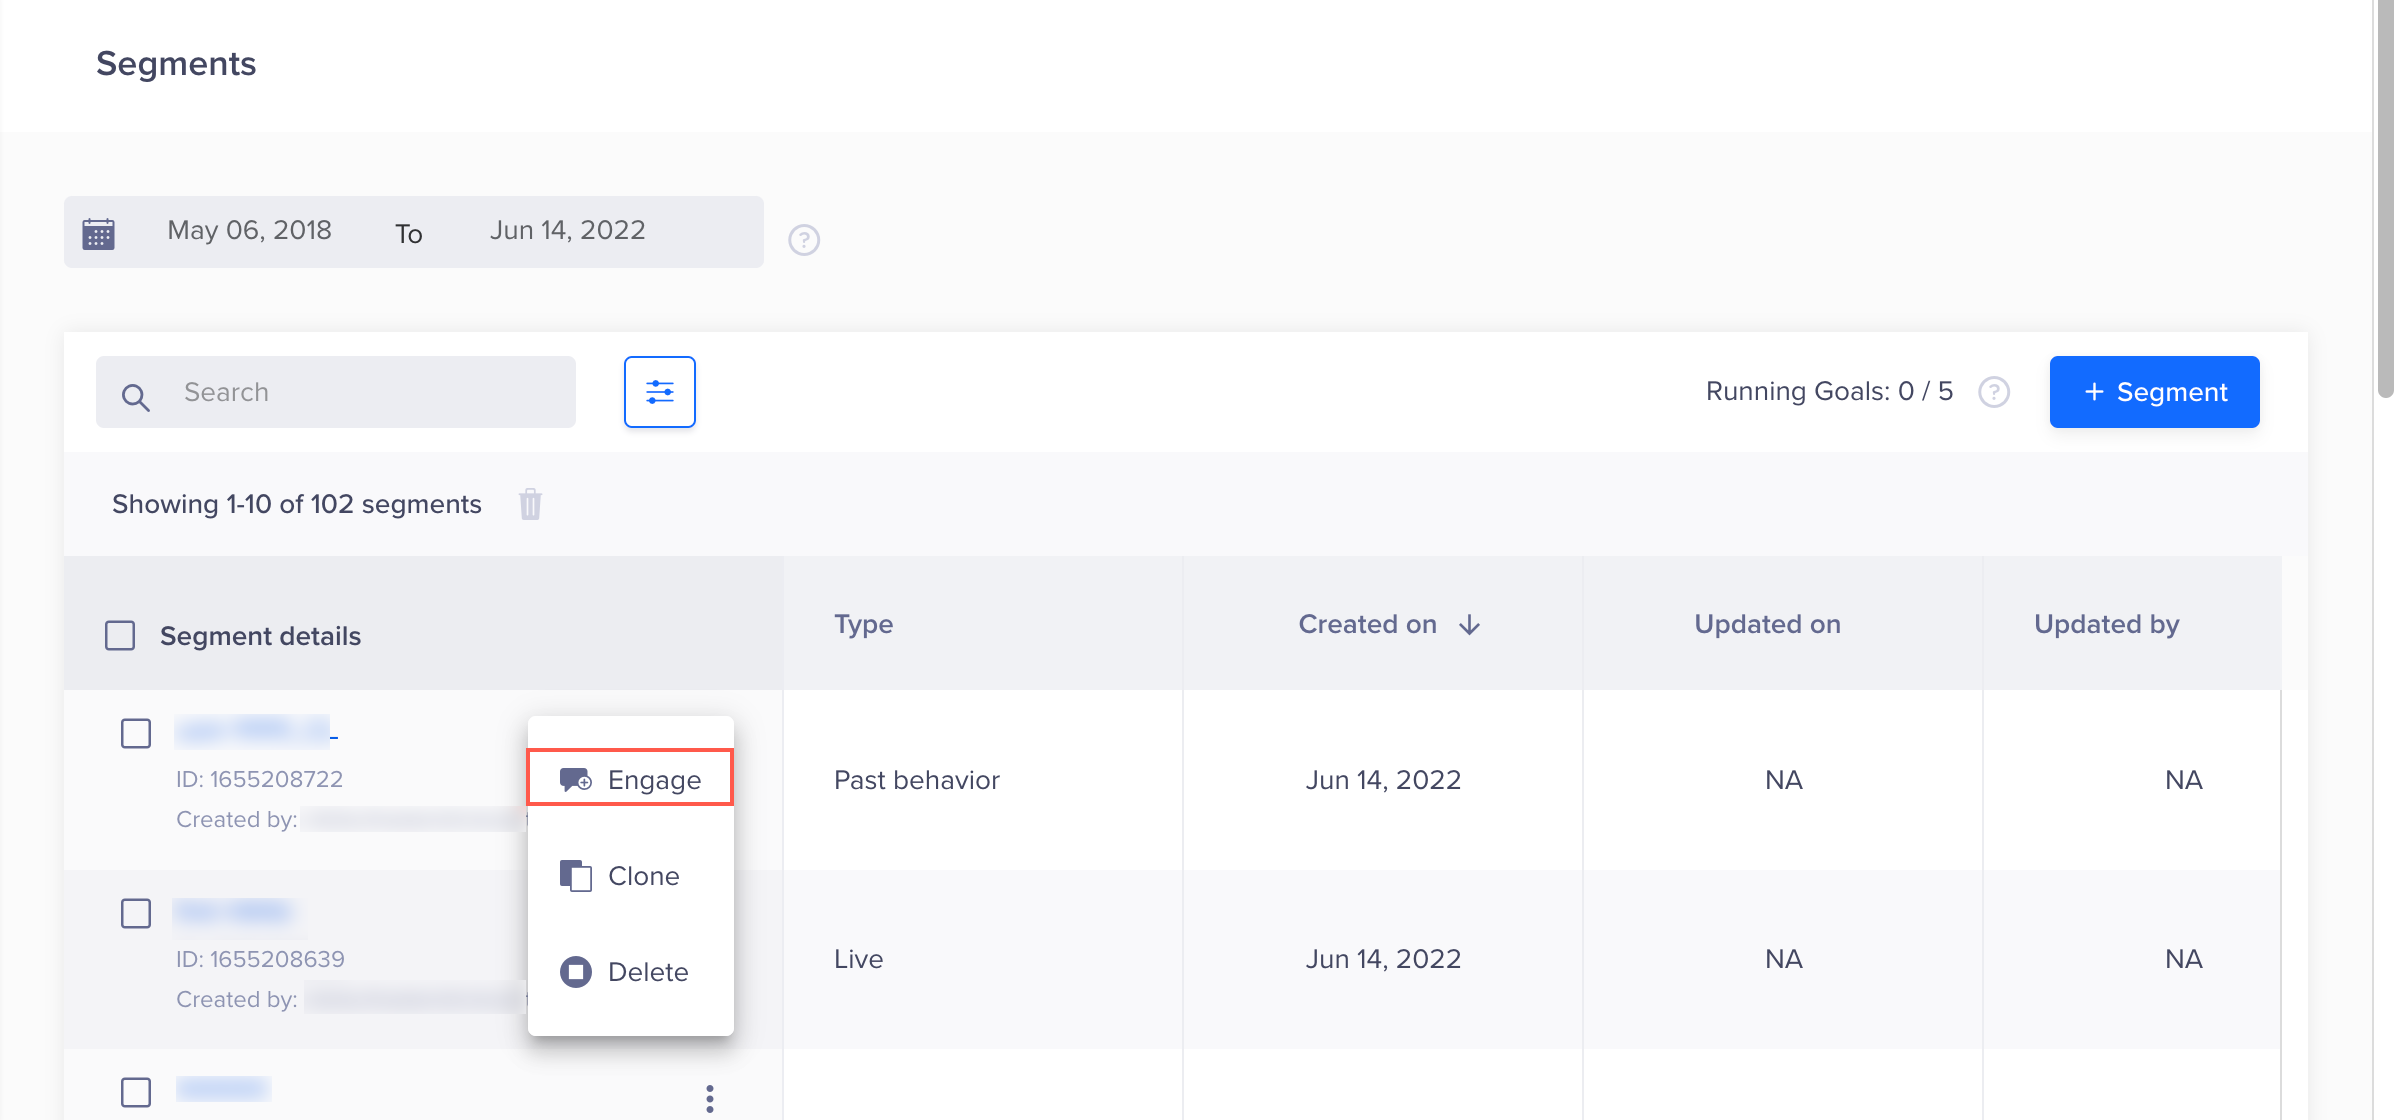
Engage with a Segment
On clicking, Messaging Channels popup displays.
- Select the Messaging Channel.
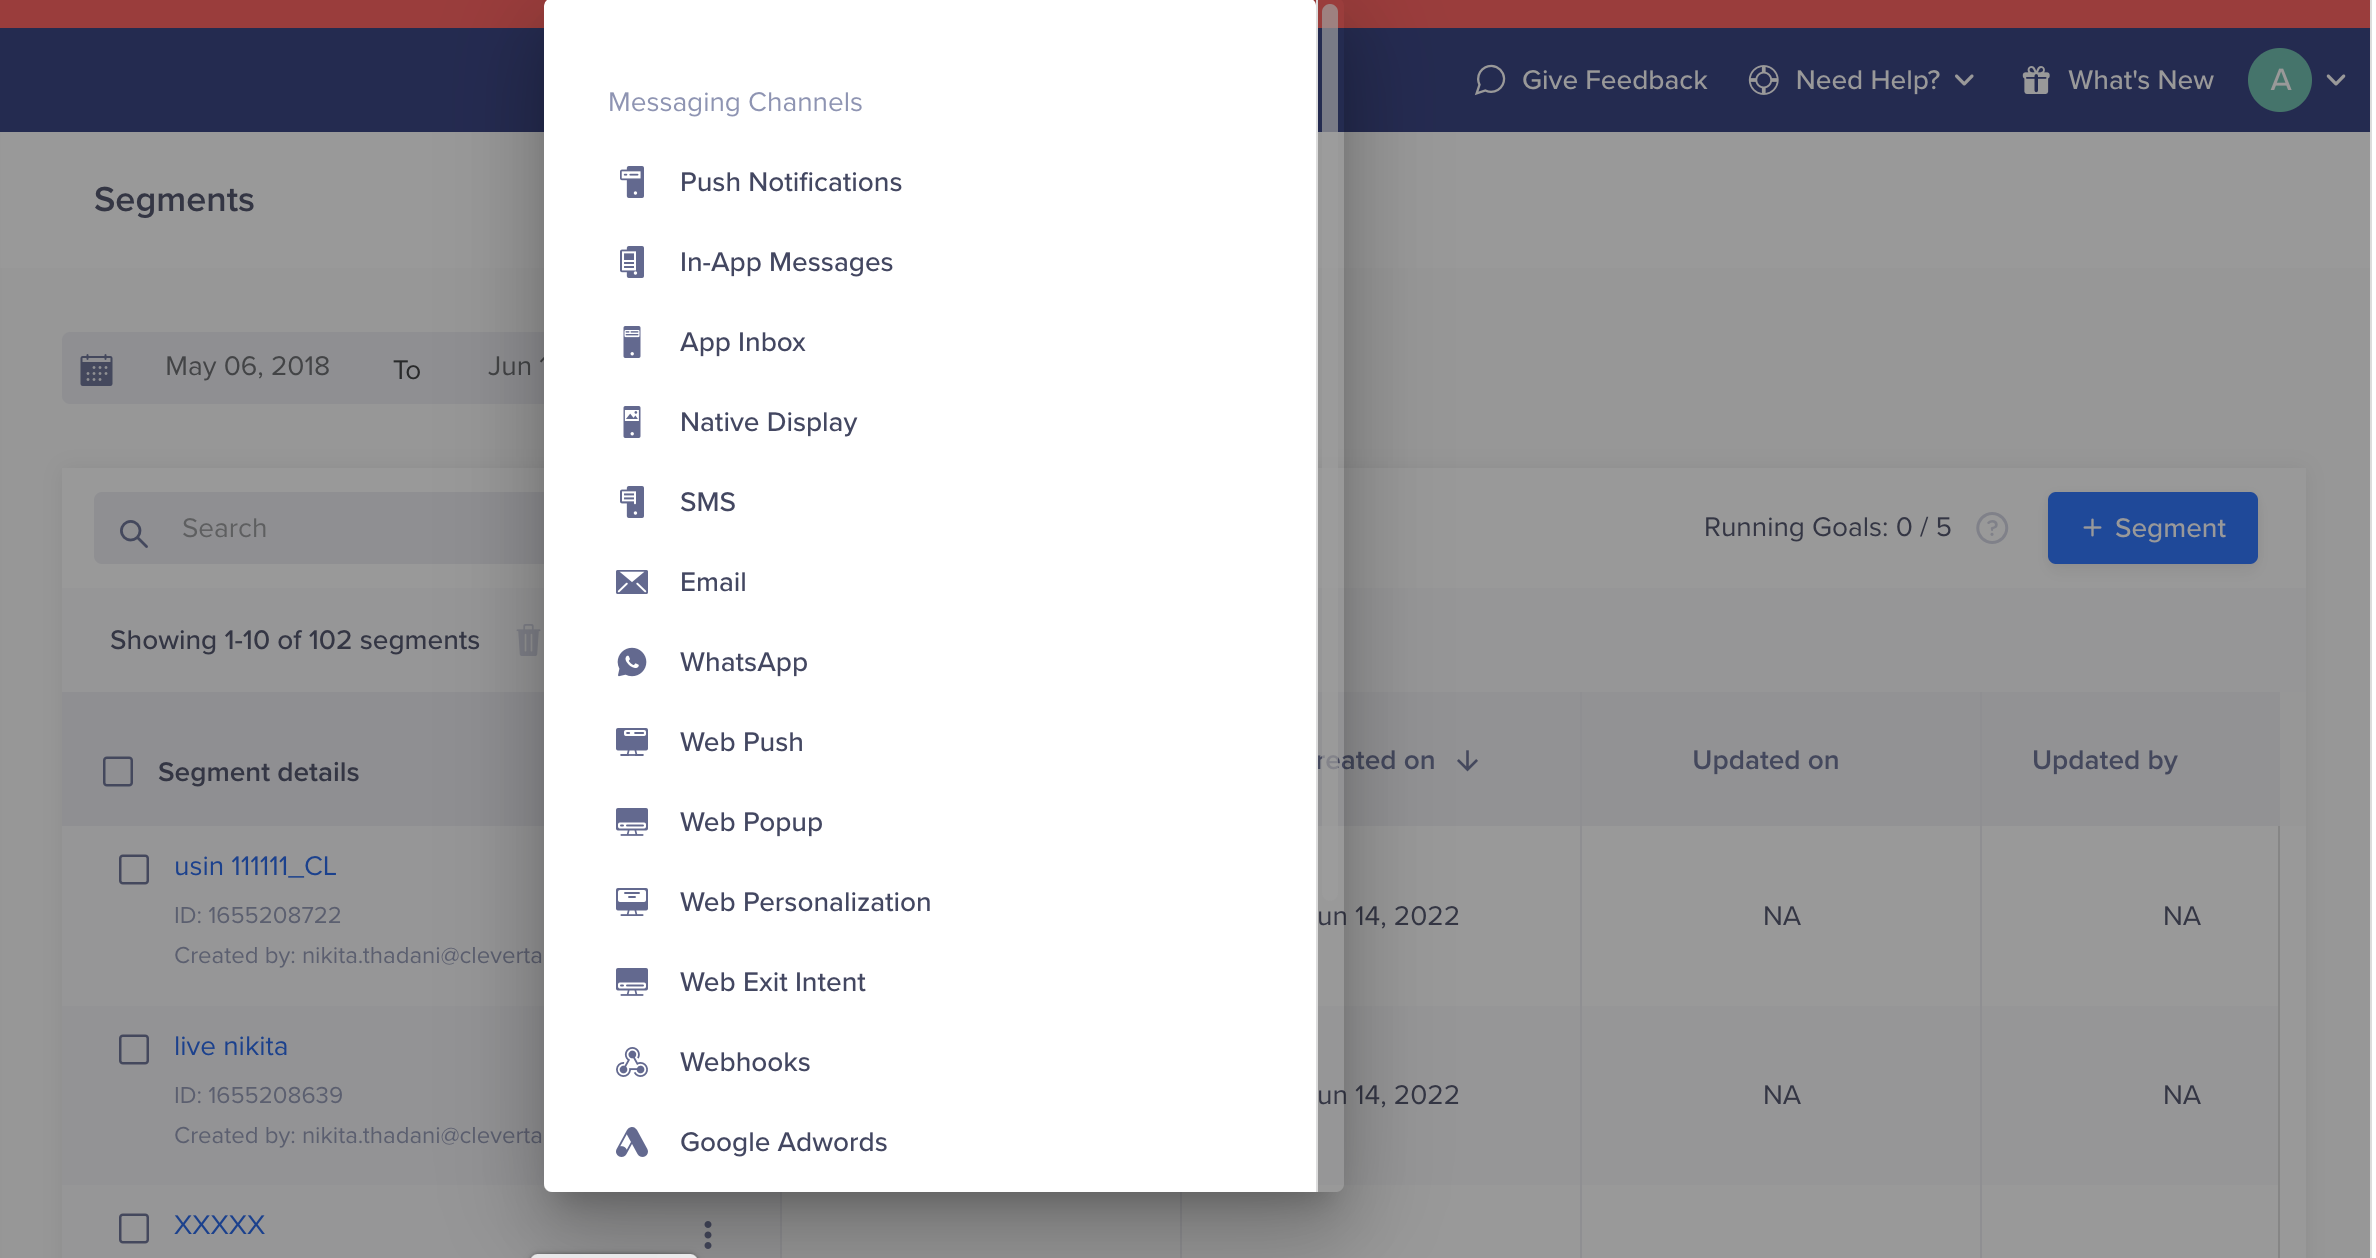
Select a Messaging Channel
On selecting the channel, you are navigated to the messaging channel with your segment criteria pre-populated under the Who section of the New Campaign page.
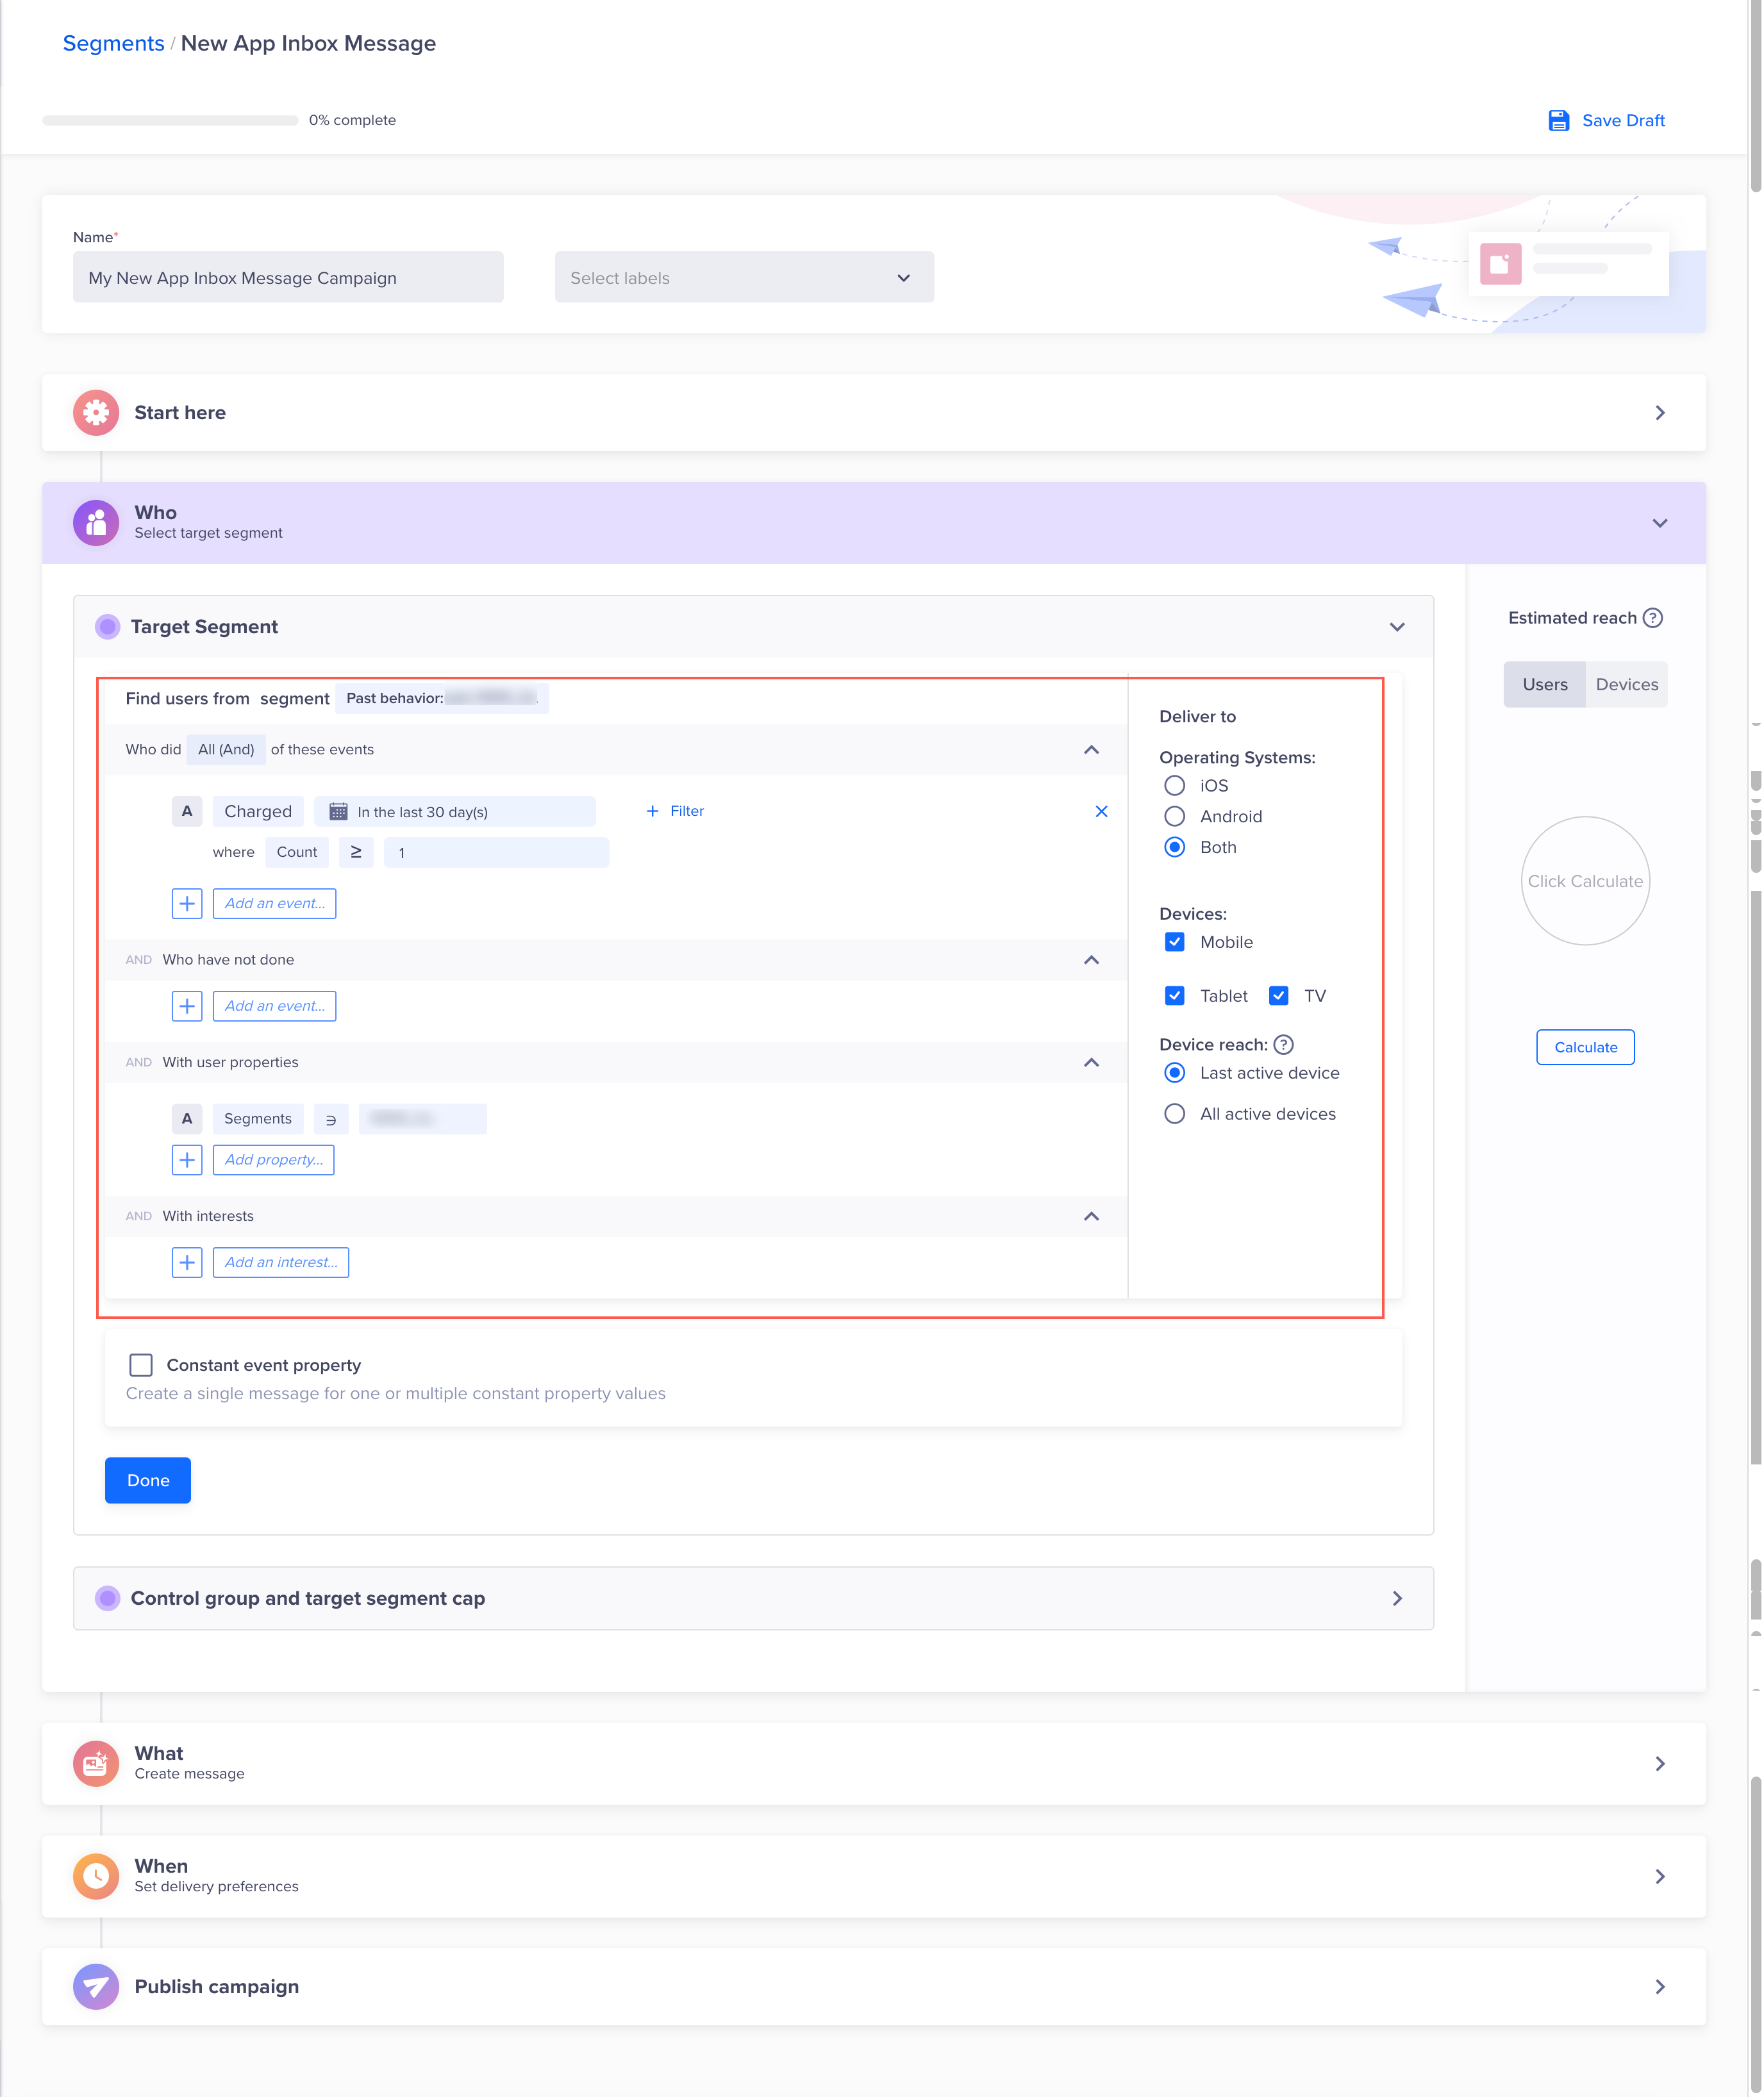
Create a Campaign
Clone a Segment
This operation helps to create a new segment from an already existing segment with minor or no modifications to the qualification criteria of the segment. To clone a segment directly from the Segments page:
- Click the
 icon displayed against the segment name under the Segment details column and click Clone.
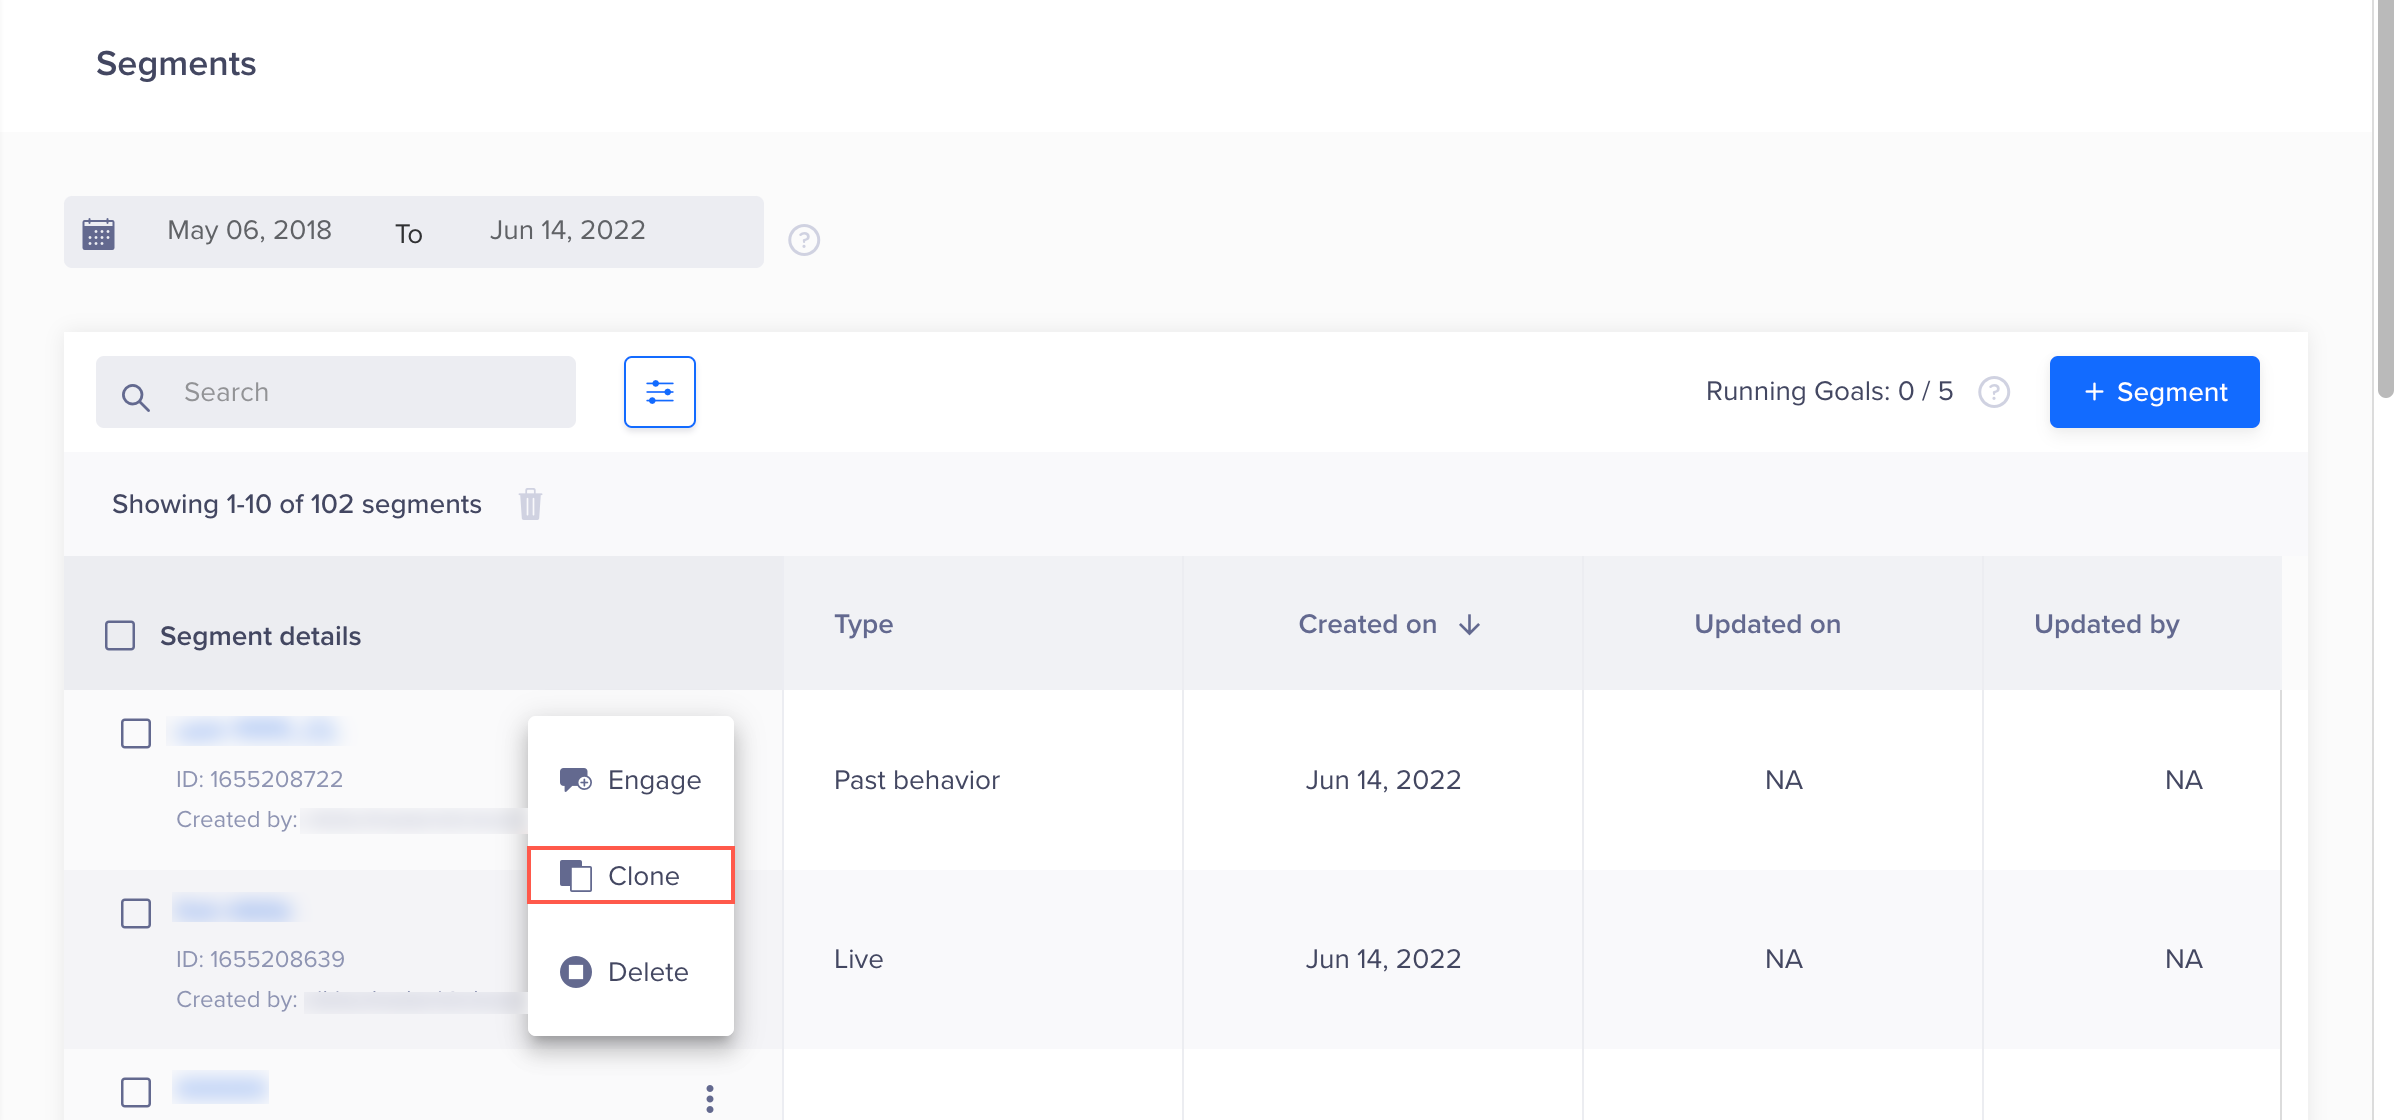
Clone a Segment
On clicking, the Create New page opens with prepopulated qualification criteria.
- Make the necessary modifications to the qualification criteria, if required.
- Click Save segment.
- Enter the Segment name and click Save.
Delete
There may be times when you may need to delete unused segments. To delete the unused segments:
- Click
 icon displayed against the segment name under the Segment details column and click Delete.
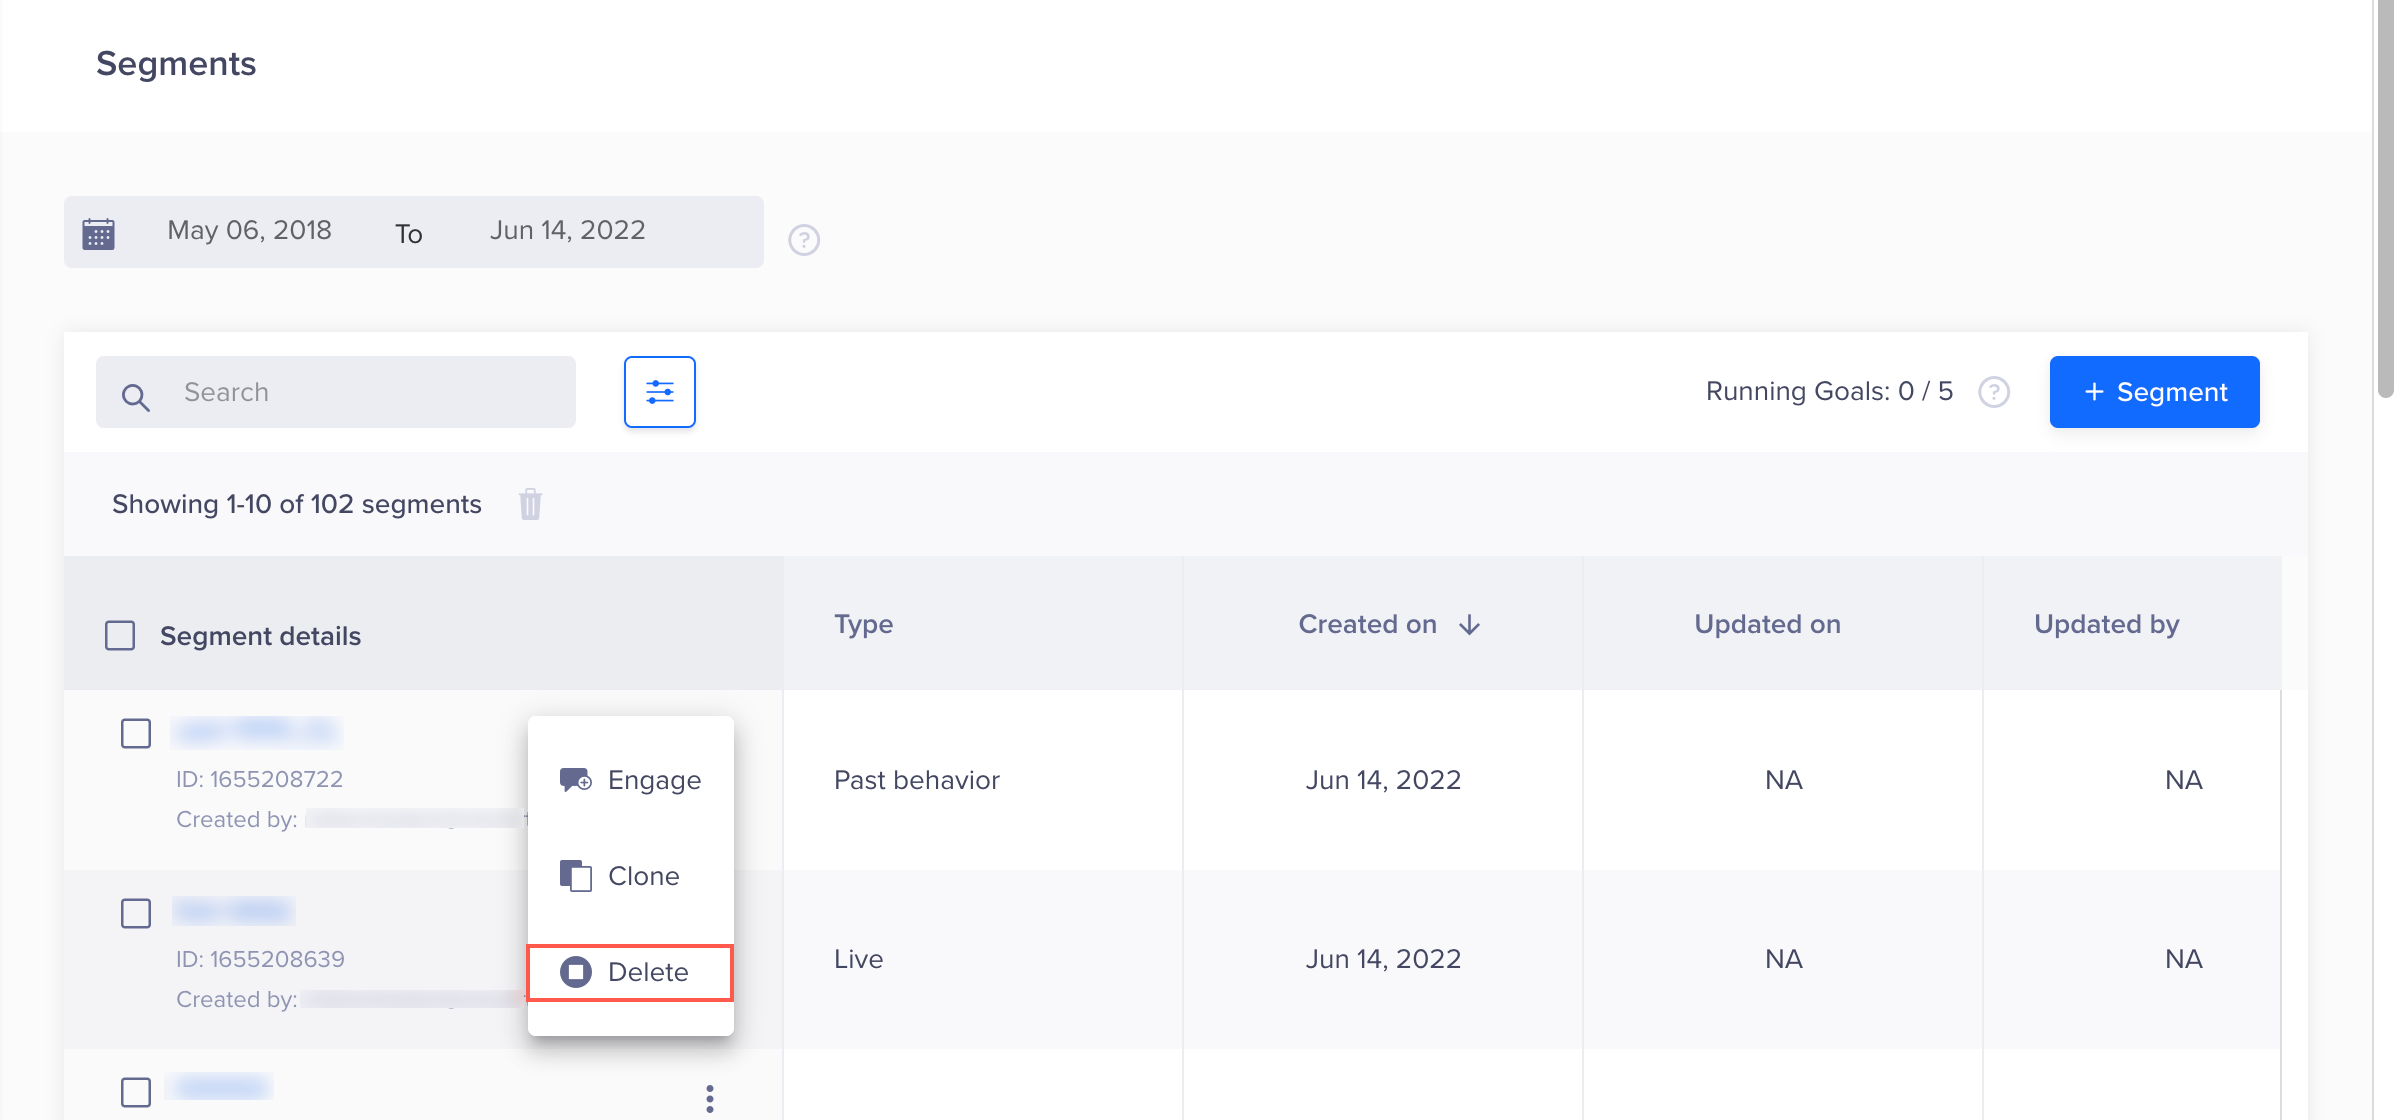
Delete a Segment
On clicking, the Delete Segment? popup is displayed on the right side of the screen.
- Click Delete to confirm your action.
NoteIf your account's total number of segments exceeds 1000, you can view up to 500 segments on a single page and delete a maximum of 500 segments at a time. If the number of segments is less than 1000, you can view up to 50 segments on a single page and delete a maximum of 50 segments at a time.
Sort
You can sort segments based on the following columns under Segments page by clicking the arrows against the respective columns :
- Segment details
- Created on
- Updated On
- Engagement
- Dependent Segments
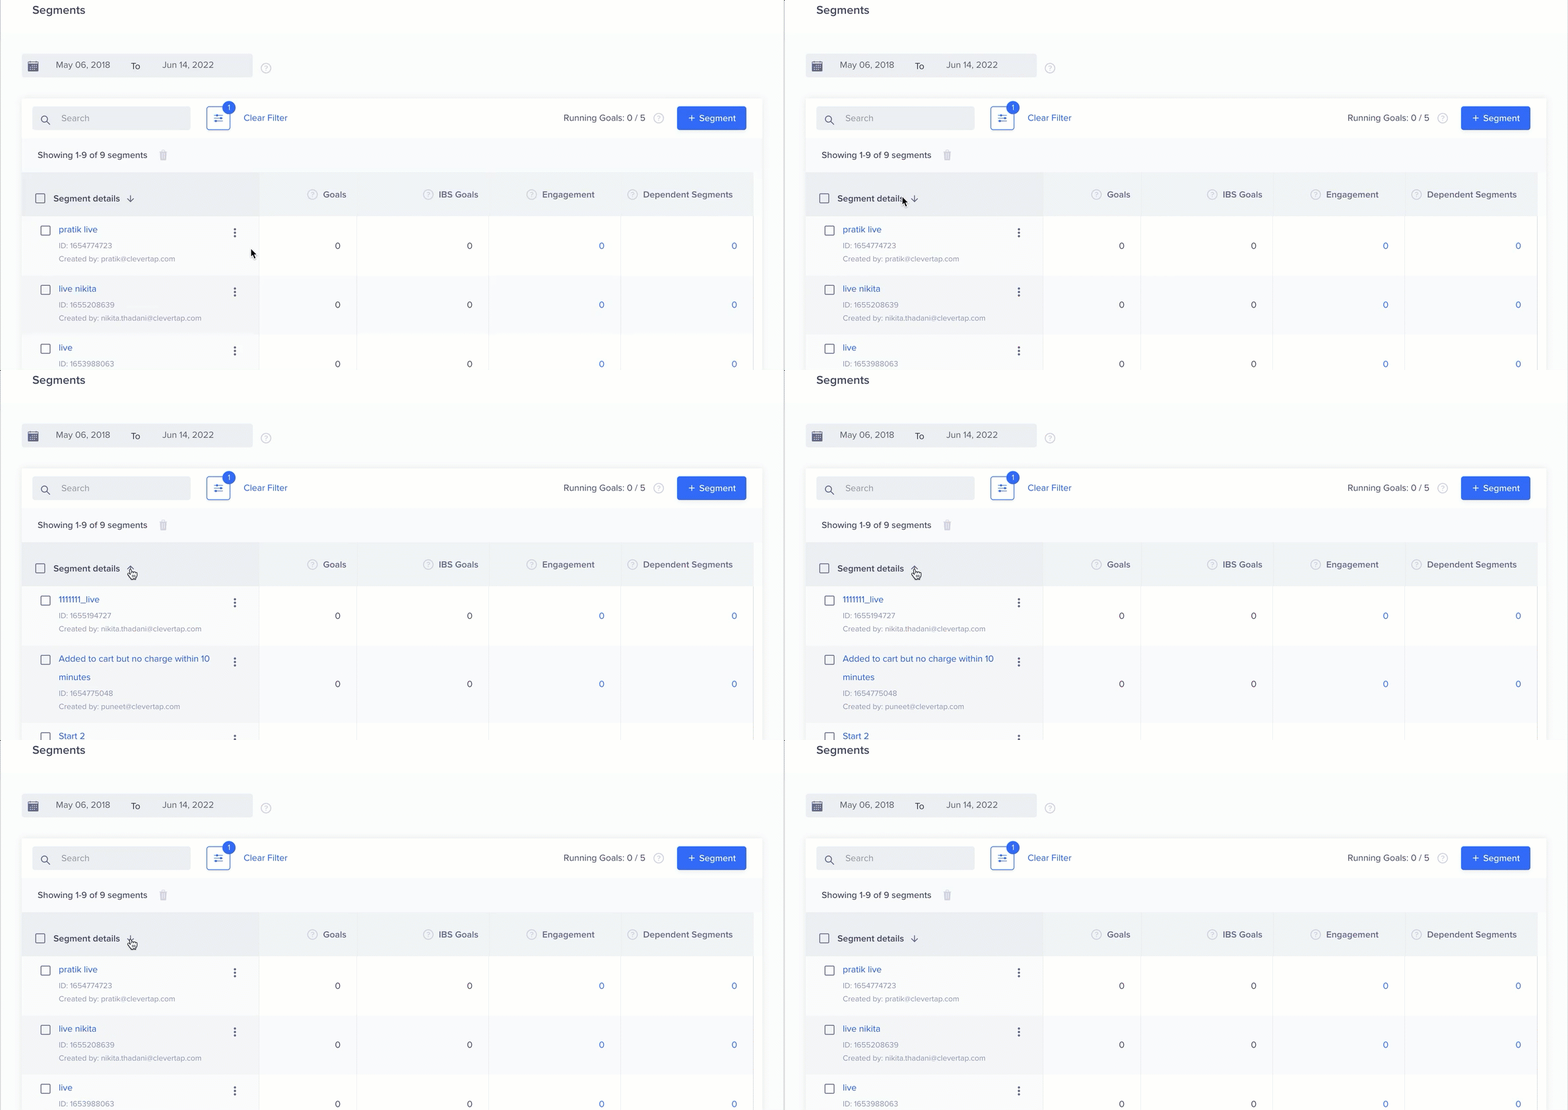
Sort Segments
Filter Segments
You can filter out segments based on the following fields by clicking the ![]() icon:
icon:
- Type: Indicates the type of segment.
- Goals. Indicates the goals running on the segment.
- Created by: Indicates the name of the user who created the segment.
- Updated by: Indicates the name of the user who last updated the segment.
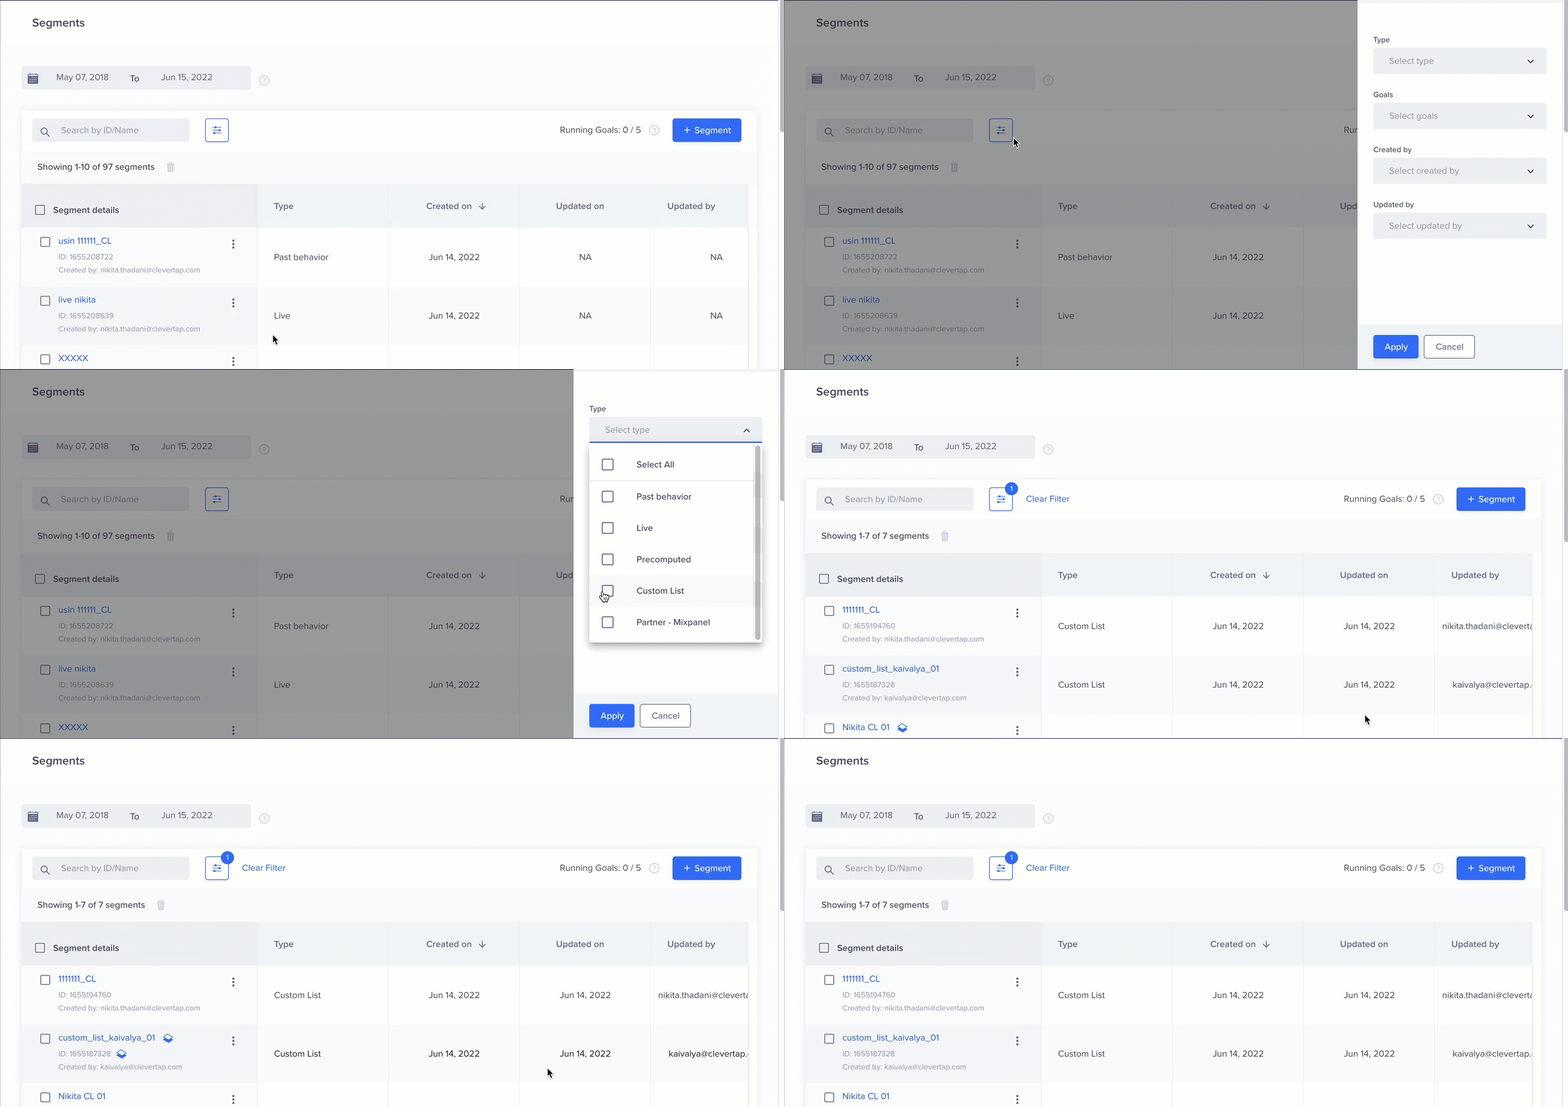
Filter Segments
You can also filter segments based on the date on which the segments were created. To do so, select the date range, available at the top, for which you want to view the segment.
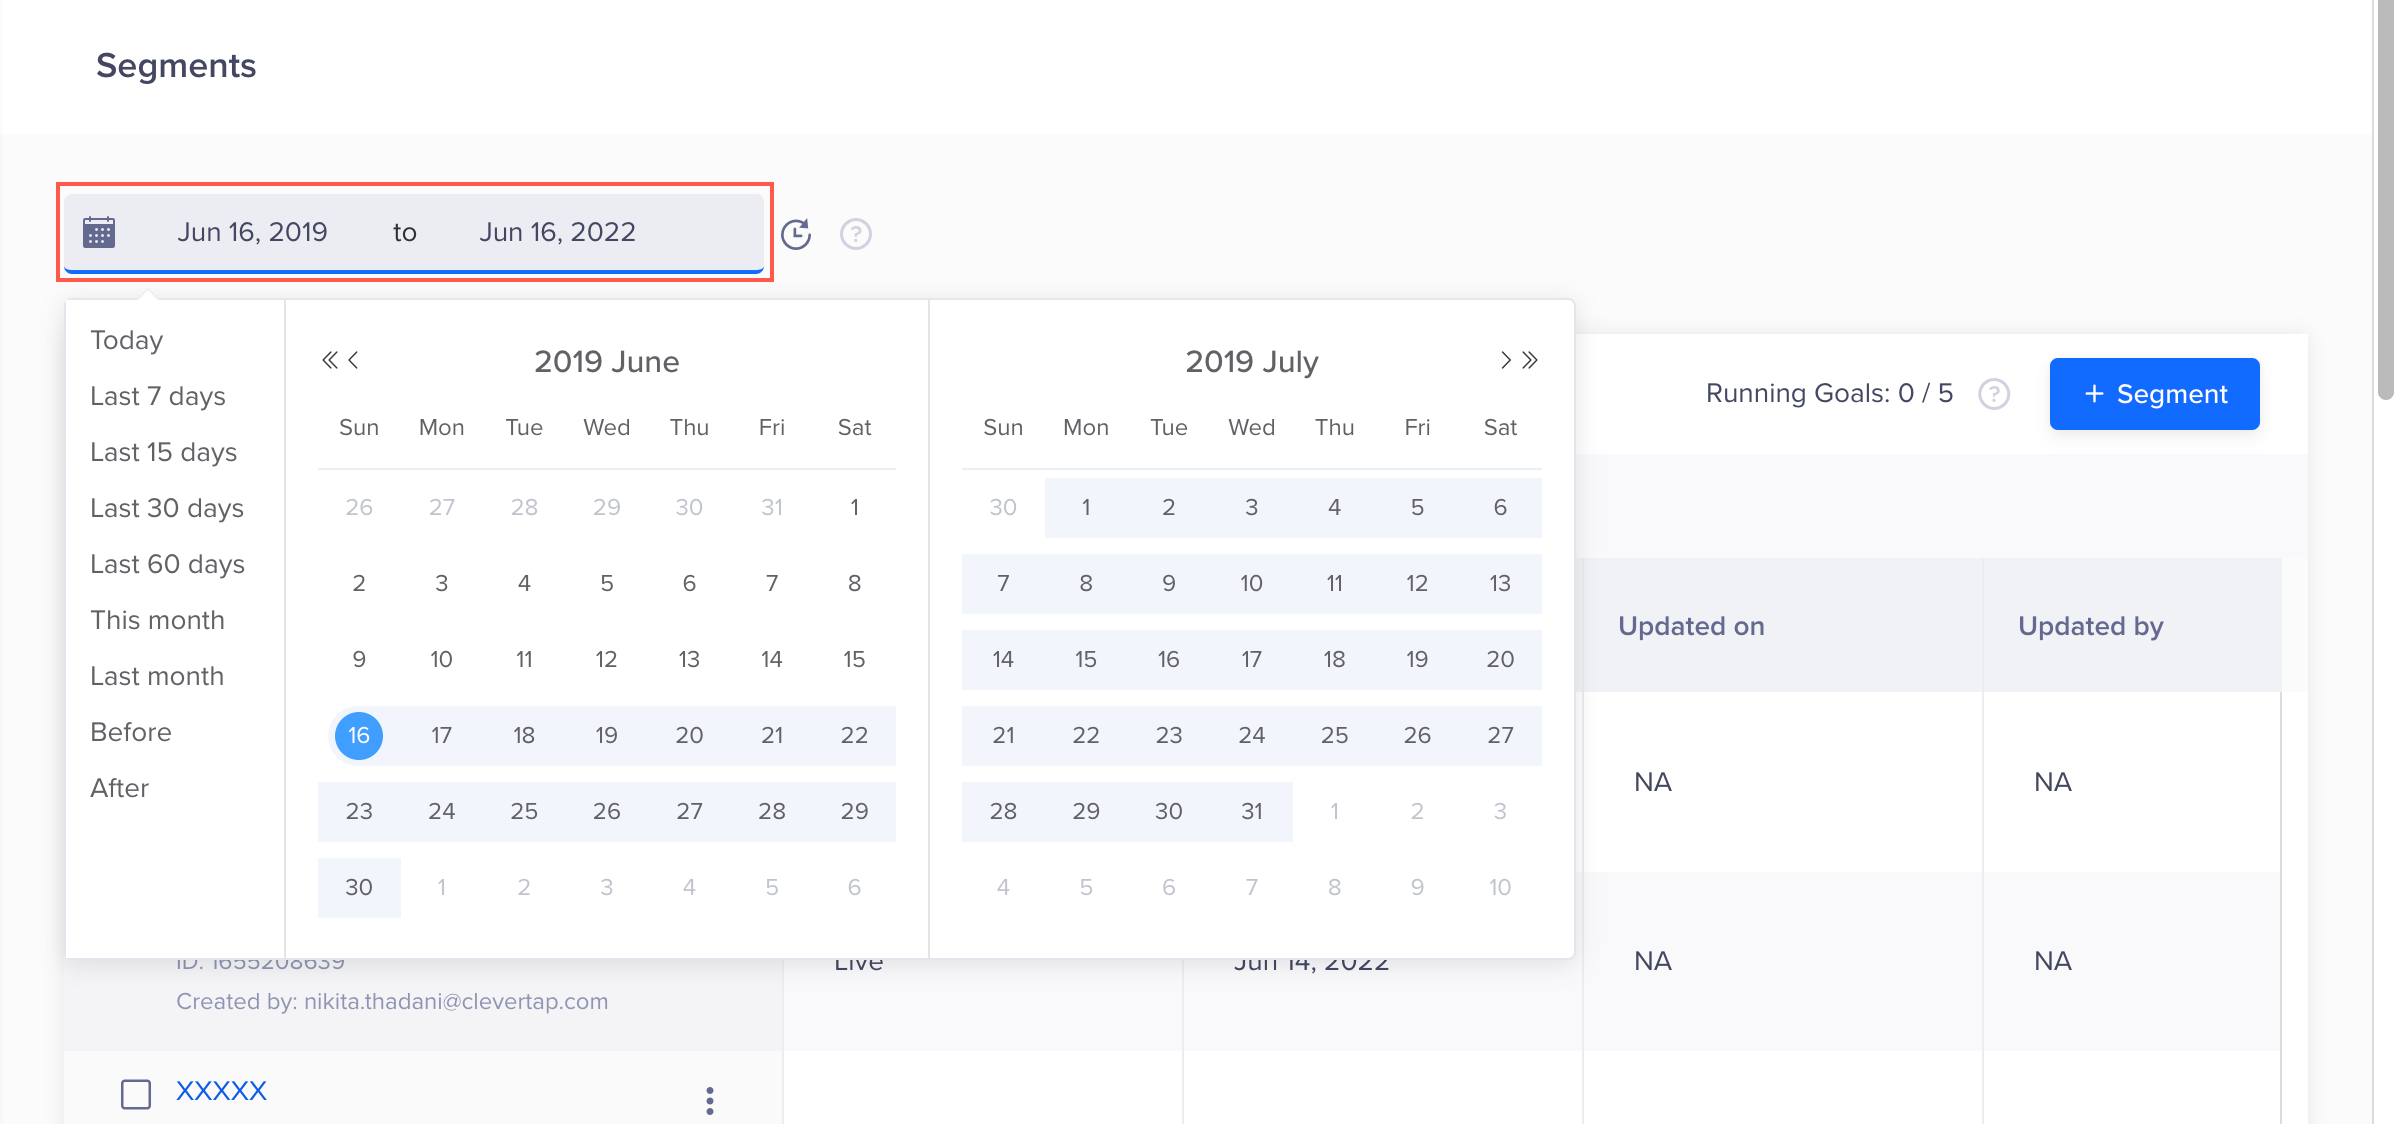
Filter Segments by Date
Updated about 1 month ago
