Single Sign On (SSO)
Learn how to configure SSO for your CleverTap application using leading Identity Providers (IdPs).
Overview
Single Sign-On (SSO) enables users to log in to CleverTap using their organization's identity provider (IdP) instead of managing separate credentials. This enhances security, streamlines user authentication, and simplifies access management.
CleverTap supports SAML-based SSO, allowing organizations to integrate their preferred IdP. Once SSO is configured, users can authenticate via the Single Sign-On process.
Prerequisites for SSO Setup
To use SSO with CleverTap, ensure that:
- You use an Identity Provider (IdP) or a custom SAML (Security Assertion Markup Language) implementation.
- You have an Admin access to the account.
- You configure SSO on the parent (production) account, not on a child account. Once SSO is set up on the parent account, it is automatically enabled for all associated child accounts.
SSO Configuration for Test and Child Accounts
If you attempt to configure SSO from a test or child account, you will not have access to the required Organization settings.
Benefits of the SSO Configuration
Here are the benefits of migrating to the SAML SSO setup:
- Flexibility to manage users entirely on the CleverTap dashboard or by sending account lists through IDP and managing roles on the dashboard.
- Enhanced security and simplified login experience for your team through email domain whitelisting.
Set Up SSO Configuration
The SSO Configuration process includes the following two major steps:
Set Up SSO configuration on CleverTap
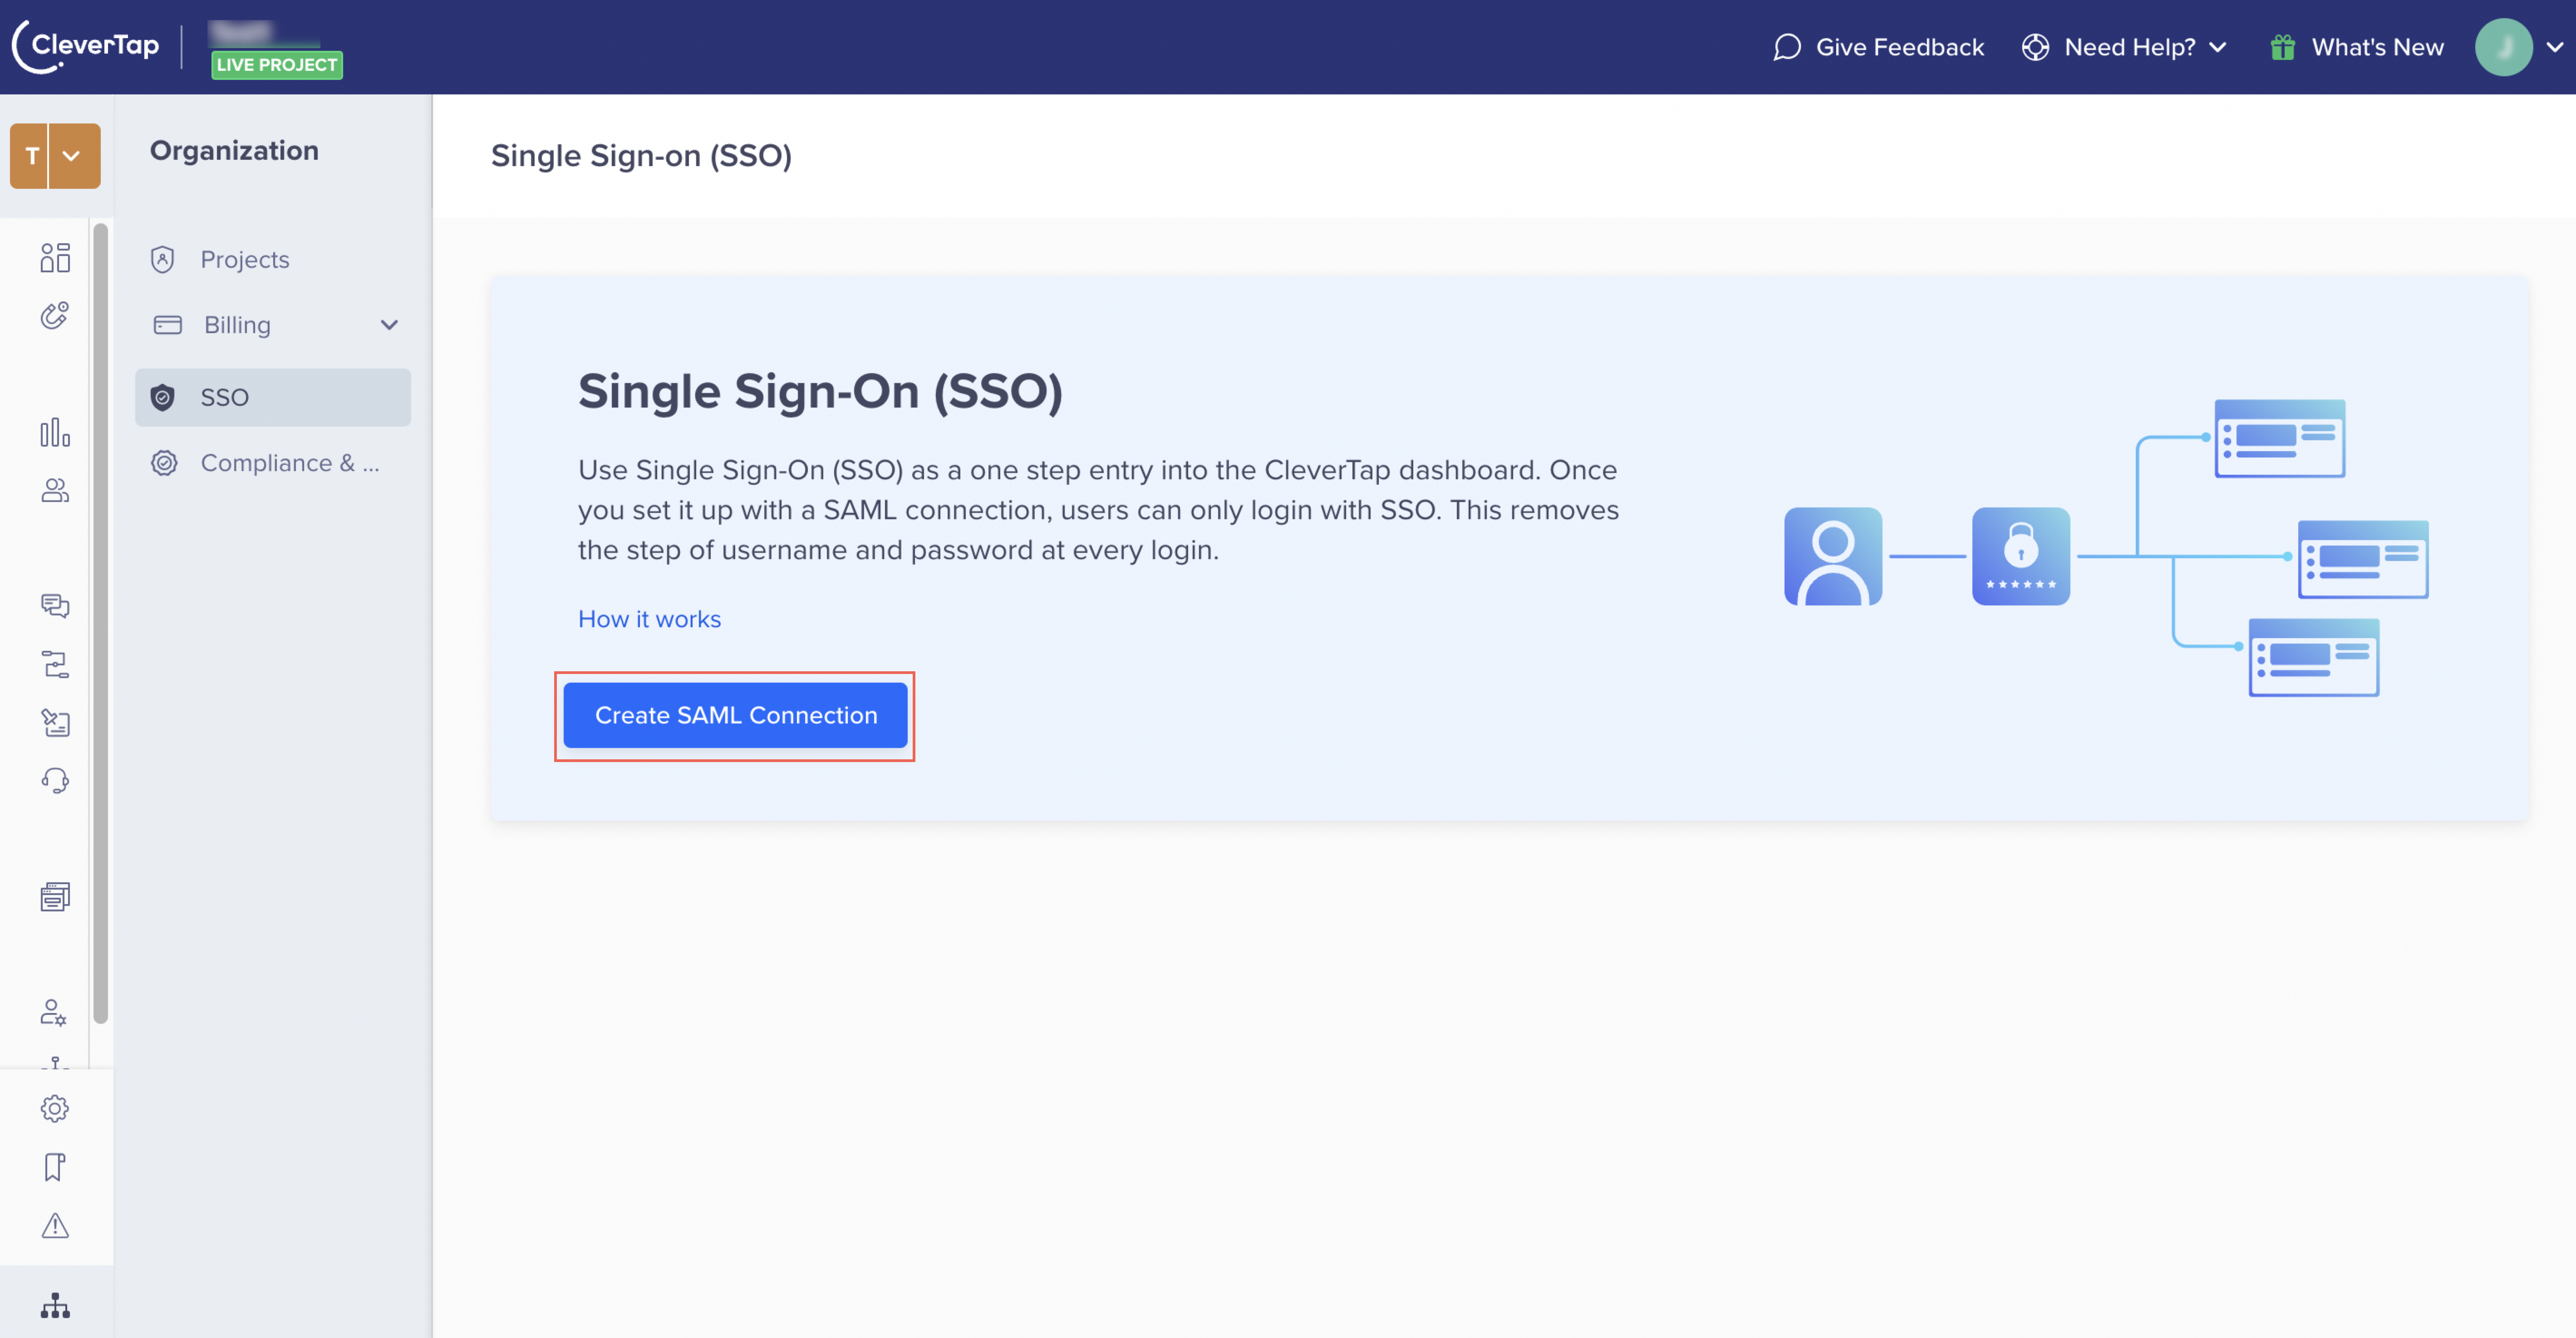
To set up the SSO configuration on the CleverTap dashboard:
- Navigate to Organization > SSO from the CleverTap dashboard.
- Click Create SAML Connection.
Create SAML Connection
The Create SAML Connection window opens on the right side of the screen after you click Create SAML Connection, as shown in the following figure:
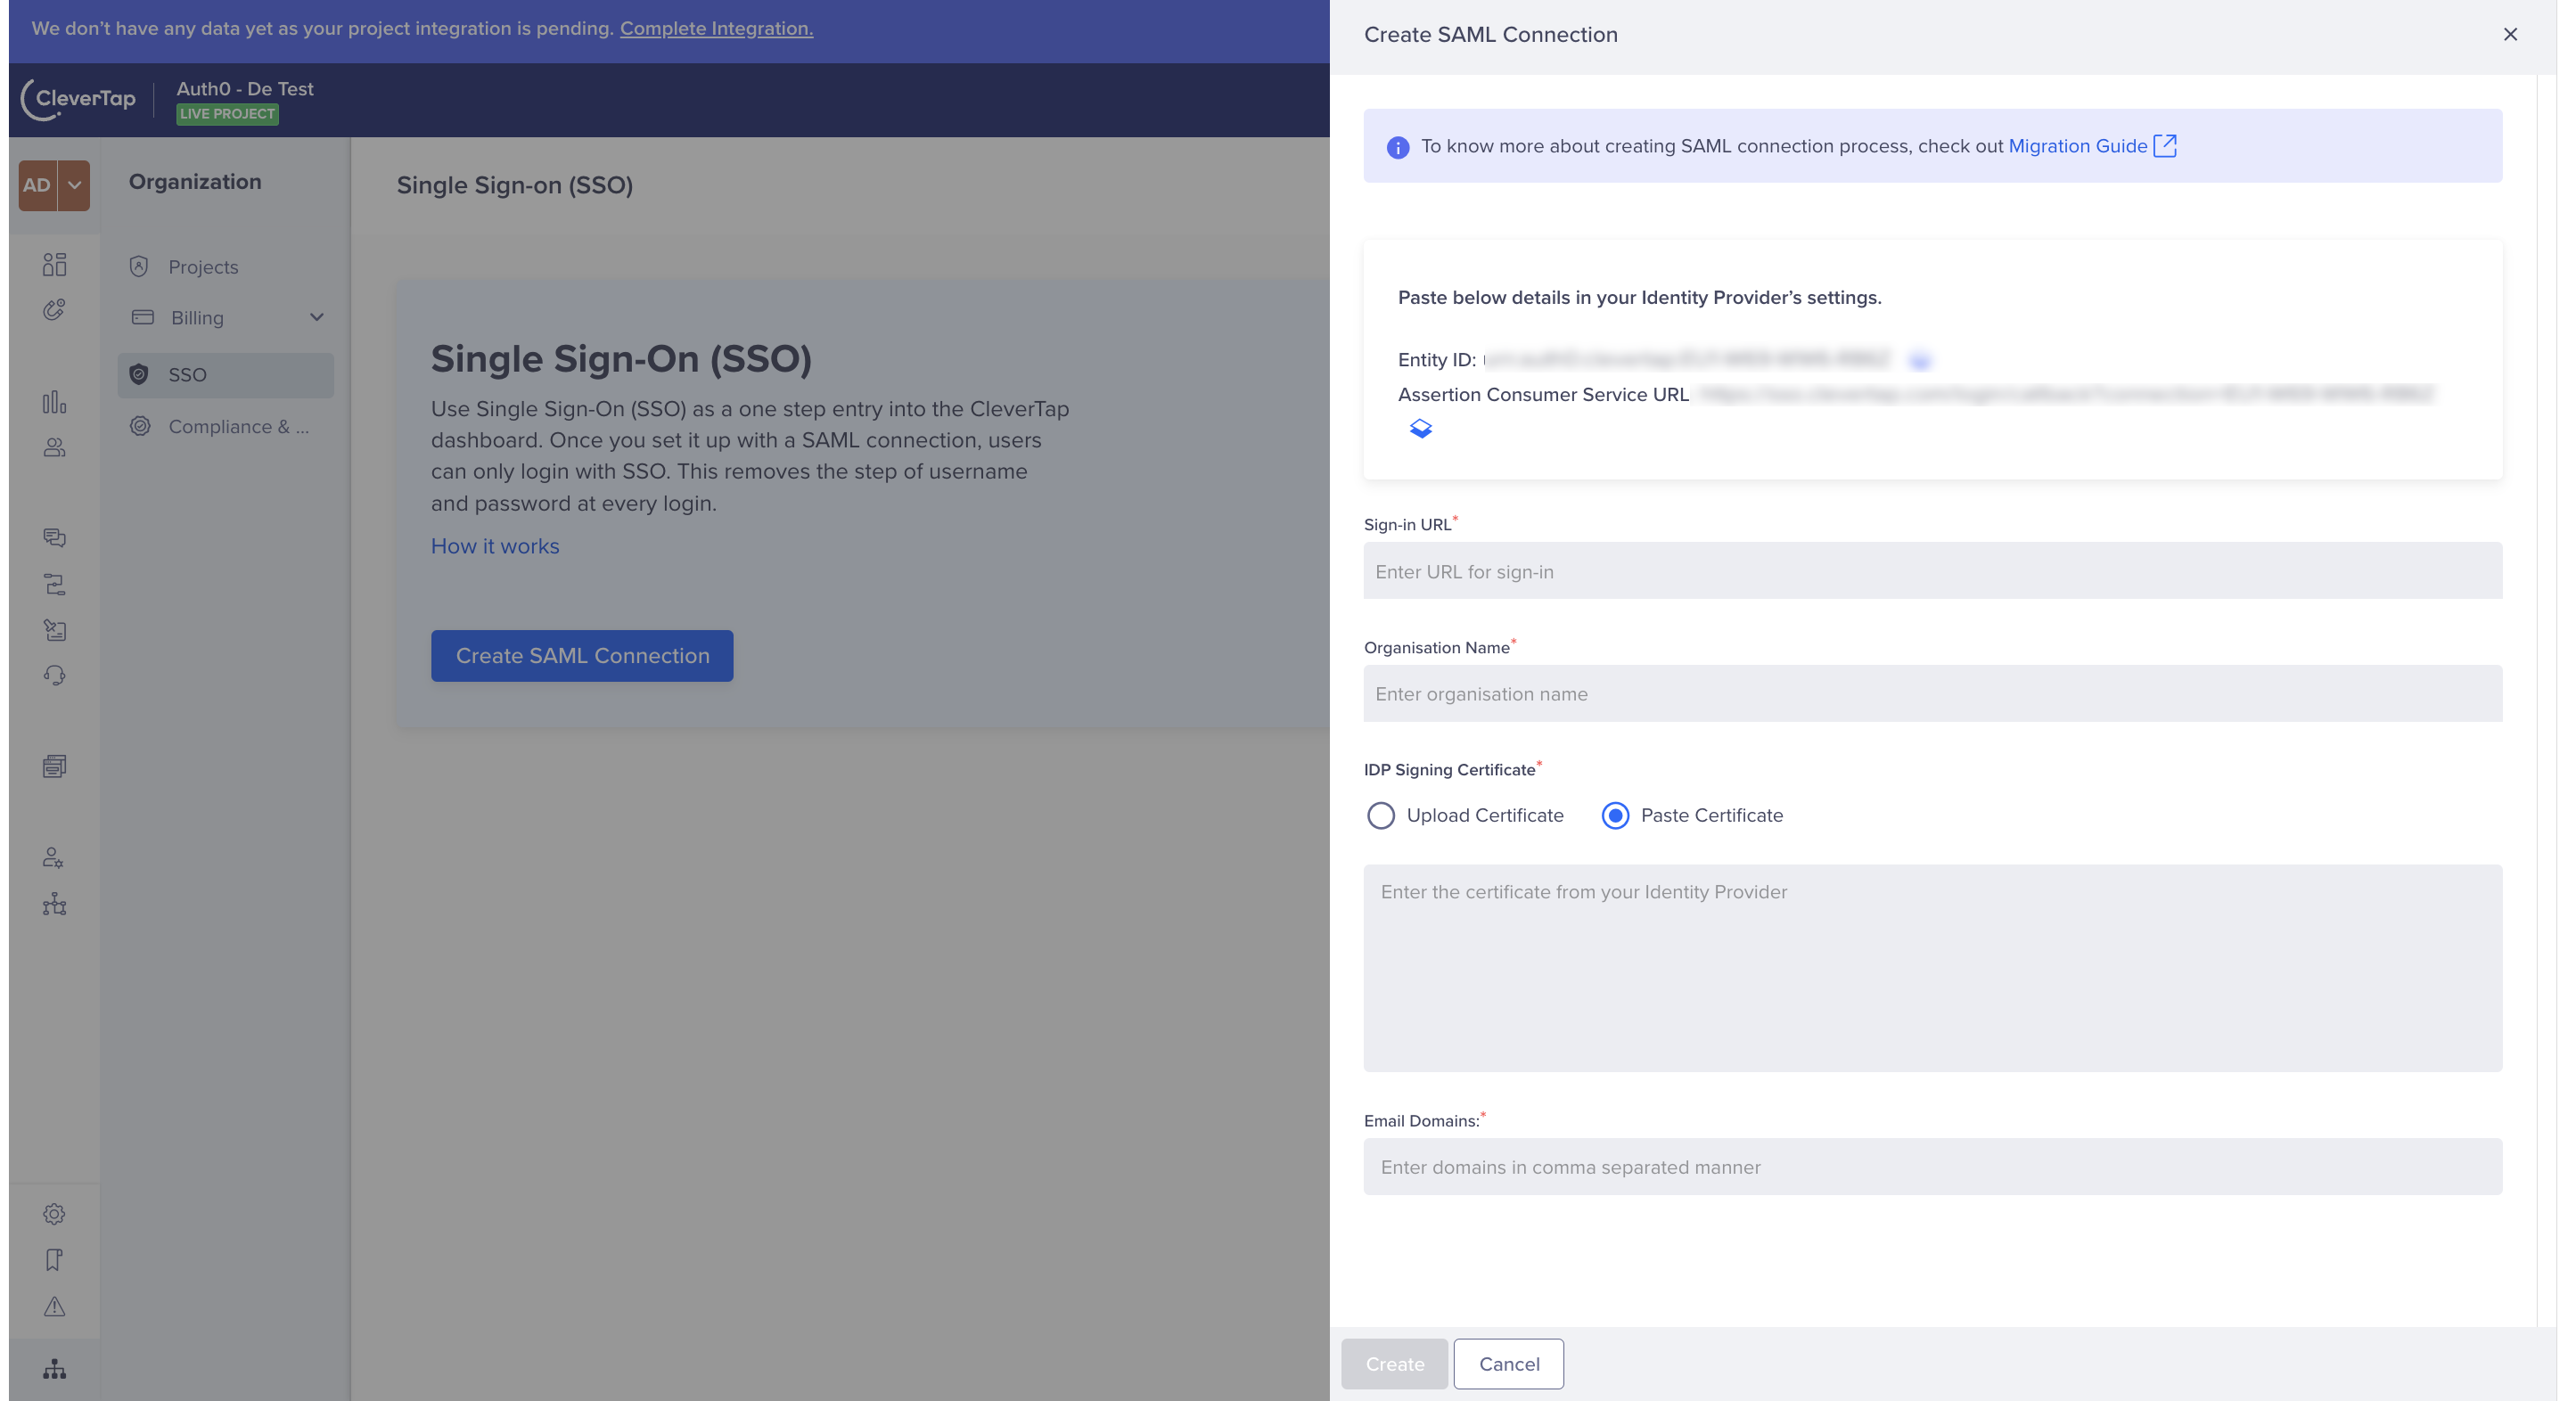
Enter Details to Create SAML Connection
-
Enter the following details:
- Sign-in URL
- Organization name
- IDP Signing certificate (You can either paste the certificate details or upload the .CER file)
- SAML Eligible Email Domains
In order to claim ownership of a domain, it is necessary for the organization to have at least one active user associated with that particular domain.
-
Click Create.
Note
- After you configure Sign-in URL and IDP Signing certificate, these details are available from your respective identity providers. For more information about IdP configuration, refer Okta, OneLogin, Azure and Gsuite.
- CleverTap recommends avoiding a word processor for copy-pasting sensitive values like certificates; instead, you can use an IDE or terminal.
After creating the SAML connection successfully, SAML Service Provider details are displayed on the page, as shown in the following figure:
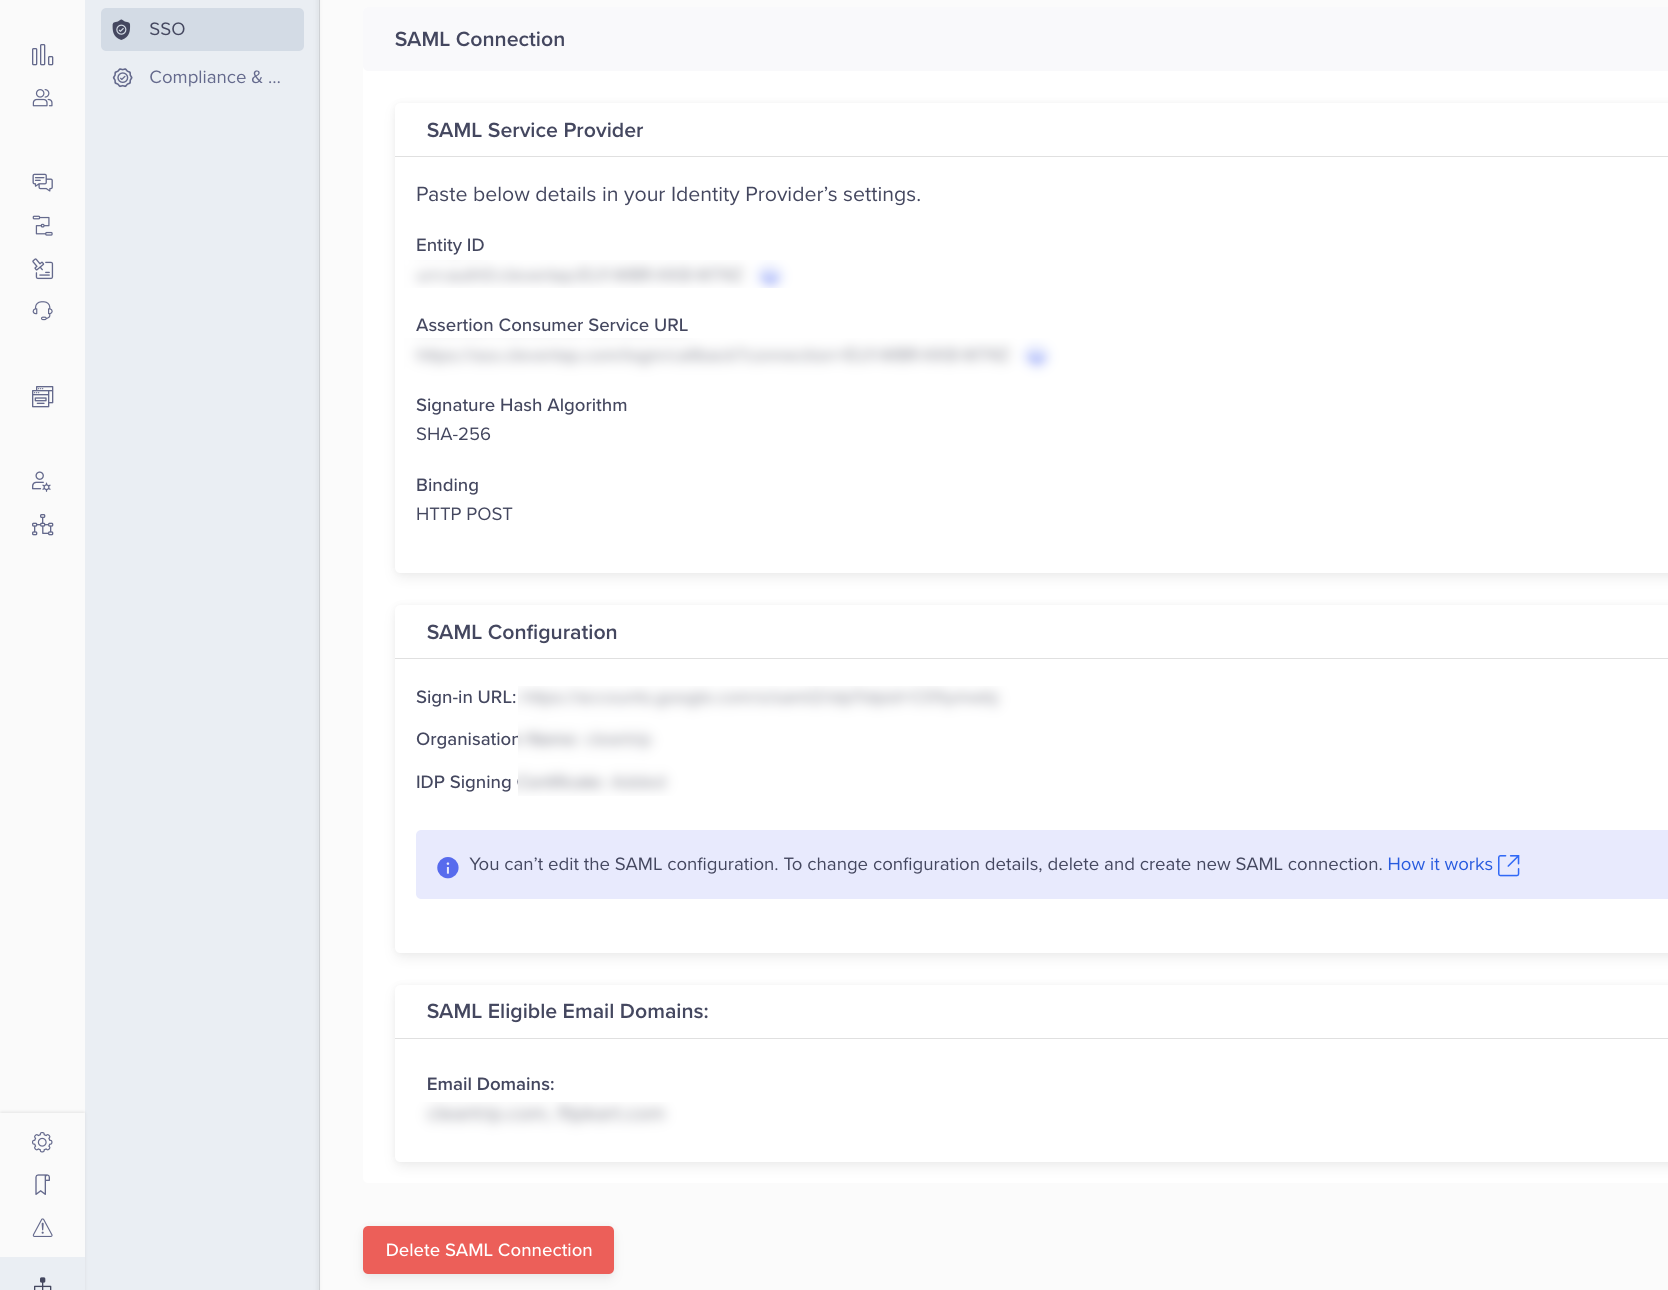
- Navigate to your respective IdP sections in the document and complete the steps mentioned to configure the connection.
Configuration Updates
The following are the updates related to CleverTap's SSO configurations process:
The IdP metadata XML is not accepted as a configuration parameter anymore.
The domain discovery now recognizes email domains. It means you can now log in through an IdP using a specific email address (for example, [email protected]) instead of organization names (for example, CleverTap). All users must provide their email addresses, and the system automatically determines if they use SAML or basic authentication.
All users must provide an email address on the new login page (the old login page still accepts the organization names).
CleverTap strongly recommends adding your email domains rather than public ones or other organizations. If you encounter errors during configuration, it may be because the email domain is public (for example, gmail.com, outlook.com) or already claimed by another organization. Contact our support team if you encounter an issue and want to claim an email domain.
Configure CleverTap Application on your IdP
To configure CleverTap on your IdP, you must map the attributes. The following are the two methods for attribute mapping:
- Add a list of names and emails only (Recommended)
- Send a list of attributes along with accountList and an array of accountIds.
Based on the selected attribute mapping logic and your IdP, map the attributes as illustrated for specific IdPs:
- Attribute Mapping for Okta
- Attribute Mapping for OneLogin
- Attribute Mapping for Azure
- Attribute Mapping for Gsuite
Identity Service Provider
Identity Provider (IdP) is an authority that verifies and asserts a user's identity and access to a requested resource (the "Service Provider"). Some examples of IdPs are Okta, GSuite, and so on.
Attribute Mapping Logic for IdPs
You can set up your IdP attributes in the following two ways:
Add a List of Names and Emails Only (Recommended)
Users onboarded before SAML SSO activation can continue to access their previous accounts. Users onboarded through SAML SSO for the first time are redirected to the no-access page and cannot access any accounts.
The user is onboarded to new accounts by sending an invitation to any account. Inviting a SAML user to an account may not send an email invite; instead, directly grant them access. However, the user needs to log out and then log in to view the new account assignments.
There are no organization-based checks in this method, as the provision of access is still in the hands of the admin of the target account.
Send a List of attributes Along With accountList and an Array of accountIds
In this case, the user can only access the accounts mentioned in the accountList attribute. The invitation flow does not work for gaining access to any account. The account must be added to the accountList. An additional check is performed on the accounts present in the accountList to validate if they belong to a family of accounts for which the current SAML SSO connection is configured. For example, if a connection is made for customer A and tries to pass the account Ids of customer B, they would be blocked.
The optional attribute accountList must be added in the following manner:
accountList : ["1000000001", "1000000002", "1000000003"].
Note
- If the user has access to any other account on the system apart from the ones present in the
accountList, they would lose access to those accounts.- You must connect all your accounts to a parent account for which the SSO configuration is created.
Configure IDPs
This section illustrates how to set up access for the following IDPs:
Note
You can configure any IdP that supports SAML SSO, following the recommended approach.
Okta Setup
This section provides information about the Okta setup. The process involves the following major steps:
Create an Application
Start the setup by creating a CleverTap app in your IdP setup. All IdPs allow you to create an app you want to access using SSO. Consider the following example of setting up an app with Okta:
- Navigate to your Okta admin dashboard.
- Select Applications from the left navigation and click Create App Integration.

Creating New Application in Okta
- After the Sign-in method box appears, select SAML 2.0.

New App Integration
- Enter your application details as shown in the image below and click Next:

App Configuration on Okta
- Add the Single sign-on URL and Audience URI(Entity ID) values. (You can find these credentials on the Create SAML connection page of the CleverTap dashboard).

SAML Settings for Okta App
Map Attributes
In continuation of the above configuration, ensure that the correct values are passed to CleverTap. To do so, you must map the attributes:
- Add three attributes - name, email and accountList appropriately, and map the attributes accordingly as shown in the image below:
Note
If you proceed further with the recommended method, add only two attributes - name, email in the attribute mapping section appropriately. You need not add any custom attributes and hence you must skip step 2.

Attribute Mapping
-
For the accountList attribute, you must create a custom attribute:
i. Navigate to Directory > Profile editor > Select your application (CleverTap).
ii. Click + Add Attributes.

Add Attributes
iii. Define all the attribute values for accountList.

iv. Click Save
Assign CleverTap Application to User
To assign your CleverTap application to users:
- Navigate to Applications > Select your application.
- Select Assign to People from the Assign dropdown.

Assigning an Applications to Users
- Select the user you want to assign and click Assign

Assign an Application to Users
- Ensure that the
accountListvalue is populated against the accountList attribute in the dropdown.

Account list Attribute Mapping
- Click Save and Go Back and then click Done.
To find the credentials for setting up SAML connection on the CleverTap dashboard:
- Navigate to Applications > Sign on
- Click View SAML Setup instruction available at the bottom right of the page. You can find the credentials as shown in the following figure:

Credentials for SAML Connection
- Use these credentials to create a SAML connection on the CleverTap dashboard.
OneLogin Setup
This section provides information about the OneLogin setup. The process involves the following major steps:
Create an Application
To create an application:
- Select Applications tab and select Applications from the menu.

Create a New OneLogin Application
- Click Add App and search for SAML Custom Connector (Advance) in the search bar.

Create a New OneLogin Application
- Select SAML Custom Connector (Advance) and enter the Display Name.

Add SAML Custom Connector
-
Click Save.
-
From the left panel, navigate to the Configuration section and enter the ACS (Consumer) URL and Audience (EntityID). (You can find these credentials on the Create SAML connection page of the CleverTap dashboard).

Configure Custom Connector
Map Attributes
After configuring the application, ensure that correct values are passed to CleverTap by mapping the attributes:
-
From the left menu under Applications tab, navigate to the Parameter section and click the + sign to add new fields and ensure that the Configured by admin button is selected.
-
Add three attributes - name, email and accountList appropriately, and map the attributes accordingly as shown below:
Note
If you proceed further with the recommended method, add only two attributes - name, email in the attribute mapping section appropriately. You do not need to add any custom attributes and hence you must skip step 4.

Map Attributes
-
Add value as FirstName and Email for Name and Email, respectively, and click Save.
-
a. Add accountList as Name and click Save.
b. Select Value as Macro from the dropdown and pass the account ID.

Map Custom Attribute
Note
Ensure that you select the Include in SAML assertion when adding all three attributes as shown in the figure above.
Assign CleverTap Application to User
To assign your CleverTap application to users:
- Navigate to Users from the top panel and click Users.

User Assignment
- Select the user you want to assign to the CleverTap application.

Assign an Application to Users
The User Info page opens:

User Profile
- Navigate to applications from the left panel, click +, and select CleverTap from the dropdown.
- Click Continue
- Verify all the values passed for that user from the Edit CleverTap Login page and click Save
Now, you have successfully assigned the CleverTap application to the user.
To create a SAML connection on the CleverTap dashboard, you need two credentials, as mentioned in the beginning. To find your Sign-in URL and IDP Signing certificate:
- Navigate to the Applications tab from the top panel, and select the CleverTap application
- Navigate to SSO from the left navigation and copy the SAML 2.0 Endpoint(HTTP) for the SAML connection on CleverTap.

SAML 2.0 Endpoint
- Click View Details for the IDP signing certificate as shown below:

View IDP Signing Certificate

Copy IDP Signing Certificate
- Use these credentials to create a SAML connection on the CleverTap dashboard.
Azure Setup
This section provides information about the Azure setup. The process involves the following major steps:
Create an Application
- Start the setup by signing up and creating a CleverTap app on the Azure Portal
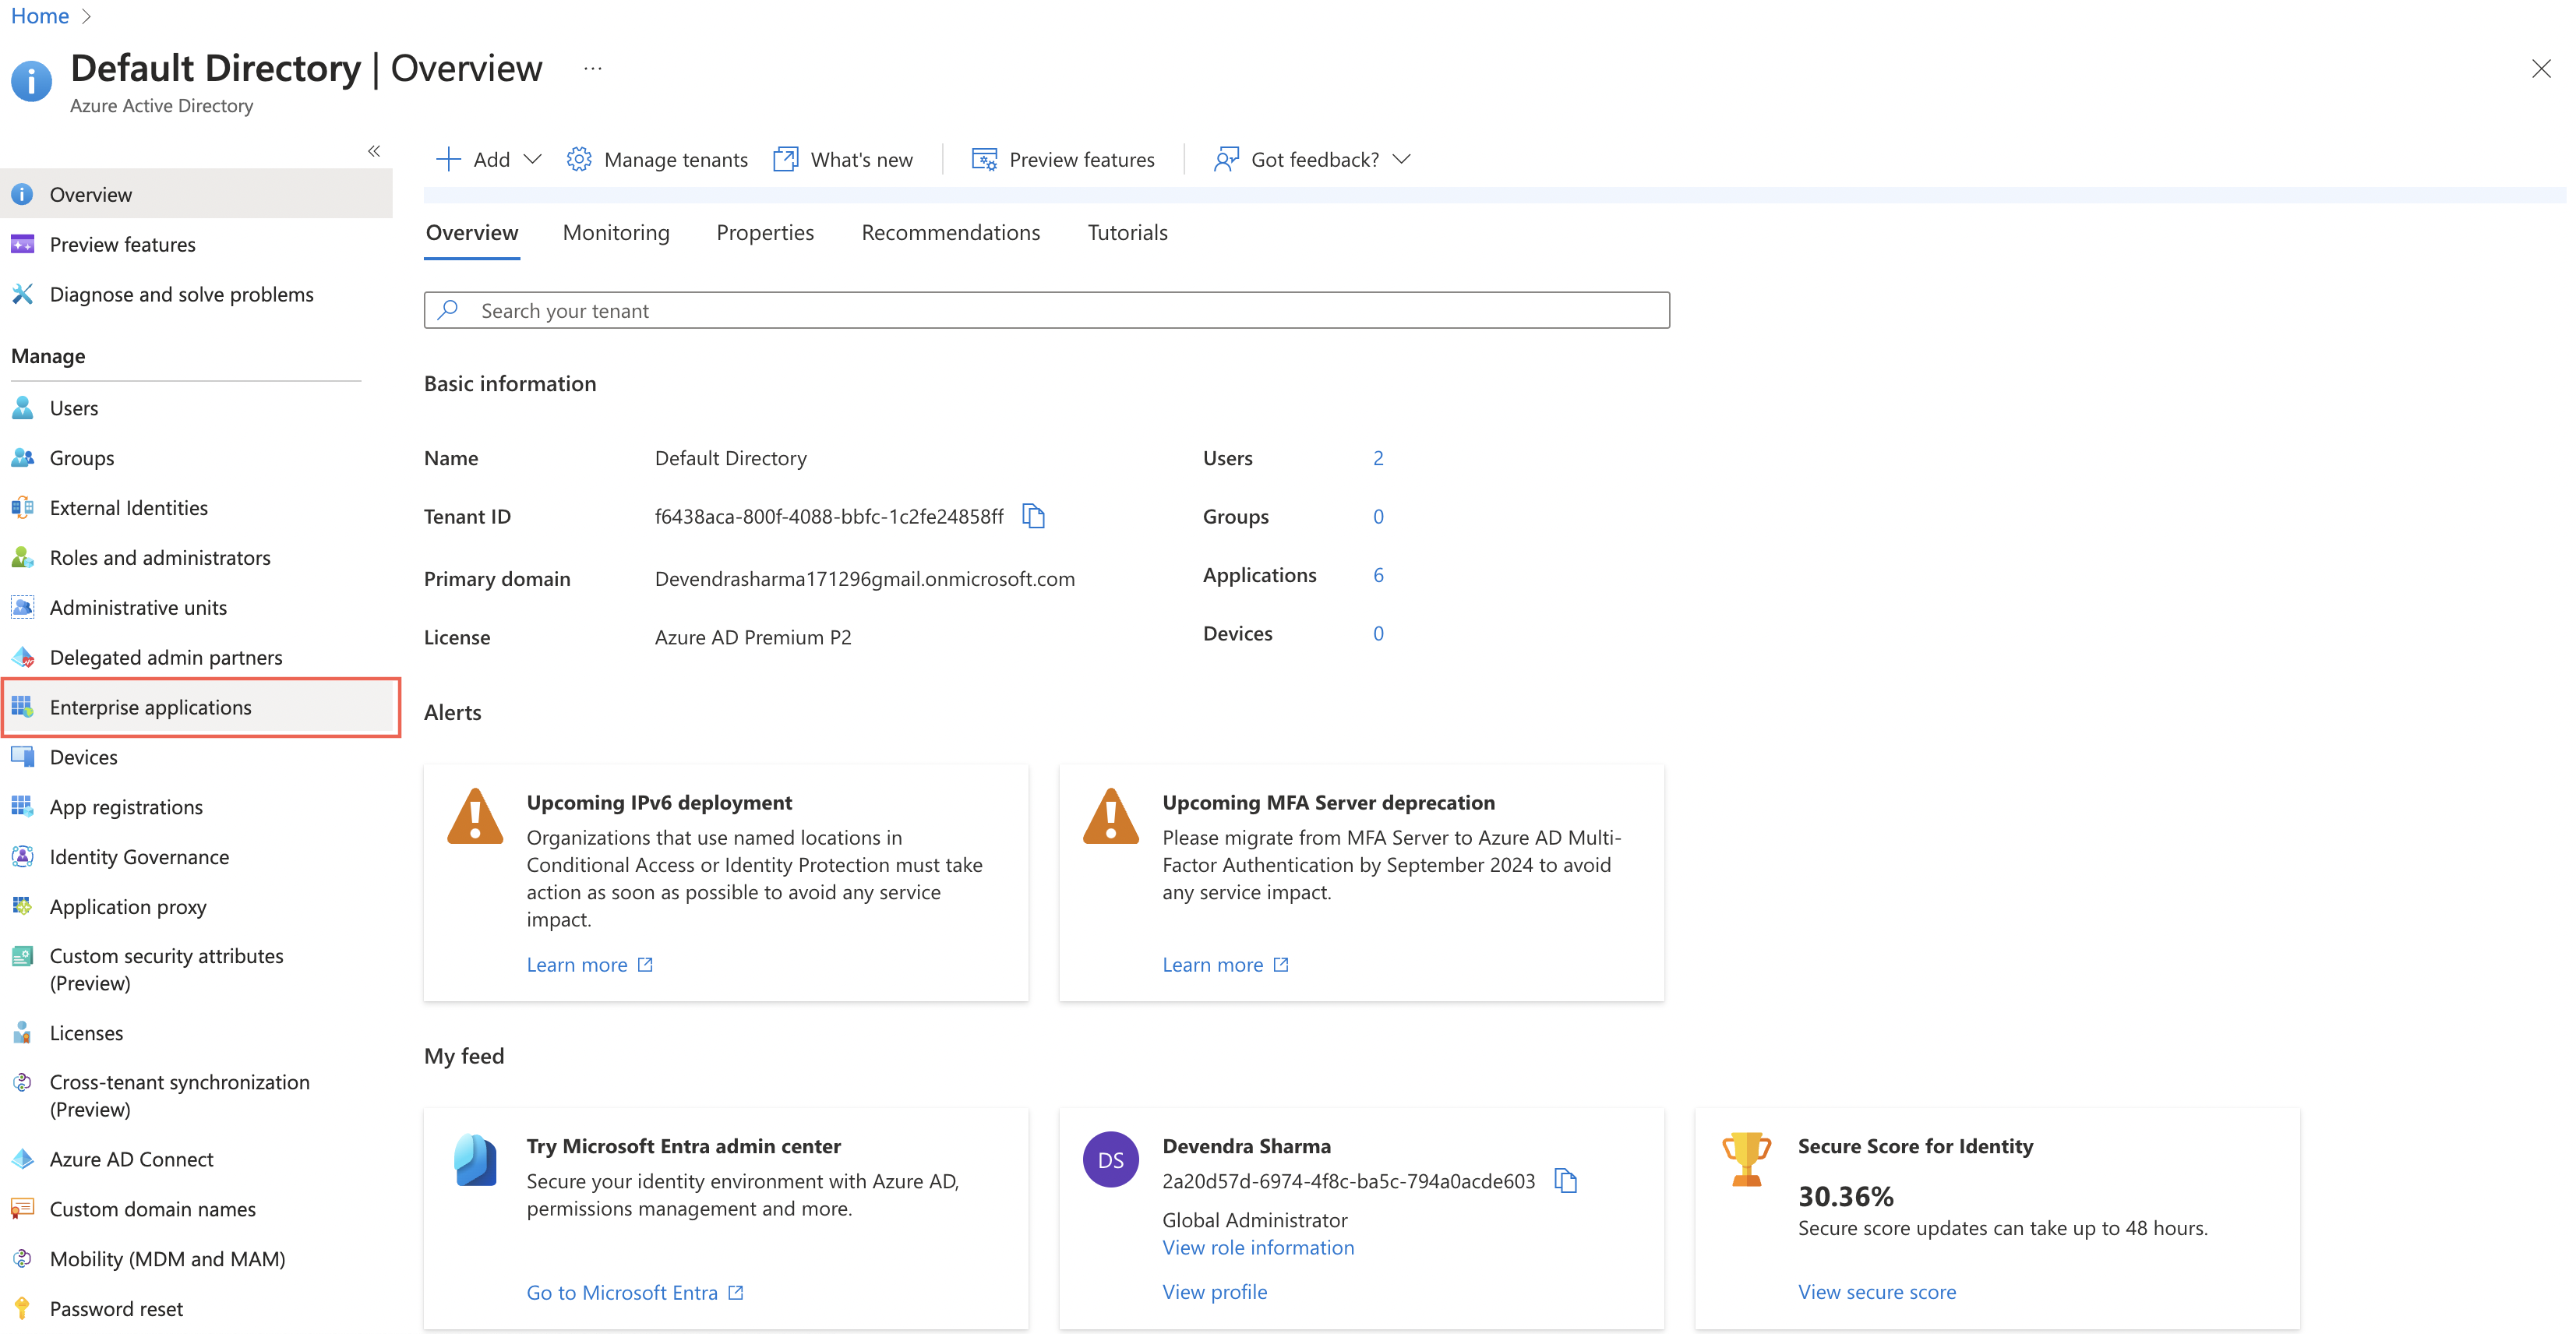
- From the left navigation panel, select Azure Active Directory.

- Click + Add and select Enterprise application

- Click + Create your application.
- Enter the name of the application.
- Select the Non-gallery application option as shown in the following image and click Add.
.png")
- Click Set up single sign on.
.png")
The Single sign-on page opens.
- Click SAML.

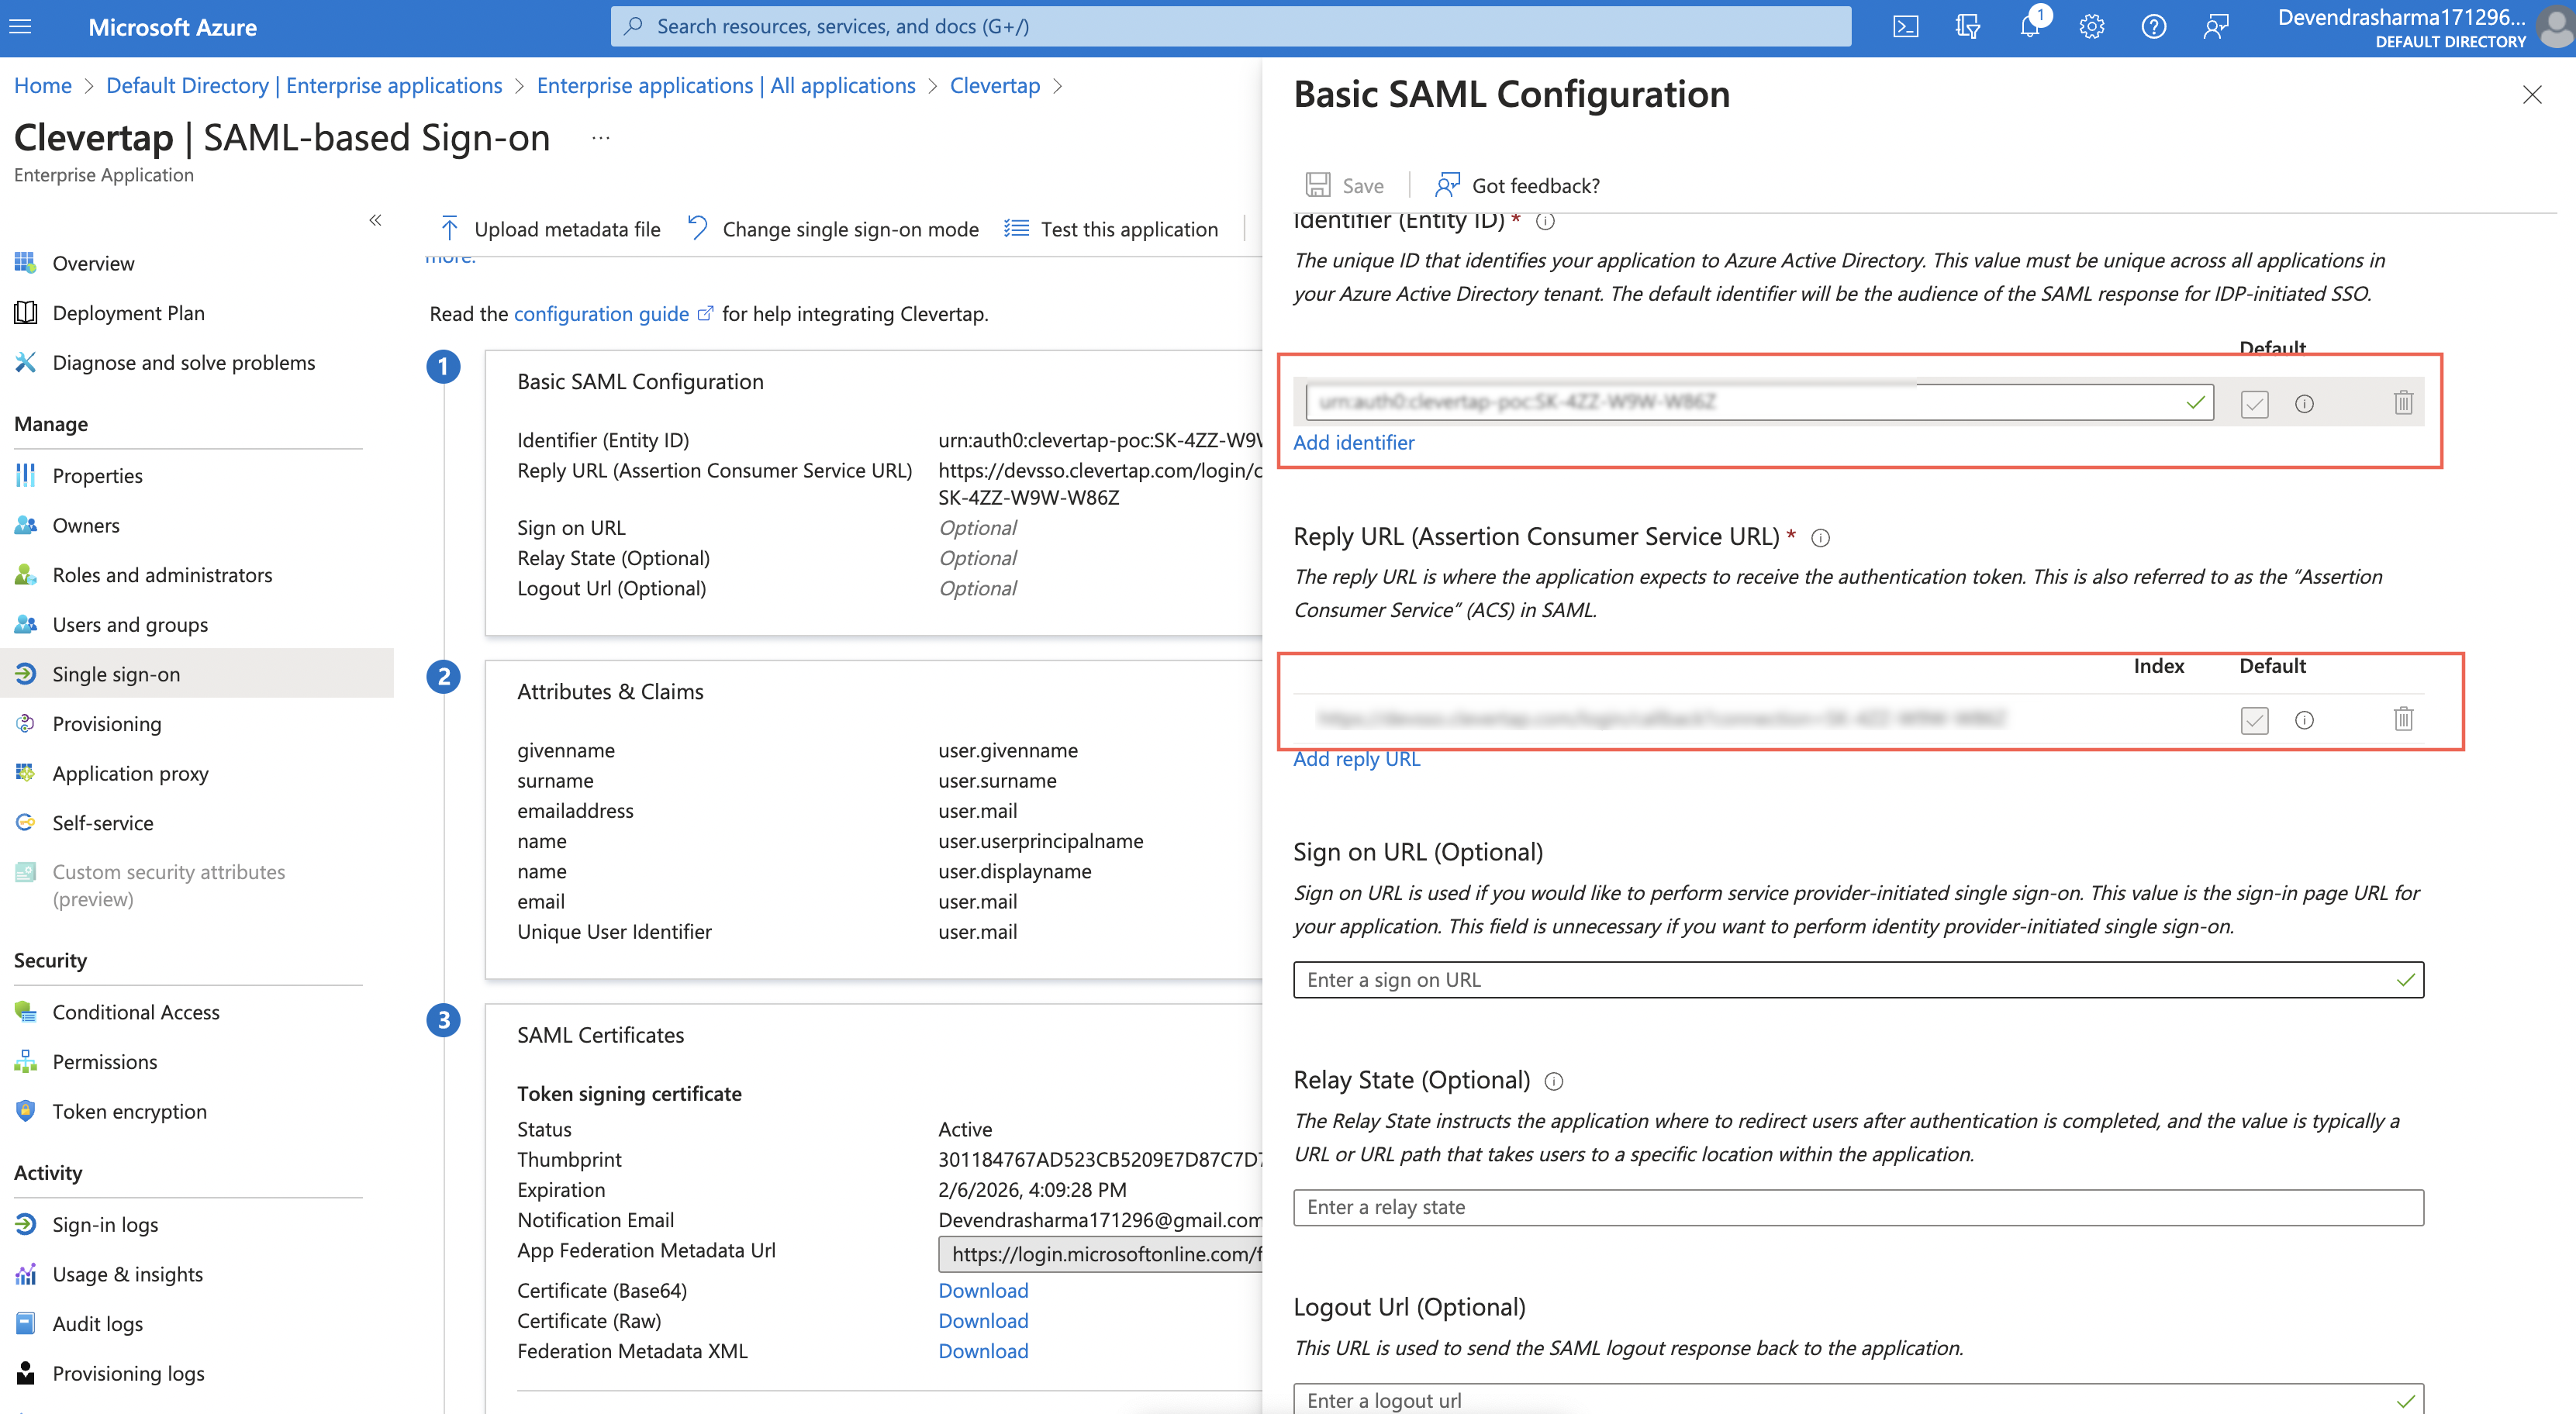
- Click the Edit icon available next to Basic SAML configuration.

- Add the ACS and Entity ID. You can find these credentials on the Create SAML connection page on CleverTap. To get these credentials:
- Navigate to Organization > SSO from the CleverTap dashboard.
- Copy the Entity ID and Assertion Consumer Service URL>Create SAML Connection.
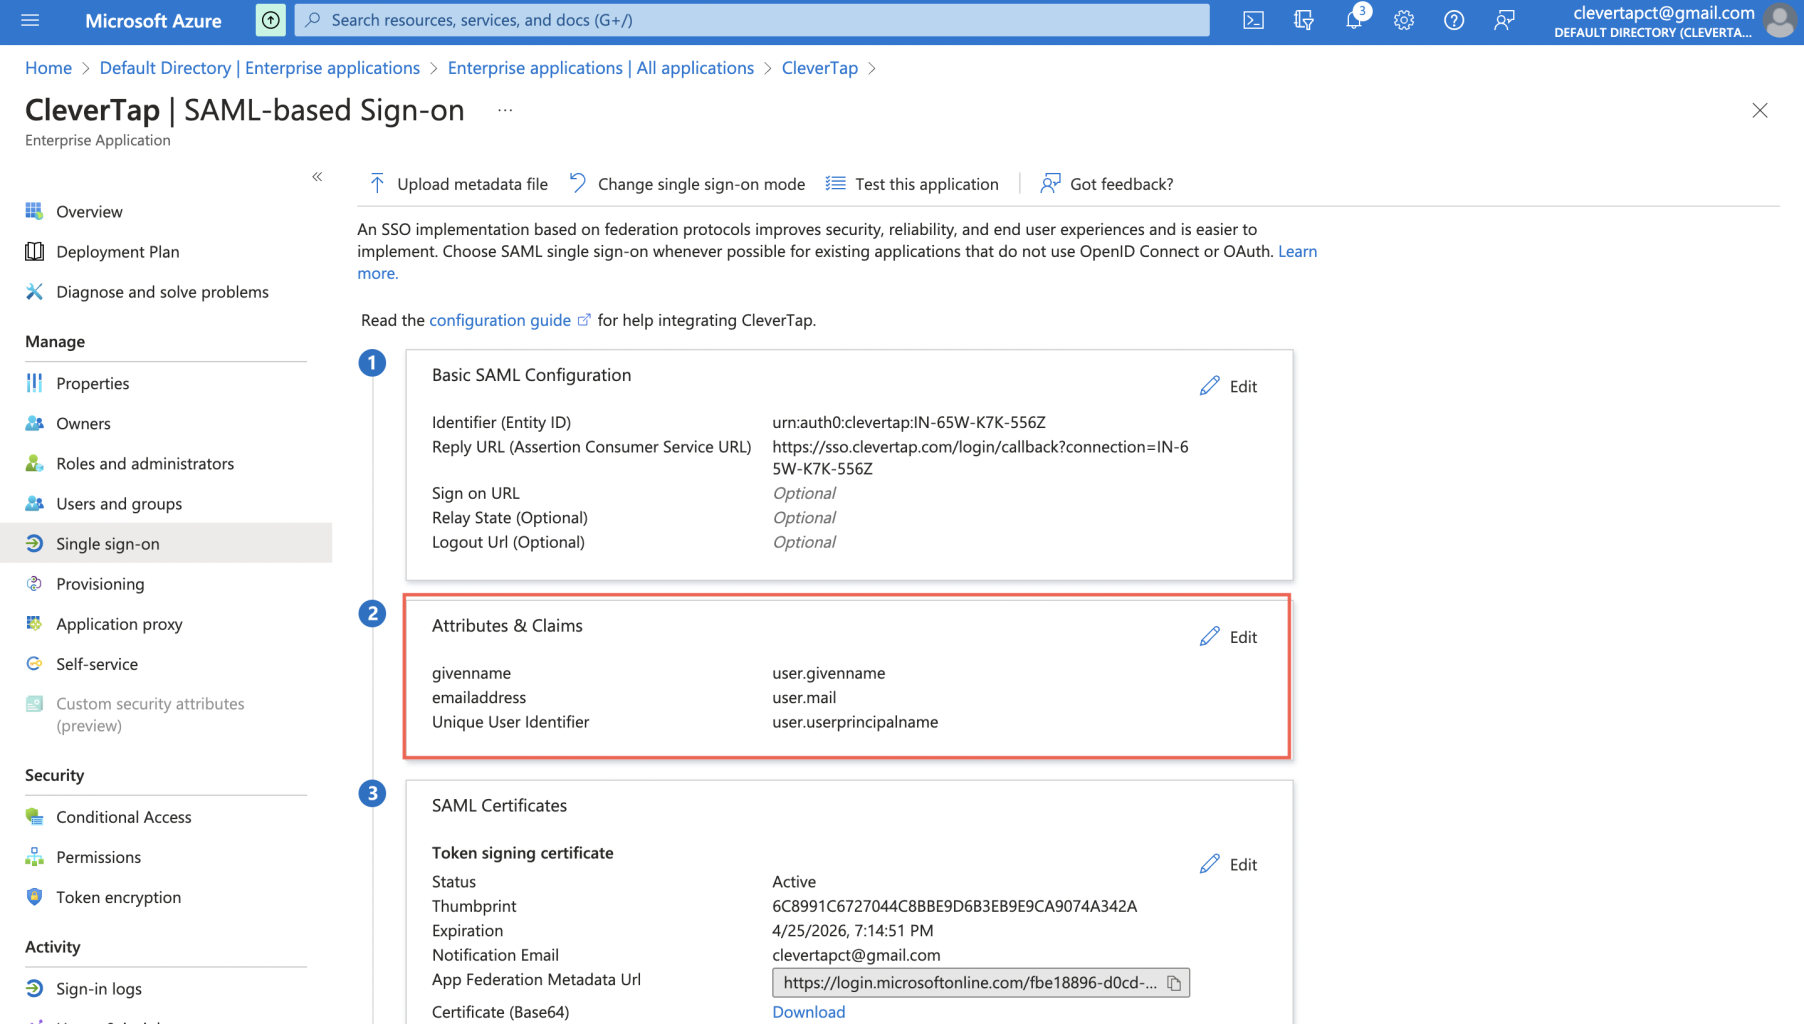
- Paste the respective values into the SAML configuration section as shown in the following screenshot and click Save.
Map Attributes
In continuation of the above configuration, ensure that the correct values are passed to CleverTap. To do so:
- Under the Attribute & Claims section, you must map the following two attributes: name and email appropriately and click Save (see following figure image below).
Note
If you proceed further with the recommended method, you need not add any custom attributes and hence you must skip step 2.
- Refer to this Azure support document to create a
accountListcustom attribute.
Assign CleverTap Application to User
To assign your CleverTap application to users:
- Navigate to the Azure Active Directory > Enterprise applications.
- Select the CleverTap application.
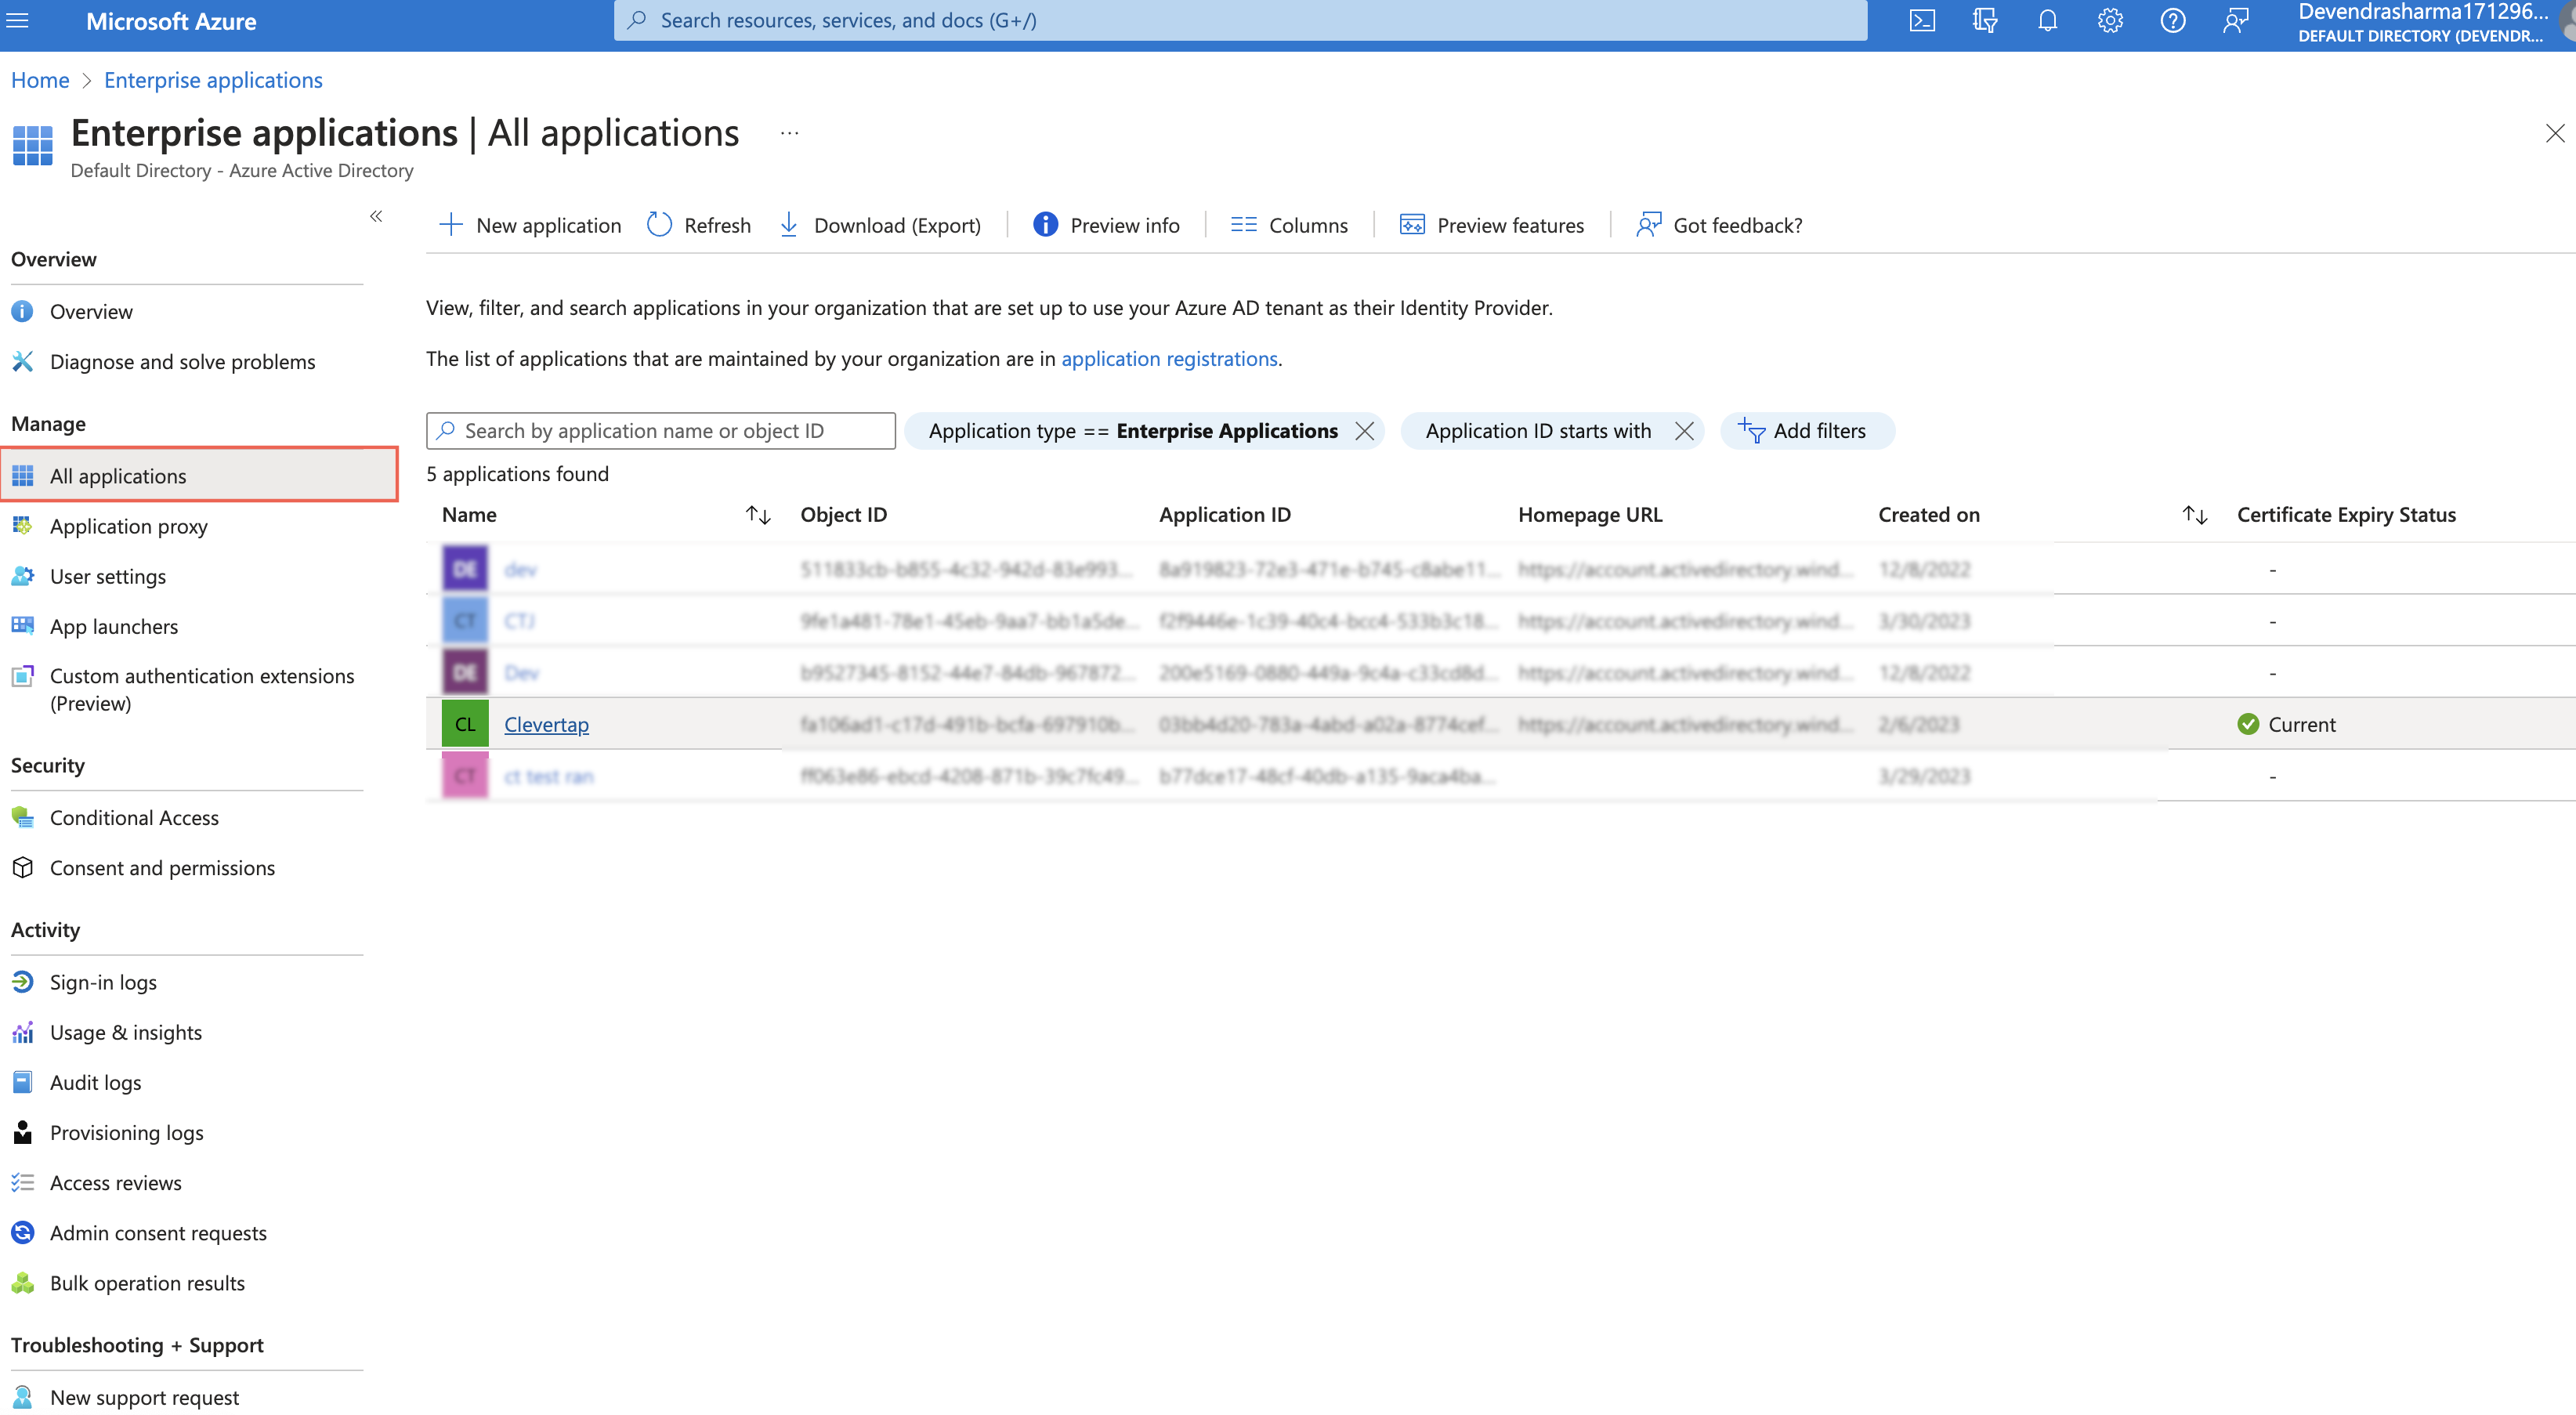
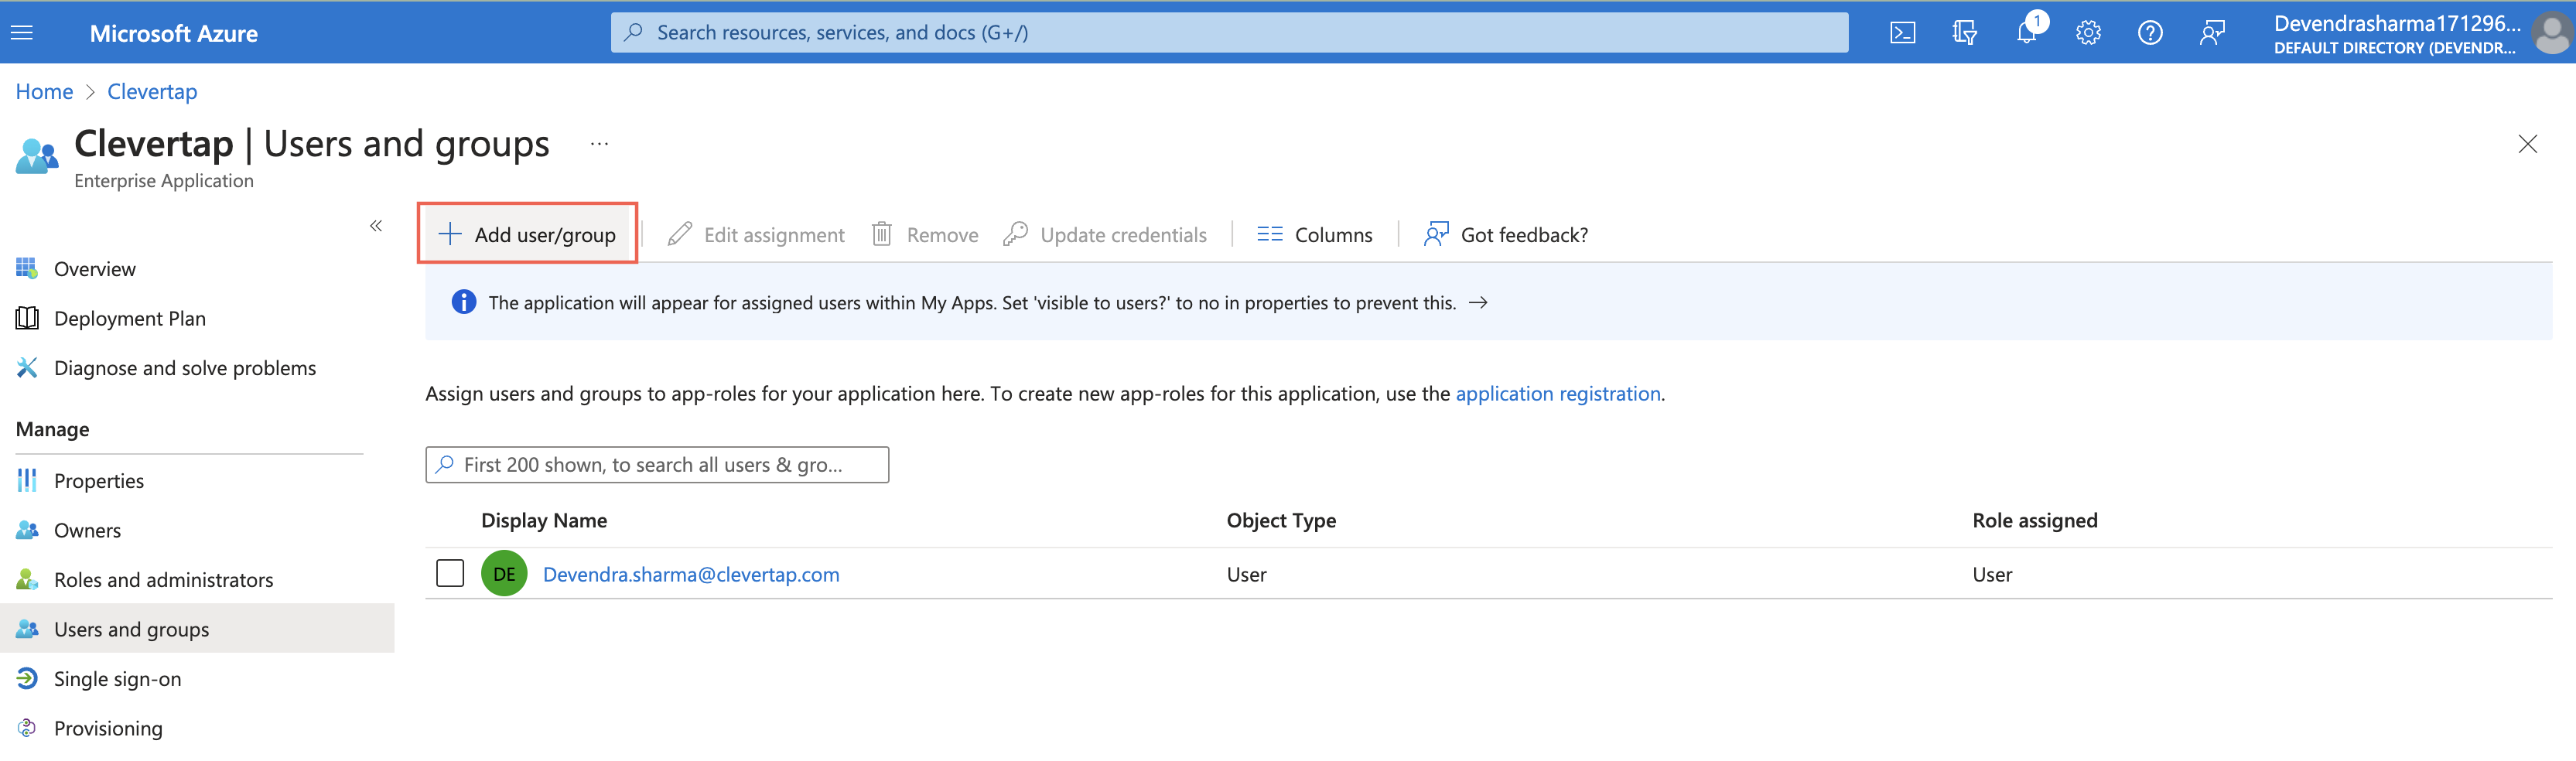
- Select Users and groups under the Manage section from the left navigation.
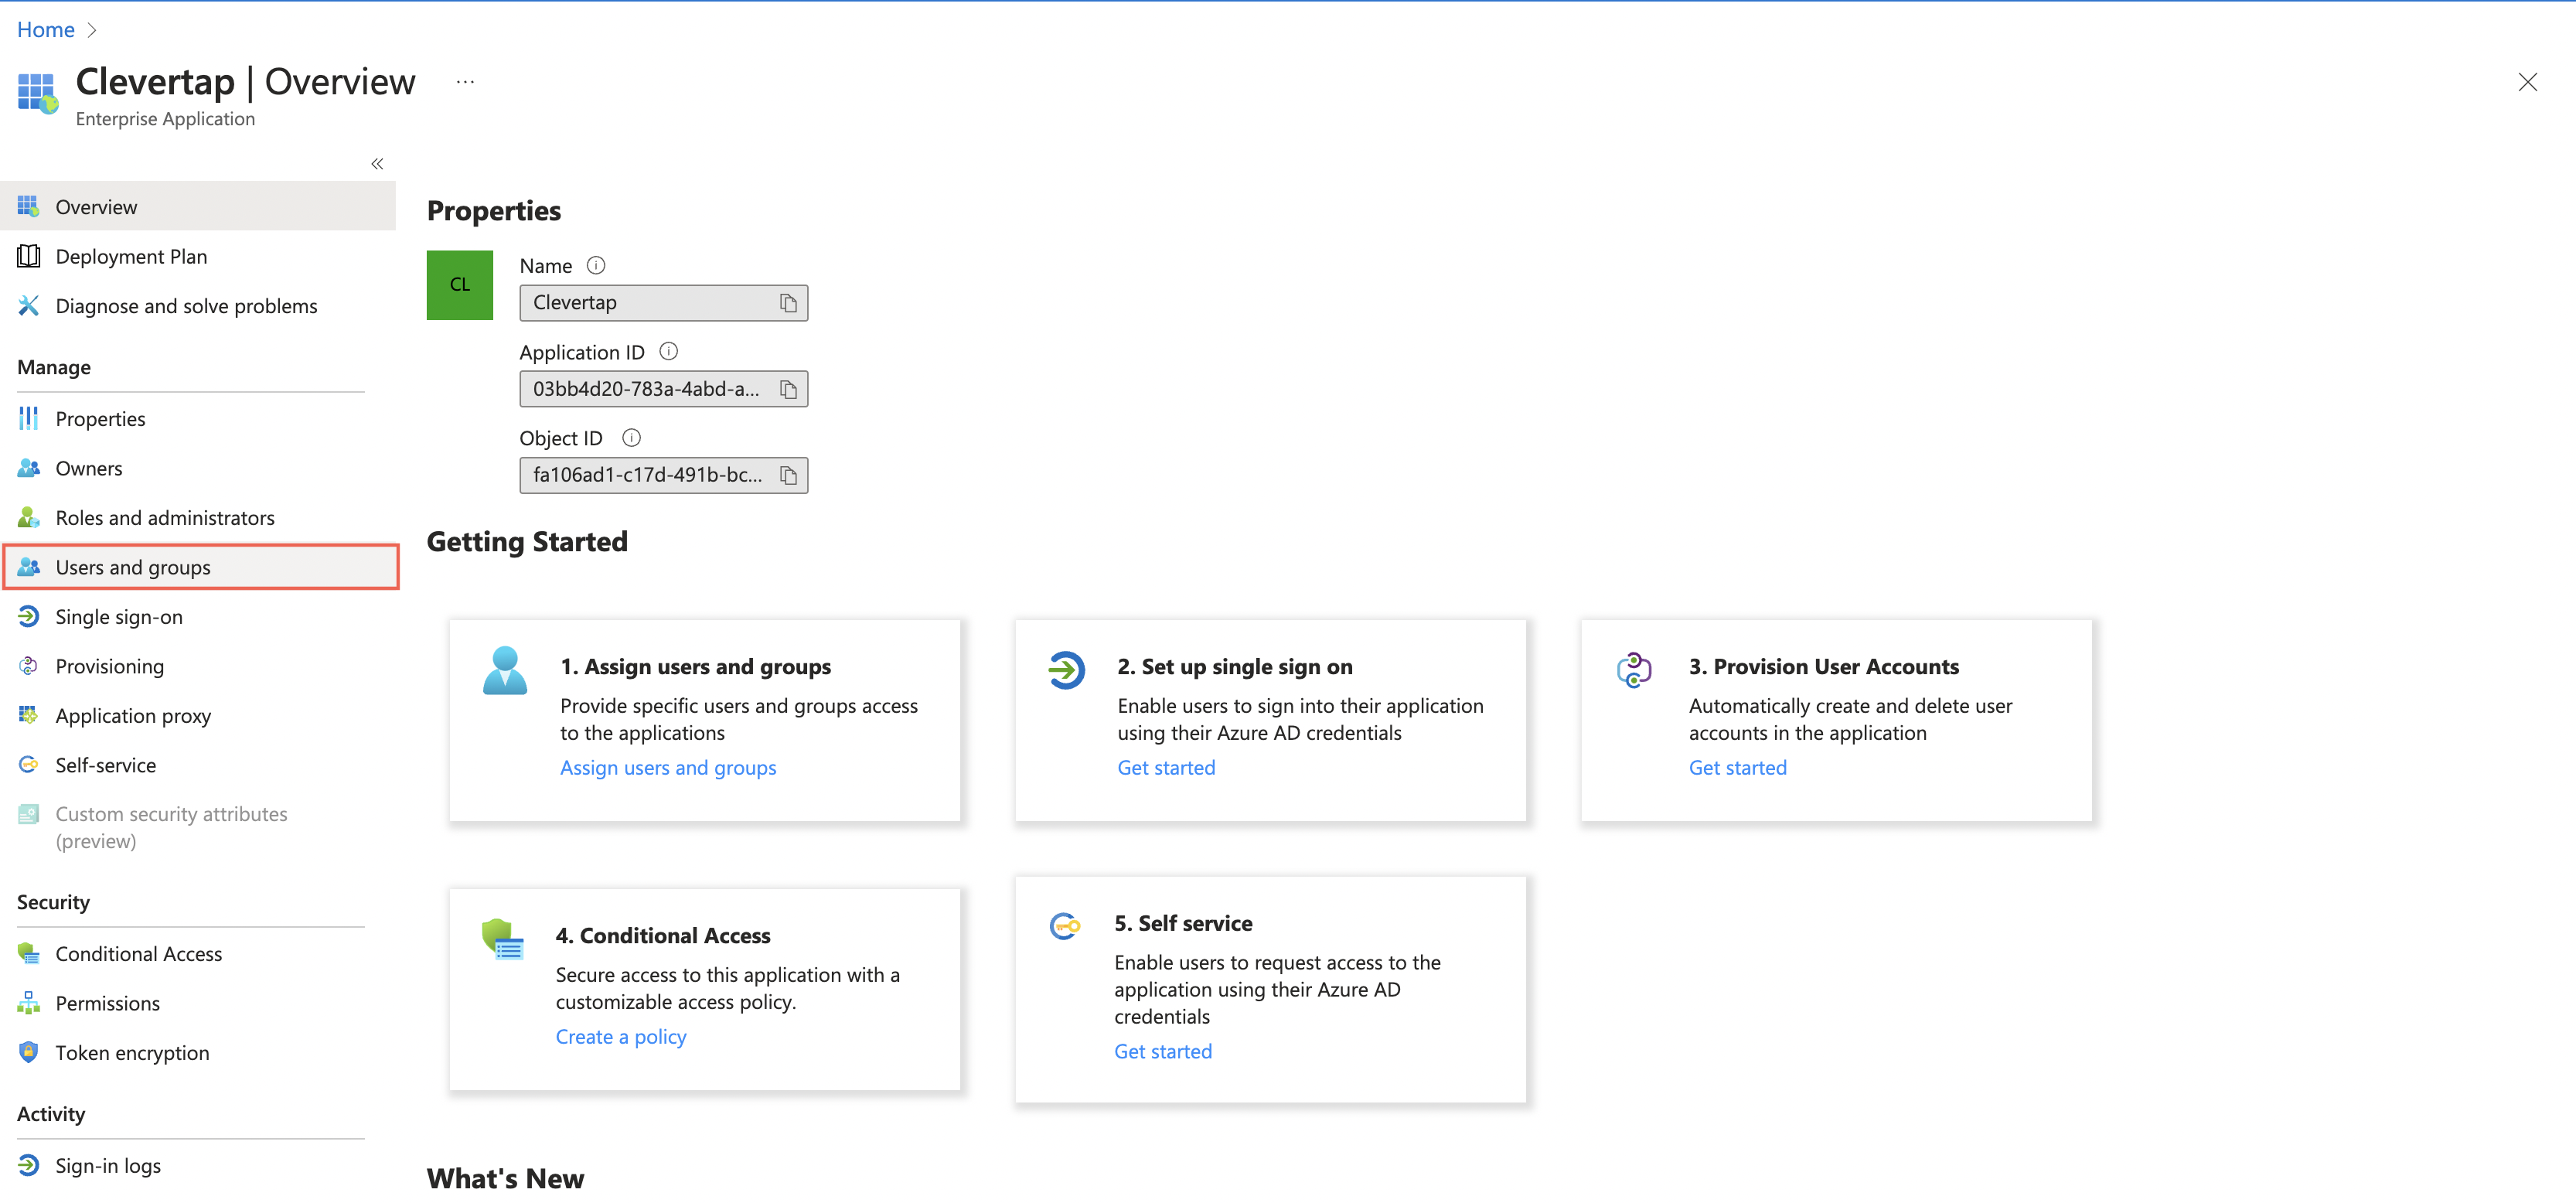
- Click + Add user/group and assign the respective user and groups to the application using the options available at the top of the screen.
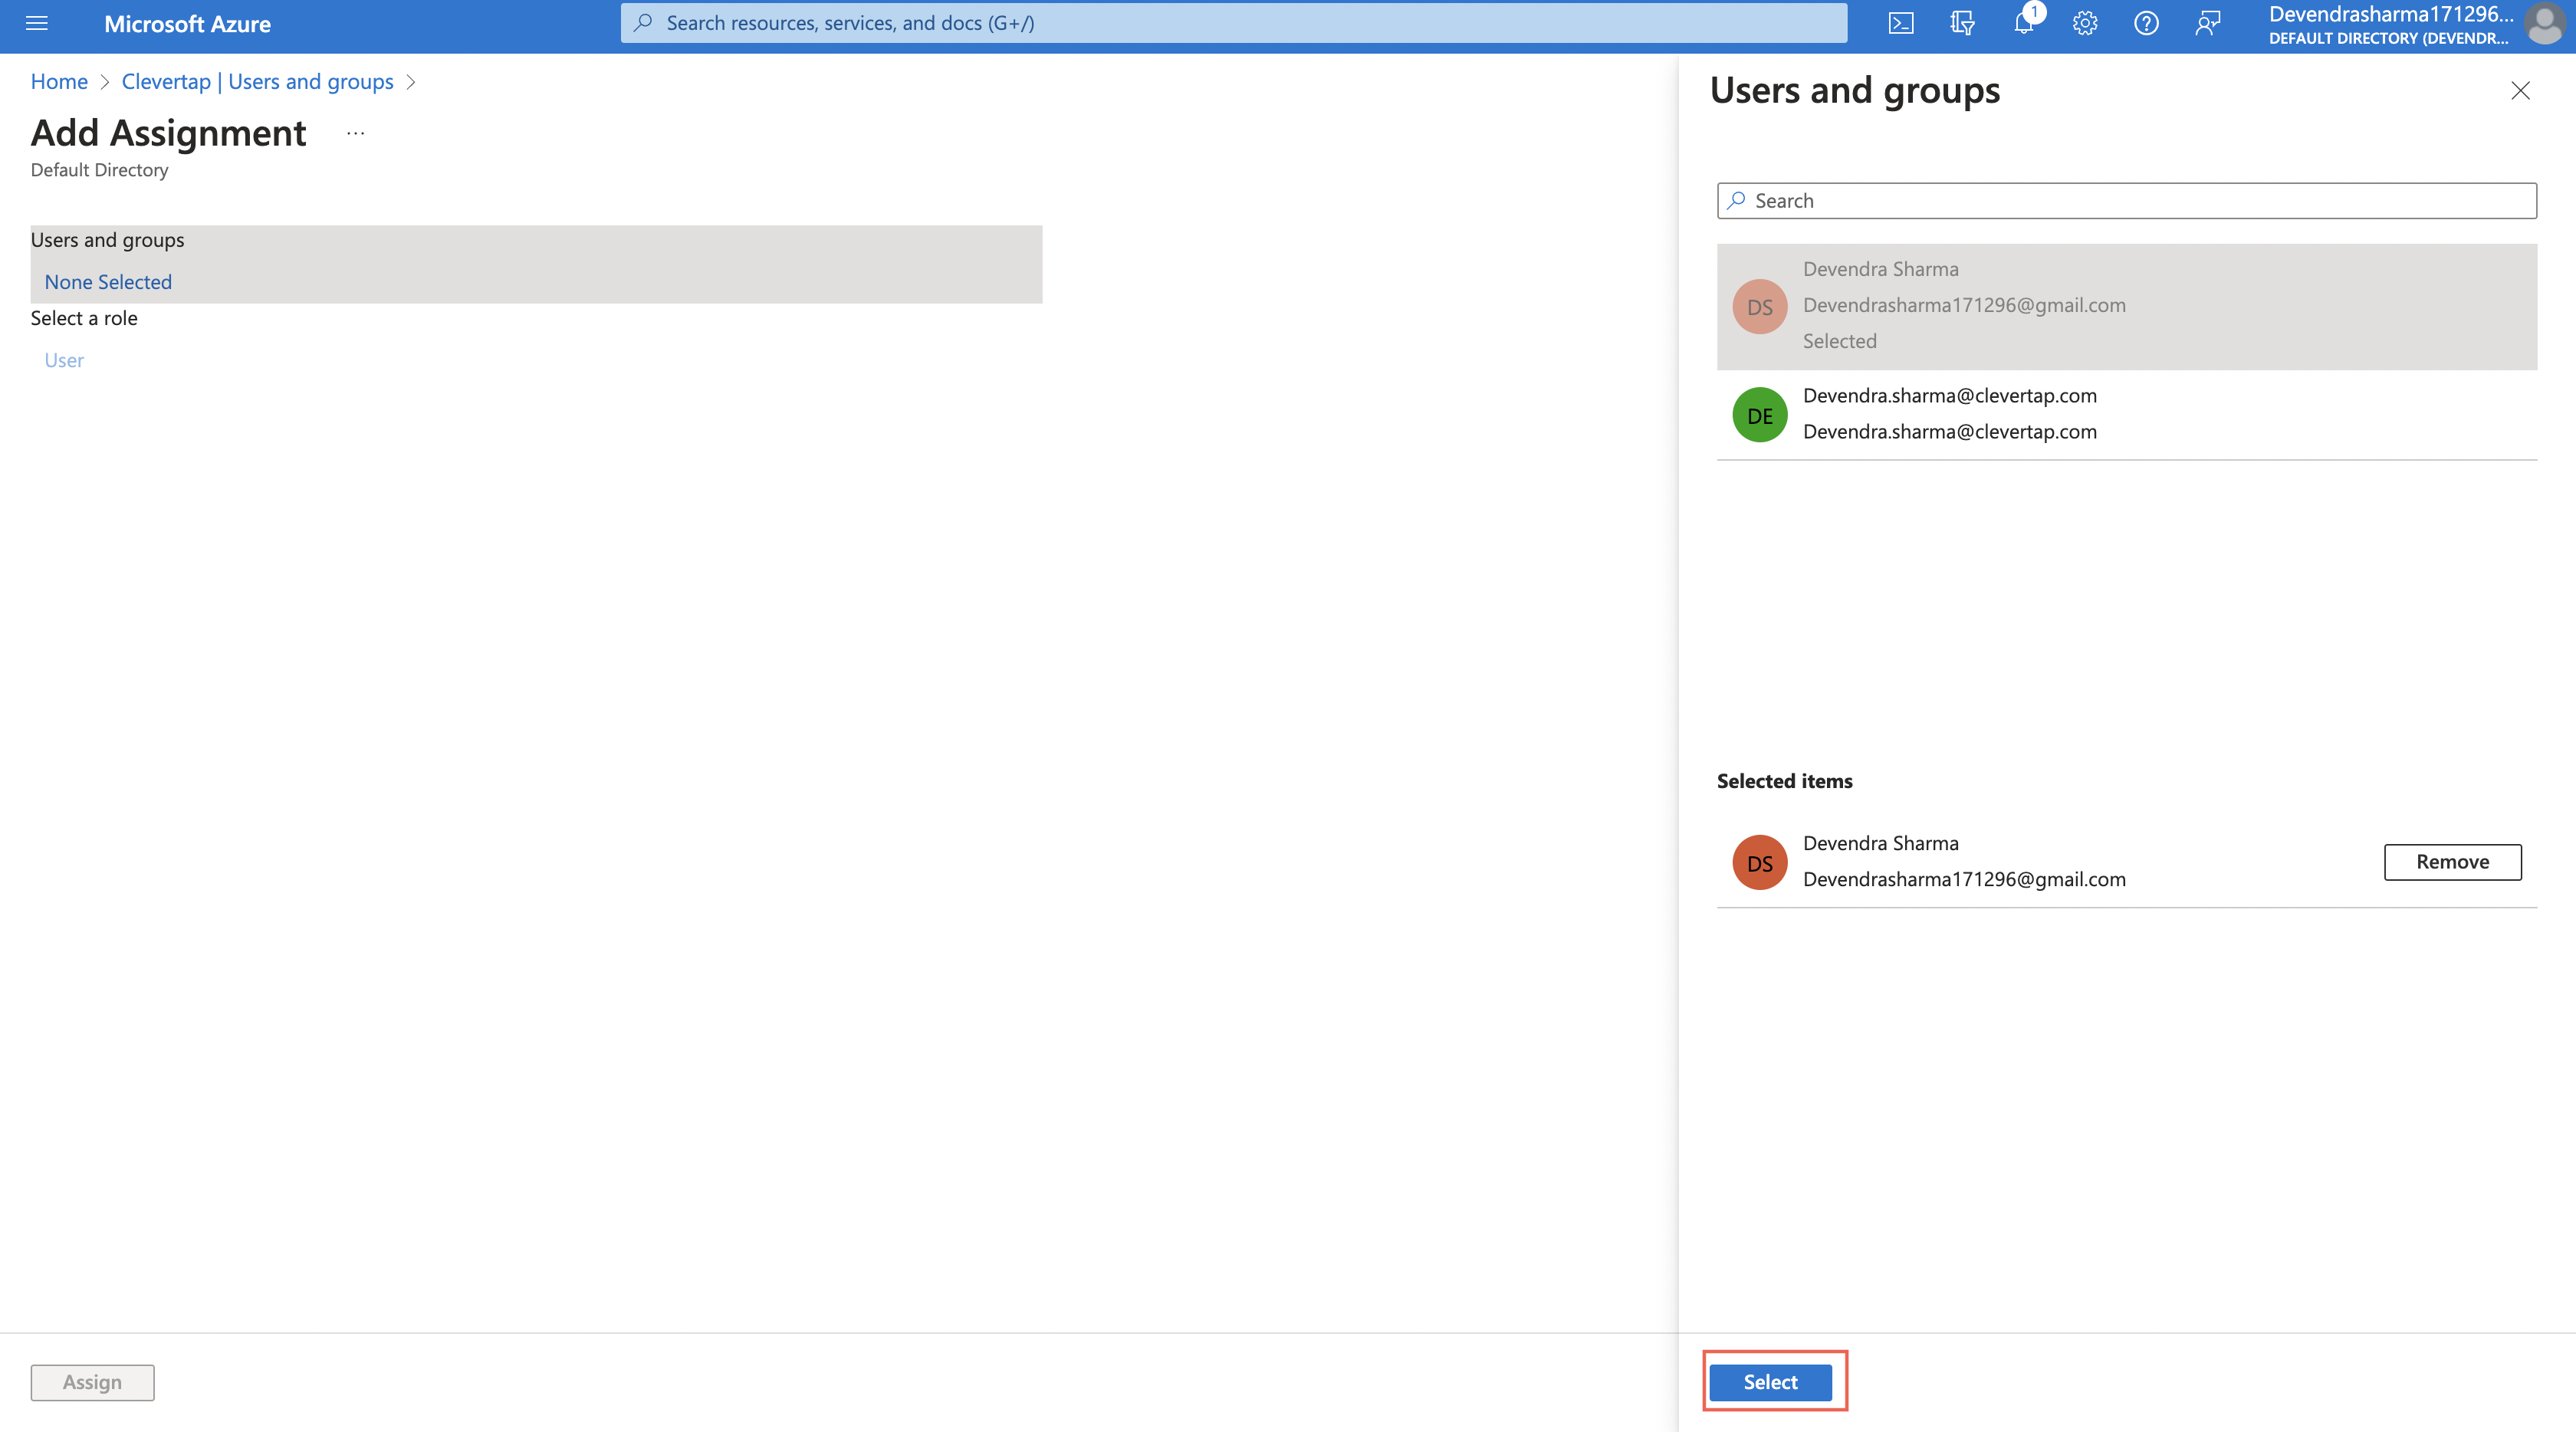
- Select the user and click Select.
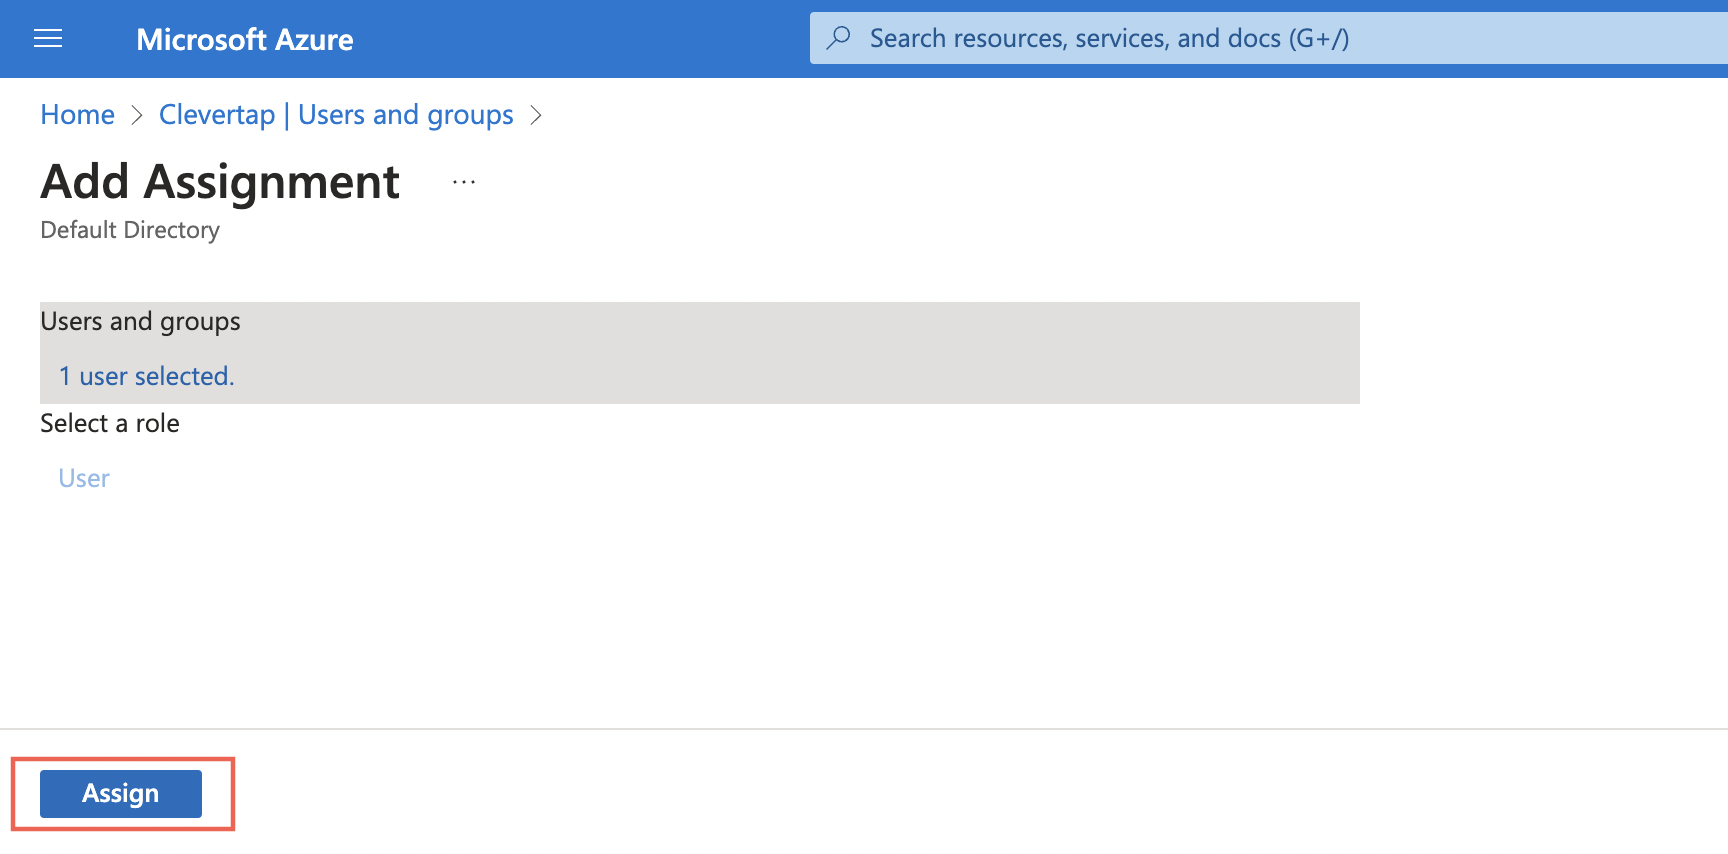
- Click Assign to assign that user or group to the SAML application as shown in the following figure:
To find the credentials for setting up SAML connection on the CleverTap dashboard:
- Navigate to the Azure Active Directory > Enterprise applications.
- Select the CleverTap application.
- Select Single Sign On.
- You can upload the Certificate (.CER )file directly after downloading it using the Download button, as shown in the image below.
- Copy the Login URL(also known as the Sign-in URL) from the Set up CleverTap section.
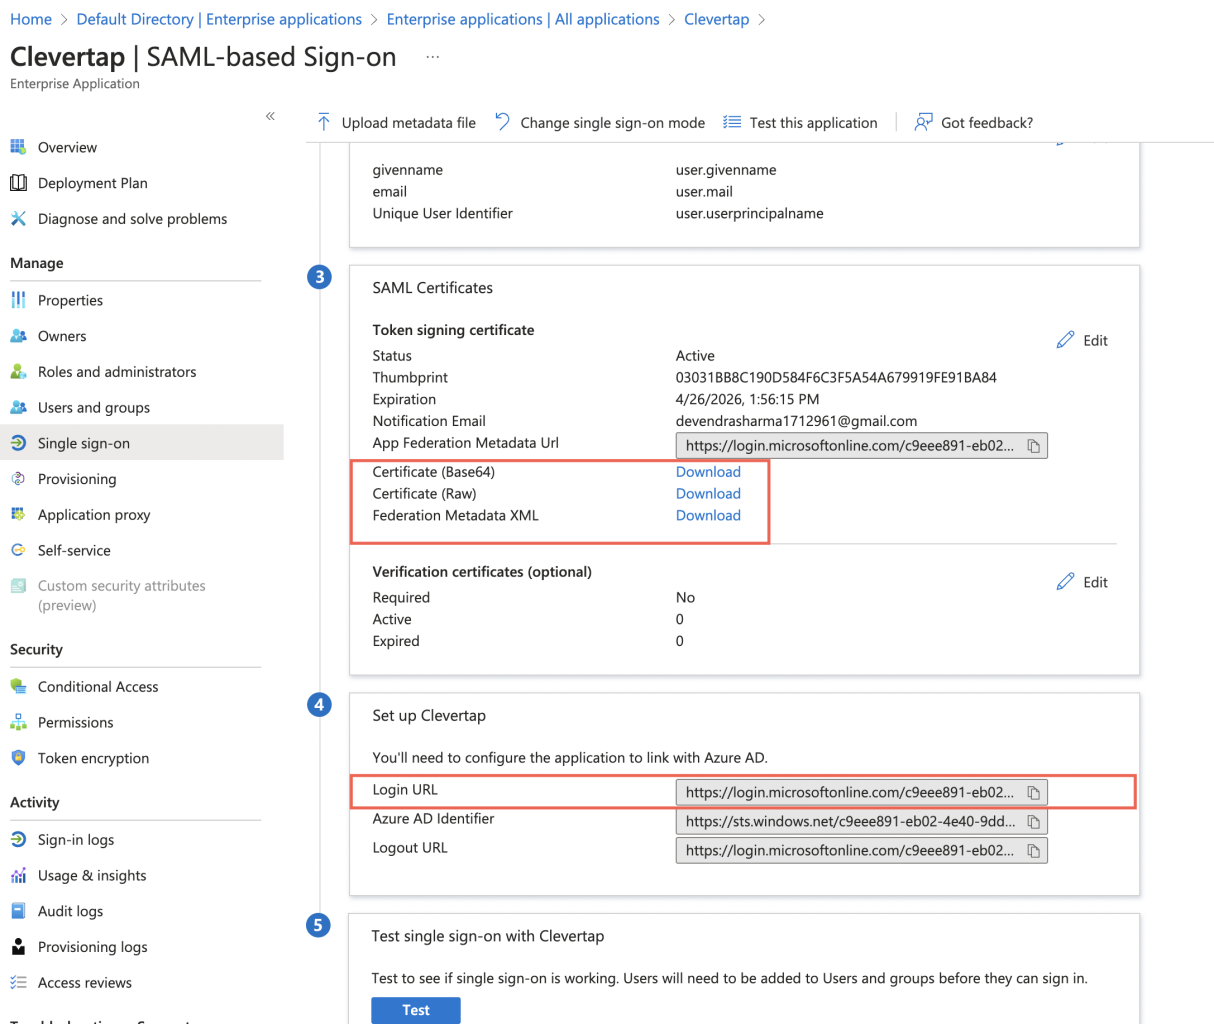
- Use these credentials to create a SAML connection on the CleverTap dashboard.
GSuite Setup
Log in to https://admin.google.com/ and log in as Admin for your app. The GSuite setup involves the following two major steps:
Create a SAML App
To create a SAML app:
- From the Gsuite admin dashboard, navigate to Home > Apps > Web and Mobile apps.
- From the Add app dropdown, select Add custom SAML app.

Adding a Custom SAML App
- Enter the App name (here, CleverTap) and Description on the App details page and click Continue.

Add App Name and Description
- Click Continue on the next screen (IdP metadata page).
- Add the ACS URL and Entity ID. (You can find these credentials on the Create SAML connection page on the CleverTap dashboard)
- Select Signed Response.

Configure Service Provider Details
- Select EMAIL as the Name ID Format for the default Name ID (Basic Information > Primary email).
- Click Continue.
Map Attributes
In continuation of the above configuration, ensure that the correct values are passed to CleverTap. To do so, you must map the attributes:
- Click ADD MAPPING after the Attribute mapping screen appears.
- Under the Attribute mapping section, you must appropriately map three attributes - name, email , and accountList and click FINISH (see figure below).
Note
If you proceed with the recommended method, add only two attributes - name, email in the attribute mapping section appropriately. You need not add any custom attributes and hence you must skip step 3.

Mapping accountList Attribute
Adding accountList Attribute
To populate accountList in Google directory attribute, you must add a custom attribute.
-
To create a custom accountList attribute:
i. From the left panel, navigate to Directory > Users > More options > Manage custom attributes.

Manage Custom Attributes
ii. Click ADD CUSTOM ATTRIBUTES.
iii. In the Category field, enter the value as accountList and add the Description as per your understanding.
iv. Under Add custom fields, enter accountList as the Name.
v. Set Info Type as Text, Visibility as Visible to the organization and No. of values as Single value.
vi. Click Add.

Assign CleverTap Application to User
To assign your CleverTap application to users,
- Navigate to the Users screen from the left panel.
- From the list of users, select the user name you want to assign.
- Click the User Information dropdown.

Assigning User
- In the accountList custom attribute, pass the accountID and click Save, as shown in the following image:

Pass the Account ID
- From the left panel, navigate to Apps > Web and mobile apps and select your app.
- Click the User access dropdown and set the service status to ON for everyone.

User Access View

Turn On Service Status
To find the credentials for setting up SAML connection on the CleverTap dashboard:
- Navigate to Apps > Web and mobile apps from the left navigation menu
- Select the CleverTap application.
- Click DOWNLOAD METADATA to display the SSO URL, Entity ID, and Certificate, as shown in the following figure.

Download Metadata
- Use these credentials to create a SAML connection on the CleverTap dashboard.
Sign In Using SSO
After you complete the setup, your SSO is activated from the subsequent login.
When you click Continue after entering the email, you are redirected to your IdP login page. After completing your authentication, you are redirected to your CleverTap dashboard again.
Login Page
Non-SSO users must enter their password after clicking Continue.
Revoke Users and Delete Connection
To revoke a user from a project, you must remove the account list for the user from the IdP. If the account list is not removed from the IdP, the user continues to have access to the project. The revoking action on the dashboard only works if the account list for the user is updated on the IdP.
When a SAML connection is deleted, users must reset their password by clicking Forgot Password on the login screen and creating a new password. They can use this new password for future login.
Updated 2 months ago