Push Notifications

Overview

Push notifications provide the capability to communicate brief, yet important alerts to your mobile app users. CleverTap’s rich segmentation and powerful infrastructure lets you send time-sensitive, relevant, and personalized push messages on a large-scale.

The Push module on the CleverTap dashboard under Campaigns makes it easy to set up push campaigns for all your users or specific user segments. These segments can be created on the basis of past or live user behavior, user properties, or a combination of user behavior and properties.

Once a campaign has been sent, you can view detailed reports on how many messages were sent, how many users clicked on them, and how many users converted as a result.

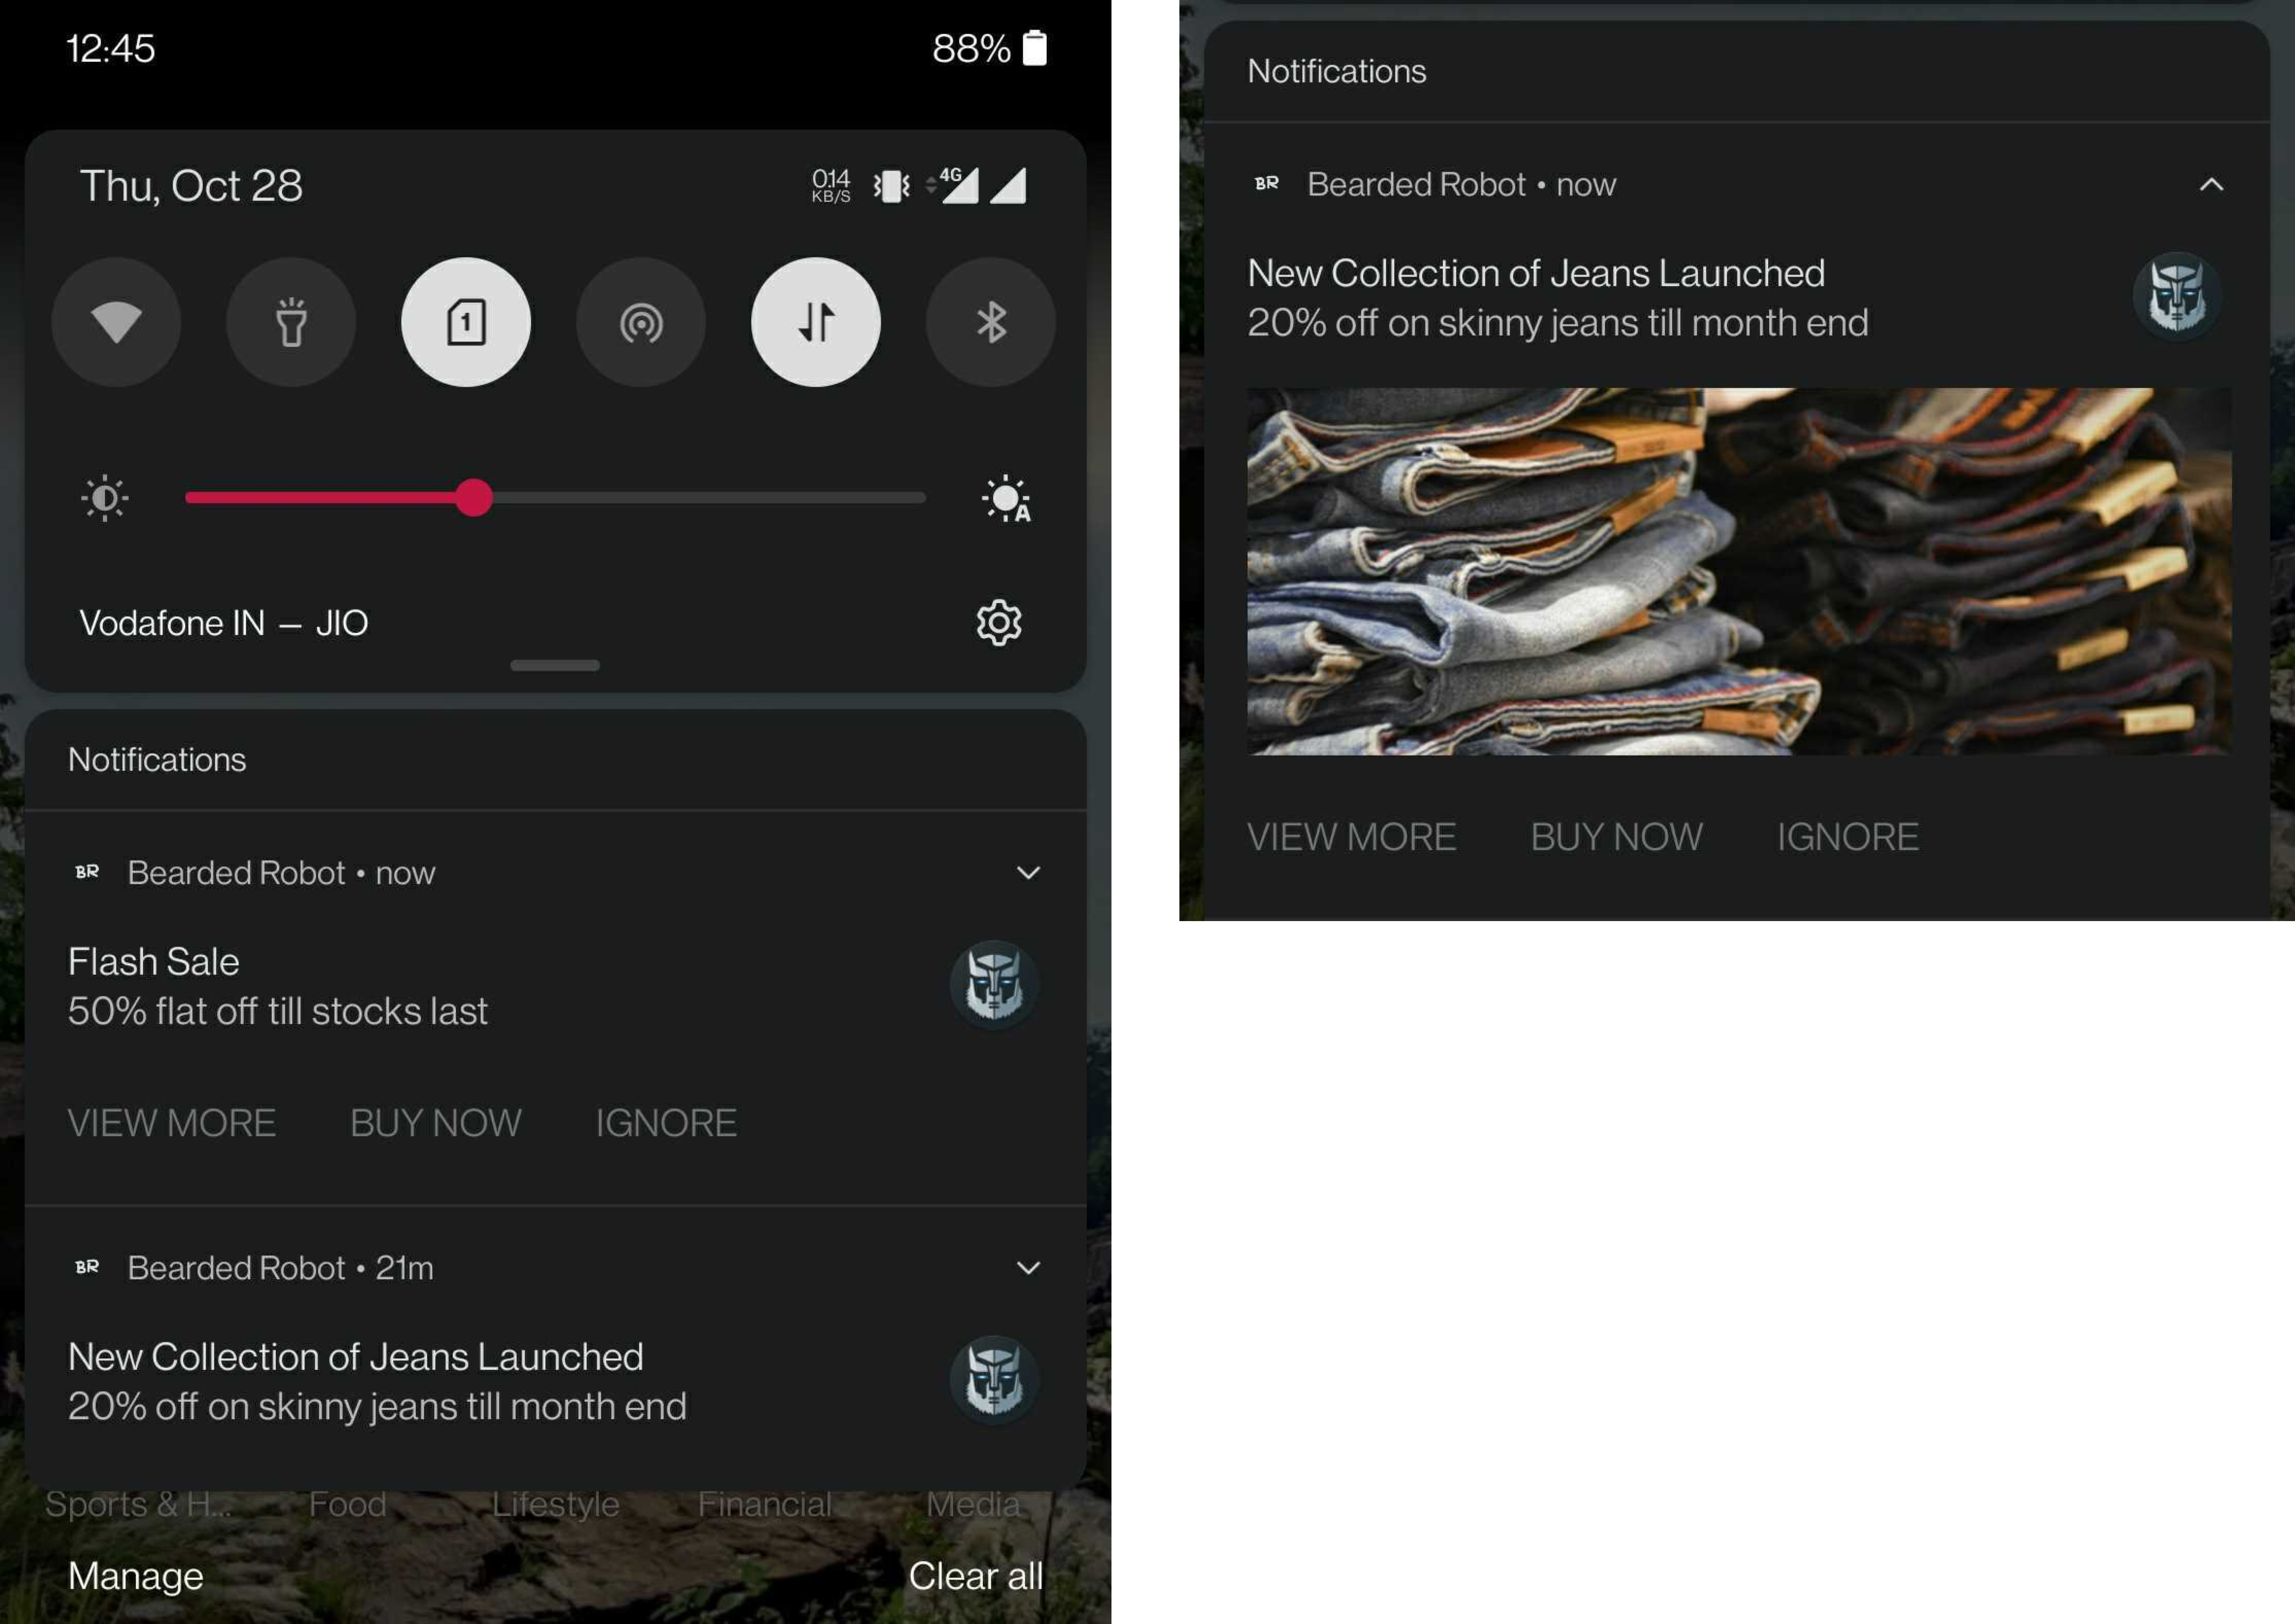
Push notifications display in the notification tray or the notification inbox of the user as displayed below.

873

Create a Push Campaign

This section covers how to create a push campaign.

Create a New Campaign

To create a new campaign, perform the following:

  1. On the CleverTap dashboard, select Campaigns.
  2. Click + Campaign.
1579

Select the Engagement Channel

Select the engagement channel by clicking on Mobile Push.

1095

Select a Campaign Type

Select one of the campaign types from the list of options as displayed below.

840

Define the When

You can set up the When to schedule the campaign start and end using the options below:

Past behavior campaigns can be scheduled to run:

  • On a specific date and time.
  • On multiple specified dates and times.
  • Recurring at a periodicity you set.

Live campaigns can be set up as follows:

  • In response to a user event.
  • User event/inaction combination (e.g., abandoned cart scenario).
  • Based on a date event property value of an event (e.g., reminder for upcoming travel booking).

Global campaign limits are limits you can apply to determine how many push notifications each app user receives per day. If you want to override these settings for an important campaign, you can click on the Don’t apply global campaign limits to this campaign checkbox.

You can also click on the Advanced checkbox to specify Do Not Disturb (DND) hours during which notifications from this push campaign are prevented from going out, either by discarding them or delaying delivery to after DND hours complete, such as 9 PM to 9 AM.

Since past behavior campaigns can have scheduled times, you have the option to stop a campaign delivery after a certain cut-off time, or even deliver at the specified time in the user’s timezone. For more information, refer to Delivery in User’s Timezone.

1610

📘

Recurring Day

If you specify a recurring day for a campaign such as the 7th of each month, then the campaign will start for the specified day and ignore the creation date. This is a precaution to avoid sending a campaign unintentionally on a prior date.

Define the Who

You must indicate the target audience for your push campaign. You can target your push campaign to a new user segment by clicking on + Create an ad-hoc segment or use a previously saved user segment from the Saved Segments list.

1147

If you want to create an ad-hoc segment, you can select a type of segment on which to base your push campaign. You can create the target on the basis of past user behavior and/or user properties, or live (ongoing) user behavior (the latter is useful to send out real-time, triggered push campaigns).

1613

For instance, you can create a live Inaction within time campaign that targets users as soon as they add a product to their cart but do not finish transacting within 10 minutes, the golden window within which most users transact on our iOS and Android app platforms.

On this basis, you would then set up the Who by choosing to send this campaign to all users who qualify or just a portion of the users who qualify under Campaign reach.

Deliver Action Based Push Notifications Instantly

You can trigger a push message instantly for an action. Users receive push notifications instantly when they perform an action in the app instead of waiting for the next app launch. This makes notifications more contextual and increases conversion. The instant push message is not triggered for campaigns with delays or when the app inbox is coupled with a push message.

You can also filter users their past user behavior or user properties. For past behavior campaigns, you also have an option to calculate estimated reach to view how many users qualify for the campaign criteria and how many are reachable via mobile push as of now.

223

Filter by User Properties

Using the Common Properties Filter feature in CleverTap, you can segment your campaign to only reach users who meet specific criteria.

For example, you can send a push notification to English female users who live in the United States.

1014

Deliver to a Subset of the Target Audience

Sometimes, you want to send a message to only a subset of the qualifying audience (Target Reach) for a campaign or avoid sending it if the number of qualified users exceeds the specified number.

A relevant use case is a limited offer where you want to send a fixed number of coupon codes you want to distribute. If the total reach for your campaign exceeds the number of coupon codes you can distribute, you can limit the number of users who will receive the message to exactly the number of coupons you want to distribute.

406

This section explains the campaign creation flow when you are determining who to send your message to. Under the Campaign Reach section, select the option to limit delivery of the messages to the number you choose.

For triggered campaigns based on live user segments, as users qualify, they will receive the message until the total quantity specified has been delivered after which the campaign ends. For campaigns based on Past Behavior Segments, we randomly select the users who receive the message.

The campaign limits can also be configured as follows:

  • Daily Limit: Limit the number of users for each day, for Best Time, User-Timezone, and Triggered campaigns.

  • Campaign Run Limit: Limit the number of users for each run of a campaign for Fixed Time or Recurring campaigns.

  • Safety Check: It prevents sending out unwanted campaigns. A campaign does not run if the number of qualified users exceeds the safety limit. The campaign creator receives an email alert for further action.

👍

Safety Check Example

A customer has a budget for distributing 1,000 discount coupons but the qualified user count is 10,000. If you select the safety check, the campaign does not run and prevents the sender from spending over budget.

1416

The following table explains the various property types:

Property TypeDescriptionExample
User PropertiesCustom user profile properties that you define and send to CleverTap.Customer Type = Platinum
DemographicsDemographics filters include Age and Gender.Age = 25 to 40 years
Gender = Female
GeographyUser's coarse location. Filters include Country, Region, and City. CleverTap's SDK can automatically detect this from the user's IP address.Country = United States
State = California
City = San Francisco
Geography RadiusUser's exact location. You can select a city, and then define the target radius. You can also select multiple cities. You can send this information using CleverTap's SDK. For more information, refer to the iOS and Android developer guides.Locations = San Francisco, USA; Paris, France
ReachabilityReachability filters include Has email address, Has phone number, Unsubscribed email, and Unsubscribed SMS.Unsubscribed email = No
App FieldsApp fields filters include App Version, Device Make, Device Model, OS Version, and CleverTap SDK Version. This information is sent by CleverTap's SDK for each device that has your app which means a single user can have multiple devices associated with their user profile.OS Version = 10

Define the What

Now, you can set up the What which is the push campaign content where you have three different options.

Single Message Campaign

In this campaign, we send the same message to all users who qualify as your target audience. This message type is best for broadcast messages and for applications that do not vary campaign communication based on differences between properties such as language, geography, or any other user properties.

A/B Testing

A/B testing helps you understand what type of message copy works best to get clicks from users.

You can test up to three message variants on a test group and the variant that gets the most clicks is declared the winning variant and is automatically sent to the rest of your target audience.

When you create multiple variants for a campaign, you can also auto-copy what is already present in a current variant.

223

Advanced Options

Sound File

You have to specify the name of the sound file which is included in your app bundle. Apple supports .aiff, .caf and .wav extensions.

Badge Count

This updates the badge count for your app to the one specified while creating the campaign. Please note that this does not increment the badge count or set the value to 0 (zero) to hide the badge number. This should be handled manually at the application level.

Category

You can input the name of the category while creating the campaign. Each category has to be registered with the app. Each such category is associated with actions that the user can perform when a notification of rich media type is delivered. Each category can have up to four actions associated with it, although the number of actions actually displayed depends on the type of notification delivered. This provides users the ability to take multiple actions for the notification.

👍

Multiple Buttons Example

A single media push notification can have two buttons such as, Buy Now and Save for Later.

Deep Link/External URL

Deep links allow you to land the user to a particular part of your app. Your app’s OpenURL method is called with the deep link specified here. If you want to use external URLs, then you have to whitelist the IPs or provide http/https before the URL so they can be handled properly by the SDK.

Mutable Content

Check this box if you would like to send the mutable-content flag along with your payload. This invokes your app’s notification service extension. For more information, refer to Modifying Content in Newly Delivered Notifications in the Apple documentation.

Content Available (iOS)

If you include the content-available key with a value of 1 to send out a silent notification to your users. It will not alert the user in any way (update badge count/play a sound/show a notification), but it will wake your app up in the background so you can fetch new content and prepare it for the next time the user opens your app.

Key: content-available
Value: 1

Split Delivery

With split delivery, you can decide what percentage of your audience receives each message variant for the duration of the campaign.

1614

Campaigns Sent to Past Behavior Segments

For campaigns sent to Past Behavior Segments (grouping of users based on what they have done in the past), you have two options: launch the A/B test to a percentage of your target audience or send out an absolute number of messages. In either case, we deliver the variants equally to the test audience.

For example:

  • If you are testing three messages (e.g., Variant A, Variant B, Variant C).
  • Your campaign reach is 2,000,000 users.
  • You choose a test population of 15% of campaign reach (300,000 users).

Then, we send:

  • Variant A to 100,000 users.
  • Variant B to 100,000 users.
  • Variant C to 100,000 users.

After all 300,000 messages have been delivered, we calculate the winning message over this test group based on the number of click-throughs. We then automatically send the winning message to the remainder of your target audience which is 1,700,000 users in this example.

Note that for A/B testing, we ensure there is always an equal number of messages sent for each variant, so there is no bias introduced during the test phase and that the best-performing message is always declared the winner.

Live User Segment (Triggered) Campaigns

With campaigns sent to live user segments (triggered) campaigns, messages are delivered immediately when a user’s activity matches the criteria you have selected. For example, you can send a message when the user has completed a booking or purchase. Since it is not possible to determine the reach of triggered campaigns upfront, you need to decide how many total messages to send for A/B testing before a winner is declared.

👍

Triggered Campaign Example

If you select 500 users as your test audience, we will alternate delivery of Variant A and Variant B as users qualify for the campaign. After a total of messages are sent (Variant A – 250 and Variant B – 250), we then decide the winner based on the number of clicks and continue only with this winning message for the duration of the campaign.

Deciding on a test audience for A/B testing triggered campaigns requires some estimation. We recommend you check the total messages that were sent for similar triggered campaigns in the past to get a sense for how many users may qualify. If you select a test audience that is too small such as 25 users, you will get a statistically insignificant sample. If your test group size exceeds the total number of users who ultimately qualify for that campaign, then no winner will be declared and each message variant will be alternatively delivered for the duration of the campaign.

Multi-message Campaign

If you would like to send different message variants to your target audience based on the user properties they possess, this campaign type is your best bet. A good example would be when you want to send a localized update to people based on their preferred language.

Similar to creating A/B test variants, you can use the + button to add multiple variants based on a user property value. In the example below, we have used the Customer Type user property so users with different customer type property values will receive corresponding copies of the campaign based on their different levels (Silver, Gold, or Platinum).

1611

Personalization for All Campaign Types

You can personalize the push notification title and message body for every user based on specific user property or event property values. For more information on user profile properties and events (dynamic replacements), refer to User Profiles.

📘

Note

Personalization using event properties is available only for live user segments.

To invoke the personalization menu, type the @ symbol in the title or the text fields while typing out the push notification message.

You can include emojis in your push notifications as you would in a regular text. You can use the CleverTap emoji picker or copy-paste emojis from an emoji keyboard online.

You can also add dynamic replacements in the push title and body. Notice a preview of the available push notification as displayed below.

1610

You can add emojis using CleverTap’s built-in emoji picker by clicking on the smiley face icon.

1617

In the Advanced section, you can add rich media such as, images/image carousels, GIFs, and even videos using publicly-hosted media URLs. A preview displays on the right-hand side as you add your media.

Rich Push Notifications

You can add a fixed (or with dynamic replacements) URL for Android (Image only) and iOS (Image and video) for push notifications.

1600

You can add an image carousel with each image having its own caption, sub caption, and call to action URL (fixed or with dynamic replacements) to your iOS push notifications.

1264

You can add default or custom (fixed or with dynamic replacements) sound files to your Android and iOS push notifications.

1374

You can add deep links (fixed or with dynamic replacements) to the overall Android or iOS push notification so users can access specific screens within the app upon clicking.

1202

To replace an existing notification with the same collapse key, you can use the collapse notification option. For example, if push 1 and push 2 have a collapse key A, the push 1 notification is present on the mobile device and now, push 2 notification is received on the device. The push 1 notification will no longer be visible (it will be collapsed) and push 2 will be displayed. The collapse key must be added under the collapse notification field.

Raising Push Impression Event

You can raise and record push notifications delivered to your users’ devices.

  1. Navigate to Settings > Schema > Events.
  2. Search for Push Impressions, then click on the vertical ellipsis.
1161
  1. Click on Setup push impressions. A new window displays.
  2. Turn on the Mobile Push toggle.
  3. Click on Save to enable the option.

After the toggle is on, all the push notifications delivered are recorded under the Push Impressions event. The viewed and conversion count from this event is also available under Analytics > Events.

🚧

SDK Considerations

Some things to consider include:

  1. The push event can only be raised for CleverTap SDK version 3.5.1 and above for Android and version 3.5.0 and above for iOS.
  2. If the notification channel is incorrect, the push notification is not delivered on the device and therefore, no event is raised for the push impression.

Raising Notification Viewed Event for iOS

To raise the Notification Viewed event for iOS, it is mandatory to enable the Mutable Content under the iOS section of the campaign creation.

For more information on how to enable Notification Viewed for your account, refer to our developer documentation.

1200

Add Custom Actions to Android Notifications

A simple way to urge users to respond to your calls to action is by adding button-like actions right into your Android push notifications.

1552

Once set up, the various calls to action would display below the push as displayed below.

223

On Android, you can also set a priority level for each notification to influence how prominently it gets displayed. The higher the priority, the more noticeable it will be.

Maximum Priority

Use for critical and urgent notifications that alert the user about a condition that is time-critical or needs to be resolved before they can continue with a particular task. These notifications get higher placement inside the user’s tray and they appear as heads-up notifications as they are promptly displayed over other active applications.

High Priority

Use for important communications that require extra attention such as chat messages. These will also display as heads-up notifications and be given a higher priority in the user’s tray.

The image below represents a sample heads-up notification.

1000

Default Priority

Use for the majority of your messages that are not time-sensitive such as general notifications and promotional offers.

Setting Priority for Notifications with CleverTap

You can set these priority levels from the CleverTap dashboard as you create your Android push campaigns.

276

Have your app running our latest SDK (versions v3.1.4 or higher) and follow the steps outlined above to send actionable push notifications and set notification priority on Android devices.

🚧

Note

For Android-O (version 8.0 and above), the tray priority of the notification needs to be determined and configured during the channel registration.

Liquid Tags

Liquid tags offer great flexibility in composing your message. You can have fixed or variable values and change the look and feel of your message by using liquid tags.

1357

Each notification is personalized to the receiver.

Hello John!

Here is a special coupon for you: Gold4All

For more information on using tags, refer to Liquid Tags.

Linked Content

Linked content provides the ability to personalize emails with rich and contextual data available outside of the CleverTap platform. With linked content, you can send messages with send-time personalization.

For example, you deliver food across different geographies and you want to personalize offers to each user based on the weather and on their location. The location can come from CleverTap personalization and the weather information can come from an API that provides the current weather. If you want to add more information, you can opt for any source such as third-party tools and in-house software to include in your message.

For more information, refer to Linked Content.

Test and Schedule a Campaign

Once you are all done setting up the content of your campaign in What, you have the option to send a test push notification to any CleverTap user profile you have marked as a Test profile.

454

After testing and once you are satisfied with the appearance of your campaign, finalize your campaign with the following steps:

  1. Click Continue to view your campaign summary. The overview page displays.
  2. View your campaign summary, then click Schedule notification.
195

Push Campaign Throttling

You can throttle the rate at which CleverTap delivers push notifications under Settings > Setup > Campaign Limits. If your user base is large and all users receive and click on a push notification at roughly the same time to open the app, you could experience a significant, unwanted load on your systems.

By using push campaign throttling, you can meter how quickly CleverTap delivers your notifications.

👍

Push Campaign Throttling Example

If your reachable audience for a campaign is 500,000 users and your back-end systems can only support up to 20% of them, you can set a throttle limit to 100,000 notifications per 15-minute interval. The entire campaign will then deliver in 1 hour 15 minutes.

View Push Campaign Stats

Once the campaign has gone out, you can view its stats by going into Push under Campaigns on the CleverTap dashboard and clicking on the campaign of interest to view its deliveries, clicks, and conversions.

1579

Under the Sent Conversions card, you can track the following stats for push notification campaigns:

  • Sent: Number of deliveries attempted on devices.
  • Errors: Number of errors for the campaign. These errors can be both technical errors such as FCM related errors or non-technical errors such as messages frequency exceeded.
1571

Under the Impressions card, you can track the following stats for push notification campaigns:

  • Impressions: Number of views generated for a Push or Facebook campaign.
  • Uplift: Click to get details of uplift achieved by Push Amplification and sending to App inbox.
  • OS Distribution: The impressions by the OS, such as iOS or Android.

Under the Clicked card, you can track the following stats for push notification campaigns:

  • Clicked: Number of clicks generated by the campaign.
  • CTR: The clickthrough rate of the campaign. It is measured by dividing the total number of clicks by the total number of impressions or viewed.
  • Uplift: Click to get details of uplift achieved by Push Amplification and sending to App inbox.

Under the Converted users card, you can also track the following:
It displays the number of users that converted after receiving the campaign.

  • View through: The users who converted after viewing the notification. View through conversions are measured by Users who converted after viewing / Users who were sent the notification.
  • Click through: The users who converted after clicking the notification. Click through conversions are measured by Users who converted after clicking / Users who were sent the notification.

Under the Control group card, you can track the following stats for push notification campaigns:

The number of users considered in the control group for the campaign.

Single Message Campaign

Below is a stats example of a single message campaign report:

1606

A/B Testing

Below is a stats example of an A/B testing campaign report:

1432

The table will display results by the variants. The stats include Sent, Viewed, Clicked, CTR, and Errors, according to the channel.

You can also split the campaign stats and view the performance of each variant of the campaign.

1430

📘

Notification Channel ID for Android 8.0 and Above

If your settings require you to add a notification channel ID, the list of valid channels will be available in campaign creation.

720

Optimize Delivery by Push Amplification

Push notifications are a great way to engage customers despite the issue of low deliverability on certain device manufacturers. In addition, more and more users choose to opt out of push notifications.

With push amplification, you can counter this challenge by enhancing the delivery of push notifications to devices that missed receiving them. This feature is supported for Android and Flutter apps.

Enable Push Amplification

To enable this feature:

  1. Integrate code for custom push amplification handling into your Android app code. For detailed steps, refer to Custom Push Amplification Handling.
  2. Navigate to Settings > Engage > Setup > Push Amplification in the CleverTap dashboard.
  3. Turn on the push amplification toggle.
2052

The Enable Push Amplification popup opens.

391
  1. Click Enable. After enabling the Push Notification Amplification successfully, the message Push Amplification is enabled is displayed:
1580

🚧

Turn On/Off Push Notification Amplification

After you turn on push amplification, all the push campaigns created are amplified from that moment onward. This applies the same way when you turn it off.

After push amplification is turned on, your push notification campaigns reach more users. You can check the uplift on the push campaign stats page.

2678

📘

Support for Push Amplification via Inbox

  • We support Push Amplification via Inbox and retrying push notifications due to delivery issues with certain OEMs.

  • If the app is online when Push is delivered, the inbox delivery is done on the next App Launch and not immediately after the Push is delivered.

Optimize Delivery by Sending to App Inbox

Apart from push amplification, you can further increase delivery of push notification by sending a copy of the same message to App Inbox.

To send a copy of the push message to App Inbox, click the checkbox that appears at the bottom of the message builder of push notification in the What section.

1318

📘

App Inbox as its Own Channel

App Inbox also exists as a stand-alone channel. For more information, refer to App Inbox.

From this screen, you can do the following:

  • You can customize the same push message for App Inbox.
    • You can change the title color, message color, background color, and also add filter tags that classify your message into tabs. For more information, refer to Message Tags.
    • You can set a time to live (TTL) for App Inbox message in the setup section. For more information on setting up TTL, refer to Time to Live.

Push Amplification and App Inbox Stats

You can view the stats for push messages copied to App Inbox on the Push stats page. The percentage boost represents the percentage of messages boosted by App Inbox as compared to the total of messages sent via App Inbox and Push Amplification.

To view the stats for the copied messages, you can use the tab App Inbox stats.

1580

Video Tutorial

For further information, you can watch the following video on push notification campaigns: