Linked content allows you to personalize your messages with rich and contextual data that is available outside of the CleverTap platform. It helps you send messages with send-time personalization.
For example, you deliver food across different geographies, and you want to personalize offers to each user based on the weather of their location. The location can come from CleverTap personalization, and the weather information can come from a third-party API that provides the current weather. If you want to add more information, you can opt for any source, such as third-party tools and in-house software, to include in your message.
In a user scenario, you could have three users: one in New York, where it is snowing; one in San Francisco, where it is cloudy; and one in Miami, where it is sunny. You can add conditions in your messages to deliver messages according to the weather and location where the message will be something, such as:
New York user - Since this user is probably staying in a cold region, you can send an offer to order piping hot food.
San Francisco user - Since it is the weekend, this user may go out in the evening, so you send an offer for a dinner reservation at a nearby restaurant.
Miami user - Since it is always sunny, you send an offer for a nearby barbeque restaurant.
This send-time personalization can help you cater to end-user requirements at send time and significantly increase your open rates.
📘
Note
You can create Linked Content using Liquid Tags. For more information, refer to Liquid Tags before you begin.
You can use Linked Content with the following engagement channels:
Email
Mobile Push
SMS
Webhooks
WhatsApp
Create Linked Content
You can get the data for send-time personalization from different APIs. API names are nicknames that you can assign to the provider APIs. You can call these anywhere in your message so that you do not have to mention the entire API name. For example, if the API fetches the weather information for a particular city. You can shorten the API endpoint URL http://api.example.com/weather-management/city-weather to just Weather as the API name. You can also personalize the API endpoint URL.
Click the + Linked Content button to call a new API. To edit the linked content, click the ellipsis menu, then click the edit icon.
Enter a name for the API.
Create API Names
Enter all the relevant details, such as the access key and query parameters.
📘
Tip
The API parameters are available with the API provider. Refer to their website or contact their support for API details.
Click the Test Linked Content link.
Enter the required details to test the API. If the input is correct, you will see a success message. The test response appears in the JSON response box. The following is an example response for the API name you entered:
"request": {
    "type": "City",
    "query": "New York, United States of America",
    "language": "en",
    "unit": "m"
  },
  "location": {
    "name": "New York",
    "country": "United States of America",
    "region": "New York",
    "lat": "40.714",
    "lon": "-74.006",
    "timezone_id": "America/New_York",
    "localtime": "2020-04-22 12:44",
    "localtime_epoch": 1587559440,
    "utc_offset": "-4.0"
  },
  "current": {
    "observation_time": "04:44 PM",
    "temperature": 7,
    "weather_code": 113,
    "weather_icons": [
      "http://cdn.worldweatheronline.com/images/wsymbols01_png_64/wsymbol_0001_sunny.png"
    ],
    "weather_descriptions": [
      "Sunny"
    ],
    "wind_speed": 17,
    "wind_degree": 280,
    "wind_dir": "W",
    "pressure": 1012,
    "precip": 0,
    "humidity": 28,
    "cloudcover": 0,
    "feelslike": 4,
    "uv_index": 6,
    "visibility": 16,
    "is_day": "yes"
  }
}
📘
Note
The response format is always JSON.
You can choose to add each API object manually or click Auto-fill Objects with the API response. All the objects are listed with their label names. If required, you can change the label names here. These labels are available at the time of campaign creation.
Add API Objects
Click Test and save changes to save all the API changes.
📘
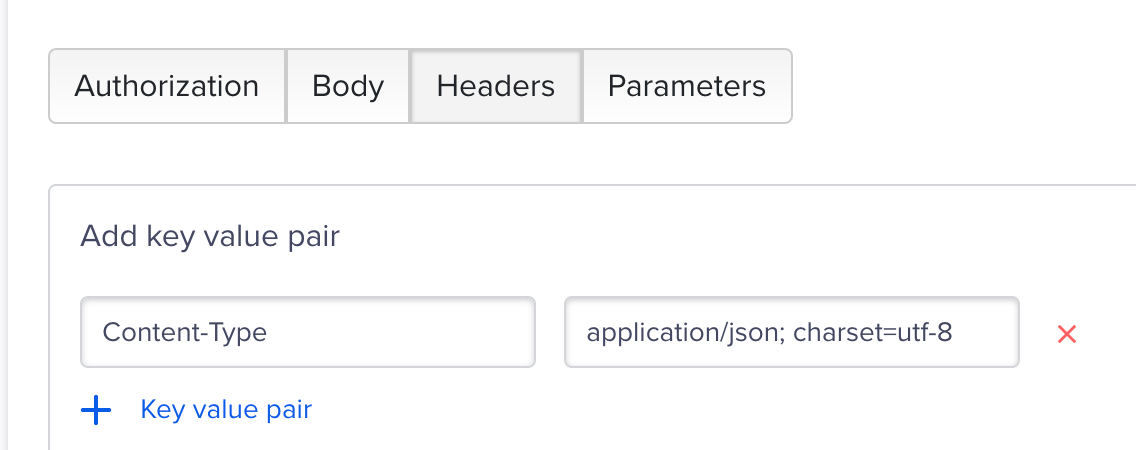
Encoding Error
If you encounter encoding errors in your API response due to non-English characters, add the charset=utf-8 parameter to your endpoint.
Personalize Linked Content URL
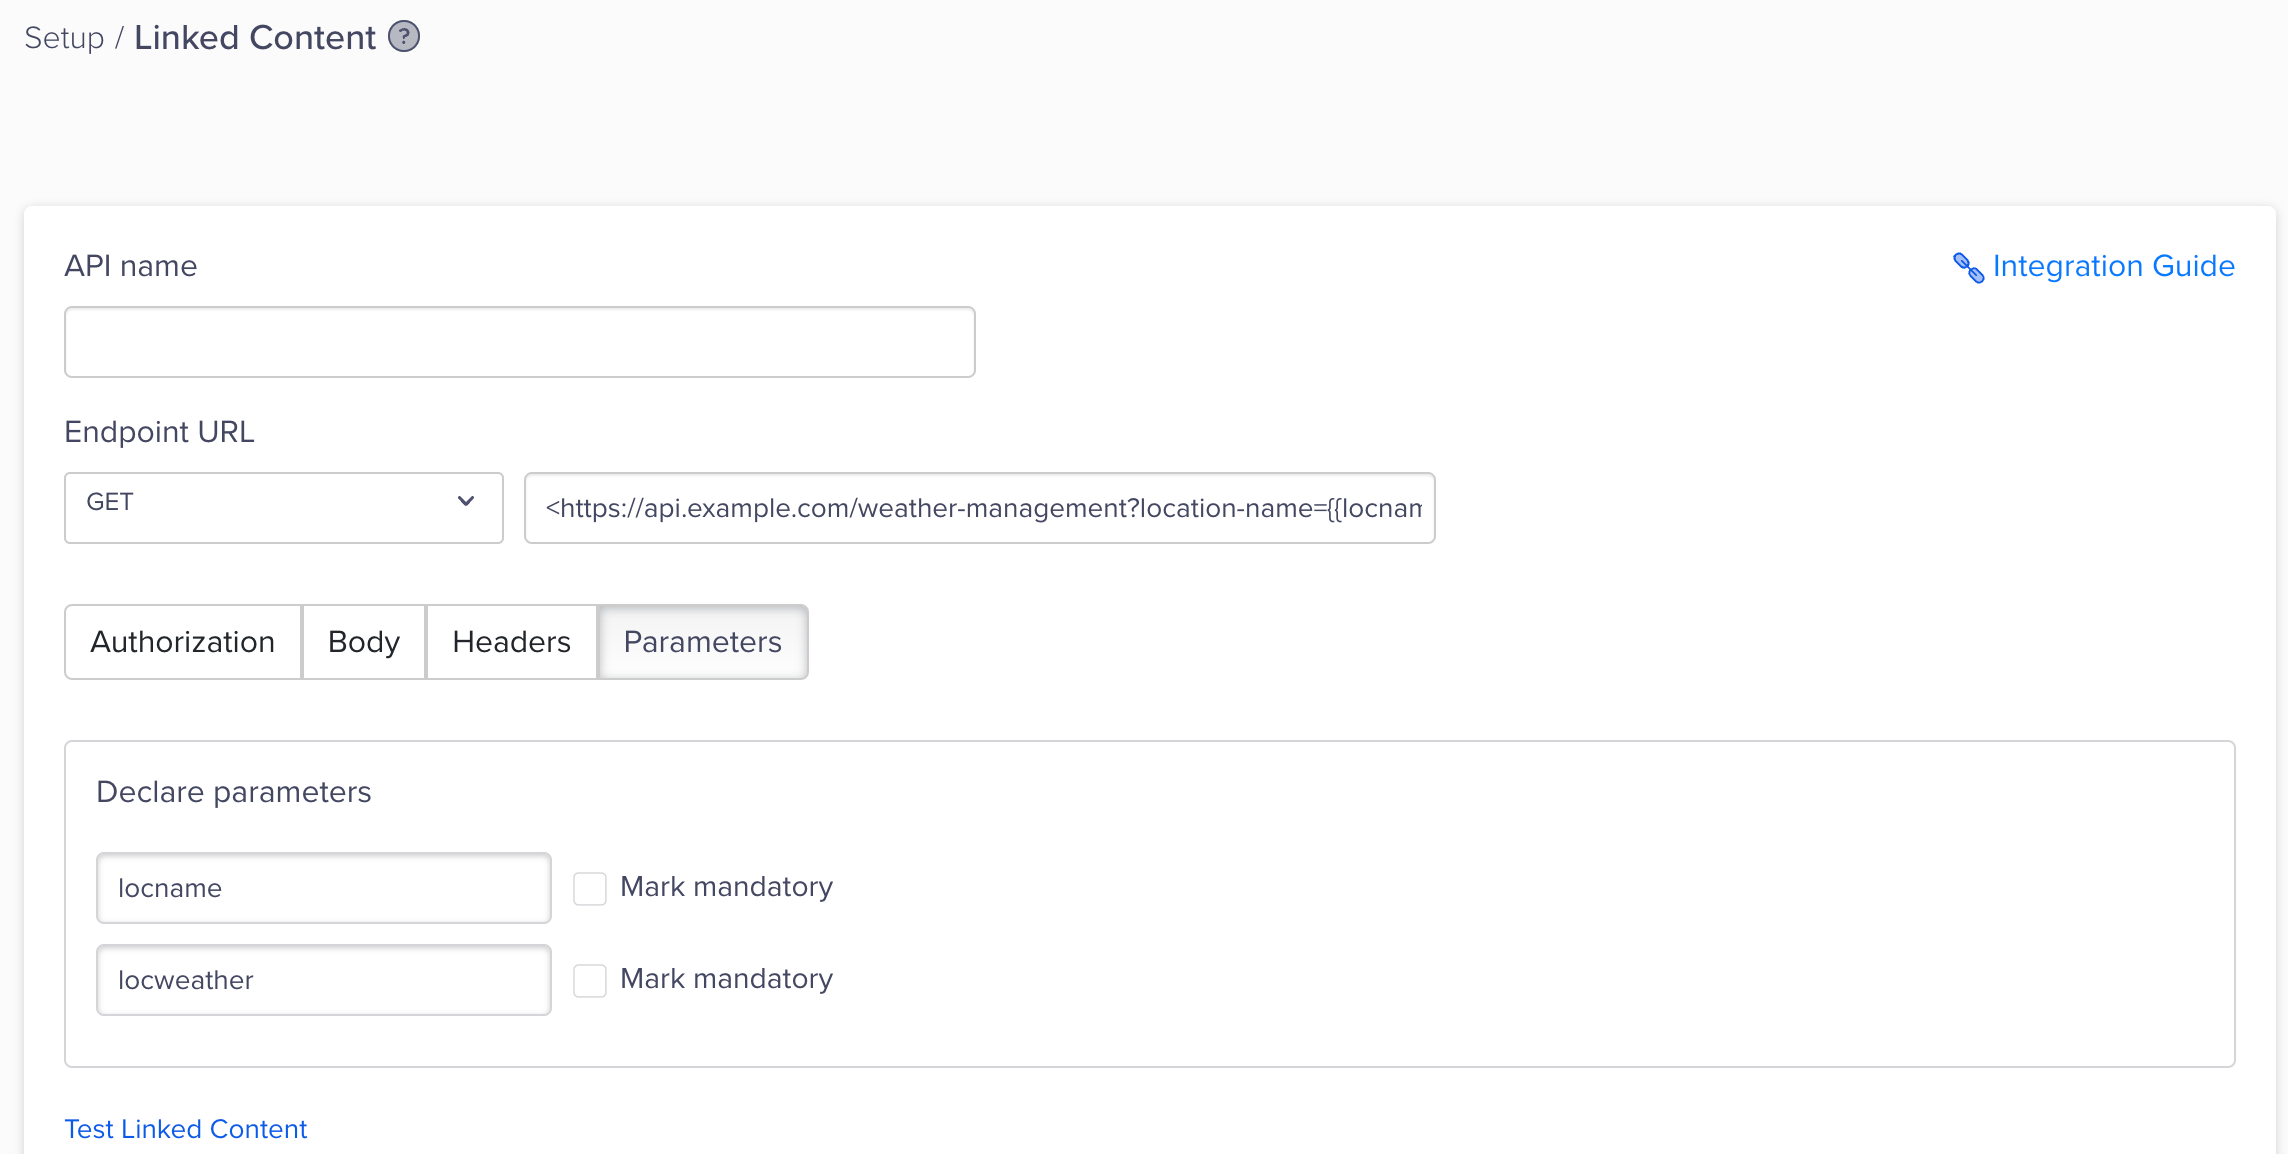
You can dynamically generate URLs that contain parameters based on the user's preferences or interactions. For example, if there is an API that fetches information for a particular city. Instead of setting up multiple Linked Content endpoint URLs to fetch weather updates from different locations, we can set up a single endpoint URL by personalizing the endpoint URL. In this case, the endpoint URL will be as follows: https://api.example.com/weather-management?location-name={{locname}}&location-weather={{locweather}}
Example for Linked Content URL Personalization
The endpoint URL consists of the following parameters:
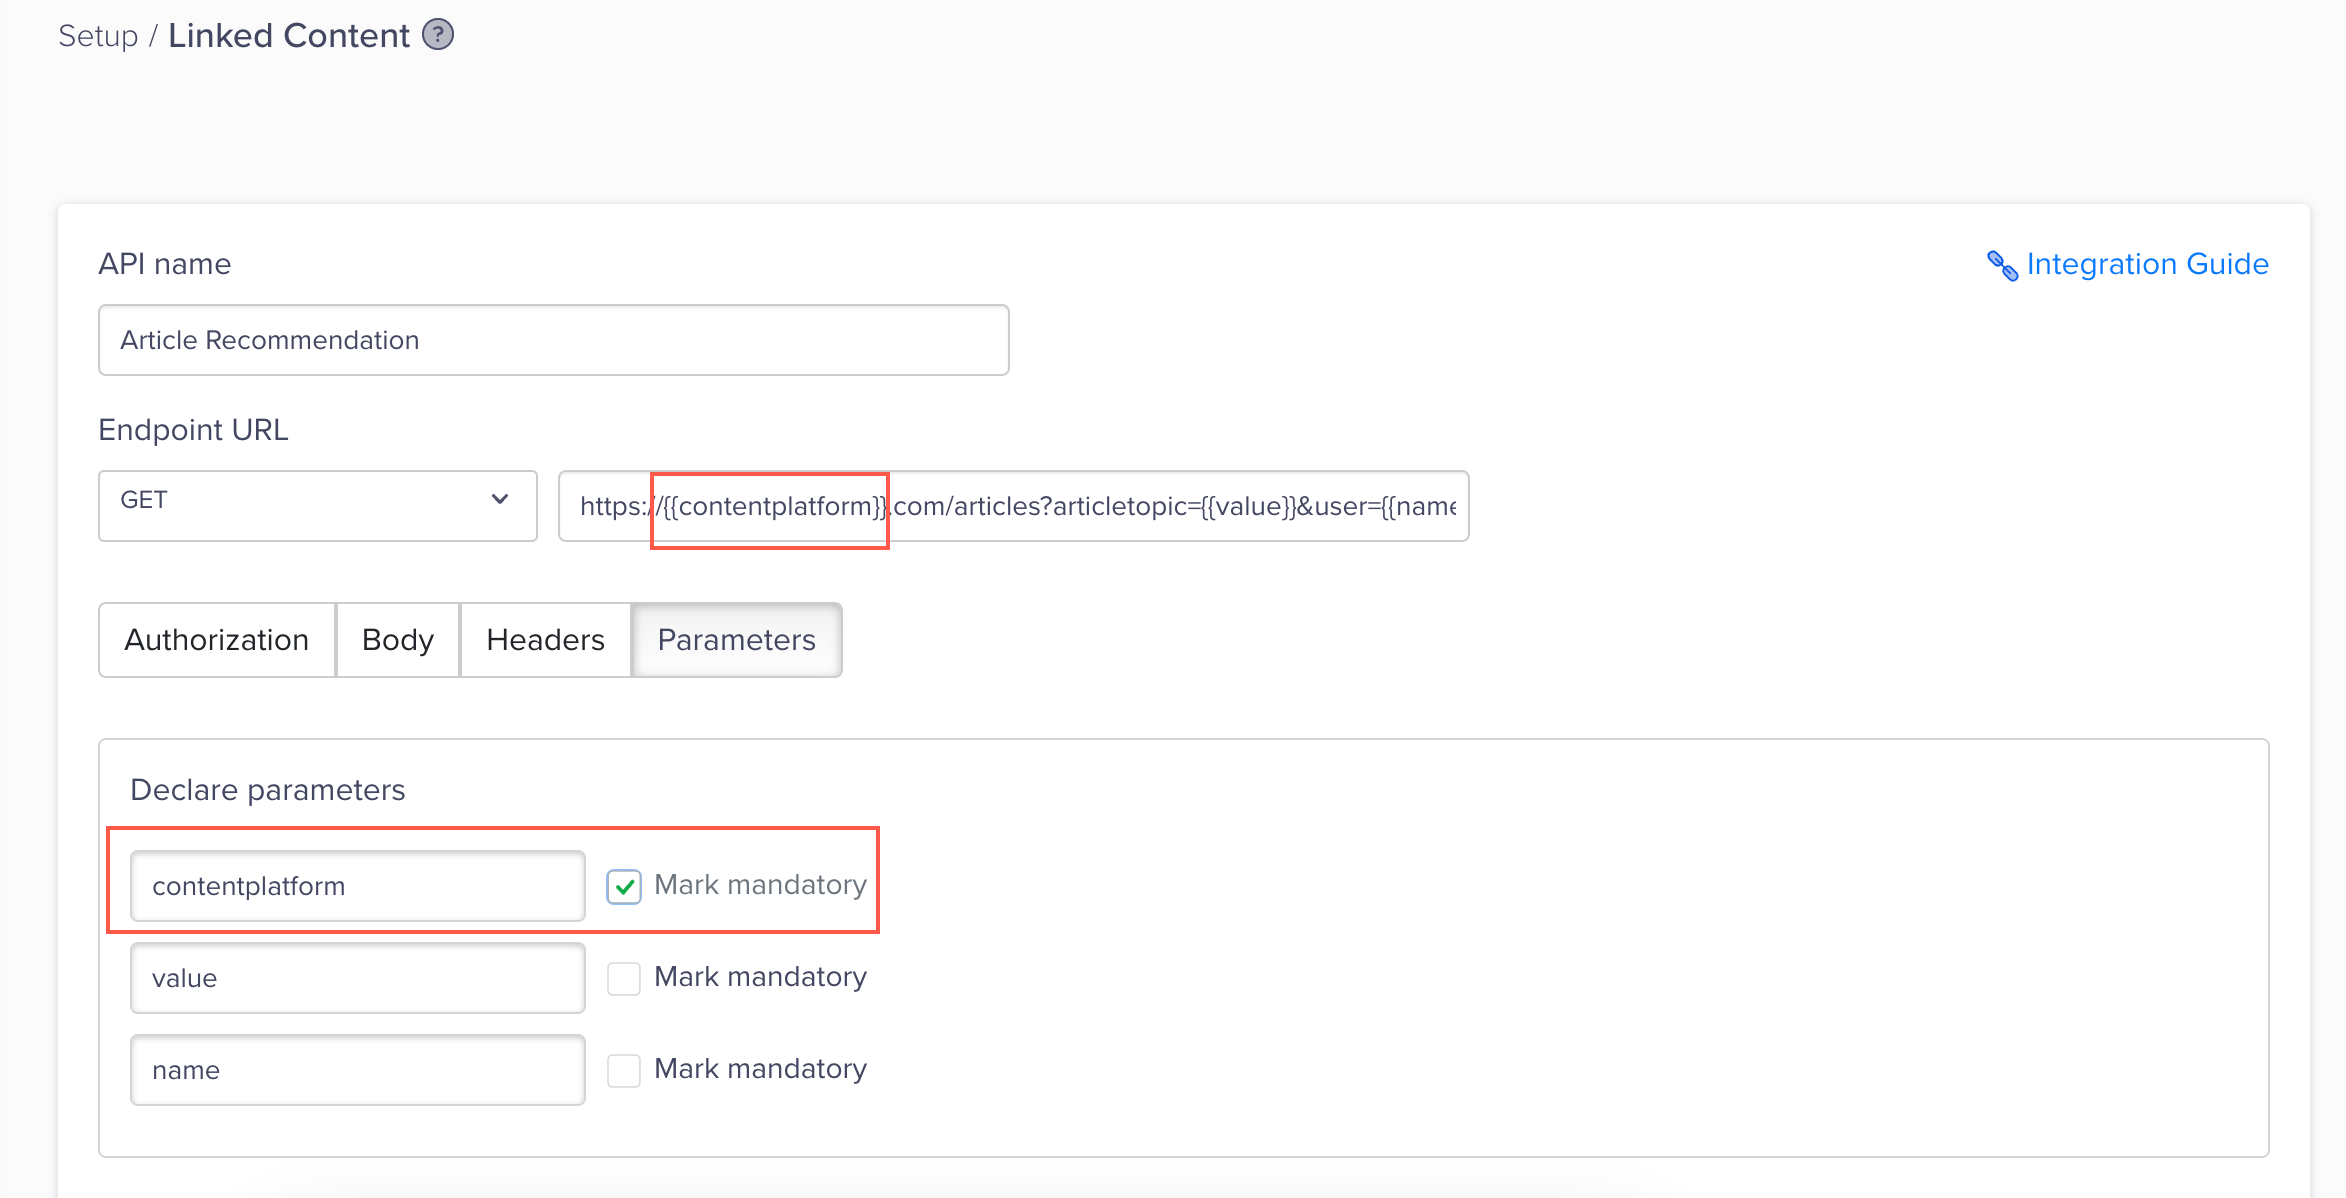
Path Parameter: These parameters help specify variable parts of the URL path, allowing APIs to target specific resources or actions dynamically based on the values provided within the URL path itself. Path parameter, when present in the endpoint URL, becomes a mandatory parameter. So, you can include the path parameter as shown in the following image:
Path Parameter Example
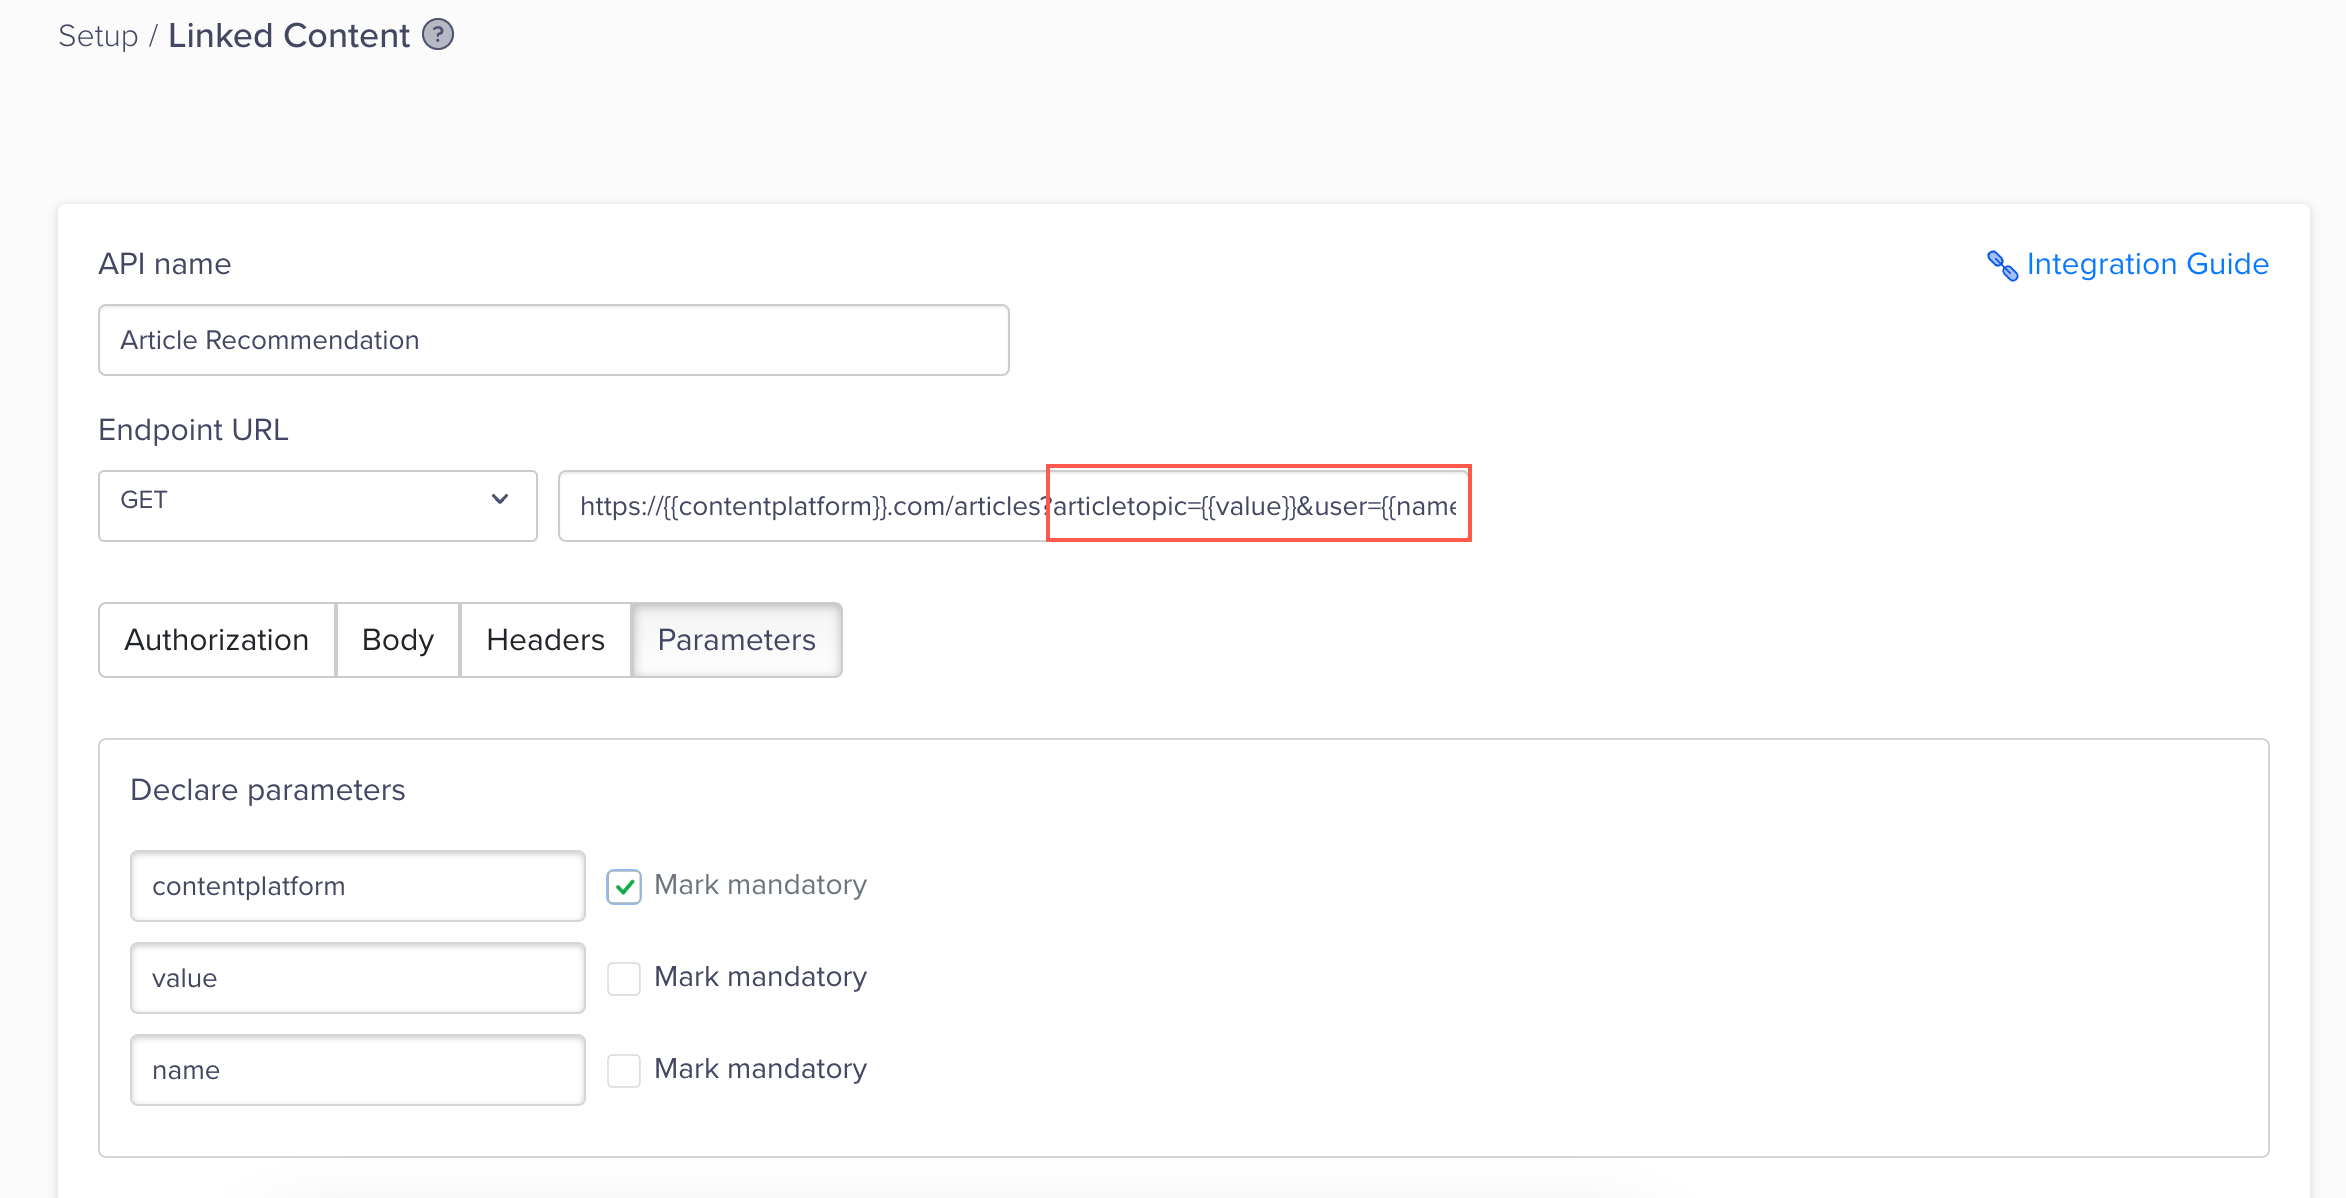
Query Parameters: Query parameters are key-value pairs appended to the end of a URL that provides additional information to an API endpoint. They are used to modify the behavior or content returned by the server. Query parameters are separated from the base URL by a question mark (?), and multiple parameters are separated by an ampersand (&). If we refer to the following image, the query parameters will be: articletopic and user.
Query Parameters Example
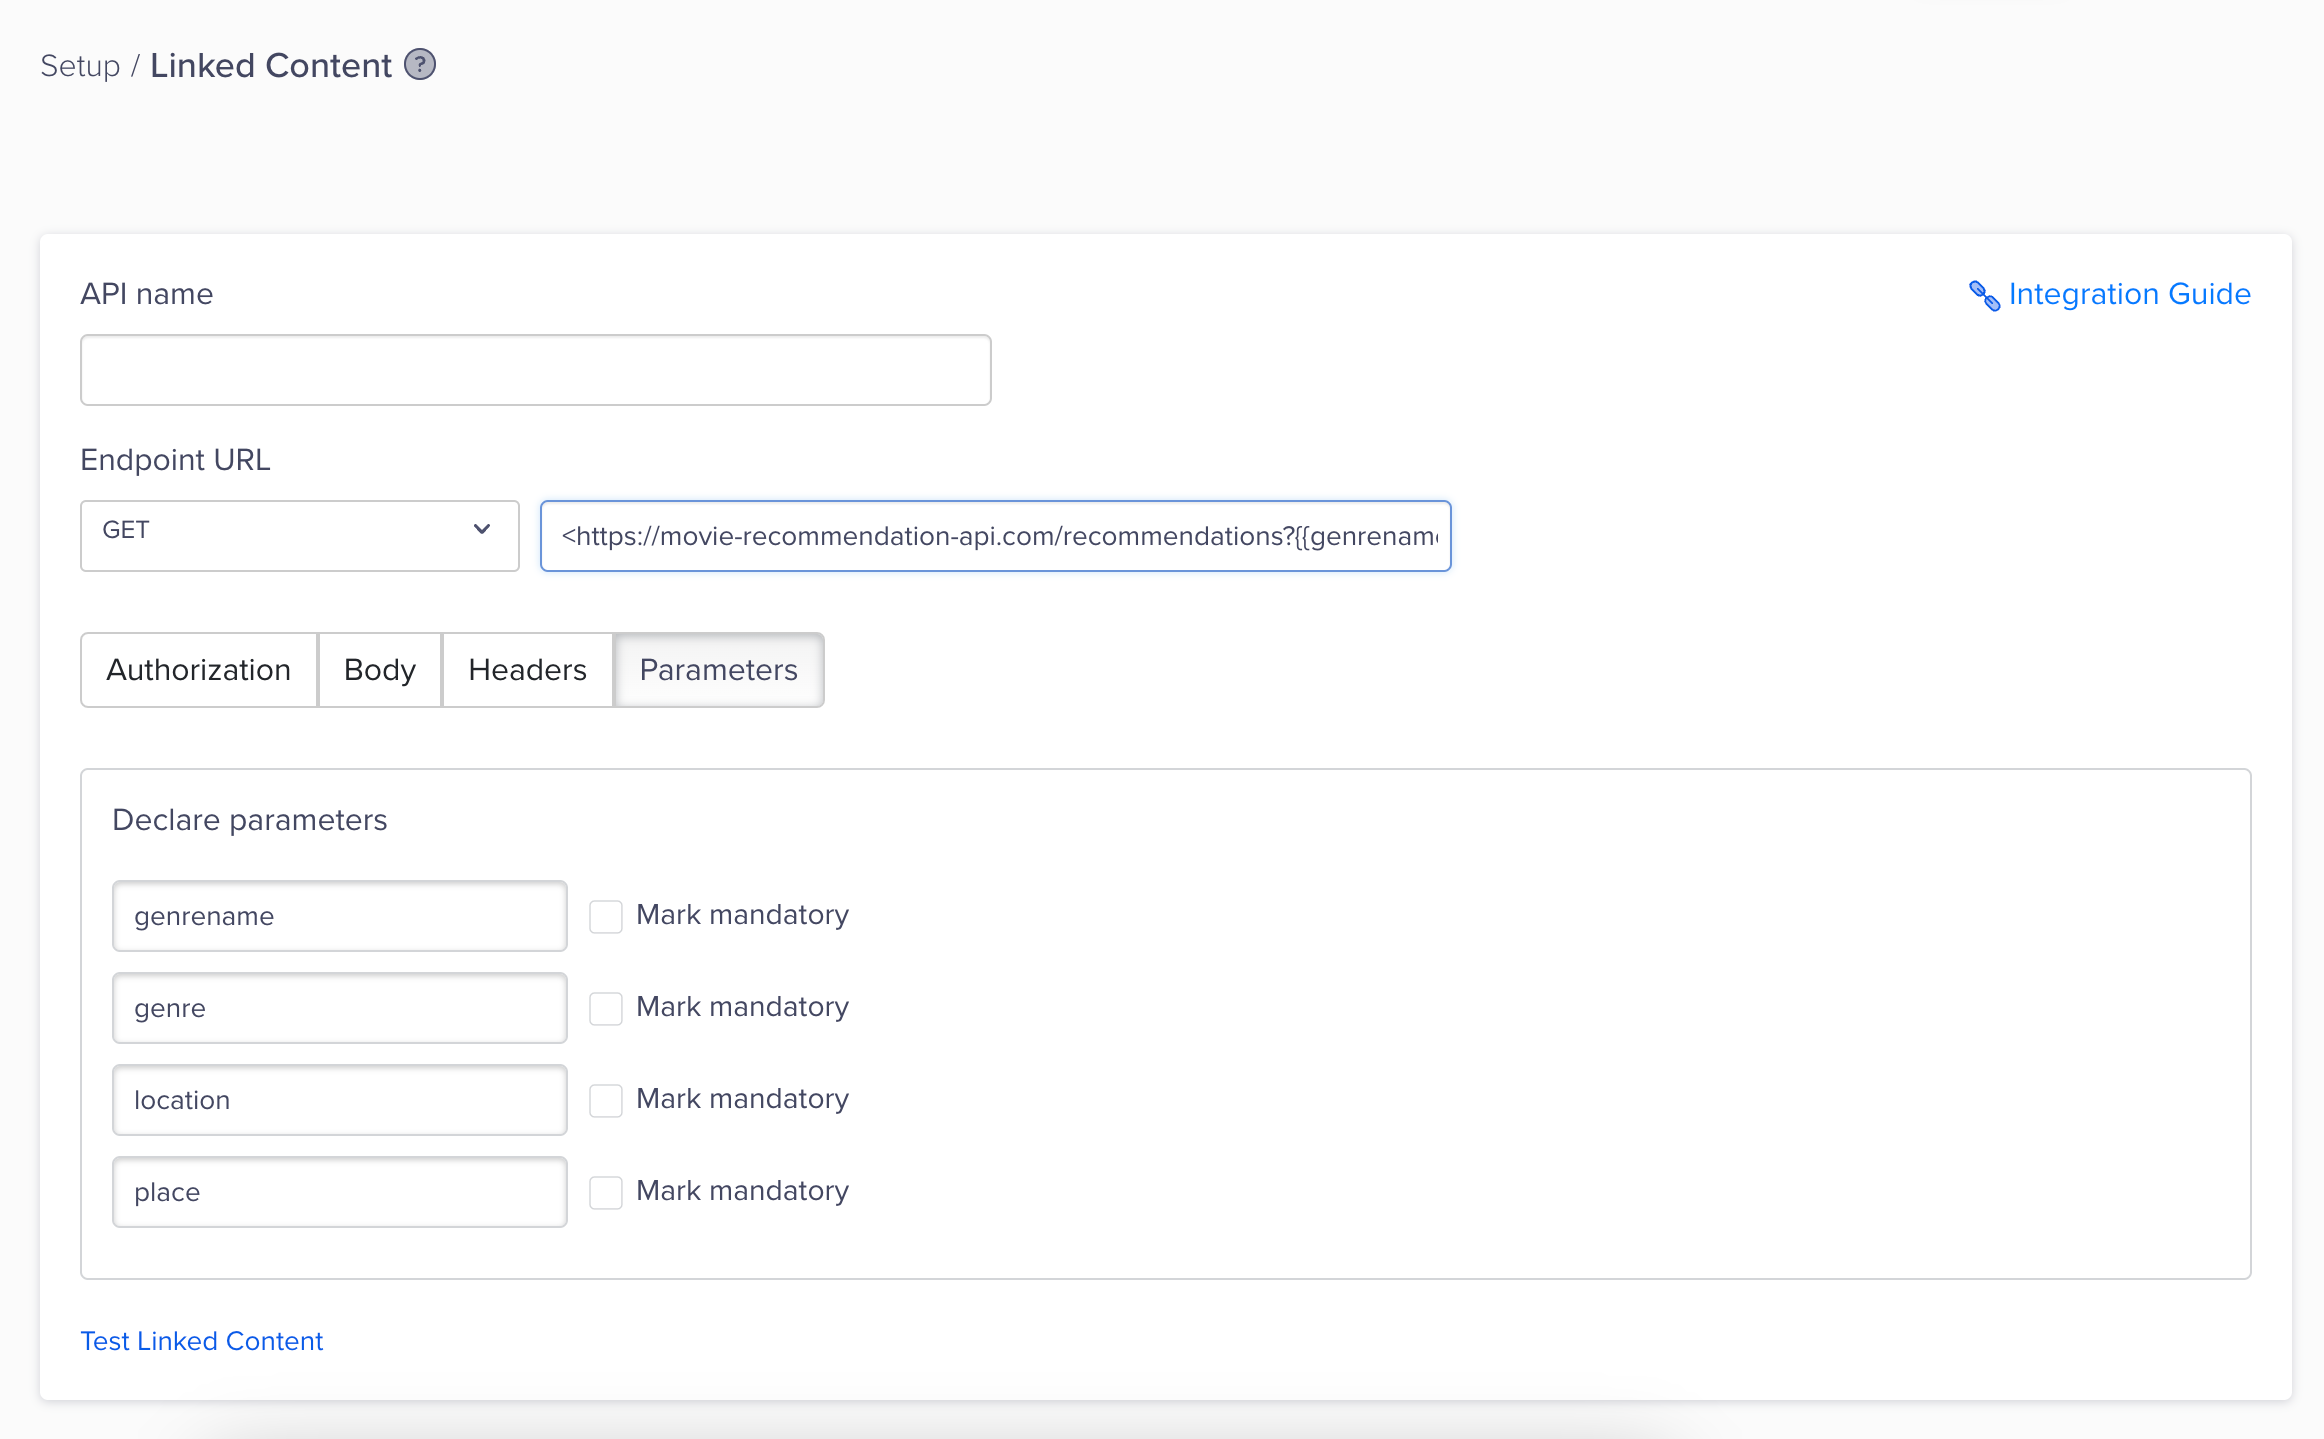
In the above image, only the values are personalized in the query parameters. You can even personalize the keys in the query parameters. For example, a user is accessing a movie recommendation API, and the API allows for personalized queries based on the user's preferences and location. In this case, the endpoint URL can be https://movie-recommendation-api.com/recommendations?{{genrename}}={{genre}}&{{location}}={{place}}. So, the keys and values change based on user input or data stored in a user profile, allowing the API to deliver personalized recommendations tailored to the individual's genre preference and location.
Personalize Both Keys and Values in Query Parameters
Map APIs
The APIs must be mapped to the campaign from the What section. After the APIs are mapped, you can use them in the email body using liquid tags. The sample scenario below shows how to create an email campaign using liquid tags and linked content.
From the What section, click icon. The Personalization Setup window displays.
Create Personalized Email
Select your APIs from the list under the Linked Content tab.
Select APIs from Linked Content
Map the API parameters to the user and event properties, or add custom parameters. Here, we map the query parameter that fetches weather information based on the user location with the help of the profile property Location. This means that each user is sent an offer based on their location.
Map Linked Content
📘
Mapping Custom Fields
You can also use liquid tags for personalization when mapping customer properties for an External Trigger Campaign. You can access this feature only if you have External Trigger enabled for your account.
Mapping Custom Fields Using Liquid Tags
Click Apply to save the mapping.
We are now ready to start writing Linked Content.
Use Labels
You can write linked content with labels. There are two types of labels that you can use in your linked content.
Custom Labels - These are labels you can create yourself. For example, a password or authorization key.
System Labels - These are default labels you can use to analyze API responses.
Custom Labels
The API response will provide you with a set of object labels. However, if you want additional personalization, you can create custom labels during the creation and editing of APIs. These will not be part of the API response.
System Labels
These are CleverTap labels that are available by default. You can use them to gauge the health of your API and check whether the responses are received correctly.
System Labels
Description
raw
This is a raw API response.
JSON
This is the raw response parsed as JSON.
http_status_code
This is the HTTP status code to identify errors, such as, 404 (not found), 401 (unauthorized), and so on.
headers
These are response headers.
Arrays in API
The response from an API may have arrays with nested JSON.
You can create conditions based on this array. For example, the response above has an array called restaurants. This array contains items under it such as id, name, rating. Notice the object user_rating. It is a nested object that contains an aggregate rating of the restaurant, rating text from an actual user, number of votes, and so on. You can use the array in the following manner:
{% for restaurant in Linked.RestaurantAPI.restaurants_info limit:5%}
{{restaurant.name}}  {{restaurant.user_rating.rating_text}}
{% endfor %}
The output will be something similar to the following text:
Marta has a rating  Excellent
PN Wood Fired Pizza  Excellent
PQR Very Good
&pizza   Good
Leonelli Focacceria e Pasticceria Good
Create Message
After you have created and saved the APIs, use the linked content in your campaigns. It is recommended that you familiarize yourself with Liquid Tags before you start writing Linked Content.
The syntax for writing linked content is Linked.APIName.label. In our previous user scenario, we had three users, one in New York, where it was snowing, one in San Francisco, where it was cloudy, and one in Miami, where it was sunny. You can add conditions in your messages to deliver messages according to the weather and zip code. So, you can plan the following message:
New York user - Since this user is probably staying in, you send an offer for ordering piping hot food.
San Francisco user - Since it is the weekend, this user may go out in the evening, so you send an offer for a dinner reservation at a nearby restaurant.
Miami user - Since it is always sunny, you send an offer for a nearby barbecue restaurant.
The following is what a written personalized linked content for your users may look like:
Hi {{ Profile.name | default:"there!" }},

{% if Linked.cityBasedWeather.temp > 30 %}
It is a bright sunny day in {{ Profile.location | default:"your city" }}. How about a barbeque today?


{% elsif Linked.cityBasedWeather.temp < 10 %}
It is indeed cold today in {{ Profile.location | default:"your city" }}!! Time for some hot pizza!
{% else %}
It has  been a while in {{ Profile.location | default:"your city" }}. Order something exotic!
{% endif %}
If you want to add a list of the top 5 restaurants in this message, you can add the following in the main message:
{% for restaurant in Linked.RestaurantAPI.restaurants_info limit:5%}
{{restaurant.name}}  {{restaurant.user_rating.rating_text}}
{% endfor %}
The final message before you send out the email may look like the following:
Hi {{ Profile.name | default:"there!" }},

{% if Linked.cityBasedWeather.temp > 30 %}
It is a bright sunny day in {{ Profile.location | default:"your city" }}. How about a barbeque today?

Use the coupon code (BARBQ).
These are the top 5 restaurants near you:
{% for restaurant in Linked.RestaurantAPI.restaurants_info limit:5%}
{{restaurant.name}}  {{restaurant.user_rating.rating_text}}
{% endfor %}


{% elsif Linked.cityBasedWeather.temp < 10 %}
It is indeed cold today in {{ Profile.location | default:"your city" }}!!
Time for some hot pizza!

Use the coupon code (PIZZA). These are the top 5 restaurants near you:
{% for restaurant in Linked.RestaurantAPI.restaurants_info limit:5%}
{{restaurant.name}}  {{restaurant.user_rating.rating_text}}
{% endfor %}

{% else %}

It has  been a while in {{ Profile.location | default:"your city" }}.
Order something exotic!

Use the coupon code (EXOTIC).These are the top 5 restaurants near you:           {% for restaurant in Linked.RestaurantAPI.restaurants_info limit:5%}
{{restaurant.name}}  {{restaurant.user_rating.rating_text}}
{% endfor %}

{% endif %}
Add some personalizations from our editor, then send out the email. For additional information on how to personalize your email, refer to Create an Email Campaign.
Create an Email Campaign using Linked Content
Using Personalization in Linked Content Response
📘
Private Beta
This feature is released in Private Beta. If you want to access this feature, contact your Customer Success Manager.
CleverTap supports personalization in Linked Content, allowing you to dynamically replace personalization placeholders with user-specific values. This ensures messages are customized before delivery, even for translated or localized content.
With this feature, you can send highly targeted messages across multiple languages using profile attributes and event properties, improving user engagement and relevance.
📘
Supported and Unsupported Variables
Supported Variables
You can personalize Linked Content responses using the following placeholders with Liquid syntax:
For Event Personalization with a delay of more than 24 hours, default values are used.
Catalog and recommendation variables fall back to default values.
As @ Personalization is not supported, any variable prefixed with @ (for example, @Profile - Name) is not parsed, that is, the variable is not replaced with a value.
Messages with invalid Liquid syntax are flagged as errors to prevent delivery with unresolved placeholders.
Syntax
Use the following syntax to configure personalization placeholders in Linked Content responses:
Use Case: Translating Personalized Messages Across Languages
Learn how to use personalization for translated messages.
Scenario
A bank customer in Germany receives notifications from his bank about promotional offers. The English version of the final notification delivered to the user is as follows:
Hi John! Now you can earn up to €50 in your savings account.
However, when the message is translated into German using Linked Content, it displays as follows:
Hallo {{Profile.name | default:"Namefailed"}}! Jetzt kannst du bis zu {{Profile.currency | default:"Currency"}} {{Event["offerPercentage"] | default:"0"}} in dein {{Profile.accounttype | default:"Account"}} Konto verdienen.
Solution
When using message translation, personalized parameters such as {{}} placeholders often remain unchanged in translated messages and notifications. This results in the German version of the message not being fully personalized when delivered to the user.
With this feature, CleverTap dynamically resolves all placeholders within translated content before the message is delivered, ensuring a fully personalized experience in the user's preferred language.
How it works
This is how the above-mentioned use case is achieved:
When the bank sends him the same promotional message, Linked Content fetches the German message from the translation service.
All personalization placeholders are dynamically replaced using real-time user data, such as Profile.name, Event["offerPercentage"], and so on.
If a placeholder is invalid or unsupported (for example, prefixed with @), it is either left as-is or flagged as an error.
The fully personalized message is delivered in the user’s preferred language, here, German:
Hallo John! Jetzt kannst du bis zu €50 in dein Sparkonto verdienen.
This use case can be extended for further personalization using Liquid setup, or through API-based translations.
📘
Key Consideration
Resolving personalization placeholders adds processing time, which may slightly delay message delivery compared to standard notifications.
No changes are required in the campaign setup process.
This ensures that personalization works seamlessly across multiple languages, improving engagement and user experience.
FAQs
Do you retry if the linked content API fails to give a successful payload?
We do not retry if the linked content API fails to give a successful payload.
How much time do you wait to fetch the API response?


 icon. The Personalization Setup window displays.