AWS S3
Overview
The data export feature provides the capability to bulk export your CleverTap event data to your AWS S3 bucket. You can use this for analysis in BI tools or storage in your data warehouse for analysis in the future.
Feature Availability
This capability is a part of the CleverTap for Enterprises plan. To activate this for your account, contact your sales account manager.
Setup
The following are the two major steps involved in enabling this feature for your account:
- Create an AWS S3 Bucket.
- Configure Buckets details on the CleverTap Dashboard using one of the following methods:
Create an AWS S3 Bucket
To create an AWS S3 bucket:
- Log in to your AWS account, then search for S3 in the AWS services box.
- Select S3 from the search results.

Select S3 from AWS Account
On clicking, the Bucket page displays.
- Click Create bucket. On clicking, the Create bucket page displays:

Click Create Bucket
- Enter a bucket name, region, logging, versioning, and encryption preferences.

Configure S3 Bucket Settings and Click Create Bucket
Recommendation for Setup
For this integration, you need not modify the default settings; however, you must check your internal organization's policies to verify if you need to modify any of these settings.
Based on your CleverTap account settings, we host your data in Europe (EU), the United States (US), Singapore (SG), or India (IN). To identify the region of your account and the corresponding region that you must select when configuring the bucket settings, refer to the following table:
| CleverTap Dashboard URL | Region | AWS S3 Bucket Region |
|---|---|---|
| https://eu1.dashboard.clevertap.com/login.html | EU | EU (Ireland) eu-west-1 |
| https://in1.dashboard.clevertap.com/login.html | India | Asia Pacific (Mumbai) ap-south-1 |
| https://us1.dashboard.clevertap.com/login.html | US | US West (Oregon) us-west-2 |
| https://sg1.dashboard.clevertap.com/login.html | Singapore | Asia Pacific (Singapore) ap-southeast-1 |
| https://sk1.dashboard.clevertap.com/login.html | South Korea | Asia Pacific (Seoul)\nap-northeast-2 |
Set Up AWS Bucket Region
When setting up the AWS bucket region for your AWS account, ensure that the AWS bucket region matches your CleverTap account region. To identify the region of your CleverTap account, refer to the above table.
Also, you can set up the CleverTap account region only once during registration.
- Click Create bucket. On successful bucket creation, the following message displays in the snack bar at the top:

S3 Bucket Created Successfully
The bucket you just created now shows up on your S3 console. We recommend you note down the name of your new bucket, as you will need it for the next step.
Configure S3 Bucket Details on CleverTap Dashboard
Using IAM Policy
The following are the two major steps to perform this task:
i. Copy IAM Policy from the CleverTap dashboard
ii. Add IAM Policy to S3 Bucket from AWS console.
Copy IAM Policy from the CleverTap Dashboard
To copy the IAM policy from the CleverTap dashboard:
- Navigate to Settings > Partners and click View Details against Amazon S3. The Integrate analytics partner - Amazon S3 window displays on the right side of the screen.

Click View Details against Amazon S3 from Partner Page
- Click + Amazon S3 Bucket to create a new bucket.
- Enter the Bucket name.
- Select IAM (Identity and Access Management) Policy option under Configure with section.

Configure S3 Bucket with IAM Policy
- Click the
 icon to copy the policy to the clipboard and keep this window open for saving these details later.
Add IAM Policy to S3 Bucket on AWS Console
To add IAM policy to the S3 bucket:
- Select the bucket from the Bucket page of the AWS console.
- Select the Permissions tab.
- Click Edit under the Bucket policy section and enter the policy that you copied in Step 4 of Copy IAM Policy from the CleverTap dashboard:

Edit S3 Bucket Policy
{
    "Version": "2012-10-17",
    "Statement": [
        {
            "Effect": "Allow",
            "Principal": {
                "AWS": "arn:aws:iam::062484260092:root"
            },
            "Action": "s3:PutObject*",
            "Resource": "arn:aws:s3:::bucket-name/*"
        },
        {
            "Effect": "Allow",
            "Principal": {
                "AWS": "arn:aws:iam::062484260092:root"
            },
            "Action": "s3:PutObject*",
            "Resource": "arn:aws:s3:::bucket-name"
        }
    ]
}
IMPORTANT
Ensure that you replace all the occurrences of
bucket-namein the above JSON payload with your actual bucket name.
- Click Save Changes to save the policy.
- Go back to the same window opened in Step 4 of Copy IAM Policy From CleverTap Dashboard and click Save Credentials.
Amazon S3 bucket is now configured on both the AWS S3 console and CleverTap dashboard.
Using Access Key
The following are the two major steps to perform this task:
i. Create an API Key for Your S3 Bucket.
ii. Add Your S3 Bucket Details to CleverTap.
Create an API Key for Your S3 Bucket
This section demonstrates the creation of an AWS API key with write access to the bucket we created in the above step. CleverTap uses this API key to export data to your S3 bucket.
- Click on your account name on the top right of the AWS console.
- Select Security credentials.

Select Security credentials
- Select Users from the left navigation and click Add user.

Add Users
On clicking, the Add user page displays.
- Enter the User name and select the Programmatic access checkbox.
- Click Next:Permissions.

Select AWS Access Type and Click Next: Permissions
On clicking, Set permissions page displays.
- Click Create group under Add user to group tab.

Add User to Group
On clicking, Create group page displays.

Assign Policy to Group
- Click Create policy. On clicking, Create policy page opens in a new tab.
- Select the JSON tab and then paste the JSON code given below in the box.
- Replace
clevertap-examplein the JSON code with the name of the S3 bucket you created in the above step.
The permissions defined in this policy allow CleverTap to get information about your bucket and upload files to it.
AWS API Access Policies
IP Whitelisting is not supported with S3 exports. For more information about AWS API access policies, refer to this post from the AWS blog.

Bucket Policy in JSON Format
{
    "Version": "2012-10-17",
    "Statement": [
        {
            "Effect": "Allow",
            "Action": [
                "s3:ListBucket"
            ],
            "Resource": [
                "arn:aws:s3:::clevertap-example"
            ]
        },
        {
            "Effect": "Allow",
            "Action": [
                "s3:PutObject"
            ],
            "Resource": [
                "arn:aws:s3:::clevertap-example/*"
            ]
        }
    ]
}
- Click Next: Tags and then click Next: Review. On clicking, the Create policy page opens.
- Enter the policy Name and click Create policy.

Enter Policy Name and Click Create policy
On successful policy creation, the following message displays in the snack bar at the top:

Bucket Policy Created Successfully
- Go back to the Create group page (opened in Step 6), search for the policy you just created, and assign it to the new group by selecting the checkbox.
- Click Create group. On clicking, the Add user page displays.

Select Policy and Click Create Group
- Click Next: Tags and then click Next: Review.

Click Next: Tags
- Click Create user.

Click Create user
On successful user creation, the following page displays. You will see your Access key ID and the Secret access key.

Copy or Download User Security Credentials
These credentials allow CleverTap to upload files to your S3 bucket. We recommend you note down these values as you will require them for the next step. Otherwise, you can also click Download .csv to save these details for future use.
Add Your S3 Bucket Details to CleverTap
To add your S3 bucket details to Clevertap, perform the following steps:
- Navigate to Settings > Partners and click View Details against Amazon S3. The Integrate analytics partner - Amazon S3 window displays on the right side of the screen.

Click View Details against Amazon S3 from Partners Page
- Click + Amazon S3 Bucket to create a new bucket. The Integrate Amazon S3 Bucket window opens on the right side of the screen.
- Enter the Bucket nickname and Bucket URL.
- Select the User details option under Configure with section.
- Enter your Access key ID and the Secret access key obtained earlier and click Save Credentials.

Enter User Security Credentials and Click Save Credentials
Create a New Data Export
To create a new data export:
- Navigate to Settings > Partners > Exports.
- Click Create Export and select Amazon S3.

Create Export
The Export to Amazon S3 pop-up displays.

Enter Export Details
-
Configure the following settings:
- Partner Bucket name: Name of the partner bucket. Choose the required partner bucket name from the drop-down.
- DATA TYPE & IDENTIFIER PRIORITY: Select the events from the available options to export. For more information, refer to Export Details.
- Fallback Priority order for identities: Select priority for user identities when exporting data. User Identifiers will be exported based on selected priority. For more information, refer to the Prioritize User Identity for Exports section.
- FREQUENCY: Select from one of the following options:
- One time: A single export for the selected export type. You can export data up to the last 60 days. You create an export for a specific day, date range, previous month, current month, and more.
- Recurring: Set up a recurring export that exports all the new events captured in the last window. You can export data as frequently as every 4 hours and up to once every 24 hours.
- Dates to export data: The export starts at 12:00 a.m. on the specified date by default.
- FORMAT: Select from the following export formats: JSON, XML, CSV, and Parquet. For more information, refer to Export Format.
- Export Data: If you choose As string, the data is sent as a string. If you do not select the box, data is sent in its original format.
-
Click Export. On clicking, the popup closes, and the following message displays at the top of the Exports page:

Amazon S3 Export Initiated
CleverTap processes the export, and you can now see the newly created export for AWS S3.

New Amazon S3 Export Displays on Exports Page
The status for each export is displayed as PENDING as soon as the export is created. The status changes to RUNNING after the processing starts. And it changes to DONE when the export is complete.
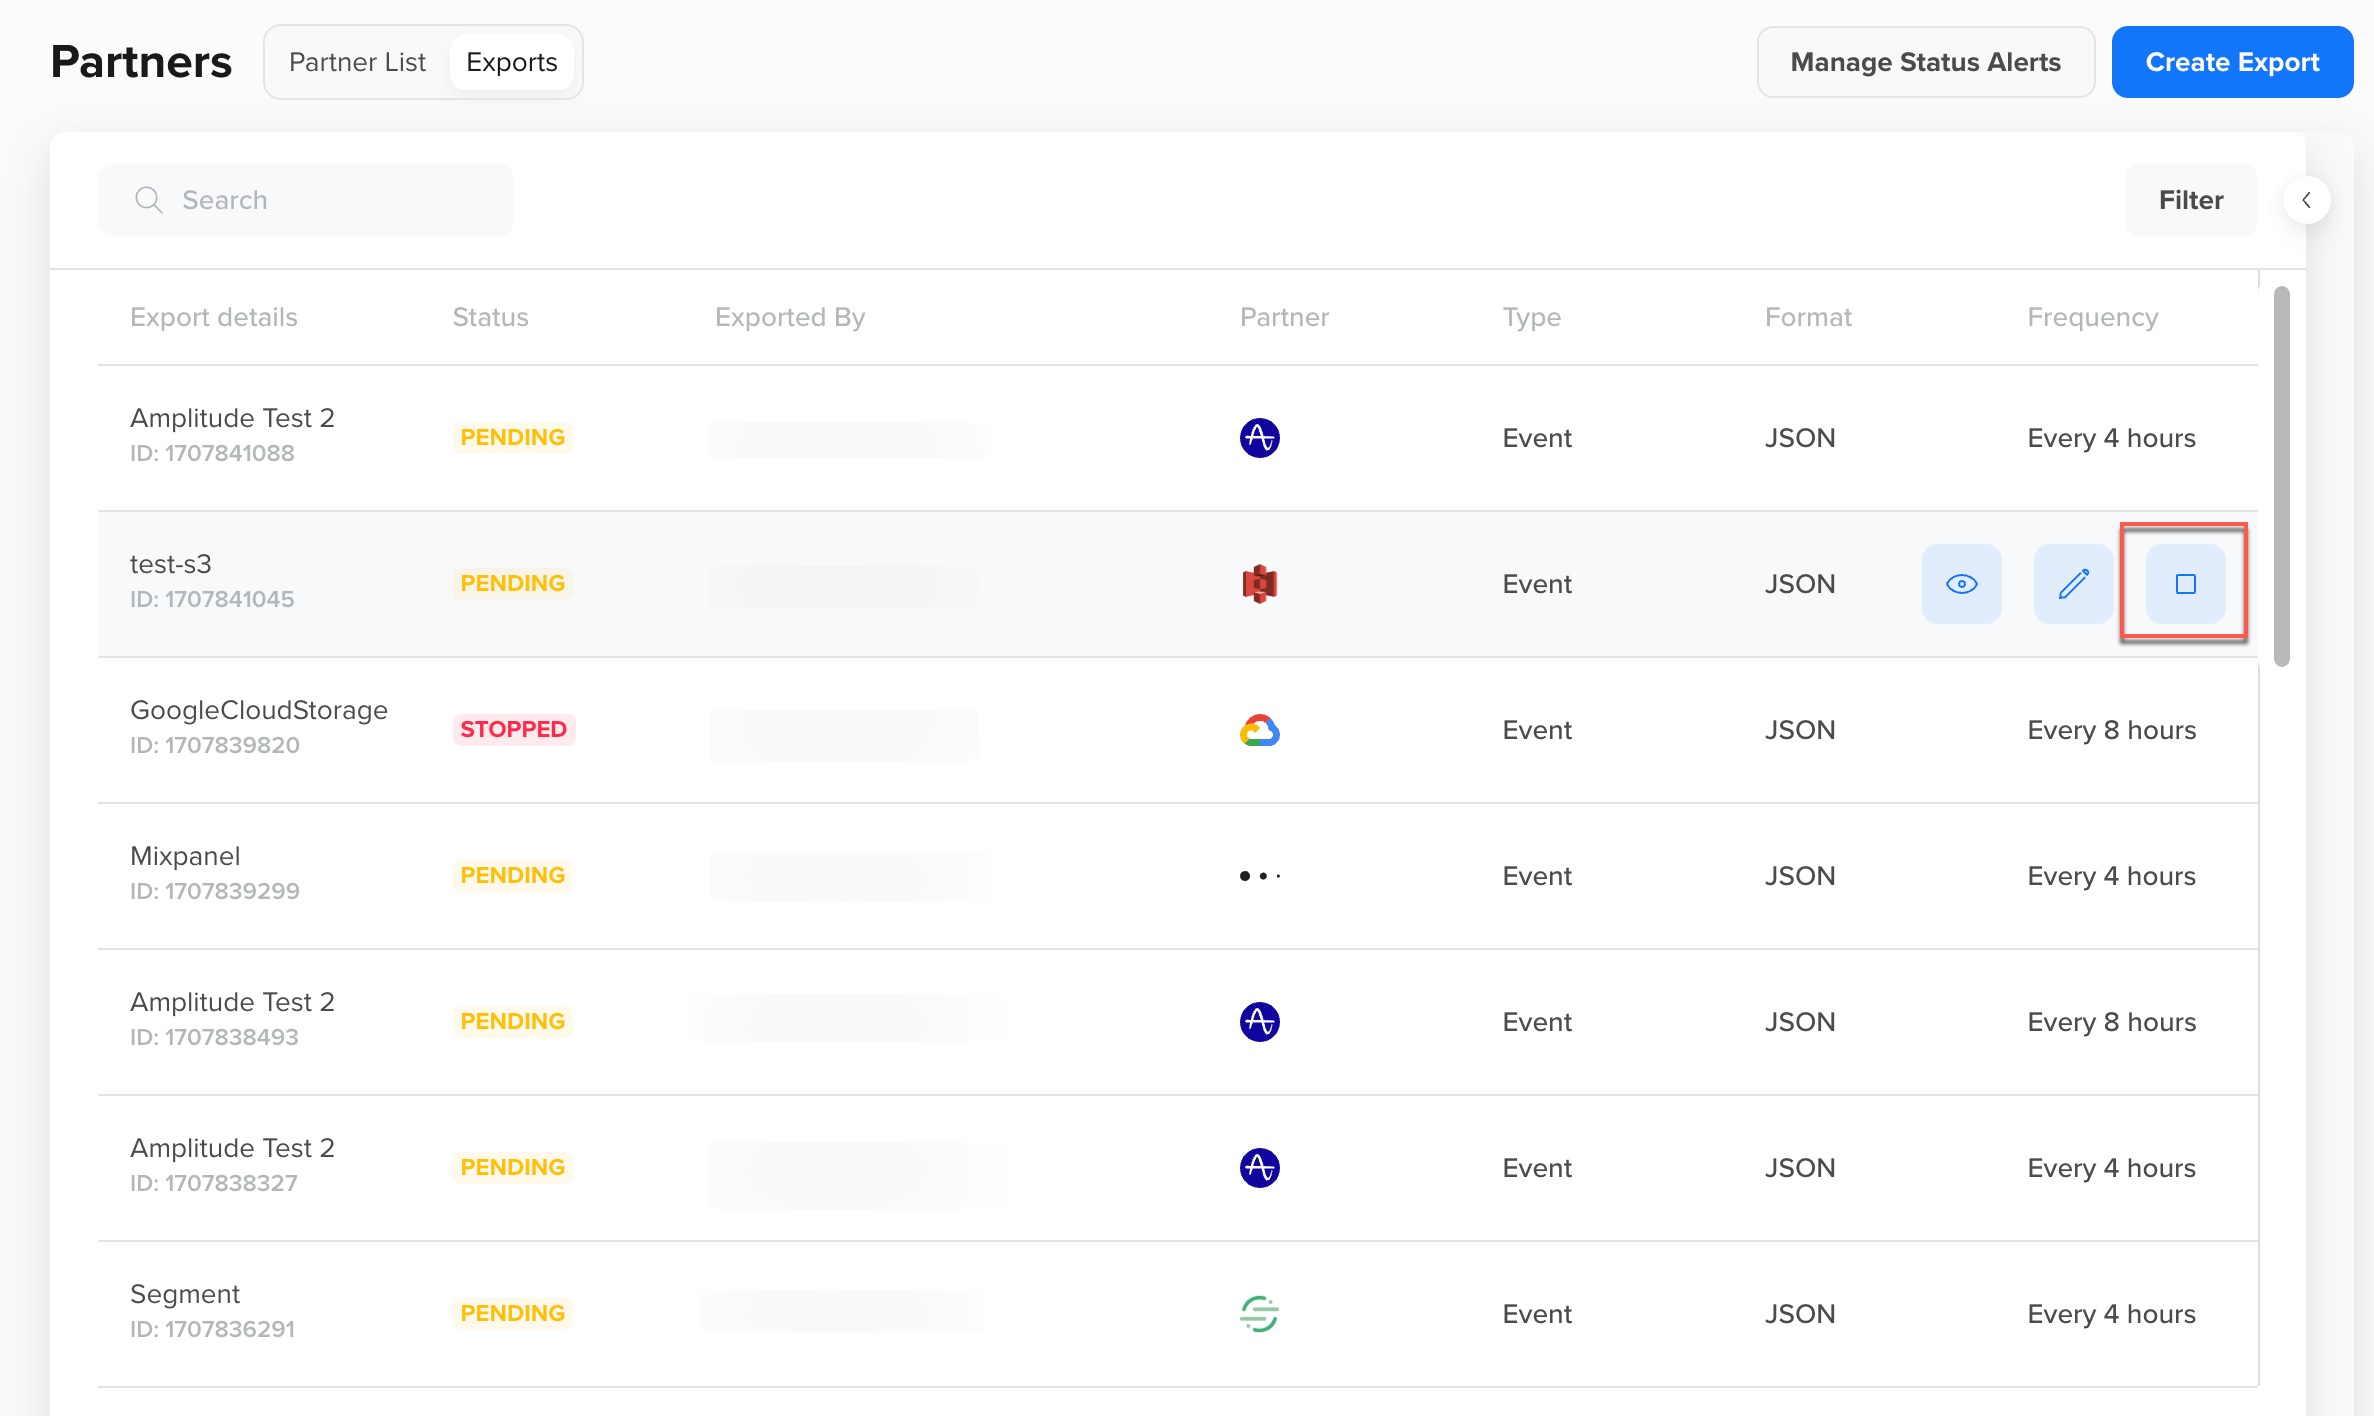
Stop Export
You can also stop the export that you have created. To do so, click the
Stop Export
icon for the export request you want to stop, and then click Stop to confirm your action.
- Confirm if your event data was successfully exported. To do so:
a. Log in to your AWS account and navigate to the S3 console.
b. Search your Bucket from the Buckets page and then click the bucket name.
c. Copy the Request ID from the activity log and search with that ID. You should see your respective file there.

New Amazon S3 Export Displays on Amazon S3 Dashboard
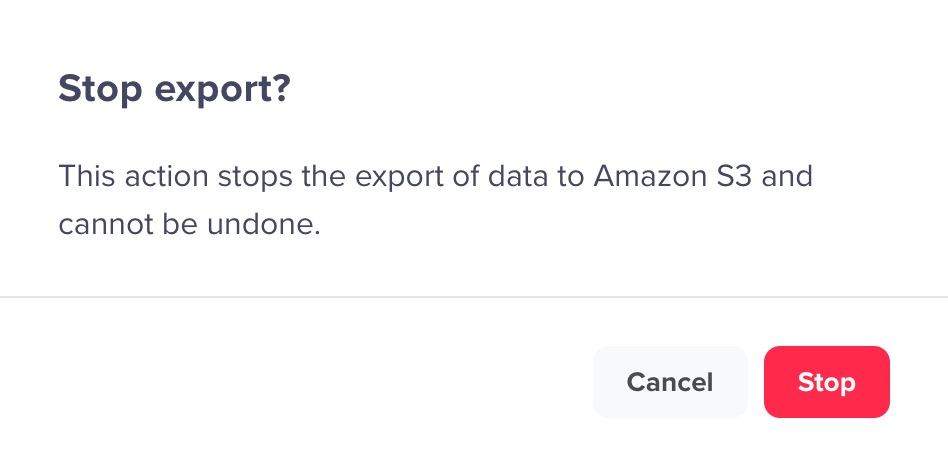
Stop Export
You can also stop the export that you have created. Hover over the required export. The View, Edit, and Stop buttons appear. Click the Stop button for the export request you want to stop.
Stop Amazon S3 Export
The Stop export? window appears. Click Stop to confirm your action.
You now return to the Exports page, and the Amazon S3 data export stopped message displays at the top. The status of the export is displayed as STOPPED.
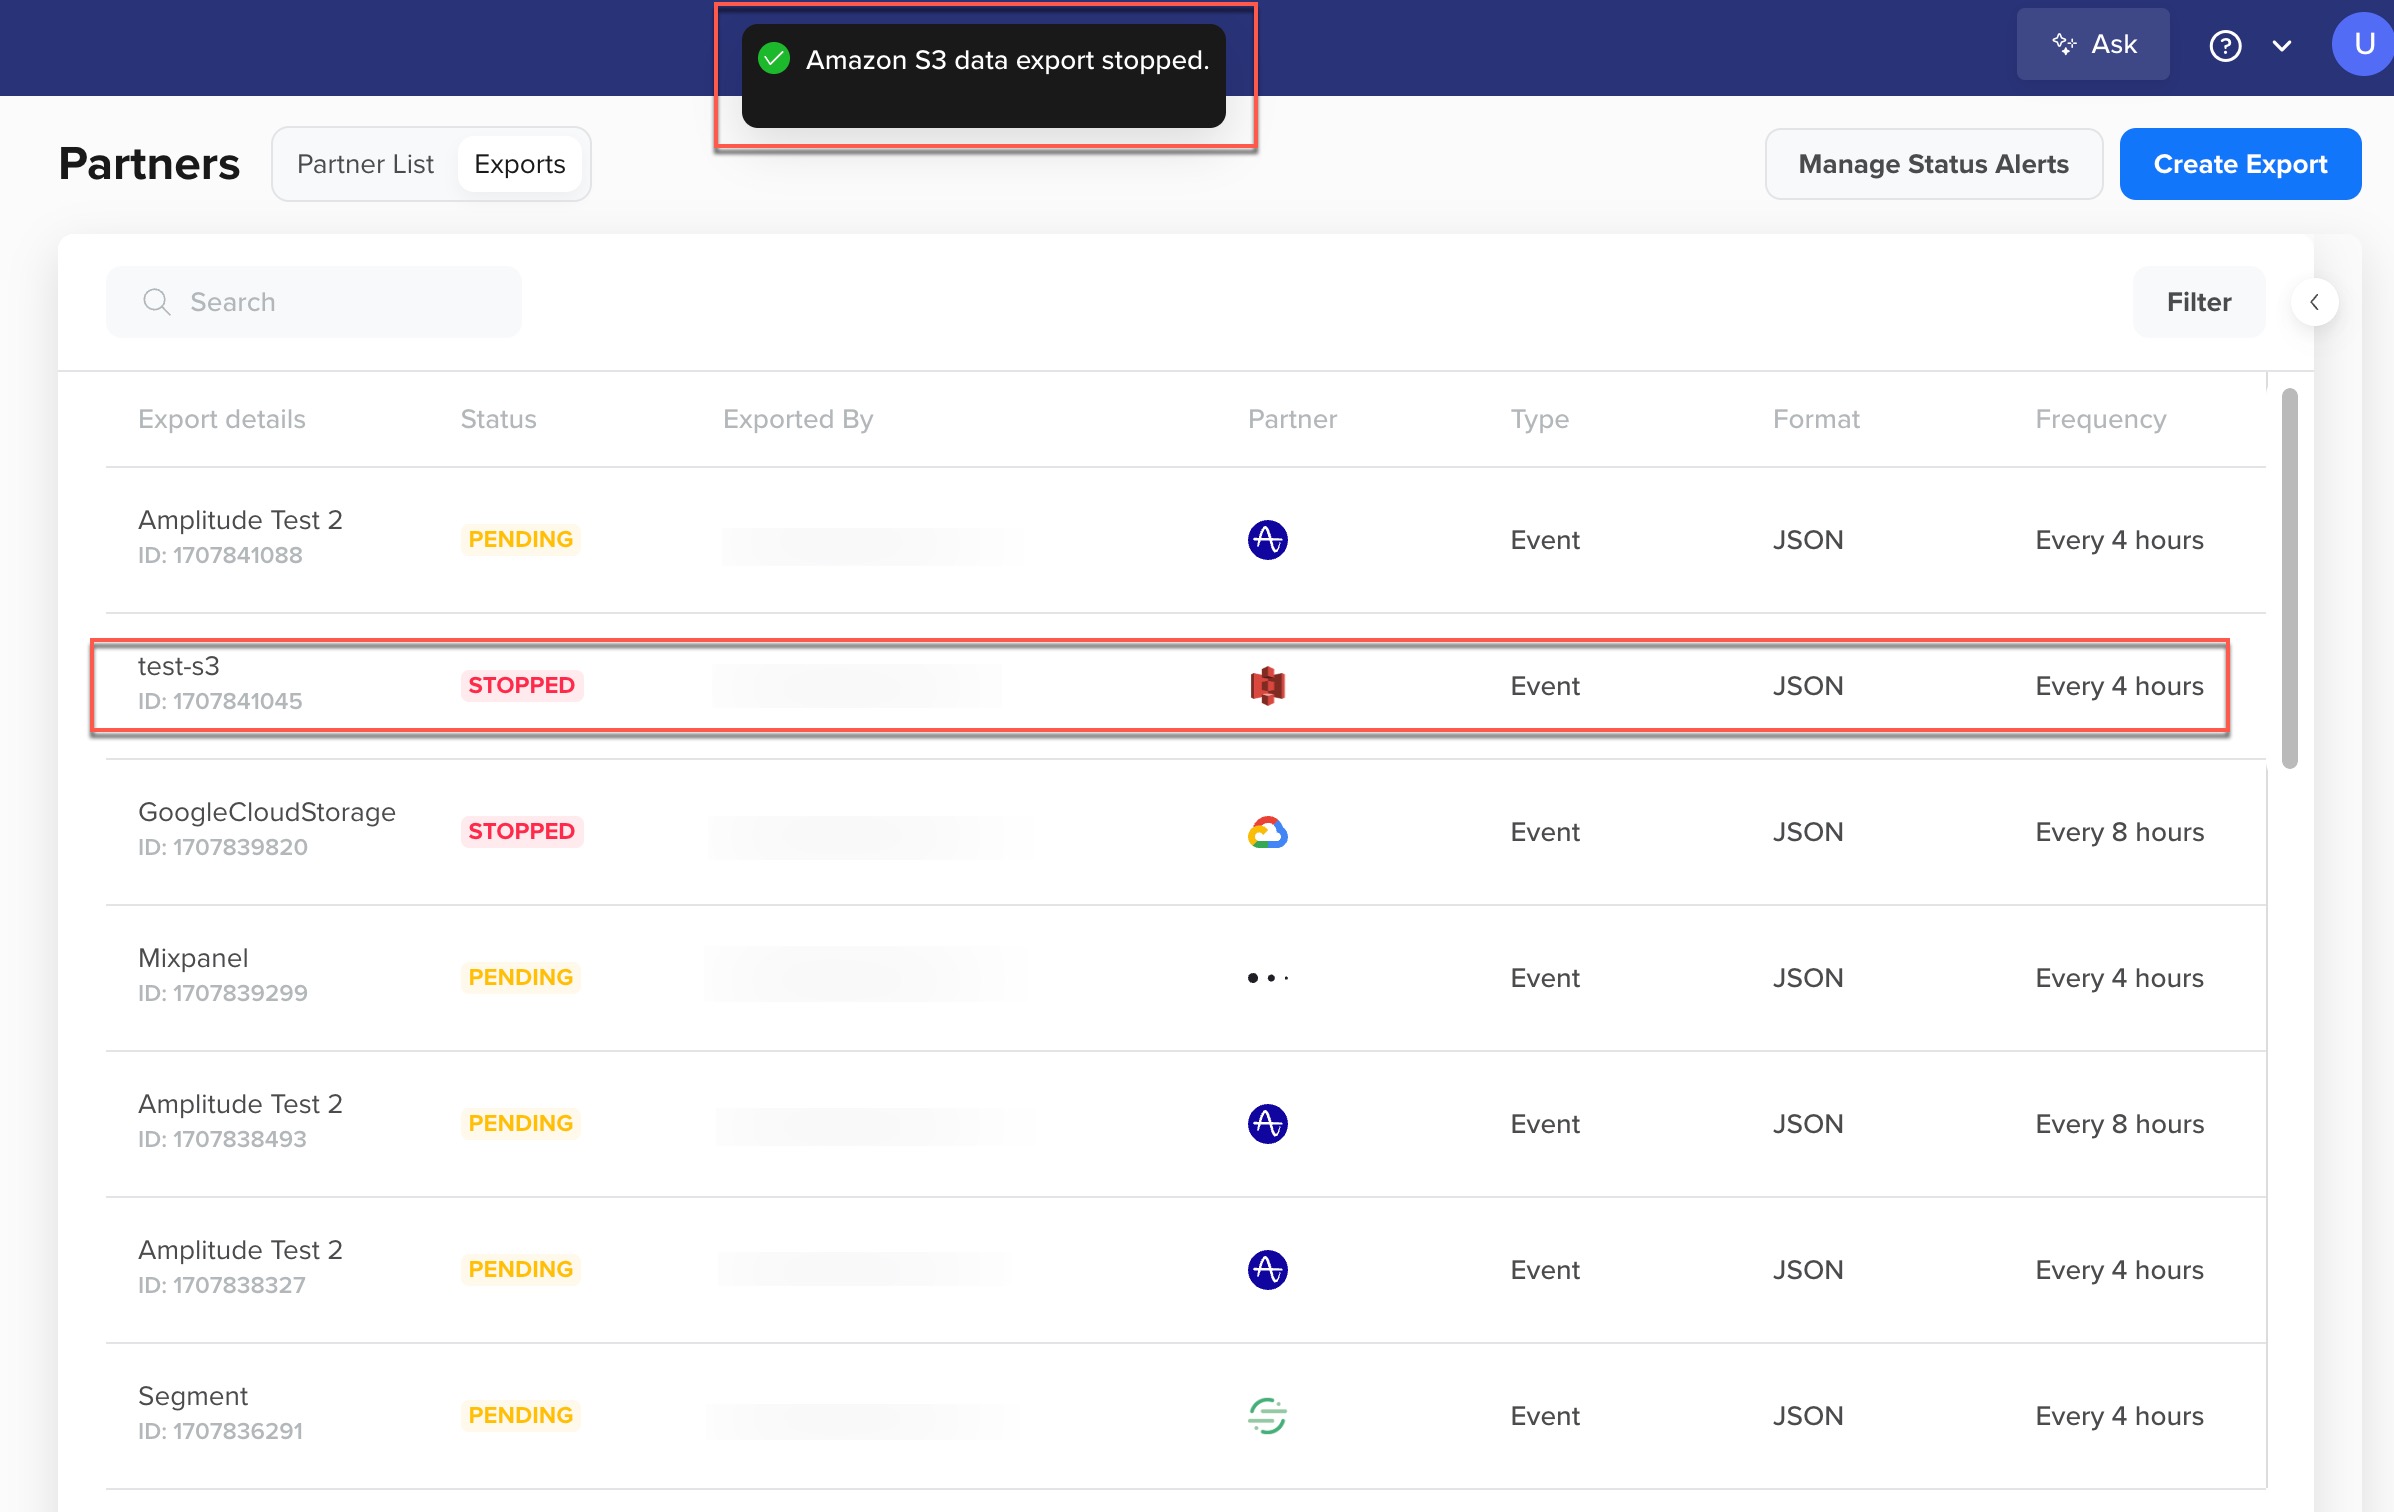
Amazon S3 Export Stopped
Edit an Export
You might need to modify an export to meet specific business requirements or while waiting for the next run. This section describes editing a Live Data Streaming and Recurring export in the RUNNING and PENDING (awaiting next run) state.
Points to Remember
- In case of running exports, the new changes will apply to the next run.
- You cannot edit a One-time export, regardless its status (RUNNING, PENDING, DONE, or STOPPED).
- You cannot change the export from User Profile to Event and vice-versa.
- You cannot modify exports marked as DONE or STOPPED.
- Export changes for Live DataStreaming take 10-15 minutes to take effect.
To edit an export:
- On the CleverTap dashboard, go to Partners > Exports.
- Hover over the export. The View, Edit, and the Stop buttons appear.
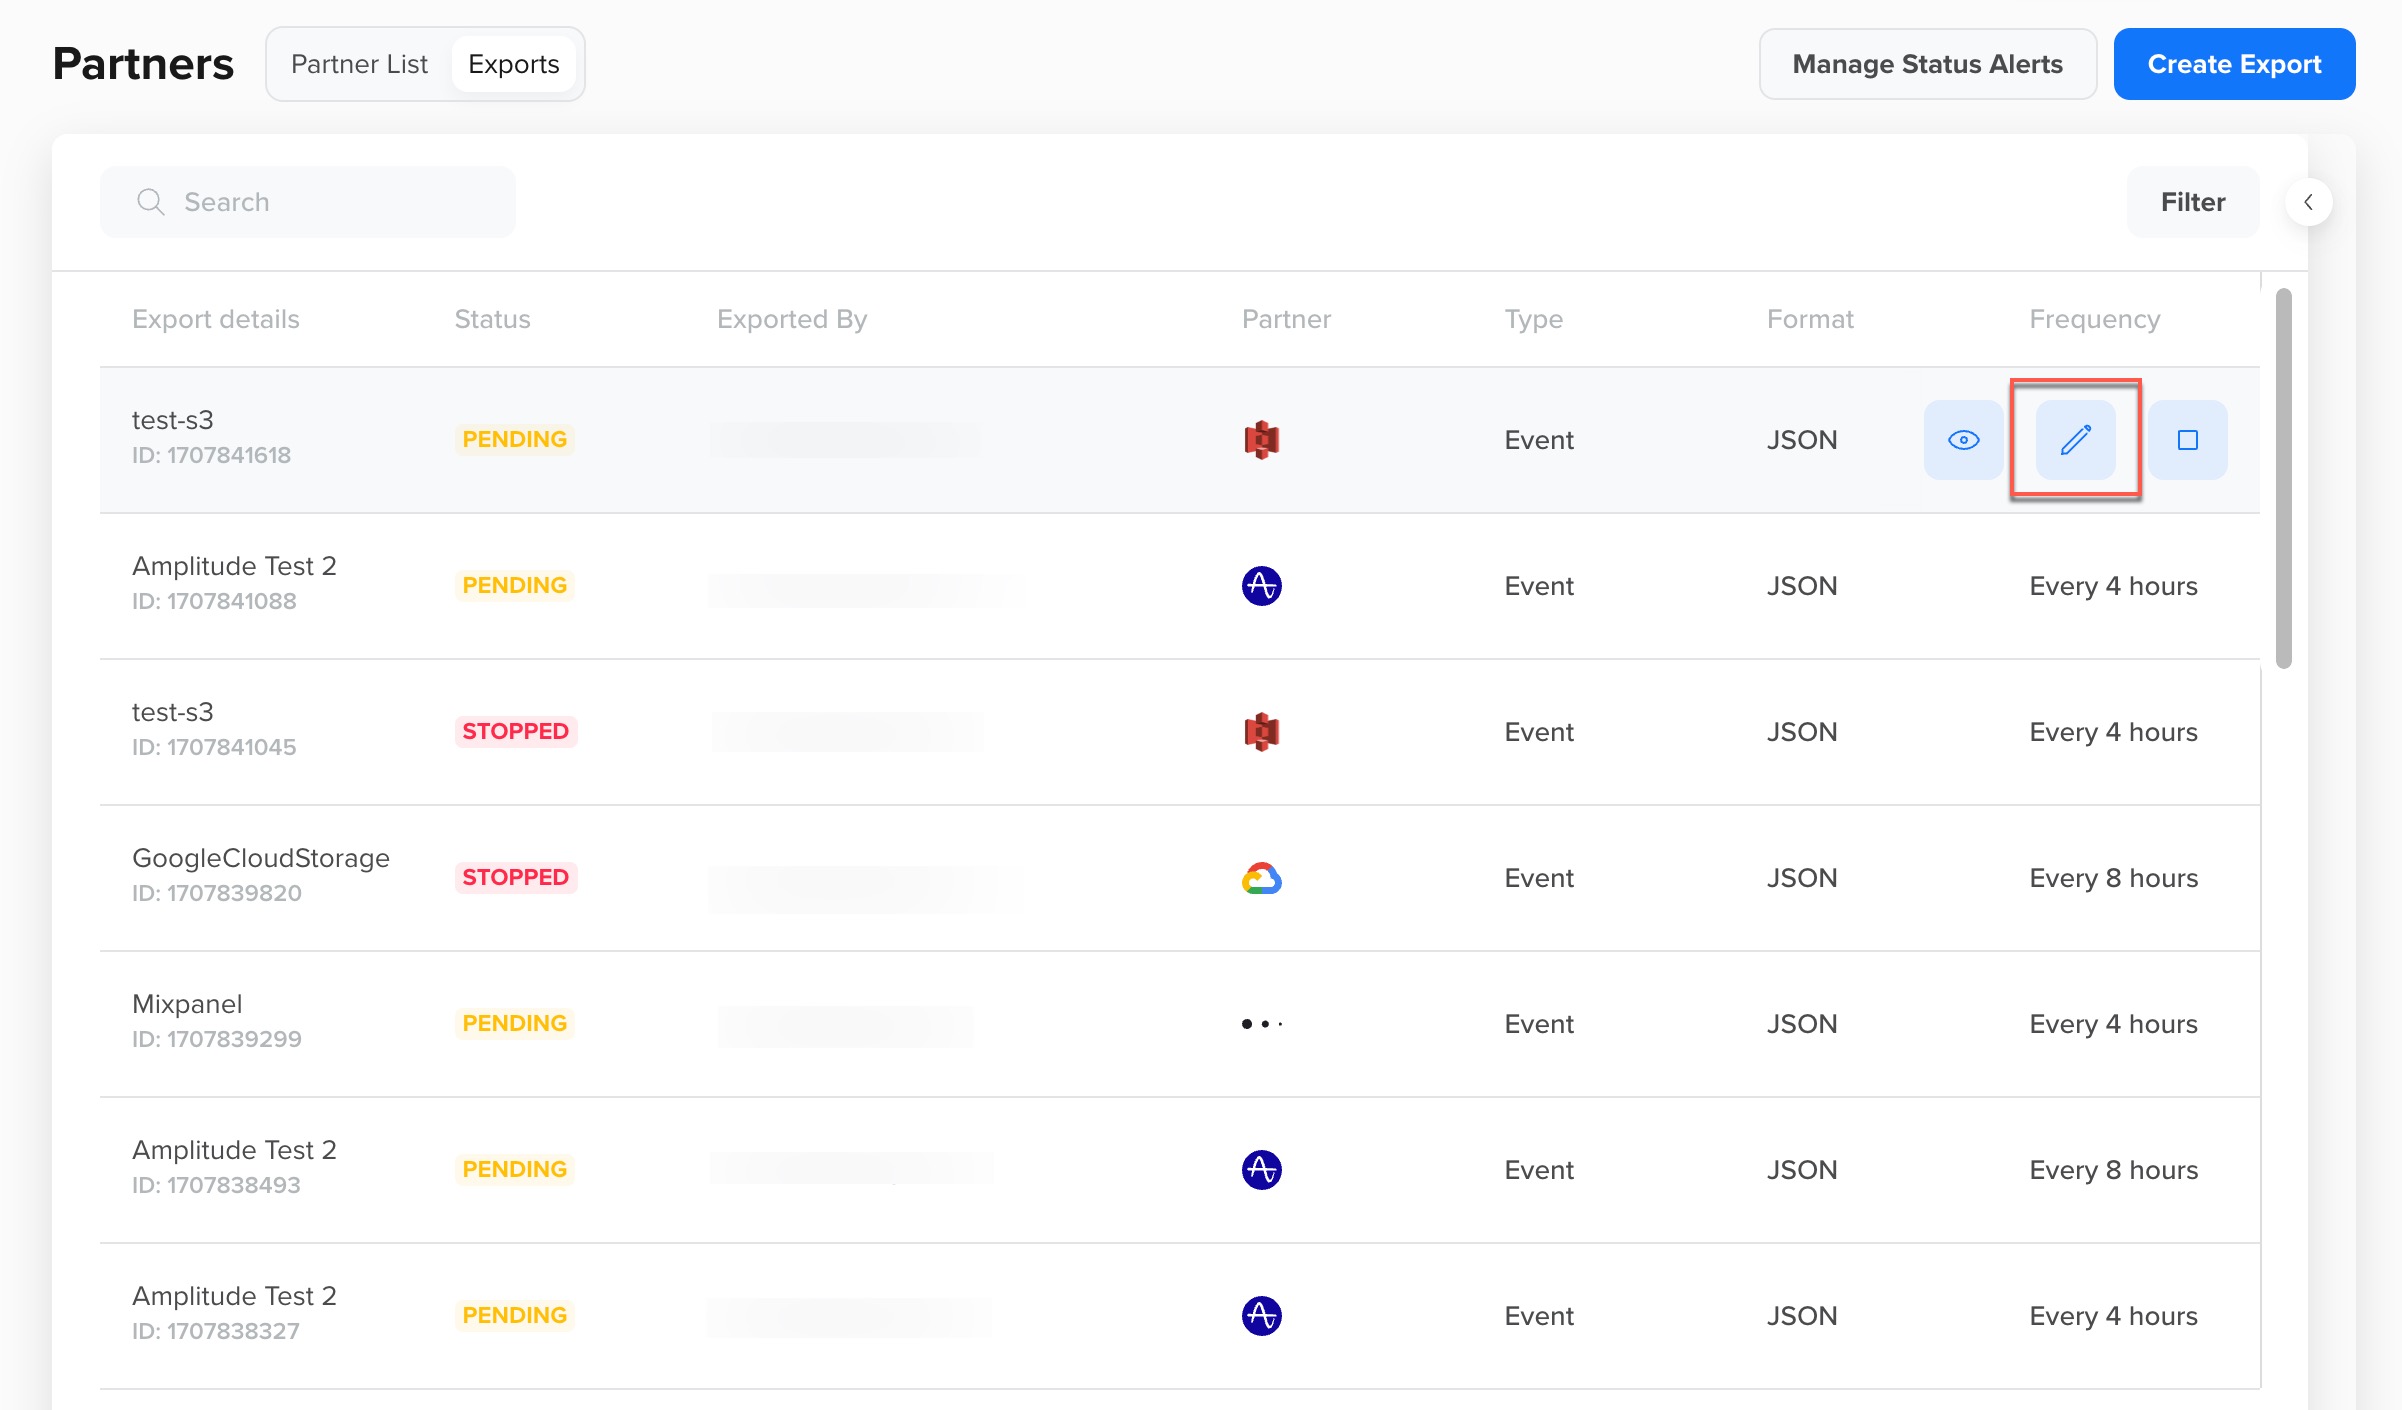
Click the Edit Export Icon
- Click the Edit button. The Export to Amazon S3 section appears.
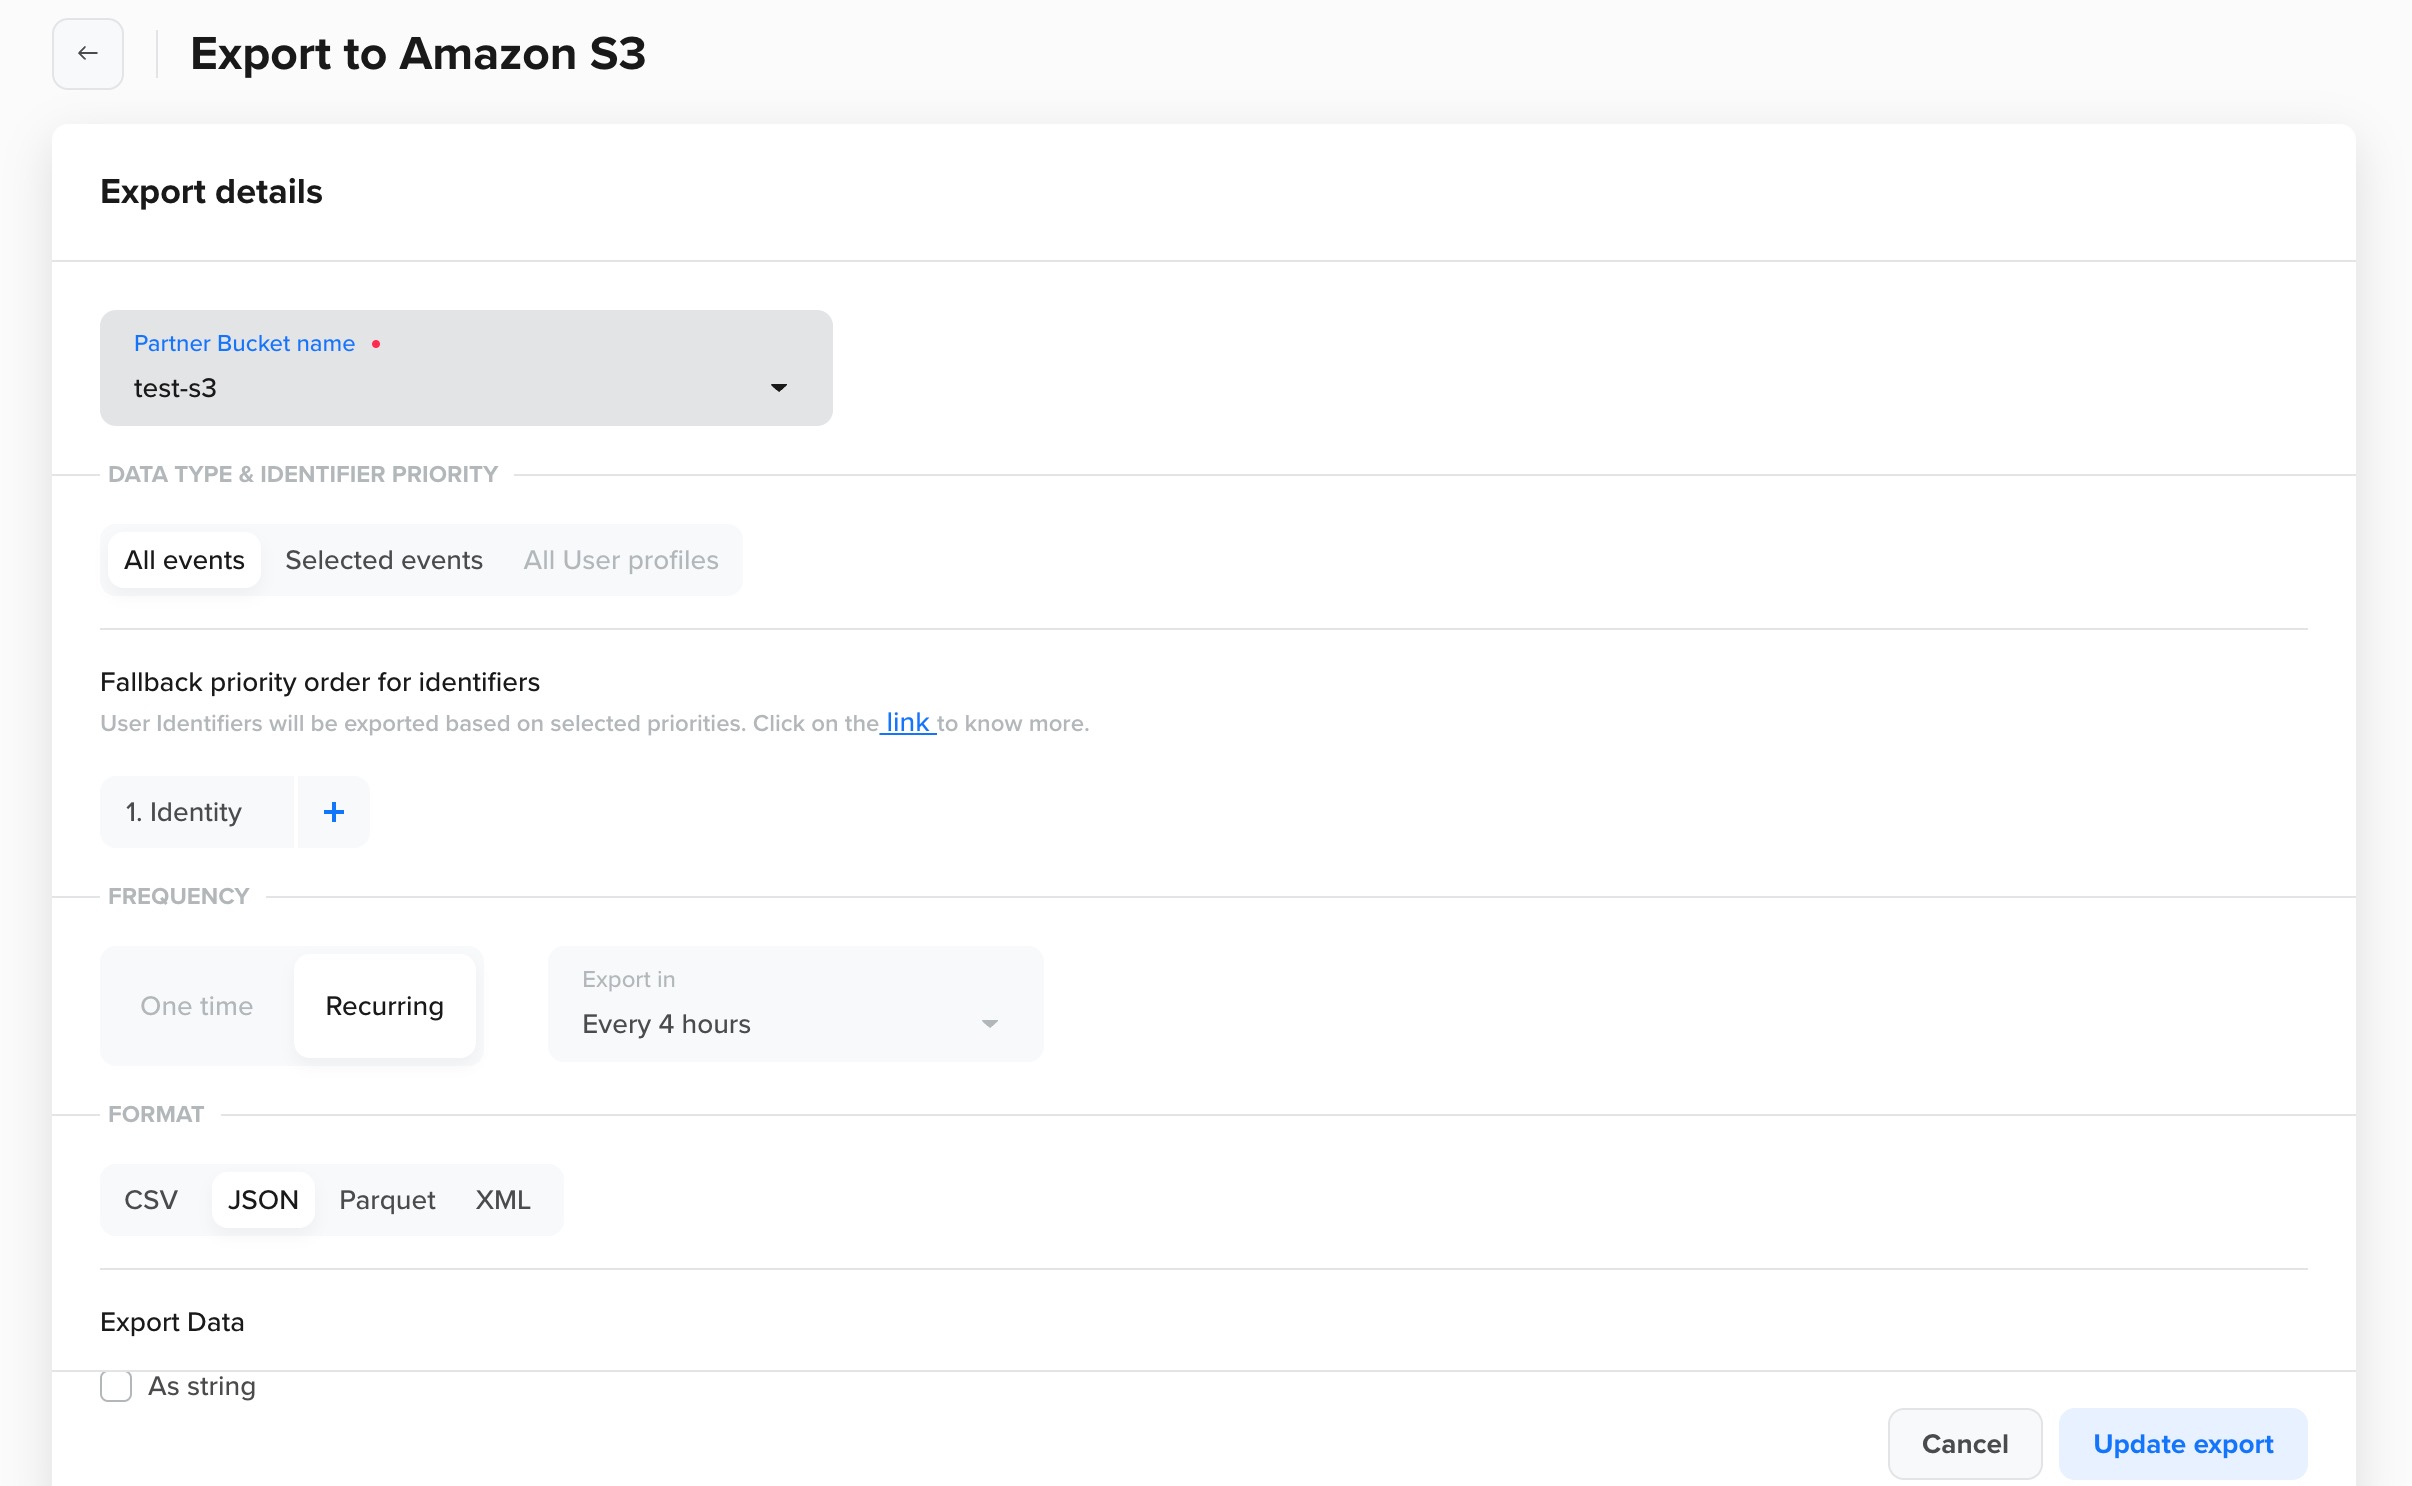
Edit the Export
- Edit the export details and click Update export.
Filter Exports
This section describes the different ways you can filter exports.
Filter by Export Details
To filter by export details:
- Click the Filter button at the top right corner.
- You can filter exports by Partner, Type, Format, Status, or Frequency.
- To clear the filter, click Reset all.
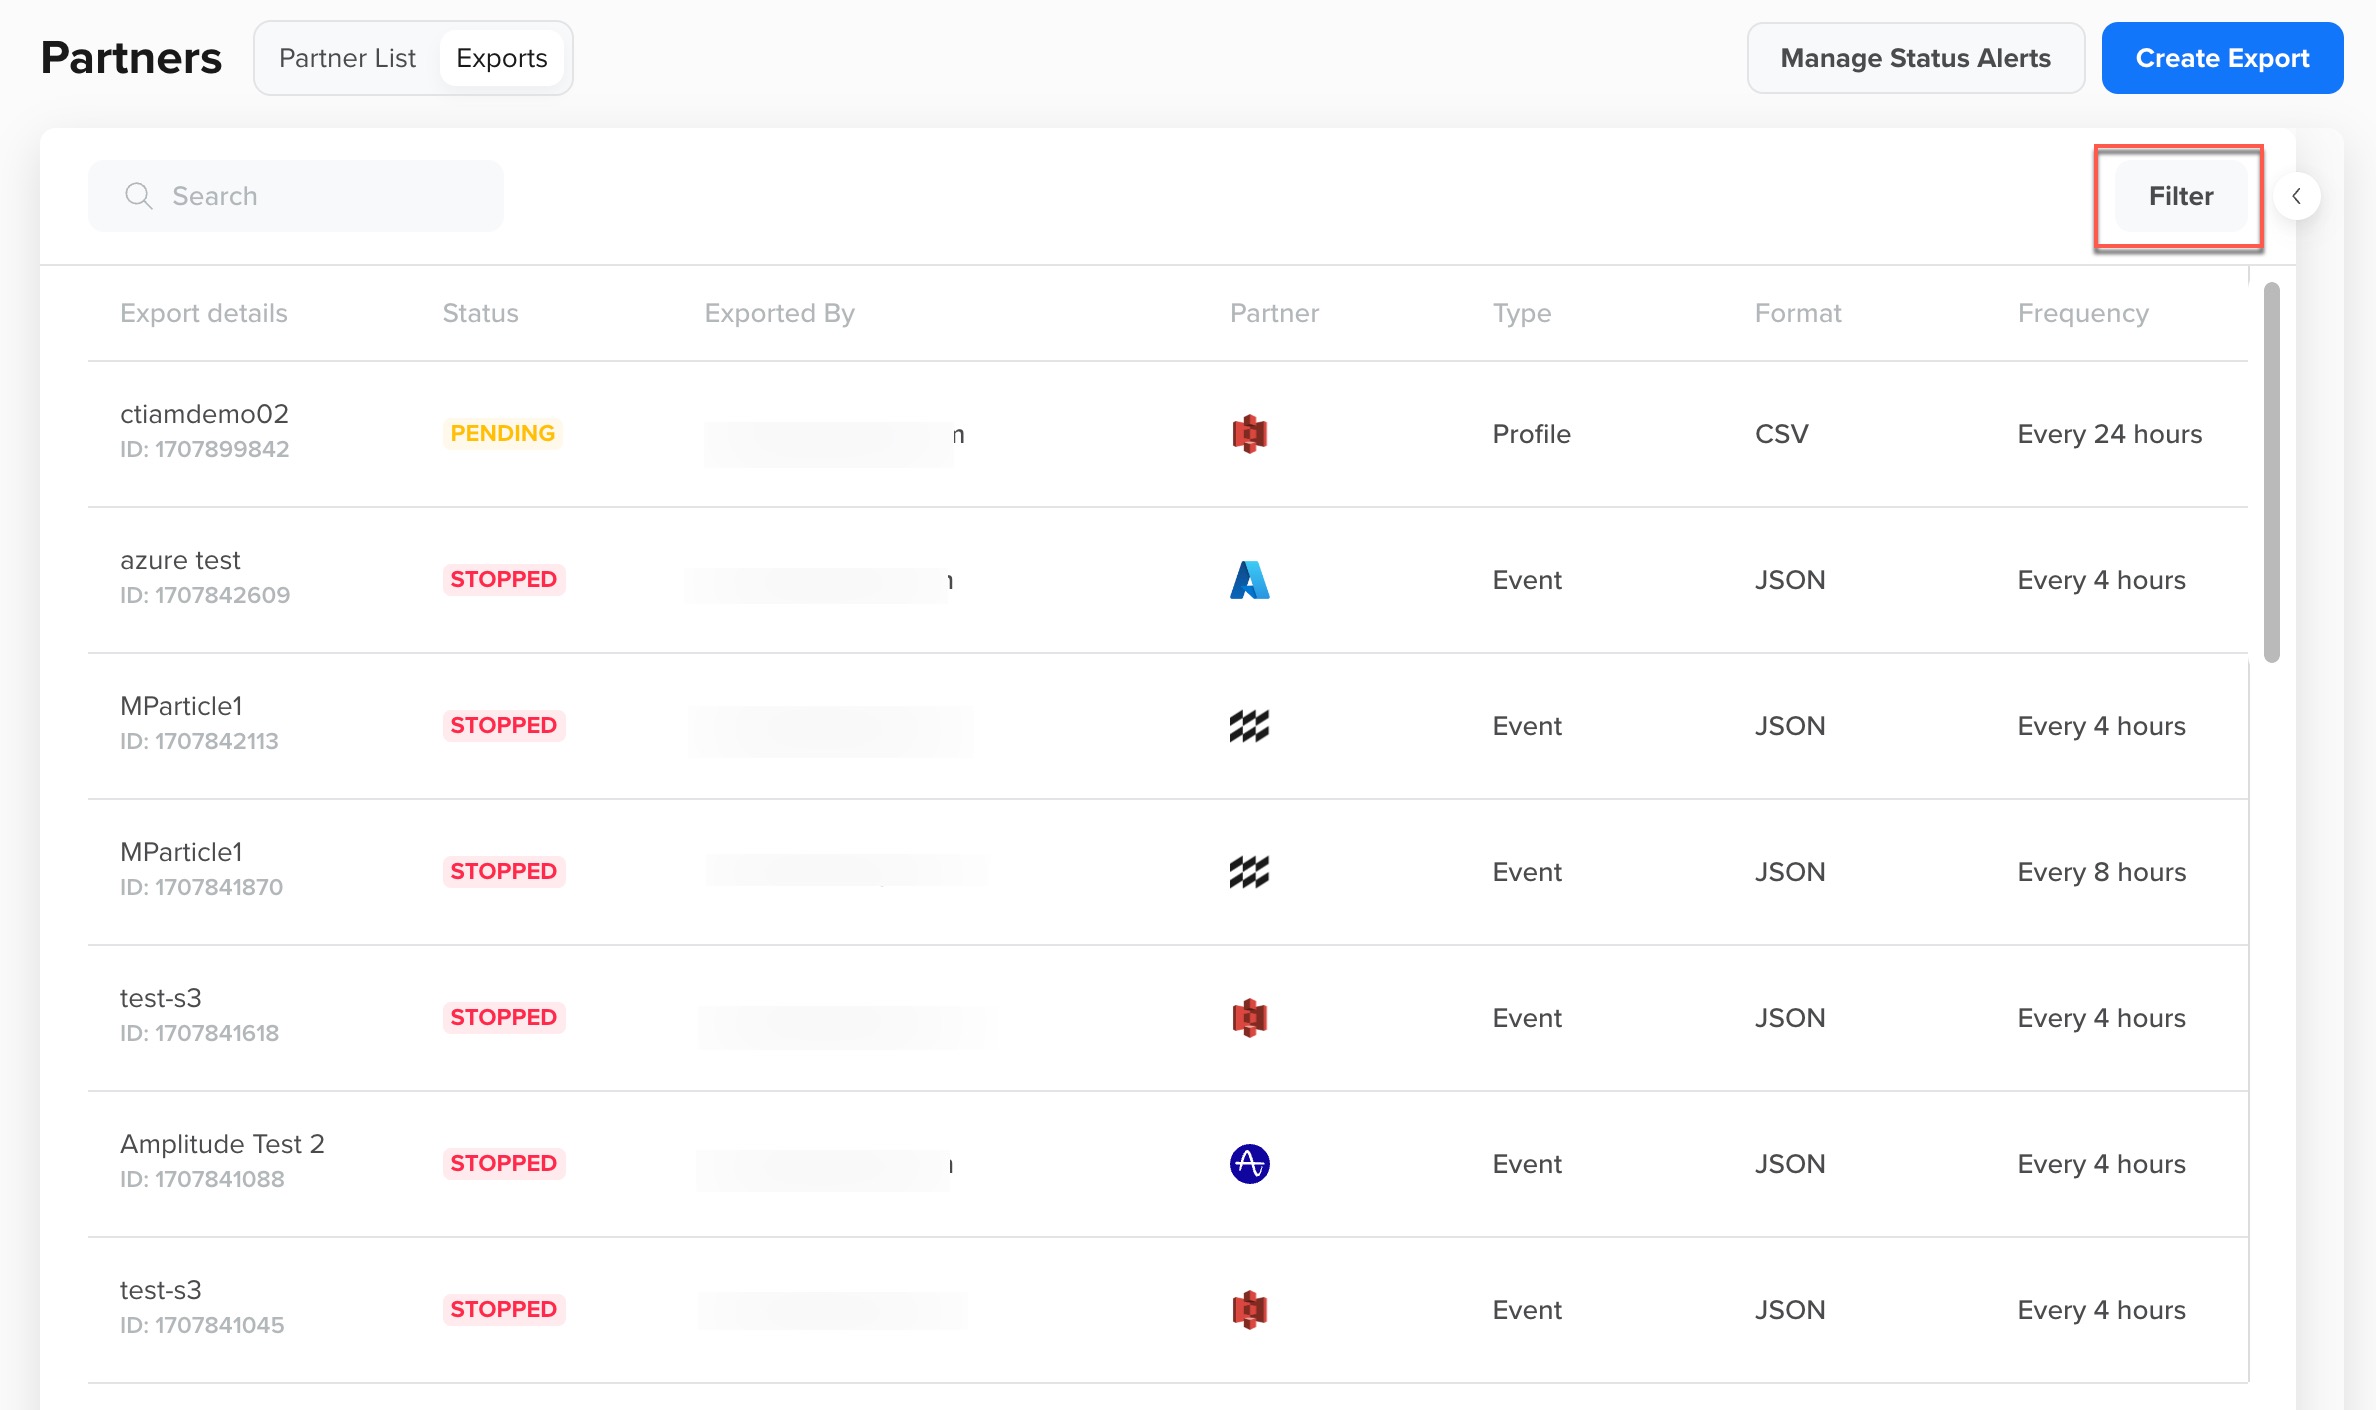
Filter Exports
Filter Exports by Date Range
You can also filter the exports based on the export date.
To filter exports by export date range:
-
Click the Filter button at the top right corner.
-
Click the Exported on button.
The Calendar widget appears.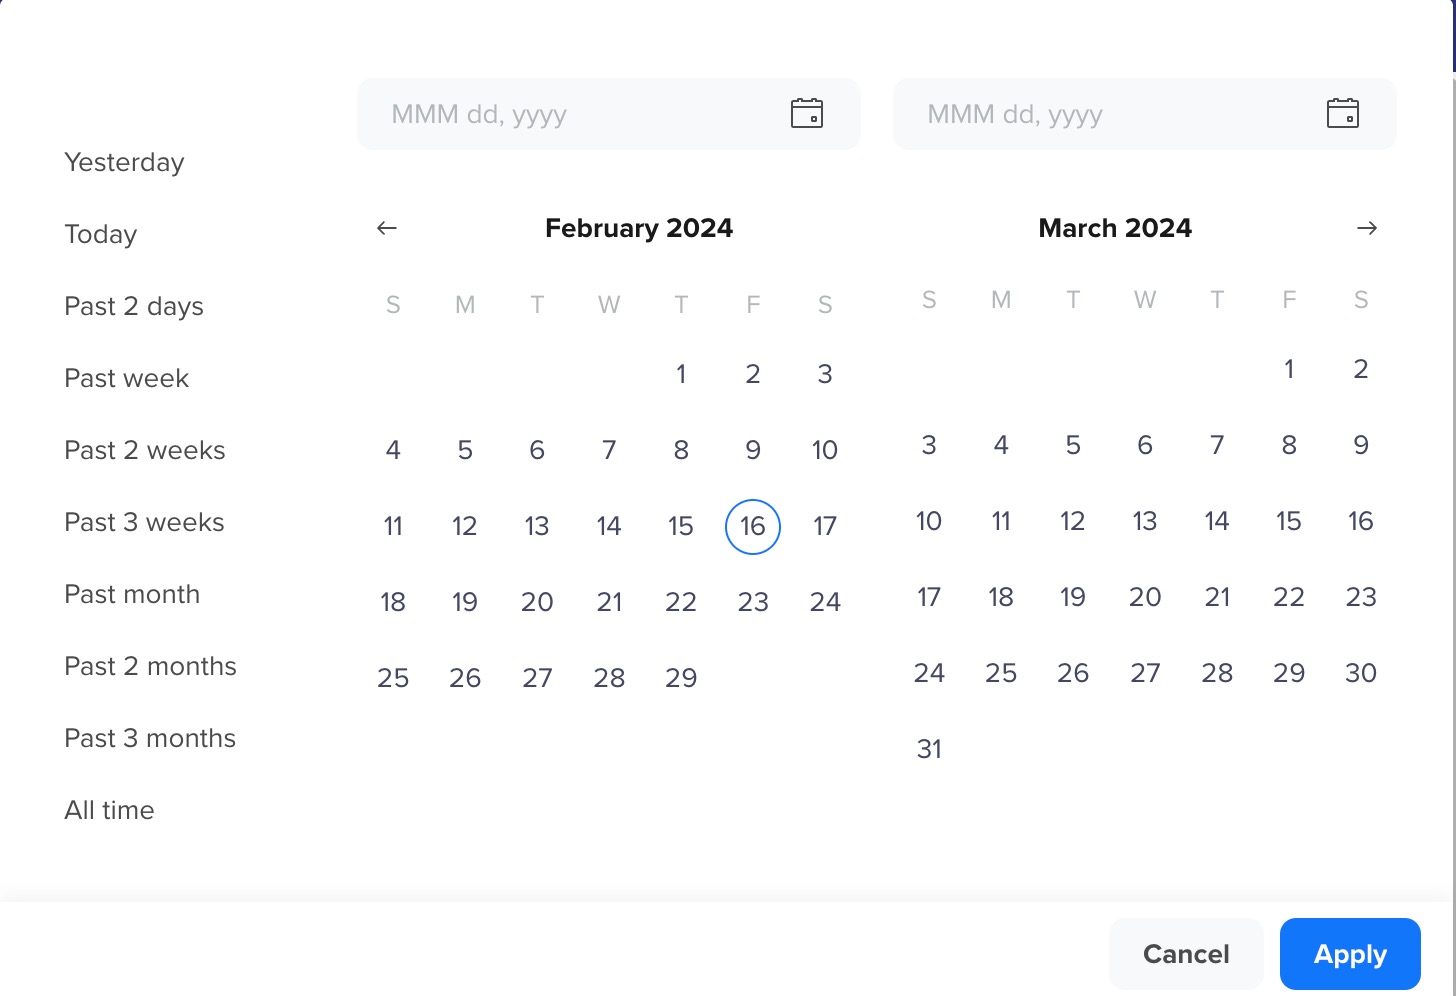
-
Choose the custom date range and click Apply.
The exports are filtered accordingly.
Filter Exports by Pagination
To choose how many export items you view per page:
- Use the Items per page drop-down at the bottom of the Exports page.
- Options include 10, 20, 30, or 40. By default, the Exports page shows 20 exports.
Export Details
Export Type
- All user events: This exports data for all events that have been defined, which include System and Custom events.
- Select events: This exports specific events you want to export.
- All user profiles: This exports all your user profile data.
Private Beta: Recurring Export for User Profiles
Previously, handling large amounts of data and frequent updates led to duplication and higher storage needs. The new method uses scheduled transfers to manage resources more effectively and ease system load. We start with a full data export to set a complete base. Then, we only transfer updates or new data. This means that the profile exports will include less data than usual, considering only incremental updates will be exported. This reduces duplication and saves storage space, making data management more efficient.
Currently, this feature is in Private Beta. To enable this feature for your account, contact your Customer Success Manager.
Export Frequency
- One time: Single export for the export type selected. You can export data up to the last 60 days.
- Recurring: Set up a recurring export that exports all the new events/user profiles captured in the last window. You can export as frequently as every 4 hours and up to once every 24 hours.
Export Format
- JSON
- XML
- CSV
- Parquet
For more information, refer to the following section.
Export Format
This section provides information about the file format and the name format of the files exported to the S3 bucket.
File Name Format
- File Name Format for Event Export
The example below shows the file name format for event export:- Export request ID: Indicates the export request ID generated when you create a request in the CleverTap dashboard.
- Timestamp of export run: Indicates when the export was run.
- Event name: Indicates the event type that is included in the file.
- File index: We chunk the data across multiple files for larger exports. We limit file sizes to 100 MB chunks to make them more consumable. The file index indicates the file number in the file series.
- Database ID: Indicates the database ID of the CleverTap from where the file was exported.
- File format: Indicates the format of the file exported to the S3 bucket.
<export request id>-<timestamp of the export run>-<event name>-<yyyymmdd>-<file index>-<database-id>.json
- File Name Format for User Profile Export:
The example below shows the file name format for user profile export:- Account ID: Indicates the integer value for your CleverTap project ID.
- Request ID: Indicates the export request ID generated when you create a request in the CleverTap dashboard.
- Timestamp of export run: Indicates when the export was run.
- Database ID: Indicates the database ID of the CleverTap from where the file was exported.
- File format: Indicates the format of the file exported to the S3 bucket.
<account id>-<request id>-<timestamp of the export run>-<database-id>-<file format>.gz
File Data Format
Files are split by event names for event exports, and each file will have all event data for the given period for the event.
JSON
The first line of the file contains the event name. After the first line, each line in JSON describes the timestamp, object id, and event properties.
{
	"profile": {
		"identity": "dqsndckfk234"
	},
	"ts": 20171109000015,
	"eventProps": {
		"ct_connected_to_wifi": "false",
		"ct_bluetooth_version": "ble",
		"ct_bluetooth_enabled": "false",
		"ct_sdk_version": 30107,
		"ct_latitude": -6.1975594,
		"ct_longitude": 106.52913,
		"ct_os_version": "5.1.1",
		"ct_app_version": "2.30.1",
		"ct_network_carrier": "3",
		"ct_network_type": "4G"
	}
}
CSV
CSV files are comma-delimited and have each event in separate rows.

Sample CSV File
XML
XML has the timeStamp, eventName, followed by eventProperties.
<Event>
    <ts>20200220130735</ts>
    <eventName>Export Custom Event</eventName>
    <profile>
        <all_identities>[email protected]</all_identities>
        <platform>Web</platform>
        <email>[email protected]</email>
    </profile>
    <deviceInfo>
        <browser>Others</browser>
    </deviceInfo>
    <eventProps>
        <entry>
            <key>CT Source</key>
            <value>API</value>
        </entry>
        <entry>
            <key>Category</key>
            <value>Mens Watch</value>
        </entry>
        <entry>
            <key>Product name</key>
            <value>Casio Chronograph Watch</value>
        </entry>
        <entry>
            <key>Price</key>
            <value>59.99</value>
        </entry>
        <entry>
            <key>Currency</key>
            <value>USD</value>
        </entry>
    </eventProps>
</Event>
Parquet
Parquet has a timestamp, eventName, and eventProperties for each event.
Parquet File Format
- Parquet is an open-source file format for Hadoop. Parquet stores nested data structures in a flat columnar format.
- Currently, exports in Parquet format are compressed as .parquet.gzip. Contact the Customer Support Team to obtain .parquet files, that is, files without any additinal compression.
Prioritize User Identity for Exports
The export file includes an identity column with the user's Identity, Phone Number, or Email values. These values are set based on the identities configured in the CleverTap dashboard under the Settings > User Identity page. This feature lets you prioritize the identifier you want to export in the identity column.
Let us understand how the prioritization works based on the identities selected in the User Identity page:
- If you select only Identity, export includes the identity value. The export file's identity column is empty if it is unavailable.
- If you select multiple identifiers, you must set the priorities on the Export page. For instance, you set Priority 1 to Identity and Priority 2 to Email ID. When exporting data, the export prioritizes the Identity value for the identity column. If it is absent, the Email ID is exported under the identity column of the export file. If both are missing, the column remains empty.
Key Points to Remember
- If you change the identity later, the export works according to the set priority. To prioritize the modified identities, edit your export.
- This feature applies only to the following export types: All events and All user profiles.
- For the old running export, this configuration or prirotization is not applicable. You can add the prioritization by editing the running exports.
To prioritize user identity for exports:
- Go to Partners > Exports.
- Hover over the required AWS S3 export. Click the Edit button.
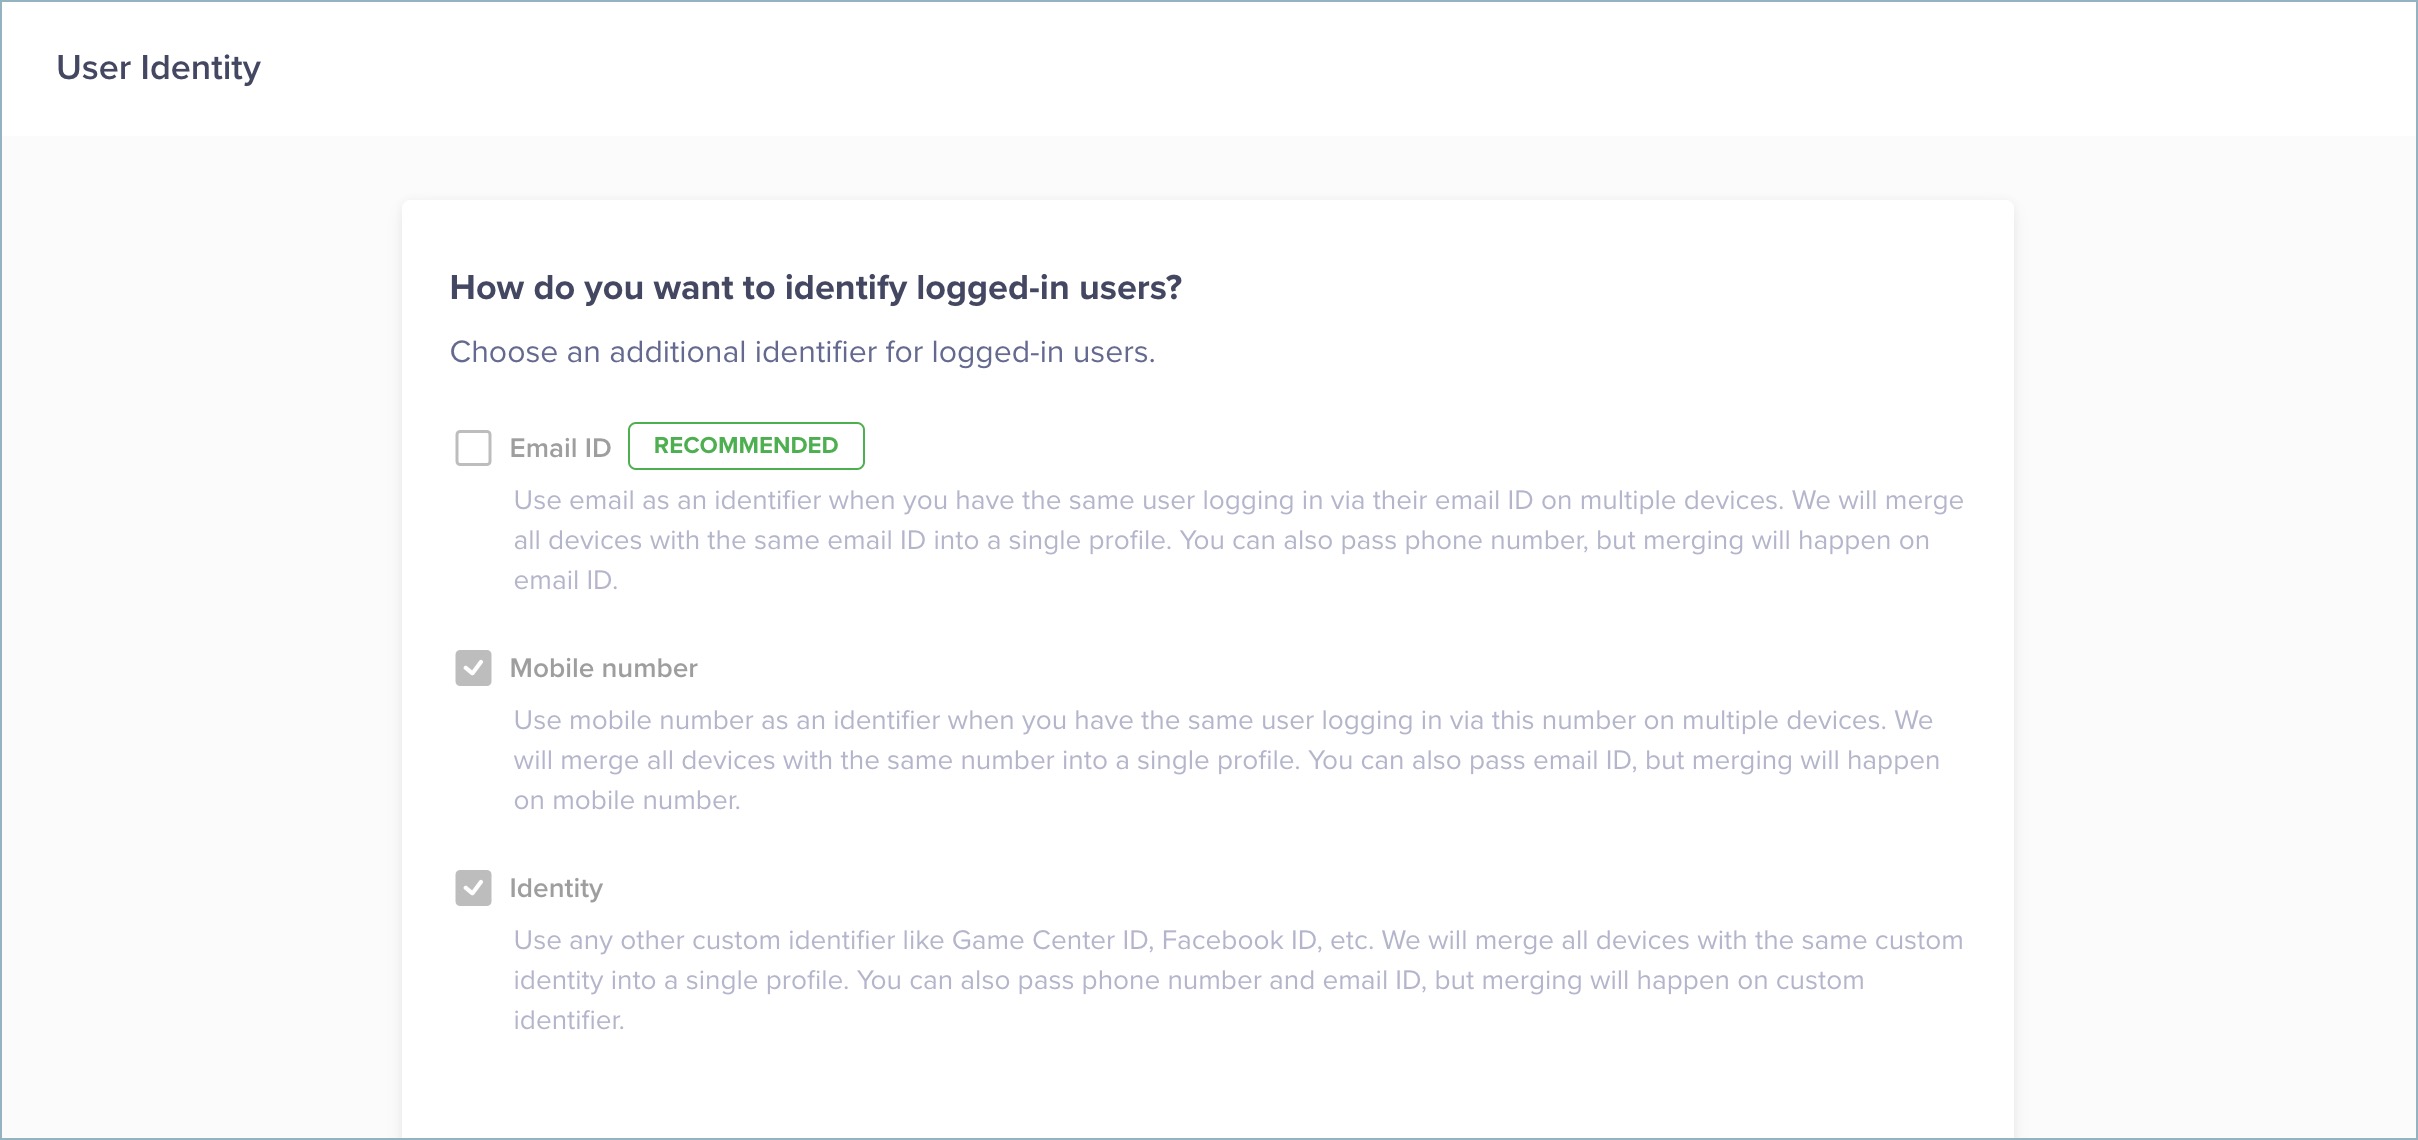
- Under Fallback priority order for identifiers, set up the priority 1, 2, and 3 for the required identities from the drop-down list.

Edit Export Priority
- Click Update export.
FAQs
Q. What permission is required for CleverTap to export data to your AWS S3 bucket?
A. CleverTap needs write permission to be able to export data to your AWS S3 bucket, as shown in the following figure:

IAM Policy to Provide CleverTap with Write Access
Q. What should I do if I already have an existing IAM policy for the AWS S3 bucket?
A. Ensure that you modify the current IAM policy to provide CleverTap with write access to export data to your AWS S3 bucket.
Q. Do CleverTap data exports allow special characters?
A. Yes, CleverTap data exports allow the following special characters:
- CleverTap's export system supports Unicode (UTF-8) character encoding. It facilitates the accurate representation of text in various languages and scripts. For example, Indian regional languages, Arabic, Korean, Russian, Japanese, Chinese, Spanish, Greek, Indonesian, etc.
- It replaces the following characters with a hyphen to avoid issues in output file generation:
- Whitespace
- Tab
- Slash
- null (\0)
- Control characters are replaced with ?. For more information, refer to Control Character.
- Supports emoji characters; however, some emojis (UTF-16) may not render properly.
Q. What customer-related errors can stop exports, and how are customers notified when interruptions occur?
A. Export processes can stop due to customer-related errors. For example, invalid/expired credentials or a missing partner bucket. CleverTap emails customers about the issue to ensure timely resolution.
Here are the customer-related errors that can stop an AWS S3 export:
| Error Code | Error Message | Cause and Resolution |
|---|---|---|
| 403 | Invalid AWS credentials | AWS credentials are expired or deleted. You must create a new Access key ID and Secret access key. For more information, refer to Create an API Key for your S3 Bucket. |
| 403 | All access to this object has been disabled | Here are the possible causes: |
| 404 | The specified S3 bucket does not exist | S3 bucket is deleted. You must create a new S3 bucket and update the credentials in CleverTap. For more information, refer to Create an AWS S3 Bucket. |
Exports are checked every hour for failures. If an error occurs, CleverTap sends three emails to the export creator within a span of three days. Emails 1 and 2 include the error details and a link to fix it. It warns that the export will stop if the problem is not fixed within three days. Email 3 notifies the creator that CleverTap has stopped the export.
Q. How can I export data from CleverTap?
A. You can export the data from CleverTap using one of the three methods below:
-
S3 Export (AWS): You can export your event and profile data in the AWS S3 bucket using CleverTap Data Exports. For more information on using our data export, refer to Data Export to AWS S3.
-
Export via API: You can export your events and user data with our APIs. For more information, refer to API Overview.
-
Find People: You can download the profile data directly from the CleverTap dashboard through the Find People page with the following steps:
- Navigate to Segments > Find People.
- Define the criteria you want to export, then click View Details.
- Click the download icon below Total users to initiate the export.
Q: How does recurring export work?
A: In recurring export, the user profile data is transferred on a scheduled basis. For example, every 4 hours.
The entire user profile data (e.g., 300 GB) is sent on day one. Only updates or additions to the user profile are exported from day two onwards. For example, only 50 GB of incremental data is sent on day two.
This incremental data export occurs when:
-
New profiles are created.
-
User properties or communication preferences are updated.
Updated 7 months ago